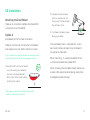
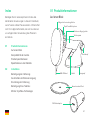
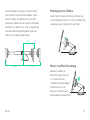
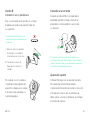
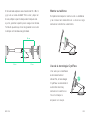
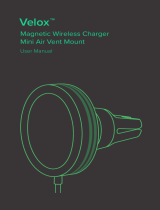
iOttie Velox es un cargador inalámbrico magnético con sistema de enfriamiento CryoFlow y soporte para tablero y parabrisas. Su tecnología CryoFlow enfría automáticamente tu teléfono mientras conduces, evitando el sobrecalentamiento y mejorando su rendimiento. La montura magnética mantiene tu teléfono en su lugar de forma segura, incluso en carreteras con baches. El brazo telescópico y el soporte giratorio te permiten ajustar fácilmente el ángulo de visión para una experiencia de conducción más cómoda. Compatible con todos los teléfonos con MagSafe, como el iPhone 12 y posteriores.
iOttie Velox es un cargador inalámbrico magnético con sistema de enfriamiento CryoFlow y soporte para tablero y parabrisas. Su tecnología CryoFlow enfría automáticamente tu teléfono mientras conduces, evitando el sobrecalentamiento y mejorando su rendimiento. La montura magnética mantiene tu teléfono en su lugar de forma segura, incluso en carreteras con baches. El brazo telescópico y el soporte giratorio te permiten ajustar fácilmente el ángulo de visión para una experiencia de conducción más cómoda. Compatible con todos los teléfonos con MagSafe, como el iPhone 12 y posteriores.


-
 1
1
-
 2
2
-
 3
3
-
 4
4
-
 5
5
-
 6
6
-
 7
7
-
 8
8
-
 9
9
-
 10
10
-
 11
11
-
 12
12
-
 13
13
-
 14
14
-
 15
15
-
 16
16
-
 17
17
-
 18
18
-
 19
19
-
 20
20
-
 21
21
-
 22
22
-
 23
23
-
 24
24
-
 25
25
-
 26
26
-
 27
27
-
 28
28
-
 29
29
-
 30
30
-
 31
31
-
 32
32
-
 33
33
-
 34
34
-
 35
35


iOttie Velox es un cargador inalámbrico magnético con sistema de enfriamiento CryoFlow y soporte para tablero y parabrisas. Su tecnología CryoFlow enfría automáticamente tu teléfono mientras conduces, evitando el sobrecalentamiento y mejorando su rendimiento. La montura magnética mantiene tu teléfono en su lugar de forma segura, incluso en carreteras con baches. El brazo telescópico y el soporte giratorio te permiten ajustar fácilmente el ángulo de visión para una experiencia de conducción más cómoda. Compatible con todos los teléfonos con MagSafe, como el iPhone 12 y posteriores.
en otros idiomas
- français: iOttie Velox Manuel utilisateur
- italiano: iOttie Velox Manuale utente
- English: iOttie Velox User manual
- Deutsch: iOttie Velox Benutzerhandbuch
Artículos relacionados
-
iOttie MGSFIO101 Manual de usuario
-
 iOttie MGSFIO104 Velox Magnetic Flush Mount Manual de usuario
-
 iOttie Velox Magnetic Mini Flush Mount Car Phone Holder Manual de usuario
-
iOttie Easy One Touch 6 Manual de usuario
-
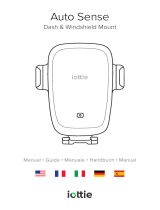 iOttie Auto Sense Manual de usuario
-
 iOttie vlxwcg211 Velox Magnetic Wireless Charger Mini Air Vent Mount Manual de usuario
-
iOttie One Touch Wireless 2 Manual de usuario
-
 iOttie Velox Magnetic Wireless Air Vent Mount Guía del usuario
-
 iOttie MGSFIO202 Guía del usuario
-


