HK Audio Linear Manual de usuario
- Categoría
- Altavoces de la barra de sonido
- Tipo
- Manual de usuario


Important Safety Instructions!
Read before connecting!
This product has been built by the manufacturer in accordance with
IEC 62368-1 and left the factory in safe working order. To maintain
this condition and ensure non-risk operation, the user must follow the
advice and warning comments found in the operating instructions. If
this product shall be used in vehicles, ships or aircraft or at altitudes
exceeding 2000 m above sea level, take care of the relevant safety
regulations which may exceed the IEC 62368-1 requirements.
WARNING: To prevent the risk of fire and shock hazard, do not
expose this appliance to moisture or rain. Do not open case – no user
serviceable parts inside. Refer service to qualified service personnel.
This symbol, wherever it appears, alerts you to the presence
of uninsulated dangerous voltage inside the enclosure – voltage that
may be sufficient to constitute a risk of shock.
This symbol, wherever it appears, alerts you to the presence
of externally accessible hazardous voltage. External wiring connected
to any terminal marked with this symbol must be a “ready made
cable” complying with the manufacturers recommendations, or must
be a wiring installed by instructed persons only.
This symbol, wherever it appears, alerts you to important
operating and maintenance instructions in the accompanying
literature. Read the manual.
This symbol, wherever it appears, tells you: Take care! Hot
surface! To prevent burns you must not touch.
All electrical and electronic products including batteries
should be disposed of separately from the municipal waste stream via
designated collection facilities appointed by the government or the
local authorities.
Read these instructions. Keep these instructions. Follow all
warnings and instructions marked on the product and in this manual.
• Do not use this product near water. Do not place the product near
water, baths, wash basins, kitchen sinks, wet areas, swimming pools
or damp rooms.
• Do not place objects containing liquid on the product – vases,
glasses, bottles etc.
• Clean only with dry cloth.
• Do not remove any covers or sections of the housing.
• The set operating voltage of the product must match the local mains
supply voltage. If you are not sure of the type of power available
consult your dealer or local power company.
• Before connecting the device, please ensure that the mains supply
you are using is equipped with adequate protection against short
circuiting and grounding faults when the device is plugged in.
• To reduce the risk of electrical shock, the grounding of this product
must be maintained. Use only the power supply cord provided with
this product, and maintain the function of the center (grounding)
pin of the mains connection at any time. Make sure the mains outlet
used provides a proper protective ground connection.
• Do not defeat the safety purpose of the polarized or grounding-type
plug. A polarized plug has two blades with one wider than the other.
A grounding type plug has two blades and a third grounding prong.
The wide blade or the third prong are provided for your safety. If the
provided plug does not fit into your outlet, consult an electrician for
replacement of the obsolete outlet.
• Protect the power cord from being walked on or pinched particularly
at plugs, convenience receptacles, and the point where they exit
from the device! Power supply cords should always be handled
carefully. Periodically check cords for cuts or sign of stress, especially
at the plug and the point where the cord exits the device.
• Never use a damaged power cord.
• Unplug this product during lightning storms or when unused for long
periods of time.
• This product can be fully disconnected from mains only by pulling
the mains plug at the unit or the wall socket. The product must be
placed in such a way at any time, that disconnecting from mains is
easily possible.
• Fuses are to be replaced exclusively by qualified personnel, and then
only with fuses of the proper type and rating.
• Refer all servicing to qualified service personnel. Servicing is
required when the unit has been damaged in any way, such as:
- When the power cord or plug is damaged or frayed.
- If liquid has been spilled or objects have fallen into the product.
- If the product has been exposed to rain or moisture.
- If the product does not operate normally when the operating
instructions are followed.
- If the product has been dropped or the cabinet has been damaged.
• Do not connect external speakers to this product with an impedance
lower than the rated impedance given on the product or in this
manual. Use only cables with sufficient cross section according to
the local safety regulations.
• Keep away from direct sunlight.
• Do not install near heat sources such as radiators, heat registers,
stoves or other devices that produce heat.
• This apparatus is for moderate climates areas use, not suitable for
use in tropical climates countries.
• Do not block any ventilation openings. Install in accordance with
manufacturer’s instructions. This product must not be placed in
a built-in installation such as a rack unless proper ventilation is
provided.
• Always allow a cold device to warm up to ambient temperature,
when being moved into a room. Condensation can form inside it and
damage the product, when being used without warming up.
• Do not place naked flame sources, such as lighted candles on the
product.
• The device must be positioned at least 20 cm/8" away from walls.
• Use only with the cart, stand, tripod, bracket or table specified by
the manufacturer or sold with the product. When a cart is used, use
caution when moving the cart/product combination to avoid injury
from tip-over.
• Use only accessories recommended by the manufacturer, this applies
for all kind of accessories, for example protective covers, transport
bags, stands, wall or ceiling mounting equipment. In case of
attaching any kind of accessories to the product, always follow the
instructions for use, provided by the manufacturer. Never use fixing
points on the product other than specified by the manufacturer.
• This appliance is NOT suitable to be used by any person or persons
(including children) with limited physical, sensorical or mental
ability, or by persons with insufficient experience and/or knowledge
to operate such an appliance. Children under 4 years of age must be
kept away from this appliance at all times.
• Never push objects of any kind into this product through cabinet
slots as they may touch dangerous voltage points or short out parts
that could result in risk of fire or electric shock.
• This product is capable of delivering sound pressure levels in excess
of 90 dB, which may cause permanent hearing damage! Exposure
to extremely high noise levels may cause a permanent hearing loss.
Wear hearing protection if continously exposed to such high levels.
• The manufacturer only guarantees the safety, reliability and
efficiency of this product if:
- Assembly, extension, re-adjustment, modifications or repairs are
carried out by the manufacturer or by persons authorized to do so.
- The electrical installation of the relevant area complies with the
requirements of IEC (ANSI) specifications.
- The unit is used in accordance with the operating instructions.
• This product is optimized for use with music and speech signals.
Using this product with sine wave, square wave or other kind of
measuring signals at higher level may lead to severe damage of the
product.
General Notes on Safety for Loudspeaker
Systems
Mounting systems may only be used for those loudspeaker
systems authorized by the manufacturer and only with the mounting
accessories specified by the manufacturer in the installation
instructions. Read and heed the manufacturer’s installation
instructions. The indicated load-bearing capacity cannot be guaranteed
and the manufacturer will not be liable for damages in the event of
improper installation or the use of unauthorized mounting accessories.
The system’s load-bearing capacity cannot be guaranteed and
the manufacturer will not be liable for damages in the event that
loudspeakers, mounting accessories, and connecting and attaching
components are modified in any way.
Components affecting safety may only be repaired by the manufacturer
or authorized agents, otherwise the operating permit will be voided.
Installation may be performed qualified personnel only, and
then only at pick-points with sufficient load-carrying capacity and
in compliance with local building regulations. Use only the mounting
hardware specified by the manufacturer in the installation instructions
(screws, anchors, etc.). Take all the precautions necessary to ensure
bolted connections and other threaded locking devices will not loosen.
Fixed and portable installations (in this case, speakers and
mounting accessories) must be secured by two independent safeties to
prevent them from falling. Safeties must be able to catch accessories
or parts that are loose or may become loose. Ensure compliance with
the given national regulations when using connecting, attaching,
and rigging devices. Factor potential dynamic forces (jerk) into the
equation when determining the proper size and load-bearing capacity
of safeties.
Be sure to observe speaker stands’ maximum load-bearing
capacity. Note that for reasons of design and construction, most
speaker stands are approved to bear centric loads only; that is, the
speakers’ mass has to be precisely centered and balanced. Ensure
speaker stands are set up stably and securely. Take appropriate added
measures to secure speaker stands, for example when:
- the floor or ground surface does not provide a stable, secure base.
- they are extended to heights that impede stability.
- high wind pressure may be expected.
- there is the risk that they may be knocked over by people.
Special measures may become necessary as precautions against
unsafe audience behavior. Do not set up speaker stands in evacuation
routes and emergency exits. Ensure corridors are wide enough and put
proper barriers and markings in place when setting speaker stands up
in passageways. Mounting and dismounting are especially hazardous
tasks. Use aids suitable for this purpose. Observe the given national
regulations when doing so.
Wear proper protection (in particular, a helmet,
gloves, and safety shoes) and use only suitable means of ascent
(ladders, scaffolds, etc.) during installation. Compliance with this
requirement is the sole responsibility of the company performing the
installation.
WARNING! After installation, inspect the system comprised
of the mounting fixtures and loudspeakers to ensure it is properly
secured.
The operator of loudspeaker systems (fixed or portable) must
regularly inspect or task a third party to regularly inspect all system
components in accordance with the given country’s regulations and
have possible defects repaired immediately.
We also strongly recommend maintaining a logbook or the like to
document all inspections.
Also be sure to provide sufficient safety margins for the rigging points
used for flown systems. Observe the given national regulations when
doing so.
Professional loudspeaker systems can produce harmful
volume levels. Even prolonged exposure to seemingly harmless levels
(starting at about 95 dBA SPL) can cause permanent hearing damage!
Therefore we recommend that everyone who is exposed to high volume
levels produced by loudspeaker systems wears professional hearing
protection (earplugs or earmuffs).
Manufacturer: Stamer Musikanlagen GmbH, Magdeburger Str. 8, 66606
St. Wendel, Germany
Version 1.0 12/2022

LINEAR 5 MK II 1.0
3
• English • Français• Deutsch • Italiano • Español
LINEAR 5 MKII
110 XA 112 XA 112 FA 115 XA 115 SUB A 118 SUB A115 FA
Welcome to the HK Audio family!
Thank you for choosing a brand-name product made by our company. Rest
assured, we engineered and built it with the greatest care so it will serve
you well for many tomorrows to come.
Even if your experience with sound systems runs deep, some things
about this product are sure to be new to you. This is why we ask that you do
not set this manual aside without reading it first. Be sure to keep it in a
safe place for later reference.
Here's wishing you the best sound at every occasion!
Your HK Audio team
Strong electromagnetic interference or electrostatic discharge may
prevent the product from functioning normally. If this happens, the
product may be returned to normal operation by powering o and on
again. Should this not result in the product functioning normally again,
please move the product away from the source of disturbance and try
again.
Warranty
Use the convenient online registration option at www.hkaudio.com.
http://warranty.hkaudio.com
The registration is only valid if the device is registered within 30 days of
the date of purchase.
HK Audio
Technischer Service
Postfach 1509
66595 St. Wendel, Germany
Fax: +49 6851 905 100

LINEAR 5 MK II 1.0
4
1 General Information
Items delivered
When you first unpack your LINEAR 5 MK II speaker cabinet, please check
that it comes complete with the Quick Start Guide and a mains cable.
2 Connections and controls
LINEAR 7
112 FA
MADE IN GERMANY
Mains Input
100-240 V~ 50-60 Hz
1 A @ 1/8 output power
Caution: Risk of electric shock! Do not open!
Refer servicing to qualified service personnel.
Attention: Risque de choc élèctrique –
ne pas ouvrir!
HK Audio is a brand of Stamer Musikanlagen GmbH
Magdeburger Str. 8 • 66606 St. Wendel • Germany
Power
Serial No.
Power
Auto Sleep
On Off
+6 dB
0 dB
Input
DSP Out
Thru Gain
Data Preset
1
2
3
4
Lock
Thru
In
Ethernet
Front
Cardioid 1:1
vertical
Cardioid 1:1
horizontal
Remote
1
5
2 3
4
6
7
8
LINEAR 5 MKII XA/FA models
Leave enough space for proper ventilation!
LINEAR 7
118 Sub A
MADE IN GERMANY
Power
Auto Sleep
On Off
+6 dB–6 dB
0 dB
Input
L
R
DSP Out
Thru Gain
Serial No.
Mains Input
100-240 V~ 50-60 Hz
1.9 A @ 1/8 output power
Link
100-240 V~ 50-60 Hz
max. 10 A
Caution: Risk of electric shock! Do not open!
Refer servicing to qualified service personnel.
Attention: Risque de choc élèctrique –
ne pas ouvrir!
HK Audio is a brand of Stamer Musikanlagen GmbH
Magdeburger Str. 8 • 66606 St. Wendel • Germany
Power
Lock Lock
1
5
2
1 2
3
4
4
9
11 12
10
13
LINEAR 5 MKII Sub A models
●
1 Input
XLR/jack combo socket, balanced input for analogue signals.
• The LINEAR 5 MK II XA/FA models have one input channel.
• The LINEAR 5 MK II 115 Sub A and LINEAR 5 MK II 118 Sub A subwoofers
have two separate inputs for the left and right signals. The two channels
are equal and summed post-preamp, so you can use either one in mono
mode.
●
2 Thru
Use this parallel, balanced XLR output to send the signal routed into the
Input through to other components. This output remains active even when
the electronic components are deactivated. The subwoofer has two of these
ports.
●
3 Gain
Use this knob to adjust the input gain for the incoming signal.
• The control range for the XA/FA models goes from –∞ (mute) to +6dB.
• This knob adjusts the gain for both of the subwoofer’s stereo preamp
channels in a range of -6 to +6dB.
The centre-notched 12 o’clock position is 0dB in both cases.
Note: The Gain setting does not aect the signal sent to the DSP Out.
●
4 Input/Limiter LED
This LED lights up green to indicate incoming signals. When it is red, either
the limiter is active or the input is clipping. The LED briefly flashes red to
tell you the Limiter is responding to signal peaks. If it stays red, turn down
the Gain knob.
●
5 DSP Out
Use this XLR port to forward the analogue signal routed into the Input jack
or to forward a digital audio signal fed in via a network. The onboard DSP
can process both types of signals.
This means the DSP Out can serve as a network interface that lets you inte-
grate an added powered speaker that is not originally network-compatible.
In the factory default configuration, the unprocessed input signal goes
straight to DSP Out, regardless of the selected preset and the Gain knob
setting.
Ethernet mid/high units
LINEAR 7
112 FA
MADE IN GERMANY
Mains Input
100-240 V~ 50-60 Hz
1 A @ 1/8 output power
Caution: Risk of electric shock! Do not open!
Refer servicing to qualified service personnel.
Attention: Risque de choc élèctrique –
ne pas ouvrir!
HK Audio is a brand of Stamer Musikanlagen GmbH
Magdeburger Str. 8 • 66606 St. Wendel • Germany
Power
Serial No.
+6 dB
0 dB
Input
DSP Out
Thru Gain
Lock
Power
Auto Sleep
On Off
Data
Flat
Monitor
Low Cut
Remote
Preset
1
2
3
4
In
Ethernet
1
5
2 3
4
6
7
8
Ethernet subwoofers
LINEAR 7
112 FA
MADE IN GERMANY
Mains Input
100-240 V~ 50-60 Hz
1 A @ 1/8 output power
Caution: Risk of electric shock! Do not open!
Refer servicing to qualified service personnel.
Attention: Risque de choc élèctrique –
ne pas ouvrir!
HK Audio is a brand of Stamer Musikanlagen GmbH
Magdeburger Str. 8 • 66606 St. Wendel • Germany
Power
Serial No.
Power
Auto Sleep
On Off
+6 dB
0 dB
Input
DSP Out
Thru Gain
Data Preset
1
2
3
4
Lock
Thru
In
Ethernet
Front
Cardioid 1:1
vertical
Cardioid 1:1
horizontal
Remote
1
5
2 3
4
6
7
8
●
6 Ethernet In /Thru
Use the etherCON port to integrate the speaker into a network. It accepts
RJ45 and etherCON (NE8 MX, NE8 MX6, NE8 MC) plugs. The mid/high units
each have an Ethernet In, and the subwoofers also have an Ethernet Thru.
Use the Ethernet Thru port to forward the network signal.
Always use S/STP or S/FTP cables to shield against electromagnetic inter-
ference. We recommend CAT6 cables. A separate manual explains the finer
points of network integration and remote control functions. You will find
it on the LINEAR5 MK II download page at www.hkaudio.com. For a brief
description of the DSP functions, see section ●
8 Preset.

LINEAR 5 MK II 1.0
5
• English • Français• Deutsch • Italiano • Español• English • Français• Deutsch • Italiano • Español
●
7 Data
This LED lights up orange when data is being transferred via the network
socket.
●
8 Preset
Use the Preset selection button to call up factory presets or a user preset
you can configure via the remote DSP CONTROL software. Tap the select
button once to scroll through Presets 1 through 4.
A separate manual explains how to program the four remote user presets.
You will find it on the LINEAR5 MK II download page at www.hkaudio.com.
Preset overview:
LINEAR 5 MK II
110 XA, 112 XA, 115 XA
LINEAR 5 MK II
112 FA, 115 FA
LINEAR 5 MK II
115 Sub A, 118 Sub A
1Flat Flat Front
2Monitor Boost Cardioid 1:1 vertical
3Low Cut Low Cut Cardioid 1:1 hori-
zontal
4Remote (to access stored settings via the remote HK Audio DSP
CONTROL software)
The LINEAR 5 MK II XA/FA models’ factory presets:
Flat Delivers linear response across the full frequency range
Monitor Optimised to dampen the extra bass generated by floor cou-
pling when you set a speaker on its side for use as a monitor
Boost Enhances low-frequency response when used as a stan-
dalone speaker without a subwoofer.
Low Cut A high-pass filter optimises the unit for use as a mid/high
unit paired with the LINEAR 5 MKII 115 Sub A or 118 Sub A
The LINEAR 5 MK II 115 Sub A and 118 Sub A's factory presets
Front Standard operating mode for a forward-facing subwoofer
Cardioid 1:1
vertical
For cardioid setups with two stacked subwoofers with one
forward-facing LINEAR 5 MKII subwoofer. (see section 4.2 for
more on this)
Cardioid 1:1
horizontal
For cardioid setups with two side-by-side subwoofers with
one forward-facing LINEAR 5 MKII subwoofer (see section
4.2 for more on this)
Factory presets 1 to 3 address the speaker only and not the DSP Out.
Note: If you are operating the speaker in a network connected to
the remote DSP CONTROL software, you can configure the DSP Out
independently even when using factory presets 1 to 3. To learn more
about this, consult the separate DSP CONTROL manual. You will find it
on the LINEAR 5 MK II download page at www.hkaudio.com.
The Remote Preset
Remote This lets you call up a user preset that you previously stored
via DSP CONTROL for the speaker as well as for the DSP
Out. The speaker does not need to be connected to the
remote software to do this.
The remote preset’s default setup is identical to factory preset 1 (Flat/
Front).
You can access the following DSP functions via the remote DSP CONTROL
software and save your settings in user presets:
Fully parametric 10-band EQ with variable filter characteristics for each fre-
quency band, high-pass and low-pass filters with variable filter characteris-
tics, Limiter, Delay, Polarity, Level, and Mute.
You can configure these parameters separately and independently for the
speaker and its DSP Out.
Screenshot of the remote DSP CONTROL software. You can download this software free of charge from
the LINEAR 5 download page at www.hkaudio.com. The speaker and DSP Out parameters are identical,
but the double DSP power lets you configure each set independently.
●
9 Power
This rocker switch turns the power on and o. Set
it to Power to turn the electronic components on
and to O to disconnect them from the mains
power supply.
●
10 Power LED
As soon as the electronic components are supplied
with voltage, this LED lights up green.
●
11 Mains Input
The mains connection is designed as a lockable IEC 14 socket. In combina-
tion with the supplied lockable connection cable, the mains cable is locked
and secured against accidental slipping out.
Leave enough space for proper ventilation!
LINEAR 7
118 Sub A
MADE IN GERMANY
Power
Auto Sleep
On Off
+6 dB–6 dB
0 dB
Input
L
R
DSP Out
Thru Gain
Serial No.
Caution: Risk of electric shock! Do not open!
Refer servicing to qualified service personnel.
Attention: Risque de choc élèctrique –
ne pas ouvrir!
HK Audio is a brand of Stamer Musikanlagen GmbH
Magdeburger Str. 8 • 66606 St. Wendel • Germany
Mains Input
100-240 V~ 50-60 Hz
1 A @ 1/8 output power
Power
1
5
2
1 2
3
4
4
9
11
12
10
13
●
12 Auto Sleep
Use this recessed button to switch energy-saving Auto Sleep mode on and
o. Your speaker leaves the factory with the Auto Sleep button pressed to
enable this mode. This function puts the electronic components into Auto
Sleep mode when four and a half hours pass without the speaker register-
ing an audio signal, data sent to the network ports, or operation of a button
or knob on the electronics. The only way to wake it up is by switching the
Power button o and on again or patching an analogue audio signal into
the Input.
Heads Up: You cannot wake up the speaker via the network ports.
The only way to disable the Auto Sleep function is to press the recessed
switch (not pressed).
Leave enough space for proper ventilation!
LINEAR 7
118 Sub A
MADE IN GERMANY
Power
Auto Sleep
On Off
+6 dB–6 dB
0 dB
Input
L
R
DSP Out
Thru Gain
Serial No.
Mains Input
100-240 V~ 50-60 Hz
1.9 A @ 1/8 output power
Link
100-240 V~ 50-60 Hz
max. 10 A
Caution: Risk of electric shock! Do not open!
Refer servicing to qualified service personnel.
Attention: Risque de choc élèctrique –
ne pas ouvrir!
HK Audio is a brand of Stamer Musikanlagen GmbH
Magdeburger Str. 8 • 66606 St. Wendel • Germany
Power
Lock Lock
1
5
2
1 2
3
4
4
9
11
12
10

LINEAR 5 MK II 1.0
6
3 Overview of the various models 110
XA, 112 XA, 112 FA, 115 XA, 115 FA, 115
Sub A, 118 Sub A
110 XA 112 XA 112 FA 115 XA 115 SUB A 118 SUB A115 FA
The LINEAR 5 series consists of five mid/high units speakers and two
subwoofers:
LINEAR 5 MK II110XA, LINEAR 5 MK II112 XA, LINEAR 5 MK II 112 FA,
LINEAR 5 MK II 115 XA, LINEAR 5 MK II 115 FA, LINEAR 5 MK II 115 Sub A and
LINEAR 5 MK II 118 Sub A. The housings of the multifunctional LINEAR 5 MK
II 110 XA, LINEAR 5 MK II 112 XA and LINEAR 5 MK II 115 XA models are angled
31° so you can also set them sideways for stage monitors. The larger hous-
ings of the LINEAR 5 MK II 112 FA and LINEAR 5 MK II 115 FA fullrange models
deliver more low-frequency sound pressure.
31°
LINEAR 5 MK II
110 XA / 112 XA / 115 XA
The LINEAR 5 MK II 110 XA and 112 XA speakers are equipped with an 80°
x 60° wide dispersion horn for homogeneous near-field dispersion. The
LINEAR 5 MK II 115 XA has a horn with a medium 70°x50° throw pattern. The
LINEAR 5 MK II 112 FA and 115 FA come with a horn with a narrower 60°x40°
long-throw pattern.
You need tools to rotate the horns, so they are not conducive to frequent
adjustment. The idea is to optimize the throw pattern for the cabinet’s
primary application.
Good to know: You do not have to rotate the horn when setting the cab
on its side for use as a stage monitor. In fact, the upright speaker’s nar-
rower vertical throw pattern works great in the horizontal position. This
minimises overlap with adjacent monitors and reduces the feedback risk
because you can focus the speaker more accurately.
4 Setting Up Speakers
4.1 The XA/FA Models
LINEAR 5 MK II mid/high units may be stacked on subwoofers, mounted
on speaker stands or poles, installed with wall brackets, or flown with the
proper rigging hardware.
Setting Up with the DuoTilt 3/7
-3° -7°
All mid/high units feature the HKAudio DuoTilt 3/7, a special mount for
35mm speaker stands and poles oering two angles, -3° and -7°, to provide
better coverage. The DuoTilt 3/7 is sited closer to the bae to maintain the
optimum centre of gravity when the speaker is on a stand.
General Information about Setting Up with Speaker Stands
Note! Always make sure the speaker stand is on solid footing and be sure
to observe the manufacturer’s instructions as to its maximum load-bear-
ing capacity.
Take care!
• Use only speaker stands that are stable enough to prevent accidental tip-
ping. Ensure the speaker stand is designed to handle the cabinet’s weight.
The highest setting on adjustable stands must be limited to prevent the
combination of speaker stand and speaker from tipping. This applies when
setting up the stand on a flat, horizontal surface.
• When setting up on an uneven or sloping surface, make sure the speaker
stand’s base is secured to prevent accidental tipping, either by attach-
ing suitable weights to the base or taking other measures to secure the
stand.
• The use of any other fixtures or fittings can result in instability that may
cause injury.
Rigging:
The XA and FA models can be flown by installing the AP-8 attachment and
steel cables or chains to their rigging points. The 112 FA, 115 FA and 115 XA
models additionally provide for rigging operation in combination with the
installation of the HK Audio TB-45N and TB-45NQ tilt brackets (Q-model
removable with quick-release pins).
4.2 LINEAR 5 MK II 115 Sub A and 118 Sub A
Deploy the LINEAR 5 MK II subwoofer as you would any other direct radiating
subwoofer. It can be used either stacked or side by side in Cardioid mode,
maintaining a distance of at least one metre from walls.
You have two Cardioid setups to choose from: Cardioid 1:1 vertical and

LINEAR 5 MK II 1.0
7
• English • Français• Deutsch • Italiano • Español
Cardioid 1:1 horizontal. The diagrams below show the front view from the
audience’s perspective.
Cardioid 1:1
vertical
Cardioid 1:1
horizontal
Preset:
Front
Preset:
Cardioid 1:1 horizontal
LINEAR 5
118 Sub A
MADE IN GERMANY
Preset:
Front
Preset:
Cardioid 1:1
vertical
LINEAR 5 MK II
118 Sub A
MADE IN GERMANY
Settings
Front
Front
Cardioid 1:1
vertical
Cardioid 1:1
horizontal
Leave 1 meter of space
in each direction!
Cardioid 1:1
vertical Cardioid 1:1
horizontal
LINEAR 5
118 Sub A
MADE IN GERMANY
LINEAR 5 MK II
118 Sub A
MADE IN GERMANY
Settings
Front
Front
Cardioid 1:1
vertical
Cardioid 1:1
horizontal
Leave 1 meter of space
in each direction!
Cardioid 1:1
vertical Cardioid 1:1
horizontal
Select the proper preset for the given setup on the rear panel of the LINEAR
5 MK II subwoofer. See section 2, ●
8 Preset for more on this.
Preset Settings
Front
Front
Cardioid 1:1
vertical
Cardioid 1:1
horizontal
Cardioid 1:1
vertical Cardioid 1:1
horizontal
Both setups attenuate the rearward sound pressure level by up to 34dB,
and boost the forward SPL around 2dB.
Front:
+2 dB
Rear:
–34 dB
When does a Cardioid setup make sense?
While medium and high frequencies can be radiated in directional patterns,
low frequencies are spherical. This often leads to an unpleasant excess of
low bass on and behind the stage. Organisers are also increasingly setting
precise demands for sound distribution, for example in marquees in city
centres. The most eective way to achieve this in the bass range is with
Cardioid technology (cancelling out the frequencies radiated to the rear).
Both LINEAR 5 MK II subwoofers therefore meet all the requirements for
quickly and easily implementing eective Cardioid setups, both mechanical-
ly and with the available filter sets.
5 Example systems
5.1 Setting Up a 2.1 Stereo System
Thanks to the LINEAR 5 MK II subwoofer’s onboard
stereo preamps, you can easily set up a 2.1 system,
routing both the left and right channels into a LIN-
EAR 5 MK II subwoofer and then forwarding their
signals to the mid/high units via its Thru ports.
The LINEAR 5 MK II 110 XA’s wide throw patterns are
perfect for this application.
Presets:
Mid-high units Low Cut
LINEAR 5 MK II
subwoofer
Front
For to ensure the most balanced image possible, centre the subwoofer
between the two mid/high units.
5.2 Setting up Speakers on Poles
If you wish to place mid/high units
on speaker poles rather than stands,
simply screw a pole with an M20 thread
into the M20 pole mount on the LINEAR
5 MK II subwoofer.
Presets:
Mid-high units Low Cut
LINEAR 5 MK II
subwoofer
Front
5.3 Stacking Speakers
Placing three LINEAR 5 MK II subwoofers on top of
one another creates a 1.65 m stack. You may place
the mid/high units directly on the bass bins.
Presets:
Mid-high units Low Cut
LINEAR 5 MK II
subwoofer
Front
Note: Setup as a stack should only be carried out by qualified
personnel and with appropriate standards such as securing with lashing
straps on flat surfaces.

LINEAR 5 MK II 1.0
8
5.4 Configuring a 1:1 Vertical Cardioid Setup
Cardioid system with a speaker pole. The bottom
subwoofers are directed to the rear.
Presets:
Mid-high units Low Cut
LINEAR 5 MK II
subwoofer
Front
LINEAR 5 MK II
subwoofer
Cardioid 1:1
vertical
5.5 Configuring a 1:1 Horizontal Cardioid Setup
Cardioid system with side-by-side
basses. One subwoofer is directed
towards the rear.
Presets:
Mid-high units Low Cut
LINEAR 5 MK II
subwoofer
Front
LINEAR 5 MK II
subwoofer
Cardioid 1:1
horizontal
You will find several detailed setup and wiring examples for your
LINEAR 5 MK II system starting on page 42.
6 Optional HK Audio Accessories
HK Audio oers Weather Protective Covers for all LINEAR 5 MK II models.
They also serve to protect the speakers in transit and splash-proof them
during operation. Visit the LINEAR 5 MK II product pages at www.hkaudio.
com to learn more.
7 Technical Specifications
Model LINEAR 5 MK II
110 XA
LINEAR 5 MK II
112 XA
LINEAR 5 MK II
112 FA
LINEAR 5 MK II
115 XA
LINEAR 5 MK II
115 FA
LINEAR 5 MK II
115 Sub A
LINEAR 5 MK II
118 Sub A
Max. SPL @ 10 % THD 127dB half space
(70Hz – 12kHz averaged)
128dB half space
(70Hz – 12kHz averaged)
128dB half space
(70Hz – 12kHz averaged)
130dB half space
(70Hz – 12kHz averaged)
130dB half space
(70Hz – 12kHz averaged)
127dB half space
(42Hz – 100Hz averaged)
130dB half space
(42Hz – 100Hz averaged)
Max. SPL Peak @ 10
% THD
135dB halfspace 136dB halfspace 135dB halfspace 138dB halfspace 138dB halfspace 130dB halfspace 131dB halfspace
Frequency response
+/-3 dB
74Hz – 12kHz 73Hz – 12kHz 70Hz – 12kHz 64Hz – 12kHz 57Hz – 12kHz 44 Hz – X-over 42 Hz – X-over
Frequency response
-10dB
68Hz – 19kHz 67Hz – 19kHz 55Hz – 19kHz 59Hz – 19kHz 54Hz – 19kHz 40 Hz – X-over 38 Hz – X-over
Power amp output
(RMS/Peak)
600 / 1,200 W 600 / 1,200 W 600 / 1,200 W 600 / 1,200 W 600 / 1,200 W 600 / 1,200 W 1,000 / 2,000 W
Amplifier type Class D – bi-amped Class D – bi-amped Class D – bi-amped Class D – bi-amped Class D – bi-amped Class D Class D
Woofer -----1x 15", 3" voice coil 1x 18", 4" voice coil
Low/mid speaker 1x10", 2" voice coil 1x 12", 2.5" voice coil 1x 12", 2.5" voice coil 1x 15", 3" voice coil 1x 15", 3" voice coil - -
HF driver 1", 1.4" voice coil 1", 1.7" voice coil 1", 1.7" voice coil 1", 1.7" voice coil 1", 1.7" voice coil - -
Horn characteristics 80° x 60° CD horn, rotatable 80° x 60° CD horn, rotatable 60° x 40° CD horn, rotatable 70° x 50° CD horn, rotatable 60° x 40° CD horn, rotatable - -
Active x-over fre-
quency
2.1kHz FIR X-over with 72dB/
oct.
1.9kHz FIR X-over with 72dB/
oct.
1.6kHz FIR X-over with 72dB/
oct.
1.6kHz FIR X-over with 72dB/
oct.
1.6kHz FIR X-over with 72dB/
oct.
- -
Maximum input level 20dBu 20dBu 20dBu 20dBu 20dBu 20dBu 20dBu
Analogue inputs 1x XLR combo balanced 1x XLR combo balanced 1x XLR combo balanced 1x XLR combo balanced 1x XLR combo balanced 2x XLR combo balanced 2x XLR combo balanced
Analogue Thru 1x XLR balanced 1x XLR balanced 1x XLR balanced 1x XLR balanced 1x XLR balanced 2x XLR balanced 2x XLR balanced
DSP Out 1x XLR balanced 1x XLR balanced 1x XLR balanced 1x XLR balanced 1x XLR balanced 1x XLR balanced 1x XLR balanced
Network port EtherCON RJ45, 1x In EtherCON RJ45, 1x In EtherCON RJ45, 1x In EtherCON RJ45, 1x In EtherCON RJ45, 1x In EtherCON RJ45, 1x In, 1x Thru EtherCON RJ45, 1x In, 1x Thru
Filter presets Flat, Monitor, Low Cut, Remote Flat, Monitor, Low Cut, Remote Flat, Boost, Low Cut, Remote Flat, Monitor, Low Cut, Remote Flat, Boost, Low Cut, Remote Front, Cardioid 1:1 vertical,
Cardioid 1:1 horizontal, Remote
Front, Cardioid 1:1 vertical,
Cardioid 1:1 horizontal, Remote
Remote software DSP CONTROL (Windows, Mac
OS)
DSP CONTROL (Windows, Mac
OS)
DSP CONTROL (Windows, Mac
OS)
DSP CONTROL (Windows, Mac
OS)
DSP CONTROL (Windows, Mac
OS)
DSP CONTROL (Windows, Mac
OS)
DSP CONTROL (Windows, Mac
OS)
DSP functions Fully parametric 10-band EQ
with variable filter characteris-
tics, High-Pass Filter, Low-Pass
Filter, Polarity, Level, Delay,
Limiter, Mute
Fully parametric 10-band EQ
with variable filter characteris-
tics, High-Pass Filter, Low-Pass
Filter, Polarity, Level, Delay,
Limiter, Mute
Fully parametric 10-band EQ
with variable filter characteris-
tics, High-Pass Filter, Low-Pass
Filter, Polarity, Level, Delay,
Limiter, Mute
Fully parametric 10-band EQ
with variable filter characteris-
tics, High-Pass Filter, Low-Pass
Filter, Polarity, Level, Delay,
Limiter, Mute
Fully parametric 10-band EQ
with variable filter characteris-
tics, High-Pass Filter, Low-Pass
Filter, Polarity, Level, Delay,
Limiter, Mute
Fully parametric 10-band EQ
with variable filter characteris-
tics, Low-Pass Filter, Polarity,
Level, Delay, Limiter, Mute
Fully parametric 10-band EQ
with variable filter characteris-
tics, Low-Pass Filter, Polarity,
Level, Delay, Limiter, Mute
Sample rate 48kHz 48kHz 48kHz 48kHz 48kHz 48kHz 48kHz
System latency Less than 2ms Less than 2ms Less than 2ms Less than 2ms Less than 2ms Less than 2ms Less than 2ms
Mains connection 1x IEC connector with V-Lock
securing system, 100-240 V
1x IEC connector with V-Lock
securing system, 100-240 V
1x IEC connector with V-Lock
securing system, 100-240 V
1x IEC connector with V-Lock
securing system, 100-240 V
1x IEC connector with V-Lock
securing system, 100-240 V
1x IEC connector with V-Lock
securing system, 100-240 V
1x IEC connector with V-Lock
securing system, 100-240 V
Power consumption 1A / 100–240V nominal
according to EN 62368-1
1A / 100–240V nominal
according to EN 62368-1
1A / 100–240V nominal
according to EN 62368-1
1A / 100–240V nominal
according to EN 62368-1
1A / 100–240V nominal
according to EN 62368-1
1A / 100–240V nominal
according to EN 62368-1
1.9A / 100–240V nominal
according to EN 62368-1
Setup angle 31° 31° -31° - -
Pole mount DuoTilt 3°/7° DuoTilt 3°/7° DuoTilt 3°/7° DuoTilt 3°/7° DuoTilt 3°/7° 1x M20 1x M20
Rigging points 3x M8 (AP-8) 3x M8 (AP-8) 3x M8 (AP-8) 3x M8 (AP-8) 3x M8 (AP-8) - -
Carrying handles 1x SingleGrip 2x SingleGrip 2x MultiGrip 2x MultiGrip, 1x SingleGrip 2x MultiGrip 2x MultiGrip 2x MultiGrip
Housing Hybrid (birch multiplex/MDF) Hybrid (birch multiplex/MDF) Hybrid (birch multiplex/MDF) Hybrid (birch multiplex/MDF) Hybrid (birch multiplex/MDF) Hybrid (birch multiplex/MDF) Birch multiplex
Surface Black acrylic enamel Black acrylic enamel Black acrylic enamel Black acrylic enamel Black acrylic enamel Black acrylic enamel Black acrylic enamel
Front grille 2 mm metal grille backed with
black acoustic foam
2 mm metal grille backed with
black acoustic foam
2 mm metal grille backed with
black acoustic foam
2 mm metal grille backed with
black acoustic foam
2 mm metal grille backed with
black acoustic foam
2 mm metal grille backed with
black acoustic foam
2 mm metal grille backed with
black acoustic foam
Dimensions (WxHxD) 36 x 52.5 x 30 cm
14-1/16 x 20-43/64 x 11-13/16"
36 x 59 x 30.5 cm
14-1/16 x 23-15/64 x 12-1/32"
37 x 67 x 36.5 cm
14-9/16 x 26-3/8 x 14-3/8"
45 x 68.5 x 42 cm
17-23/32 x 26-31/32 x 16-17/32"
44,8 x 70,7 x 44,75 cm
17-2/3 x 27-4/5 x 17-2/3"
48 x 53.5 x 67.5 cm
18-57/64 x 21-1/16 x 26-37/64"
55 x 56 x 68.5 cm
21-21/32 x 22-3/64 x 26-31/32"
Weight 14.9kg / 32.85lbs 17.6kg / 38.80lbs 21.9kg / 48.28lbs 27.6kg / 60.85lbs 30,2 kg / 66,47 lbs 32.9kg / 72.53lbs 41.6kg / 91.71lbs

LINEAR 5 MK II 1.0
9
• English • Français• Deutsch • Italiano • Español
7 Technical Specifications
Model LINEAR 5 MK II
110 XA
LINEAR 5 MK II
112 XA
LINEAR 5 MK II
112 FA
LINEAR 5 MK II
115 XA
LINEAR 5 MK II
115 FA
LINEAR 5 MK II
115 Sub A
LINEAR 5 MK II
118 Sub A
Max. SPL @ 10 % THD 127dB half space
(70Hz – 12kHz averaged)
128dB half space
(70Hz – 12kHz averaged)
128dB half space
(70Hz – 12kHz averaged)
130dB half space
(70Hz – 12kHz averaged)
130dB half space
(70Hz – 12kHz averaged)
127dB half space
(42Hz – 100Hz averaged)
130dB half space
(42Hz – 100Hz averaged)
Max. SPL Peak @ 10
% THD
135dB halfspace 136dB halfspace 135dB halfspace 138dB halfspace 138dB halfspace 130dB halfspace 131dB halfspace
Frequency response
+/-3 dB
74Hz – 12kHz 73Hz – 12kHz 70Hz – 12kHz 64Hz – 12kHz 57Hz – 12kHz 44 Hz – X-over 42 Hz – X-over
Frequency response
-10dB
68Hz – 19kHz 67Hz – 19kHz 55Hz – 19kHz 59Hz – 19kHz 54Hz – 19kHz 40 Hz – X-over 38 Hz – X-over
Power amp output
(RMS/Peak)
600 / 1,200 W 600 / 1,200 W 600 / 1,200 W 600 / 1,200 W 600 / 1,200 W 600 / 1,200 W 1,000 / 2,000 W
Amplifier type Class D – bi-amped Class D – bi-amped Class D – bi-amped Class D – bi-amped Class D – bi-amped Class D Class D
Woofer -----1x 15", 3" voice coil 1x 18", 4" voice coil
Low/mid speaker 1x10", 2" voice coil 1x 12", 2.5" voice coil 1x 12", 2.5" voice coil 1x 15", 3" voice coil 1x 15", 3" voice coil - -
HF driver 1", 1.4" voice coil 1", 1.7" voice coil 1", 1.7" voice coil 1", 1.7" voice coil 1", 1.7" voice coil - -
Horn characteristics 80° x 60° CD horn, rotatable 80° x 60° CD horn, rotatable 60° x 40° CD horn, rotatable 70° x 50° CD horn, rotatable 60° x 40° CD horn, rotatable - -
Active x-over fre-
quency
2.1kHz FIR X-over with 72dB/
oct.
1.9kHz FIR X-over with 72dB/
oct.
1.6kHz FIR X-over with 72dB/
oct.
1.6kHz FIR X-over with 72dB/
oct.
1.6kHz FIR X-over with 72dB/
oct.
- -
Maximum input level 20dBu 20dBu 20dBu 20dBu 20dBu 20dBu 20dBu
Analogue inputs 1x XLR combo balanced 1x XLR combo balanced 1x XLR combo balanced 1x XLR combo balanced 1x XLR combo balanced 2x XLR combo balanced 2x XLR combo balanced
Analogue Thru 1x XLR balanced 1x XLR balanced 1x XLR balanced 1x XLR balanced 1x XLR balanced 2x XLR balanced 2x XLR balanced
DSP Out 1x XLR balanced 1x XLR balanced 1x XLR balanced 1x XLR balanced 1x XLR balanced 1x XLR balanced 1x XLR balanced
Network port EtherCON RJ45, 1x In EtherCON RJ45, 1x In EtherCON RJ45, 1x In EtherCON RJ45, 1x In EtherCON RJ45, 1x In EtherCON RJ45, 1x In, 1x Thru EtherCON RJ45, 1x In, 1x Thru
Filter presets Flat, Monitor, Low Cut, Remote Flat, Monitor, Low Cut, Remote Flat, Boost, Low Cut, Remote Flat, Monitor, Low Cut, Remote Flat, Boost, Low Cut, Remote Front, Cardioid 1:1 vertical,
Cardioid 1:1 horizontal, Remote
Front, Cardioid 1:1 vertical,
Cardioid 1:1 horizontal, Remote
Remote software DSP CONTROL (Windows, Mac
OS)
DSP CONTROL (Windows, Mac
OS)
DSP CONTROL (Windows, Mac
OS)
DSP CONTROL (Windows, Mac
OS)
DSP CONTROL (Windows, Mac
OS)
DSP CONTROL (Windows, Mac
OS)
DSP CONTROL (Windows, Mac
OS)
DSP functions Fully parametric 10-band EQ
with variable filter characteris-
tics, High-Pass Filter, Low-Pass
Filter, Polarity, Level, Delay,
Limiter, Mute
Fully parametric 10-band EQ
with variable filter characteris-
tics, High-Pass Filter, Low-Pass
Filter, Polarity, Level, Delay,
Limiter, Mute
Fully parametric 10-band EQ
with variable filter characteris-
tics, High-Pass Filter, Low-Pass
Filter, Polarity, Level, Delay,
Limiter, Mute
Fully parametric 10-band EQ
with variable filter characteris-
tics, High-Pass Filter, Low-Pass
Filter, Polarity, Level, Delay,
Limiter, Mute
Fully parametric 10-band EQ
with variable filter characteris-
tics, High-Pass Filter, Low-Pass
Filter, Polarity, Level, Delay,
Limiter, Mute
Fully parametric 10-band EQ
with variable filter characteris-
tics, Low-Pass Filter, Polarity,
Level, Delay, Limiter, Mute
Fully parametric 10-band EQ
with variable filter characteris-
tics, Low-Pass Filter, Polarity,
Level, Delay, Limiter, Mute
Sample rate 48kHz 48kHz 48kHz 48kHz 48kHz 48kHz 48kHz
System latency Less than 2ms Less than 2ms Less than 2ms Less than 2ms Less than 2ms Less than 2ms Less than 2ms
Mains connection 1x IEC connector with V-Lock
securing system, 100-240 V
1x IEC connector with V-Lock
securing system, 100-240 V
1x IEC connector with V-Lock
securing system, 100-240 V
1x IEC connector with V-Lock
securing system, 100-240 V
1x IEC connector with V-Lock
securing system, 100-240 V
1x IEC connector with V-Lock
securing system, 100-240 V
1x IEC connector with V-Lock
securing system, 100-240 V
Power consumption 1A / 100–240V nominal
according to EN 62368-1
1A / 100–240V nominal
according to EN 62368-1
1A / 100–240V nominal
according to EN 62368-1
1A / 100–240V nominal
according to EN 62368-1
1A / 100–240V nominal
according to EN 62368-1
1A / 100–240V nominal
according to EN 62368-1
1.9A / 100–240V nominal
according to EN 62368-1
Setup angle 31° 31° -31° - -
Pole mount DuoTilt 3°/7° DuoTilt 3°/7° DuoTilt 3°/7° DuoTilt 3°/7° DuoTilt 3°/7° 1x M20 1x M20
Rigging points 3x M8 (AP-8) 3x M8 (AP-8) 3x M8 (AP-8) 3x M8 (AP-8) 3x M8 (AP-8) - -
Carrying handles 1x SingleGrip 2x SingleGrip 2x MultiGrip 2x MultiGrip, 1x SingleGrip 2x MultiGrip 2x MultiGrip 2x MultiGrip
Housing Hybrid (birch multiplex/MDF) Hybrid (birch multiplex/MDF) Hybrid (birch multiplex/MDF) Hybrid (birch multiplex/MDF) Hybrid (birch multiplex/MDF) Hybrid (birch multiplex/MDF) Birch multiplex
Surface Black acrylic enamel Black acrylic enamel Black acrylic enamel Black acrylic enamel Black acrylic enamel Black acrylic enamel Black acrylic enamel
Front grille 2 mm metal grille backed with
black acoustic foam
2 mm metal grille backed with
black acoustic foam
2 mm metal grille backed with
black acoustic foam
2 mm metal grille backed with
black acoustic foam
2 mm metal grille backed with
black acoustic foam
2 mm metal grille backed with
black acoustic foam
2 mm metal grille backed with
black acoustic foam
Dimensions (WxHxD) 36 x 52.5 x 30 cm
14-1/16 x 20-43/64 x 11-13/16"
36 x 59 x 30.5 cm
14-1/16 x 23-15/64 x 12-1/32"
37 x 67 x 36.5 cm
14-9/16 x 26-3/8 x 14-3/8"
45 x 68.5 x 42 cm
17-23/32 x 26-31/32 x 16-17/32"
44,8 x 70,7 x 44,75 cm
17-2/3 x 27-4/5 x 17-2/3"
48 x 53.5 x 67.5 cm
18-57/64 x 21-1/16 x 26-37/64"
55 x 56 x 68.5 cm
21-21/32 x 22-3/64 x 26-31/32"
Weight 14.9kg / 32.85lbs 17.6kg / 38.80lbs 21.9kg / 48.28lbs 27.6kg / 60.85lbs 30,2 kg / 66,47 lbs 32.9kg / 72.53lbs 41.6kg / 91.71lbs

Version 1.0 12/2022
Wichtige Sicherheitshinweise!
Bitte vor Anschluss lesen!
Dieses Produkt wurde gemäß IEC 62368-1 hergestellt und hat das
Werk in einem sicheren, betriebsfähigen Zustand verlassen. Um
diesen Zustand zu erhalten und um einen gefahrlosen Betrieb zu
gewährleisten, ist es notwendig, dass der Benutzer die Empfehlungen
und Warnhinweise befolgt, die in der Betriebsanleitung zu finden sind.
Bei Einsatz dieses Produktes in Fahrzeugen, Schiffen oder Flugzeugen,
oder in Höhen oberhalb 2000 m Meereshöhe müssen die entsprechen-
den Sicherheitsstandards zusätzlich zur IEC 62368-1 beachtet werden.
WARNUNG: Um das Risiko von Feuer oder Stromschlag zu verhüten,
darf dieses Gerät nicht Feuchtigkeit oder Regen ausgesetzt werden.
Öffnen Sie das Gehäuse nicht – im Inneren gibt es keine Bauteile, die
vom Benutzer wartbar sind. Die Wartung darf nur von einem qualifi-
ziertem Kundendienst durchgeführt werden.
Dieses Symbol, wo immer es erscheint, warnt Sie vor
gefährlicher, nicht isolierter Spannung im Gehäuse – Spannung, die
möglicherweise genügt, eine Stromschlaggefahr darzustellen.
Dieses Symbol, wo immer es erscheint, warnt Sie vor außen
zugänglicher, gefährlicher Spannung. Eine Verbindung zu jeder
Anschlussklemme, die mit diesem Symbol versehen ist, darf nur mit
konfektioniertem Kabel hergestellt werden, dass den Empfehlungen
des Herstellers genügt, oder mit Kabel, das von qualifiziertem Personal
installiert wurde.
Dieses Symbol, wo immer es erscheint, macht Sie auf wichtige
Bedienungs- und Wartungsanweisungen aufmerksam, die in
beiliegenden Unterlagen zu finden sind. Bitte lesen Sie das Handbuch.
Dieses Symbol, wo immer es erscheint, sagt Ihnen: Vorsicht!
Heiße Oberfläche! Um Verbrennungen zu vermeiden, nicht anfassen.
Elektro- und Elektronikgeräte einschließlich Batterien sind
getrennt vom Hausmüll über offizielle Sammelstellen fachgerecht zu
entsorgen.
Bitte lesen Sie diese Anweisungen. Bewahren Sie diese
Anweisungen auf. Befolgen Sie alle Warnhinweise und Anweisungen
auf dem Gerät und in dieser Anleitung.
• Benutzen Sie dieses Gerät nicht in der Nähe von Wasser. Stellen Sie
das Gerät nicht in der Nähe von Wasser, Badewannen, Waschbecken,
Küchenspülen, nassen Stellen, Schwimmbecken oder in feuchten
Räumen auf.
• Stellen Sie keine Gefäße, wie Vasen, Gläser, Flaschen usw., die
Flüssigkeiten enthalten, auf das Gerät.
• Reinigen Sie das Gerät nur mit einem trockenen Tuch.
• Entfernen Sie keine Abdeckungen oder Teile des Gehäuses.
• Die auf dem Gerät angegebene Betriebsspannung muss mit der
örtlichen Spannung der Netzstromversorgung übereinstimmen.
Wenn Sie sich nicht sicher sind, welche Spannung in Ihrem Netz
zur Verfügung steht, konsultieren Sie bitte Ihren Händler oder den
örtlichen Stromversorger.
• Stellen Sie vor Anschluss des Gerätes unbedingt sicher, dass die
Netz versorgungsinstallation über ausreichende Schutz einrichtungen
gegen Kurzschluss und Erdungsfehler angeschlossener Geräte
verfügt.
• Um das Risiko eines Stromschlags zu verringern, muss die Erdung
des Gerätes beibehalten werden. Verwenden Sie nur das mitgelieferte
Stromführungskabel und behalten Sie die Funktion der seitlichen,
geerdeten Schutzkontakte des Netzanschlusses immer aufrecht. Stel-
len Sie sicher, dass das Gerät nur an Steckdosen angeschlossen wird,
die über eine ordnungsgemäß funktionierende Schutzerde verfügen.
• Schützen Sie das Stromführungskabel vor Betreten und Quetschen,
besonders in der Nähe der Stecker, Gerätesteckdosen – und dort, wo
sie am Gerät austreten! Stromführungskabel sollten immer vorsichtig
behandelt werden. Kontrollieren Sie die Stromführungskabel in
regelmäßigen Abständen auf Einschnitte und Anzeichen von Abnut-
zung, besonders in der Nähe des Steckers und an der Verbindung
zum Gerät.
• Benutzen Sie niemals ein beschädigtes Stromführungskabel.
• Ziehen Sie bei Gewittern den Stecker des Gerätes und wenn das Gerät
über einen längeren Zeitraum nicht benutzt wird.
• Dieses Gerät wird nur vollständig von Stromnetz getrennt, wenn der
Stecker vom Gerät oder aus der Steckdose gezogen wird. Das Gerät
sollte so aufgestellt werden, dass das Trennen vom Stromnetz leicht
möglich ist.
• Sicherungen dürfen nur von qualifiziertem Personal gewechselt wer-
den, und nur unter Verwendung des korrekten Typs und Nennwerts.
• Alle Wartungsarbeiten sollten nur von qualifiziertem Personal ausge-
führt werden. Wartung ist notwendig, wenn das Gerät auf irgendeine
Weise beschädigt wurde, wie zum Beispiel:
- Wenn das Stromführungskabel oder der Stecker beschädigt oder
abgenutzt ist.
- Wenn Flüssigkeit oder Gegenstände in das Gerät gelangt sind.
- Wenn das Gerät Regen oder Feuchtigkeit ausgesetzt war.
- Wenn das Gerät nicht ordnungsgemäß funktioniert, obwohl die
Bedienungsanleitung beachtet wurde.
- Wenn das Gerät hingefallen ist oder das Gehäuse beschädigt wurde.
• Beim Anschluss von Lautsprechern an dieses Gerät darf die auf dem
Gerät oder in dieser Anleitung angegebene Mindestimpedanz nicht
unterschritten werden. Die verwendeten Kabel müssen entsprechend
den lokalen Regelungen über einen ausreichenden Querschnitt
verfügen.
• Halten Sie das Gerät vom Sonnenlicht fern.
• Installieren Sie das Gerät nicht in der Nähe von Wärmequellen, wie
zum Beispiel Heizkörper, Heizregister, Öfen oder anderen Geräten,
die Hitze erzeugen.
• Dieses Gerät wurde für die Verwendung in gemäßigten Klimazonen
entwickelt. Nicht geeignet zur Verwendung in tropischen Klimazonen.
• Verstopfen Sie nicht die Lüftungsöffnungen. Installieren Sie das
Gerät entsprechend der Anleitung des Herstellers. Das Gerät darf
nicht eingebaut werden – wie zum Beispiel in einen Gestellrahmen,
es sei denn, dass für angemessene Belüftung gesorgt wird.
• Ein kaltes Gerät sollte immer auf die Umgebungstemperatur erwärmt
werden, wenn es in einen Raum transportiert wird. Es könnte sich
Kondensation im Inneren bilden, die das Gerät beschädigt, wenn es
ohne vorherige Erwärmung benutzt wird.
• Stellen Sie keine offenen Flammen, wie brennende Kerzen, auf das
Gerät.
• Das Gerät sollte mindestens 20 cm von Wänden aufgestellt werden.
• Das Gerät darf nur mit Rollwagen, Ständern, Stativen, Tischen oder
Halterungen benutzt werden, die vom Hersteller spezifiziert sind
oder zusammen mit dem Gerät verkauft wurden. Wenn ein Rollwagen
benutzt wird, seien Sie vorsichtig, wenn Sie die Rollwagen/Geräte-
Kombination transportieren, um Verletzungen durch Umkippen zu
vermeiden.
• Verwenden Sie nur Zubehör, das vom Hersteller empfohlen ist. Das
gilt für alle Arten von Zubehör, wie zum Beispiel Schutzabdeckungen,
Transporttaschen, Ständer sowie Wand- und Deckenhalterungen.
Wenn Sie irgendein Zubehör am Gerät anbringen, befolgen Sie immer
die Anleitungen des Herstellers. Benutzen Sie nur die Befestigungs-
punkte des Geräts, die vom Hersteller vorgesehen sind.
• Dieses Gerät ist NICHT geeignet für eine Person oder Personen (ein-
schließlich Kindern) mit eingeschränkten physischen, sensorischen
und geistigen Fähigkeiten, oder für Personen mit unzulänglicher
Erfahrung und/oder Fachkenntnis, um solch ein Gerät zu bedienen.
Kinder unter 4 Jahren sollten stets von diesem Gerät fern gehalten
werden.
• Es sollten keinerlei Gegenstände durch die Gehäuseschlitze einge-
führt werden, da dadurch gefährliche, spannungsführende Bauteile
berührt oder kurzgeschlossen werden können. Dies könnte zu einer
Feuer- oder Stromschlaggefahr führen.
• Dieses Gerät ist imstande, Schalldruckpegel von mehr als 90 dB zu
produzieren. Dies könnte zu einem dauerhaften Hörschaden führen!
Eine Belastung durch extrem hohe Geräuschpegel kann zu einem
dauerhaften Gehörverlust führen. Bei einer anhaltenden Belastung
durch solch hohe Pegel sollte ein Gehörschutz getragen werden.
• Der Hersteller gewährleistet die Sicherheit, Zuverlässigkeit und
Leistung des Gerätes nur unter folgenden Voraussetzungen:
- Einbau, Erweiterung, Neueinstellung, Modifikationen oder Reparatu-
ren werden vom Hersteller oder autorisiertem Personal ausgeführt.
- Die elektrische Installation des betreffenden Bereiches entspricht
den Anforderungen der IEC (ANSI) Maßgaben.
- Das Gerät wird entsprechend der Bedienungsanleitung benutzt.
• Dieses Produkt ist auf die Verwendung mit Musik- und Sprach-
signalen optimiert. Verwendung mit Sinus-, Rechteck- oder anderen
Mess-Signalen bei höherem Pegel kann zu ernsten Beschädigungen
des Geräts führen.
Allgemeine Sicherheitshinweise
für Lautsprechersysteme
Befestigungssysteme dürfen ausschließlich für die vom
Hersteller freigegebenen Lautsprechersysteme und mit dem in der
Montageanleitung genannten Montage-Zubehör verwendet werden.
Die Montagehinweise des Herstellers sind dabei unbedingt zu
beachten. Bei unsachgemäßer Montage bzw. Verwendung von nicht
freigegebenem Montage-Zubehör kann die angegebene Belastung
nicht garantiert und keinerlei Haftung seitens des Herstellers
übernommen werden.
Sollten Änderungen an Lautsprechern, an Montage-Zubehör,
Verbindungs- und Befestigungselementen sowie Anschlagmitteln
vorgenommen werden, kann die Tragfähigkeit des Systems nicht
mehr garantiert werden und seitens des Hersteller keinerlei Haftung
übernommen werden.
Reparaturen an sicherheitsrelevanten Bauteilen dürfen nur vom
Hersteller oder Bevollmächtigten durchgeführt werden, andernfalls
erlischt die Betriebserlaubnis.
Die Installation darf ausschließlich durch Sachkundige und nur
an Montagepunkten mit ausreichender Tragfähigkeit, ggf. unter der
Berücksichtigung von Bauauflagen, erfolgen. Das vom Hersteller in der
Montageanleitung vorgeschriebene Befestigungsmaterial (Schrauben,
Dübel, etc.) muss verwendet werden. Schraubverbindungen müssen
durch geeignete Maßnahmen gegen Lösen gesichert sein.
Ortsfeste oder mobile Installationen (hier Lautsprecher
inkl. Montagezubehör) müssen durch zwei unabhängig voneinander
wirkende Einrichtungen gegen Herabfallen gesichert sein. Lose Zusatz-
teile oder sich lösende Teile müssen durch geeignete Einrichtungen
aufgefangen werden können. Bei Verwendung von Verbindungs- und
Befestigungselementen sowie Anschlagmitteln sind die nationalen
Vorschriften zu beachten. Hinsichtlich der Bemessung der Sicherungs-
mittel sind mögliche dynamische Belastungen (Ruckkräfte) mit zu
berücksichtigen.
Bei Stativen ist vor allem die maximale Traglast zu beachten.
Außerdem sind die meisten Stative aus konstruktiven Gründen nur
für das Tragen von genau zentrischer Belastung zugelassen. Stative
müssen standsicher aufgestellt werden. Stative sind durch geeignete
Maßnahmen zusätzlich zu sichern, wenn zum Beispiel:
- ihre Aufstandfläche keinen sicheren Stand zulässt,
- ihre Höhen die Standsicherheit einschränken,
- mit zu hohem Winddruck zu rechnen ist,
- damit zu rechnen ist, dass sie durch Personen umgestoßen werden.
Besondere Maßnahmen können auch zur Vorsorge gegen gefährdendes
Verhalten von Zuschauern erforderlich werden. Stative dürfen nicht
in Flucht- und Rettungswegen aufgestellt werden. Bei Aufstellung
in Verkehrswegen ist auf die erforderliche Breite der Wege und auf
ordnungsgemäße Absperrung sowie Kennzeichnung zu achten. Beim
Auf- und Absetzen ist eine besondere Gefährdung gegeben. Hierzu
sind geeignete Hilfsmittel zu verwenden. Es sind hierbei die nationalen
Vorschriften zu beachten.
Während der Montage ist geeignete Schutz-
ausrüstung (insbesondere Kopfschutz, Handschuhe und Sicherheits-
schuhe) zu tragen und es sind nur geeignete Aufstiegshilfen (Leitern,
Gerüste, etc.) zu verwenden. Die Verantwortung dafür liegt alleine
beim ausführenden Installationsbetrieb.
ACHTUNG! Nach der Montage ist die Aufhängung des Systems
aus Halterung und Lautsprecher auf sichere Befestigung zu überprüfen.
Der Betreiber von Lautsprechersystemen (ortsfest oder mobil) ist
verpflichtet, alle Systemkomponenten unter Berücksichtigung der
jeweils nationalen Regelungen regelmäßig zu überprüfen bzw. prüfen
zu lassen und mögliche Schäden unverzüglich beseitigen zu lassen.
Weiterhin raten wir dringend zu einer ausführlichen Dokumentation
aller Überprüfungsmaßnahmen in Prüfbüchern o.ä.
Insbesondere die Lastaufnahmepunkte geflogener Systeme sollten hier
mit ausreichenden Sicherheitsreserven dimensioniert werden. Es sind
hierbei die nationalen Vorschriften zu beachten.
Professionelle Lautsprechersysteme sind in der Lage,
gesundheitsschädliche Schallpegel zu erzeugen. Selbst die Einwirkung
scheinbar harmloser Schallpegel über einen längeren Zeitraum kann zu
bleibenden Schäden am Gehör führen (ab ca. 95dBA SPL)! Daher raten
wir für alle Personen, die durch den Betrieb von Lautsprechersystemen
dem Einfluss hoher Schallpegel ausgesetzt sind, zum Tragen von
professionellem Gehörschutz (Ohrstöpsel oder Kapselgehörschutz).
Hersteller: Stamer Musikanlagen GmbH, Magdeburger Str. 8,
66606 St. Wendel, Deutschland

LINEAR 5 MK II 1.0
11
Willkommen in der HK Audio Familie!
Vielen Dank, dass Sie sich für ein Markenprodukt aus unserem Hause ent-
schieden haben, das mit größter Sorgfalt für Sie entwickelt und gefertigt
wurde.
Auch wenn Sie bereits eingehende Erfahrungen mit Beschallungsan-
lagen gesammelt haben – bei diesem Produkt wird es trotzdem einige
Dinge geben, die neu für Sie sind. Legen Sie deshalb diese Bedienungs-
anleitung nicht ungelesen beiseite und bewahren Sie sie zur späteren
Verwendung auf.
Wir wünschen Ihnen allzeit besten Sound!
Ihr HK Audio Team
Hinweis: Die Funktionalität dieses Produkts kann durch starke
elektromagnetische Felder oder elektrostatische Entladungen gestört
werden. In diesem Fall kann durch Ausschalten und erneutes Einschalten
die Funktionalität wieder hergestellt werden. Falls dies nicht hilft, muss
das Gerät von der Störquelle entfernt werden.
Garantie
Nutzen Sie die komfortable Online-Registrierung über www.hkaudio.com.
http://warranty.hkaudio.com
Die Registrierung ist nur gültig, wenn sie innerhalb von 30 Tagen ab
Kaufdatum erfolgte.
HK Audio
Technischer Service
Postfach 1509
66595 St. Wendel, Deutschland
Fax: +49 6851 905 100
• English • Français• Deutsch • Italiano • Español
LINEAR 5 MKII
110 XA 112 XA 112 FA 115 XA 115 SUB A 118 SUB A115 FA

LINEAR 5 MK II 1.0
12
1 Allgemeines
Lieferumfang
Bitte überprüfen Sie beim Auspacken Ihrer LINEAR 5 MK II Lautsprecherbox
den Lieferumfang auf Vollständigkeit. Im Lieferumfang sind der Quick-
Start-Guide und ein Netzkabel enthalten.
2 Anschlüsse und Bedienelemente
LINEAR 7
112 FA
MADE IN GERMANY
Mains Input
100-240 V~ 50-60 Hz
1 A @ 1/8 output power
Caution: Risk of electric shock! Do not open!
Refer servicing to qualified service personnel.
Attention: Risque de choc élèctrique –
ne pas ouvrir!
HK Audio is a brand of Stamer Musikanlagen GmbH
Magdeburger Str. 8 • 66606 St. Wendel • Germany
Power
Serial No.
Power
Auto Sleep
On Off
+6 dB
0 dB
Input
DSP Out
Thru Gain
Data Preset
1
2
3
4
Lock
Thru
In
Ethernet
Front
Cardioid 1:1
vertical
Cardioid 1:1
horizontal
Remote
1
5
2 3
4
6
7
8
LINEAR 5 MKII XA/FA-Modelle
Leave enough space for proper ventilation!
LINEAR 7
118 Sub A
MADE IN GERMANY
Power
Auto Sleep
On Off
+6 dB–6 dB
0 dB
Input
L
R
DSP Out
Thru Gain
Serial No.
Mains Input
100-240 V~ 50-60 Hz
1.9 A @ 1/8 output power
Link
100-240 V~ 50-60 Hz
max. 10 A
Caution: Risk of electric shock! Do not open!
Refer servicing to qualified service personnel.
Attention: Risque de choc élèctrique –
ne pas ouvrir!
HK Audio is a brand of Stamer Musikanlagen GmbH
Magdeburger Str. 8 • 66606 St. Wendel • Germany
Power
Lock Lock
1
5
2
1 2
3
4
4
9
11 12
10
13
LINEAR 5 MKII Sub A-Modelle
●
1 Input
XLR/Klinke-Kombibuchse, symmetrischer Eingang für analoge Signale.
• Die LINEAR 5 MK II XA/FA-Modelle verfügen über einen Eingangskanal.
• Die Subwoofer LINEAR 5 MK II 115 Sub A und LINEAR 5 MK II 118 Sub A ver-
fügen über zwei getrennte Eingänge für das linke und rechte Signal. Die
beiden Kanäle sind gleichwertig und werden nach der Vorstufe summiert,
im Mono-Betrieb spielt es daher keine Rolle, welcher der beiden Kanäle
angeschlossen wird.
●
2 Thru
Symmetrischer, parallel zur Eingangsbuchse geschalteter XLR-Ausgang
(beim Subwoofer zwei), dient zur Weiterleitung des am Input anliegenden
Eingangssignals, unabhängig davon, ob die Elektronik eingeschaltet ist oder
nicht.
●
3 Gain
Der Gain-Regler regelt die Vorverstärkung des am Input anliegenden
Signals.
• bei den XA/FA-Modellen –∞ (Mute) bis + 6 dB
• bei der Stereo-Vorstufe der Subwoofer gilt der Regler für beide Kanäle,
hier ist der Regelbereich -6 bis +6 dB
Mittelstellung des Reglers (Centerclick) entspricht in beiden Fällen 0 dB.
Hinweis: Das Signal, das am DSP-Out anliegt, wird durch diesen Regler
nicht beeinflusst.
●
4 Input/Limiter-LED
Diese LED leuchtet grün wenn ein Signal am Input anliegt – und rot sobald
der Limiter aktiv ist oder der Eingang übersteuert wird. Ein kurzzeitiges
rotes Aufleuchten der LED zeigt das Arbeiten des Limiters bei Pegelspitzen
an. Leuchtet sie dauerhaft rot, muss der Pegel reduziert werden.
●
5 DSP Out
XLR-Buchse, die entweder zur Ausgabe des analogen Input-Signals (von der
Input-Buchse kommend) oder zur Ausgabe eines über ein Netzwerk eingespeis-
ten digitalen Audio-Signals dient. In beiden Fällen kann das Signal mit dem
internen DSP bearbeitet werden.
Damit stellt der DSP Out ein Netzwerk-Interface zur Integration einer zusätzli-
chen – von Haus aus nicht netzwerkfähigen – Aktivbox dar.
Im Auslieferungszustand liegt am DSP Out das unbearbeitete Eingangssignal
an, unabhängig von der Preset-Auswahl und von der Stellung des Gain-Reglers.
Ethernet Topteile
LINEAR 7
112 FA
MADE IN GERMANY
Mains Input
100-240 V~ 50-60 Hz
1 A @ 1/8 output power
Caution: Risk of electric shock! Do not open!
Refer servicing to qualified service personnel.
Attention: Risque de choc élèctrique –
ne pas ouvrir!
HK Audio is a brand of Stamer Musikanlagen GmbH
Magdeburger Str. 8 • 66606 St. Wendel • Germany
Power
Serial No.
+6 dB
0 dB
Input
DSP Out
Thru Gain
Lock
Power
Auto Sleep
On Off
Data
Flat
Monitor
Low Cut
Remote
Preset
1
2
3
4
In
Ethernet
1
5
2 3
4
6
7
8
Ethernet Subwoofer
LINEAR 7
112 FA
MADE IN GERMANY
Mains Input
100-240 V~ 50-60 Hz
1 A @ 1/8 output power
Caution: Risk of electric shock! Do not open!
Refer servicing to qualified service personnel.
Attention: Risque de choc élèctrique –
ne pas ouvrir!
HK Audio is a brand of Stamer Musikanlagen GmbH
Magdeburger Str. 8 • 66606 St. Wendel • Germany
Power
Serial No.
Power
Auto Sleep
On Off
+6 dB
0 dB
Input
DSP Out
Thru Gain
Data Preset
1
2
3
4
Lock
Thru
In
Ethernet
Front
Cardioid 1:1
vertical
Cardioid 1:1
horizontal
Remote
1
5
2 3
4
6
7
8
●
6 Ethernet In /Thru
Die Ethercon-Buchse dient zur Integration in ein Netzwerk. Sie ist kompatibel
mit RJ45- und Ethercon (NE8 MX, NE8 MX6, NE 8 MC)-Steckern. Die Topteile
verfügen jeweils über ein Ethernet In, die Subwoofer zusätzlich über ein Ether-
net Thru. Nutzen Sie die Ethernet Thru-Buchse bei den Bässen zum Weiter-
schleifen des Netzwerk-Signals.
Bitte verwenden Sie zum Schutz gegen elektromagnetische Störungen stets
S/STP- oder S/FTP-Kabel. Wir empfehlen die Verwendung von CAT6-Kabeln.
Die Integration in ein Netzwerk, Funktionen des Remote-Controlling sind in
einer separaten Bedienungsanleitung beschrieben, die im Download-Bereich

LINEAR 5 MK II 1.0
13
zu LINEAR5 MK II auf www.hkaudio.com zur Verfügung steht. Eine Kurzbe-
schreibung der DSP-Funktionen finden Sie unter ●
8 Preset.
●
7 Data
Diese LED leuchtet orange, wenn Daten über die Netzwerkbuchse fließen.
●
8 Preset
Über den Preset-Wahltaster lassen sich die voreingestellten Werks-Presets
sowie ein über die Remote-Software DSP CONTROL konfigurierbares User-
Preset abrufen. Durch einmaliges Tippen auf den Wahltaster können Sie durch
die Presets 1 bis 4 scrollen.
Die Nutzung von User-Presets (4 Remote) ist in einer separaten Bedienungs-
anleitung beschrieben, die im Download-Bereich zu LINEAR5 MK II auf www.
hkaudio.com zur Verfügung steht.
Preset-Übersicht:
LINEAR 5 MK II
110 XA, 112 XA, 115 XA
LINEAR 5 MK II
112 FA, 115 FA
LINEAR 5 MK II
115 Sub A, 118 Sub A
1Flat Flat Front
2Monitor Boost Cardioid 1:1 vertical
3Low Cut Low Cut Cardioid 1:1 horizontal
4Remote (Abruf der über Remote-Software
HK Audio DSP CONTROL gespeicherten Einstellungen)
Die Werks-Presets der LINEAR 5 MK II XA/FA-Modelle:
Flat über den Wiedergabebereich hinweg linearer Frequenzgang
Monitor auf Anwendung als quer liegender Bühnenmonitor opti-
miert, korrigiert die durch Bodenankopplung verursachte
Überbetonung des Tieftonbereiches mittels Pegelreduktion
Boost betont den Tieftonbereich, etwa beim Einsatz im Stand-
Alone-Betrieb ohne Subwoofer.
Low Cut optimiert für die Nutzung als Topteil in Verbindung mit
dem LINEAR 5 MKII 115 Sub A oder 118 Sub A mit Hilfe eines
Hochpass-Filters
Die Werks-Presets der LINEAR 5 MK II 115 Sub A und 118 Sub A
Front Für den Standard-Betrieb als nach vorne gerichteter Sub-
woofer
Cardioid 1:1
vertical
Für den Cardioid-Betrieb zweier übereinander gestapelten
Subwoofer mit einem nach vorne gerichteten LINEAR 5 MKII
Subwoofer. (siehe auch Kapitel 4.2)
Cardioid 1:1
horizontal
Für den Cardioid-Betrieb zweier nebeneinander stehenden
Subwoofer mit einem nach vorne gerichteten LINEAR 5 MKII
Subwoofer (siehe auch Kapitel 4.2)
Die Werks-Presets 1 bis 3 beeinflussen nur die Box selbst, nicht den DSP-Out.
Hinweis: Im Netzwerk mit verbundener Remote-Software DSP CONTROL
kann der DSP Out – auch bei Nutzung der Werks-Presets 1 bis 3 – unabhängig
von diesen Werks-Presets konfiguriert werden. Mehr dazu erfahren Sie in der
separaten Bedienungsanleitung für DSP CONTROL, welche Sie im Download-
Bereich der LINEAR 5 MK II -Produkte auf www.hkaudio.com finden.
Das Remote-Preset
Remote Hier kann ein zuvor über DSP CONTROL gespeicherters User-
Preset für die Box selbst, als auch für den DSP-Out
abgerufen werden. Die Box muss dazu nicht mit der
Remote-Software verbunden sein.
Im Auslieferungszustand entspricht das Remote-Preset dem Werks-Preset
1 (Flat/Front).
Über die Remote-Software DSP CONTROL zur Verfügung stehende DSP-
Funktionen, die als User-Preset gespeichert werden können:
Vollparametrischer 10-Band EQ mit wählbarer Filter-Charakteristik pro
Frequenzband, High-Pass- und Low-Pass-Filter mit jeweils wählbarer Filter-
Charakteristik, Limiter, Delay, Polarität, Pegel, Mute.
Die Parameter können für die Box selbst und für den DSP Out unabhängig
voneinander konfiguriert werden.
Screenshot der Remote-Software DSP CONTROL, welche im Download-Bereich der LINEAR 5-Produkte
auf www.hkaudio.com kostenlos zur Verfügung steht. Die Parameter für „Speaker“ und „DSP Out“ sind
identisch, können aber dank doppelter DSP-Power unabhängig voneinander konfiguriert werden.
●
9 Power
Der Netzschalter ist als Kippschalter ausgeführt. In Stellung Power ist die
Elektronik eingeschaltet, im ausgeschalteten Zustand ist die Elektronik
komplett vom Netz getrennt.
●
10 Power-LED
Sobald die Elektronik mit Spannung versorgt wird,
leuchtet diese LED grün.
●
11 Mains Input
Der Netzanschluss ist als verriegelbare IEC 14
Buchse ausgelegt. In Kombination mit dem mitge-
lieferten verriegelbaren Anschlusskabel, wird das
Netzkabel arretiert und gegen versehentliches Herausrutschen gesichert..
Leave enough space for proper ventilation!
LINEAR 7
118 Sub A
MADE IN GERMANY
Power
Auto Sleep
On Off
+6 dB–6 dB
0 dB
Input
L
R
DSP Out
Thru Gain
Serial No.
Caution: Risk of electric shock! Do not open!
Refer servicing to qualified service personnel.
Attention: Risque de choc élèctrique –
ne pas ouvrir!
HK Audio is a brand of Stamer Musikanlagen GmbH
Magdeburger Str. 8 • 66606 St. Wendel • Germany
Mains Input
100-240 V~ 50-60 Hz
1 A @ 1/8 output power
Power
1
5
2
1 2
3
4
4
9
11
12
10
13
●
12 Auto Sleep
Über diesen versenkten Schalter kann die energiesparende Auto-Sleep-
Funktion ein- und ausgeschaltet werden. Ab Werk ist Auto Sleep aktiviert
(Schalter gedrückt). Diese Funktion versetzt die Elektronik in den Auto
Sleep-Modus wenn über einen Zeitraum von 4,5 Stunden weder ein Signal
anliegt, noch Daten über die Netzwerk-Buchsen eingehen oder Taster
und Regler an der Elektronik bedient werden. Ein Wieder-Aktivieren der
Lautsprecherbox ist nur durch Aus- und Einschalten des Netzschalters oder
durch Anlegen eines analogen Audiosignals am Eingang möglich.
Achtung: Die Aktivierung über die Netzwerkbuchsen ist nicht möglich.
Die Deaktivierung der Auto-Sleep-Funktion ist nur durch Bedienung des
versenkten Schalters (nicht gedrückt) möglich.
• English • Français• Deutsch • Italiano • Español
Leave enough space for proper ventilation!
LINEAR 7
118 Sub A
MADE IN GERMANY
Power
Auto Sleep
On Off
+6 dB–6 dB
0 dB
Input
L
R
DSP Out
Thru Gain
Serial No.
Mains Input
100-240 V~ 50-60 Hz
1.9 A @ 1/8 output power
Link
100-240 V~ 50-60 Hz
max. 10 A
Caution: Risk of electric shock! Do not open!
Refer servicing to qualified service personnel.
Attention: Risque de choc élèctrique –
ne pas ouvrir!
HK Audio is a brand of Stamer Musikanlagen GmbH
Magdeburger Str. 8 • 66606 St. Wendel • Germany
Power
Lock Lock
1
5
2
1 2
3
4
4
9
11
12
10

LINEAR 5 MK II 1.0
14
3 Übersicht über die verschiedenen
Modelle 110 XA, 112 XA, 112 FA,
115 XA, 115 FA, 115 Sub A, 118 Sub A
110 XA 112 XA 112 FA 115 XA 115 SUB A 118 SUB A115 FA
Die LINEAR 5-Serie besteht aus fünf Topteilen und zwei Subwoofern:
LINEAR 5 MK II110XA, LINEAR 5 MK II112 XA, LINEAR 5 MK II 112 FA,
LINEAR 5 MK II 115 XA, LINEAR 5 MK II 115 FA, LINEAR 5 MK II 115 Sub A und
LINEAR 5 MK II 118 Sub A. Die Multifunktionsmodelle LINEAR 5 MK II 110 XA,
LINEAR 5 MK II 112 XA und LINEAR 5 MK II 115 XA eignen sich dank ihrer
Gehäuseform mit integrierter 31°-Schräge auch für die Anwendung als quer
liegender Bühnenmonitor. Die Fullrange Modelle LINEAR 5 MK II 112 FA und
LINEAR 5 MK II 115 FA liefern dank ihres größeren Gehäuse-Volumens mehr
Schalldruck im Tieftonbereich.
31°
LINEAR 5 MK II
110 XA / 112 XA / 115 XA
Die LINEAR 5 MK II 110 XA und 112 XA sind mit einem breit abstrahlenden
Horn von 80° x 60° für eine homogene Abstrahlung im Nahfeld ausgestat-
tet. Das Horn der LINEAR 5 MK II 115 XA bietet einen mittleren Abstrahlwin-
kel von 70° x 50°, in der LINEAR 5 MK II 112 FA und 115 FA kommt ein enger
abstrahlendes Horn mit Abstrahlwinkel von 60° x 40° zum Einsatz, um
höhere Reichweiten zu ermöglichen.
Die Hörner sind nicht ohne Werkzeuge zu drehen, sie sind daher weniger
geeignet für regelmäßige Anpassungen, sondern eher dafür gedacht, eine
Box auf ihre Hauptanwendung hin zu optimieren.
Tipp: Beim Einsatz als quer liegender Bühnen-Monitor ist es nicht
zwingend notwendig das Horn zu drehen, es ist sogar von Vorteil, wenn
der für den aufrecht stehenden Betrieb notwendige schmalere vertikale
Abstrahlwinkel quer liegend als horizontaler Abstrahlwinkel genutzt
wird. Dadurch minimiert sich der Überlappungsbereich mit benachbarten
Monitoren und das Feedback-Risiko kann durch die genauere Ausrich-
tung gesenkt werden.
4 Aufstellung
4.1 Die XA/FA-Modelle
LINEAR 5 MK II -Tops können auf Subwoofern gestapelt, auf Stativen oder
Distanz stangen montiert, mit Wandhaltern installiert, oder mit dem ent-
sprechendem Zubehör geflogen werden.
Aufstellung mit DuoTilt 3/7
-3° -7°
Um eine ideale Schallverteilung zu erreichen sind alle Tops mit dem
HK Audio DuoTilt 3/7 ausgestattet, einem speziellen Flansch für 35 mm-
Stative und Distanzstangen, der Neigungswinkeln von -3° und -7° ermög-
licht. Um den optimalen Schwerpunkt der Box auf dem Stativ beizubehal-
ten, ist der DuoTilt 3/7 nahe zur Schallwand positioniert.
Allgemeines zum Aufbau mit Stativen
Hinweis! Achten Sie stets auf sicheren Stand und auf die Herstelleranga-
ben zur maximalen Belastung der Stative.
Vorsicht!
• Es dürfen nur Stative verwendet werden, für die die Kippsicherheit
gewährleistet ist. Das Stativ muss für das Gewicht der Lautsprecherbox
ausgelegt sein. Die maximale Auszugshöhe ist derart zu begrenzen, dass
die Kombination aus Stativ und Box nicht kippt. Dies gilt bei Aufstellung
auf einer ebenen waagerechten Fläche.
• Des Weiteren ist bei Aufstellung auf einer unebenen oder geneigten
Fläche darauf zu achten, dass die Kippsicherheit gewährleistet wird,
entweder durch Beschwerung des Stativfußes mit geeigneten Gewichten
oder durch anderweitige Sicherungsmaßnahmen.
• Die Verwendung mit anderen Vorrichtungen kann zur Instabilität führen,
die Verletzungen verursachen kann.
Rigging:
Die XA und FA Modelle können über deren Flugpunkte (Stahlseile oder
Ketten in Verbindung mit dem Anschlagpunkt AP-8) geflogen werden. Die
Modelle 112 FA, 115 FA und 115 XA sehen zusätzlich den Flugbetrieb in Kom-
bination mit der Montage der Flugbügel HK Audio TB-45N und TB-45NQ
(Q-Modell mit Quick-Release-Pins demontierbar) vor.
4.2 LINEAR 5 MK II 115 Sub A und 118 Sub A
Die LINEAR 5 MK II Subwoofer können grundsätzlich wie jeder andere direkt
abstrahlende Bass gehandhabt werden. Bei der Nutzung im Cardioid Betrieb
ist die Nutzung entweder übereinander oder nebeneinander möglich. Es
muss mindestens 1 Meter Abstand zu Wänden eingehalten werden.

LINEAR 5 MK II 1.0
15
Im Cardioid-Betrieb sind zwei Aufbauvarianten möglich: Cardioid 1:1 vertical
und Cardioid 1:1 horizontal - die folgende Illustration zeigt die Frontansicht
(vom Publikum aus gesehen)
Cardioid 1:1
vertical
Cardioid 1:1
horizontal
Preset:
Front
Preset:
Cardioid 1:1 horizontal
LINEAR 5
118 Sub A
MADE IN GERMANY
Preset:
Front
Preset:
Cardioid 1:1
vertical
LINEAR 5 MK II
118 Sub A
MADE IN GERMANY
Settings
Front
Front
Cardioid 1:1
vertical
Cardioid 1:1
horizontal
Leave 1 meter of space
in each direction!
Cardioid 1:1
vertical Cardioid 1:1
horizontal
LINEAR 5
118 Sub A
MADE IN GERMANY
LINEAR 5 MK II
118 Sub A
MADE IN GERMANY
Settings
Front
Front
Cardioid 1:1
vertical
Cardioid 1:1
horizontal
Leave 1 meter of space
in each direction!
Cardioid 1:1
vertical Cardioid 1:1
horizontal
Das passende Preset ist an der Rückseite der LINEAR 5 MK II Subwoofer
auswählbar. siehe auch Kapitel 2, ●
8 Preset:
Preset Settings
Front
Front
Cardioid 1:1
vertical
Cardioid 1:1
horizontal
Cardioid 1:1
vertical Cardioid 1:1
horizontal
In beiden Fällen wird der rückwärtige Schalldruck um bis zu 34 dB abge-
senkt, nach vorne erhöht sich der Schalldruck um ca. 2 dB.
Front:
+2 dB
Rear:
–34 dB
Wann macht ein Cardioid-Aufbau Sinn?
Während mittlere und hohe Frequenzen gerichtet abgestrahlt werden
können, breiten sich tiefe Frequenzen kugelförmig aus. Das führt oft zu
einem unangenehmen Übermaß an Tiefbässen auf und hinter der Bühne.
Auch wird es zunehmend üblich, dass Veranstalter genaue Vorgaben zur
Schallverteilung machen, z.B. für Festzelte in Innenstädten. Das ist im
Bassbereich am eektivsten mit Cardioid-Technik umzusetzen (Auslöschung
der nach hinten abgestrahlten Frequenzen). Die LINEAR 5 MK II Subwoofer
erfüllen deshalb sowohl mechanisch als auch mit den zur Verfügung
stehenden Filtersätzen die Voraussetzungen, schnell und einfach wirkungs-
volle Cardioid-Setups zu realisieren.
5 System-Beispiele
5.1 Aufbau als 2.1-Stereo-System
Dank der in den LINEAR 5 MK II Subwoofer integrier-
ten Stereo Preamps kann ein 2.1 System elegant
realisiert werden, indem beide Känäle (links und
rechts) in einen LINEAR 5 MK II Subwoofer gespeist
werden, und aus dessen Thru-Buchsen das Signal
an die Tops weitergeleitet wird. Ideale Ergänzung
sind in diesem Fall die breit abstrahlenden
LINEAR 5 MK II 110 XA
Presets:
Topteile Low Cut
LINEAR 5 MK II
Subwoofer
Front
Um ein möglichst homogenes Klangbild zu gewährleisten, sollte der
Subwoofer mittig zwischen den beiden Satelliten platziert werden.
5.2 Aufbau mit Distanzstange
Statt Tops auf Stative zu platzieren,
kann eine Distanzstange mit M20-
Gewinde in den M20-Flansch des
LINEAR 5 MK II Subwoofer geschraubt
werden.
Presets:
Topteile Low Cut
LINEAR 5 MK II
Subwoofer
Front
5.3 Aufbau als Stack
Drei LINEAR 5 MK II Subwoofer übereinander ge-
stapelt ergibt eine Höhe von ca. 1,65 m. In diesem
Fall können die Topteile direkt auf die Bässe
gestellt werden.
Presets:
Topteile Low Cut
LINEAR 5 MK II
Subwoofer
Front
Hinweis: Ein Setup als Stack sollte nur mit qualifiziertem Personal
und entsprechenden Standards wie Verzurren mit Gurten auf ebenen
Untergründen erfolgen .
• English • Français• Deutsch • Italiano • Español

LINEAR 5 MK II 1.0
16
5.4 Aufbau als Cardioid-Setup 1:1 vertical
Cardioid-System mit Distanzstange – die unteren
Bässe sind nach hinten gerichtet.
Presets:
Topteile Low Cut
LINEAR 5 MK II
Subwoofer
Front
LINEAR 5 MK II
Subwoofer
Cardioid 1:1
vertical
5.5 Aufbau als Cardioid-Setup 1:1 horizontal
Cardioid-System mit nebeneinander
liegenden Bässen - ein Subwoofer ist
jeweils nach hinten gerichtet.
Presets:
Topteile Low Cut
LINEAR 5 MK II
Subwoofer
Front
LINEAR 5 MK II
Subwoofer
Cardioid 1:1
horizontal
Ab Seite 42 finden Sie mehrere ausführliche Aufbau- und Verkabe-
lungsbeispiele zum Betrieb Ihres LINEAR 5 MK II -Systems.
6 Optionales Zubehör von HK Audio
Für alle LINEAR 5 MK II bietet HK Audio Weather Protective Covers an,
die gleichzeitig als Transportschutz und als Regenschutz (während des
Betriebes) geeignet sind. Nähere Infos finden Sie unter www.hkaudio.com
auf der Produktseite von LINEAR 5 MK II.
7 Technische Daten
Modell LINEAR 5 MK II
110 XA
LINEAR 5 MK II
112 XA
LINEAR 5 MK II
112 FA
LINEAR 5 MK II
115 XA
LINEAR 5 MK II
115 FA
LINEAR 5 MK II
115 Sub A
LINEAR 5 MK II
118 Sub A
Max. SPL @ 10 % THD 127 dB Halfspace
(70 Hz – 12 kHz gemittelt)"
128 dB Halfspace
(70 – 12 kHz gemittelt)
128 dB Halfspace
(70 Hz – 12 kHz gemittelt)
130 dB Halfspace
(70 Hz – 12 kHz gemittelt)
130 dB Halfspace
(70 Hz – 12 kHz gemittelt)
127 dB Halfspace
( 42 Hz– 100 Hz gemittelt)
130 dB Halfspace
(42 – 100 Hz gemittelt)
Max. SPL Peak @ 10 % THD 135 dB Halfspace 136 dB Halfspace 135 dB Halfspace 138 dB Halfspace 138 dB Halfspace 130 dB Halfspace 131 dB Halfspace
Frequenzgang +/-3 dB 74 Hz – 12 kHz 73 Hz – 12 kHz 70 Hz – 12 kHz 64 Hz – 12 kHz 57 Hz – 12 kHz 44 Hz – X-Over 42 Hz – X-Over
Frequenzgang -10 dB 68 Hz – 19 kHz 67 Hz – 19 kHz 55 Hz – 19 kHz 59 Hz – 19 kHz 54 Hz – 19 kHz 40 Hz – X-Over 38 Hz – X-Over
Endstufenleistung
(RMS/Peak)
600 / 1.200 Watt 600 / 1.200 Watt 600 / 1.200 Watt 600 / 1.200 Watt 600 / 1.200 Watt 600 / 1.200 Watt 1.000 / 2.000 Watt
Endstufentyp Class D - Biamped Class D - Biamped Class D - Biamped Class D - Biamped Class D - Biamped Class D Class D
Basslautsprecher -----1x 15", 3" Schwingspule 1x 18", 4" Schwingspule
Tief-/Mitteltonlaut-
sprecher
1x 10", 2" Schwingspule 1x 12", 2,5" Schwingspule 1x 12", 2,5" Schwingspule 1x 15", 3" Schwingspule 1x 15", 3" Schwingspule - -
Hochtontreiber 1", 1,4" Schwingspule 1", 1,7" Schwingspule 1", 1,7" Schwingspule 1", 1,7" Schwingspule 1", 1,7" Schwingspule - -
Horncharakteristik 80° x 60° CD-Horn, drehbar 80° x 60° CD-Horn, drehbar 60° x 40° CD-Horn, drehbar 70° x 50° CD-Horn, drehbar 60° x 40° CD-Horn, drehbar - -
Trennfrequenz aktiv 2,1 kHz FIR X-Over mit 72 dB/Okt. 1,9 kHz FIR X-Over mit 72 dB/Okt. 1,6 kHz FIR X-Over mit 72 dB/Okt. 1,6 kHz FIR X-Over mit 72 dB/Okt. 1,6kHz FIR X-Over mit 72 dB/Okt. - -
Maximaler Eingangs-
pegel
20 dBu 20 dBu 20 dBu 20 dBu 20 dBu 20 dBu 20 dBu
Analoge Eingänge 1x XLR/Klinke-Kombi symmetrisch 1x XLR/Klinke-Kombi symmetrisch 1x XLR/Klinke-Kombi symmetrisch 1x XLR/Klinke-Kombi symmetrisch 1x XLR/Klinke-Kombi symmetrisch 2x XLR/Klinke-Kombi symmetrisch 2x XLR/Klinke-Kombi symmetrisch
Analoger Thru 1x XLR symmetrisch 1x XLR symmetrisch 1x XLR symmetrisch 1x XLR symmetrisch 1x XLR symmetrisch 2x XLR symmetrisch 2x XLR symmetrisch
DSP Out 1x XLR symmetrisch 1x XLR symmetrisch 1x XLR symmetrisch 1x XLR symmetrisch 1x XLR symmetrisch 1x XLR symmetrisch 1x XLR symmetrisch
Netzwerkanschluss Ethercon RJ45, 1x In Ethercon RJ45, 1x In Ethercon RJ45, 1x In Ethercon RJ45, 1x In Ethercon RJ45, 1x In Ethercon RJ45, 1x In, 1x Thru Ethercon RJ45, 1x In, 1x Thru
Filter-Presets Flat, Monitor, Low Cut, Remote Flat, Monitor, Low Cut, Remote Flat, Boost, Low Cut, Remote Flat, Monitor, Low Cut, Remote Flat, Boost, Low Cut, Remote Front, Cardioid 1:1 vertical,
Cardioid 1:1 horizontal, Remote
Front, Cardioid 1:1 vertical,
Cardioid 1:1 horizontal, Remote
Remote-Software DSP CONTROL (Windows, Mac
OS)
DSP CONTROL (Windows, Mac OS) DSP CONTROL (Windows, Mac OS) DSP CONTROL (Windows, Mac OS) DSP CONTROL (Windows, Mac OS) DSP CONTROL (Windows, Mac OS) DSP CONTROL (Windows, Mac OS)
DSP-Funktionen Vollparametrischer 10-Band EQ
mit variabler Filter-Charakteris-
tik, High-Pass-Filter, Low-Pass-
Filter, Polarität, Level, Delay,
Limiter, Mute
Vollparametrischer 10-Band EQ
mit variabler Filter-Charakteris-
tik, High-Pass-Filter, Low-Pass-
Filter, Polarität, Level, Delay,
Limiter, Mute
Vollparametrischer 10-Band EQ
mit variabler Filter-Charakteris-
tik, High-Pass-Filter, Low-Pass-
Filter, Polarität, Level, Delay,
Limiter, Mute
Vollparametrischer 10-Band EQ
mit variabler Filter-Charakteris-
tik, High-Pass-Filter, Low-Pass-
Filter, Polarität, Level, Delay,
Limiter, Mute
Vollparametrischer 10-Band EQ
mit variabler Filter-Charakteris-
tik, High-Pass-Filter, Low-Pass-
Filter, Polarität, Level, Delay,
Limiter, Mute
Vollparametrischer 10-Band EQ
mit variabler Filter-Charakteris-
tik, Low-Pass-Filter, Polarität,
Level, Delay, Limiter, Mute
Vollparametrischer 10-Band EQ
mit variabler Filter-Charakteris-
tik, Low-Pass-Filter, Polarität,
Level, Delay, Limiter, Mute
Sampling-Rate 48 kHz 48 kHz 48 kHz 48 kHz 48 kHz 48 kHz 48 kHz
Systemlatenz Unter 2 ms Unter 2 ms Unter 2 ms Unter 2 ms Unter 2 ms Unter 2 ms Unter 2 ms
Netzanschluss 1x Kaltgeräteanschluss mit
V-Lock Sicherungssystem,
100-240 V
1x Kaltgeräteanschluss mit
V-Lock Sicherungssystem,
100-240 V
1x Kaltgeräteanschluss mit
V-Lock Sicherungssystem,
100-240 V
1x Kaltgeräteanschluss mit
V-Lock Sicherungssystem,
100-240 V
1x Kaltgeräteanschluss mit
V-Lock Sicherungssystem,
100-240 V
1x Kaltgeräteanschluss mit
V-Lock Sicherungssystem,
100-240 V
1x Kaltgeräteanschluss mit
V-Lock Sicherungssystem,
100-240 V
Leistungsaufnahme 1 A / 100–240 V Nenn-Strom-
verbrauch nach EN 62368-1
1 A / 100–240 V Nenn-Strom-
verbrauch nach EN 62368-1
1 A / 100–240 V Nenn-Strom-
verbrauch nach EN 62368-1
1 A / 100–240 V Nenn-Strom-
verbrauch nach EN 62368-1
1 A / 100–240 V Nenn-Strom-
verbrauch nach EN 62368-1
1 A / 100–240 V Nenn-Strom-
verbrauch nach EN 62368-1
1,9 A / 100–240 V Nenn-Strom-
verbrauch nach EN 62368-1
Aufstellwinkel 31° 31° -31° - -
Hochständerflansch DuoTilt 3°/7° DuoTilt 3°/7° DuoTilt 3°/7° DuoTilt 3°/7° DuoTilt 3°/7° 1x M20 1x M20
Flugpunkte 3x M8 (AP-8) 3x M8 (AP-8) 3x M8 (AP-8) 3x M8 (AP-8) 3x M8 (AP-8) - -
Griffe 1x SingleGrip 2x SingleGrip 2x MultiGrip 2x MultiGrip, 1 x SingleGrip 2x MultiGrip 2x MultiGrip 2x MultiGrip
Gehäuse Hybrid (Birke-Multiplex/MDF) Hybrid (Birke-Multiplex/MDF) Hybrid (Birke-Multiplex/MDF) Hybrid (Birke-Multiplex/MDF) Hybrid (Birke-Multiplex/MDF) Hybrid (Birke-Multiplex/MDF) Birke-Multiplex
Oberfläche Acryllack, schwarz Acryllack, schwarz Acryllack, schwarz Acryllack, schwarz Acryllack, schwarz Acryllack, schwarz Acryllack, schwarz
Frontgitter 2 mm Metallgitter mit schwar-
zem Akustikschaumstoff
2 mm Metallgitter mit schwar-
zem Akustikschaumstoff
2 mm Metallgitter mit schwar-
zem Akustikschaumstoff
2 mm Metallgitter mit schwar-
zem Akustikschaumstoff
2 mm Metallgitter mit schwar-
zem Akustikschaumstoff
2 mm Metallgitter mit schwar-
zem Akustikschaumstoff
2 mm Metallgitter mit schwar-
zem Akustikschaumstoff
Abmessungen (BxHxT) 36 x 52,5 x 30 cm
14-1/16 x 20-43/64 x 11-13/16"
36 x 59 x 30,5 cm
14-1/16 x 23-15/64 x 12-1/32"
37 x 67 x 36,5 cm
14-9/16 x 26-3/8 x 14-3/8"
45 x 68,5 x 42 cm
17-23/32 x 26-31/32 x 16-17/32"
44,8 x 70,7 x 44,75 cm
17-2/3 x 27-4/5 x 17-2/3"
48 x 53,5 x 67,5 cm
18-57/64 x 21-1/16 x 26-37/64"
55 x 56 x 68,5 cm
21-21/32 x 22-3/64 x 26-31/32"
Gewicht 14,9 kg / 32.85 lbs 17,6 kg / 38.80 lbs 21,9kg / 48.28 lbs 27,6 kg / 60.85 lbs 30,2 kg / 66,47 lbs 32,9 kg / 72.53 lbs 41,6 kg / 91.71 lbs

LINEAR 5 MK II 1.0
17
• English • Français• Deutsch • Italiano • Español
7 Technische Daten
Modell LINEAR 5 MK II
110 XA
LINEAR 5 MK II
112 XA
LINEAR 5 MK II
112 FA
LINEAR 5 MK II
115 XA
LINEAR 5 MK II
115 FA
LINEAR 5 MK II
115 Sub A
LINEAR 5 MK II
118 Sub A
Max. SPL @ 10 % THD 127 dB Halfspace
(70 Hz – 12 kHz gemittelt)"
128 dB Halfspace
(70 – 12 kHz gemittelt)
128 dB Halfspace
(70 Hz – 12 kHz gemittelt)
130 dB Halfspace
(70 Hz – 12 kHz gemittelt)
130 dB Halfspace
(70 Hz – 12 kHz gemittelt)
127 dB Halfspace
( 42 Hz– 100 Hz gemittelt)
130 dB Halfspace
(42 – 100 Hz gemittelt)
Max. SPL Peak @ 10 % THD 135 dB Halfspace 136 dB Halfspace 135 dB Halfspace 138 dB Halfspace 138 dB Halfspace 130 dB Halfspace 131 dB Halfspace
Frequenzgang +/-3 dB 74 Hz – 12 kHz 73 Hz – 12 kHz 70 Hz – 12 kHz 64 Hz – 12 kHz 57 Hz – 12 kHz 44 Hz – X-Over 42 Hz – X-Over
Frequenzgang -10 dB 68 Hz – 19 kHz 67 Hz – 19 kHz 55 Hz – 19 kHz 59 Hz – 19 kHz 54 Hz – 19 kHz 40 Hz – X-Over 38 Hz – X-Over
Endstufenleistung
(RMS/Peak)
600 / 1.200 Watt 600 / 1.200 Watt 600 / 1.200 Watt 600 / 1.200 Watt 600 / 1.200 Watt 600 / 1.200 Watt 1.000 / 2.000 Watt
Endstufentyp Class D - Biamped Class D - Biamped Class D - Biamped Class D - Biamped Class D - Biamped Class D Class D
Basslautsprecher -----1x 15", 3" Schwingspule 1x 18", 4" Schwingspule
Tief-/Mitteltonlaut-
sprecher
1x 10", 2" Schwingspule 1x 12", 2,5" Schwingspule 1x 12", 2,5" Schwingspule 1x 15", 3" Schwingspule 1x 15", 3" Schwingspule - -
Hochtontreiber 1", 1,4" Schwingspule 1", 1,7" Schwingspule 1", 1,7" Schwingspule 1", 1,7" Schwingspule 1", 1,7" Schwingspule - -
Horncharakteristik 80° x 60° CD-Horn, drehbar 80° x 60° CD-Horn, drehbar 60° x 40° CD-Horn, drehbar 70° x 50° CD-Horn, drehbar 60° x 40° CD-Horn, drehbar - -
Trennfrequenz aktiv 2,1 kHz FIR X-Over mit 72 dB/Okt. 1,9 kHz FIR X-Over mit 72 dB/Okt. 1,6 kHz FIR X-Over mit 72 dB/Okt. 1,6 kHz FIR X-Over mit 72 dB/Okt. 1,6kHz FIR X-Over mit 72 dB/Okt. - -
Maximaler Eingangs-
pegel
20 dBu 20 dBu 20 dBu 20 dBu 20 dBu 20 dBu 20 dBu
Analoge Eingänge 1x XLR/Klinke-Kombi symmetrisch 1x XLR/Klinke-Kombi symmetrisch 1x XLR/Klinke-Kombi symmetrisch 1x XLR/Klinke-Kombi symmetrisch 1x XLR/Klinke-Kombi symmetrisch 2x XLR/Klinke-Kombi symmetrisch 2x XLR/Klinke-Kombi symmetrisch
Analoger Thru 1x XLR symmetrisch 1x XLR symmetrisch 1x XLR symmetrisch 1x XLR symmetrisch 1x XLR symmetrisch 2x XLR symmetrisch 2x XLR symmetrisch
DSP Out 1x XLR symmetrisch 1x XLR symmetrisch 1x XLR symmetrisch 1x XLR symmetrisch 1x XLR symmetrisch 1x XLR symmetrisch 1x XLR symmetrisch
Netzwerkanschluss Ethercon RJ45, 1x In Ethercon RJ45, 1x In Ethercon RJ45, 1x In Ethercon RJ45, 1x In Ethercon RJ45, 1x In Ethercon RJ45, 1x In, 1x Thru Ethercon RJ45, 1x In, 1x Thru
Filter-Presets Flat, Monitor, Low Cut, Remote Flat, Monitor, Low Cut, Remote Flat, Boost, Low Cut, Remote Flat, Monitor, Low Cut, Remote Flat, Boost, Low Cut, Remote Front, Cardioid 1:1 vertical,
Cardioid 1:1 horizontal, Remote
Front, Cardioid 1:1 vertical,
Cardioid 1:1 horizontal, Remote
Remote-Software DSP CONTROL (Windows, Mac
OS)
DSP CONTROL (Windows, Mac OS) DSP CONTROL (Windows, Mac OS) DSP CONTROL (Windows, Mac OS) DSP CONTROL (Windows, Mac OS) DSP CONTROL (Windows, Mac OS) DSP CONTROL (Windows, Mac OS)
DSP-Funktionen Vollparametrischer 10-Band EQ
mit variabler Filter-Charakteris-
tik, High-Pass-Filter, Low-Pass-
Filter, Polarität, Level, Delay,
Limiter, Mute
Vollparametrischer 10-Band EQ
mit variabler Filter-Charakteris-
tik, High-Pass-Filter, Low-Pass-
Filter, Polarität, Level, Delay,
Limiter, Mute
Vollparametrischer 10-Band EQ
mit variabler Filter-Charakteris-
tik, High-Pass-Filter, Low-Pass-
Filter, Polarität, Level, Delay,
Limiter, Mute
Vollparametrischer 10-Band EQ
mit variabler Filter-Charakteris-
tik, High-Pass-Filter, Low-Pass-
Filter, Polarität, Level, Delay,
Limiter, Mute
Vollparametrischer 10-Band EQ
mit variabler Filter-Charakteris-
tik, High-Pass-Filter, Low-Pass-
Filter, Polarität, Level, Delay,
Limiter, Mute
Vollparametrischer 10-Band EQ
mit variabler Filter-Charakteris-
tik, Low-Pass-Filter, Polarität,
Level, Delay, Limiter, Mute
Vollparametrischer 10-Band EQ
mit variabler Filter-Charakteris-
tik, Low-Pass-Filter, Polarität,
Level, Delay, Limiter, Mute
Sampling-Rate 48 kHz 48 kHz 48 kHz 48 kHz 48 kHz 48 kHz 48 kHz
Systemlatenz Unter 2 ms Unter 2 ms Unter 2 ms Unter 2 ms Unter 2 ms Unter 2 ms Unter 2 ms
Netzanschluss 1x Kaltgeräteanschluss mit
V-Lock Sicherungssystem,
100-240 V
1x Kaltgeräteanschluss mit
V-Lock Sicherungssystem,
100-240 V
1x Kaltgeräteanschluss mit
V-Lock Sicherungssystem,
100-240 V
1x Kaltgeräteanschluss mit
V-Lock Sicherungssystem,
100-240 V
1x Kaltgeräteanschluss mit
V-Lock Sicherungssystem,
100-240 V
1x Kaltgeräteanschluss mit
V-Lock Sicherungssystem,
100-240 V
1x Kaltgeräteanschluss mit
V-Lock Sicherungssystem,
100-240 V
Leistungsaufnahme 1 A / 100–240 V Nenn-Strom-
verbrauch nach EN 62368-1
1 A / 100–240 V Nenn-Strom-
verbrauch nach EN 62368-1
1 A / 100–240 V Nenn-Strom-
verbrauch nach EN 62368-1
1 A / 100–240 V Nenn-Strom-
verbrauch nach EN 62368-1
1 A / 100–240 V Nenn-Strom-
verbrauch nach EN 62368-1
1 A / 100–240 V Nenn-Strom-
verbrauch nach EN 62368-1
1,9 A / 100–240 V Nenn-Strom-
verbrauch nach EN 62368-1
Aufstellwinkel 31° 31° -31° - -
Hochständerflansch DuoTilt 3°/7° DuoTilt 3°/7° DuoTilt 3°/7° DuoTilt 3°/7° DuoTilt 3°/7° 1x M20 1x M20
Flugpunkte 3x M8 (AP-8) 3x M8 (AP-8) 3x M8 (AP-8) 3x M8 (AP-8) 3x M8 (AP-8) - -
Griffe 1x SingleGrip 2x SingleGrip 2x MultiGrip 2x MultiGrip, 1 x SingleGrip 2x MultiGrip 2x MultiGrip 2x MultiGrip
Gehäuse Hybrid (Birke-Multiplex/MDF) Hybrid (Birke-Multiplex/MDF) Hybrid (Birke-Multiplex/MDF) Hybrid (Birke-Multiplex/MDF) Hybrid (Birke-Multiplex/MDF) Hybrid (Birke-Multiplex/MDF) Birke-Multiplex
Oberfläche Acryllack, schwarz Acryllack, schwarz Acryllack, schwarz Acryllack, schwarz Acryllack, schwarz Acryllack, schwarz Acryllack, schwarz
Frontgitter 2 mm Metallgitter mit schwar-
zem Akustikschaumstoff
2 mm Metallgitter mit schwar-
zem Akustikschaumstoff
2 mm Metallgitter mit schwar-
zem Akustikschaumstoff
2 mm Metallgitter mit schwar-
zem Akustikschaumstoff
2 mm Metallgitter mit schwar-
zem Akustikschaumstoff
2 mm Metallgitter mit schwar-
zem Akustikschaumstoff
2 mm Metallgitter mit schwar-
zem Akustikschaumstoff
Abmessungen (BxHxT) 36 x 52,5 x 30 cm
14-1/16 x 20-43/64 x 11-13/16"
36 x 59 x 30,5 cm
14-1/16 x 23-15/64 x 12-1/32"
37 x 67 x 36,5 cm
14-9/16 x 26-3/8 x 14-3/8"
45 x 68,5 x 42 cm
17-23/32 x 26-31/32 x 16-17/32"
44,8 x 70,7 x 44,75 cm
17-2/3 x 27-4/5 x 17-2/3"
48 x 53,5 x 67,5 cm
18-57/64 x 21-1/16 x 26-37/64"
55 x 56 x 68,5 cm
21-21/32 x 22-3/64 x 26-31/32"
Gewicht 14,9 kg / 32.85 lbs 17,6 kg / 38.80 lbs 21,9kg / 48.28 lbs 27,6 kg / 60.85 lbs 30,2 kg / 66,47 lbs 32,9 kg / 72.53 lbs 41,6 kg / 91.71 lbs

Version 1.0 12/2022
Consignes de sécurité importantes! A lire avant
de se connecter!
Ce produit a été construit conformément à la norme IEC 62368-1 par
le fabricant et a quitté l’usine en bon état de marche. Pour garantir
son intégrité et un fonctionnement sans risque, l’utilisateur se doit de
suivre les conseils et les avertissements préconisés dans cette notice
d’utilisation. En cas d’utilisation de ce produit dans un véhicule terrestre,
un navire ou un avion, ou encore à une altitude supérieure à 2000
mètres, il convient de prendre en considération les normes de sécurité
suivantes, en plus de la norme IEC 62368-1.
ATTENTION: Afin d’éviter tout risque d‘incendie et d‘électrocution,
n‘exposez pas cet appareil à l’humidité ou à la pluie. N’ouvrez pas le
boîtier; les pièces se trouvant à l’intérieur ne nécessitent pas d’entretien
de la part des utilisateurs. Adressez-vous à un spécialiste qualifié pour
procéder à l‘entretien de l‘appareil.
Ce symbole, quel que soit l’endroit où il apparaît, vous signale
des pièces sous tension non isolées dans le boîtier. Une tension
suffisante pour présenter un risque d’électrocution.
Ce symbole, quel que soit l’endroit où il apparaît, vous signale des
pièces sous tension accessibles depuis l’extérieur du boîtier. Tous les
câbles extérieurs raccordés à un composant marqué de ce symbole
doivent être de type préfabriqués et conformes aux spécifications du fab-
ricant ou doivent avoir été installés par des spécialistes qualifiés.
Ce symbole, quel que soit l’endroit où il apparaît, vous signale
des instructions importantes relatives à l’utilisation ou l’entretien de
l’appareil à lire dans les documents l’accompagnant. Lisez la notice
d’utilisation.
Ce symbole, quel que soit l’endroit où il apparaît, vous signale
un risque de brûlure dû à une surface chaude. Ne touchez pas cette
surface afin d’éviter de vous brûler.
Tous les appareils électriques et électroniques y compris les
piles doivent être éliminés séparément des déchets ménagers auprès des
points de collecte officiels prévus à cet effet.
Lisez ces instructions. Conservez ces instructions. Prenez en
compte tous les avertissements et toutes les instructions mentionnés sur
le produit ou dans cette notice d’utilisation.
• N’utilisez pas ce produit à proximité de l’eau. Ne le placez pas près de
l’eau, d’une baignoire, d’un bassin, d’un évier, d’une surface humide,
d’une piscine ou d’une pièce humide.
• Ne mettez pas d’objet contenant du liquide sur l’appareil, par exemple,
un vase, un verre ou une bouteille, etc.
• Nettoyez-le exclusivement avec un chiffon sec.
• N’enlevez pas le boîtier, ne serait-ce que partiellement.
• La tension de fonctionnement de l’appareil doit être réglée de manière
à correspondre à la tension d’alimentation de l’endroit où vous vous
trouvez. Si vous n’êtes pas sûr de connaître la tension d’alimentation,
demandez à votre revendeur ou à la compagnie d’électricité locale.
• Avant de brancher l’appareil, assurez-vous systématiquement que
l’installation électrique (alimentation) dispose de systèmes de protec-
tion suffisants contre les courts-circuits et les erreurs de mise à la terre
des appareils raccordés.
• Afin de réduire le risque d’électrocution, vous ne devez jamais
supprimer la mise à la terre de l’appareil. Utilisez uniquement le câble
d’alimentation fourni avec le produit et maintenez la broche centrale
de la prise (mise à la terre) en état de fonctionnement. Ne négligez
pas la sécurité offerte par les prises polarisées ou avec mise à la terre.
Assurez-vous que l’appareil est bien raccordé à une prise disposant
d’une terre de protection et que celle-ci est en ordre de marche.
• Protégez le câble d’alimentation afin d’éviter que quelqu’un marche
dessus ou qu’il soit pincé, notamment près de la prise, de la prise
murale ou à la sortie de l’appareil même! Les câbles d’alimentation do-
ivent être tout le temps maniés avec précaution. Vérifiez régulièrement
que le câble n’est pas fendu ou qu’il ne présente pas de signe d’usure,
en particulier près de la prise et à la sortie de l’appareil.
• N’utilisez jamais de câble d’alimentation usé.
• Débranchez l’appareil en cas d’orage ou si vous ne l’utilisez pas
pendant une longue période.
• Débranchez l’appareil uniquement en le tenant par la prise au niveau
de la prise murale ou de la rallonge. L’appareil doit être placé de telle
manière à ce qu’il puisse être débranché facilement à tout moment.
• Les fusibles ne peuvent être remplacés que par des personnels qualifiés
et uniquement sous réserve d’utiliser des pièces de type et de valeur
nominale correctes.
• Confiez tous les travaux d’entretien à des spécialistes qualifiés. Il est
nécessaire d’effectuer de tels travaux lorsque l’unité a été endomma-
gée, comme par exemple dans les cas suivants:
- Lorsque le câble d’alimentation est endommagé ou effiloché.
- Si du liquide a pénétré ou un objet est tombé dans le boîtier.
- Si l’appareil a été exposé à la pluie ou à l’humidité.
- Si l’appareil ne fonctionne pas correctement alors que vous avez suivi
toutes les instructions à la lettre.
- Si l’appareil est tombé ou que le boîtier est endommagé.
• En cas de raccordement de haut-parleurs à cet appareil, il faut veiller
à ne pas descendre sous l’impédance minimale indiquée sur ledit
appareil ou dans la présente notice. Les câbles employés doivent pré-
senter une section suffisante, qui soit conforme aux réglementations
locales en vigueur.
• Ne l’exposez pas directement aux rayons du soleil.
• Ne l’installez pas à proximité d’une source de chaleur, telle qu’un radia-
teur, une grille de chauffage, un four ou tout autre appareil susceptible
de produire de la chaleur.
• Cet appareil est conçu pour une utilisation dans des zones climatiques
modérées. Il n'est pas adapté pour une utilisation dans des pays à climat
tropical.
• Ne masquez pas les bouches d’aération. Installez l’appareil confor-
mément aux instructions du fabricant. Il ne doit pas être placé dans
un emplacement confiné, comme un rack ou une console, sauf si une
ventilation suffisante est garantie.
• Si vous déplacez l’appareil, attendez qu’il soit à température ambiante
avant de le démarrer, sinon de la condensation peut se former à
l’intérieur et endommager l’appareil.
• Ne posez pas de d’objet à flamme ouverte sur l’appareil, comme par
exemple une bougie allumée.
• L’appareil doit être placé à au moins 20cm/8" pouces du premier mur.
• Utilisez l’appareil uniquement avec un chariot, un support, un trépied,
des fixations ou une table recommandés par le fabricant ou vendus
avec le produit. Si vous utilisez un chariot, maniez-le avec précaution
afin d’éviter tout risque de blessure s’il se renverse.
• Utilisez uniquement les accessoires recommandés par le fabricant.
Cette consigne concerne toute sorte d’accessoires, qu’il s’agisse de
couvercles de protection, de sacs de transport, de supports ou de
dispositifs de fixation au mur ou au plafond. Si vous fixez un accessoire
à l’appareil, suivez toujours les instructions d’utilisation du fabricant.
N’utilisez pas d’autres points de fixation que ceux préconisés par le
fabricant.
• Cet appareil NE convient PAS aux personnes dont les capacités
motrices, sensorielles ou mentales sont déficientes (y compris les
enfants) ou aux personnes ne disposant pas de l’expérience ou des
connaissances nécessaires pour faire fonctionner le présent appareil.
Cet appareil doit dans tous les cas et être tenu constamment hors de
portée des enfants de moins de quatre ans.
• N’insérez jamais d‘objets à travers les grilles du boîtier, car ils pour-
raient toucher des pièces sous tension dangereuses ou provoquer un
court-circuit pouvant causer un risque d’incendie ou d’électrocution.
• Cet appareil est capable de délivrer un niveau de pression acoustique
de 90dB, pouvant ainsi causer des troubles irréversibles de l’audition!
L’exposition continue à une nuisance sonore peut provoquer une perte
d’audition permanente. Portez des protections auditives adéquates
si vous vous exposez de manière continue à un tel niveau de pression
acoustique.
• Le fabricant garantit la sécurité, la fiabilité et l’efficacité de fonction-
nement de son produit uniquement si:
- l’assemblage, l’extension, le réajustement, la modification ou la
réparation de l’appareil ont été effectués par le fabricant ou par des
personnes agréées pour ce genre de travaux.
- l’installation électrique concernée est conforme aux normes IEC (ANSI).
- l’unité est utilisée conformément aux instructions d’utilisation.
• Ce produit a été optimisé pour une utilisation avec des signaux
musicaux ou voix. Une utilisation avec des signaux sinusoïdaux,
rectangulaires ou autres signaux de mesure risque de l’endommager
gravement.
Consignes de sécurité générales pour systèmes
de haut-parleurs
Les systèmes de fixation doivent exclusivement être employés
pour les systèmes de haut-parleurs fournis par le fabricant et avec les
accessoires de montage tels qu’évoqués dans la notice de montage. Dans
ce cadre, il convient de respecter scrupuleusement les indications de
montage du fabricant. En cas d’utilisation non conforme d’accessoires ou
d’installation d’accessoires de montage non d’origine, le dommage en
résultant éventuellement ne sera pas couvert par la garantie et la
responsabilité du fabricant ne pourra en aucun cas être engagée.
Si des modifications sont apportées aux haut-parleurs, aux accessoires
de montage, aux raccords et fixations ainsi qu’au matériel d’élingage, la
portabilité du système ne pourra plus être garantie et la responsabilité
du fabricant ne pourra en aucun cas être engagée.
Toute réparation d’éléments de sécurité ne peut être effectuée que
par le fabricant ou son représentant agréé, faute de quoi le permis
d’exploitation s’éteint.
L’installation sera exclusivement réalisée par un spécialiste, et ce,
uniquement dans des zones de montage présentant une capacité de
charge suffisante, un point à vérifier notamment par la prise en compte
des normes de construction appliquées. Le matériel de fixation prescrit
par le constructeur dans la notice de montage (vis, chevilles, etc.) doit
impérativement être employé. Les raccords boulonnés doivent être
assurés contre tout desserrement au moyen de mesures appropriées.
Les installations fixes ou mobiles (ici les haut-parleurs,
accessoires de montage compris) doivent être assurés contre la chute par
deux dispositifs indépendants l’un de l’autre. Les éléments supplémen-
taires lâches ou les pièces se desserrant doivent pouvoir être retenus par
des dispositifs adaptés. En cas d’utilisation de raccords, d’éléments de
fixation et de matériel d’élingage, il convient de respecter les
dispositions nationales en la matière. Le calcul du dimensionnement des
dispositifs de sécurité requiert la prise en compte des charges
dynamiques possibles (forces de recul).
En cas d’utilisation de trépieds, il faut surtout prendre en
considération la charge maximale supportée. En outre, de par leur
conception, la plupart des trépieds permettent uniquement de supporter
des charges parfaitement centrées. Les trépieds doivent dès lors être
disposés de façon stable. Il est nécessaire d’assurer les trépieds par des
mesures supplémentaires dans les cas suivants (liste non exhaustive) :
- lorsque leur surface de pose n’offre pas une stabilité suffisante;
- lorsque leur hauteur limite leur stabilité ;
- lorsque la force du vent risque d’être élevée ;
- lorsqu’ils risquent d’être heurtés par des personnes.
Des mesures particulières peuvent également s’avérer nécessaires, à titre
préventif, pour se prémunir contre des comportements dangereux de la
part de spectateurs. Les trépieds ne doivent donc pas être disposés dans
des voies d’évacuation ou des passages réservés aux secours. En cas
d’installation sur des voies de circulation, veiller à respecter la largeur de
circulation requise, à verrouiller le secteur de façon adaptée et à mettre
en place la signalisation idoine. Le montage et le démontage sont des
phases qui présentent des risques particuliers. Il faut dès lors employer
des moyens auxiliaires appropriés. Veiller également, lors de ces opéra-
tions, à respecter la législation nationale en la matière.
Lors du montage, il est indispensable de porter
des équipements de sécurité adaptés (en particulier un casque, des
gants et des chaussures de sécurité) et d’utiliser uniquement des
dispositifs d’aide à l’ascension adaptés (échelles, échafaudages, etc.).
La responsabilité dans ce domaine incombe uniquement à la société de
montage exécutante.
ATTENTION! À l’issue du montage, il y a lieu de contre-vérifier la
fixation ou la suspension du système (haut-parleurs et supports).
L’exploitant des systèmes de haut-parleurs (fixes ou mobiles) est tenu de
vérifier, ou de faire vérifier, tous les composants du système en fonction
des réglementations en vigueur dans le pays concerné, et de faire élimi-
ner sans délai les éventuels défauts constatés.
En outre, nous recommandons fortement de constituer une documenta-
tion détaillée sur toutes les mesures d’inspection dans les registres de
contrôle ou similaires.
Dans ce cas, il convient en particulier de dimensionner avec des réserves
de sécurité suffisantes les points de support de charge de systèmes
suspendus. Veiller également, lors de ces opérations, à respecter la
législation nationale en la matière.
Les systèmes de haut-parleurs professionnels sont capables de
produire des niveaux sonores dangereux pour la santé. Même des niveaux
sonores a priori inoffensifs peuvent, en cas d’exposition prolongée, pro-
voquer des pertes auditives irréversibles (à partir de 95 dBA SPL environ)
! C’est pourquoi nous conseillons à toutes les personnes soumises à des
niveaux sonores élevés en raison de l’exploitation de systèmes de haut-
parleurs, de porter des protections auditives professionnelles (bouchons
d’oreilles ou casques antibruit).
Fabricant : Stamer Musikanlagen GmbH, Magdeburger Str. 8,
66606 St. Wendel, Allemagne

LINEAR 5 MK II 1.0
19
• English • Français• Deutsch • Italiano • Español
Bienvenue dans la famille HK Audio!
Nous vous remercions d'avoir choisi un produit de notre marque, conçu et
fabriqué pour vous avec le plus grand soin.
Même si vous avez déjà une longue expérience des systèmes de
sonorisation, ce produit se distinguera à coup sûr par des caractéristiques
nouvelles pour vous. Ne mettez donc pas ce mode d'emploi de côté sans
l'avoir lu et conservez-le pour une consultation ultérieure.
Nous vous souhaitons le meilleur des sons!
Votre équipe HK Audio
Remarque: le fonctionnement de ce produit peut être perturbé par
les champs électromagnétiques puissants ou les décharges électrosta-
tiques. Dans ce cas, il est possible de rétablir un fonctionnement normal
en éteignant et en rallumant l'appareil. Si cela ne résout pas le problème,
il conviendra d'éloigner l'appareil de la source d'interférence.
Garantie
Profitez du confort de l'enregistrement en ligne sur www.hkaudio.com.
http://warranty.hkaudio.com
L’enregistrement n'est valable que s’il est eectué dans les 30jours qui
suivent la date d’achat.
HK Audio
Service technique
Postfach 1509
66595 St. Wendel, Allemagne
Fax: +49 6851 905 100
LINEAR 5 MKII
110 XA 112 XA 112 FA 115 XA 115 SUB A 118 SUB A115 FA

LINEAR 5 MK II 1.0
20
1 Généralités
Détail de la livraison
Lorsque vous déballez votre enceinte LINEAR5 MKII, veuillez vérifier que la
livraison est complète. Le guide de prise en main et un câble d'alimentation
sont inclus dans la livraison.
2 Prises et commandes
LINEAR 7
112 FA
MADE IN GERMANY
Mains Input
100-240 V~ 50-60 Hz
1 A @ 1/8 output power
Caution: Risk of electric shock! Do not open!
Refer servicing to qualified service personnel.
Attention: Risque de choc élèctrique –
ne pas ouvrir!
HK Audio is a brand of Stamer Musikanlagen GmbH
Magdeburger Str. 8 • 66606 St. Wendel • Germany
Power
Serial No.
Power
Auto Sleep
On Off
+6 dB
0 dB
Input
DSP Out
Thru Gain
Data Preset
1
2
3
4
Lock
Thru
In
Ethernet
Front
Cardioid 1:1
vertical
Cardioid 1:1
horizontal
Remote
1
5
2 3
4
6
7
8
Modèles LINEAR 5 MKII XA/FA
Leave enough space for proper ventilation!
LINEAR 7
118 Sub A
MADE IN GERMANY
Power
Auto Sleep
On Off
+6 dB–6 dB
0 dB
Input
L
R
DSP Out
Thru Gain
Serial No.
Mains Input
100-240 V~ 50-60 Hz
1.9 A @ 1/8 output power
Link
100-240 V~ 50-60 Hz
max. 10 A
Caution: Risk of electric shock! Do not open!
Refer servicing to qualified service personnel.
Attention: Risque de choc élèctrique –
ne pas ouvrir!
HK Audio is a brand of Stamer Musikanlagen GmbH
Magdeburger Str. 8 • 66606 St. Wendel • Germany
Power
Lock Lock
1
5
2
1 2
3
4
4
9
11 12
10
13
Modèles LINEAR 5 MKII Sub A
●
1 Input
Entrée symétrique sur prise mixte XLR/jack pour signaux analogiques.
• Les modèles LINEAR5 MKII XA/FA disposent d'un canal d'entrée.
• Les caissons de graves LINEAR5 MKII 115 SubA et LINEAR5 MKII 118 SubA
disposent de deux entrées distinctes pour les signaux gauche et droit.
Les deux canaux sont équivalents et comme ils subissent une sommation
mono en sortie du préamplificateur, peu importe celui des deux canaux qui
est connecté.
●
2 Thru
Sortie XLR symétrique raccordée en parallèle à la prise d'entrée (deux pour
le caisson de graves), servant à renvoyer le signal reçu par l'entrée, que
l'électronique soit activée ou non.
●
3 Gain
La commande de gain règle la préamplification du signal reçu par l'entrée.
• pour les modèles XA/FA, de −∞ (Mute) à + 6dB
• pour le préamplificateur stéréo des caissons de graves, le réglage agit sur
les deux canaux, de −6 à +6dB
Dans les deux cas, la position centrale de la commande (clic du cran central)
correspond à 0dB.
Remarque: le signal produit par la sortie DSP Out n'est pas influencé par
ce réglage.
●
4 LED d'entrée de signal / limiteur
Cette LED s'allume en vert lorsqu'un signal arrive à l'entrée, et en rouge dès
que le limiteur entre en action ou que l'entrée est saturée. Un bref allumage
intermittent de la LED en rouge témoigne de l'intervention du limiteur lors
des pics de niveau. Si elle reste allumée en permanence en rouge, le niveau
doit être réduit.
●
5 DSP Out
Prise XLR servant soit à la sortie du signal d'entrée analogique (reçu par la
prise d'entrée), soit à la sortie d'un signal audio numérique reçu d'un réseau.
Dans les deux cas, le signal peut être traité par le DSP interne.
La sortie DSP Out constitue ainsi une interface réseau pour l'intégration
d'une enceinte active supplémentaire, même si elle est initialement non
compatible avec le réseau.
À la livraison, la sortie DSP Out produit le signal d'entrée non traité, indépen-
damment de la sélection du preset et de la position de la commande Gain.
Ethernet sur les enceintes satellites
LINEAR 7
112 FA
MADE IN GERMANY
Mains Input
100-240 V~ 50-60 Hz
1 A @ 1/8 output power
Caution: Risk of electric shock! Do not open!
Refer servicing to qualified service personnel.
Attention: Risque de choc élèctrique –
ne pas ouvrir!
HK Audio is a brand of Stamer Musikanlagen GmbH
Magdeburger Str. 8 • 66606 St. Wendel • Germany
Power
Serial No.
+6 dB
0 dB
Input
DSP Out
Thru Gain
Lock
Power
Auto Sleep
On Off
Data
Flat
Monitor
Low Cut
Remote
Preset
1
2
3
4
In
Ethernet
1
5
2 3
4
6
7
8
Ethernet sur le caisson de graves
LINEAR 7
112 FA
MADE IN GERMANY
Mains Input
100-240 V~ 50-60 Hz
1 A @ 1/8 output power
Caution: Risk of electric shock! Do not open!
Refer servicing to qualified service personnel.
Attention: Risque de choc élèctrique –
ne pas ouvrir!
HK Audio is a brand of Stamer Musikanlagen GmbH
Magdeburger Str. 8 • 66606 St. Wendel • Germany
Power
Serial No.
Power
Auto Sleep
On Off
+6 dB
0 dB
Input
DSP Out
Thru Gain
Data Preset
1
2
3
4
Lock
Thru
In
Ethernet
Front
Cardioid 1:1
vertical
Cardioid 1:1
horizontal
Remote
1
5
2 3
4
6
7
8
●
6 Ethernet In / Thru
La prise EtherCON sert à l'intégration dans un réseau. Elle est compatible
avec les connecteurs RJ45 et EtherCON (NE8MX, NE8MX6, NE8MC). Les
enceintes satellites disposent chacune d'une entrée Ethernet, les caissons
de graves disposent en plus d'un renvoi Ethernet (Thru). Utilisez la prise
Ethernet Thru des caissons pour renvoyer le signal du réseau.
Veuillez toujours utiliser des câbles S/STP ou S/FTP pour assurer la pro-
tection contre les interférences électromagnétiques. Nous recommandons
l'utilisation de câbles CAT6. L'intégration dans un réseau et les fonctions

LINEAR 5 MK II 1.0
21
• English • Français• Deutsch • Italiano • Español• English • Français• Deutsch • Italiano • Español
de commande à distance sont décrites dans un mode d'emploi distinct,
disponible dans la section de téléchargement du LINEAR5 MKII sur www.
hkaudio.com. Vous trouverez une brève description des fonctions du DSP
dans ●
8 Preset.
●
7 Data
Cette LED s'allume en orange lorsque des données transitent par la prise
réseau.
●
8 Preset
Le sélecteur Preset permet de rappeler les presets (préréglages) configurés
en usine ainsi qu'un preset personnel («User») configurable par l'utilisateur
dans le logiciel de commande à distance DSP CONTROL. Appuyer sur le
sélecteur permet de faire défiler les presets 1 à4.
L'utilisation de presets personnels (4 Remote) est décrite dans un mode
d'emploi distinct, disponible dans la section de téléchargement du LI-
NEAR5 MKII sur www.hkaudio.com.
Aperçu des presets:
LINEAR 5 MK II
110 XA, 112 XA, 115 XA
LINEAR 5 MK II
112 FA, 115 FA
LINEAR 5 MK II
115 Sub A, 118 Sub A
1Flat Flat Front
2Monitor Boost Cardioid 1:1 vertical
3Low Cut Low Cut Cardioid 1:1 hori-
zontal
4Remote (rappel des réglages enregistrés dans le logiciel de com-
mande à distance HK Audio DSP CONTROL)
Les presets d'usine des modèles LINEAR5 MKII XA/FA:
Flat Réponse en fréquence linéaire sur toute la bande passante
Monitor Optimisé pour une utilisation en tant que retour de scène
«bain de pied», corrige l'accentuation excessive des basses
fréquences causée par le couplage avec le sol en réduisant
leur niveau
Boost Renforce les basses fréquences, par exemple en cas d'utili-
sation de façon autonome sans caisson de graves.
Low Cut Optimisé à l'aide d'un filtre passe-haut pour une utilisation
en tant qu'enceinte satellite avec le LINEAR5 MKII 115 SubA
ou 118 SubA
Les presets d'usine des modèles LINEAR5 MKII 115 SubA et 118 SubA
Front Pour une utilisation standard comme caisson de graves
orienté vers l'avant
Cardioid 1:1
vertical
Pour le fonctionnement cardioïde de deux caissons de
graves empilés l'un sur l'autre avec un caisson de graves
LINEAR5 MKII orienté vers l'avant (voir aussi le chapitre 4.2)
Cardioid 1:1
horizontal
Pour le fonctionnement cardioïde de deux caissons de
graves placés côte à côte avec un caisson de graves LI-
NEAR5 MKII orienté vers l'avant (voir aussi chapitre 4.2)
Les presets d'usine 1 à3 n'influencent que l'enceinte elle-même, pas la
sortie DSP Out.
Remarque: en réseau, avec le logiciel de commande à distance
DSP CONTROL connecté, la sortie DSP Out peut être configurée
indépendamment des presets d'usine 1 à3, même si ceux-ci sont utilisés.
Pour en savoir plus, consultez le mode d'emploi propre au logiciel DSP
CONTROL, que vous trouverez dans la section de téléchargement des
produits LINEAR 5 MKII sur www.hkaudio.com.
Le preset Remote
Remote Il permet le rappel d'un preset personnel préalablement en-
registré par l'utilisateur dans DSP CONTROL, pour l'enceinte
elle-même ainsi que pour la sortie DSP Out. Il n'est pas
nécessaire pour cela que l'enceinte soit connectée au logiciel
de commande à distance.
À la livraison, le preset Remote correspond au preset d'usine1 (Flat/Front).
Fonctions du DSP disponibles dans le logiciel de commande à distance DSP
CONTROL et qui peuvent être enregistrées dans un preset personnel par
l'utilisateur:
Égaliseur entièrement paramétrique à 10bandes avec sélection des carac-
téristiques du filtre pour chaque bande de fréquence, filtres passe-haut et
passe-bas entièrement paramétrables, limiteur, délai, polarité, niveau,
coupure du son (mute).
Les paramètres peuvent être configurés indépendamment pour l'enceinte
elle-même et pour la sortie DSP Out.
Capture d'écran du logiciel de commande à distance DSP CONTROL, disponible gratuitement dans
la section de téléchargement des produits LINEAR5 sur www.hkaudio.com. Les paramètres sont
identiques pour «Speaker» (enceinte) et «DSP Out», mais peuvent être configurés indépendamment
pour les deux grâce à la double fonctionnalité du DSP.
●
9 Power
Le commutateur d'alimentation Power est un
interrupteur à bascule. Quand il est enclenché,
l'électronique est activée. Sinon, l'électronique est
complètement déconnectée du réseau.
●
10 LED Power
Dès que l'électronique est alimentée en tension,
cette LED s'allume en vert.
●
11 Mains Input
Le raccordement au secteur se fait par cette prise IEC14 verrouillable. Le
verrouillage du câble de connexion fourni empêche de le débrancher par
inadvertance.
Leave enough space for proper ventilation!
LINEAR 7
118 Sub A
MADE IN GERMANY
Power
Auto Sleep
On Off
+6 dB–6 dB
0 dB
Input
L
R
DSP Out
Thru Gain
Serial No.
Caution: Risk of electric shock! Do not open!
Refer servicing to qualified service personnel.
Attention: Risque de choc élèctrique –
ne pas ouvrir!
HK Audio is a brand of Stamer Musikanlagen GmbH
Magdeburger Str. 8 • 66606 St. Wendel • Germany
Mains Input
100-240 V~ 50-60 Hz
1 A @ 1/8 output power
Power
1
5
2
1 2
3
4
4
9
11
12
10
13
●
12 Auto Sleep
Ce commutateur encastré permet d'activer ou de désactiver la fonction
Auto Sleep de mise en veille automatique qui permet d'économiser de
l'énergie. La fonction Auto Sleep est activée en usine (commutateur enfoncé).
Leave enough space for proper ventilation!
LINEAR 7
118 Sub A
MADE IN GERMANY
Power
Auto Sleep
On Off
+6 dB–6 dB
0 dB
Input
L
R
DSP Out
Thru Gain
Serial No.
Mains Input
100-240 V~ 50-60 Hz
1.9 A @ 1/8 output power
Link
100-240 V~ 50-60 Hz
max. 10 A
Caution: Risk of electric shock! Do not open!
Refer servicing to qualified service personnel.
Attention: Risque de choc élèctrique –
ne pas ouvrir!
HK Audio is a brand of Stamer Musikanlagen GmbH
Magdeburger Str. 8 • 66606 St. Wendel • Germany
Power
Lock Lock
1
5
2
1 2
3
4
4
9
11
12
10

LINEAR 5 MK II 1.0
22
Cette fonction fait passer l'électronique en mode de veille automatique
après 4,5heures sans signal, sans réception de données par les prises ré-
seau ni utilisation des touches et commandes. La réactivation de l'enceinte
n'est possible qu'en éteignant et en rallumant cette dernière avec son
commutateur d'alimentation ou en envoyant un signal audio analogique à
son entrée.
Attention: la réactivation ne peut pas se faire par les prises réseau.
La désactivation de la fonction Auto-Sleep nécessite d'actionner son com-
mutateur encastré (pour lui faire quitter sa position enfoncée).
3 Vue d'ensemble des diérents modèles
110XA, 112XA, 112FA, 115XA, 115FA,
115SubA, 118SubA
110 XA 112 XA 112 FA 115 XA 115 SUB A 118 SUB A115 FA
La série LINEAR5MKII se compose de cinq satellites et de deux caissons de
graves:
LINEAR5MKII 110XA, LINEAR5MKII 112XA, LINEAR5MKII 112FA, LI-
NEAR5MKII 115XA, LINEAR 5MK II 115FA, LINEAR5MKII 115SubA et
LINEAR 5MKII 118SubA. Les modèles multifonctions LINEAR5MKII 110XA,
LINEAR5MKII 112XA et LINEAR5 MKII 115XA conviennent également à
une utilisation comme retour de scène «bain de pied» grâce à leur forme
à pan coupé permettant une inclinaison de 31°. Les modèles large bande
LINEAR5MKII 112FA et LINEAR5MKII 115FA fournissent une pression
acoustique supérieure dans les basses fréquences grâce au volume plus
important de leur enceinte.
31°
LINEAR 5 MK II
110 XA / 112 XA / 115 XA
Les LINEAR5MKII 110XA et 112XA sont équipées d'un pavillon à large
dispersion sur 80°x60° pour une diusion homogène en champ proche. Le
pavillon de la LINEAR5MKII 115XA ore un angle de dispersion moyen de
70°x50°, les LINEAR5MKII 112FA et 115FA utilisent un pavillon à diusion
plus étroite avec un angle de dispersion de 60°x40°, afin de permettre de
plus longues portées.
Les pavillons ne pouvant pas être tournés sans outils, ils sont donc moins
prévus pour des ajustements réguliers que pour optimiser une enceinte en
fonction de son utilisation principale.
Conseil: en cas d'utilisation comme retour de scène «bain de pied», il
n'est pas obligatoire de tourner le pavillon. Dans cette position, il est
même bénéfique d'utiliser comme angle de diusion horizontale l'angle
de diusion verticale plus étroit nécessaire à l'utilisation verticale. La
zone de chevauchement avec les retours voisins est ainsi minimisée et le
risque de Larsen peut être réduit grâce à une orientation plus précise.
4 Installation
4.1 Modèles XA/FA
Les enceintes satellites LINEAR5 MKII peuvent être empilées sur des caissons de
graves, montées sur des trépieds ou des mâts, installées avec des supports
muraux, ou suspendues à l'aide des accessoires adaptés.
Installation avec le DuoTilt 3/7
-3° -7°
Afin d'obtenir une distribution idéale du son, toutes les enceintes satellites
sont équipées d'une embase spéciale HKAudio DuoTilt 3/7 pour les trépieds
et mâts de 35mm qui permet des angles d'inclinaison de −3° et −7°. Pour
optimiser le centre de gravité de l'enceinte sur le trépied, l'embase DuoTilt
3/7 est positionnée près du bae.
Généralités concernant le montage sur trépieds
Remarque! Veillez toujours à ce que le support soit bien stable et res-
pectez les indications du fabricant concernant la charge maximale des
trépieds.
Attention!
• Seuls peuvent être utilisés des trépieds garantissant la sécurité contre le
basculement. Le trépied doit être conçu pour supporter le poids de l'en-
ceinte. La hauteur maximale d'extension doit être limitée de manière à ce
que l'ensemble trépied/enceinte ne bascule pas. Cela est valable pour une
installation sur une surface plane et horizontale.
• En outre, en cas d'installation sur une surface inégale ou inclinée, il faut
veiller à ce que la sécurité contre le basculement soit assurée, soit en
lestant les pieds du trépied à l'aide de poids appropriés, soit par d'autres
mesures de sécurité.
• L'utilisation avec d'autres dispositifs peut entraîner une instabilité sus-
ceptible de provoquer des blessures.
Suspension:
Les modèles XA et FA peuvent être suspendus par leurs points d'ancrage
(élingues en acier ou chaînes fixés au point d'ancrage AP-8). Les modèles

LINEAR 5 MK II 1.0
23
• English • Français• Deutsch • Italiano • Español
112FA, 115FA et 115XA peuvent en outre fonctionner suspendus en combi-
naison avec les étriers HKAudio TB-45N et TB-45NQ (modèle Q démontable
avec goupilles de libération rapide).
4.2 LINEAR 5 MK II 115 Sub A et 118 Sub A
Les caissons de graves LINEAR5MKII peuvent en principe être gérés comme
tout autre caisson de graves à rayonnement direct. Lors de l'utilisation en
mode cardioïde, il est possible de les disposer soit l'un au-dessus de l'autre,
soit l'un à côté de l'autre. Une distance d'au moins 1mètre doit être respec-
tée par rapport aux murs.
En mode cardioïde, deux montages sont possibles: Cardioid 1:1 vertical et
Cardioid 1:1 horizontal – l'illustration suivante montre la vue de face (vue du
public)
Cardioid 1:1
vertical
Cardioid 1:1
horizontal
Preset:
Front
Preset:
Cardioid 1:1 horizontal
LINEAR 5
118 Sub A
MADE IN GERMANY
Preset:
Front
Preset:
Cardioid 1:1
vertical
LINEAR 5 MK II
118 Sub A
MADE IN GERMANY
Settings
Front
Front
Cardioid 1:1
vertical
Cardioid 1:1
horizontal
Leave 1 meter of space
in each direction!
Cardioid 1:1
vertical Cardioid 1:1
horizontal
LINEAR 5
118 Sub A
MADE IN GERMANY
LINEAR 5 MK II
118 Sub A
MADE IN GERMANY
Settings
Front
Front
Cardioid 1:1
vertical
Cardioid 1:1
horizontal
Leave 1 meter of space
in each direction!
Cardioid 1:1
vertical Cardioid 1:1
horizontal
Le preset approprié peut être sélectionné à l'arrière du caisson de graves
LINEAR5MKII. Voir également le chapitre 2,●
8 Preset:
Preset Settings
Front
Front
Cardioid 1:1
vertical
Cardioid 1:1
horizontal
Cardioid 1:1
vertical Cardioid 1:1
horizontal
Dans les deux cas, la pression acoustique vers l'arrière est réduite de jusqu'à
34dB, tandis que vers l'avant, elle est augmentée d'environ 2dB.
Front:
+2 dB
Rear:
–34 dB
Quand une configuration cardioïde est-elle judicieuse?
Alors que les moyennes et hautes fréquences sont directionnelles, la
propagation des basses fréquences est sphérique. Cela engendre souvent
un excès désagréable de basses fréquences sur et derrière la scène. Il est
également de plus en plus courant que les organisateurs imposent des
directives précises sur la répartition du son, par exemple pour les chapiteaux
dans les centres-villes. Dans les basses, le moyen le plus ecace pour y
parvenir fait appel à la technique cardioïde (annulation des fréquences
émises vers l'arrière). Les caissons de graves LINEAR5MK II remplissent les
conditions, tant sur le plan mécanique qu'avec leurs jeux de filtres dispo-
nibles, pour réaliser rapidement et facilement des configurations cardioïdes
ecaces.
5 Exemples de systèmes
5.1 Montage en système stéréo 2.1
Grâce aux préamplis stéréo intégrés dans les
caissons de graves LINEAR5MKII, il est possible
de réaliser un élégant système 2.1 en envoyant les
deux canaux (gauche et droite) dans un caisson
de graves LINEAR5MKII et en le renvoyant aux
satellites par ses prises Thru. Dans ce cas, les
LINEAR5MKII 110XA à diusion large sont un
complément idéal
Presets:
Satellites Low Cut
Caisson de
graves LI-
NEAR5MKII
Front
Pour garantir une image sonore aussi homogène que possible, le caisson
de graves doit être placé au centre, entre les deux satellites.
5.2 Montage sur mât
Au lieu de placer les satellites sur des
trépieds, un mât à filetage M20 peut
être vissé dans l'embase M20 du cais-
son de graves LINEAR5MKII.
Presets:
Satellites Low Cut
Caisson de
graves LI-
NEAR5MKII
Front
5.3 Montage en empilage
Trois caissons de graves LINEAR5MKII empilés les
uns sur les autres donnent une hauteur d'environ
1,65m. Dans ce cas, les satellites peuvent être
posés directement sur les caissons.
Presets:
Satellites Low Cut
Caisson de
graves LI-
NEAR5MKII
Front

LINEAR 5 MK II 1.0
24
Remarque: un empilage ne doit être réalisé que par du personnel
qualifié et en respectant les normes appropriées, comme l'arrimage avec
des sangles sur des surfaces planes.
5.4 Montage en configuration cardioïde 1:1 verticale
Système cardioïde avec mâts – les caissons de
graves du dessous sont dirigés vers l'arrière.
Presets:
Satellites Low Cut
Caisson de graves
LINEAR5MKII
Front
Caisson de graves
LINEAR5MKII
Cardioid 1:1
vertical
5.5 Montage en configuration cardioïde 1:1 horizontale
Système cardioïde avec caissons
de graves juxtaposés – un des deux
caissons est à chaque fois tourné vers
l'arrière.
Presets:
Satellites Low Cut
Caisson de graves
LINEAR5MKII
Front
Caisson de graves
LINEAR5MKII
Cardioid 1:1
horizontal
À compter de la page42, vous trouverez des exemples détaillés
de montage et de câblage pour l'utilisation de votre système
LINEAR5MKII.
6 Accessoires optionnels de HK Audio
Pour tous les modèles LINEAR5MKII, HK Audio propose des housses
qui protègent à la fois durant le transport et contre la pluie (pendant
l'utilisation). Vous trouverez de plus amples informations sur www.hkaudio.
com, dans la page des produits LINEAR5MKII.
7 Caractéristiques techniques
Modèle LINEAR 5 MK II
110 XA
LINEAR 5 MK II
112 XA
LINEAR 5 MK II
112 FA
LINEAR 5 MK II
115 XA
LINEAR 5 MK II
115 FA
LINEAR 5 MK II
115 Sub A
LINEAR 5 MK II
118 Sub A
SPL max. à 10% de DHT 126dB en demi-espace
(70Hz – 12kHz en moyenne)
128dB en demi-espace
(70Hz – 12kHz en moyenne)
128dB en demi-espace
(70Hz – 12kHz en moyenne)
130dB en demi-espace
(70Hz – 12kHz en moyenne)
130dB en demi-espace
(70Hz – 12kHz en moyenne)
127dB en demi-espace
(42Hz– 100Hz en moyenne)
130dB en demi-espace
(42Hz – 100Hz en moyenne)
SPL max. en crête à 10%
de DHT
135dB en demi-espace 136dB en demi-espace 135dB en demi-espace 138dB en demi-espace 138dB en demi-espace 130dB en demi-espace 131dB en demi-espace
Réponse en fréquence
+/-3dB
74Hz – 12kHz 73Hz – 12kHz 70Hz – 12kHz 64Hz – 12kHz 57Hz – 12kHz 44Hz – Crossover 42Hz – Crossover
Réponse en fréquence
-10dB
68Hz – 19kHz 67Hz – 19kHz 55Hz – 19kHz 59Hz – 19kHz 54Hz – 19kHz 40Hz – Crossover 38Hz – Crossover
Puissance de l’étage de
sortie (RMS / crête)
600 / 1200W 600 / 1200W 600 / 1200W 600 / 1200W 600 / 1200W 600 / 1200W 1000 / 2000W
Type d’étage de sortie Classe D – biamplifié Classe D – biamplifié Classe D – biamplifié Classe D – biamplifié Classe D – biamplifié Classe D Classe D
Haut-parleur de basses -----1x 15" avec bobine mobile de 3" 1x 18" avec bobine mobile de 4"
Haut-parleur de graves/
médiums
1x 10" avec bobine mobile de 2" 1x 12" avec bobine mobile de
2,5"
1x 12" avec bobine mobile de
2,5"
1x 15" avec bobine mobile de 3" 1x 15" avec bobine mobile de 3" - -
Moteur d‘aigus 1" avec bobine mobile de 1,4" 1" avec bobine mobile de 1,7" 1" avec bobine mobile de 1,7" 1" avec bobine mobile de 1,7" 1" avec bobine mobile de 1,7" - -
Caractéristiques du
pavillon
Pavillon à directivité constante
80° x 60°, pivotant
Pavillon à directivité constante
80° x 60°, pivotant
Pavillon à directivité constante
60° x 40°, pivotant
Pavillon à directivité constante
70° x 50°, pivotant
Pavillon à directivité constante
60° x 40°, pivotant
- -
Fréquence de crossover
actif
Crossover RIF 2,1kHz, pente de
72dB/oct.
Crossover RIF 1,9kHz, pente de
72dB/oct.
Crossover RIF 1,6kHz, pente de
72dB/oct.
Crossover RIF 1,6kHz, pente de
72dB/oct.
Crossover RIF 1,6kHz, pente de
72dB/oct.
- -
Niveau d’entrée max. 20dBu 20dBu 20dBu 20dBu 20dBu 20dBu 20dBu
Entrées analogiques 1 entrée symétrique mixte XLR/
jack
1 entrée symétrique mixte XLR/
jack
1 entrée symétrique mixte XLR/
jack
1 entrée symétrique mixte XLR/
jack
1 entrée symétrique mixte XLR/
jack
2entrées symétriques mixtes
XLR/jack
2entrées symétriques mixtes
XLR/jack
Renvoi analogique (Thru) 1 XLR symétrique 1 XLR symétrique 1 XLR symétrique 1 XLR symétrique 1 XLR symétrique 2 XLR symétriques 2 XLR symétriques
DSP Out 1 XLR symétrique 1 XLR symétrique 1 XLR symétrique 1 XLR symétrique 1 XLR symétrique 1 XLR symétrique 1 XLR symétrique
Connexion réseau EtherCON RJ45, 1entrée EtherCON RJ45, 1entrée EtherCON RJ45, 1entrée EtherCON RJ45, 1entrée EtherCON RJ45, 1entrée EtherCON RJ45, 1entrée,
1renvoi
EtherCON RJ45, 1entrée,
1renvoi
Presets de filtres Flat, Monitor, Low Cut, Remote Flat, Monitor, Low Cut, Remote Flat, Boost, Low Cut, Remote Flat, Monitor, Low Cut, Remote Flat, Boost, Low Cut, Remote Front, Cardioid 1:1 vertical,
Cardioid 1:1 horizontal, Remote
Front, Cardioid 1:1 vertical,
Cardioid 1:1 horizontal, Remote
Logiciel de commande à
distance
DSP CONTROL (Windows,
macOS)
DSP CONTROL (Windows,
macOS)
DSP CONTROL (Windows,
macOS)
DSP CONTROL (Windows,
macOS)
DSP CONTROL (Windows,
macOS)
DSP CONTROL (Windows,
macOS)
DSP CONTROL (Windows,
macOS)
Fonctions du DSP EQ 10 bandes entièrement pa-
ramétrable avec caractéristique
de filtre variable, filtre passe-
haut, filtre passe-bas, polarité,
niveau, délai, limiteur, mute
EQ 10 bandes entièrement pa-
ramétrable avec caractéristique
de filtre variable, filtre passe-
haut, filtre passe-bas, polarité,
niveau, délai, limiteur, mute
EQ 10 bandes entièrement pa-
ramétrable avec caractéristique
de filtre variable, filtre passe-
haut, filtre passe-bas, polarité,
niveau, délai, limiteur, mute
EQ 10 bandes entièrement pa-
ramétrable avec caractéristique
de filtre variable, filtre passe-
haut, filtre passe-bas, polarité,
niveau, délai, limiteur, mute
EQ 10 bandes entièrement pa-
ramétrable avec caractéristique
de filtre variable, filtre passe-
haut, filtre passe-bas, polarité,
niveau, délai, limiteur, mute
EQ 10 bandes entièrement
paramétrable avec caractéris-
tique de filtre variable, filtre
passe-bas, polarité, niveau,
délai, limiteur, mute
EQ 10 bandes entièrement
paramétrable avec caractéris-
tique de filtre variable, filtre
passe-bas, polarité, niveau,
délai, limiteur, mute
Fréquence d’échantillonnage 48kHz 48kHz 48kHz 48kHz 48kHz 48kHz 48kHz
Latence du système Inférieure à 2ms Inférieure à 2ms Inférieure à 2ms Inférieure à 2ms Inférieure à 2ms Inférieure à 2ms Inférieure à 2ms
Raccordement au secteur 1 connecteur IEC avec système
de sécurité V-Lock, 100-240V
1 connecteur IEC avec système
de sécurité V-Lock, 100-240V
1 connecteur IEC avec système
de sécurité V-Lock, 100-240V
1 connecteur IEC avec système
de sécurité V-Lock, 100-240V
1 connecteur IEC avec système
de sécurité V-Lock, 100-240V
1 connecteur IEC avec système
de sécurité V-Lock, 100-240V
1 connecteur IEC avec système
de sécurité V-Lock, 100-240V
Puissance absorbée Consommation de courant
nominale de 1A / 100–240V
selon norme EN 62368-1
Consommation de courant
nominale de 1A / 100–240V
selon norme EN 62368-1
Consommation de courant
nominale de 1A / 100–240V
selon norme EN 62368-1
Consommation de courant
nominale de 1A / 100–240V
selon norme EN 62368-1
Consommation de courant
nominale de 1A / 100–240V
selon norme EN 62368-1
Consommation de courant
nominale de 1A / 100–240V
selon norme EN 62368-1
Consommation de courant
nominale de 1,9A / 100–240V
selon norme EN 62368-1
Angle de montage 31° 31° -31° - -
Embase pour pied DuoTilt 3°/7° DuoTilt 3°/7° DuoTilt 3°/7° DuoTilt 3°/7° DuoTilt 3°/7° 1x M20 1x M20
Points d'ancrage 3x M8 (AP-8) 3x M8 (AP-8) 3x M8 (AP-8) 3x M8 (AP-8) 3x M8 (AP-8) - -
Poignées 1x SingleGrip 2x SingleGrip 2x MultiGrip 2x MultiGrip, 1 x SingleGrip 2x MultiGrip 2x MultiGrip 2x MultiGrip
Enceinte Composite (contreplaqué de
bouleau/MDF)
Composite (contreplaqué de
bouleau/MDF)
Composite (contreplaqué de
bouleau/MDF)
Composite (contreplaqué de
bouleau/MDF)
Composite (contreplaqué de
bouleau/MDF)
Composite (contreplaqué de
bouleau/MDF)
Contreplaqué de bouleau
Revêtement Laque acrylique, noire Laque acrylique, noire Laque acrylique, noire Laque acrylique, noire Laque acrylique, noire Laque acrylique, noire Laque acrylique, noire
Grille Grille métallique de 2mm avec
mousse acoustique noire
Grille métallique de 2mm avec
mousse acoustique noire
Grille métallique de 2mm avec
mousse acoustique noire
Grille métallique de 2mm avec
mousse acoustique noire
Grille métallique de 2mm avec
mousse acoustique noire
Grille métallique de 2mm avec
mousse acoustique noire
Grille métallique de 2mm avec
mousse acoustique noire
Dimensions (L x H x P) 36 x 52,5 x 30cm
14-1/16 x 20-43/64 x 11-1/16"
36 x 59 x 30,5cm
14-1/16 x 23-15/64 x 12-1/32"
37 x 67 x 36,5cm
14-9/16 x 26-3/8 x 14-3/8"
45 x 68,5 x 42cm
17-23/32 x 26-31/32 x 16-17/32"
44,8 x 70,7 x 44,75 cm
17-2/3 x 27-4/5 x 17-2/3"
48 x 53,5 x 67,5cm
18-57/64 x 21-1/16 x 26-37/64"
55 x 56 x 68,5cm
21-21/32 x 22-3/64 x 26-31/32"
Poids 14,9kg / 32,85lbs 17,6kg / 38,80lbs 21,9kg / 48,28lbs 27,6kg / 60,85lbs 30,2 kg / 66,47 lbs 32,9kg / 72,53lbs 41,6kg / 91,71lbs

LINEAR 5 MK II 1.0
25
• English • Français• Deutsch • Italiano • Español
7 Caractéristiques techniques
Modèle LINEAR 5 MK II
110 XA
LINEAR 5 MK II
112 XA
LINEAR 5 MK II
112 FA
LINEAR 5 MK II
115 XA
LINEAR 5 MK II
115 FA
LINEAR 5 MK II
115 Sub A
LINEAR 5 MK II
118 Sub A
SPL max. à 10% de DHT 126dB en demi-espace
(70Hz – 12kHz en moyenne)
128dB en demi-espace
(70Hz – 12kHz en moyenne)
128dB en demi-espace
(70Hz – 12kHz en moyenne)
130dB en demi-espace
(70Hz – 12kHz en moyenne)
130dB en demi-espace
(70Hz – 12kHz en moyenne)
127dB en demi-espace
(42Hz– 100Hz en moyenne)
130dB en demi-espace
(42Hz – 100Hz en moyenne)
SPL max. en crête à 10%
de DHT
135dB en demi-espace 136dB en demi-espace 135dB en demi-espace 138dB en demi-espace 138dB en demi-espace 130dB en demi-espace 131dB en demi-espace
Réponse en fréquence
+/-3dB
74Hz – 12kHz 73Hz – 12kHz 70Hz – 12kHz 64Hz – 12kHz 57Hz – 12kHz 44Hz – Crossover 42Hz – Crossover
Réponse en fréquence
-10dB
68Hz – 19kHz 67Hz – 19kHz 55Hz – 19kHz 59Hz – 19kHz 54Hz – 19kHz 40Hz – Crossover 38Hz – Crossover
Puissance de l’étage de
sortie (RMS / crête)
600 / 1200W 600 / 1200W 600 / 1200W 600 / 1200W 600 / 1200W 600 / 1200W 1000 / 2000W
Type d’étage de sortie Classe D – biamplifié Classe D – biamplifié Classe D – biamplifié Classe D – biamplifié Classe D – biamplifié Classe D Classe D
Haut-parleur de basses -----1x 15" avec bobine mobile de 3" 1x 18" avec bobine mobile de 4"
Haut-parleur de graves/
médiums
1x 10" avec bobine mobile de 2" 1x 12" avec bobine mobile de
2,5"
1x 12" avec bobine mobile de
2,5"
1x 15" avec bobine mobile de 3" 1x 15" avec bobine mobile de 3" - -
Moteur d‘aigus 1" avec bobine mobile de 1,4" 1" avec bobine mobile de 1,7" 1" avec bobine mobile de 1,7" 1" avec bobine mobile de 1,7" 1" avec bobine mobile de 1,7" - -
Caractéristiques du
pavillon
Pavillon à directivité constante
80° x 60°, pivotant
Pavillon à directivité constante
80° x 60°, pivotant
Pavillon à directivité constante
60° x 40°, pivotant
Pavillon à directivité constante
70° x 50°, pivotant
Pavillon à directivité constante
60° x 40°, pivotant
- -
Fréquence de crossover
actif
Crossover RIF 2,1kHz, pente de
72dB/oct.
Crossover RIF 1,9kHz, pente de
72dB/oct.
Crossover RIF 1,6kHz, pente de
72dB/oct.
Crossover RIF 1,6kHz, pente de
72dB/oct.
Crossover RIF 1,6kHz, pente de
72dB/oct.
- -
Niveau d’entrée max. 20dBu 20dBu 20dBu 20dBu 20dBu 20dBu 20dBu
Entrées analogiques 1 entrée symétrique mixte XLR/
jack
1 entrée symétrique mixte XLR/
jack
1 entrée symétrique mixte XLR/
jack
1 entrée symétrique mixte XLR/
jack
1 entrée symétrique mixte XLR/
jack
2entrées symétriques mixtes
XLR/jack
2entrées symétriques mixtes
XLR/jack
Renvoi analogique (Thru) 1 XLR symétrique 1 XLR symétrique 1 XLR symétrique 1 XLR symétrique 1 XLR symétrique 2 XLR symétriques 2 XLR symétriques
DSP Out 1 XLR symétrique 1 XLR symétrique 1 XLR symétrique 1 XLR symétrique 1 XLR symétrique 1 XLR symétrique 1 XLR symétrique
Connexion réseau EtherCON RJ45, 1entrée EtherCON RJ45, 1entrée EtherCON RJ45, 1entrée EtherCON RJ45, 1entrée EtherCON RJ45, 1entrée EtherCON RJ45, 1entrée,
1renvoi
EtherCON RJ45, 1entrée,
1renvoi
Presets de filtres Flat, Monitor, Low Cut, Remote Flat, Monitor, Low Cut, Remote Flat, Boost, Low Cut, Remote Flat, Monitor, Low Cut, Remote Flat, Boost, Low Cut, Remote Front, Cardioid 1:1 vertical,
Cardioid 1:1 horizontal, Remote
Front, Cardioid 1:1 vertical,
Cardioid 1:1 horizontal, Remote
Logiciel de commande à
distance
DSP CONTROL (Windows,
macOS)
DSP CONTROL (Windows,
macOS)
DSP CONTROL (Windows,
macOS)
DSP CONTROL (Windows,
macOS)
DSP CONTROL (Windows,
macOS)
DSP CONTROL (Windows,
macOS)
DSP CONTROL (Windows,
macOS)
Fonctions du DSP EQ 10 bandes entièrement pa-
ramétrable avec caractéristique
de filtre variable, filtre passe-
haut, filtre passe-bas, polarité,
niveau, délai, limiteur, mute
EQ 10 bandes entièrement pa-
ramétrable avec caractéristique
de filtre variable, filtre passe-
haut, filtre passe-bas, polarité,
niveau, délai, limiteur, mute
EQ 10 bandes entièrement pa-
ramétrable avec caractéristique
de filtre variable, filtre passe-
haut, filtre passe-bas, polarité,
niveau, délai, limiteur, mute
EQ 10 bandes entièrement pa-
ramétrable avec caractéristique
de filtre variable, filtre passe-
haut, filtre passe-bas, polarité,
niveau, délai, limiteur, mute
EQ 10 bandes entièrement pa-
ramétrable avec caractéristique
de filtre variable, filtre passe-
haut, filtre passe-bas, polarité,
niveau, délai, limiteur, mute
EQ 10 bandes entièrement
paramétrable avec caractéris-
tique de filtre variable, filtre
passe-bas, polarité, niveau,
délai, limiteur, mute
EQ 10 bandes entièrement
paramétrable avec caractéris-
tique de filtre variable, filtre
passe-bas, polarité, niveau,
délai, limiteur, mute
Fréquence d’échantillonnage 48kHz 48kHz 48kHz 48kHz 48kHz 48kHz 48kHz
Latence du système Inférieure à 2ms Inférieure à 2ms Inférieure à 2ms Inférieure à 2ms Inférieure à 2ms Inférieure à 2ms Inférieure à 2ms
Raccordement au secteur 1 connecteur IEC avec système
de sécurité V-Lock, 100-240V
1 connecteur IEC avec système
de sécurité V-Lock, 100-240V
1 connecteur IEC avec système
de sécurité V-Lock, 100-240V
1 connecteur IEC avec système
de sécurité V-Lock, 100-240V
1 connecteur IEC avec système
de sécurité V-Lock, 100-240V
1 connecteur IEC avec système
de sécurité V-Lock, 100-240V
1 connecteur IEC avec système
de sécurité V-Lock, 100-240V
Puissance absorbée Consommation de courant
nominale de 1A / 100–240V
selon norme EN 62368-1
Consommation de courant
nominale de 1A / 100–240V
selon norme EN 62368-1
Consommation de courant
nominale de 1A / 100–240V
selon norme EN 62368-1
Consommation de courant
nominale de 1A / 100–240V
selon norme EN 62368-1
Consommation de courant
nominale de 1A / 100–240V
selon norme EN 62368-1
Consommation de courant
nominale de 1A / 100–240V
selon norme EN 62368-1
Consommation de courant
nominale de 1,9A / 100–240V
selon norme EN 62368-1
Angle de montage 31° 31° -31° - -
Embase pour pied DuoTilt 3°/7° DuoTilt 3°/7° DuoTilt 3°/7° DuoTilt 3°/7° DuoTilt 3°/7° 1x M20 1x M20
Points d'ancrage 3x M8 (AP-8) 3x M8 (AP-8) 3x M8 (AP-8) 3x M8 (AP-8) 3x M8 (AP-8) - -
Poignées 1x SingleGrip 2x SingleGrip 2x MultiGrip 2x MultiGrip, 1 x SingleGrip 2x MultiGrip 2x MultiGrip 2x MultiGrip
Enceinte Composite (contreplaqué de
bouleau/MDF)
Composite (contreplaqué de
bouleau/MDF)
Composite (contreplaqué de
bouleau/MDF)
Composite (contreplaqué de
bouleau/MDF)
Composite (contreplaqué de
bouleau/MDF)
Composite (contreplaqué de
bouleau/MDF)
Contreplaqué de bouleau
Revêtement Laque acrylique, noire Laque acrylique, noire Laque acrylique, noire Laque acrylique, noire Laque acrylique, noire Laque acrylique, noire Laque acrylique, noire
Grille Grille métallique de 2mm avec
mousse acoustique noire
Grille métallique de 2mm avec
mousse acoustique noire
Grille métallique de 2mm avec
mousse acoustique noire
Grille métallique de 2mm avec
mousse acoustique noire
Grille métallique de 2mm avec
mousse acoustique noire
Grille métallique de 2mm avec
mousse acoustique noire
Grille métallique de 2mm avec
mousse acoustique noire
Dimensions (L x H x P) 36 x 52,5 x 30cm
14-1/16 x 20-43/64 x 11-1/16"
36 x 59 x 30,5cm
14-1/16 x 23-15/64 x 12-1/32"
37 x 67 x 36,5cm
14-9/16 x 26-3/8 x 14-3/8"
45 x 68,5 x 42cm
17-23/32 x 26-31/32 x 16-17/32"
44,8 x 70,7 x 44,75 cm
17-2/3 x 27-4/5 x 17-2/3"
48 x 53,5 x 67,5cm
18-57/64 x 21-1/16 x 26-37/64"
55 x 56 x 68,5cm
21-21/32 x 22-3/64 x 26-31/32"
Poids 14,9kg / 32,85lbs 17,6kg / 38,80lbs 21,9kg / 48,28lbs 27,6kg / 60,85lbs 30,2 kg / 66,47 lbs 32,9kg / 72,53lbs 41,6kg / 91,71lbs

Version 1.0 12/2022
Istruzioni di sicurezza importanti.
Leggere prima di eettuare il collegamento!
Il presente prodotto è stato fabbricato dal produttore in conformità
alla norma IEC 62368-1 ed è uscito dallo stabilimento in perfette con-
dizioni di funzionamento. Per preservare tali condizioni e garantirne
l’uso sicuro, l’utente deve attenersi alle indicazioni e alle avvertenze
riportate nelle istruzioni per l’uso. Se volete usare questo prodotto su
veicoli, a bordo di navi o di aerei oppure ad altitudini superiori a 2000
m dovete badare alle rispettive norme di sicurezza suppletive alla
norma IEC 62368-1.
AVVISO: Per evitare il rischio di incendio o folgorazione, non esporre
l’apparecchio ad umidità o pioggia. Non aprire l’involucro poiché al
suo interno non vi sono parti riparabili dall’utente. Per la riparazione
rivolgersi a personale tecnico qualificato.
Questo simbolo segnala la presenza all’interno dell’involucro
di tensione pericolosa priva di isolamento sufficientemente alta da
costituire un pericolo di folgorazione.
Questo simbolo segnala la presenza di tensione pericolosa
accessibile dall’esterno. Il cablaggio esterno collegato ad un
qualunque morsetto contrassegnato da questo simbolo deve essere un
cavo preconfezionato conforme ai requisiti indicati dal produttore o
un cablaggio installato da personale qualificato.
Questo simbolo segnala importanti istruzioni per l’uso e la
manutenzione nella documentazione allegata. Leggere il manuale.
Questo simbolo ha il seguente significato: Attenzione!
Superficie calda! Non toccare per evitare scottature.
Apparecchiature elettriche o elettroniche di qualsiasi tipo,
batterie incluse, non appartengono nell'immondizia - smaltite questo
tipo di rifiuti presso gli ufficiali centri di raccolta.
Leggere queste istruzioni. Conservare queste istruzioni.
Attenersi a tutti gli avvisi e istruzioni riportati sul prodotto e nel
manuale.
• Non utilizzare il prodotto vicino all’acqua. Non collocare il prodotto
vicino ad acqua, vasche, lavandini, zone umide, piscine o stanze con
presenza di vapore.
• Non collocare sul prodotto oggetti contenenti liquidi, quali vasi,
bicchieri, bottiglie ecc.
• Pulire solo con un panno asciutto.
• Non togliere alcun coperchio o parti dell’involucro.
• La tensione di esercizio prescritta per il prodotto deve corrispondere
alla tensione di alimentazione della rete locale. In caso di dubbi sul
tipo di alimentazione disponibile, rivolgersi al proprio rivenditore o
all’azienda di fornitura elettrica locale.
• Prima di collegare l‘apparecchio, verificate che l‘impianto elettrico
sia munito di adatti dispositivi di protezione contro corto circuito e
errori della messa a terra in apparecchi collegati.
• Per ridurre il rischio di folgorazione, la messa a terra del prodotto
deve essere mantenuta. Utilizzare solo il cavo di alimentazione in
dotazione al prodotto e mantenere sempre in funzione il connettore
centrale (di terra) del collegamento alla rete. Non escludere la
funzione di sicurezza del connettore polarizzato o di messa a terra.
Collegate l‘apparecchio soltanto a prese di corrente con messa in
terra conforme alle norme vigenti.
• Proteggere il cavo di alimentazione affinché non venga calpestato o
pizzicato, in particolare in corrispondenza delle prese e degli innesti
e nel punto di uscita dal dispositivo. Maneggiare sempre con cura
i cavi di alimentazione. Controllare periodicamente la presenza di
tagli o usura sui cavi, soprattutto all’altezza della presa e nel punto
di uscita dal dispositivo.
• Non utilizzare mai il cavo di alimentazione se danneggiato.
• Scollegare il prodotto in caso di temporale o di lunghi periodi di
inutilizzo.
• Il prodotto si scollega completamente dall’alimentazione di rete solo
staccando la spina di alimentazione dall’unità o dalla presa a muro.
Il prodotto va collocato sempre in modo che sia possibile scollegarlo
dall’alimentazione con facilità.
• Fate sostituire i fusibili soltanto da un tecnico qualificato e usate
solamente fusibili dal corretto tipo e valore nominale.
• Per tutte le operazioni di riparazione, rivolgersi a personale
qualificato. L’unità va riparata nel caso abbia subito danni, come nei
seguenti casi:
- Il cavo o la presa di alimentazione sono danneggiati o usurati.
- È penetrato del liquido o degli oggetti all’interno del prodotto.
- Il prodotto è stato esposto a pioggia o umidità.
- Il prodotto non funziona correttamente seguendo le istruzioni.
- Il prodotto ha subito una caduta o l’armadio è stato danneggiato.
• Quando collegate altoparlanti badate di non scendere sotto
l’impedenza minima dichiarata sull’apparecchio oppure in questo
manuale. Usate sempre cavi dello spessore adatto e corrispondenti
alle vigenti norme locali.
• Non esporre ai raggi solari diretti.
• Non installare accanto a fonti di calore quali radiatori, bocchette
di diffusione d’aria calda, fornelli o altri dispositivi che generano
calore.
• Apparecchiature elettriche o elettroniche di qualsiasi tipo, batterie
incluse, non appartengono nell'immondizia - smaltite questo tipo di
rifiuti presso gli ufficiali centri di raccolta.
• Non chiudere le aperture di ventilazione. Installare l’unità seguendo
le istruzioni fornite dal produttore. Il prodotto non è adatto
all’installazione ad incasso, ad esempio in un rack, a meno di non
garantire un’adeguata ventilazione.
• Quando viene spostato all’interno di un locale, attendere sempre
che il dispositivo, se freddo, raggiunga la temperatura ambiente.
Qualora venga utilizzato senza che si sia riscaldato, sussiste il
rischio di formazione di condensa al suo interno e di conseguenti
danni.
• Non collocare sul prodotto fiamme libere, come ad esempio candele
accese.
• Il dispositivo va collocato ad almeno 20 cm/8" di distanza dalle
pareti.
• Utilizzare solo in abbinamento al carrello, supporto, piedistallo,
staffa o tavola specificati dal produttore o venduti insieme al
prodotto. Qualora si utilizzi un carrello, prestare attenzione nello
spostare il carrello/la combinazione di prodotto per evitare lesioni
causate dall’inciampamento.
• Utilizzare solo accessori consigliati dal produttore. Tale prescrizione
si applica a tutti i tipi di accessori, ad esempio coperchi di protezi-
one, borse per il trasporto, supporti, dispositivi per il montaggio a
parete o a soffitto, ecc. In caso di applicazione di qualsiasi tipo di
accessorio al prodotto, osservare sempre le istruzioni per l’uso forni-
te dal produttore. Non utilizzare mai punti di fissaggio sul prodotto
diversi da quelli indicati dal produttore.
• Questo apparecchio NON è adatto all’uso da parte di persone (com-
presi i bambini) con capacità fisiche, mentali o sensoriali limitate o
da persone prive della necessaria esperienza e/o conoscenza. Tenere
sempre l’apparecchio al di fuori della portata dei bambini di età
inferiore ai 4 anni.
• Non inserire mai oggetti di alcun tipo all’interno del prodotto
attraverso le fessure dell’armadio, poiché potrebbero toccare punti
con presenza di tensione pericolosa o causare il cortocircuito dei
componenti, con il conseguente rischio di incendio o folgorazione.
• Questo prodotto genera livelli di pressione sonora superiori a 90 dB
in grado di causare danni permanenti all’udito. L’esposizione a livelli
di rumore estremamente elevati può causare la perdita permanente
dell’udito. In caso di esposizione continua, indossare protezioni per
l’udito.
• Il produttore garantisce la sicurezza, l’affidabilità e l’efficienza del
prodotto solo se:
- l’assemblaggio, l’ampliamento, la reimpostazione, le modifiche o le
riparazioni sono eseguiti dal produttore o da personale autorizzato.
- l’impianto elettrico dell’area interessata è conforme ai requisiti
specificati nelle norme IEC (ANSI).
- l’unità è utilizzata secondo le istruzioni per l’uso.
• Questo prodotto è stato concepito per un‘ottima riproduzione di
segnali vocali e musicali. Una riproduzione di segnali sinusoidali,
onde quadre o altri segnali di misurazione a livelli elevati può
gravemente danneggiare l‘apparecchio.
Avvisi di sicurezza per sistemi di altoparlanti
Usate soltanto sistemi di montaggio autorizzati dal produttore
per il rispettivo sistema di altoparlanti. Seguite attentamente le
istruzioni di montaggio ed usate soltanto accessori di montaggio
omologati. È escluso qualsiasi diritto di garanzia in caso di montaggio
improprio o se vengono usati accessori di montaggio non omologati.
Modificazioni agli altoparlanti, agli accessori di montaggio, agli
elementi di connessione e di fissaggio e alle imbracature potrebbero
alterare la stabilità del sistema e faranno decadere ogni forma di
garanzia.
La riparazione di componenti rilevanti dal punto di vista della sicurez-
za deve venir eseguita soltanto dal produttore o da un suo rappresen-
tante autorizzato – altrimenti decadrà ogni forma di garanzia.
L’istallazione deve venir eseguita soltanto da personale
competente. Usate soltanto punti di montaggio con una sufficiente
capacità portante, considerando eventuali vincoli architettonici. È
assolutamente obbligatorio di usare il materiale di fissaggio (viti,
tasselli ecc.) indicato nelle istruzioni di montaggio del produttore.
Adottate provvedimenti adatti (frenafiletti, dadi autobloccanti) per
prevenire un allentamento dei raccordi filettati.
Assicurate istallazioni stazionarie e/o mobili (in questo
caso gli altoparlanti e gli accessori di montaggio) contro una caduta
dall’alto con due dispositivi indipendenti. Provvedete ad istallare dis-
positivi adatti per cogliere ogni elemento allentato prima che questo
possa cadere in terra. Assicuratevi che gli elementi di montaggio e di
fissaggio e le imbracature vengano scelti e montati nel rispetto delle
normative nazionali e locali vigenti. Tenete conto dei carichi dinamici
(forze di trazione-compressione) per calcolare le dimensioni dei
dispositivi di sicurezza.
Se usate stativi, badate che non venga oltrepassato il loro
carico massimo ammissibile. Badate inoltre che, per motivi costruttivi,
gli stativi di solito sono concepiti ed omologati soltanto per portare
un carico centrato. Gli stativi devono essere posizionati in modo
sicuro e stabile. Provvedete ad assicurare (o meglio ancora fissare) gli
stativi se per esempio:
- la loro superficie di appoggio non consenta un posizionamento
stabile,
- la loro altezza limita la stabilità,
- si potrebbero manifestare venti forti,
- potrebbero essere rovesciate da persone.
Prendete provvedimenti contro ogni forma di comportamento rischio-
so da parte degli spettatori. È vietato posare stativi che ingombrano
le vie di fuga e l’accesso soccorsi. Se volete posare stativi in una via di
comunicazione, verificate prima che la larghezza della via lo consenta
e badate in ogni caso ad una protezione (transenne, cordone ecc.) e
ad una segnalazione adeguata. Il montaggio e smontaggio degli alto-
parlanti significa un rischio elevato. Utilizzate sempre l’attrezzatura
adatta e assicuratevi che le attività vengano svolte nel rispetto delle
normative nazionali in vigore.
Durante il montaggio, indossate sempre indu-
menti protettivi appropriati (casco, guanti, calzature di sicurezza) ed
usate soltanto mezzi di salita adatti e sicuri (scala, ponteggio ecc.). Il
rischio è a esclusivo carico della ditta o del tecnico che esegue i lavori
di montaggio.
ATTENZIONE! Verificate dopo il montaggio del sistema di altoparlanti
che il montaggio e cablaggio sia avvenuto in modo corretto e che tutte
le giunzioni siano stabili.
L’operatore di un sistema di altoparlanti (stazionario o mobile) è obb-
ligato a controllare o a fare controllare regolarmente ogni componente
del sistema nel rispetto delle normative nazionali e locali in vigore e a
fare riparare ogni danno immediatamente.
Vi consigliamo di documentare meticolosamente ogni missione di
controllo in un libretto di controllo.
Badate a dimensionare i punti di sollevamento per un montaggio in
sospensione prendendo in considerazione una sufficiente riserva di
sicurezza. Assicuratevi che tutto avvenga nel rispetto delle normative
nazionali in vigore.
I sistemi di sonorizzazione professionali sono in grado di
produrre livelli sonori nocivi alla salute. Anche essere sottoposto a
livelli apparentemente inoffensivi (a partire da circa 95 dBA SPL) per
un elevato periodo di tempo può provocare perdite dell’udito. Quindi
consigliamo che ogni persona sottoposta ad alti livelli sonori prove-
nienti da un sistema di sonorizzazione porti un’adatta protezione per
l’udito (tappi auricolari o paraorecchie).
Produttore: Stamer Musikanlagen GmbH, Magdeburger Str. 8,
66606 St. Wendel, Germania

LINEAR 5 MK II 1.0
27
• English • Français• Deutsch • Italiano • Español
Benvenuti nella famiglia HK Audio!
Grazie per aver scelto un prodotto di marca concepito e fabbricato nella
nostra casa secondo i nostri meticolosi criteri di qualità.
Anche se siete un utente esperto di sistemi di sonorizzazione - que-
sto prodotto vi orirà alcuni aspetti che saranno nuovi per voi. Per questo vi
preghiamo di non ignorare questo manuale e di conservarlo in un luogo sicu-
ro per averlo sempre a disposizione.
Vi auguriamo il migliore suono in qualsiasi situazione!
Il vostro team HK Audio
Avviso: Forti campi elettromagnetici o scariche elettrostatiche
possono disturbare la funzione del prodotto. In questo caso, basta
spegnere e riaccendere il prodotto per farlo funzionare nuovamente. Se
questo non aiuta a risolvere il problema, è necessario allontanare il
dispositivo dalla sorgente di disturbo.
Garanzia
Il modo più veloce e confortevole: la registrazione online sul nostro sito
www.hkaudio.com.
http://warranty.hkaudio.com
La registrazione è valida soltanto se avviene su internet ed entro 30
giorni dalla data d’acquisto.
HK Audio
Technischer Service (servizio tecnico)
Postfach 1509
66595 St. Wendel, Germania
Fax: +49 6851 905 100
LINEAR 5 MKII
110 XA 112 XA 112 FA 115 XA 115 SUB A 118 SUB A115 FA

LINEAR 5 MK II 1.0
28
1 Generale
Contenuto della fornitura
Durante il disimballaggio del diusore LINEAR 5 MK II, verificare che il
contenuto sia completo. La fornitura comprende la guida rapida e un cavo di
alimentazione.
2 Collegamenti ed elementi di comando
LINEAR 7
112 FA
MADE IN GERMANY
Mains Input
100-240 V~ 50-60 Hz
1 A @ 1/8 output power
Caution: Risk of electric shock! Do not open!
Refer servicing to qualified service personnel.
Attention: Risque de choc élèctrique –
ne pas ouvrir!
HK Audio is a brand of Stamer Musikanlagen GmbH
Magdeburger Str. 8 • 66606 St. Wendel • Germany
Power
Serial No.
Power
Auto Sleep
On Off
+6 dB
0 dB
Input
DSP Out
Thru Gain
Data Preset
1
2
3
4
Lock
Thru
In
Ethernet
Front
Cardioid 1:1
vertical
Cardioid 1:1
horizontal
Remote
1
5
2 3
4
6
7
8
Modelli LINEAR 5 MKII XA/FA
Leave enough space for proper ventilation!
LINEAR 7
118 Sub A
MADE IN GERMANY
Power
Auto Sleep
On Off
+6 dB–6 dB
0 dB
Input
L
R
DSP Out
Thru Gain
Serial No.
Mains Input
100-240 V~ 50-60 Hz
1.9 A @ 1/8 output power
Link
100-240 V~ 50-60 Hz
max. 10 A
Caution: Risk of electric shock! Do not open!
Refer servicing to qualified service personnel.
Attention: Risque de choc élèctrique –
ne pas ouvrir!
HK Audio is a brand of Stamer Musikanlagen GmbH
Magdeburger Str. 8 • 66606 St. Wendel • Germany
Power
Lock Lock
1
5
2
1 2
3
4
4
9
11 12
10
13
Modelli LINEAR 5 MKII Sub A
●
1 Input
Presa combinata XLR/jack, ingresso bilanciato per segnali analogici.
• I modelli LINEAR 5 MK II XA/FA dispongono di un canale di ingresso.
• I subwoofer LINEAR 5 MK II 115 Sub A e LINEAR 5 MK II 118 Sub A sono dotati
di due ingressi separati per i segnali sinistro e destro. Entrambi i canali
sono identici e vengono sommati dopo la preamplificazione, quindi in
modalità mono non ha importanza quale dei due canali sia collegato.
●
2 Thru
Uscita XLR bilanciata (due sul subwoofer) collegata in parallelo alla presa di
ingresso per inoltrare il segnale di ingresso presente nell’input, indipenden-
temente dal fatto che l’impianto elettronico sia abilitato o meno.
●
3 Gain
Il controller del gain regola la preamplificazione del segnale presente nell’input.
• Per i modelli XA/FA –∞ (Mute) fino a + 6dB
• Per il preamplificatore stereo del subwoofer, il controller si applica a
entrambi i canali. In questo caso la gamma di controllo è compresa tra -6
a +6dB
La posizione centrale del controller (clic centrale) corrisponde in entrambi i
casi a 0dB.
Avviso: Il segnale presente su DSP Out non viene influenzato da questo
controller.
●
4 LED Input/Limiter
Questo LED diventa verde quando è presente un segnale nell'input ed è
rosso non appena il limitatore è attivo o l'ingresso viene sovraccaricato. Se il
LED è in rosso lampeggiante, allora indica che il limitatore sta operando sui
picchi di segnale. Se diventa rosso fisso, allora è necessario diminuire il gain.
●
5 DSP Out
Presa XLR utilizzata per emettere il segnale di input analogico (proveniente
dalla presa di ingresso) o per emettere un segnale audio digitale alimentato
tramite una rete. In entrambi i casi il segnale può essere processato con il
DSP interno.
Pertanto il DSP Out rappresenta un'interfaccia di rete per l'integrazione di
una cassa attiva supplementare che per impostazione predefinita non è
compatibile con la rete.
Allo stato di consegna, è presente sul DSP Out il segnale di ingresso non
elaborato, indipendentemente dalla selezione del preset e da dove è posi-
zionato il controller del Gain.
Satelliti Ethernet
LINEAR 7
112 FA
MADE IN GERMANY
Mains Input
100-240 V~ 50-60 Hz
1 A @ 1/8 output power
Caution: Risk of electric shock! Do not open!
Refer servicing to qualified service personnel.
Attention: Risque de choc élèctrique –
ne pas ouvrir!
HK Audio is a brand of Stamer Musikanlagen GmbH
Magdeburger Str. 8 • 66606 St. Wendel • Germany
Power
Serial No.
+6 dB
0 dB
Input
DSP Out
Thru Gain
Lock
Power
Auto Sleep
On Off
Data
Flat
Monitor
Low Cut
Remote
Preset
1
2
3
4
In
Ethernet
1
5
2 3
4
6
7
8
Subwoofer ethernet
LINEAR 7
112 FA
MADE IN GERMANY
Mains Input
100-240 V~ 50-60 Hz
1 A @ 1/8 output power
Caution: Risk of electric shock! Do not open!
Refer servicing to qualified service personnel.
Attention: Risque de choc élèctrique –
ne pas ouvrir!
HK Audio is a brand of Stamer Musikanlagen GmbH
Magdeburger Str. 8 • 66606 St. Wendel • Germany
Power
Serial No.
Power
Auto Sleep
On Off
+6 dB
0 dB
Input
DSP Out
Thru Gain
Data Preset
1
2
3
4
Lock
Thru
In
Ethernet
Front
Cardioid 1:1
vertical
Cardioid 1:1
horizontal
Remote
1
5
2 3
4
6
7
8
●
6 Ethernet In / Thru
La presa EtherCON viene utilizzata per l'integrazione in una rete. È com-
patibile con connettori RJ45 ed EtherCon (NE8 MX, NE8 MX6, NE 8 MC). I
satelliti dispongono rispettivamente di un Ethernet In e in più i subwoofer
hanno anche un Ethernet Thru. Per i bassi utilizzare la presa Ethernet Thru
per inoltrare il segnale di rete.
Utilizzare sempre cavi S/STP o S/FTP per proteggersi dalle interferenze
elettromagnetiche. Consigliamo a tale proposito l'uso di cavi CAT6. L'inte-
grazione in una rete e le funzioni di controllo da remoto sono descritte in

LINEAR 5 MK II 1.0
29
• English • Français• Deutsch • Italiano • Español• English • Français• Deutsch • Italiano • Español
un manuale disponibile separatamente nell'area download di LINEAR 5 MK II
su www.hkaudio.com. Per una breve descrizione delle funzioni DSP, vedere
●
8 Preset.
●
7 Data
Questo indicatore LED si illumina di arancione quando i dati passano attra-
verso la presa di rete.
●
8 Preset
Il selettore Preset permette di accedere ai preset di fabbrica preimpostati e
a un preset User configurabile tramite il software di controllo remoto DSP
CONTROL. Premendo una volta il selettore potete scorrere i preset da 1 a 4.
L'uso dei preset User (4 Remote) è descritto in un manuale operativo sepa-
rato, disponibile nell'area download di LINEAR 5 MK II su www.hkaudio.com.
Panoramica dei preset:
LINEAR 5 MK II
110 XA, 112 XA, 115 XA
LINEAR 5 MK II
112 FA, 115 FA
LINEAR 5 MK II
115 Sub A, 118 Sub A
1Flat Flat Front
2Monitor Boost Cardioid 1:1 vertical
3Low Cut Low Cut Cardioid 1:1 hori-
zontal
4Remote (richiama le impostazioni salvate tramite
il software per il controllo da remoto HK Audio DSP CONTROL)
I preset di fabbrica dei modelli LINEAR 5 MK II XA/FA:
Flat Risposta in frequenza lineare sull’intera gamma di ripro-
duzione
Monitor ottimizzato per l'uso come monitor da palcoscenico trasver-
sale, corregge l'eccessiva enfasi sulla gamma delle basse
frequenze causata dall'accoppiamento a terra mediante
riduzione del segnale
Boost enfatizza la gamma delle basse frequenze, ad esempio se
utilizzato in modalità stand-alone senza subwoofer.
Low Cut ottimizzato per l'uso come satellite in connessione con
LINEAR 5 MKII 115 Sub A o 118 Sub A con l'ausilio di un filtro
passa-alto
I preset di fabbrica del LINEAR 5 MK II 115 Sub A e 118 Sub A
Front Per il funzionamento standard come subwoofer rivolto in
avanti
Cardioid 1:1
vertical
Per il funzionamento cardioide di due subwoofer impilati con
un subwoofer LINEAR 5 MKII rivolto in avanti. (si veda anche
il capitolo 4.2)
Cardioid 1:1
horizontal
Per il funzionamento cardioide di due subwoofer adiacenti
con un subwoofer LINEAR 5 MKII rivolto in avanti (si veda
anche il capitolo 4.2)
I preset di fabbrica da 1 a 3 riguardano solo la stessa cassa, non il DSP Out.
Avviso: Nella rete con il software di controllo remoto DSP CONTROL già
collegato è possibile collegare il DSP Out indipendentemente da questi
preset di fabbrica, anche quando si utilizzano i preset di fabbrica da 1 a
3. Per saperne di più a tale riguardo, consultare il manuale separato per
DSP CONTROL,reperibile nell'area download dei prodotti LINEAR 5 MK II
su www.hkaudio.com.
Il preset Remote
Remote Qui è possibile accedere a un preset User salvato in prece-
denza tramite DSP CONTROL per la cassa stessa ma anche
per il DSP Out. Per questo motivo la cassa non deve essere
collegata al software di controllo remoto.
Alla consegna, il preset Remote corrisponde al preset di fabbrica 1 (Flat/
Front).
Funzioni DSP disponibili tramite il software remoto DSP CONTROL che
possono essere salvate come preset User:
EQ a 10 bande completamente parametrico con caratteristiche del filtro
selezionabili per banda di frequenza, filtri passa-alto e passa-basso rispetti-
vamente con caratteristiche del filtro selezionabili:
Limiter, Delay, Polarità, Livello, Mute.
È possibile configurare i parametri indipendentemente per la stessa cassa e
per il DSP Out.
Screenshot del software di controllo remoto DSP CONTROL, disponibile gratuitamente nell'area
download dei prodotti LINEAR 5 su www.hkaudio.com. I parametri per "Speaker" e "DSP Out" sono
identici, ma possono essere configurati indipendentemente grazie al DSP raddoppiato.
●
9 Power
L’interruttore di rete è disponibile nella versione
con interruttore a levetta. In posizione Power l’im-
pianto elettronico è acceso, mentre risulta spento
quando è completamente scollegato dalla rete.
●
10 LED Power
Non appena l’impianto elettronico viene alimenta-
to con tensione, questo LED diventa verde.
●
11 Mains Input
Il collegamento alla rete è concepito come presa IEC 14 bloccabile. In
combinazione con il cavo di collegamento bloccabile in dotazione, il cavo di
alimentazione è bloccato ed è assicurato da scivolamenti accidentali.
Leave enough space for proper ventilation!
LINEAR 7
118 Sub A
MADE IN GERMANY
Power
Auto Sleep
On Off
+6 dB–6 dB
0 dB
Input
L
R
DSP Out
Thru Gain
Serial No.
Caution: Risk of electric shock! Do not open!
Refer servicing to qualified service personnel.
Attention: Risque de choc élèctrique –
ne pas ouvrir!
HK Audio is a brand of Stamer Musikanlagen GmbH
Magdeburger Str. 8 • 66606 St. Wendel • Germany
Mains Input
100-240 V~ 50-60 Hz
1 A @ 1/8 output power
Power
1
5
2
1 2
3
4
4
9
11
12
10
13
●
12 Auto Sleep
La funzione di sospensione automatica a risparmio energetico (Auto Sleep)
può essere attivata e disattivata tramite questo interruttore svasato.
L’Auto Sleep è abilitato di fabbrica (interruttore premuto). Questa funzione
imposta l’impianto elettronico in modalità Auto Sleep se non è presente
alcun segnale per un periodo di 4 ore e mezza, se non si ricevono dati tra-
mite le prese di rete e se non si azionano pulsanti o comandi sull’impianto
elettronico. Il diusore può essere riattivato solo spegnendo e riaccendendo
l'interruttore di rete o applicando un segnale audio analogico all'ingresso.
Attenzione: l'attivazione tramite le prese di rete non è possibile.
La disattivazione della funzione Auto Sleep è possibile solo azionando
l'interruttore svasato (non premuto).
Leave enough space for proper ventilation!
LINEAR 7
118 Sub A
MADE IN GERMANY
Power
Auto Sleep
On Off
+6 dB–6 dB
0 dB
Input
L
R
DSP Out
Thru Gain
Serial No.
Mains Input
100-240 V~ 50-60 Hz
1.9 A @ 1/8 output power
Link
100-240 V~ 50-60 Hz
max. 10 A
Caution: Risk of electric shock! Do not open!
Refer servicing to qualified service personnel.
Attention: Risque de choc élèctrique –
ne pas ouvrir!
HK Audio is a brand of Stamer Musikanlagen GmbH
Magdeburger Str. 8 • 66606 St. Wendel • Germany
Power
Lock Lock
1
5
2
1 2
3
4
4
9
11
12
10

LINEAR 5 MK II 1.0
30
3 Panoramica dei vari modelli 110 XA, 112
XA, 112 FA, 115 XA, 115 FA, 115 Sub A,
118 Sub A
110 XA 112 XA 112 FA 115 XA 115 SUB A 118 SUB A115 FA
La serie LINEAR 5 è composta da cinque satelliti e due subwoofer:
LINEAR 5 MK II110XA, LINEAR 5 MK II112 XA, LINEAR 5 MK II 112 FA,
LINEAR 5 MK II 115 XA, LINEAR 5 MK II 115 FA, LINEAR 5 MK II 115 Sub A e
LINEAR 5 MK II 118 Sub A. I modelli multifunzionali LINEAR 5 MK II 110 XA,
LINEAR 5 MK II 112 XA e LINEAR 5 MK II 115 XA sono indicati anche per l'uso
come monitor da palco trasversale grazie alla forma dell'alloggiamento con
un'inclinazione integrata di 31°. I modelli Fullrange LINEAR 5 MK II 112 FA e LI-
NEAR 5 MK II 115 FA forniscono una maggiore pressione sonora nella gamma
delle basse frequenze grazie al volume maggiore dell'alloggiamento.
31°
LINEAR 5 MK II
110 XA / 112 XA / 115 XA
I LINEAR 5 MK II 110 XA e 112 XA sono dotati di una tromba a dispersione
ampia di 80° x 60° per una radiazione omogenea a campo vicino. La tromba
della LINEAR 5 MK II 115 XA ore un angolo di copertura medio di 70° x 50°,
mentre nella LINEAR 5 MK II 112 FA e 115 FA viene utilizzata una tromba
con una dispersione più stretta con un angolo di copertura di 60° x 40° per
consentire portate maggiori.
Le trombe non possono essere ruotate senza l’ausilio di utensili, per cui
sono meno indicate per eettuare adattamenti regolari e sono destinate
più che altro per ottimizzare l’utilizzo principale di una cassa.
Suggerimento: se utilizzato come monitor da palco trasversale, non
è assolutamente necessario ruotare la tromba; addirittura risulta
conveniente se l'angolo di copertura verticale più stretto, richiesto per
il funzionamento in verticale, viene utilizzato come angolo di copertura
orizzontale se disposto in senso trasversale. Ciò riduce al minimo l'area di
sovrapposizione con i monitor adiacenti e il rischio di feedback può essere
ridotto attraverso un allineamento più preciso.
4 Installazione
4.1 I modelli XA/FA
I satelliti LINEAR 5 MK II possono essere impilati su subwoofer, montati su
treppiedi o supporti distanziatori, installati con stae a muro o montati in
sospensione con accessori indicati.
Installazione con DuoTilt 3/7
-3° -7°
Per ottenere una distribuzione del suono ideale, tutti i satelliti sono dotati
di HK Audio DuoTilt 3/7, una flangia speciale per treppiedi da 35 mm e
supporti distanziatori che consente angoli di inclinazione di -3° e -7°. Per
mantenere il baricentro ottimale della cassa sul treppiede, il DuoTilt 3/7 è
posizionato vicino al deflettore.
Informazioni generali sull'installazione con treppiedi
Avviso! Assicurarsi sempre di stare in piedi in modo sicuro e fare riferi-
mento alle informazioni del produttore sul carico massimo del treppiede.
Attenzione!
• È possibile utilizzare solo treppiedi la cui resistenza all’inclinazione è
garantita. Il treppiede deve essere concepito per il peso del diusore.
L'altezza massima di estensione deve essere limitata in modo tale che la
combinazione di treppiede e cassa non provochi ribaltamenti. Questo vale
per l'installazione su una superficie piana e orizzontale.
• Inoltre, quando si eettua l’installazione su una superficie irregolare o in
pendenza, assicurarsi che sia garantita la resistenza all'inclinazione, appe-
santendo la base del treppiede con pesi adeguati o con misure di sicurezza
di altro tipo.
• L'uso con altri dispositivi può causare instabilità che potrebbe causare
lesioni.
Sospensione:
I modelli XA e FA possono essere sospesi utilizzando i loro punti di rigging
(cavi o catene d'acciaio in connessione con il punto di attacco AP-8). I
modelli 112 FA, 115 FA e 115 XA prevedono anche il funzionamento in so-
spensione insieme all’installazione dei supporti volanti HK Audio TB-45N e
TB-45NQ (il modello Q può essere rimosso con perni a sgancio rapido).
4.2 LINEAR 5 MK II 115 Sub A e 118 Sub A
Generalmente i subwoofer LINEAR 5 MK II possono essere gestiti come qual-
siasi altro basso a irradiazione diretta. Se utilizzati in modalità cardioide, è

LINEAR 5 MK II 1.0
31
• English • Français• Deutsch • Italiano • Español
possibile configurarli l’uno sopra l'altro o l’uno accanto all'altro. Mantenere
una distanza di almeno 1 metro dalle pareti.
In modalità cardioide sono possibili due configurazioni: Cardioid 1:1 vertical
e Cardioid 1:1 horizontal - l'illustrazione seguente mostra la vista frontale
(vista dal pubblico)
Cardioid 1:1
vertical
Cardioid 1:1
horizontal
Preset:
Front
Preset:
Cardioid 1:1 horizontal
LINEAR 5
118 Sub A
MADE IN GERMANY
Preset:
Front
Preset:
Cardioid 1:1
vertical
LINEAR 5 MK II
118 Sub A
MADE IN GERMANY
Settings
Front
Front
Cardioid 1:1
vertical
Cardioid 1:1
horizontal
Leave 1 meter of space
in each direction!
Cardioid 1:1
vertical Cardioid 1:1
horizontal
LINEAR 5
118 Sub A
MADE IN GERMANY
LINEAR 5 MK II
118 Sub A
MADE IN GERMANY
Settings
Front
Front
Cardioid 1:1
vertical
Cardioid 1:1
horizontal
Leave 1 meter of space
in each direction!
Cardioid 1:1
vertical Cardioid 1:1
horizontal
È possibile selezionare il preset giusto sul retro del subwoofer LINEAR 5 MK II
. si veda anche il capitolo 2, ●
8 Preset:
Preset Settings
Front
Front
Cardioid 1:1
vertical
Cardioid 1:1
horizontal
Cardioid 1:1
vertical Cardioid 1:1
horizontal
In entrambi i casi, la pressione sonora nella parte posteriore viene ridotta
fino a 34dB, mentre la pressione sonora nella parte anteriore aumenta di
circa 2dB.
Front:
+2 dB
Rear:
–34 dB
Quando è conveniente scegliere una configurazione
cardioide?
Mentre le frequenze medie e alte possono essere irradiate in modo direzio-
nale, le frequenze basse si espandono sfericamente. Spesso questo com-
porta uno scomodo eccesso di bassi profondi dentro e fuori dal palco. Inoltre
sta diventando sempre più comune per gli organizzatori stabilire specifiche
precise per la distribuzione del suono, ad esempio per i tendoni dei festival
nei centri urbani. Ciò può essere messo in atto in modo più ecace nella
gamma dei bassi con la tecnologia cardioide (cancellazione delle frequenze
irradiate verso la parte posteriore). I subwoofer LINEAR 5 MK II soddisfano
quindi i requisiti, sia a livello meccanico che con i set di filtri disponibili, per
realizzare in modo rapido e semplice delle ecaci configurazioni cardioidi.
5 Esempi di sistema
5.1 Configurazione come sistema stereo 2.1
Grazie ai preamplificatori stereo integrati nel
subwoofer LINEAR 5 MK II , è possibile realizzare
un sistema 2.1 in modo elegante, alimentando
entrambi i canali (sinistro e destro) in un subwo-
ofer LINEAR 5 MK II e facendo inoltrare il segnale
dalle sue prese Thru ai satelliti. In questo caso
l’implementazione ideale è il LINEAR 5 MK II 110 XA
a dispersione ampia
Preset:
Satelliti Low Cut
LINEAR 5 MK II
subwoofer
Front
Per garantire un suono il più omogeneo possibile, il subwoofer dovrebbe
essere posizionato al centro tra i due satelliti.
5.2 Configurazione con supporti distanziatori
Anziché posizionare i satelliti sui trep-
piedi, è possibile avvitare un supporto
distanziatore con filettatura M20 nella
flangia M20 del subwoofer LINEAR 5
MK II .
Preset:
Satelliti Low Cut
LINEAR 5 MK II
subwoofer
Front
5.3 Struttura a pila
Tre subwoofer LINEAR 5 MK II impilati uno sopra
l'altro forniscono un'altezza di circa 1,65 m. In
questo caso, i satelliti possono essere posizionati
direttamente sopra i bassi.
Preset:
Satelliti Low Cut
LINEAR 5 MK II
subwoofer
Front
Avviso: una configurazione a pila andrebbe eseguita esclusivamen-
te tramite personale qualificato e standard appropriati come l'ancoraggio
con cinghie su superfici piane.

LINEAR 5 MK II 1.0
32
5.4 Configurazione cardioid 1:1 vertical
Sistema cardioide con supporto distanziatore - i
bassi inferiori sono direzionati all’indietro.
Preset:
Satelliti Low Cut
LINEAR 5 MK II
subwoofer
Front
LINEAR 5 MK II
subwoofer
Cardioid 1:1
vertical
5.5 Configurazione cardioid 1:1 horizontal
Sistema cardioide con bassi
aancati - un subwoofer é
comunque rivolto all'indietro.
Preset:
Satelliti Low Cut
LINEAR 5 MK II
subwoofer
Front
LINEAR 5 MK II
subwoofer
Cardioid 1:1
horizontal
A partire da pagina 42 troverete diversi esempi dettagliati di con-
figurazione e cablaggio per il funzionamento del vostro sistema
LINEAR 5 MK II .
6 Accessori opzionali HK Audio
HK Audio ore coperture protettive dagli agenti atmosferici per tutti i
LINEAR 5 MK II , che sono adatte sia come protezione per il trasporto che
come antipioggia (durante il funzionamento). Per ulteriori informazioni,
visitare la pagina del prodotto LINEAR 5 MK II su www.hkaudio.com.
7 Caratteristiche tecniche
Modello LINEAR 5 MK II
110 XA
LINEAR 5 MK II
112 XA
LINEAR 5 MK II
112 FA
LINEAR 5 MK II
115 XA
LINEAR 5 MK II
115 FA
LINEAR 5 MK II
115 Sub A
LINEAR 5 MK II
118 Sub A
Max. SPL @ 10% THD 127dB half space
(70Hz – 12kHz medio)
128dB half space
(70Hz – 12kHz medio)
128dB half space
(70Hz – 12kHz medio)
130dB half space
(70Hz – 12kHz medio)
130dB half space
(70Hz – 12kHz medio)
127dB half space
(42Hz – 100Hz medio)
130dB half space
(40Hz – 100Hz medio)
Max. SPL peak @ 10%
THD
135dB half space 136dB half space 135dB half space 138dB half space 138dB half space 130dB half space 131dB half space
Risposta in frequenza
+/-3dB
74Hz – 12kHz 73Hz – 12kHz 70Hz – 12kHz 64Hz – 12kHz 57Hz – 12kHz 44Hz – X-Over 42Hz – X-Over
Risposta in frequenza
-10dB
68Hz – 19kHz 67Hz – 19kHz 55Hz – 19kHz 59Hz – 19kHz 54Hz – 19kHz 40Hz – X-Over 38Hz – X-Over
Potenza del finale
(RMS/peak)
600 / 1.200 Watt 600 / 1.200 Watt 600 / 1.200 Watt 600 / 1.200 Watt 600 / 1.200 Watt 600 / 1.200 Watt 1.000 / 2.000 Watt
Tipo d‘amplificatore Class D – Biamped Class D – Biamped Class D – Biamped Class D – Biamped Class D – Biamped Class D Class D
Altoparlante bassi -----1x 15" con bobina 3" 1x 18" con bobina 4"
Altoparlanti bassi/
medi
1x 10" con bobina 2" 1x 12" con bobina 2,5" 1x 12" con bobina 2,5" 1x 15" con bobina 3" 1x 15" con bobina 3" - -
Driver acuti 1" con bobina 1,4" 1" con bobina 1,7" 1" con bobina 1,7" 1" con bobina 1,7" 1" con bobina 1,7" - -
Caratteristiche della
tromba
80° x 60° tromba-CD, girabile 80° x 60° tromba-CD, girabile 60° x 40° tromba-CD, girabile 70° x 50° tromba-CD, girabile 60° x 40° tromba-CD, girabile - -
Frequenza di separa-
zione attiva
2,1kHz FIR X-Over con 72dB/
ottava
1,9kHz FIR X-Over con 72dB/
ottava
1,6kHz FIR X-Over con 72dB/
ottava
1,6kHz FIR X-Over con 72dB/
ottava
1,6kHz FIR X-Over con 72dB/
ottava
- -
Max. livello d’ingresso 20dBu 20dBu 20dBu 20dBu 20dBu 20dBu 20dBu
Ingressi analogici 1x combo XLR/jack bilanciato 1x combo XLR/jack bilanciato 1x combo XLR/jack bilanciato 1x combo XLR/jack bilanciato 1x combo XLR/jack bilanciato 2x combo XLR/jack bilanciato 2x combo XLR/jack bilanciato
Thru analogico 1x XLR bilanciato 1x XLR bilanciato 1x XLR bilanciato 1x XLR bilanciato 1x XLR bilanciato 2x XLR bilanciato 2x XLR bilanciato
DSP Out 1x XLR bilanciato 1x XLR bilanciato 1x XLR bilanciato 1x XLR bilanciato 1x XLR bilanciato 1x XLR bilanciato 1x XLR bilanciato
Collegamento di rete EtherCON RJ45, 1x In EtherCON RJ45, 1x In EtherCON RJ45, 1x In EtherCON RJ45, 1x In EtherCON RJ45, 1x In EtherCON RJ45, 1x In, 1x Thru EtherCON RJ45, 1x In, 1x Thru
Preset filtri Flat, Monitor, Low Cut, Remote Flat, Monitor, Low Cut, Remote Flat, Boost, Low Cut, Remote Flat, Monitor, Low Cut, Remote Flat, Boost, Low Cut, Remote Front, Cardioid 1:1 vertical,
Cardioid 1:1 horizontal, Remote
Front, Cardioid 1:1 vertical,
Cardioid 1:1 horizontal, Remote
Software remoto DSP CONTROL (Windows, Mac OS) DSP CONTROL (Windows, Mac OS) DSP CONTROL (Windows, Mac OS) DSP CONTROL (Windows, Mac OS) DSP CONTROL (Windows, Mac OS) DSP CONTROL (Windows, Mac OS) DSP CONTROL (Windows, Mac OS)
Funzioni DSP EQ a 10 bande parametrico con
caratteristiche filtri varia-
bili, Filtro passa-alto, Filtro
passa-basso, Polarità, Livello,
Delay, Limiter, Mute
EQ a 10 bande parametrico con
caratteristiche filtri varia-
bili, Filtro passa-alto, Filtro
passa-basso, Polarità, Livello,
Delay, Limiter, Mute
EQ a 10 bande parametrico con
caratteristiche filtri varia-
bili, Filtro passa-alto, Filtro
passa-basso, Polarità, Livello,
Delay, Limiter, Mute
EQ a 10 bande parametrico con
caratteristiche filtri varia-
bili, Filtro passa-alto, Filtro
passa-basso, Polarità, Livello,
Delay, Limiter, Mute
EQ a 10 bande parametrico con
caratteristiche filtri varia-
bili, Filtro passa-alto, Filtro
passa-basso, Polarità, Livello,
Delay, Limiter, Mute
EQ a 10 bande parametrico con
caratteristiche filtri variabili,
Filtro passa-basso, Polarità,
Livello, Delay, Limiter, Mute
EQ a 10 bande parametrico con
caratteristiche filtri variabili,
Filtro passa-basso, Polarità,
Livello, Delay, Limiter, Mute
Frequenza di campio-
namento
48kHz 48kHz 48kHz 48kHz 48kHz 48kHz 48kHz
Tempo di latenza
sistema
<2ms <2ms <2ms <2ms <2ms <2ms <2ms
Alimentazione 1x connessione per apparecchi a
freddo con sistema di sicurezza
V-Lock, 100-240 V
1x connessione per apparecchi a
freddo con sistema di sicurezza
V-Lock, 100-240 V
1x connessione per apparecchi a
freddo con sistema di sicurezza
V-Lock, 100-240 V
1x connessione per apparecchi a
freddo con sistema di sicurezza
V-Lock, 100-240 V
1x connessione per apparecchi a
freddo con sistema di sicurezza
V-Lock, 100-240 V
1x connessione per apparecchi a
freddo con sistema di sicurezza
V-Lock, 100-240 V
1x connessione per apparecchi a
freddo con sistema di sicurezza
V-Lock, 100-240 V
Assorbimento di
potenza
1 A / 100–240V consumo
energetico nominale conforme
alla normativa EN62368-1
1 A / 100–240V consumo
energetico nominale conforme
alla normativa EN62368-1
1 A / 100–240V consumo
energetico nominale conforme
alla normativa EN62368-1
1 A / 100–240V consumo
energetico nominale conforme
alla normativa EN62368-1
1 A / 100–240V consumo
energetico nominale conforme
alla normativa EN62368-1
1 A / 100–240V consumo
energetico nominale conforme
alla normativa EN62368-1
1,9 A / 100–240V consumo
energetico nominale conforme
alla normativa EN62368-1
Angolo di installazione 31° 31° -31° - -
Flangia di supporto DuoTilt 3°/7° DuoTilt 3°/7° DuoTilt 3°/7° DuoTilt 3°/7° DuoTilt 3°/7° 1x M20 1x M20
Punti da rigging 3x M8 (AP-8) 3x M8 (AP-8) 3x M8 (AP-8) 3x M8 (AP-8) 3x M8 (AP-8) - -
Manici 1x SingleGrip 2x SingleGrip 2x MultiGrip 2x MultiGrip, 1 x SingleGrip 2x MultiGrip 2x MultiGrip 2x MultiGrip
Custodia Ibrida (compensato in betulla/
MDF)
Ibrida (compensato in betulla/
MDF)
Ibrida (compensato in betulla/
MDF)
Ibrida (compensato in betulla/
MDF)
Ibrida (compensato in betulla/
MDF)
Ibrida (compensato in betulla/
MDF)
Compensato in betulla
Superficie Smalto acrilico, nero Smalto acrilico, nero Smalto acrilico, nero Smalto acrilico, nero Smalto acrilico, nero Smalto acrilico, nero Smalto acrilico, nero
Griglia frontale Griglia in metallo 2mm con
plastico espanso speciale
Griglia in metallo 2mm con
plastico espanso speciale
Griglia in metallo 2mm con
plastico espanso speciale
Griglia in metallo 2mm con
plastico espanso speciale
Griglia in metallo 2mm con
plastico espanso speciale
Griglia in metallo 2mm con
plastico espanso speciale
Griglia in metallo 2mm con
plastico espanso speciale
Dimensioni (L x A x P) 36 x 52,5 x 30 cm
14-1/16 x 20-43/64 x 11-13/16"
36 x 59 x 30,5cm
14-1/16 x 23-15/64 x 12-1/32"
37 x 67 x 36,5cm
14-9/16 x 26-3/8 x 14-3/8"
45 x 68,5 x 42 cm
17-23/32 x 26-31/32 x 16-17/32"
44,8 x 70,7 x 44,75 cm
17-2/3 x 27-4/5 x 17-2/3"
48 x 53,5 x 67,5cm
18-57/64 x 21-1/16 x 26-37/64"
55 x 56 x 68,5cm
21-21/32 x 22-3/64 x 26-31/32"
Peso 14,9kg / 32,85lbs 17,6kg / 38,80lbs 21,9kg / 48,28lbs 27,6kg / 60,85lbs 30,2 kg / 66,47 lbs 32,9kg / 72,53lbs 41,6kg / 91,71lbs

LINEAR 5 MK II 1.0
33
• English • Français• Deutsch • Italiano • Español
7 Caratteristiche tecniche
Modello LINEAR 5 MK II
110 XA
LINEAR 5 MK II
112 XA
LINEAR 5 MK II
112 FA
LINEAR 5 MK II
115 XA
LINEAR 5 MK II
115 FA
LINEAR 5 MK II
115 Sub A
LINEAR 5 MK II
118 Sub A
Max. SPL @ 10% THD 127dB half space
(70Hz – 12kHz medio)
128dB half space
(70Hz – 12kHz medio)
128dB half space
(70Hz – 12kHz medio)
130dB half space
(70Hz – 12kHz medio)
130dB half space
(70Hz – 12kHz medio)
127dB half space
(42Hz – 100Hz medio)
130dB half space
(40Hz – 100Hz medio)
Max. SPL peak @ 10%
THD
135dB half space 136dB half space 135dB half space 138dB half space 138dB half space 130dB half space 131dB half space
Risposta in frequenza
+/-3dB
74Hz – 12kHz 73Hz – 12kHz 70Hz – 12kHz 64Hz – 12kHz 57Hz – 12kHz 44Hz – X-Over 42Hz – X-Over
Risposta in frequenza
-10dB
68Hz – 19kHz 67Hz – 19kHz 55Hz – 19kHz 59Hz – 19kHz 54Hz – 19kHz 40Hz – X-Over 38Hz – X-Over
Potenza del finale
(RMS/peak)
600 / 1.200 Watt 600 / 1.200 Watt 600 / 1.200 Watt 600 / 1.200 Watt 600 / 1.200 Watt 600 / 1.200 Watt 1.000 / 2.000 Watt
Tipo d‘amplificatore Class D – Biamped Class D – Biamped Class D – Biamped Class D – Biamped Class D – Biamped Class D Class D
Altoparlante bassi -----1x 15" con bobina 3" 1x 18" con bobina 4"
Altoparlanti bassi/
medi
1x 10" con bobina 2" 1x 12" con bobina 2,5" 1x 12" con bobina 2,5" 1x 15" con bobina 3" 1x 15" con bobina 3" - -
Driver acuti 1" con bobina 1,4" 1" con bobina 1,7" 1" con bobina 1,7" 1" con bobina 1,7" 1" con bobina 1,7" - -
Caratteristiche della
tromba
80° x 60° tromba-CD, girabile 80° x 60° tromba-CD, girabile 60° x 40° tromba-CD, girabile 70° x 50° tromba-CD, girabile 60° x 40° tromba-CD, girabile - -
Frequenza di separa-
zione attiva
2,1kHz FIR X-Over con 72dB/
ottava
1,9kHz FIR X-Over con 72dB/
ottava
1,6kHz FIR X-Over con 72dB/
ottava
1,6kHz FIR X-Over con 72dB/
ottava
1,6kHz FIR X-Over con 72dB/
ottava
- -
Max. livello d’ingresso 20dBu 20dBu 20dBu 20dBu 20dBu 20dBu 20dBu
Ingressi analogici 1x combo XLR/jack bilanciato 1x combo XLR/jack bilanciato 1x combo XLR/jack bilanciato 1x combo XLR/jack bilanciato 1x combo XLR/jack bilanciato 2x combo XLR/jack bilanciato 2x combo XLR/jack bilanciato
Thru analogico 1x XLR bilanciato 1x XLR bilanciato 1x XLR bilanciato 1x XLR bilanciato 1x XLR bilanciato 2x XLR bilanciato 2x XLR bilanciato
DSP Out 1x XLR bilanciato 1x XLR bilanciato 1x XLR bilanciato 1x XLR bilanciato 1x XLR bilanciato 1x XLR bilanciato 1x XLR bilanciato
Collegamento di rete EtherCON RJ45, 1x In EtherCON RJ45, 1x In EtherCON RJ45, 1x In EtherCON RJ45, 1x In EtherCON RJ45, 1x In EtherCON RJ45, 1x In, 1x Thru EtherCON RJ45, 1x In, 1x Thru
Preset filtri Flat, Monitor, Low Cut, Remote Flat, Monitor, Low Cut, Remote Flat, Boost, Low Cut, Remote Flat, Monitor, Low Cut, Remote Flat, Boost, Low Cut, Remote Front, Cardioid 1:1 vertical,
Cardioid 1:1 horizontal, Remote
Front, Cardioid 1:1 vertical,
Cardioid 1:1 horizontal, Remote
Software remoto DSP CONTROL (Windows, Mac OS) DSP CONTROL (Windows, Mac OS) DSP CONTROL (Windows, Mac OS) DSP CONTROL (Windows, Mac OS) DSP CONTROL (Windows, Mac OS) DSP CONTROL (Windows, Mac OS) DSP CONTROL (Windows, Mac OS)
Funzioni DSP EQ a 10 bande parametrico con
caratteristiche filtri varia-
bili, Filtro passa-alto, Filtro
passa-basso, Polarità, Livello,
Delay, Limiter, Mute
EQ a 10 bande parametrico con
caratteristiche filtri varia-
bili, Filtro passa-alto, Filtro
passa-basso, Polarità, Livello,
Delay, Limiter, Mute
EQ a 10 bande parametrico con
caratteristiche filtri varia-
bili, Filtro passa-alto, Filtro
passa-basso, Polarità, Livello,
Delay, Limiter, Mute
EQ a 10 bande parametrico con
caratteristiche filtri varia-
bili, Filtro passa-alto, Filtro
passa-basso, Polarità, Livello,
Delay, Limiter, Mute
EQ a 10 bande parametrico con
caratteristiche filtri varia-
bili, Filtro passa-alto, Filtro
passa-basso, Polarità, Livello,
Delay, Limiter, Mute
EQ a 10 bande parametrico con
caratteristiche filtri variabili,
Filtro passa-basso, Polarità,
Livello, Delay, Limiter, Mute
EQ a 10 bande parametrico con
caratteristiche filtri variabili,
Filtro passa-basso, Polarità,
Livello, Delay, Limiter, Mute
Frequenza di campio-
namento
48kHz 48kHz 48kHz 48kHz 48kHz 48kHz 48kHz
Tempo di latenza
sistema
<2ms <2ms <2ms <2ms <2ms <2ms <2ms
Alimentazione 1x connessione per apparecchi a
freddo con sistema di sicurezza
V-Lock, 100-240 V
1x connessione per apparecchi a
freddo con sistema di sicurezza
V-Lock, 100-240 V
1x connessione per apparecchi a
freddo con sistema di sicurezza
V-Lock, 100-240 V
1x connessione per apparecchi a
freddo con sistema di sicurezza
V-Lock, 100-240 V
1x connessione per apparecchi a
freddo con sistema di sicurezza
V-Lock, 100-240 V
1x connessione per apparecchi a
freddo con sistema di sicurezza
V-Lock, 100-240 V
1x connessione per apparecchi a
freddo con sistema di sicurezza
V-Lock, 100-240 V
Assorbimento di
potenza
1 A / 100–240V consumo
energetico nominale conforme
alla normativa EN62368-1
1 A / 100–240V consumo
energetico nominale conforme
alla normativa EN62368-1
1 A / 100–240V consumo
energetico nominale conforme
alla normativa EN62368-1
1 A / 100–240V consumo
energetico nominale conforme
alla normativa EN62368-1
1 A / 100–240V consumo
energetico nominale conforme
alla normativa EN62368-1
1 A / 100–240V consumo
energetico nominale conforme
alla normativa EN62368-1
1,9 A / 100–240V consumo
energetico nominale conforme
alla normativa EN62368-1
Angolo di installazione 31° 31° -31° - -
Flangia di supporto DuoTilt 3°/7° DuoTilt 3°/7° DuoTilt 3°/7° DuoTilt 3°/7° DuoTilt 3°/7° 1x M20 1x M20
Punti da rigging 3x M8 (AP-8) 3x M8 (AP-8) 3x M8 (AP-8) 3x M8 (AP-8) 3x M8 (AP-8) - -
Manici 1x SingleGrip 2x SingleGrip 2x MultiGrip 2x MultiGrip, 1 x SingleGrip 2x MultiGrip 2x MultiGrip 2x MultiGrip
Custodia Ibrida (compensato in betulla/
MDF)
Ibrida (compensato in betulla/
MDF)
Ibrida (compensato in betulla/
MDF)
Ibrida (compensato in betulla/
MDF)
Ibrida (compensato in betulla/
MDF)
Ibrida (compensato in betulla/
MDF)
Compensato in betulla
Superficie Smalto acrilico, nero Smalto acrilico, nero Smalto acrilico, nero Smalto acrilico, nero Smalto acrilico, nero Smalto acrilico, nero Smalto acrilico, nero
Griglia frontale Griglia in metallo 2mm con
plastico espanso speciale
Griglia in metallo 2mm con
plastico espanso speciale
Griglia in metallo 2mm con
plastico espanso speciale
Griglia in metallo 2mm con
plastico espanso speciale
Griglia in metallo 2mm con
plastico espanso speciale
Griglia in metallo 2mm con
plastico espanso speciale
Griglia in metallo 2mm con
plastico espanso speciale
Dimensioni (L x A x P) 36 x 52,5 x 30 cm
14-1/16 x 20-43/64 x 11-13/16"
36 x 59 x 30,5cm
14-1/16 x 23-15/64 x 12-1/32"
37 x 67 x 36,5cm
14-9/16 x 26-3/8 x 14-3/8"
45 x 68,5 x 42 cm
17-23/32 x 26-31/32 x 16-17/32"
44,8 x 70,7 x 44,75 cm
17-2/3 x 27-4/5 x 17-2/3"
48 x 53,5 x 67,5cm
18-57/64 x 21-1/16 x 26-37/64"
55 x 56 x 68,5cm
21-21/32 x 22-3/64 x 26-31/32"
Peso 14,9kg / 32,85lbs 17,6kg / 38,80lbs 21,9kg / 48,28lbs 27,6kg / 60,85lbs 30,2 kg / 66,47 lbs 32,9kg / 72,53lbs 41,6kg / 91,71lbs

Version 1.0 12/2022
Importantes instrucciones de seguridad.
¡Leer antes de encender!
Este producto ha sido elaborado por el fabricante de conformidad con
IEC62368-1 y ha salido de fábrica en perfecto estado. Para que se
mantenga en perfectas condiciones y asegurar que no exista riesgo
alguno, el usuario deberá observar los avisos y advertencias que se
encuentran en el manual de instrucciones. En caso de utilizar este
producto en vehículos, embarcaciones o aviones, así como a altitudes
superiores a los 2.000 m sobre el nivel del mar, además de la norma
IEC 62368-1 también se deberán cumplir las demás normas de seguri-
dad aplicables
ADVERTENCIA: Para prevenir el riesgo de incendio y el peligro de elec-
trocución, evite la exposición del equipo a humedad o lluvia. No abra la
cubierta: en el interior no hay elementos que deba manipular el usua-
rio. El mantenimiento deberá quedar a cargo de personal cualificado.
La presencia de este símbolo advierte de la existencia de
tensión peligrosa sin aislar en el interior que podría ser suficiente para
provocar una electrocución.
La presencia de este símbolo advierte de la existencia de
tensión peligrosa accesible desde el exterior. Todo cableado externo
conectado con algún terminal marcado con este símbolo deberá ser un
cableado preelaborado que satisfaga las recomendaciones del
fabricante o deberá ser instalado por personal cualificado.
La presencia de este símbolo advierte de importantes
instrucciones de uso y mantenimiento en la bibliografía adjunta. Lea el
manual.
La presencia de este símbolo indica: ¡Precaución! ¡Superficie
caliente! No tocar para evitar quemaduras.
Todos los aparatos eléctricos y electrónicos inclusive las
baterías, se han de evacuar por separado de la basura doméstica, a
través de centros de recogida y reciclaje oficiales.
Lea las presentes instrucciones. Conserve las presentes
instrucciones. Observe todas las advertencias e indicaciones señaladas
en el producto y en las instrucciones.
• No utilice el producto cerca del agua. No coloque el producto cerca de
agua, baños, bañeras, fregaderos, zonas húmedas, piscinas o saunas.
• No coloque objetos que contengan líquidos sobre el producto, como
jarrones, vasos, botellas, etcétera.
• Limpie exclusivamente con paños secos.
• No retire ninguna cubierta ni elementos del armazón.
• La tensión operativa del producto deberá ajustarse a la tensión del
suministro eléctrico local. Si no está seguro del tipo de electricidad
disponible, consulte con su distribuidor o con la compañía eléctrica
local.
• Antes de conectar el aparato debe asegurarse de que la instalación de
alimentación de red tenga equipos de protección suficientes contra
cortocircuito y fallo de puesta a tierra de los dispositivos conectados.
• Para reducir el riesgo de electrocución, deberá mantenerse la puesta
a tierra del producto. Utilice solamente el cable de alimentación
suministrado con el producto y mantenga siempre activo de la patilla
central (puesta a tierra) del cuadro de conexiones. No desactive la
función de seguridad del enchufe polarizado o con puesta a tierra.
El aparato solamente debe conectarse a enchufes que tengan una
puesta a tierra de protección que funcione reglamentariamente.
• Proteja el cable de alimentación de pisadas o pinzamientos, especial-
mente junto a enchufes, soportes de dispositivos y el punto de salida
desde el equipo. Los cables de alimentación deberán manipularse
siempre con precaución. Compruebe periódicamente que los cables
no tengan cortes ni signos de desgaste, especialmente en el enchufe
y en el punto de salida desde el equipo.
• No utilice nunca un cable dañado.
• Desenchufe el producto durante las tormentas con aparato eléctrico o
cuando vaya a estar en desuso durante periodos prolongados.
• El producto solamente se puede desconectar por completo de la red
extrayendo el enchufe de red de la unidad o de la toma de la pared.
El producto deberá colocarse en todo momento de tal modo que su
desconexión de la red sea sencilla.
• Los fusibles sólo los debe cambiar personal técnico cualificado,
utilizando el tipo y valor nominal correcto.
• El mantenimiento deberá quedar a cargo de personal cualificado.
Será necesaria una revisión si la unidad resulta dañada de cualquier
forma, por ejemplo:
- si el cable de alimentación o el enchufe están dañados o deshilacha-
dos;
- si se han derramado líquidos sobre el producto o han caído objetos
en él;
- si el producto se ha visto expuesto a lluvia o humedad;
- si el producto no funciona con normalidad pese a seguirse las instruc-
ciones de uso;
- si el producto ha sido salpicado o el cajetín ha sido dañado.
• Cuando se conecten altavoces a este aparato no se podrá sobrepasar
el límite de impedancia mínima especificado en el aparato o en las
presentes instrucciones. La sección de los cables empleados debe ser
suficiente en conformidad con la reglamentación local.
• Proteja de la luz solar directa.
• No instale cerca de fuentes de calor como radiadores, difusores de
calor, estufas u otros dispositivos que produzcan calor.
• Este aparato ha sido desarrollado para su uso en zonas climáticas
moderadas – y no para su uso en zonas climáticas tropicales.
• No bloquee ninguna abertura de ventilación. Instale de conformidad
con las instrucciones del fabricante. No deberá situarse el producto
en una instalación integrada, como una rejilla, a no ser que exista la
ventilación necesaria.
• Permita siempre que un dispositivo frío se caliente a temperatura
ambiente cuando se traslade a alguna sala. Pueden formarse
condensaciones en el interior del producto y dañarlo cuando se usa
sin precalentamiento.
• No sitúe fuentes de llama abierta, como velas encendidas, sobre el
producto.
• El dispositivo deberá situarse al menos a 20cm/8" de distancia de
las paredes.
• Utilice solamente con el carro, soporte, trípode, abrazadera o tablero
especificado por el fabricante o vendido junto con el producto.
Cuando se use un carro, deberá tenerse precaución al mover la com-
binación de carro/producto para evitar daños por vuelcos.
• Utilice solamente accesorios recomendados por el fabricante;
esto será de aplicación para todo tipo de accesorios, por ejemplo,
cubiertas protectoras, bolsas de transporte, pies, soportes murales
o de techo. En caso de instalación de cualquier tipo de accesorio en
el producto, siga siempre las instrucciones de uso suministradas
por el fabricante. Nunca utilice puntos de fijación distintos de los
especificados por el fabricante.
• El dispositivo NO es apropiado para su uso por parte de cualquier
persona o personas (niños incluidos) con las capacidades físicas,
sensoriales o mentales limitadas o sin la experiencia o el conocimien-
to suficientes con productos de este tipo. El dispositivo deberá man-
tenerse siempre fuera del alcance de los niños menores de 4 años.
• Nunca introduzca objetos de ninguna clase en el producto a través
de las ranuras del cajetín, ya que podrían tocar puntos de tensión
peligrosa, ni cortocircuite elementos que pudieran causar riesgo de
incendio o electrocución.
• El producto puede emitir niveles de presión sonora por encima de
90dB, lo que puede causar daños auditivos permanentes. La exposi-
ción a niveles sonoros extremadamente altos puede causar pérdidas
auditivas permanentes. Lleve protección auditiva si va a estar
expuesto de forma continua a dicho tipo de elevados niveles.
• El fabricante solamente garantiza la seguridad, la fiabilidad y la
eficiencia del producto si:
- el montaje, la extensión, el reajuste, las modificaciones o las repara-
ciones son realizados por el fabricante o por personal autorizado;
- la instalación eléctrica del área interesada es conforme con los
requisitos de las especificaciones de IEC (ANSI);
- la unidad se utiliza conforme a las instrucciones de uso.
• Este producto está optimizado para el uso de señales de música y
voz. El uso de señales senoidales, rectangulares o de medición de
otro tipo con nivel superior puede dañar seriamente el aparato.
Instrucciones generales de seguridad
para sistemas de altavoces
Los sistemas de fijación deben usarse exclusivamente para los
sistemas de altavoces autorizados por el fabricante y con los accesorios
de montaje indicados en las Instrucciones de montaje. Deben tenerse
en cuenta obligatoriamente las Instrucciones de montaje del
fabricante. No puede garantizarse la carga indicada y el fabricante no
asume ninguna responsabilidad en caso de montaje inadecuado o uso
de accesorios de montaje no autorizados.
No puede garantizarse la capacidad de carga del sistema y el fabricante
no asume ninguna responsabilidad si se realizan modificaciones en
los altavoces, los accesorios de montaje, los elementos de unión y de
fijación, así como los medios de sujeción.
Los reparaciones en las piezas relevantes para la seguridad deben ser
realizadas sólo por el fabricante o personas autorizadas por él, de lo
contrario se extinguirá la autorización de funcionamiento.
La instalación tiene que realizarla exclusivamente un experto
y sólo en puntos de montaje con una capacidad de carga suficiente, si
procede, teniendo en cuenta las servidumbres de construcción. Debe
usarse el material de fijación (tornillos, tacos, etc.) estipulado por el
fabricante en las Instrucciones de montaje. Las uniones atornilladas
deben asegurarse contra aflojamiento con las medidas apropiadas.
Las instalaciones estacionarias o móviles (altavoces incluidos
accesorios de montaje) deben asegurarse contra caídas por medio de
dos dispositivos de actuación independiente entre sí. Las piezas adicio-
nales sueltas o las que se aflojen deben sujetarse con los dispositivos
apropiados. Si se usan elementos de unión y de fijación, así como
medios de sujeción, deben tenerse en cuenta las normas nacionales.
Respecto a la medición de los medios de seguridad, deben tenerse en
cuenta las posibles cargas dinámicas (fuerzas a sacudidas).
En los pies de soporte debe tenerse en cuenta principalmente
la carga máxima. Además, por motivos constructivos, la mayoría de
los pies de soporte sólo están autorizados para soportar la carga
exactamente centrada. Los pies de soporte deben instalarse de forma
estable. Los pies de soporte tienen que asegurarse adicionalmente con
las medidas apropiadas, por ejemplo cuando:
- su superficie de apoyo no permita un apoyo estable,
- sus alturas limiten la estabilidad,
- se espere una presión del viento excesiva,
- se prevea que puedan ser volcados por personas.
Pueden ser también necesarias medidas especiales como precaución
contra el comportamiento peligroso de los espectadores. Los pies de
soporte no deben instalarse en las vías de escape y de emergencia. En
caso de instalación en vías de circulación debe tenerse en cuenta la
anchura necesaria de las vías y el bloqueo y señalización reglamentari-
os. Existe un peligro especial al colocar y apilar. Para ello deben usarse
los medios auxiliares adecuados. Deben tenerse en cuenta las normas
nacionales.
Durante el montaje debe usarse equipo protector
adecuado (especialmente casco protector, guantes y calzado de segu-
ridad) y sólo deben usarse ayudas para subir apropiadas (escaleras,
andamios, etc.). La responsabilidad exclusiva será de la empresa que
realice la instalación.
¡ATENCIÓN! Después del montaje tiene que comprobarse la suspensión
del sistema en el soporte y la fijación segura de los altavoces.
El explotador de los sistemas de altavoces (estacionarios o móviles)
está obligado a comprobar o hacer comprobar regularmente todos los
componentes del sistema teniendo en cuenta las regulaciones naciona-
les respectivas y hacer solucionar inmediatamente los posibles daños.
Además, recomendamos una documentación completa de todas las
medidas de comprobación en los libros de inspección o similares.
En especial, los puntos de sujeción de la carga de los sistemas suspen-
didos tienen que dimensionarse con reservas de seguridad suficientes.
Deben tenerse en cuenta las normas nacionales.
Los sistemas de altavoces profesionales pueden crear niveles
acústicos perjudiciales para la salud. La influencia de un nivel acústico
aparentemente inofensivo durante un periodo prolongado puede
causar daños permanentes en la audición (desde aprox. 95 dBA SPL).
Por ello, aconsejamos que todas las personas expuestas a un nivel
acústico alto debido al funcionamiento de sistemas de altavoces usen
protección acústica profesional (tapones para los oídos o auriculares
protectores).
Fabricante: Stamer Musikanlagen GmbH, Magdeburger Str. 8,
66606 St. Wendel, Alemania

LINEAR 5 MK II 1.0
35
• English • Français• Deutsch • Italiano • Español
¡Bienvenido a la familia HK Audio!
Muchas gracias por haberse decidido por un producto de una de nuestras
marcas. Ya que lo hemos desarrollado y cuidado con el máximo esmero para
que le sirva durante muchos años.
Aunque tenga ya una amplia experiencia con instalaciones de sonido,
en este producto encontrará novedades para Ud. Por lo tanto, lea atenta-
mente estas instrucciones de uso y consérvelas para futuras consultas.
¡Le deseamos el mejor sonido en cada ocasión!
El equipo HKAudio
Nota: La funcionalidad de este producto puede verse perturbada
por los campos electromagnéticos intensos o las descargas electrostáti-
cas. En este caso, el problema puede solucionarse apagando y volviendo a
encender el aparato. Si no se soluciona así, debe alejarse de la fuente de
interferencias.
Garantía
Hágalo cómodamente online en www.hkaudio.com.
http://warranty.hkaudio.com
El registro solo es válido si se realiza online en un plazo de 30 días desde
la fecha de compra.
HK Audio
Technischer Service (servicio técnico)
Postfach 1509
66595 St. Wendel, Alemania
Fax: +49 6851 905 100
LINEAR 5 MKII
110 XA 112 XA 112 FA 115 XA 115 SUB A 118 SUB A115 FA

LINEAR 5 MK II 1.0
36
1 Generalidades
Volumen de suministro
Cuando desembale por primera vez su recinto acústico LINEAR 5 MK II,
compruebe que viene completo con la Guía de arranque rápido y un cable de
alimentación.
2 Conexiones y elementos de mando
LINEAR 7
112 FA
MADE IN GERMANY
Mains Input
100-240 V~ 50-60 Hz
1 A @ 1/8 output power
Caution: Risk of electric shock! Do not open!
Refer servicing to qualified service personnel.
Attention: Risque de choc élèctrique –
ne pas ouvrir!
HK Audio is a brand of Stamer Musikanlagen GmbH
Magdeburger Str. 8 • 66606 St. Wendel • Germany
Power
Serial No.
Power
Auto Sleep
On Off
+6 dB
0 dB
Input
DSP Out
Thru Gain
Data Preset
1
2
3
4
Lock
Thru
In
Ethernet
Front
Cardioid 1:1
vertical
Cardioid 1:1
horizontal
Remote
1
5
2 3
4
6
7
8
Modelos LINEAR 5 MKII XA/FA
Leave enough space for proper ventilation!
LINEAR 7
118 Sub A
MADE IN GERMANY
Power
Auto Sleep
On Off
+6 dB–6 dB
0 dB
Input
L
R
DSP Out
Thru Gain
Serial No.
Mains Input
100-240 V~ 50-60 Hz
1.9 A @ 1/8 output power
Link
100-240 V~ 50-60 Hz
max. 10 A
Caution: Risk of electric shock! Do not open!
Refer servicing to qualified service personnel.
Attention: Risque de choc élèctrique –
ne pas ouvrir!
HK Audio is a brand of Stamer Musikanlagen GmbH
Magdeburger Str. 8 • 66606 St. Wendel • Germany
Power
Lock Lock
1
5
2
1 2
3
4
4
9
11 12
10
13
Modelos LINEAR 5 MKII Sub A
●
1 Input
Toma combo XLR/jack, entrada balanceada para señales analógicas.
• Los modelos LINEAR 5 MK II XA/FA tienen un canal de entrada.
• Los subwoofers LINEAR 5 MK II 115 Sub A y LINEAR 5 MK II 118 Sub A tie-
nen dos entradas separadas para las señales izquierda y derecha. Los dos
canales son iguales y se suman post-preamplificación, por lo que puede
utilizar cualquiera de ellos en modo mono.
●
2 Thru
Utilice esta salida XLR paralela y balanceada para enviar la señal encami-
nada a la Entrada a través de otros componentes. Esta salida permanece
activa incluso cuando los componentes electrónicos están desactivados. El
subwoofer tiene dos de estos puertos.
●
3 Gain
Utilice este knob para ajustar la ganancia de entrada de la señal entrante.
• El rango de control para los modelos XA/FA va de -∞ (silencio) a +6 dB.
• Este knob ajusta la ganancia de ambos canales del previo estéreo del
subwoofer en un rango de -6 a +6 dB.
La posición de las 12 en punto con muesca central es 0 dB en ambos casos.
Nota: El ajuste de Ganancia no afecta a la señal enviada a la Salida DSP.
●
4 LED Input/Limiter
Este LED se ilumina en verde para indicar señales entrantes. Cuando está
rojo, el limitador está activo o la entrada está saturando. El LED parpadea
brevemente en rojo para indicarle que el limitador está respondiendo a los
picos de señal. Si permanece en rojo, baje el knob de Ganancia.
●
5 DSP Out
Utilice este puerto XLR para reenviar la señal analógica encaminada al jack
de Entrada o para reenviar una señal de audio digital alimentada a través de
una red. El DSP integrado puede procesar ambos tipos de señales.
Esto significa que la Salida DSP puede servir como interfaz de red que le
permita integrar un altavoz autoamplificado añadido que no sea original-
mente compatible con la red.
En la configuración por defecto, la señal de entrada sin procesar va directa-
mente a la salida DSP, independientemente del preset seleccionado y del
ajuste del control de Ganancia.
Unidades mid/high Ethernet
LINEAR 7
112 FA
MADE IN GERMANY
Mains Input
100-240 V~ 50-60 Hz
1 A @ 1/8 output power
Caution: Risk of electric shock! Do not open!
Refer servicing to qualified service personnel.
Attention: Risque de choc élèctrique –
ne pas ouvrir!
HK Audio is a brand of Stamer Musikanlagen GmbH
Magdeburger Str. 8 • 66606 St. Wendel • Germany
Power
Serial No.
+6 dB
0 dB
Input
DSP Out
Thru Gain
Lock
Power
Auto Sleep
On Off
Data
Flat
Monitor
Low Cut
Remote
Preset
1
2
3
4
In
Ethernet
1
5
2 3
4
6
7
8
Subwoofers Ethernet
LINEAR 7
112 FA
MADE IN GERMANY
Mains Input
100-240 V~ 50-60 Hz
1 A @ 1/8 output power
Caution: Risk of electric shock! Do not open!
Refer servicing to qualified service personnel.
Attention: Risque de choc élèctrique –
ne pas ouvrir!
HK Audio is a brand of Stamer Musikanlagen GmbH
Magdeburger Str. 8 • 66606 St. Wendel • Germany
Power
Serial No.
Power
Auto Sleep
On Off
+6 dB
0 dB
Input
DSP Out
Thru Gain
Data Preset
1
2
3
4
Lock
Thru
In
Ethernet
Front
Cardioid 1:1
vertical
Cardioid 1:1
horizontal
Remote
1
5
2 3
4
6
7
8
●
6 Ethernet In /Thru
Utilice el puerto etherCON para integrar el altavoz en una red. Acepta co-
nectores RJ45 y etherCON (NE8 MX, NE8 MX6, NE8 MC). Las unidades mid/
high tienen cada una entrada Ethernet, y los subwoofers también tienen
una Ethernet Thru. Utilice el puerto Ethernet Thru para reenviar la señal de
red.
Utilice siempre cables S/STP ó S/FTP para protegerse de las interferencias
electromagnéticas. Recomendamos cables CAT6. En otro manual se expli-
can los detalles de la integración en red y las funciones de control remo-
to. Lo encontrará en la página de descargas de LINEAR 5 MK II en www.
hkaudio.com. Para una breve descripción de las funciones DSP, consulte la
sección●
8 Preset.

LINEAR 5 MK II 1.0
37
• English • Français• Deutsch • Italiano • Español• English • Français• Deutsch • Italiano • Español
●
7 Data
Este LED se ilumina en naranja cuando se están transfiriendo datos a través
de la toma de red.
●
8 Preset
Utilice el botón de selección de Presets para llamar a los presets de fábrica
o a un preset de usuario que puede configurar a través del software remoto
DSP CONTROL. Pulse el botón de selección una vez para desplazarse por los
presets 1 a 4.
En un manual aparte se explica cómo programar los cuatro presets de
usuario remotos. Lo encontrará en la página de descargas de LINEAR 5 MK
II en www.hkaudio.com.
Visión general de los presets:
LINEAR 5 MK II
110 XA, 112 XA, 115 XA
LINEAR 5 MK II
112 FA, 115 FA
LINEAR 5 MK II
115 Sub A, 118 Sub A
1Flat Flat Front
2Monitor Boost Cardioid 1:1 vertical
3Low Cut Low Cut Cardioid 1:1 hori-
zontal
4Mando a distancia (para acceder a los ajustes almacenados me-
diante el software remoto HK Audio DSP CONTROL)
Los presets de fábrica de los modelos LINEAR 5 MK II XA/FA:
Flat Ofrece una respuesta lineal en toda la gama de frecuencias
Monitor Optimizado para amortiguar los graves adicionales genera-
dos por el acoplamiento al suelo cuando se coloca un altavoz
de lado para utilizarlo como monitor
Boost Mejora la respuesta de graves cuando se utiliza como alta-
voz independiente sin subwoofer.
Low Cut Un filtro de paso alto optimiza la unidad para su uso como
unidad de medios/agudos emparejada con el LINEAR 5 MKII
115 Sub A ó 118 Sub A
Los presets de fábrica de LINEAR 5 MK II 115 Sub A y 118 Sub A
Front Modo de funcionamiento estándar para un subwoofer orien-
tado hacia delante
Cardioid 1:1
vertical
Para configuraciones cardioides con dos subwoofers apilados
con un subwoofer LINEAR 5 MKII orientado hacia delante.
(para más información, consulte la sección 4.2)
Cardioid 1:1
horizontal
Para configuraciones cardioides con dos subwoofers uno al
lado del otro y un subwoofer LINEAR 5 MKII orientado hacia
delante (para más información, consulte la sección 4.2)
Los presets de fábrica 1 a 3 sólo se refieren al altavoz y no a la salida DSP.
Nota: Si utiliza el altavoz en una red conectada al software remoto
DSP CONTROL, puede configurar la Salida DSP de forma independiente
incluso cuando utilice los presets 1 a 3 de fábrica. Para obtener más
información, consulte el manual del software DSP CONTROL. Lo
encontrará en la página de descarga de LINEAR 5 MK II en www.hkaudio.
com.
El preset Remote
Remote Esto le permite llamar a un preset de usuario que haya
guardado previamente a través de DSP CONTROL tanto para
el altavoz como para la salida DSP. Para ello, no es necesario
que el altavoz esté conectado al software remoto.
La configuración por defecto del preset Remote es idéntica a la del preset 1
de fábrica (Flat/Front).
Puede acceder a las siguientes funciones DSP a través del software remoto
DSP CONTROL y guardar sus ajustes en presets del usuario:
Ecualizador de 10 bandas totalmente paramétrico con características de
filtro variables para cada banda de frecuencia, filtros de paso alto y paso
bajo con características de filtro variables, Limitador, Delay, Polaridad, Nivel
y Mute.
Puede configurar estos parámetros por separado e independientemente
para el altavoz y su salida DSP.
Captura de pantalla del software remoto DSP CONTROL. Es posible descargar gratuitamente este
software desde la página de descargas de LINEAR 5 en www.hkaudio.com. Los parámetros del altavoz
y de la salida DSP son idénticos, pero la doble potencia DSP permite configurar cada conjunto de forma
independiente.
●
9 Power
Este interruptor basculante conecta y desconecta
la alimentación. Colóquelo en Power para encender
los componentes electrónicos y en O para desco-
nectarlos de la red eléctrica.
●
10 LED Power
En cuanto los componentes electrónicos reciben
tensión, este LED se ilumina en verde.
●
11 Mains Input
La conexión a la red está diseñada como una toma IEC 14 con bloqueo. En
combinación con el cable de conexión con bloqueo suministrado, el cable
de alimentación queda bloqueado y protegido contra el deslizamiento
accidental.
Leave enough space for proper ventilation!
LINEAR 7
118 Sub A
MADE IN GERMANY
Power
Auto Sleep
On Off
+6 dB–6 dB
0 dB
Input
L
R
DSP Out
Thru Gain
Serial No.
Caution: Risk of electric shock! Do not open!
Refer servicing to qualified service personnel.
Attention: Risque de choc élèctrique –
ne pas ouvrir!
HK Audio is a brand of Stamer Musikanlagen GmbH
Magdeburger Str. 8 • 66606 St. Wendel • Germany
Mains Input
100-240 V~ 50-60 Hz
1 A @ 1/8 output power
Power
1
5
2
1 2
3
4
4
9
11
12
10
13
●
12 Auto Sleep
Utilice este botón empotrado para activar y desactivar el modo de reposo
automático de ahorro de energía. El altavoz sale de fábrica con el botón
de reposo automático pulsado para activar este modo. Esta función pone
los componentes electrónicos en modo de reposo automático cuando
pasan cuatro horas y media sin que el altavoz registre una señal de audio,
se envíen datos a los puertos de red o se accione un botón o knob de los
componentes electrónicos. La única forma de despertarlo es apagando
y volviendo a encender el botón Power o conectando una señal de audio
analógica a la entrada.
Atención: No es posible la activación a través de las tomas de red.
La desactivación de la función Auto Sleep solo puede utilizarse por medio
del interruptor encastrado (no presionado).
Leave enough space for proper ventilation!
LINEAR 7
118 Sub A
MADE IN GERMANY
Power
Auto Sleep
On Off
+6 dB–6 dB
0 dB
Input
L
R
DSP Out
Thru Gain
Serial No.
Mains Input
100-240 V~ 50-60 Hz
1.9 A @ 1/8 output power
Link
100-240 V~ 50-60 Hz
max. 10 A
Caution: Risk of electric shock! Do not open!
Refer servicing to qualified service personnel.
Attention: Risque de choc élèctrique –
ne pas ouvrir!
HK Audio is a brand of Stamer Musikanlagen GmbH
Magdeburger Str. 8 • 66606 St. Wendel • Germany
Power
Lock Lock
1
5
2
1 2
3
4
4
9
11
12
10

LINEAR 5 MK II 1.0
38
3 Resumen de los diferentes modelos
110 XA, 112 XA, 112 FA, 115 XA, 115 FA,
115 Sub A, 118 Sub A
110 XA 112 XA 112 FA 115 XA 115 SUB A 118 SUB A115 FA
La serie LINEAR5 está compuesta por cinco partes superiores y dos su-
bwoofers:
LINEAR 5 MK II110 XA, LINEAR 5 MK II112 XA, LINEAR 5 MK II 112 FA,
LINEAR 5 MK II 115 XA, LINEAR 5 MK II 115 FA, LINEAR 5 MK II 115 Sub
A y LINEAR 5 MK II 118 Sub A. Gracias a la forma de su carcasa con una
inclinación de 31° integrada, los modelos multifuncionales LINEAR 5 MK II 110
XA, LINEAR 5 MK II 112 XA y LINEAR 5 MK II 115 XA son ideales también para el
uso como monitor de escenario horizontal. Las carcasas más grandes de los
modelos de rango completo LINEAR 5 MK II 112 FA y LINEAR 5 MK II 115 FA
proporcionan más presión sonora de baja frecuencia.
31°
LINEAR 5 MK II
110 XA / 112 XA / 115 XA
Los altavoces LINEAR 5 MK II 110 XA y 112 XA están equipados con una
bocina de dispersión amplia de 80° x 60° para una dispersión homogénea en
campo cercano. El LINEAR 5 MK II 115 XA tiene una bocina con un patrón de
dispersión media de 70°x50°. Los LINEAR 5 MK II 112 FA y 115 FA vienen con
una bocina con un patrón más estrecho de 60°x40° de largo alcance.
Se necesitan herramientas para girar las bocinas, por lo que no se prestan a
ajustes frecuentes. La idea es optimizar el patrón de tiro para la aplicación
principal de la caja.
Consejo: No es necesario girar la bocina cuando se coloca la carcasa de
lado para utilizarla como monitor de escenario. De hecho, el patrón de
proyección vertical más estrecho del altavoz vertical funciona muy bien
en posición horizontal. Esto minimiza el solapamiento con los monitores
adyacentes y reduce el riesgo de realimentación porque se puede enfocar
el altavoz con mayor precisión.
4 Configuración de los altavoces
4.1 Los modelos XA/FA
Las unidades de medios/agudos LINEAR 5 MK II pueden apilarse sobre
subwoofers, montarse en soportes de altavoz o mástiles, instalarse con
soportes de pared o colgarse con el hardware de aparejo adecuado.
Configuración con el DuoTilt 3/7
-3° -7°
Todas las unidades de medios/altos incorporan el DuoTilt 3/7 de HK Audio,
un soporte especial para soportes de altavoz y mástiles de 35 mm que ofre-
ce dos ángulos, -3° y -7°, para proporcionar una mejor cobertura. El DuoTilt
3/7 está situado más cerca del bafle para mantener el centro de gravedad
óptimo cuando el altavoz está sobre un soporte.
Información general sobre la instalación con soportes de altavoces
¡Atención! Asegúrese siempre de que el soporte del altavoz está sobre
una base sólida y respete las instrucciones del fabricante en cuanto a su
capacidad de carga máxima.
¡Tenga cuidado!
• Utilice únicamente soportes de altavoz lo suficientemente estables como
para evitar vuelcos accidentales. Asegúrese de que el soporte del altavoz
está diseñado para soportar el peso de la caja acústica. El ajuste más alto
de los soportes ajustables debe limitarse para evitar que la combinación
de soporte de altavoz y altavoz vuelque. Esto se aplica cuando se coloca el
soporte sobre una superficie plana y horizontal.
• Cuando se instale en una superficie irregular o inclinada, asegúrese de
que la base del soporte del altavoz esté bien sujeta para evitar vuelcos
accidentales, ya sea fijando pesos adecuados a la base o tomando otras
medidas para asegurar el soporte.
• El uso de cualquier otro tipo de fijación o accesorio puede provocar una
inestabilidad que puede causar lesiones.
Aparejo:
Los modelos XA y FA pueden colgarse instalando el accesorio AP-8 y cables
o cadenas de acero en sus puntos de enganche. Los modelos 112 FA, 115 FA y
115 XA permiten además la operación de aparejo en combinación con la ins-
talación de los soportes de inclinación HK Audio TB-45N y TB-45NQ (modelo
Q desmontable con pasadores de desenganche rápido).
4.2 LINEAR 5 MK II 115 Sub A y 118 Sub A
Coloque el subwoofer LINEAR 5 MK II como lo haría con cualquier otro

LINEAR 5 MK II 1.0
39
• English • Français• Deutsch • Italiano • Español
subwoofer de radiación directa. Se puede utilizar apilado o uno al lado del
otro en modo cardioide, manteniendo una distancia de al menos un metro
de las paredes.
Puede elegir entre dos configuraciones cardioides: Cardioid 1:1 vertical y
Cardioid 1:1 horizontal. Los diagramas siguientes muestran la vista frontal
desde la perspectiva del público.
Cardioid 1:1
vertical
Cardioid 1:1
horizontal
Preset:
Front
Preset:
Cardioid 1:1 horizontal
LINEAR 5
118 Sub A
MADE IN GERMANY
Preset:
Front
Preset:
Cardioid 1:1
vertical
LINEAR 5 MK II
118 Sub A
MADE IN GERMANY
Settings
Front
Front
Cardioid 1:1
vertical
Cardioid 1:1
horizontal
Leave 1 meter of space
in each direction!
Cardioid 1:1
vertical Cardioid 1:1
horizontal
LINEAR 5
118 Sub A
MADE IN GERMANY
LINEAR 5 MK II
118 Sub A
MADE IN GERMANY
Settings
Front
Front
Cardioid 1:1
vertical
Cardioid 1:1
horizontal
Leave 1 meter of space
in each direction!
Cardioid 1:1
vertical Cardioid 1:1
horizontal
Seleccione el preset adecuado para la configuración dada en el panel poste-
rior del subwoofer LINEAR 5 MK II. Consulte la sección 2, ●
8 Preset para
más información.
Preset Settings
Front
Front
Cardioid 1:1
vertical
Cardioid 1:1
horizontal
Cardioid 1:1
vertical Cardioid 1:1
horizontal
Ambas configuraciones atenúan el nivel de presión sonora hacia atrás hasta
34 dB y aumentan el SPL hacia delante unos 2 dB.
Front:
+2 dB
Rear:
–34 dB
¿Cuándo tiene sentido una configuración cardioide?
Mientras que las frecuencias medias y altas pueden irradiarse en patrones
direccionales, las bajas frecuencias son esféricas. Esto a menudo provoca un
exceso desagradable de graves en el escenario y detrás de él. Además, los
organizadores exigen cada vez más precisión en la distribución del sonido,
por ejemplo en las carpas de los centros urbanos. La forma más eficaz de
conseguirlo en la gama de graves es con la tecnología Cardioide (cancelan-
do las frecuencias radiadas hacia atrás). Por lo tanto, ambos subwoofers
LINEAR 5 MK II cumplen todos los requisitos para implementar rápida y
fácilmente configuraciones Cardioides eficaces, tanto mecánicamente como
con los juegos de filtros disponibles.
5 Ejemplos del sistema
5.1 Instalación como sistema 2.1 Stereo
Gracias a los preamplificadores estéreo integrados
del subwoofer LINEAR 5 MK II, puede configurar
fácilmente un sistema 2.1, enrutando los canales
izquierdo y derecho a un subwoofer LINEAR 5 MK
II y reenviando después sus señales a las unidades
de medios/agudos a través de sus puertos Thru.
Los patrones de gran alcance del LINEAR 5 MK II
110 XA son perfectos para esta aplicación.
Presets:
Partes supe-
riores
Low Cut
LINEAR 5 MK II
subwoofer
Front
Para garantizar una imagen lo más equilibrada posible, centre el subwoo-
fer entre las dos unidades de medios/agudos.
5.2 Instalación con la barra distanciadora
Si desea colocar las unidades de
medios/agudos en mástiles de altavoz
en lugar de soportes, simplemente
enrosque un mástil con rosca M20 en el
soporte para mástil M20 del subwoofer
LINEAR 5 MK II.
Preajustes:
Partes supe-
riores
Low Cut
LINEAR 5 MK II
subwoofer
Front
5.3 Instalación apilada
Colocando tres subwoofers LINEAR 5 MK II uno
encima del otro se crea una pila de 1.65 m. Puede
colocar las unidades de medios/agudos directa-
mente sobre las cajas de graves.
Preajustes:
Partes supe-
riores
Low Cut
LINEAR 5 MK II
subwoofer
Front
Nota: La instalación como pila sólo debe ser llevada a cabo por
personal cualificado y con las normas adecuadas, como la sujeción con
correas de amarre en superficies planas.

LINEAR 5 MK II 1.0
40
5.4 Configuración de un sistema cardioide vertical 1:1
Sistema cardioide con un mástil de altavoz. Los
subwoofers inferiores están orientados hacia
atrás.
Preajustes:
Partes superiores Low Cut
LINEAR 5 MK II
subwoofer
Front
LINEAR 5 MK II
subwoofer
Cardioid 1:1
vertical
5.5 Configuración de un sistema cardioide horizontal 1:1
Sistema cardioide con bajos uno al
lado del otro. Un subwoofer está orien-
tado hacia atrás.
Presets:
Partes superiores Low Cut
LINEAR 5 MK II
subwoofer
Front
LINEAR 5 MK II
subwoofer
Cardioid 1:1
horizontal
Encontrará varios ejemplos detallados de configuración y cableado
para su sistema LINEAR 5 MK II a partir de la página 42.
6 Accesorio opcional de HK Audio
HK Audio ofrece fundas protectoras contra la intemperie para todos los
modelos LINEAR 5 MK II. También sirven para proteger los altavoces
durante el transporte y a prueba de salpicaduras durante el funcionamiento.
Visite las páginas de producto de LINEAR 5 MK II en www.hkaudio.com para
obtener más información.
7 Datos técnicos
Modelo LINEAR 5 MK II
XA 110
LINEAR 5 MK II
XA 112
LINEAR 5 MK II
FA 112
LINEAR 5 MK II
XA 115
LINEAR 5 MK II
FA 115
LINEAR 5 MK II
115 Sub A
LINEAR 5 MK II
118 Sub A
Máx. SPL@10% THD 127dB medio espacio
(70Hz – 12kHz promediado)
128dB medio espacio
(70Hz – 12kHz promediado)
128dB medio espacio
(70Hz – 12kHz promediado)
130dB medio espacio
(70Hz – 12kHz promediado)
130dB medio espacio
(70Hz – 12kHz promediado)
127dB medio espacio
(42Hz – 100Hz promediado)
130dB medio espacio
(42Hz – 100Hz promediado)
Máx. SPL Peak@10%
THD
135dB medio espacio 136dB medio espacio 135dB medio espacio 138dB medio espacio 138dB medio espacio 130dB medio espacio 131dB medio espacio
Respuesta de frecuen-
cia +/-3dB
74Hz – 12kHz 73Hz – 12kHz 70Hz – 12kHz 64Hz – 12kHz 57Hz – 12kHz 44Hz – X-over 42Hz – X-over
Respuesta de frecuen-
cia -10dB
68Hz – 19kHz 67Hz – 19kHz 55Hz – 19kHz 59Hz – 19kHz 54Hz – 19kHz 40Hz – X-over 38Hz – X-over
Potencia de la etapa
final (RMS/Peak)
600 / 1200W 600 / 1200W 600 / 1200W 600 / 1200W 600 / 1200W 600 / 1200W 1000 / 2000W
Tipo de etapa final Class D – Biamped Class D – Biamped Class D – Biamped Class D – Biamped Class D – Biamped Class D Class D
Altavoz de graves - - - - - 1x 15" con bobina oscilatoria de 3" 1x 18" con bobina oscilatoria de 4"
Altavoz de graves/
medios
1x10" con bobina oscilatoria
de 2"
1x 12" con bobina oscilatoria
de 2,5"
1x 12" con bobina oscilatoria
de 2,5"
1x 15" con bobina oscilatoria
de 3"
1x 15" con bobina oscilatoria
de 3"
- -
Altavoz de agudos 1" con bobina oscilatoria de 1,4" 1" con bobina oscilatoria de 1,7" 1" con bobina oscilatoria de 1,7" 1" con bobina oscilatoria de 1,7" 1" con bobina oscilatoria de 1,7" - -
Característica de difusor 80° x 60° CD bocina, giratorio 80° x 60° CD bocina, giratorio 60° x 40° CD bocina, giratorio 70° x 50° CD bocina, giratorio 60° x 40° CD bocina, giratorio - -
Frecuencia de separa-
ción activa
2,1kHz FIR X-Over con 72dB/
oct.
1,9kHz FIR X-Over con 72dB/
oct.
1,6kHz FIR X-Over con 72dB/
oct.
1,6kHz FIR X-Over con 72dB/
oct.
1,6kHz FIR X-Over con 72dB/
oct.
- -
Nivel de entrada máx. 20dBu 20dBu 20dBu 20dBu 20dBu 20dBu 20dBu
Conexiones analógicas 1x XLR combo balanceado 1x XLR combo balanceado 1x XLR combo balanceado 1x XLR combo balanceado 1x XLR combo balanceado 2x XLR combo balanceado 2x XLR combo balanceado
Analog Thru 1x XLR balanceado 1x XLR balanceado 1x XLR balanceado 1x XLR balanceado 1x XLR balanceado 2x XLR balanceado 2x XLR balanceado
DSP Out 1x XLR balanceado 1x XLR balanceado 1x XLR balanceado 1x XLR balanceado 1x XLR balanceado 1x XLR balanceado 1x XLR balanceado
Conexión de red
informática
etherCON RJ45, 1x In etherCON RJ45, 1x In etherCON RJ45, 1x In etherCON RJ45, 1x In etherCON RJ45, 1x In etherCON RJ45, 1x In, 1x Thru etherCON RJ45, 1x In, 1x Thru
Presets de filtros Flat, Monitor, Low Cut, Remote Flat, Monitor, Low Cut, Remote Flat, Boost, Low Cut, Remote Flat, Monitor, Low Cut, Remote Flat, Boost, Low Cut, Remote Front, Cardioid 1:1 vertical,
Cardioid 1:1 horizontal, Remote
Front, Cardioid 1:1 vertical,
Cardioid 1:1 horizontal, Remote
Software remoto DSP CONTROL (Windows, Mac OS) DSP CONTROL (Windows, Mac OS) DSP CONTROL (Windows, Mac OS) DSP CONTROL (Windows, Mac OS) DSP CONTROL (Windows, Mac OS) DSP CONTROL (Windows, Mac OS) DSP CONTROL (Windows, Mac OS)
Funciones DSP EQ de 10 bandas, totalmente
paramétrico, con característica
de filtro variable, filtro de paso
alto, filtro de paso bajo, pola-
ridad, nivel, retardo, limitador,
mute
EQ de 10 bandas, totalmente
paramétrico, con característica
de filtro variable, filtro de paso
alto, filtro de paso bajo, pola-
ridad, nivel, retardo, limitador,
mute
EQ de 10 bandas, totalmente
paramétrico, con característica
de filtro variable, filtro de paso
alto, filtro de paso bajo, pola-
ridad, nivel, retardo, limitador,
mute
EQ de 10 bandas, totalmente
paramétrico, con característica
de filtro variable, filtro de paso
alto, filtro de paso bajo, pola-
ridad, nivel, retardo, limitador,
mute
EQ de 10 bandas, totalmente
paramétrico, con característica
de filtro variable, filtro de paso
alto, filtro de paso bajo, pola-
ridad, nivel, retardo, limitador,
mute
EQ de 10 bandas, totalmente
paramétrico, con característica
de filtro variable, filtro de paso
bajo, polaridad, nivel, retardo,
limitador, mute
EQ de 10 bandas, totalmente
paramétrico, con característica
de filtro variable, filtro de paso
bajo, polaridad, nivel, retardo,
limitador, mute
Frecuencia de muestreo 48kHz 48kHz 48kHz 48kHz 48kHz 48kHz 48kHz
Latencia del sistema Inferior a 2ms Inferior a 2ms Inferior a 2ms Inferior a 2ms Inferior a 2ms Inferior a 2ms Inferior a 2ms
Conexión de red 1x Conector IEC con sistema de
seguridad V-Lock, 100-240 V
1x Conector IEC con sistema de
seguridad V-Lock, 100-240 V
1x Conector IEC con sistema de
seguridad V-Lock, 100-240 V
1x Conector IEC con sistema de
seguridad V-Lock, 100-240 V
1x Conector IEC con sistema de
seguridad V-Lock, 100-240 V
1x Conector IEC con sistema de
seguridad V-Lock, 100-240 V
1x Conector IEC con sistema de
seguridad V-Lock, 100-240 V
Consumo de potencia 1A / 100–240V consumo
de corriente nominal según
EN62368-1
1A / 100–240V consumo
de corriente nominal según
EN62368-1
1A / 100–240V consumo
de corriente nominal según
EN62368-1
1A / 100–240V consumo
de corriente nominal según
EN62368-1
1A / 100–240V consumo
de corriente nominal según
EN62368-1
1A / 100–240V consumo
de corriente nominal según
EN62368-1
1,9A / 100–240V consumo
de corriente nominal según
EN62368-1
Ángulo de instalación 31° 31° -31° - -
Montaje en mástil DuoTilt 3°/7° DuoTilt 3°/7° DuoTilt 3°/7° DuoTilt 3°/7° DuoTilt 3°/7° 1x M20 1x M20
Puntos de suspensión 3x M8 (AP-8) 3x M8 (AP-8) 3x M8 (AP-8) 3x M8 (AP-8) 3x M8 (AP-8) - -
Asas de transporte 1x SingleGrip 2x SingleGrip 2x MultiGrip 2x MultiGrip, 1x SingleGrip 2x MultiGrip 2x MultiGrip 2x MultiGrip
Carcasa Híbrida (abedul-Multiplex/MDF) Híbrida (abedul-Multiplex/MDF) Híbrida (abedul-Multiplex/MDF) Híbrida (abedul-Multiplex/MDF) Híbrida (abedul-Multiplex/MDF) Híbrida (abedul-Multiplex/MDF) abedul-Multiplex
Superficie Laca acrílica, negra Laca acrílica, negra Laca acrílica, negra Laca acrílica, negra Laca acrílica, negra Laca acrílica, negra Laca acrílica, negra
Rejilla frontal Rejilla metálica de 2mm con
espuma negra acústica
Rejilla metálica de 2mm con
espuma negra acústica
Rejilla metálica de 2mm con
espuma negra acústica
Rejilla metálica de 2mm con
espuma negra acústica
Rejilla metálica de 2mm con
espuma negra acústica
Rejilla metálica de 2mm con
espuma negra acústica
Rejilla metálica de 2mm con
espuma negra acústica
Dimensiones (AxAxP) 36 x 52.5 x 30 cm
14-1/16 x 20-43/64 x 11-13/16"
36 x 59 x 30,5 cm
14-1/16 x 23-15/64 x 12-1/32"
37 x 67 x 36,5 cm
14-9/16 x 26-3/8 x 14-3/8"
45 x 68.5 x 42 cm
17-23/32 x 26-31/32 x 16-17/32"
44,8 x 70,7 x 44,75 cm
17-2/3 x 27-4/5 x 17-2/3"
48 x 53,5 x 67,5 cm
18-57/64 x 21-1/16 x 26-37/64"
55 x 56 x 68,5cm
21-21/32 x 22-3/64 x 26-31/32"
Peso 14,9kg / 32,85lbs 17,6kg / 38,80lbs 21,9kg / 48,28lbs 27,6kg / 60,85lbs 30,2 kg / 66,47 lbs 32,9kg / 72,53lbs 41,6kg / 91,71lbs

LINEAR 5 MK II 1.0
41
• English • Français• Deutsch • Italiano • Español
7 Datos técnicos
Modelo LINEAR 5 MK II
XA 110
LINEAR 5 MK II
XA 112
LINEAR 5 MK II
FA 112
LINEAR 5 MK II
XA 115
LINEAR 5 MK II
FA 115
LINEAR 5 MK II
115 Sub A
LINEAR 5 MK II
118 Sub A
Máx. SPL@10% THD 127dB medio espacio
(70Hz – 12kHz promediado)
128dB medio espacio
(70Hz – 12kHz promediado)
128dB medio espacio
(70Hz – 12kHz promediado)
130dB medio espacio
(70Hz – 12kHz promediado)
130dB medio espacio
(70Hz – 12kHz promediado)
127dB medio espacio
(42Hz – 100Hz promediado)
130dB medio espacio
(42Hz – 100Hz promediado)
Máx. SPL Peak@10%
THD
135dB medio espacio 136dB medio espacio 135dB medio espacio 138dB medio espacio 138dB medio espacio 130dB medio espacio 131dB medio espacio
Respuesta de frecuen-
cia +/-3dB
74Hz – 12kHz 73Hz – 12kHz 70Hz – 12kHz 64Hz – 12kHz 57Hz – 12kHz 44Hz – X-over 42Hz – X-over
Respuesta de frecuen-
cia -10dB
68Hz – 19kHz 67Hz – 19kHz 55Hz – 19kHz 59Hz – 19kHz 54Hz – 19kHz 40Hz – X-over 38Hz – X-over
Potencia de la etapa
final (RMS/Peak)
600 / 1200W 600 / 1200W 600 / 1200W 600 / 1200W 600 / 1200W 600 / 1200W 1000 / 2000W
Tipo de etapa final Class D – Biamped Class D – Biamped Class D – Biamped Class D – Biamped Class D – Biamped Class D Class D
Altavoz de graves - - - - - 1x 15" con bobina oscilatoria de 3" 1x 18" con bobina oscilatoria de 4"
Altavoz de graves/
medios
1x10" con bobina oscilatoria
de 2"
1x 12" con bobina oscilatoria
de 2,5"
1x 12" con bobina oscilatoria
de 2,5"
1x 15" con bobina oscilatoria
de 3"
1x 15" con bobina oscilatoria
de 3"
- -
Altavoz de agudos 1" con bobina oscilatoria de 1,4" 1" con bobina oscilatoria de 1,7" 1" con bobina oscilatoria de 1,7" 1" con bobina oscilatoria de 1,7" 1" con bobina oscilatoria de 1,7" - -
Característica de difusor 80° x 60° CD bocina, giratorio 80° x 60° CD bocina, giratorio 60° x 40° CD bocina, giratorio 70° x 50° CD bocina, giratorio 60° x 40° CD bocina, giratorio - -
Frecuencia de separa-
ción activa
2,1kHz FIR X-Over con 72dB/
oct.
1,9kHz FIR X-Over con 72dB/
oct.
1,6kHz FIR X-Over con 72dB/
oct.
1,6kHz FIR X-Over con 72dB/
oct.
1,6kHz FIR X-Over con 72dB/
oct.
- -
Nivel de entrada máx. 20dBu 20dBu 20dBu 20dBu 20dBu 20dBu 20dBu
Conexiones analógicas 1x XLR combo balanceado 1x XLR combo balanceado 1x XLR combo balanceado 1x XLR combo balanceado 1x XLR combo balanceado 2x XLR combo balanceado 2x XLR combo balanceado
Analog Thru 1x XLR balanceado 1x XLR balanceado 1x XLR balanceado 1x XLR balanceado 1x XLR balanceado 2x XLR balanceado 2x XLR balanceado
DSP Out 1x XLR balanceado 1x XLR balanceado 1x XLR balanceado 1x XLR balanceado 1x XLR balanceado 1x XLR balanceado 1x XLR balanceado
Conexión de red
informática
etherCON RJ45, 1x In etherCON RJ45, 1x In etherCON RJ45, 1x In etherCON RJ45, 1x In etherCON RJ45, 1x In etherCON RJ45, 1x In, 1x Thru etherCON RJ45, 1x In, 1x Thru
Presets de filtros Flat, Monitor, Low Cut, Remote Flat, Monitor, Low Cut, Remote Flat, Boost, Low Cut, Remote Flat, Monitor, Low Cut, Remote Flat, Boost, Low Cut, Remote Front, Cardioid 1:1 vertical,
Cardioid 1:1 horizontal, Remote
Front, Cardioid 1:1 vertical,
Cardioid 1:1 horizontal, Remote
Software remoto DSP CONTROL (Windows, Mac OS) DSP CONTROL (Windows, Mac OS) DSP CONTROL (Windows, Mac OS) DSP CONTROL (Windows, Mac OS) DSP CONTROL (Windows, Mac OS) DSP CONTROL (Windows, Mac OS) DSP CONTROL (Windows, Mac OS)
Funciones DSP EQ de 10 bandas, totalmente
paramétrico, con característica
de filtro variable, filtro de paso
alto, filtro de paso bajo, pola-
ridad, nivel, retardo, limitador,
mute
EQ de 10 bandas, totalmente
paramétrico, con característica
de filtro variable, filtro de paso
alto, filtro de paso bajo, pola-
ridad, nivel, retardo, limitador,
mute
EQ de 10 bandas, totalmente
paramétrico, con característica
de filtro variable, filtro de paso
alto, filtro de paso bajo, pola-
ridad, nivel, retardo, limitador,
mute
EQ de 10 bandas, totalmente
paramétrico, con característica
de filtro variable, filtro de paso
alto, filtro de paso bajo, pola-
ridad, nivel, retardo, limitador,
mute
EQ de 10 bandas, totalmente
paramétrico, con característica
de filtro variable, filtro de paso
alto, filtro de paso bajo, pola-
ridad, nivel, retardo, limitador,
mute
EQ de 10 bandas, totalmente
paramétrico, con característica
de filtro variable, filtro de paso
bajo, polaridad, nivel, retardo,
limitador, mute
EQ de 10 bandas, totalmente
paramétrico, con característica
de filtro variable, filtro de paso
bajo, polaridad, nivel, retardo,
limitador, mute
Frecuencia de muestreo 48kHz 48kHz 48kHz 48kHz 48kHz 48kHz 48kHz
Latencia del sistema Inferior a 2ms Inferior a 2ms Inferior a 2ms Inferior a 2ms Inferior a 2ms Inferior a 2ms Inferior a 2ms
Conexión de red 1x Conector IEC con sistema de
seguridad V-Lock, 100-240 V
1x Conector IEC con sistema de
seguridad V-Lock, 100-240 V
1x Conector IEC con sistema de
seguridad V-Lock, 100-240 V
1x Conector IEC con sistema de
seguridad V-Lock, 100-240 V
1x Conector IEC con sistema de
seguridad V-Lock, 100-240 V
1x Conector IEC con sistema de
seguridad V-Lock, 100-240 V
1x Conector IEC con sistema de
seguridad V-Lock, 100-240 V
Consumo de potencia 1A / 100–240V consumo
de corriente nominal según
EN62368-1
1A / 100–240V consumo
de corriente nominal según
EN62368-1
1A / 100–240V consumo
de corriente nominal según
EN62368-1
1A / 100–240V consumo
de corriente nominal según
EN62368-1
1A / 100–240V consumo
de corriente nominal según
EN62368-1
1A / 100–240V consumo
de corriente nominal según
EN62368-1
1,9A / 100–240V consumo
de corriente nominal según
EN62368-1
Ángulo de instalación 31° 31° -31° - -
Montaje en mástil DuoTilt 3°/7° DuoTilt 3°/7° DuoTilt 3°/7° DuoTilt 3°/7° DuoTilt 3°/7° 1x M20 1x M20
Puntos de suspensión 3x M8 (AP-8) 3x M8 (AP-8) 3x M8 (AP-8) 3x M8 (AP-8) 3x M8 (AP-8) - -
Asas de transporte 1x SingleGrip 2x SingleGrip 2x MultiGrip 2x MultiGrip, 1x SingleGrip 2x MultiGrip 2x MultiGrip 2x MultiGrip
Carcasa Híbrida (abedul-Multiplex/MDF) Híbrida (abedul-Multiplex/MDF) Híbrida (abedul-Multiplex/MDF) Híbrida (abedul-Multiplex/MDF) Híbrida (abedul-Multiplex/MDF) Híbrida (abedul-Multiplex/MDF) abedul-Multiplex
Superficie Laca acrílica, negra Laca acrílica, negra Laca acrílica, negra Laca acrílica, negra Laca acrílica, negra Laca acrílica, negra Laca acrílica, negra
Rejilla frontal Rejilla metálica de 2mm con
espuma negra acústica
Rejilla metálica de 2mm con
espuma negra acústica
Rejilla metálica de 2mm con
espuma negra acústica
Rejilla metálica de 2mm con
espuma negra acústica
Rejilla metálica de 2mm con
espuma negra acústica
Rejilla metálica de 2mm con
espuma negra acústica
Rejilla metálica de 2mm con
espuma negra acústica
Dimensiones (AxAxP) 36 x 52.5 x 30 cm
14-1/16 x 20-43/64 x 11-13/16"
36 x 59 x 30,5 cm
14-1/16 x 23-15/64 x 12-1/32"
37 x 67 x 36,5 cm
14-9/16 x 26-3/8 x 14-3/8"
45 x 68.5 x 42 cm
17-23/32 x 26-31/32 x 16-17/32"
44,8 x 70,7 x 44,75 cm
17-2/3 x 27-4/5 x 17-2/3"
48 x 53,5 x 67,5 cm
18-57/64 x 21-1/16 x 26-37/64"
55 x 56 x 68,5cm
21-21/32 x 22-3/64 x 26-31/32"
Peso 14,9kg / 32,85lbs 17,6kg / 38,80lbs 21,9kg / 48,28lbs 27,6kg / 60,85lbs 30,2 kg / 66,47 lbs 32,9kg / 72,53lbs 41,6kg / 91,71lbs

LINEAR 5 MK II 1.0
42
Application Samples
1. Standard Analog Setup
Use this option when rendering analog audio signals without the remote DSP CONTROL software.
Analog audio signal
Monitor 1 Monitor 2
Front left
Analog Out
Front right
LINEAR 5 MK II
118 Sub A
MADE IN GERMANY
LINEAR 5 MK II
118 Sub A
MADE IN GERMANY
Input InputInput L
Thru L
Thru L
Input L
Input
Input R
Thru R
Thru R
Input R
Input
• Deutsch
1. Standard-Setup analog
für den Betrieb mit analogem Audio-
Signal – ohne Remote-Software DSP
CONTROL
• Français
1. Setup analogique standard
Pour l’utilisation avec un signal audio
analogique – sans logiciel distant DSP
CONTROL
• Italiano
1. Configurazione standard
analogica
per l’utilizzo con segnale audio ana-
logico – senza software remoto DSP
CONTROL
• Español
1. Configuración estándar
analógica
para el funcionamiento con señal de
audio analógica – sin software remoto
DSP CONTROL

LINEAR 5 MK II 1.0
43

LINEAR 5 MK II
9840292 D-3211
HK Audio® • Postfach 1509 • 66595 St. Wendel • Germany • inf[email protected] • www.hkaudio.com
International Inquiries: fax +49-68 51-905 215 • [email protected]
Subject to change without notice • Technische Änderungen vorbehalten
Copyrights 2022 Music & Sales GmbH • 11/2022
-
 1
1
-
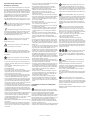 2
2
-
 3
3
-
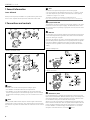 4
4
-
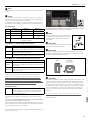 5
5
-
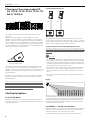 6
6
-
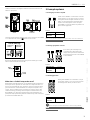 7
7
-
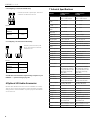 8
8
-
 9
9
-
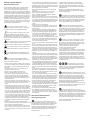 10
10
-
 11
11
-
 12
12
-
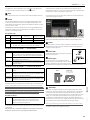 13
13
-
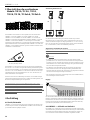 14
14
-
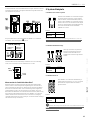 15
15
-
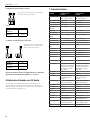 16
16
-
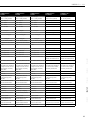 17
17
-
 18
18
-
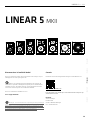 19
19
-
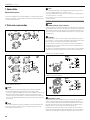 20
20
-
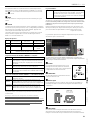 21
21
-
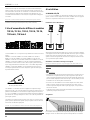 22
22
-
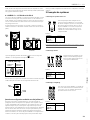 23
23
-
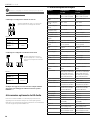 24
24
-
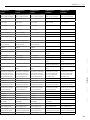 25
25
-
 26
26
-
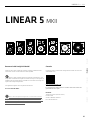 27
27
-
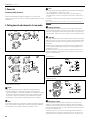 28
28
-
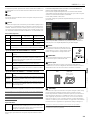 29
29
-
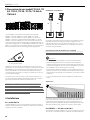 30
30
-
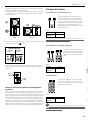 31
31
-
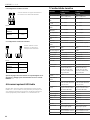 32
32
-
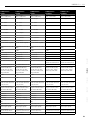 33
33
-
 34
34
-
 35
35
-
 36
36
-
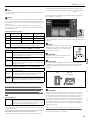 37
37
-
 38
38
-
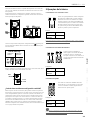 39
39
-
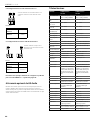 40
40
-
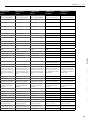 41
41
-
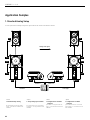 42
42
-
 43
43
-
 44
44


HK Audio Linear Manual de usuario
- Categoría
- Altavoces de la barra de sonido
- Tipo
- Manual de usuario
en otros idiomas
- français: HK Audio Linear Manuel utilisateur
- italiano: HK Audio Linear Manuale utente
- Deutsch: HK Audio Linear Benutzerhandbuch
Artículos relacionados
-
HK Audio LINEAR 7 112 XA Manual de usuario
-
HK Audio L7 118 Sub A Manual de usuario
-
HK Audio LINEAR 3 112 XA Manual de usuario
-
-
HK Audio Lucas 2K15 Manual de usuario
-
HK Audio L SUB 1800 A Manual de usuario
-
-