homeBASICS QSPC2924 Instrucciones de operación
- Tipo
- Instrucciones de operación

1
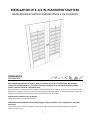
INSTALLATION OF 2-1/4 IN. PLANTATION SHUTTERS
INSTALACIÓ N DE POSTIGOS PLANTATION DE 2 1/4 PULGADAS
PREPARATION
PREPARACIÓ N
Before beginning installation of product, make sure all parts are present. Compare parts with package
contents list and diagram above. If any part is missing or damaged, do not attempt to install the product.
Contact customer service for replacement parts.
Antes de comenzar a instalar el producto, asegúrese de tener todas las piezas. Compare las piezas con la lista del contenido
del paquete y el diagrama anterior. No intente instalar el product si falta alguna pieza o si éstas están dañadas. Póngase en
contacto con el Departamento de Servicio al Cliente para obtener piezas de repuesto.
Approximate Installation Time: 45 minutes.
Tiempo de instalacion aproximado: 45 minutos.
Tools Required for Installation: Pencil, Safety Goggles, Phillips Screwdriver, Drill, Tape Measure, Step Stool
and a Level.
Herramientas necesarias para la instalación: Lápiz, gafas de seguridad, destornillador Phillips, taladro, cinta métrica,
taburete escalera y nivel.

2
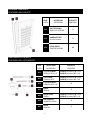
PACKAGE CONTENTS
CONTENIDO DEL PAQUETE
PART
PIEZA
DECRIPTION
DECRIPCIÓ N
QUANTITY
CANTIDAD
PC1
SHUTTER PANEL
PANEL DEL POSTIGO
2
PC2
HANGING STRIP
LISTÓN COLGANTE
2
PC3
FILLER STRIPS
TIRAS DE RELLENO
16
HARDWARE CONTENTS
CONTENIDO DEL ADITAMENTOS
PART
PIEZA
DECRIPTION
DECRIPCIÓ N
QUANTITY
CANTIDAD
HC1
2-1/2 IN. SCREW
TORNILLO DE 2 1/2”
(HEIGHT/ALTURA <= 36”) → 4
(HEIGHT/ALTURA > 36”) → 6
HC2
2 IN. SCREW
TORNILLO DE 2”
(HEIGHT/ALTURA <= 36”) → 4
(HEIGHT/ALTURA > 36”) → 6
HC3
1-1/8 IN. SCREW
TORNILLO DE 1 1/8”
2
HC4
KNOB
PERILLA
2
HC5
SCREW PLUG
TAPÓ N
(HEIGHT/ALTURA <= 36”) → 4
(HEIGHT/ALTURA > 36”) → 6
HC6
FLAT WASHER
ARANDELA PLANA
2
HC7
HOOK
GANCHO
1

3
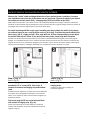
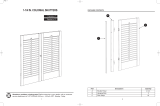
INSIDE MOUNT INSTALLATION INSTRUCTIONS
INSTRUCCIONES DE INSTALACIÓN DEL MONTAJE INTERIOR
Measure the “inside” width and height dimension of your desired shutter installation. Compare
your installation size to the size of the shutter set you purchased. The overall width of your shutter
set includes the shutter panels (PC1), 2 hanging strips (PC2) and 16 filler strips (PC3).
Mida la dimension del ancho y de la altura “interior” de la instalación deseada de su postigo. Compare su tamaño de
instalación col el tamaño del juego de postigos que compró. El ancho total de su juego de postigos incluye los paneles de
los postigos (PC1), 2 listones colgantes (PC2) y 16 tiras de relleno (PC3).
For inside mounting and filler strips are an incredibly easy way to adjust the width of the shutter
set, without having to use a saw. Each filler strip is 1/8 in. thick. To reduce the overall width of the
frame set by 1/8 in., simply peel off 1 filler strip. With the 16 filler strips provided, you can adjust
the overall width up to 2 inches. If you peel off too many strips, simply snap back into place.
Nuestras tiras de relleno para montaje interior son una manera increíblemente fácil de regular el ancho del juego de
postigos, sin necesidad de utilizer la sierra. Cada tira de relleno tiene 0,32 cm de ancho. Para reducer el ancho total del
juego de marcos a 0,32 cm, simplemente despegue 1 tira de relleno. Can las 16 tiras de relleno incluidas, puede regular
el ancho total hasta 5,08 cm. Si despegu demasiadas tiras, simplemente vuelva a colocarlas en su lugar.
Step 1: (Fig. 1)
Poso 1: (Fig. 3)
Step 2: (Fig. 2)
Poso 2: (Fig. 2)
Install hanging strips into the window jamb using the
provided 2-1/2 in. screws (HC1). Filler strips, if
needed, fit between the hanging strip and window
jamb.
Instale los listones colgantes en la jamba de la ventana utilizando
los tornillos de 2-1/2 pulgadas incluidos (HC1). Los listones de
relleno, si son necesarios, caben entre los listones colgantes y la
jamba de la ventana.
Hang the shutter panels onto the
hanging strips.
Cuelgue los paneles de los postigos en
los listones colgantes.
Push screw plugs (HC5) into screw hold until flush
with surface of hanging strip. (Fig. 1A)
Presione los tapones de los tornillos (HC5) en el orificio del
tornillo hasta que queden al ras de la superficie de los listones
colgantes. (Fig. 1A)

4
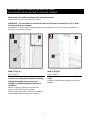
OUTISDE MOUNT INSTALLATION INSTRUCTIONS
INSTRUCCIONES DE INSTALACIÓN DEL MONTAJE EXTERIOR
Measure the exact width and height of the area to be covered.
Mida la altura y el ancho exactos del area a cubrir.
IMPORTANT – The total width of the selected shutter set should be a minimum of 2-1/2 in. wider
than the inside of your window.
IMPORTANTE – El ancho total del juego de postigos que elija debe ser como mínimo de 2-1/2 pulgadas más
ancho que el interior de su ventana.
Step 1: (Fig. 3)
Poso 1: (Fig. 3)
Step 2: (Fig. 4)
Poso 2: (Fig. 4)
Drill a hole through the face of the hanging strip.
Use the 2 in. screws (HC2) provided by screwing
through the hanging strips and into your
molding or wall depending upon the place of
installation.
Perfore un agujero a través de la cara del listón
colgante. Use los tornillos de 2 pulgadas
proporcionados al atornillar a través de sus molduras
o la pared dependiendo del lugar de instalación.
Hang the shutter panels onto the hanging
strips.
Cuelgue los paneles de los pastigos en loslistones
colgantes.

5
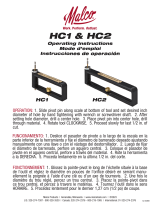
INSTALL OPTIONAL KNOB & HOOK SET
PERILLAS Y DEL GANCHO
Step 1: (Fig. 5)
Poso 1: (Fig. 5)
The knob and hook set is an optional
decorating option and can be located at any
desired height.
El juego de perilla y gancho es una decoració n
opcional y puede colocarse a cualquier altura
deseada.
Locate the hook (HC7), Knobs (HC4),
Washers (HC6) and 1-1/8 in. screws (HC3).
Coloque el gancho (HC7), las perillas (HC4), las
arandelas (HC6) y los tornillos de 1-1/8” (HC3).
Assemble and position in desired location
as shown in Fig. 5.
Ensámblelos y coló quelos en la posició n
deseada como se muestra en la fig. 5.
ALL SHUTTERS CAN BE SHORTENED
TODOS LOS POSTIGOS PUEDEN CORTARSE
Step 1: (Fig 6)
Poso 1: (Fig. 6)
The overall height of your shutter panels
can be adjusted by trimming the top and
bottom rails.
La altura total de los paneles de los postigos se
puede regular cortando los rieles superiors e
inferiors.
Plantation shutters may be trimmed up to
1/4 in. on the top and 1-1/4 in. on the
bottom. Trim the rails by using a fine tooth
circular saw.
Los postigos Plantation pueden acortarse 0,63
cm en la parte de arriba y 3,18 cm en la parte de
abajo. Corte los rieles utilizando una sierra
circular de dientes finos.
IMPORTANT – Do not exceed the maximum
recommended trimming.
IMPORTANTE – No exceda la capacidad maxima
de corte.
-
 1
1
-
 2
2
-
 3
3
-
 4
4
-
 5
5


homeBASICS QSPC2924 Instrucciones de operación
- Tipo
- Instrucciones de operación
En otros idiomas
Documentos relacionados

Otros documentos
-
Handy Home Products 18832-9 Guía de instalación
-
Zebra HC1 Guía del usuario
-
Allen + Roth PW 1033QS Guía de instalación
-
 Style Selections TW 1001QS Guía de instalación
-
-
 Malco HC1 Instrucciones de operación
-
 Vantage 8214039030 Guía de instalación
-
Alpha VBL15X75BU Guía de instalación
-
Sony SPK-HCD El manual del propietario
-
Petsafe HPA11-10969 Guía de instalación


