
MP49D
PRINTED IN CHINA
INSTRUCTIONS
INSTRUCCIONES
REEMPLAZO DE LA BATERÍA DE RESPALDO
La batería de seguridad de la memoria conserva la carga y el ajuste del calendario y del
reloj cuando se interrumpe la alimentación o incluso cuando se desconecta el cable de CA.
Pila : 1 pila de litio (Type : CR2032)
Duración de la pila : Tíempo de backup 2000 horas.
Reemplazo de la batería de respaldo
Después de reemplazar la batería de respaldo, presione el botón [RESET].
Una vez restablecida, asegúrese de volver configurar el calendario, el reloj, el tipo
impositivo y el conversion de divisas.
PRECAUCIÓN: Existe un riesgo de explosión si se utiliza un tipo de bateria incorrecto.
Siga las instrucciones para desechar las baterias.
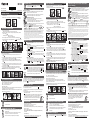
REPLACING THE INK RIBBON
Note: Turn the power switch off.
1) Lift up the tab on the back-side of the printer cover, and then remove the cover.
(Figure )
2) While pinching together the ribbon lock (A) in the direction of arrow, lift ribbon spools
off the shafts. Discard the old ribbon and spools. (Figure )
3) Separate the spools of new ribbon between the tape and printer head. Guide it
around the four positions of the ribbon guide (B) and place the spools on the shafts.
(Figure )
4) When the ribbon spools have settled, release the ribbon locks. If necessary, rotate
the spools until the pegs on the botton of the spool seat themselves in the holes of
the spool holder. (Figure )
5) Rotate either spool to take up any ribbon slack, making sure that the ribbon is
positioned around the four ribbon guides. Replace the printer cover. (Figure )
IMPORTANT: Use only the same type of ribbon spools.
ENGLISH
ESPAÑOLA
BEFORE STARTING
•
Remove the insulation tape and press the [ RESET ] button at the back of the
calculator before use.
•
Remove the tape on the ink ribbon of the calculator before use. (Figure , )
SPECIFICATIONS
Power Source: AC 120V, 60Hz
Operation Temperature: 32ºF to 104ºF (0ºC to 40ºC)
Calculating Capacity: 14 digits maximum
Dimension: 336mm(L) x 225mm(W) x 76mm(H) / 13-15/64"(L) x 8-55/64"(W) x 3"(H)
Weight: 1.8 kg (4 lb)
(Subject to change without notice)
The socket-outlet shall be installed near the equipment and shall be easily
accessible.
For CA, USA Only
Included battery contains perchlorate material - special handling may apply.
See http://www.dtsc.ca.gov/hazardouswaste/perchlorate/ for detail.
ESPECIFICACIONES
Suministro de Energía: CA120V 60Hz
Temperatura de operación: 32ºF a 104ºF (0ºC a 40ºC)
Capacidad de Cálculos: Máximo de 14 dígitos
Dimensiones: 336mm (longitud) x 225mm (ancho) x 76mm (alto)
13-15/64" (longitud) x 8-55/64" (ancho) x 3" (alto)
Peso: 1.8 kg (4 lb)
(Sujeto a cambios sin previo aviso)
La toma de corriente debe estar instalada cerca del equipo y se debe tener fácil
acceso a ella.
Para el Ca, los E.E.U.U. Solamente
La batería incluida contiene el material del perclorato - El manejo especial debe ser aplicado.
Para el detalle, por favor ver http://www.dtsc.ca.gov/hazardouswaste/perchlorate
ANTES DE EMPEZAR
• Retire la cinta aislante y presione el botón [ RESET ] en la parte trasera de la
calculadora antes de usarla.
• Quite la tapa de la cinta gris la calculadora antes de utilizarla. (Figura , )
INSTALLING PRINTING PAPER
1) Lift up the arm (Figure ).
• When inserting the paper, cut the edge of the paper as shown.
2) Place the new paper roll on the arm. The edge of the paper should be positioned
as shown (Figure ).
• Suitable paper roll – Width: 2-1/4" (57mm)
Diameter: 3-3/8" (86mm) max.
3) Insert the paper into the slit at the back of the machine as indicated. (Figure )
4) Turn the power switch on. Press the paper feed key to advance the paper as
shown. (Figure )
ITEM COUNT SWITCH
• At "n+" or "n+/–" position, the calculator count and print the number of
calculation items up to 999.
ITEM COUNTER
• When the "ITEM" switch is set at "n+", the calculator counts the number
of times the + and – keys are pressed.
• When the switch is set at "n+/–", the calculator counts the number of times
the + key is pressed and subtracts from the total numbers of times the –
key is pressed.
MEMORY ITEM COUNT
• When the "ITEM" switch is set at "n+", the calculator counts number of
times and keys are pressed.
• When the switch is set at "n+/–", the calculator counts the number of times
the key is pressed and subtracts from the total number of times the
key is pressed.
PRINTOUT OF ITEM COUNT
• When the PRINT switch is turned "ON", and the "ITEM" switch is at the
"n+" or "n+/–" position, the number of items recorded by the counter can
print up to three digits on the left-hand side of the paper by pressing either
the key or the key for item count and key or key for memory
item count.
CONMUTADOR CONTADOR DE ENTRADAS
• Este conmutador activa la cuenta e impresión del número de ítems
hasta 999.
CONTADOR DE ENTRADAS
• Cuando el contador de n de entradas está situado en n+, la calculadora
contará el n de veces que las teclas + y – se presionan. Cuando el
contador de n de entradas está situado en n+/– la calculadora contará el
n de veces que se presiona la tecla + y restará del total el n de veces
que se presiona la tecla – .
CONTADOR DE ENTRADAS DE MEMORIA
• Cuando el contador de n de entradas está situado en n+, la calculadora
contará el n de veces que las teclas y se presionan. Cuando el
contador de n de entradas está situado en n+/– la calculadora contará
el n de veces que se presiona la tecla y restará del total el n de veces
que se presiona la tecla .
IMPRESÍON DE LA CUENTA DE ÍTEMS
• Cuando el interruptor de impresión “PRINT” se posiciona en ON, y el
interruptor de cuenta de entradas (ITEM) está en la posición n+ o n+/–,
puede imprimirse el número de entradas registradas por el contador,
hasta tres dígitos, en la izquierda del papel, presionando la tecla o la
tecla para la cuenta de entradas y la tecla o la tecla para la
memoria de cuenta de entradas.
E-IM-2503
REPLACING BACKUP BATTERY
Memory backup battery retains the tax rate, calendar and clock setting, when the power
is off or even when the AC cord is disconnected.
Battery : 1 Lithium battery (Type : CR2032)
Battery life : Backup time 2000 hours
Replace back-up battery
After replace the back-up battery, press the [ RESET ] button. After resetting be sure to
set the calendar, clock, tax and currency rate again.
CAUTION: Risk of explosion if battery is replaced by an incorrect type. Dispose of used
batteries according to the instruction.
POWER ON/OFF SWITCH
• Turns calculator On.
• Turns calculator Off.
SUMINISTRO ACTIVADO / DESACTIVADO
• Activa la calculadora.
• Desactiva la calculadora.
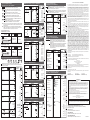
MEMORY / CURRENCY CONVERSION SELECTION SWITCH
MEMORY CALCULATION
Set the switch to "ON MEMORY PRINT" position to perform calculation
using memory and basic calculation function.
• Entries and result will appear on the display but will not be printed out.
• Entries and result will appear on the display and printout.
CURRENCY CONVERSION CALCULATION
Set the switch to "CONV. PRINT ON" position to perform currency
conversion and basic calculation function.
• Entries and result will appear on the display but will not be printed out.
• Entries and result will appear on the display and printout.
• Press and hold for 1 second, then enter the currency conversion rate
and press , or to store the rate.
• Press , or to recall the stored currency conversion rate.
• Press to convert currency figure displayed from , or to the .
• Press , or to convert displayed figure from to or .
*1 Specifying the Number of Decimal Places for Intermediate US Dollar Amounts.
When you convert from one national currency to another, the calculator internally converts the original currency to US
dollars. This conversion result is the "intermediate US dollar amount". Next, the intermediate US dollar amount is
converted to the target currency. The flow of the steps of the conversions will be shown on the printout.
For such a calculation, you should use the following procedure to specify the number of decimal places for the
intermediate US dollar amount. You can specify from 0 (*2) to 9 decimal places, for a floating decimal point (F). The
intermediate US dollar amount is rounded off to the number of decimal places you specify.
*2 0 is displayed when F ( floating point) is set for the number of decimal places. F is the initial default setting.
• For rates of 1 or greater, you can input up to six digits. For rates less than 1 you can input up to 8 digits, including 0 for
the integer digit and leading zeros (though only six significant digits, counted from the left and starting with the first
non-zero digit, can be specified).
CONMUTADOR PARA SELECCIÓN DE CONVERSION DE
DIVISAS / MEMORIA
CALCULO DE MEMORIA
Coloque el conmutador en la posición "ON MEMORY PRINT" para efectuar
el cálculo usando la función de cálculo básico y de memoria.
• Las entradas y el resultado aparecerán en la pantalla pero no se imprimirán.
• Las entradas y el resultado aparecerán en la pantalla y se imprimirán.
CALCULO DE CONVERSION DE DIVISA
Coloque el conmutador en la posición "CONV. PRINT ON" para efectuar el
cálculo de conversión de divisa.
• Las entradas y el resultado aparecerán en la pantalla pero no se imprimirán.
• Las entradas y el resultado aparecerán en la pantalla y se imprimirán.
• La prensa y el asimiento por 1 segundo, entonces entran en el índice de
conversión de modernidad y la prensa , o para almacenar la tarifa.
•
Presione , ó para llamar la tasa de conversión de divisa en memoria.
• Presione para convertir la cifra de divisa que se visualiza de , ó
a .
• Presione , ó para convertir la cifra que se visualiza de a
ó .
*1 Especificando el Número de Posiciones Decimales para Cantidades Intermedias en Dólar de los EE.UU.
Cuando Ud. convierte de una moneda de un país a otra, la calculadora convierte internamente la divisa original a dólares
de los EE.UU. El resultado de esta conversión es la "cantidad intermedia en dólar de los EE.UU.". A continuación, la
cantidad intermedia en dólar de los EE.UU. es convertida a la moneda objetivo. El flujo de los pasos de las conversiones
será mostrado en la impresión.
Para tal cálculo, Ud. deberá usar el siguiente procedimiento para especificar el número de posiciones decimales para la
cantidad intermedia en dólar de los EE.UU.. Ud. puede especificar de 0 (*2) a 9 posiciones decimales, para un punto
flotante decimal (F). La cantidad intermedia en dólar de los EE.UU. es redondeada al número de posiciones decimales
que Ud. especifique.
*2 Se visualiza o cuando F (punto flotante) se ajusta para el número de lugares decimales. F es el ajuste inicial fijado por
omisión.
• Para tasas de 1 o mayors, puede ingresar hasta seis dígitos. Para tasas menores de 1 puede ingresar hasta 8 dígitos,
incluyendo 0 para el dígito entero y ceros a la izquierda (aunque solamente se pueden especificar seis dígitos
significantes, contados desde la izquierda y comenzando con el primer dígito que no sea cero).
ROUNDING SWITCH
• Used for round-up [ ] , round-off [5/4], or round-down [ ] to the
pre-selected decimal digits in the result.
DECIMAL POINT SELECTOR SWITCH
• Used for designating the decimal point position (+, 0, 2, 3, 4, 6, F) for
calculated results.
• Addition and subtraction functions are performed with an automatic
2-digit decimal. It is convenient for currency calculations.
• All effective numbers up to 14 digits are printed or displayed.
INTERRUPTOR SELECTOR DE PUNTO DECIMAL
• Utilizado para designar la posición del punto decimal para
(+, 0, 2, 3, 4, 6, F) los resultados calculados.
• Las adiciones y substracciones son realizadas con dos dígitos
decimales automáticamente. Es conveniente para cálculos monetarios.
• Todos los números efectivos hasta 14 dígitos son impresos o
desplegados.
OVERFLOW FUNCTION
In the following cases, when "E" is displayed, a dotted line is printed, the keyboard is
electronically locked, and further operation is impossible. Press to clear the overflow.
The overflow function occurs when:
1) The result or the memory content exceeds 14 digits to the left of the decimal point.
2) Dividing by "0".
3) The sequential operation speed is faster than the calculation processing speed.
(Buffer Register Overflow)
Electromagnetic interference or electrostatic discharge may cause the display to
malfunction or the memory and tax rate to be lost or altered. Should this
occur, use the tip of a ballpoint pen (or similar sharp object) to press
the [ RESET ] button on the back of the calculator. After resetting be
sure to set the calendar, clock, tax and currency rate again.
FUNCIÓN DE REBOSE
En los siguientes casos, cuando aparece una "E" en la pantalla, una línea de puntos es
impresa, el teclado se bloquea electrónicamente, y la operación subsiguiente no es
posible, presione para borrar el rebose. La función de rebose ocurre cuando:
1) El resultado o el contenido de la memoria excede de 14 dígitos a la izquierda del
punto decimal.
2) Divide por "0"
3) La velocidad de la operación secuencial es más rápida que la velocidad del proceso
de cálculo. (Rebosamiento del registro de la memoria intermedia)
Las interferencias electromagnéticas o las descargas electrostáticas pueden originar
que la pantalla funcione incorrectamente o que la memoria y el tipo imositivo se pierdan
o alteren. Si esto sucede, utilice la punta de un bolígrafo (u objeto con punta similar)
para pulsar el botón [ RESET ] (Restablecer) situado en la parte
posterior de la calculadora. Una vez restablecida, asegúrese de
volver configurar el calendario, el reloj, el tipo impositivo y el
conversion de divisas.
GRAND TOTAL / RATE SET SWITCH
GRAND TOTAL
/ • When the calculations are performed with the GT switch set to "ON", the
totals are accumulated in the grand total memory. Each time is pressed,
the subtotal number is printed with the symbols G+. When is pressed,
the intermediate grand total is printed with the symbols G . Press
successively to get the grand total followed by the symbols G .
RATE SET
• Set switch to "RATE" for setting or recalling the TAX rate.
CONMUTADOR DE REDONDEO
• Es usado para redondear el resultado hacia arriba [ ], redondear [5/4], o
redondear hacia abajo [ ] a la cantidad de decimales pre-seleccionados
.
TECLA DE GRAN TOTAL / RATE SET
GRAN TOTAL
/ • Cuando los cálculos son realizados con el conmutador GT colocado en
Activado (ON), los totales son acumulados en el registro de gran total.
Cada vez que usted presiona , el subtotal y el símbolo G+ son
impresos. Cuando usted presiona la tecla , el gran total intermedio
es desplegado e impreso con el símbolo G . Presione por segunda
vez para obtener el gran total seguido por el símbolo G .
RATE SET
• Sitúe el interuptor en "RATE" Para fijarlo en el modo de conversión "TAX".
INSTALANDO PAPEL DE IMPRESIÓN
1) Levantar la cubierta de la impresora. (Figura )
• Antes de introducir el papel, corte el borde del papel como se muestra.
2) Coloque el nuevo rollo de papel en el brazo de la calculadora. El borde del papel
deberá ser colocado como se muestra en la (Figura ).
• Rollo de papel adecuado – Ancho: 2-1/4" (57mm)
Diámetro: 3-3/8" (86mm) max.
3) Introduzca el papel en la ranura posterior de la máquina, como se indica en la.
(Figura )
4) Encienda la calculadora. Presione la tecla de advance de papel para avanzar
el papel como se muestra. (Figura )
a
b
a
b
a
b
a
b
COMO CAMBIAR LA CINTA
Nota: Apáguela.
1) Levante la pestaña del lado posterior de la tapa de la impresora y luego retire la
tapa. (Figura )
2) Mientras sostiene el seguro de la cinta (A) en la dirección de las flechas, levante
los carretes de cinta del eje. Deseche la cinta y carretes viejos. (Figura )
3) Separe los carretes de cinta nueva entre la cinta y la cabeza de la impresora. Guíe
la cinta alrededor de las cuatro guias de cinta (B) y coloque los carretes encima de
los ejes. (Figura )
4) Permita que los carretes se asienten y suelte los seguros de cinta. Si es necesario,
gire los carretes hasta que las clavijas en la base encajen en los huecos del soporte
de carrete. (Figura )
5) Gire cualquiera de los carretes para templar la cinta y asegúrese que la cinta pase
por las cuatro guias de cinta. Coloque nuevamente la cubierta de la impresora.
(Figura )
NOTA IMPORTATE: Utilice unicamente el mismo tipo de carretes de cinta y
coloque la cinta de la manera indicada.
AUTO AHORRO DE ENERGIA
Cuando la energía es activada en "ON" y la calculadora no se usa por un período de
aproximadamente 7 minutos, la calculadora cambiará al modo de ahorro de energía
automáticamente y la luz LED cambiará a roja. Presione la tecla y la calculadora se
enccenderá otra vez y la luz LED cambiará a color verde para representar en modo normal
.
AUTO POWER SAVE
When the power is turned "ON" and the calculator is not being used for approx. 7 minutes.
The calculator will switch to power save mode automatically and the LED light will turns
red color. Press key the calculator will resume and the LED light will change into
green color to return into normal calculation mode.
La página se está cargando...
Transcripción de documentos
MP49D INSTRUCTIONS INSTRUCCIONES • Used for round-up [ ] , round-off [5/4], or round-down [ pre-selected decimal digits in the result. ] to the MEMORY / CURRENCY CONVERSION SELECTION SWITCH E-IM-2503 BEFORE STARTING PRINTED IN CHINA ENGLISH • Remove the insulation tape and press the [ RESET ] button at the back of the calculator before use. • Remove the tape on the ink ribbon of the calculator before use. (Figure a , b ) a b INSTALLING PRINTING PAPER 1) Lift up the arm (Figure ). • When inserting the paper, cut the edge of the paper as shown. 2) Place the new paper roll on the arm. The edge of the paper should be positioned as shown (Figure ). • Suitable paper roll – Width: 2-1/4" (57mm) Diameter: 3-3/8" (86mm) max. 3) Insert the paper into the slit at the back of the machine as indicated. (Figure ) 4) Turn the power switch on. Press the paper feed key to advance the paper as shown. (Figure ) REPLACING THE INK RIBBON Note: Turn the power switch off. 1) Lift up the tab on the back-side of the printer cover, and then remove the cover. (Figure ) 2) While pinching together the ribbon lock (A) in the direction of arrow, lift ribbon spools off the shafts. Discard the old ribbon and spools. (Figure ) 3) Separate the spools of new ribbon between the tape and printer head. Guide it around the four positions of the ribbon guide (B) and place the spools on the shafts. (Figure ) 4) When the ribbon spools have settled, release the ribbon locks. If necessary, rotate the spools until the pegs on the botton of the spool seat themselves in the holes of the spool holder. (Figure ) 5) Rotate either spool to take up any ribbon slack, making sure that the ribbon is positioned around the four ribbon guides. Replace the printer cover. (Figure ) IMPORTANT: Use only the same type of ribbon spools. MEMORY CALCULATION Set the switch to "ON MEMORY PRINT" position to perform calculation using memory and basic calculation function. • Entries and result will appear on the display but will not be printed out. • Entries and result will appear on the display and printout. CURRENCY CONVERSION CALCULATION Set the switch to "CONV. PRINT ON" position to perform currency conversion and basic calculation function. • Entries and result will appear on the display but will not be printed out. • Entries and result will appear on the display and printout. • Press and hold for 1 second, then enter the currency conversion rate and press , or to store the rate. • Press , or to recall the stored currency conversion rate. • Press to convert currency figure displayed from , or to the . • Press , or to convert displayed figure from to or . *1 Specifying the Number of Decimal Places for Intermediate US Dollar Amounts. When you convert from one national currency to another, the calculator internally converts the original currency to US dollars. This conversion result is the "intermediate US dollar amount". Next, the intermediate US dollar amount is converted to the target currency. The flow of the steps of the conversions will be shown on the printout. For such a calculation, you should use the following procedure to specify the number of decimal places for the intermediate US dollar amount. You can specify from 0 (*2) to 9 decimal places, for a floating decimal point (F). The intermediate US dollar amount is rounded off to the number of decimal places you specify. *2 0 is displayed when F ( floating point) is set for the number of decimal places. F is the initial default setting. • For rates of 1 or greater, you can input up to six digits. For rates less than 1 you can input up to 8 digits, including 0 for the integer digit and leading zeros (though only six significant digits, counted from the left and starting with the first non-zero digit, can be specified). ITEM COUNT SWITCH • At "n+" or "n+/–" position, the calculator count and print the number of calculation items up to 999. ITEM COUNTER • When the "ITEM" switch is set at "n+", the calculator counts the number of times the + and – keys are pressed. • When the switch is set at "n+/–", the calculator counts the number of times the + key is pressed and subtracts from the total numbers of times the – key is pressed. MEMORY ITEM COUNT • When the "ITEM" switch is set at "n+", the calculator counts number of times and keys are pressed. • When the switch is set at "n+/–", the calculator counts the number of times the key is pressed and subtracts from the total number of times the key is pressed. PRINTOUT OF ITEM COUNT • When the PRINT switch is turned "ON", and the "ITEM" switch is at the "n+" or "n+/–" position, the number of items recorded by the counter can print up to three digits on the left-hand side of the paper by pressing either the key or the key for item count and key or key for memory item count. Memory backup battery retains the tax rate, calendar and clock setting, when the power is off or even when the AC cord is disconnected. Battery : 1 Lithium battery (Type : CR2032) Battery life : Backup time 2000 hours Replace back-up battery After replace the back-up battery, press the [ RESET ] button. After resetting be sure to set the calendar, clock, tax and currency rate again. CAUTION: Risk of explosion if battery is replaced by an incorrect type. Dispose of used batteries according to the instruction. POWER ON/OFF SWITCH • Turns calculator On. • Turns calculator Off. DECIMAL POINT SELECTOR SWITCH • Used for designating the decimal point position (+, 0, 2, 3, 4, 6, F) for calculated results. • Addition and subtraction functions are performed with an automatic 2-digit decimal. It is convenient for currency calculations. • All effective numbers up to 14 digits are printed or displayed. • Retire la cinta aislante y presione el botón [ RESET ] en la parte trasera de la calculadora antes de usarla. • Quite la tapa de la cinta gris la calculadora antes de utilizarla. (Figura a , b ) a b INSTALANDO PAPEL DE IMPRESIÓN 1) Levantar la cubierta de la impresora. (Figura ) • Antes de introducir el papel, corte el borde del papel como se muestra. 2) Coloque el nuevo rollo de papel en el brazo de la calculadora. El borde del papel deberá ser colocado como se muestra en la (Figura ). • Rollo de papel adecuado – Ancho: 2-1/4" (57mm) Diámetro: 3-3/8" (86mm) max. 3) Introduzca el papel en la ranura posterior de la máquina, como se indica en la. (Figura ) 4) Encienda la calculadora. Presione la tecla de advance de papel para avanzar el papel como se muestra. (Figura ) GRAND TOTAL / • When the calculations are performed with the GT switch set to "ON", the totals are accumulated in the grand total memory. Each time is pressed, the subtotal number is printed with the symbols G+. When is pressed, the intermediate grand total is printed with the symbols G . Press successively to get the grand total followed by the symbols G . RATE SET • Set switch to "RATE" for setting or recalling the TAX rate. When the power is turned "ON" and the calculator is not being used for approx. 7 minutes. The calculator will switch to power save mode automatically and the LED light will turns red color. Press key the calculator will resume and the LED light will change into green color to return into normal calculation mode. OVERFLOW FUNCTION In the following cases, when "E" is displayed, a dotted line is printed, the keyboard is electronically locked, and further operation is impossible. Press to clear the overflow. The overflow function occurs when: 1) The result or the memory content exceeds 14 digits to the left of the decimal point. 2) Dividing by "0". 3) The sequential operation speed is faster than the calculation processing speed. (Buffer Register Overflow) Electromagnetic interference or electrostatic discharge may cause the display to malfunction or the memory and tax rate to be lost or altered. Should this occur, use the tip of a ballpoint pen (or similar sharp object) to press the [ RESET ] button on the back of the calculator. After resetting be sure to set the calendar, clock, tax and currency rate again. SPECIFICATIONS Power Source: AC 120V, 60Hz Operation Temperature: 32ºF to 104ºF (0ºC to 40ºC) Calculating Capacity: 14 digits maximum Dimension: 336mm(L) x 225mm(W) x 76mm(H) / 13-15/64"(L) x 8-55/64"(W) x 3"(H) Weight: 1.8 kg (4 lb) (Subject to change without notice) The socket-outlet shall be installed near the equipment and shall be easily accessible. For CA, USA Only Included battery contains perchlorate material - special handling may apply. See http://www.dtsc.ca.gov/hazardouswaste/perchlorate/ for detail. CONMUTADOR PARA SELECCIÓN DE CONVERSION DE DIVISAS / MEMORIA CALCULO DE MEMORIA Coloque el conmutador en la posición "ON MEMORY PRINT" para efectuar el cálculo usando la función de cálculo básico y de memoria. • Las entradas y el resultado aparecerán en la pantalla pero no se imprimirán. • Las entradas y el resultado aparecerán en la pantalla y se imprimirán. CALCULO DE CONVERSION DE DIVISA Coloque el conmutador en la posición "CONV. PRINT ON" para efectuar el cálculo de conversión de divisa. • Las entradas y el resultado aparecerán en la pantalla pero no se imprimirán. • Las entradas y el resultado aparecerán en la pantalla y se imprimirán. • La prensa y el asimiento por 1 segundo, entonces entran en el índice de conversión de modernidad y la prensa , o para almacenar la tarifa. • Presione , ó para llamar la tasa de conversión de divisa en memoria. • Presione para convertir la cifra de divisa que se visualiza de , ó a . • Presione , ó para convertir la cifra que se visualiza de a ó . *1 Especificando el Número de Posiciones Decimales para Cantidades Intermedias en Dólar de los EE.UU. Cuando Ud. convierte de una moneda de un país a otra, la calculadora convierte internamente la divisa original a dólares de los EE.UU. El resultado de esta conversión es la "cantidad intermedia en dólar de los EE.UU.". A continuación, la cantidad intermedia en dólar de los EE.UU. es convertida a la moneda objetivo. El flujo de los pasos de las conversiones será mostrado en la impresión. Para tal cálculo, Ud. deberá usar el siguiente procedimiento para especificar el número de posiciones decimales para la cantidad intermedia en dólar de los EE.UU.. Ud. puede especificar de 0 (*2) a 9 posiciones decimales, para un punto flotante decimal (F). La cantidad intermedia en dólar de los EE.UU. es redondeada al número de posiciones decimales que Ud. especifique. *2 Se visualiza o cuando F (punto flotante) se ajusta para el número de lugares decimales. F es el ajuste inicial fijado por omisión. • Para tasas de 1 o mayors, puede ingresar hasta seis dígitos. Para tasas menores de 1 puede ingresar hasta 8 dígitos, incluyendo 0 para el dígito entero y ceros a la izquierda (aunque solamente se pueden especificar seis dígitos significantes, contados desde la izquierda y comenzando con el primer dígito que no sea cero). CONMUTADOR CONTADOR DE ENTRADAS COMO CAMBIAR LA CINTA Nota: Apáguela. 1) Levante la pestaña del lado posterior de la tapa de la impresora y luego retire la tapa. (Figura ) 2) Mientras sostiene el seguro de la cinta (A) en la dirección de las flechas, levante los carretes de cinta del eje. Deseche la cinta y carretes viejos. (Figura ) 3) Separe los carretes de cinta nueva entre la cinta y la cabeza de la impresora. Guíe la cinta alrededor de las cuatro guias de cinta (B) y coloque los carretes encima de los ejes. (Figura ) 4) Permita que los carretes se asienten y suelte los seguros de cinta. Si es necesario, gire los carretes hasta que las clavijas en la base encajen en los huecos del soporte de carrete. (Figura ) 5) Gire cualquiera de los carretes para templar la cinta y asegúrese que la cinta pase por las cuatro guias de cinta. Coloque nuevamente la cubierta de la impresora. (Figura ) NOTA IMPORTATE: Utilice unicamente el mismo tipo de carretes de cinta y coloque la cinta de la manera indicada. GRAND TOTAL / RATE SET SWITCH AUTO POWER SAVE REPLACING BACKUP BATTERY ESPAÑOLA ANTES DE EMPEZAR ROUNDING SWITCH REEMPLAZO DE LA BATERÍA DE RESPALDO La batería de seguridad de la memoria conserva la carga y el ajuste del calendario y del reloj cuando se interrumpe la alimentación o incluso cuando se desconecta el cable de CA. Pila : 1 pila de litio (Type : CR2032) Duración de la pila : Tíempo de backup 2000 horas. Reemplazo de la batería de respaldo Después de reemplazar la batería de respaldo, presione el botón [RESET]. Una vez restablecida, asegúrese de volver configurar el calendario, el reloj, el tipo impositivo y el conversion de divisas. PRECAUCIÓN: Existe un riesgo de explosión si se utiliza un tipo de bateria incorrecto. Siga las instrucciones para desechar las baterias. SUMINISTRO ACTIVADO / DESACTIVADO • Activa la calculadora. • Desactiva la calculadora. INTERRUPTOR SELECTOR DE PUNTO DECIMAL • Utilizado para designar la posición del punto decimal para (+, 0, 2, 3, 4, 6, F) los resultados calculados. • Las adiciones y substracciones son realizadas con dos dígitos decimales automáticamente. Es conveniente para cálculos monetarios. • Todos los números efectivos hasta 14 dígitos son impresos o desplegados. CONMUTADOR DE REDONDEO • Es usado para redondear el resultado hacia arriba [ ], redondear [5/4], o redondear hacia abajo [ ] a la cantidad de decimales pre-seleccionados. • Este conmutador activa la cuenta e impresión del número de ítems hasta 999. CONTADOR DE ENTRADAS • Cuando el contador de n de entradas está situado en n+, la calculadora contará el n de veces que las teclas + y – se presionan. Cuando el contador de n de entradas está situado en n+/– la calculadora contará el n de veces que se presiona la tecla + y restará del total el n de veces que se presiona la tecla – . CONTADOR DE ENTRADAS DE MEMORIA • Cuando el contador de n de entradas está situado en n+, la calculadora contará el n de veces que las teclas y se presionan. Cuando el contador de n de entradas está situado en n+/– la calculadora contará el n de veces que se presiona la tecla y restará del total el n de veces que se presiona la tecla . IMPRESÍON DE LA CUENTA DE ÍTEMS • Cuando el interruptor de impresión “PRINT” se posiciona en ON, y el interruptor de cuenta de entradas (ITEM) está en la posición n+ o n+/–, puede imprimirse el número de entradas registradas por el contador, hasta tres dígitos, en la izquierda del papel, presionando la tecla o la tecla para la cuenta de entradas y la tecla o la tecla para la memoria de cuenta de entradas. TECLA DE GRAN TOTAL / RATE SET GRAN TOTAL / • Cuando los cálculos son realizados con el conmutador GT colocado en Activado (ON), los totales son acumulados en el registro de gran total. Cada vez que usted presiona , el subtotal y el símbolo G+ son impresos. Cuando usted presiona la tecla , el gran total intermedio es desplegado e impreso con el símbolo G . Presione por segunda vez para obtener el gran total seguido por el símbolo G . RATE SET • Sitúe el interuptor en "RATE" Para fijarlo en el modo de conversión "TAX". AUTO AHORRO DE ENERGIA Cuando la energía es activada en "ON" y la calculadora no se usa por un período de aproximadamente 7 minutos, la calculadora cambiará al modo de ahorro de energía automáticamente y la luz LED cambiará a roja. Presione la tecla y la calculadora se enccenderá otra vez y la luz LED cambiará a color verde para representar en modo normal. FUNCIÓN DE REBOSE En los siguientes casos, cuando aparece una "E" en la pantalla, una línea de puntos es impresa, el teclado se bloquea electrónicamente, y la operación subsiguiente no es posible, presione para borrar el rebose. La función de rebose ocurre cuando: 1) El resultado o el contenido de la memoria excede de 14 dígitos a la izquierda del punto decimal. 2) Divide por "0" 3) La velocidad de la operación secuencial es más rápida que la velocidad del proceso de cálculo. (Rebosamiento del registro de la memoria intermedia) Las interferencias electromagnéticas o las descargas electrostáticas pueden originar que la pantalla funcione incorrectamente o que la memoria y el tipo imositivo se pierdan o alteren. Si esto sucede, utilice la punta de un bolígrafo (u objeto con punta similar) para pulsar el botón [ RESET ] (Restablecer) situado en la parte posterior de la calculadora. Una vez restablecida, asegúrese de volver configurar el calendario, el reloj, el tipo impositivo y el conversion de divisas. ESPECIFICACIONES Suministro de Energía: CA120V 60Hz Temperatura de operación: 32ºF a 104ºF (0ºC a 40ºC) Capacidad de Cálculos: Máximo de 14 dígitos Dimensiones: 336mm (longitud) x 225mm (ancho) x 76mm (alto) 13-15/64" (longitud) x 8-55/64" (ancho) x 3" (alto) Peso: 1.8 kg (4 lb) (Sujeto a cambios sin previo aviso) La toma de corriente debe estar instalada cerca del equipo y se debe tener fácil acceso a ella. Para el Ca, los E.E.U.U. Solamente La batería incluida contiene el material del perclorato - El manejo especial debe ser aplicado. Para el detalle, por favor ver http://www.dtsc.ca.gov/hazardouswaste/perchlorate-
 1
1
-
 2
2


Canon MP2D Manual de usuario
- Tipo
- Manual de usuario
- Este manual también es adecuado para
en otros idiomas
- English: Canon MP2D User manual
Artículos relacionados
-
Canon LS-80TCG Manual de usuario
-
Canon MP49DII El manual del propietario
-
-
-
-
Canon MP25DV Manual de usuario
-
Canon MP27DII Manual de usuario
-
-
-