LG 28TL430D-PU El manual del propietario
- Categoría
- Televisores LCD
- Tipo
- El manual del propietario

(1907-REV02)
*MFL71181902*
Head
washer
ղࢶQU
৮ࢿػࠂઁೞৈ
1BUIGJOEFS6OJUF৻ࢶઁ
QU"MJHOTUSPLFPVUTJEF
AAA
a
X 4
(M4 x L16)
32LM50*
28LM40*
28LM43*
28TL43*
b
X 4
(M4 x L18)
43LM50*
43LM5000PUA 28LM400B-PU
32LM500BPUA 28LM430B-PU
32LM505BBUA 28TL430D-PU
Printed in Korea
1
2
3 4
5 6
R
L
R
L
a
b

Kg
VIDEO/Y P
B
P
R
L/MONO AUDIO R
VIDEO/Y P
B
P
R
L/MONO AUDIO R
VIDEO AUDIO
VIDEO L/MONO AUDIO R
VIDEO/Y P
B
P
R
L/MONO AUDIO R
VIDEO/Y P
B
P
R
L/MONO AUDIO R
VIDEO AUDIO
VIDEO L/MONO AUDIO R
A
B C D E F F
G
32LM500BPUA
32LM505BBUA
730
(28.7)
730
(28,7)
476
(18.7)
476
(18,7)
184.1
(7.2)
184,1
(7,2)
436
(17.1)
436
(17,1)
75.8
(2.9)
75,8
(2,9)
3.9
(8.5)
3,9
(8,5)
3.8
(8.3)
3,8
(8,3)
55 W
43LM5000PUA
969
(38.1)
969
(38,1)
626
(24.6)
626
(24,6)
217.8
(8.5)
217,8
(8,5)
569
(22.4)
569
(22,4)
82.4
(3.2)
82,4
(3,2)
7.1
(15.6)
7,1
(15,6)
6.9
(15.2)
6,9
(15,2)
74 W
28LM400B-PU
28LM430B-PU
28TL430D-PU
634
(24.9)
634
(24,9)
425
(16.7)
425
(16,7)
183
(7.2)
183
(7,2)
385
(15.1)
385
(15,1)
76
(2.9)
76
(2,9)
3.2
(7.0)
3,2
(7,0)
3.1
(6.8)
3,1
(6,8)
45 W
For USA and Canada / Pour les États-Unis et le Canada AC 120 V ~ 60 Hz
Para México AC 127 V ~ 60 Hz
, , , ,
: mm (inches / pulgadas / po)
,
: kg (lbs / libras / lb)
90°
D
B
E
C
A
F
G

Printed in Korea
LED TV*
OWNER’S MANUAL
Please read this manual carefully before operating
your set and retain it for future reference.
* LG LED TV applies LCD screen with LED backlights.
Safety and Reference
32LM500BPUA
32LM505BBUA
43LM5000PUA 28LM400B-PU
28LM430B-PU
28TL430D-PU
www.lg.com
Copyright © 2019 LG Electronics Inc. All Rights Reserved.
*MFL71101904*
(1911-REV03)

2
ENGLISH
Important Safety Instruction
• Read these instructions.
• Keep these instructions.
• Heed all warnings.
• Follow all instructions.
• Do not use this apparatus near water.
• Clean only with dry cloth.
• Do not block any ventilation openings. Install in accordance with the manufacturer’s instructions.
• Do not install near any heat sources such as radiators, heat registers, stoves, or other apparatus (including ampliers) that produce heat.
• Do not defeat the safety purpose of the polarized or grounding-type plug. A polarized plug has two blades with one wider than the other. A
grounding type plug has two blades and a third grounding prong. The wide blade or the third prong are provided for your safety. If the provided
plug does not t into your outlet, consult an electrician for replacement of the obsolete outlet.
• Protect the power cord from being walked on or pinched particularly at plugs, convenience receptacles, and the point where they exit from the
apparatus.
• Only use attachments/accessories specied by the manufacturer.
• Use only with the cart, stand, tripod, bracket, or table specied by the manufacturer, or sold with the apparatus. When a cart is used, use
caution when moving the cart/apparatus combination to avoid injury from tip-over.
• Unplug this apparatus during lightning storms or when unused for long periods of time.
• Refer all servicing to qualied service personnel. Servicing is required when the apparatus has been damaged in any way, such as power-supply
cord or plug is damaged, liquid has been spilled or objects have fallen into the apparatus, the apparatus has been exposed to rain or moisture,
does not operate normally, or has been dropped.

ENGLISH
3
Warning! Safety Instructions
CAUTION
RISK OF ELECTRIC SHOCK
DO NOT OPEN
CAUTION: TO REDUCE THE RISK OF ELECTRIC SHOCK, DO NOT
REMOVE COVER (OR BACK). NO USER-SERVICEABLE PARTS INSIDE.
REFER TO QUALIFIED SERVICE PERSONNEL.
This symbol is intended to alert the user to the presence of
uninsulated dangerous voltage within the product’s
enclosure that may be of sucient magnitude to constitute a risk
of electric shock to persons.
This symbol is intended to alert the user to the presence of
important operating and maintenance (servicing)
instructions in the literature accompanying the device.
WARNING: TO REDUCE THE RISK OF FIRE AND ELECTRIC SHOCK, DO
NOT EXPOSE THIS PRODUCT TO RAIN OR MOISTURE.
• TO PREVENT THE SPREAD OF FIRE, KEEP CANDLES OR OTHER ITEMS
WITH OPEN FLAMES AWAY FROM THIS PRODUCT AT ALL TIMES.
• Do not place the TV and/or remote control in the following
environments:
- Keep the product away from direct sunlight.
- An area with high humidity such as a bathroom
- Near any heat source such as stoves and other devices that
produce heat.
- Near kitchen counters or humidiers where they can easily be
exposed to steam or oil.
- An area exposed to rain or wind.
- Do not expose to dripping or splashing and do not place objects
lled with liquids, such as vases, cups, etc. on or over the
apparatus (e.g., on shelves above the unit).
- Near ammable objects such as gasoline or candles, or expose
the TV to direct air conditioning.
- Do not install in excessively dusty places.
Otherwise, this may result in re, electric shock, combustion/
explosion, malfunction or product deformation.
• Ventilation
- Install your TV where there is proper ventilation. Do not install in
a conned space such as a bookcase.
- Do not install the product on a carpet or cushion.
- Do not block or cover the product with cloth or other materials
while unit is plugged in.
• Take care not to touch the ventilation openings. When watching
the TV for a long period, the ventilation openings may become hot.
• Protect the power cord from physical or mechanical abuse, such as
being twisted, kinked, pinched, closed in a door, or walked upon.
Pay particular attention to plugs, wall outlets, and the point where
the cord exits the device.
• Do not move the TV whilst the Power cord is plugged in.
• Do not use a damaged or loosely tting power cord.
• Be sure to grasp the plug when unplugging the power cord. Do
not pull on the power cord to unplug the TV.
• Do not connect too many devices to the same AC power outlet as
this could result in re or electric shock.
• Disconnecting the Device from the Main Power
- The power plug is the disconnecting device. In case of an
emergency, the power plug must remain readily accessible.
• Do not let your children climb or cling onto the TV. Otherwise, the
TV may fall over, which may cause serious injury.
• Outdoor Antenna Grounding (Can dier by country):
- If an outdoor antenna is installed, follow the precautions below.
An outdoor antenna system should not be located in the vicinity
of overhead power lines or other electric light or power circuits,
or where it can come in contact with such power lines or circuits
as death or serious injury can occur.
Be sure the antenna system is grounded to provide some
protection against voltage surges and built-up static charges.
Section 810 of the National Electrical Code (NEC) in the U.S.A.
provides information with respect to proper grounding of the
mast and supporting structure, grounding of the lead-in wire
to an antenna discharge unit, size of grounding conductors,
location of antenna discharge unit, connection to grounding
electrodes and requirements for the grounding electrode.
Antenna grounding according to the National Electrical Code,
ANSI/NFPA 70

4
ENGLISH
• Grounding (Except for devices which are not grounded.)
- TV with a three-prong grounded AC plug must be connected to
a three-prong grounded AC outlet. Ensure that you connect the
earth ground wire to prevent possible electric shock.
• Never touch this apparatus or antenna during a lightning storm.
You may be electrocuted.
• Make sure the power cord is connected securely to the TV and wall
socket if not secured damage to the Plug and socket may occur and
in extreme cases a re may break out.
• Do not insert metallic or inammable objects into the product. If a
foreign object is dropped into the product, unplug the power cord
and contact the customer service.
• Do not touch the end of the power cord while it is plugged in. You
may be electrocuted.
• If any of the following occur, unplug the product
immediately and contact your local customer service.
- The product has been damaged.
- If water or another substance enters the product (like an AC
adapter, power cord or TV).
- If you smell smoke or other odors coming from the TV
- When lightning storms or when unused for long periods of time.
Even the TV is turned o by remote control or button, AC power
source is connected to the unit if not unplugged in.
• Do not use high voltage electrical equipment near the TV (e.g., a
bug zapper). This may result in product malfunction.
• Do not attempt to modify this product in any way without written
authorization from LG Electronics. Accidental re or electric shock
can occur. Contact your local customer service for service or repair.
Unauthorized modication could void the user’s authority to
operate this product.
• Use only an authorized attachments / accessories approved by
LG Electronics. Otherwise, this may result in re, electric shock,
malfunction, or product damage.
• Never disassemble the AC adapter or power cord. This may result in
re or electric shock.
• Handle the adapter carefully to avoid dropping or striking it. An
impact could damage the adapter.
• To reduce the risk of re or electrical shock, do not touch the TV
with wet hands. If the power cord prongs are wet or covered with
dust, dry the power plug completely or wipe dust o.
• Batteries
- Store the accessories (battery, etc.) in a safe location out of the
reach of children.
- Do not short circuit, disassemble, or allow the batteries to
overheat. Do not dispose of batteries in a re. Batteries should
not be exposed to excessive heat.
• Moving
- When moving, make sure the product is turned o, unplugged,
and all cables have been removed. It may take 2 or more people
to carry larger TVs. Do not press or put stress on the front panel
of the TV. Otherwise, this may result in product damage, re
hazard or injury.
• Keep the packing anti-moisture material or vinyl packing out of the
reach of children.
• Do not allow an impact shock, any objects to fall into the product,
and do not drop anything onto the screen.
• Do not press strongly upon the panel with a hand or a sharp
object such as a nail, pencil, or pen, or make a scratch on it. It may
causedamage to screen.
• Cleaning
- When cleaning, unplug the power cord and wipe gently with a
soft/dry cloth. Do not spray water or other liquids directly on the
TV. Do not clean your TV with chemicals including glass cleaner,
any type of air freshener, insecticide, lubricants, wax (car,
industrial), abrasive, thinner, benzene, alcohol etc., which can
damage the product and/or its panel. Otherwise, this may result
in electric shock or product damage.

ENGLISH
5
Preparing
• When the TV is turned on for the rst time after being shipped
from the factory, initialization of the TV may take approximately
one minute.
• Image shown may dier from your TV.
• Your TV’s OSD (On Screen Display) may dier slightly from that
shown in this manual.
• The available menus and options may dier from the input source
or product model that you are using.
• New features may be added to this TV in the future.
• The device must be easily accessed to a location outlet near the
access. Some devices are not made by turning on / o button,
turning o the device and unplugging the power cord.
• The items supplied with your product may vary depending upon
the model.
• Product specications or contents of this manual may be changed
without prior notice due to upgrade of product functions.
• For an optimal connection, HDMI cables and USB devices should
have bezels less than 10 mm (0.39 inches) thick and 18 mm (0.7
inches) width.
• Use an extension cable that supports USB 2.0 if the USB cable or
USB ash drive does not t into your TV’s USB port.
• Use a certied cable with the HDMI logo attached. If you do not use
a certied HDMI cable, the screen may not display or a connection
error may occur.
• Recommended HDMI cable types, (3 m (9.84 feet) or less).
- Ultra High Speed HDMI®/
TM
cable
A
B
A
B
*A
<
=
10 mm (0.39 inches)
*B
<
=
18 mm (0.7 inches)
Optional Extras
Optional extras can be changed or modied for quality improvement
without any notication. Contact your dealer for buying these items.
These devices work only with certain models.
The model name or design may be changed due to the manufacturer’s
circumstances or policies.
Wall Mounting Bracket
(Depending upon model)
Make sure to use screws and wall mount bracket that meet the VESA
standard. Standard dimensions for the wall mount kits are described in
the following table.
A
B
Model 32LM50* 43LM50*
28LM40*
28LM43*
28TL43*
VESA (A x B)
(mm)
100 x 100 200 x 200 100 x 100
Standard
screw
M4 M6 M4
Number of
screws
4 4 4
Wall mount
bracket
(optional)
LSW140B
LSW240B
MSW240
RW120

6
ENGLISH
Lifting and moving the TV
When moving or lifting the TV, read the following to prevent the TV
from being scratched or damaged and for safe transportation regardless
of its type and size.
• It is recommended to move the TV in the box or packing material
that the TV originally came in.
• Before moving or lifting the TV, disconnect the power cord and
all cables.
• When holding the TV, the screen should face away from you to
avoid damage.
• Hold the top and bottom of the TV frame rmly. Make sure not to
hold the transparent part, speaker, or speaker grille area.
• Use at least two people to move a large TV.
• When transporting the TV by hand, hold the TV as shown in the
following illustration.
• When transporting the TV, do not expose the TV to jolts or
excessive vibration.
• When transporting the TV, keep the TV upright; never turn the TV
on its side or tilt towards the left or right.
• When handling the TV, be careful not to damage the protruding
buttons.
• Avoid touching the screen at all times, as this may result in
damage to the screen.
• Do not place the product on the oor with its front facing
down without padding. Failure to do so may result in
damage to the screen.
• When attaching the stand to the TV set, place the screen
facing down on a cushioned table or at surface to protect
the screen from scratches.
Mounting on the Table
1 Lift and tilt the TV into its upright position on a table.
• Leave a 10 cm (4 inches) (minimum) space from the wall for proper
ventilation.
10
cm
10 cm (4 inches)
10
cm
10
cm
10
cm
(Depending upon model)
2 Connect the power cord to a wall outlet.
• Do not apply foreign substances (oils, lubricants, etc.) to
the screw parts when assembling the product.
(Doing so may damage the product.)
• If you install the TV on a stand, you need to take actions
to prevent the product from overturning. Otherwise, the
product may fall over, which may cause injury.
• Do not use any unapproved items to ensure the safety and
product life span.
• Any damage or injuries caused by using unapproved items
are not covered by the warranty.
• Make sure that the screws are fastened tightly. (If they
are not fastened securely enough, the TV may tilt forward
after being installed.)
• Do not fasten the screws with excessive force otherwise
they may be worn out and become loose.

ENGLISH
7
Securing TV to the Wall
(Depending upon model)
1 Insert and tighten the eye-bolts, or TV brackets and bolts on the back
of the TV.
• If there are bolts inserted at the eye-bolts position, remove the
bolts rst.
2 Mount the wall brackets with the bolts to the wall.
Match the location of the wall bracket and the eye-bolts on the rear
of the TV.
3 Connect the eye-bolts and wall brackets tightly with a sturdy rope.
Make sure to keep the rope horizontal with the at surface.
• Use a platform or cabinet that is strong and large enough to
support the TV securely.
• Brackets, bolts and ropes are not provided. You can obtain
additional accessories from your local dealer.
Mounting to the Wall
An optional wall mount can be used with your LG Television. Consult
with your local dealer for a wall mount that supports the VESA
standard used by your TV model. Carefully attach the wall mount
bracket at the rear of the TV. Install the wall mount bracket on a solid
wall perpendicular to the oor. If you are attaching the TV to other
building materials, please contact qualied personnel to install the
wall mount. Detailed instructions will be included with the wall mount.
We recommend that you use an LG brand wall mount. The LG wall
mount is easy to adjust or to connect the cables. When you do not use
LG’s wall mount bracket, use a wall mount bracket where the device is
adequately secured to the wall with enough space to allow connectivity
to external devices. If you are using a non-adjustable mount, attach the
mount to the wall. Attach the cables to the TV rst, then attach the TV
to the mount.
10
cm
10 cm (4 inches)
10
cm
10
cm
10
cm
(Depending upon model)
• Remove the stand before installing the TV on a wall
mount by performing the stand attachment in reverse.
• For more information of screws and wall mount bracket,
refer to the Separate purchase.
• If you intend to mount the product to a wall, attach VESA
standard mounting interface (optional parts) to the back
of the product. When you install the set to use the wall
mounting bracket (optional parts), x it carefully so as
not to drop.
• When mounting a TV on the wall, make sure not to install
the TV by hanging the power and signal cables on the
back of the TV.
• Do not install this product on a wall if it could be exposed
to oil or oil mist. This may damage the product and cause
it to fall.
• Screw length from outer surface of back cover should
be under 8 mm (0.31 inches). (For 28LM40*, 28LM43*,
28TL43*)
Wall mount Pad
Back Cover
Standard screw
: M4 x L10
Wall mount Pad
Back Cover
Max. 8 mm
(0.31 inches)

8
ENGLISH
Connections
You can connect various external devices to the TV. For more
information on external device’s connection, refer to the manual
provided with each device.
Antenna/Cable
Connect an antenna, cable, or cable box to watch TV while referring to
the following. The illustrations may dier from the actual items and an
RF cable is optional.
• Make sure not to bend the copper wire of the RF cable.
Copper wire
• Complete all connections between devices, and then connect the
power cord to the power outlet to prevent damage to your TV.
• Use a signal splitter to use 2 TVs or more.
• DTV Audio Supported Codec: MPEG, Dolby Digital, HE-AAC
Other connections
Connect your TV to external devices. For the best picture and audio
quality, connect the external device and the TV with the HDMI cable.
HDMI
•
When connecting the HDMI cable, the product and external devices
should be turned o and unplugged.
• HDMI Audio Supported Format:
(Depending upon model)
AC3 (32 kHz / 44.1 kHz / 48 kHz),
PCM (32 kHz / 44.1 kHz / 48 kHz / 96 kHz)
External Devices
Supported external devices are: Blu-ray player, HD receivers, DVD
players, VCRs, audio systems, USB storage devices, PC, gaming devices,
and other external devices. For more information on external device’s
connection, refer to the manual provided with each device.
• If you record a TV program on a Blu-ray/DVD recorder or VCR, make
sure to connect the TV signal input cable to the TV through a DVD
recorder or VCR. For more information about recording, refer to the
manual provided with the connected device.
• The external device connections shown may dier slightly from
illustrations in a manual.
• Connect external devices to the TV regardless about the order of
the TV port.
• If you connect a gaming device to the TV, use the cable supplied
with the gaming device.
• Refer to the external equipment’s manual for operating
instructions.
• In PC mode, there may be noise associated with the resolution,
vertical pattern, contrast or brightness. If noise is present, change
the PC output to another resolution, change the refresh rate to
another rate or adjust the brightness and contrast on the [Picture]
menu until the picture is clear.
Using Button
You can simply operate the TV functions, using the button.
Basic functions
Power On / O (Press)

ENGLISH
9
Using Remote Control
(Depending upon model)
The descriptions in this manual are based on the buttons on the remote
control. Please read this manual carefully and use the TV correctly.
To install batteries, open the battery cover, replace batteries (1.5 V AAA)
matching the and ends to the label inside the compartment,
and close the battery cover. To remove the batteries, perform the
installation actions in reverse. This remote uses infrared light. When in
use, it should be pointed in the direction of the TV’s remote sensor.
Make sure to point the remote control toward the remote control sensor
on the TV.
(Some buttons and services may not be provided depending upon
models or regions.)
(POWER) Turns the TV on or o.
Returns to the last TV channel.
Activates or deactivates the subtitles.
Resizes an image.
Shows information on the current program.
(Input) Changes the input source.
Number buttons Enters numbers.
(Dash) Inserts a dash between numbers such as 2-1 and 2-2.
Accesses the saved channel list.
Alternates between the two last channels selected (pressing
repeatedly).
Adjusts the volume level.
Accesses your favorite channel list.
Displays the program event according to time scheduler.
(Depending upon model)
(MUTE) Mutes all sounds.
Scrolls through the saved channels.
Moves to the previous or next screen.
Changes the picture mode.
(Home) Accesses the Home menu.
Changes the sound mode.
(Settings) Accesses the Settings menu.
Accesses the quick menu.
Navigation buttons (up/down/left/right) Scrolls through menus
or options.
(OK) Selects menus or options and conrms your input.
Returns to the previous screen.
Clears all on-screen displays and returns to TV viewing.
Enables SAP (Secondary Audio Program) Feature. (Depending
upon model)
Starts to record. (Only Time Machine
Ready
supported model)
(Depending upon model)
Control buttons for media contents
, , , These access special functions in some menus.
• Do not mix new batteries with old batteries. This may
cause the batteries to overheat and leak.
• Failure to match the correct polarities of the battery
may cause the battery to burst or leak, resulting in re,
personal injury, or ambient pollution.
• This apparatus uses batteries. In your community there
might be regulations that require you to dispose of these
batteries properly due to environmental considerations.
Please contact your local authorities for disposal or
recycling information.
• Batteries inside or inside the product shall not be exposed
to excessive heat such as sunshine, re or the like.

10
ENGLISH
Settings
To select Picture Mode
(Settings) → [Picture] → [Picture Mode Settings] → [Picture Mode]
Select the picture mode optimized for the viewing environment or the
program.
•
[Vivid]: Heightens contrast, brightness, and sharpness to display
vivid images.
• [Standard]: Displays images in standard levels of contrast,
brightness and sharpness.
• [Cinema] / [Game]: Displays the optimum picture for movie or
game.
• [Sports]: Optimised picture mode for football matches. The pitch
and kits are presented in vibrant colors, with crystal-clear images
even for fast movements.
• Depending upon the input signal, the available range of picture
modes may dier.
Setting the Picture Mode
(Settings) → [Picture] → [Picture Mode Settings]
This feature allows you to adjust the selected picture mode in detail.
• [Backlight]: Controls the level of screen brightness by adjusting the
backlight. The closer to 100, the brighter the screen. Decrease the
Backlight to reduce energy consumption.
• [Contrast]: Adjusts the contrast of the bright and dark areas of the
picture. The closer to 100, the higher the contrast.
• [Brightness]: Adjusts the overall screen brightness. The closer to
100, the brighter the screen.
• [Sharpness]: Adjusts the sharpness of the image. The closer to 50,
the sharper and clearer the image.
• [Color]: Tones down or up the colors displayed on the screen. The
closer to 100, the deeper the color.
• [Tint]: Adjusts the color balance between red and green displayed
on the screen. The closer to Red 50, the more red the color will be.
The closer to Green 50, the more green the color will be.
• [Color Temperature]: Adjusts the overall tone of the screen as
desired. In Expert mode, detailed ne-tuning can be set via
Gamma method, etc.
• The settings you specify only applies to the currently selected input
mode. To apply your current picture settings to all input modes,
select [Apply to all inputs].
• Depending upon input signal or other picture settings, the range of
detailed items for adjustment may dier.
To set expert control
(Settings) → [Picture] → [Picture Mode Settings] → [Expert
Controls]
For each picture mode, the screen can be calibrated; or for a special
screen, picture settings can be adjusted. Select the desired [Picture
Mode].
•
[Dynamic Contrast]: Adjusts the contrast to the optimal level
according to the image’s brightness.
• [Dynamic Color]: Adjusts colors to make the image appear in more
natural colors.
• [Gamma]: Sets the gradation curve according to the output of
picture signal in relation to the input signal.
• Depending upon input signal or other picture settings, the range of
detailed items for adjustment may dier.
To set additional picture options
(Settings) → [Picture] → [Picture Mode Settings] → [Picture
Options]
Adjusts detailed setting for images.
• [Noise Reduction]: Eliminates noise in the picture.
• [MPEG Noise Reduction]: Eliminates noise generated while
creating digital picture signals.
• [Black Level]: Adjusts the brightness and contrast of the screen to
suit the black level.
• [Real Cinema]: Optimizes the screen for movie viewing.
• Depending upon input signal or other picture settings, the range of
detailed items for adjustment may dier.
Initializing picture settings
(Settings) → [Picture] → [Picture Mode Settings] → [Picture Reset]
Initializes picture settings that the user customizes. Each picture mode
is reset. Select the desired picture mode to reset.

ENGLISH
11
Setting the Screen Size
(Settings) → [Picture] → [Aspect Ratio]
Selects the screen aspect ratio.
• [16:9]: Displays an aspect ratio of [16:9].
• [Original]: Changes the aspect ratio to [4:3] or [16:9] depending
upon the input video signal.
• [4:3]: Displays an aspect ratio of [4:3].
• [Zoom]: Resizes the image to t the screen width. The top and
bottom parts of the image may be cut o.
• [Just Scan]: Displays video images in the original size without
removing parts of the edge of the image. (This function works in
DTV/Component/HDMI (720p / 1080i / 1080p) Mode.)
- If you select [Just Scan], you may see image noises at the edge of
the original signal.
• Viewing content from an external device or, for an extended period
of time, having xed text such as the program name or using an
aspect ratio of [4:3] may result in image sticking.
• Available picture size may dier depending upon the input signal.
To use Energy Saving Feature
(Settings) → [Picture] → [Energy Saving]
Reduces power consumption by adjusting peak screen brightness.
• [O]: Turns o the Energy Saving.
• [Minimum] / [Medium] / [Maximum]: Applies the pre-set Energy
Saving.
• [Screen O]: Screen is turned o and only sound is played. Press
any button on the remote control to turn the screen back on.
To use picture test
(Settings) → [Picture] → [Picture Test]
Conducts Picture Test rst to verify that image signal output is normal.
When the test image is normal, check connected external devices or
broadcast signal.
Selecting Sound Mode
(Settings) → [Sound] → [Sound Mode Settings] → [Sound Mode]
Adjusts TV audio to an optimal level based on a selected sound mode.
• [Standard]: Optimizes the sound for all types of content.
• [Cinema]: Optimizes the sound for cinemas.
• [Sports]: Optimizes the sound for sports.
• [Music]: Optimizes the sound for music.
• [Game]: Optimizes the sound for gameplay.
To adjust audio balance
(Settings) → [Sound] → [Sound Mode Settings] → [Balance]
Adjust the volume of the left and right speakers.
Using the Sound Eect function
(Settings) → [Sound] → [Sound Mode Settings]
The user can select various sound eects.
• [Treble]: Controls the dominant sounds in the output. When
you turn up the treble, it will increase the output to the higher
frequency range.
• [Bass]: Controls the softer sounds in the output. When you turn up
the bass, it will increase the output to the lower frequency range.
• [Reset]: Reset the sound eect settings.
• This is only available if [Sound Mode] is set to [Standard].
To set Auto Volume
(Settings) → [Sound] → [Auto Volume]
Sets [Auto Volume] to [On] and volume output from channel to channel
is automatically adjusted for convenient TV watching when clicking
through dierent channels.
Playing audio through the TV’s internal speakers
(Settings) → [Sound] → [Sound Out] → [Internal TV Speaker]
Audio is played through the TV’s internal speakers.
Connecting and Using an Audio Device
Supporting Optical
(Settings) → [Sound] → [Sound Out] → [Audio Out (Optical)]
You can connect an audio device that supports Optical to the optical
digital audio output port to enjoy your TV’s sound in richer quality and
greater convenience.
• Only available for models with an optical digital port.
• You can use the TV remote control to adjust the volume of the
connected device.
Using Internal TV Speaker +Optical
(Settings) → [Sound] → [Sound Out] → [Internal TV Speaker +
Audio Out (Optical)]
Audio is played through the TV’s built-in speakers and the audio device
connected to the digital optical audio output port simultaneously.

12
ENGLISH
Conguring digital sound output settings
(Settings) → [Sound] → [Sound Out] → [Digital Sound Out]
You can congure the [Digital Sound Out] settings.
• These settings are available only when an Optical is selected.
Sound Input Digital Sound Output
Auto
MPEG
Dolby Digital
HE-AAC
PCM
Dolby Digital
PCM
PCM All PCM
To use sound test
(Settings) → [Sound] → [Sound Test]
Try Sound Test to verify that sound signal output is normal. When the
test sound is normal, check connected external devices or broadcast
signal.
To set up the channels automatically
(Settings) → [Channels] → [Auto Tuning]
Memorizes automatically the channels being broadcast.
• The channels will not be memorized properly if the antenna/cable
is not installed correctly.
• [Auto Tuning] memorizes the channels that are currently being
broadcast.
• If [Lock System] is turned on, a pop-up window will appear asking
for password.
To set up the channels at manually
(Settings) → [Channels] → [Manual Tuning]
Adjusts channels manually and saves the results. For digital
broadcasting, signal strength, etc. can be checked.
Editing the channels
(Settings) → [Channels] → [Channel Manager]
Edits the saved channels.
To set Language
(Settings) → [General] → [Language]
You can select the language of the menu displayed on the screen and
the digital sound broadcasting.
• [Menu Language]: Selects a language for the display text.
• [Audio Language]: (In Digital mode Only) Selects the desired
language when watching digital broadcasting containing several
voice languages.
To set current time
(Settings) → [General] → [Time & Date] → [Set Automatically]
Checks or changes the time while watching TV.
• Synchronizes the TV clock to the digital time information sent by
the TV station.
• [Time] / [Date] / [Time Zone]: Sets the time and date manually if
the auto setup does not correspond to the current time or region.
• [Daylight Saving]: Daylight Saving Time refers to the practice of
setting the clocks forward one hour from standard time during the
summer months.
To use Sleep Timer
(Settings) → [General] → [Timers] → [Sleep Timer]
Turns o the TV after a prescribed number of minutes.
• To deactivate the [Sleep Timer], select [O].
To turn on/o the TV
(Settings) → [General] → [Timers] → [Timer Power On] /
[Timer Power O]
You can set the Power On/O time for the TV.
• Select [O] if you are not going to set [Timer Power On] / [Timer
Power O].
• To set [Timer Power On] / [Timer Power O], set the current time
correctly.

ENGLISH
13
Requesting service
(Settings) → [General] → [About This TV]
For information on requesting service, refer to the TV’s menu.
To set Power Indicator
(Settings) → [General] → [Standby Light]
Turns on/o the standby light in the front panel of the TV.
To change the TV Mode
(Settings) → [General] → [Home/Store Mode]
Selects [Home Mode] or [Store Mode].
• When in use in home, please select [Home Mode].
• [Store Mode] is for store display.
To return to initial settings
(Settings) → [General] → [Reset to Initial Settings]
Returns to initial default mode by deleting all optional setup. Once
initialization is completed, the TV will turn o and on by itself.
• When [Lock System] is in place, a pop-up window appears and
asks for password.
• Do not turn o the power during initialization.
To set the password
(Settings) → [Safety] → [Set Password]
Set or change the TV password.
• The initial password is set to 0000.
To set the Lock System
(Settings) → [Safety] → [Lock System]
Permits only specic programs by blocking channels or external input.
At rst, set [Lock System] to [On].
• Set the movie and TV rating level by select relevant option from
[Movie Lock], [Children TV Program Locks] and [General TV
Program Locks]. For downloadable videos, select [Downloadable
Rating] to set up the rating level.
• A channel can be blocked by setting up [Channel Locks].
• A input source can be blocked by setting up [Input Locks].
To set the caption
(Settings) → [Accessibility] → [Closed Caption]
View captions when the TV station provides captioned programming.
Program captions work only on digital/analog broadcasts or external
input.
Change [Closed Caption] to [On] and select caption settings.
• Mode
[CC 1-4] (Closed Captioning) / [Text 1-4]: Displays the audio portion
of a TV program as text on the TV screen. CC1 is the most common
mode in use. Field 1 data channels: two Captions (CC1, CC2), two
Text (T1, T2).
Field 2 data channels: two Captions (CC3, CC4), two Text (T3, T4).
[Service 1-6]: This is only available for the digital broadcasting
system.
• [Digital Mode Options]: Set up the size and color of the captions on
[Digital Mode Options]. Please select [Set By Program] or [Custom].
Select [Custom] to adjust minute options such as the captions’ size
and color.
To use Audio Guidance
(Settings) → [Accessibility] → [Audio Guidance]
When the Audio Guidance is set to On, the TV will announce its current
status (Channel, Volume) by voice.
To remove the USB device
→ [USB Device]
Once the message that the USB device was removed is displayed,
remove the device from the TV.
• After selecting to remove USB device, the USB storage device
cannot be read. Remove the USB storage device and then reconnect
it.

14
ENGLISH
Warning when using USB storage devices
•
USB storage devices with a built-in auto recognition program or its
own driver may not work.
• Some USB storage devices may not work or may work improperly.
• Use only those USB storage devices formatted with FAT16, FAT32 or
NTFS File System provided by Windows.
• For external USB HDD, use devices with less than 5V-rated voltages
and 500 mA-rated current.
• It is recommended to use USB ash drive with 32 GB or less and
USB HDD with 2 TB or less.
• If a USB HDD with power-saving function does not work properly,
turn the power o and on. For more information, refer to the user
manual of USB HDD.
• Data in the USB storage device can be damaged so back up
important les in other devices. Data maintenance is the user’s
responsibility. The manufacturer is not responsible for data loss.
My Media Supported Files
•
External supported subtitle formats:
.srt (SubRip), .ssa/.ass (SubStation Alpha), .smi (SAMI), .sub
(SubViewer
1
, MicroDVD, DVDSubtitleSystem, SubIdx(VobSub)), .txt
(TMPlayer)
1 SubViewer: SubViewer 1.0 & 2.0 Only
• Internal supported subtitle formats:
.dat/.mpg/.mpeg/.vob (DVD Subtitle), .ts/.trp/.tp (DVB Subtitle),
.mp4 (DVD Subtitle, UTF-8 Plain Text), .mkv (ASS, SSA, UTF-8 Plain
Text, VobSub, DVD Subtitle), .avi (XSUB, XSUB
+
)
Supported Video Formats
• Maximum: 1920 x 1080 @ 30p (Only Motion JPEG 640 x 480 @ 30p)
Extension Codec
.mpg, .mpeg
Video MPEG-1, MPEG-2, MPEG-4
Audio MPEG1/2/2.5 Layer3, AC3, AAC, LPCM
.avi
Video
MJPEG, MPEG-4, H.263, XViD, H.264,
MPEG-1, MPEG-2
Audio MPEG1/2/2.5 Layer3, AC3, AAC, LPCM
.ts
Video
MPEG-2, H.264, HEVC
Audio MPEG1/2/2.5 Layer3, AC3, AAC, LPCM
.mov, .mkv
Video
MPEG-4, H.263, H.264, HEVC, MPEG-1,
MPEG-2, XViD
Audio MPEG1/2/2.5 Layer3, AC3, AAC, LPCM
.dat
Video
MPEG-1, MPEG-2
Audio MPEG1/2/2.5 Layer3, AC3, AAC, LPCM
.mp4
Video
MPEG-4, H.264, MPEG-1, MPEG-2
Audio MPEG1/2/2.5 Layer3, AC3, AAC, LPCM
.vob
Video
MPEG-1, MPEG-2
Audio MPEG1/2/2.5 Layer3, AC3, AAC, LPCM
.3gp
Video
H.264, MPEG-4
Audio MPEG1/2/2.5 Layer3, AC3, AAC, LPCM
.v
Video H.264
Audio
MPEG1/2/2.5 Layer3, AC3, AAC, LPCM
• Some codecs may not be supported depending upon model.
• Some subtitles created by users may not work properly.
• The video and subtitle les should be placed in the same folder.
Assign the same names to the video and subtitle les for proper
display.
• Streams containing GMC (Global Motion Compensation) or Qpel
(Quarterpel Motion Estimation) are not supported.
• Only H.264/AVC prole levels 4.1 and lower are supported.
• Video les that exceed 50 GB (Gigabyte) are not supported
for playback. The le size limit is dependent on the encoding
environment.
• (This feature is available on certain models only.) The DTS is
supported only for playback of USB and HDMI video les.
• The DTS support may vary depending upon your country and
model.

ENGLISH
15
Supported Audio Formats
Extension Item Info
.mp3
Bit rate 32 Kbps - 320 Kbps
Sample rate 16 kHz - 48 kHz
Support MPEG1/2/2.5 Layer3
.ac3
Bit rate 32 Kbps - 640 Kbps
Sample rate 32 KHz, 44.1 KHz, 48 KHz
Support AC3
.m4a, .aac
Sample rate 8 kHz - 48 kHz
Support AAC
.ac
Bit rate <1.6 Mbps
Sample rate 8 kHz - 48 kHz
Support FLAC
.wav
Bit rate 64 Kbps - 1.5 Mbps
Sample rate 8 kHz - 48 kHz
Support PCM
•
When moving to a folder containing videos while playing music,
the music may stop playing.
Supported Photo Formats
Extension Item Resolution
.jpg
Available le
type
Progressive JPEG
Photo size
Minimum: 2 (W) x 2 (H),
Maximum: 1024 (W) x 768 (H)
.jpeg
Available le
type
Baseline JPEG
Photo size
Minimum: 2 (W) x 2 (H),
Maximum: 15360 (W) x 8640 (H)
.bmp
Available le
type
BMP
Photo size
Minimum: 2 (W) x 2 (H),
Maximum: 9600 (W) x 6400 (H)
Pixel Depth 1/4/8/16/24/32 bpp
.png
Available le
type
Interlace, Non-Interlace
Photo size
Minimum: 2 (W) x 2 (H)
Maximum (Interlace):
1200 (W) x 800 (H),
Maximum (Non-Interlace):
9600 (W) x 6400 (H)
• BMP and PNG format les may be slower to display than JPEG,
especially in high resolution.

16
ENGLISH
Troubleshooting
Cannot control the TV with the remote control.
• Check if anything such as tape has been placed over the receiver.
• Check if there is any obstacle between the product and the remote
control.
•
Replace the batteries with new fresh ones.
No image display and no sound is produced.
• Check if the product is turned on.
• Check if the power cord is connected to a wall outlet.
• Check if there is a problem in the wall outlet by connecting other
products.
The TV turns o suddenly.
• Check the power control settings. The power supply may be
interrupted.
• Check if the auto-o function is activated in the settings menu.
• If there is no signal while the TV is on, the TV will turn o
automatically after 15 minutes of inactivity.
Abnormal Display
•
If the TV feels cold to the touch, there may be a small icker when
it is turned on. This is normal; there is nothing wrong with TV.
Some minute dot defects may be visible on the screen, appearing
as tiny red, green, or blue spots. However, they have no adverse
eect on the TV’s performance. Avoid touching the LCD screen or
holding your nger(s) against it for long periods of time. Doing so
may produce some temporary distortion eects on the screen.
• This panel is an advanced product that contains millions of pixels.
In a very few cases, you could see ne dots on the screen while
you’re viewing the TV. Those dots are deactivated pixels and do not
aect the performance and reliability of the TV.
• Displaying a still image for a prolonged period of time may cause
an image sticking. Avoid displaying a xed image on the TV screen
for a extended length of time.
Generated Sound
• Cracking noise
A cracking noise that occurs when watching or
turning o the TV is generated by plastic thermal contraction due
to temperature and humidity. This noise is common for products
where thermal deformation is required.
• Electrical circuit humming/panel buzzing A low level noise
is generated from a high-speed switching circuit, which supplies a
large amount of current to operate a product. It varies depending
upon the product. This generated sound does not aect the
performance and reliability of the product.
• When cleaning the product, be careful not to allow any
liquid or foreign objects to enter the gap between the
upper, left or right side of the panel and the guide panel,
(Depending upon model).
• Make sure to wring any excess water or cleaner from the
cloth.
• Do not spray water or cleaner directly onto the TV screen.
• Make sure to spray just enough of water or cleaner onto a
dry cloth to wipe the screen.

ENGLISH
17
Specications
Product specications may be changed without prior notice due to upgrade of product functions.
Estimated yearly energy consumption indicated on the FTC label is measured in accordance with the Test Procedures for Television Sets (USA only).
The actual energy consumption depends on the usage environment (The content watched, TV settings, etc.).
(Depending upon country)
Broadcasting Specifications
Television system ATSC, NTSC-M, 64 & 256 QAM
Program coverage
(Band)
VHF 2 - 13, UHF 14 - 69, DTV 2 - 69, CATV 1 - 135, CADTV 1 - 135
External antenna
impedance
75 Ω
Environment condition
Operating Temperature 0 °C to 40 °C (32 °F to 104 °F)
Operating Humidity Less than 80 %
Storage Temperature -20 °C to 60 °C (-4 °F to 140 °F)
Storage Humidity Less than 85 %

18
ENGLISH
HDMI-PC supported mode
Resolution
Horizontal
Frequency (kHz)
Vertical
Frequency (Hz)
720 x 400 31.469 70.00
640 x 480 31.469 59.94
800 x 600
35.156
37.879
56.25
60.317
1024 x 768 48.363 60.004
1280 x 720 45.00 60.00
1280 x 768
1
47.776 59.870
1366 x 768 49.10 60.00
1280 x 960
2
60.00 60.00
1280 x 1024
2
63.90 60.00
1280 x 800
2
49.50 59.80
1680 x 1050
2
65.20 59.90
1920 x 1080
2
67.50 60.00
1 Except for 43LM50*
2 For 43LM50*
HDMI-DTV supported mode
Resolution
Horizontal
Frequency (kHz)
Vertical
Frequency (Hz)
640 x 480p
31.47
31.50
59.94
60.00
720 x 480p
31.47
31.50
59.94
60.00
1280 x 720p
37.50
44.96
45.00
50.00
59.94
60.00
720 (1440) x 480i
15.73
15.75
59.94
60.00
720 x 576p 31.25 50.00
720 (1440) x 576i 15.63 50.00
1920 x 1080i
28.125
33.72
33.75
50.00
59.94
60.00
1920 x 1080p
26.97
27.00
33.716
33.75
56.25
67.432
67.50
23.976
24.00
29.976
30.00
50.00
59.94
60.00
Component port connecting
information
Component ports on the TV Y P
B
P
R
Video output ports on DVD player
Y P
B
P
R
Y B-Y R-Y
Y Cb Cr
Y Pb Pr
Component supported mode
Resolution
Horizontal
Frequency (kHz)
Vertical
Frequency (Hz)
720 x 480i 15.73 60.00
720 x 480p 31.50 60.00
1440 x 576i 16.63 50.00
720 x 576p 31.50 50.00
1280 x 720p
37.50
45.00
50.00
60.00
1920 x 1080i
28.13
33.75
50.00
60.00
1920 x 1080p
56.25
67.50
50.00
60.00

ENGLISH
19
Licenses
The terms HDMI, HDMI High-Denition Multimedia Interface, and the
HDMI Logo are trademarks or registered trademarks of HDMI Licensing
Administrator, Inc.
Manufactured under license from Dolby Laboratories. Dolby, Dolby
Vision, Dolby Audio, Dolby Atmos, and the double-D symbol are
trademarks of Dolby Laboratories.
Regulatory
-
-
-
-

20
ENGLISH
(1)
(2)
(3)
(4)
NOTE TO CABLE/TV INSTALLER
(For USA and Canada)
This reminder is provided to call the CATV system installer’s attention to
Article 820-40 of the National Electric Code (U.S.A.). The code provides
guidelines for proper grounding and, in particular, species that
the cable ground shall be connected to the grounding system of the
building, as close to the point of the cable entry as practical.

ENGLISH
21
WARNING!
Never place a television set in an unstable location. A television set may
fall, causing serious personal injury or death. Many injuries, particularly
to children, can be avoided by taking simple precautions such as:
• Using cabinets or stands recommended by the manufacturer of the
television set.
• Only using furniture that can safely support the television set.
• Ensuring the television set is not overhanging the edge of the
supporting furniture.
• Not placing the television set on tall furniture (for example,
cupboards or bookcases) without anchoring both the furniture and
the television set to a suitable support.
• Not placing the television set on cloth or other materials that may
be located between the television set and supporting furniture.
• Educating children about the dangers of climbing on furniture to
reach the television set or its controls.
If your existing television set is being retained and relocated, the same
considerations as above should be applied.
Symbols
Refers to alternating current (AC).
Refers to direct current (DC).
Refers to class II equipment.
Refers to stand-by.
Refers to “ON” (power).
Refers to dangerous voltage.

ENGLISH
23
(Image shown may dier from your TV.)
90°
D
B
E
C
A
F
G
MODELS
A
B
C
D
E
F
F
G
Power consumption
mm (inches) kg (lbs)
32LM500BPUA
32LM505BBUA
730 (28.7)
476 (18.7) 184.1 (7.2) 436 (17.1) 75.8 (2.9) 3.9 (8.5) 3.8 (8.3) 55 W
43LM5000PUA
969 (38.1)
626 (24.6) 217.8 (8.5) 569 (22.4) 82.4 (3.2) 7.1 (15.6) 6.9 (15.2) 74 W
28LM400B-PU
28LM430B-PU
28TL430D-PU
634 (24.9)
425 (16.7) 183 (7.2) 385 (15.1) 76 (2.9) 3.2 (7.0) 3.1 (6.8) 45 W
Power requirement AC 127 V ~ 60 Hz

The model and serial number of the product are located
on the back and on one side of the product. Record
them below in case you ever need service.
MODEL
Serial NO.

TELEVISOR LED*
MANUAL DEL USUARIO
Lea atentamente este manual antes de poner en
marcha el equipo y consérvelo para futuras consultas.
* Los televisores con LED de LG tienen pantallas LCD con luces de fondo LED.
Seguridad y Consultas
32LM500BPUA
32LM505BBUA
43LM5000PUA 28LM400B-PU
28LM430B-PU
28TL430D-PU
www.lg.com
Copyright © 2019 LG Electronics Inc. Todos los derechos reservados.

2
Instrucciones de Seguridad Importantes
• Lea estas instrucciones.
• Conserve estas instrucciones.
• Preste atención a las advertencias.
• Siga todas las instrucciones.
• No use el aparato cerca del agua.
• Limpie únicamente con un paño seco.
• No tape ni bloquee las aberturas de ventilación. Realice la instalación siguiendo las instrucciones del fabricante.
• No instale el producto cerca de fuentes de calor como radiadores, rejillas de calefacción central, estufas u otro tipo de aparatos que emitan calor
(incluidos los amplicadores).
• No anule el propósito de seguridad del enchufe polarizado o del enchufe a tierra. Un enchufe polarizado tiene dos clavijas, una más ancha que
la otra. Un enchufe a tierra tiene dos clavijas y un tercer terminal de puesta a tierra. La clavija ancha o el terminal de puesta a tierra se proveen
para proteger al usuario. Si el enchufe del equipo no entra en la toma, consulte a un electricista para cambiar el tomacorriente.
• Asegúrese de que el cable de alimentación esté protegido para evitar que lo pisen o aplasten, especialmente en los enchufes, los tomacorrientes
o el punto de salida desde el aparato.
• Use únicamente los accesorios recomendados por el fabricante.
• Use el producto únicamente en mesas portátiles, pies, trípodes, soportes o mesas indicados por el fabricante o provistos con el aparato. Al
emplear una mesa portátil, tenga cuidado al moverla con el aparato encima, para evitar daños por caídas.
• Desenchufe el aparato durante tormentas eléctricas o si no planea usarlo durante un periodo prolongado.
• Consulte todas las cuestiones de servicio de mantenimiento al personal de servicio calicado. El servicio es necesario cuando el aparato sufre
algún tipo de daño, por ejemplo, cuando un cable de suministro eléctrico o un conector está dañado, se derrama líquido o se cae un objeto
dentro del aparato, el aparato se expone a la lluvia o a la humedad, no funciona en forma normal o sufre una caída.
ESPAÑOL
ESPAÑOL

3
¡Advertencia! Instrucciones
de seguridad
PRECAUCIÓN
RIESGO DE CHOQUE ELÉCTRICO
NO ABRIR
PRECAUCIÓN: PARA REDUCIR EL RIESGO DE DESCARGAS
ELÉCTRICAS, NO QUITE LA CUBIERTA (O LA PARTE POSTERIOR). EL
USUARIO NO PUEDE CAMBIAR NI REPARAR LOS COMPONENTES
INTERNOS. CONSULTE ÚNICAMENTE AL PERSONAL DE SERVICIO
CALIFICADO.
El símbolo tiene como n alertar al usuario sobre la
presencia de voltaje peligroso sin aislamiento dentro del
compartimiento del producto que puede tener la potencia
suciente como para representar un riesgo de descargas
eléctricas para los usuarios.
Este símbolo tiene como n alertar al usuario sobre la
presencia de instrucciones importantes de funcionamiento
y mantenimiento (servicio) en la documentación que se incluye
con el aparato.
ADVERTENCIA: PARA REDUCIR EL RIESGO DE INCENDIOS O
DESCARGAS ELÉCTRICAS, NO EXPONGA EL PRODUCTO A LA
LLUVIA O LA HUMEDAD.
• PARA EVITAR UN INCENDIO, MANTENGA LAS VELAS U OTROS
ELEMENTOS CON FUEGO LEJOS DEL PRODUCTO EN TODO MOMENTO.
• No ubique el TV o el control remoto en ninguno de los
siguientes ambientes:
- Mantenga el aparato alejado de la luz solar directa.
- Áreas con alto nivel de humedad, como ser un baño
- Cerca de fuentes de calor como estufas u otros dispositivos que
emitan calor.
- Cerca del mostrador de la cocina o de humidicadores ya que
pueden estar expuestos a vapor o aceites.
- Áreas expuestas a lluvia o viento.
- No exponga el producto a ningún tipo de goteo ni salpicaduras,
y no coloque sobre o por encima del televisor (por ejemplo, en
estantes que pudieran encontrarse arriba de la unidad) ningún
tipo de objeto que contenga líquido, como oreros, tazas, etc.
- No deje el producto cerca de objetos inamables, como
gasolina o velas, ni exponga el televisor a un sistema de aire
acondicionado de forma directa.
- No lo instale en lugares con demasiado polvo.
No seguir estas indicaciones podría provocar un incendio,
una descarga eléctrica, una combustión o explosión, fallas o
deformaciones del producto.
• Ventilación
- Instale el televisor en un lugar con ventilación adecuada. No
lo coloque en un lugar cerrado como, por ejemplo, un estante
para libros.
- No instale el producto en alfombras o cojines.
- No bloquee o cubra el producto con paño u otros materiales
mientras esté conectado.
• Procure no tocar las aberturas de ventilación. Si se utiliza el
producto por un tiempo prolongado, las aberturas de ventilación
pueden calentarse.
• Proteja el cable de alimentación de daños físicos o mecánicos, es
decir, que no se tuerza, doble, deforme, que no quede atrapado al
cerrar una puerta y que no lo pisen. Preste especial atención a los
enchufes, tomacorrientes de la pared y al punto de salida del cable
en el aparato.
• No mueva el televisor mientras el cable de alimentación esté
conectado.
• No utilice un cable de alimentación que esté dañado o suelto.
• Al desenchufar el cable, asegúrese de hacerlo desde el enchufe. No
tire del cable de alimentación para desenchufar el televisor.
• No conecte demasiados dispositivos al mismo tomacorriente de ca
dado que podría provocar incendios o descargas eléctricas.
• Desconexión del dispositivo de la alimentación principal
- El conector de alimentación es el dispositivo de desconexión. En
caso de emergencia, el conector de alimentación debe ser de
fácil acceso.
• No deje que los niños de trepen o se aferren al TV. De lo contrario,
el TV puede caerse y provocar lesiones graves.
• Puesta a tierra con una antena exterior (puede variar según
el país):
- Si instala una antena exterior, tome las siguientes precauciones.
El sistema de antena exterior no debe instalarse cerca de las
líneas eléctricas de trasmisión aérea, cerca de ningún otro
circuito de alimentación o luz eléctrica, ni en ningún lugar
donde pudiera entrar en contacto con este tipo de cables
eléctricos o circuitos, dado que podría provocar daños graves o
incluso la muerte.
Asegúrese de que el sistema de antena tenga una puesta a
tierra como protección contra sobretensiones y acumulaciones
de cargas estáticas. La Sección 810 del Código Nacional de
Electricidad (NEC) de los Estados Unidos establece la forma de
realizar una puesta a tierra correcta del mástil, de la estructura
de soporte, del cable de bajada a una unidad de descarga de
la antena, el tamaño de los conductores de puesta a tierra, la
ubicación de la unidad de descarga de la antena, y la conexión y
los requisitos de los electrodos de puesta a tierra.
Puesta a tierra de la antena según el Código Nacional de
Electricidad, ANSI/NFPA 70
ESPAÑOL
ESPAÑOL

4
• Puesta a tierra
(Excepto dispositivos sin conexión a tierra.)
- El televisor con un conector de ca de conexión a tierra de tres
clavijas debe conectarse a un tomacorriente de ca de conexión a
tierra de tres clavijas. Asegúrese de conectar el cable de conexión
a tierra para evitar posibles descargas eléctricas.
• Nunca toque el aparato o la antena durante una tormenta eléctrica.
Podría electrocutarse.
• Asegúrese de que el cable de alimentación esté conectado de
manera segura al televisor y al enchufe de pared. De no ser así,
podría dañarse el enchufe y el conector y, en casos extremos,
podría producirse un incendio.
• No inserte objetos metálicos o inamables en el producto. Si
un objeto extraño ingresa al producto, desenchufe el cable de
alimentación y póngase en contacto con el centro de atención al
cliente.
• No toque el extremo del cable de alimentación mientras esté
enchufado. Podría electrocutarse.
• Si ocurre lo siguiente, desenchufe el producto de inmediato
y póngase en contacto con el centro de atención al cliente
local.
- Se dañó el producto.
- Si el agua u otra sustancia entra al producto (como un adaptador
de ca cable de alimentación o la TV).
- Si huele humo u otros olores que provienen de la TV
- Si hay tormentas eléctricas o cuando no se utiliza por un largo
período de tiempo.
Incluso si el televisor se apaga con el control remoto o el botón, la
fuente de alimentación de ca permanece conectada a la unidad al
menos que se desenchufe.
• No utilice equipo de alto voltaje cerca del televisor (por ejemplo,
un eliminador de insectos eléctrico). Esto puede causar que el
producto funcione mal.
• No intente modicar este producto de ninguna manera sin
autorización previa por escrito de LG Electronics. Puede provocar
un incendio o una descarga eléctrica por accidente. Póngase en
contacto con el centro de atención al cliente local para obtener
servicio técnico o reparaciones. La modicación sin autorización
podría anular la autoridad del usuario para operar este producto.
• Utilice solo accesorios/acoplamientos aprobados por LG Electronics.
No seguir estas indicaciones podría provocar un incendio, una
descarga eléctrica, fallas o daños en el producto.
• Nunca desarme el adaptador de ca o el cable de alimentación. Esto
podría provocar un incendio o descargas eléctricas.
• Maneje el adaptador cuidadosamente para evitar dejarlo caer o
golpearlo. Un golpe podría dañar el adaptador.
• Para reducir el riesgo de incendio o descarga eléctrica, no toque
el televisor con las manos mojadas. Si las clavijas del cable de
alimentación están mojadas o cubiertas de polvo, seque el conector
de alimentación por completo o retire el polvo.
• Baterías
- Guarde los accesorios (baterías, etc.) en un lugar seguro lejos del
alcance de los niños.
- No provoque un corto circuito, desarme o permita que las
baterías se recalienten. No arroje las baterías al fuego. No debe
exponer las baterías al calor excesivo.
• Traslados
- Cuando lo traslade, asegúrese de que el aparato esté apagado,
desenchufado y que no quede ningún cable conectado. Es
posible que se necesiten 2 o más personas para trasladar los
televisores de gran tamaño. No ejerza presión sobre el panel
frontal del televisor. No seguir estas indicaciones podría resultar
en un daño al producto, peligro de incendio o lesiones.
• Mantenga el material de embalaje contra la humedad y el
embalaje de vinilo fuera del alcance de los niños.
• No permita que se golpee el producto, que algún objeto se caiga
dentro de él y no golpee la pantalla con nada.
• No ejerza demasiada presión sobre el panel con la mano o un
objeto loso, como un clavo, un lápiz o una lapicera, ni raye la
supercie. Puede causar daños en la pantalla.
• Limpieza
- Cuando lo limpie, desenchufe el cable de alimentación y limpie
con cuidado con un paño suave y seco. No rocíe el televisor
con agua u otros líquidos directamente. No limpie el televisor
con productos químicos como limpiador de cristales, cualquier
tipo de ambientador, insecticida, lubricantes, cera (automóvil,
industrial), abrasivo, diluyente, benceno, alcohol, etc., que
pueden dañar el producto y / o su panel. Podría causar daños al
producto o una descarga eléctrica.
ESPAÑOL
ESPAÑOL

5
Preparación
• Cuando se enciende la TV por primera vez después de ser
enviada desde la fábrica, la inicialización de la TV puede tardar
aproximadamente un minuto.
• La imagen puede ser diferente a la de su televisor.
• El OSD (On Screen Display, Despliegue En la Pantalla) de su TV
puede ser un poco diferente que este manual.
• Los menús y las opciones disponibles pueden variar según la fuente
de entrada que utilice.
• Es posible que se agreguen nuevas funciones a este televisor en
el futuro.
• El dispositivo debe estar cerca de un tomacorriente. Algunos
dispositivos no cuentan con un botón de apagado/encendido, para
apagar el dispositivo desconecte el cable de alimentación.
• Los artículos suministrados con el producto adquirido pueden
variar según el modelo.
• Es posible que cambien las especicaciones del producto o el
contenido del manual sin previo aviso, debido a las actualizaciones
de las funciones del producto.
• Para que la conexión sea óptima, los cables HDMI y los dispositivos
USB tienen que tener biseles que no superen los 10 mm
(0,39 pulgadas) de espesor y 18 mm (0,7 pulgadas) de ancho.
• Utilice un cable de extensión que sea compatible con USB 2.0 en
caso de que el cable USB o la tarjeta de memoria USB no encajen
en el puerto USB del TV.
• Utilice un cable certicado con el logotipo de HDMI adjunto. Si
no utiliza un cable HDMI certicado, es posible que la pantalla no
muestre imágenes o que ocurra un error de conexión.
• Tipos de cable HDMI recomendados (3 m (9,84 pies) o menos)
- Cable HDMI®/
TM
de velocidad ultra alta
A
B
A
B
*A
<
=
10 mm (0,39 pulgadas)
*B
<
=
18 mm (0,7 pulgadas)
Complementos opcionales
Los complementos opcionales se pueden cambiar o modicar para
mejorar la calidad, sin necesidad de aviso previo. Para adquirir estos
elementos, comuníquese con su distribuidor. Estos dispositivos solo
funcionarán en ciertos modelos.
Es posible que el nombre o el diseño del modelo hayan cambiado,
debido a las circunstancias o políticas del fabricante.
Soporte de pared
(Según el modelo)
Asegúrese de utilizar tornillos y soportes de pared que cumplan con el
estándar VESA. En la tabla siguiente se detallan las dimensiones de los
conjuntos de montaje de pared.
A
B
Modelo 32LM50* 43LM50*
28LM40*
28LM43*
28TL43*
VESA (A x B)
(mm)
100 x 100 mm 200 x 200 mm 100 x 100 mm
Tornillo
estándar
M4 M6 M4
Cantidad de
tornillos
4 4 4
Soporte
de pared
(opcional)
LSW140B
LSW240B
MSW240
RW120
ESPAÑOL
ESPAÑOL

6
Levantamiento y traslado de
su TV
Si desea levantar o trasladar el televisor, lea las instrucciones a
continuación para no rayar o dañar el aparato, y para transportarlo de
forma segura, independientemente del tamaño o tipo de aparato.
• Se recomienda trasladar el televisor en la caja o el material de
empaque en el que lo recibió al comprarlo.
• Antes de mover o levantar el televisor, desconecte el cable de
alimentación y el resto de los cables.
• Cuando sostenga la televisión, la pantalla debe estar orientada
lejos de usted para evitar algún daño.
• Sostenga con rmeza la parte superior e inferior del marco del
televisor. Asegúrese de no sostenerlo por la parte transparente, por
la bocina o por el área de rejillas de las bocinas.
• Utilizar al menos dos personas para mover un televisor grande.
• Al transportar el televisor con las manos, sosténgalo como se indica
en esta ilustración.
• Al transportar el televisor, no lo someta a sacudones o vibración
excesiva.
• Al transportar el televisor manténgalo en posición vertical, nunca
lo apoye sobre uno de los costados, ni lo incline hacia la derecha o
la izquierda.
• Cuando manipule la televisión, tenga cuidado de no dañar los
botones salientes.
• No toque la pantalla. De lo contrario, podría dañarla.
• No coloque el producto en el piso con la parte frontal hacia
abajo sin una almohadilla. Al hacerlo puede causar daños
a la pantalla.
• Al instalar la base del televisor, ponga la pantalla hacia
abajo sobre una mesa acolchada o una supercie plana
para evitar rayas.
Montar sobre una mesa
1 Levante el televisor y déjelo en ubicación vertical sobre la mesa.
• Deje un espacio mínimo de 10 cm (4 pulgadas) entre el televisor y
la pared para asegurar una ventilación adecuada.
10
cm
10 cm (4 pulgadas)
10
cm
10
cm
10
cm
(Según el modelo)
2 Conecte el cable de alimentación al tomacorriente de la pared.
• No aplique sustancias extrañas (aceites, lubricantes, etc.) a
las piezas de los tornillos para el montaje del producto.
(Se podría dañar el producto.)
• Si instala la televisión en un soporte, debe tomar medidas
para evitar que el producto se vuelque. De lo contrario, el
producto puede caerse y provocar lesiones.
• No use ningún producto no autorizado para garantizar la
seguridad y la vida útil del producto.
• La garantía no cubre daños o lesiones que pueden
producirse al utilizar elementos no aprobados.
• Asegúrese de que los tornillos estén completamente
ajustados. (Si no están lo sucientemente ajustados, el TV
puede inclinarse hacia delante después de instalarse.)
• No ajuste los tornillos con demasiada fuerza, de lo
contrario, se pueden desgastar y aojar.
ESPAÑOL
ESPAÑOL

7
Sujeción del televisor a la pared
(Según el modelo)
1 Inserte y ajuste los tornillos de ojo del televisor en su parte posterior.
• En caso de que haya tornillos insertados, primero retírelos.
2 Utilice los tornillos para colocar los soportes correspondientes en la
pared.
Haga coincidir la ubicación del soporte de pared y los cáncamos de la
parte posterior de la televisión.
3 Conecte los cáncamos y los soportes de pared con una amarra
resistente y ajústelos con rmeza. Asegúrese de mantener la amarra
en posición horizontal a la supercie plana.
• Utilice una plataforma o un armario que sea lo sucientemente
fuerte y grande para sostener el televisor de manera segura.
• No se proporcionan soportes, tornillos ni amarras. Puede solicitar
otros accesorios a través de su distribuidor local.
Montaje en la pared
Se puede usar un soporte de pared opcional con el televisor LG. Consulte
al distribuidor local para adquirir un soporte de pared que cumpla con
el estándar VESA que usa su modelo de TV. Cuidadosamente coloque
el soporte de pared en la parte posterior del TV. Instale el soporte de
pared en una pared sólida, perpendicular al piso. Si va a instalar el
TV sobre otros materiales de construcción, póngase en contacto con
personal técnico calicado para instalar el soporte de pared. El soporte
de pared incluirá instrucciones detalladas. Recomendamos que use un
soporte de pared de marca LG. El soporte de pared LG hace que sea fácil
ajustar o conectar los cables. Cuando no utilice el soporte de montaje de
pared LG, por favor, utilice un soporte de montaje de pared en el que el
dispositivo esté debidamente sujeto a la pared con el espacio suciente
para permitir la conectividad con dispositivos externos. Si utiliza un
soporte no ajustable, instale el soporte en la pared. Primero, conecte los
cables a la TV, luego instale la TV en el soporte.
10
cm
10 cm (4 pulgadas)
10
cm
10
cm
10
cm
(Según el modelo)
• Antes de montar el televisor en la pared, retire la base,
realizando la instalación de ésta en orden inverso.
• Para obtener más información sobre los tornillos y el
soporte de montaje en pared, consulte la sección de
compras por separado.
• Si desea montar el producto en una pared, instale la
interfaz de soporte estándar VESA (piezas opcionales)
en la parte posterior del producto. Cuando instale el
producto para usar la interfaz de montaje en pared (piezas
opcionales), fíjelo con cuidado para que no se caiga.
• Cuando monte la televisión en la pared, no la instale
colgándola por los cables de señal y alimentación que se
encuentran en su parte posterior.
• No instale este producto en una pared si podría ser
expuesto a aceite o vapor de aceite. Esto podría dañar el
producto y hacer que se caiga.
• El largo del tornillo desde la supercie externa de la
cubierta posterior no debe superar los 8 mm
(0,31 pulgadas). (Para series 28LM40*, 28LM43*, 28TL43*)
Tablero de montaje en pared
Tapa posterior
Tornillo estándar
: M4 x L10
Tablero de montaje en pared
Tapa posterior
Máx. 8 mm
(0,31 pulgadas)
ESPAÑOL
ESPAÑOL

8
Conexiones
Se pueden conectar dispositivos externos al TV. Para más información
acerca de la conexión de dispositivos externos, diríjase al manual que
viene con cada dispositivo.
Antena/cable
Para ver televisión, conecte una antena, un cable o una caja de cable.
Las ilustraciones pueden diferir de los elementos reales y el cable RF
es opcional.
• Asegúrese de no doblar el alambre de cobre del cable de RF.
Alambre de cobre
• Primero conecte todos los dispositivos entre sí y luego conecte el
cable de alimentación al tomacorriente, para que el televisor no
resulte dañado.
• Utilice un divisor de señal para usar 2 televisores o más.
• Códec compatible con Audio DTV: MPEG, Dolby Digital, HE-AAC
Otras conexiones
Conecte su TV a dispositivos externos. Para tener una mejor calidad de
imagen y audio, conecte el dispositivo externo y el televisor con el cable
HDMI tal como se muestra.
HDMI
•
Cuando conecte el cable HDMI, el producto y los dispositivos
externos deben estar apagados y desenchufados.
• Formato de audio compatible con HDMI:
(Según el modelo)
AC3 (32 kHz / 44,1 kHz / 48 kHz),
PCM (32 kHz / 44,1 kHz / 48 kHz / 96 kHz)
Dispositivos externos
Los dispositivos externos compatibles son: Reproductores de Blu-ray,
receptores de HD, reproductores de DVD, VCR, sistemas de audio,
dispositivos de almacenamiento USB, PC, dispositivos de juegos y otros
dispositivos externos. Para más información acerca de la conexión de
dispositivos externos, diríjase al manual que viene con cada dispositivo.
• Si graba un programa de televisión en una grabadora de Blu-ray/
DVD o VCR, asegúrese de conectar el cable de entrada de señal
al TV a través de la grabadora de DVD o VCR. Para obtener
más información acerca de la grabación, consulte el manual
proporcionado con el dispositivo conectado.
• Las conexiones de dispositivos externos que se muestran pueden
ser levemente diferentes de las ilustraciones en el manual.
• Conecte los dispositivos externos al televisor independientemente
del orden del puerto del aparato.
• Si conecta un dispositivo de juego al televisor, utilice el cable
provisto con un dispositivo de juego.
• Consulte el manual del equipo externo para ver las instrucciones de
funcionamiento.
• En el modo PC, es posible que haya ruido asociado con la
resolución, los patrones verticales, el contraste o el brillo. Si se
producen ruidos, cambie la resolución de la salida de la PC, cambie
la frecuencia de actualización o ajuste el brillo y el contraste en el
menú [Imagen] hasta que la imagen mejore.
Uso del botón
Puede operar la televisión con el botón.
Funciones básicas
Encendido / Apagado (presionar)
ESPAÑOL
ESPAÑOL

9
Uso del control remoto
(Según el modelo)
Las descripciones en este manual se basan en los botones en el control
remoto. Lea atentamente este manual y siga las instrucciones de uso.
Para instalar las baterías, abra la tapa de las baterías, coloque otras
(AAA 1,5Vcc) y haga coincidir los extremos y con la etiqueta que
se encuentra dentro del compartimiento. A continuación, cierre la tapa.
Para retirar las baterías, realice la acción de instalación a la inversa. Este
control remoto utiliza luz infrarroja. Al usarlo, es necesario apuntarlo en
dirección al sensor remoto del TV.
Asegúrese de que el control remoto apunte hacia el sensor
correspondiente del TV.
(Algunos botones y servicios pueden no proporcionarse dependiendo de
los modelos o regiones.)
(ENCENDIDO) Enciende o apaga el televisor.
Regresa al último canal de televisión.
Activa o desactiva los subtítulos.
Cambia el tamaño de una imagen.
Muestra información del programa actual.
(Input) Accesar a las fuentes de entrada.
Botones Numerales Permiten introducir números.
(Guión) Inserta un guión entre los números, por ejemplo, 2-1
y 2-2.
Permite acceder a la lista de canales guardados.
Permite alternar entre los dos últimos canales seleccionados
(al presionarlo repetidamente).
Ajusta el nivel del volumen.
Acceder a la lista de canales favoritos.
Muestra el evento del programa según la hora programada.
(Según el modelo)
(SILENCIO) Silencia todos los sonidos.
Permite desplazarse por los canales guardados.
Permite ir a la pantalla anterior o siguiente.
Cambia el modo de la imagen.
(Home) Permite acceder al menú Home.
Cambia el modo de la imagen.
(Configuración) Permite acceder al menú de conguración.
Permite acceder al menú rápido.
Botones de navegación (hacia arriba/abajo/izquierda/
derecha) Permiten desplazarse por los menús o las opciones.
(OK) Permite seleccionar menús u opciones y conrmar lo
ingresado.
Permite volver al nivel anterior.
Borra todo lo que muestra la pantalla y se regresa a ver la
televisión.
Habilita la función SAP (Programa de audio secundario).
(Según el modelo)
Comenzar a grabar. (Solo modelos compatibles para Time
Machine
Ready
) (Según el modelo)
Botones de control para contenido de medios.
, , , Estos accesos de funciones especiales son usados en
algunos menús.
• No mezcle las baterías nuevas con las usadas. Esto podría
provocar el recalentamiento y la ltración de las baterías.
• Introducir las baterías sin hacer coincidir su polaridad
puede causar ltraciones o quemar la batería, lo que
podría provocar un incendio, lesiones en personas o
contaminación ambiental.
• Este aparato usa baterías. Puede ser que en su comunidad
existan normativas que requieren que deseche estas
baterías de forma correcta debido a las consideraciones
ambientales. Póngase en contacto con la autoridad local
para obtener información acerca del desecho o reciclaje.
• Las baterías dentro del producto no deben exponerse a
calor excesivo como luz solar, fuego, entre otras.
ESPAÑOL
ESPAÑOL

10
Conguración
Para seleccionar el Modo de imagen
(Conguración) → [Imagen] → [Conguración del Modo de
imagen] → [Modo de imagen]
Seleccione el modo de imagen optimizado para el programa o ambiente
de visualización.
• [Vivo] : Resalta el contraste, el brillo y la nitidez para mostrar
imágenes vivas.
• [Estándar] : Muestra imágenes en niveles estándares de contraste,
brillo y nitidez.
• [Cine] / [Juego] : Muestra la imagen óptima para películas, juegos.
• [Deporte] : Modo de imagen optimizado para partidos de fútbol.
El terreno de juego y los equipos se presentan en colores vibrantes,
con imágenes nítidas, incluso para los movimientos rápidos.
• Según la señal de entrada, el rango disponible de modos de
imagen podría variar.
Para ajustar el modo de imagen
(Conguración) → [Imagen] → [Conguración del Modo de
imagen]
Esta función le permite realizar ajustes detallados al modo de imagen
seleccionado.
•
[Luz de Fondo] : Permite controlar el nivel de brillo de la pantalla
mediante el ajuste de la retroiluminación. Cuanto más se acerque a
100, más brillante será la pantalla. Disminuya la retroiluminación
para reducir el consumo de energía.
• [Contraste] : Permite ajustar el contraste de las áreas oscuras y
brillantes de la imagen. Cuanto más se acerque a 100, mayor será
el contraste.
• [Brillo] : Permite ajustar el brillo general de la pantalla. Cuanto más
se acerque a 100, más brillante será la pantalla.
• [Nitidez] : Permite ajustar la nitidez de la imagen. Cuanto más se
acerque a 50, más nítida y clara será la imagen.
• [Color] Permite aumentar o disminuir los tonos de color que se
muestran en la pantalla. Cuanto más acerque a 100, más profundo
será el color.
• [Tinte] : Permite ajustar el balance de color, entre rojo y verde, que
se muestra en la pantalla. Cuanto más se acerque el rojo a 50, más
rojo será el color. Cuanto más se acerque el verde a 50, más verde
será el color.
• [Temp color] : Ajusta el tono general de la pantalla según se
preera. En el Modo Experto, se puede establecer una calibración
na detallada mediante el método Gamma, etc.
• Las conguraciones que especique solo se aplican al modo de
entrada seleccionado actualmente. Para aplicar las conguraciones
actuales de imagen a todos los modos de entrada, seleccione
[Aplicar a todas las entradas].
• Según la señal de entrada y otras características de la imagen,
podría variar el rango de los elementos de ajuste detallados.
Para congurar el control experto
(Conguración) → [Imagen] → [Conguración del Modo de
imagen] → [Controles Experto]
En cada modo de imagen puede calibrarse la pantalla y también
es posible ajustar las características de la imagen en el caso de una
pantalla especial. Según lo preera, seleccione el [Modo de imagen].
• [Contraste Dinámico] : Ajuste el contraste en el nivel óptimo de
acuerdo con el brillo de la imagen.
• [Color Dinámico] : Ajuste los colores para lograr que la imagen
aparezca en colores más naturales.
• [Gamma] : Establece la curva de gradación de acuerdo con la salida
de la señal de la imagen en relación con la señal de entrada.
• Según la señal de entrada y otras características de la imagen,
podría variar el rango de los elementos de ajuste detallados.
Para ajustar otras opciones de imagen
(Conguración) → [Imagen] → [Conguración del Modo de
imagen] → [Opciones de Imagen]
Ajusta la conguración para las imágenes.
• [Reducción de ruido] : Elimina el ruido de la imagen.
• [Reducción ruido MPEG] : Elimina el ruido generado al crear señales
digitales de la imagen.
• [Nivel de Negro] : Ajusta el brillo y el contraste de la pantalla para
que se ajusten al nivel de negro de la imagen de entrada, mediante
el uso de la oscuridad (nivel de negro) de la pantalla.
• [Cine real] : Optimiza la pantalla para poder ver películas.
• Según la señal de entrada y otras características de la imagen,
podría variar el rango de los elementos de ajuste detallados.
Para inicializar los ajustes de imagen
(Conguración) → [Imagen] → [Conguración del Modo de
imagen] → [Restablecer imagen]
Permite inicializar los ajustes de imagen que el usuario personaliza. Se
restablece cada modo de imagen. Según lo preera, seleccione el Modo
de imagen.
ESPAÑOL
ESPAÑOL

11
Para congurar el tamaño de la pantalla
(Conguración) → [Imagen] → [Relación de Aspecto]
Selecciona la relación de aspecto de la pantalla.
• [16:9] : Permite mostrar una relación de aspecto de [16:9].
• [Original] : cambia la relación de aspecto a [4:3] o a [16:9] según la
señal de video de entrada.
• [4:3] : Permite mostrar una relación de aspecto de [4:3].
• [Zoom] : Permite cambiar el tamaño de la imagen para que se
ajuste al ancho de la pantalla. Es probable que se corten las partes
superior e inferior de la imagen.
• [Original] : Permite mostrar las imágenes de video en su tamaño
original sin quitar partes del borde de la imagen. (Esta función
opera en el modo DTV/Componente/HDMI (720p/1 080i/1 080p)).
- Si selecciona [Original], es posible que haya ruido en la imagen
en el contorno de la señal original.
• Es posible que la imagen se congele cuando vea contenido de
un dispositivo externo, cuando vea texto jo durante un período
prolongado (como el nombre del programa) o cuando utilice una
relación de aspecto de [4:3].
• El tamaño de imagen disponible puede variar según la señal de
entrada.
Para usar la función de Ahorro de Energía
(Conguración) → [Imagen] → [Ahorro de energía]
Reduce el consumo de energía mediante el ajuste del límite de brillo
de la pantalla.
• [Apagado] : Apaga el Ahorro de Energía.
• [Mínimo] / [Medio] / [Máximo] : Se aplica al Ahorro de Energía
pre ajustado.
• [Apagado de Pantalla] : La pantalla se apaga y solo se reproduce
audio. Pulse cualquier botón del control remoto para volver a
encender la pantalla.
Para utilizar la prueba de imagen
(Conguración) → [Imagen] → [Prueba de imagen]
En primer lugar, ejecute una prueba de imagen para vericar que
la salida de la señal de imagen sea normal. Si la imagen de prueba
es normal, revise los dispositivos externos conectados o la señal de
transmisión.
Para seleccionar un modo de audio
(Conguración) → [Audio] → [Conguración del Modo de Audio] →
[Modo de Audio]
Permite ajustar el audio de la televisión a su nivel óptimo según el
modo de audio seleccionado.
• [Estándar] : Permite optimizar el audio de todo tipo de contenido.
• [Cine] : Permite optimizar el audio para las películas.
• [Deporte] : Permite optimizar el audio para los deportes.
• [Música] : Permite optimizar el audio para la música.
• [Juego] : Permite optimizar el audio para los juegos.
Para ajustar el balance de audio
(Conguración) → [Audio] → [Conguración del Modo de Audio]
→ [Balance]
Permite ajustar el volumen de la bocinas izquierda y derecha.
Para usar la función de efectos de sonido
(Conguración) → [Audio] → [Conguración del Modo de Audio]
El usuario puede seleccionar varios efectos de sonido.
• [Agudos] : Permite controlar los sonidos dominantes en la
salida. Cuando eleve los agudos, la salida aumentará al rango de
frecuencia más alto.
• [Graves] : Permite controlar los sonidos más tenues en la salida.
Cuando eleve los graves, la salida aumentará al rango de frecuencia
más bajo.
• [Restablecer] : Permite restablecer los ajustes de los efectos de
sonido.
• Esta opción solo se encuentra disponible cuando el [Modo de
Audio] está congurado como [Estándar].
Para ajustar el volumen automático
(Conguración) → [Audio] → [Volumen automático]
Permite establecer el [Volumen automático] en [Encendido] y la salida
del volumen de canal a canal se ajusta automáticamente. Así podrá ver
cómodamente la televisión mientras revisa diferentes canales.
Reproducir audio a través las bocinas internas del
televisor
(Conguración) → [Audio] → [Salida de audio] → [Bocina interna
del TV]
El audio se reproduce a través de las bocinas internas del televisor.
Conectar y usar un dispositivo de audio que
soporte la entrada óptica
(Conguración) → [Audio] → [Salida de audio] → [Salida de audio
(Óptica)]
Puede conectar un dispositivo de audio que soporte la entrada óptica al
puerto de salida de audio digital óptico para disfrutar del sonido de su
TV en una mejor calidad y con mayor comodidad.
• Solamente disponible para modelos con un puerto óptico digital.
• Puede usar el control remoto del TV para ajustar el volumen del
dispositivo conectado.
Usar las Bocinas internas +la entrada óptica del
televisor
(Conguración) → [Audio] → [Salida de audio] → [Bocina interna
del TV + Salida de audio (Óptica)]
El audio se reproduce a través de las bocinas integradas al televisor y
el dispositivo de audio conectado al puerto de salida de audio digital
óptico simultáneamente.
ESPAÑOL
ESPAÑOL

12
Establecer la conguración de la salida de sonido
digital
(Conguración) → [Audio] → [Salida de audio] → [Salida de Audio
Digital]
Puede establecer la conguración de [Salida de Audio Digital].
• Estas conguraciones están disponibles solamente cuando se
selecciona una entrada óptica.
Entrada de audio Salida de audio digital
Automático
MPEG
Dolby Digital
HE-AAC
PCM
Dolby Digital
PCM
PCM Todos PCM
Para usar una prueba de sonido
(Conguración) → [Audio] → [Prueba de audio]
Realice una prueba de sonido para vericar que la salida de la señal
de sonido sea normal. Si la prueba de sonido es normal, revise los
dispositivos externos conectados o la señal de transmisión.
Para ajustar canales de forma automática
(Conguración) → [Canales] → [Sintonización automática]
Memoriza de manera automática los canales que se están
transmitiendo.
•
Si la antena/cable no se instala correctamente, los canales no se
memorizarán de forma adecuada.
• La [Sintonización automática] memoriza los canales que se
transmiten en ese momento.
• Si el [Sist. de Bloqueo] está encendido, aparecerá una ventana
emergente que le pedirá la contraseña.
Para ajustar canales de forma manual
(Conguración) → [Canales] → [Sintonización manual]
Permite ajustar los canales de forma manual y guardar los resultados. Es
posible comprobar la intensidad de señal, entre otras opciones, para la
transmisión digital.
Para editar canales
(Conguración) → [Canales] → [Administrador de Canales]
Permite editar los canales guardados.
Para establecer el idioma
(Conguración) → [General] → [Idioma (Language)]
Puede seleccionar el idioma que muestra el menú en la pantalla y la
transmisión de sonido digital.
• [Idioma del menú (Menu Language)] : Permite seleccionar el
idioma del texto que se muestra en pantalla.
• [Lenguaje de Audio] : (Solo en modo Digital) Permite seleccionar el
idioma que desea para las transmisiones digitales que contengan
varios idiomas de audio.
Para ajustar la hora actual
(Conguración) → [General] → [Hora y Fecha] → [Ajuste
automático]
Permite revisar o cambiar la hora mientras ve la televisión.
• Sincroniza el reloj del TV con la información digital de la hora que
envía la estación de TV.
• [Hora] / [Fecha] / [Zona horaria] : Ajusta la hora y la fecha de forma
manual si la conguración automática no corresponde con la hora
actual o la región.
• [Horario de verano] : El horario de verano se reere a la práctica
de adelantar una hora los relojes con respecto al horario estándar
durante los meses de verano.
Para usar el temporizador
(Conguración) → [General] → [Temporizadores] →
[Temporizador]
Permite apagar la televisión transcurrida la cantidad de minutos
establecida.
•
Para desactivar el [Temporizador], seleccione [Apagado].
Para encender/apagar la televisión
(Conguración) → [General] → [Temporizadores] → [Temporizador
de Encendido] / [Temporizador de Apagado]
Puede jar la hora de encendido/apagado de la televisión.
• Seleccione [Apagado] si no desea jar una [Temporizador de
Encendido] ni una [Temporizador de Apagado].
• Para jar la [Temporizador de Encendido] y la [Temporizador de
Apagado], ajuste correctamente la hora actual.
ESPAÑOL
ESPAÑOL

13
Solicitud de servicio
(Conguración) → [General] → [Acerca de este TV]
Para obtener más información acerca de la solicitud de reparación,
consulte el menú del TV.
Para ajustar el indicador de encendido
(Conguración) → [General] → [Luz de Apagado]
Enciende o apaga la luz de apagado del panel frontal del TV.
Para cambiar el modo de la televisión
(Conguración) → [General] → [Modo de Casa/Tienda]
Seleccione [Uso en Casa] o [Modo de Tienda].
• Si la usa en su hogar, seleccione [Uso en Casa].
• El [Modo de Tienda] es adecuado para la exhibición en tiendas.
Para volver a la conguración inicial
(Conguración) → [General] → [Restaurar Conguraciones Iniciales]
Vuelve al modo predeterminado inicial mediante la eliminación de toda
la conguración opcional. Una vez que se completa la inicialización, el
TV se apagará y encenderá automáticamente.
• Cuando [Sist. de Bloqueo] se activa, aparece una ventana
emergente que solicita la contraseña.
• No desconecte la energía durante la inicialización.
Para congurar la contraseña
(Conguración) → [Seguridad] → [Fijar Contraseña]
Congura o cambia la contraseña del TV.
• La contraseña inicial es 0000.
Para denir el sistema de bloqueo
(Conguración) → [Seguridad] → [Sist. de Bloqueo]
Permite exclusivamente programas especícos mediante el bloqueo de
canales o entradas externas.
Para comenzar, je la función [Sist. de Bloqueo] en [Encendido].
• Establezca el nivel de calicación de TV y películas seleccionando
la opción pertinente en [Bloqueo de película], [Bloqueos de
programas de TV infantiles] y [Bloqueos de programas de TV
generales]. Para los videos que se pueden descargar, seleccione
[Clasicación Descargable] para congurar el nivel de clasicación.
• Puede bloquear un canal congurando los [Bloqueos de Canales].
• Puede bloquear una fuente de señal congurando los [Bloqueo
de entradas].
Para establecer el subtítulo
(Conguración) → [Accesibilidad] → [Subtítulos (Closed Caption)]
Vea subtítulos cuando la estación de TV proporcione programación
subtitulada. La programación de subtítulos funciona solo en emisiones
digitales/análogas o salidas externas.
Cambie [Subtítulos (Closed Caption)] a [Encendido] y seleccione los
ajustes de subtítulo.
• Modo
[Subtít. 1-4] (Subtitulado oculto) / [Texto 1-4]: Muestra el audio
de un programa de TV como texto en pantalla. CC1 es el modo más
común en uso. Canales de datos de campo 1: Dos leyendas (CC1,
CC2), dos textos (T1, T2).
Canales de datos de campo 2: Dos leyendas (CC3, CC4), dos textos
(T3, T4).
[Servicio1-6]: Este modo solo se encuentra disponible para el
sistema de transmisión digital.
• [Opción de modo digital]: Ajuste el tamaño y los colores de
los subtítulos en la [Opción de modo digital]. Seleccione [Por
Programa] o [Personalizar]. Seleccione [Personalizar] para ajustar
las opciones de minuto, tales como el tamaño y el color de los
subtítulos.
Uso de la guía de audio
(Conguración) → [Accesibilidad] → [Guía de Audio]
Cuando la guía de audio esté en encendida, el TV anunciará su estado
actual (canal, volumen) mediante una voz.
Para quitar el dispositivo USB
→ [Dispositivo USB]
Una vez que se muestre el mensaje con el aviso de que el dispositivo
USB se ha quitado, desconecte el dispositivo del TV.
• Después de seleccionar quitar el dispositivo USB, el dispositivo
de almacenamiento USB no podrá leerse. Quite el dispositivo de
almacenamiento USB y luego vuelva a conectarlo.
ESPAÑOL
ESPAÑOL

14
Advertencia al usar un dispositivo de
almacenamiento USB
•
Los dispositivos de almacenamiento USB que cuenten con un
programa de reconocimiento integrado o con un controlador propio
podrían no funcionar.
• Algunos dispositivos de almacenamiento USB podrían no funcionar
de manera adecuada o no funcionar en absoluto.
• Use solo aquellos dispositivos USB formateados con el sistema de
archivos FAT16, FAT32 o NTFS proporcionado por Windows.
• Para discos duros externos USB, use voltajes nominales inferiores a
5 Vcc y corriente nominal de 500 mA
• Se recomienda usar una tarjeta de memoria USB con capacidad
no superior a 32 GB y un disco duro USB con capacidad no superior
a 2 TB
• Si un disco duro USB que usa la función de ahorro de energía no
funciona adecuadamente, apague y luego vuelva a encender. Para
obtener más información, consulte el manual del usuario del disco
duro HDD.
• Los datos del dispositivo de almacenamiento USB pueden
sufrir daños, por lo que se recomienda respaldar la información
importante en otros dispositivos. El mantenimiento de los datos
es una responsabilidad del usuario. El fabricante no se hace
responsable por la pérdida de datos.
Archivo de Mis medios compatible
•
Formatos externos de subtítulos compatibles:
.srt (SubRip), .ssa/.ass (SubStation Alpha), .smi (SAMI), .sub
(SubViewer
1
, MicroDVD, DVDSubtitleSystem, Subldx (VobSub)),
.txt (TMPlayer)
1 SubViewer: Solo SubViewer1.0 y 2.0
• Formatos internos de subtítulos compatibles:
.dat/.mpg/.mpeg/.vob (DVD Subtitle), .ts/.trp/.tp (DVB Subtitle),
.mp4 (DVD Subtitle, UTF-8 Plain Text), .mkv (ASS, SSA, UTF-8 Plain
Text, VobSub, DVD Subtitle), .avi (XSUB, XSUB
+
)
Archivo de video disponible
•
Máximo: 1 920 x 1 080 pixeles @ 30 progresivo (Solo Motion JPEG
640 x 480 pixeles @ 30 progresivo)
Extensión Códec
.mpg, .mpeg
Video MPEG-1, MPEG-2, MPEG-4
Audio MPEG1/2/2.5 capa3, AC3, AAC, LPCM
.avi
Video
MJPEG, MPEG-4, H.263, XViD, H.264,
MPEG-1, MPEG-2
Audio MPEG1/2/2.5 capa3, AC3, AAC, LPCM
.ts
Video
MPEG-2, H.264, HEVC
Audio MPEG1/2/2.5 capa3, AC3, AAC, LPCM
.mov, .mkv
Video
MPEG-4, H.263, H.264, HEVC, MPEG-1,
MPEG-2, XViD
Audio MPEG1/2/2.5 capa3, AC3, AAC, LPCM
.dat
Video
MPEG-1, MPEG-2
Audio MPEG1/2/2.5 capa3, AC3, AAC, LPCM
.mp4
Video
MPEG-4, H.264, MPEG-1, MPEG-2
Audio MPEG1/2/2.5 capa3, AC3, AAC, LPCM
.vob
Video
MPEG-1, MPEG-2
Audio MPEG1/2/2.5 capa3, AC3, AAC, LPCM
.3gp
Video
H.264, MPEG-4
Audio MPEG1/2/2.5 capa3, AC3, AAC, LPCM
.v
Video H.264
Audio
MPEG1/2/2.5 capa3, AC3, AAC, LPCM
• Según el modelo, es posible que algunos códecs no sean
compatibles.
• Algunos subtítulos creados por usuarios podrían no funcionar
correctamente.
• Los archivos del video y los subtítulos deberían estar ubicados en la
misma carpeta. Asigne el mismo nombre a los archivos del video y
los subtítulos para una visualización correcta.
• Las transmisiones que contengan GMC (compensación de
movimiento global) o Qpel (estimación de movimiento de cuarto
de píxel) no son compatibles.
• Solo los niveles de perl de H.264/AVC 4.1 o menores son
compatibles.
• Los archivos de video que excedan los 50 GB (gigabyte) no son
compatibles para su reproducción. El límite de tamaño de los
archivos depende del entorno de codicación.
• (Esta función se encuentra disponible solamente en algunos
modelos.) DTS es compatible solo para reproducción de archivos de
videos en USB o HDMI.
• La compatibilidad de DTS puede variar dependiendo de su modelo
y país.
ESPAÑOL
ESPAÑOL

15
Archivo de música disponible
Extensión Elemento Info
.mp3
Velocidad de
bits
De 32 kb/s - 320 kb/s
Frecuencia de
muestreo
16 kHz - 48 kHz
Compatibilidad MPEG1/2/2.5 capa3
.ac3
Velocidad de
bits
De 32 kb/s - 640 kb/s
Frecuencia de
muestreo
32 KHz, 44,1 KHz, 48 KHz
Compatibilidad AC3
.m4a, .aac
Frecuencia de
muestreo
8 kHz - 48 kHz
Compatibilidad AAC
.ac
Velocidad de
bits
<1,6 Mb/s
Frecuencia de
muestreo
8 kHz - 48 kHz
Compatibilidad FLAC
.wav
Velocidad de
bits
De 64 kb/s - 1,5 Mb/s
Frecuencia de
muestreo
8 kHz - 48 kHz
Compatibilidad PCM
•
Cuando se mueve a una carpeta que contiene videos mientras se
reproduce música, la música puede dejar de reproducirse.
Archivo de foto disponible
Extensión Elemento Resolución píxeles
.jpg
Tipo de archivo
disponible
Progresivo JPEG
Tamaño de foto
Mínimo: 2 (ancho) x 2 (altura),
Máximo:
1 024 (ancho) x 768 (altura)
.jpeg
Tipo de archivo
disponible
Secuencial base JPEG
Tamaño de foto
Mínimo: 2 (ancho) x 2 (altura),
Máximo: 15 360 (ancho) x 8 640
(altura)
.bmp
Tipo de archivo
disponible
BMP
Tamaño de foto
Mínimo: 2 (ancho) x 2 (altura),
Máximo: 9 600 (ancho) x 6 400 (altura)
Profundidad de
píxeles
1/4/8/16/24/32 bpp
.png
Tipo de archivo
disponible
Entrelazado, No entrelazado
Tamaño de foto
Mínimo: 2 (ancho) x 2 (altura)
Máximo (Entrelazado):
1 200 (ancho) x 800 (altura),
Máximo (No entrelazado):
9 600 (ancho) x 6 400 (altura)
• Es posible que los formatos de archivo BMP y PNG se vean más
lento que los JPEG, especialmente cuando está en alta resolución.
ESPAÑOL
ESPAÑOL

16
Solución de problemas
No se puede controlar el televisor con el control remoto.
• Compruebe si puso cualquier cosa sobre el receptor, como por
ejemplo cinta adhesiva.
• Compruebe que no haya ningún obstáculo entre el producto y el
control remoto.
• Sustituya las baterías por unas nuevas.
No se muestra ninguna imagen ni se emite sonido.
• Compruebe si el producto está encendido.
• Compruebe si el cable de alimentación está conectado a la toma
de la pared.
• Conecte otros productos para comprobar si hay un problema con la
toma de la pared.
El televisor se apaga de repente.
• Compruebe la conguración del control de energía. Es posible que
el suministro eléctrico se interrumpa.
• Verique si la función de apagado automático está activada en la
conguración relacionada al tiempo.
• Si no hay señal mientras el televisor está encendido, este se
apagará automáticamente después de 15 minutos de inactividad.
Visualización anormal
•
Si siente que el televisor está frío al tocarlo, es posible que ocurra
un pequeño parpadeo cuando lo prenda. Se trata de algo normal
y no signica que el televisor esté dañado. También es posible que
aparezcan pequeños puntos en la pantalla, de color rojo, verde
o azul. Sin embargo, no afectan el rendimiento del televisor. No
toque la pantalla LCD ni coloque los dedos sobre ella durante
mucho tiempo. Esto podría producir algunos efectos de distorsión
temporales en la pantalla.
• Este panel es un producto avanzado que contiene millones de
píxeles. En raras ocasiones, es posible que note la presencia de
pequeños puntos en la pantalla mientras mira televisión. Estos
puntos son píxeles desactivados y no afectan el rendimiento ni la
abilidad del televisor.
• Emitir una imagen durante un período largo puede provocar que
la imagen se je. Evite emitir una imagen ja en la pantalla del
televisor durante un período largo.
Reproducción de ruidos
• Crujidos
Es posible que se produzcan crujidos cuando esté
mirando televisión o al apagar el televisor; se trata de un ruido
generado por la contracción térmica del plástico debido a la
temperatura y la humedad. Este ruido es común en productos
donde se requiere la deformación térmica.
• Zumbidos en el circuito eléctrico o el panel Se trata de un
ruido de bajo nivel, generado por un circuito de conmutación de
alta velocidad, que suministra una gran cantidad de corriente para
que un producto pueda funcionar. Varía según cada producto. Este
ruido no afecta el rendimiento ni la abilidad del producto.
• Cuando limpie el producto, sea cuidadoso de no permitir
que ningún líquido u objeto extraño ingrese en la
separación que existe entre el lado superior, izquierdo o
derecho del panel, y el panel guía. (Según el modelo).
• Asegúrese de estrujar el exceso de agua o limpiador del
paño.
• No rocíe agua o limpiador directamente en la pantalla de
la televisión.
• Asegúrese de rociar suciente agua o limpiador en un
paño seco para limpiar la pantalla.
ESPAÑOL
ESPAÑOL

17
Especicaciones
Las especicaciones del producto pueden cambiar sin previo aviso debido a las actualizaciones de las funciones de los productos.
El consumo de energía anual estimado indicado en la etiqueta de la FTC se mide de acuerdo con los
procedimientos de prueba para televisiones (Solo EE. UU.).
El consumo de energía real depende del entorno de uso (El contenido que se visualiza, la conguración del televisor, etc.).
(Según del país)
Especificaciones de transmisión
Sistema de televisión ATSC, NTSC-M, 64 & 256 QAM
Cobertura de
programas (Banda)
VHF 2 - 13, UHF 14 - 69, DTV 2 - 69, CATV 1 - 135, CADTV 1 - 135
Impedancia de la
antena externa
75 Ω
Condición de ambiente
Temperatura de funcionamiento 0 °C a 40 °C
Humedad de funcionamiento Menos de 80 %
Temperatura de almacenamiento -20 °C a 60 °C
Humedad de almacenamiento Menos de 85 %
ESPAÑOL
ESPAÑOL

18
Modo HDMI-PC admitido
Resolución
píxeles
Frecuencia
horizontal (kHz)
Frecuencia
vertical (Hz)
720 x 400 31,469 70,00
640 x 480 31,469 59,94
800 x 600
35,156
37,879
56,25
60,317
1 024 x 768 48,363 60,004
1 280 x 720 45,00 60,00
1 280 x 768
1
47,776 59,87
1 366 x 768 49,10 60,00
1 280 x 960
2
60,00 60,00
1 280 x 1 024
2
63,90 60,00
1 280 x 800
2
49,50 59,80
1 680 x 1 050
2
65,20 59,90
1 920 x 1 080
2
67,50 60,00
1 Excepto para 43LM50*
2 Sólo 43LM50*
Modo HDMI-DTV admitido
Resolución
píxeles
Frecuencia
horizontal (kHz)
Frecuencia
vertical (Hz)
640 x 480
progresivo
31,47
31,50
59,94
60,00
720 x 480
progresivo
31,47
31,50
59,94
60,00
1 280 x 720
progresivo
37,50
44,96
45,00
50,00
59,94
60,00
720 (1 440) x 480
entrelazado
15,73
15,75
59,94
60,00
720 x 576
progresivo
31,25 50,00
720 (1 440) x 576
entrelazado
15,63 50,00
1 920 x 1 080
entrelazado
28,125
33,72
33,75
50,00
59,94
60,00
1 920 x 1 080
progresivo
26,97
27,00
33,716
33,75
56,25
67,432
67,50
23,976
24,00
29,976
30,00
50,00
59,94
60,00
Información de conexión de puerto
componente
Puertos componente del televisor Y P
B
P
R
Puertos de salida de video del
reproductor de DVD
Y P
B
P
R
Y B-Y R-Y
Y Cb Cr
Y Pb Pr
Modo de componente admitido
Resolución píxeles
Frecuencia
horizontal (kHz)
Frecuencia
vertical (Hz)
720 x 480 entrelazado 15,73 60,00
720 x 480 progresivo 31,50 60,00
1 440 x 576
entrelazado
16,63 50,00
720 x 576 progresivo 31,50 50,00
1 280 x 720 progresivo
37,50
45,00
50,00
60,00
1 920 x 1 080
entrelazado
28,13
33,75
50,00
60,00
1 920 x 1 080
progresivo
56,25
67,50
50,00
60,00
ESPAÑOL
ESPAÑOL

19
Licencias
Los términos HDMI y HDMI High-Denition Multimedia Interface, y
el logotipo de HDMI son marcas comerciales o marcas comerciales
registradas de HDMI Licensing Administrator, Inc. en los Estados
Unidos y otros países.
Fabricado con la autorización de Dolby Laboratories. Dolby, Dolby
Vision, Dolby Audio, Dolby Atmos y el símbolo de doble D son marcas
comerciales de Dolby Laboratories.
Regulación
-
-
-
-
ESPAÑOL
ESPAÑOL

20
(1)
(2)
(3)
(4)
NOTA PARA EL INSTALADOR DE
CATV
(Para Estados Unidos y Canadá)
Se recomienda al instalador de televisión por cable (CATV) que consulte
el Artículo 820-40 del Código Nacional de Electricidad de los Estados
Unidos. El código establece las disposiciones para efectuar una puesta a
tierra correcta, y en especial, indica que el cable de puesta a tierra debe
conectarse al sistema de puesta a tierra del edicio lo más cerca posible
del punto de entrada del cable.
ESPAÑOL
ESPAÑOL

21
¡ADVERTENCIA!
Nunca coloque una televisión en un lugar inestable. Se puede caer y
provocar lesiones graves o la muerte. Puede evitar muchas lesiones,
especialmente en niños, con tan solo tomar simples precauciones,
como:
•
Usar los gabinetes o soportes recomendados por el fabricante de
la televisión.
• Apoyar la televisión solamente sobre muebles que soporten su
peso.
• Asegurarse de que la televisión no quede colgando al borde del
mueble.
• No colocar la televisión sobre un mueble alto (por ejemplo,
despensas o estantes) sin anclar tanto el televisor como el mueble
a un soporte adecuado.
• No colocar telas u otros materiales debajo de la televisión cuando
se apoya sobre el mueble.
• Enseñar a los niños los peligros de escalar el mueble para alcanzar
la televisión o sus controles.
Si va a conservar su televisión y reubicarla, debe tener en cuenta las
mismas consideraciones anteriores.
Símbolos
Se reere a la corriente alterna (ca).
Se reere a la corriente continua (cc).
Se reere a los equipos clase II.
Se reere al modo de espera.
Se reere a "ENCENDIDO" (alimentación).
Se reere a voltaje peligroso.
ESPAÑOL
ESPAÑOL

23
ESPAÑOL
ESPAÑOL
(La imagen puede ser diferente a la de su televisor.)
90°
D
B
E
C
A
F
G
MODELOS
A
B
C
D
E
F
F
G
Consumo de potencia
mm (pulgadas) kg (libras)
32LM500BPUA
32LM505BBUA
730 (28,7)
476 (18,7) 184,1 (7,2) 436 (17,1) 75,8 (2,9) 3,9 (8,5) 3,8 (8,3) 55 W
43LM5000PUA
969 (38,1)
626 (24,6) 217,8 (8,5) 569 (22,4) 82,4 (3,2) 7,1 (15,6) 6,9 (15,2) 74 W
28LM400B-PU
28LM430B-PU
28TL430D-PU
634 (24,9)
425 (16,7) 183 (7,2) 385 (15,1) 76 (2,9) 3,2 (7,0) 3,1 (6,8) 45 W
Alimentación requerida AC 127 V ~ 60 Hz

Los números de modelo y de serie del producto se
encuentran ubicados en su parte posterior. Regístrelos
en el siguiente espacio por si alguna vez necesita
recurrir al servicio técnico.
MODELO
N.º de serie
-
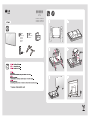 1
1
-
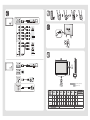 2
2
-
 3
3
-
 4
4
-
 5
5
-
 6
6
-
 7
7
-
 8
8
-
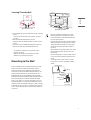 9
9
-
 10
10
-
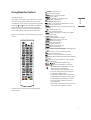 11
11
-
 12
12
-
 13
13
-
 14
14
-
 15
15
-
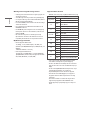 16
16
-
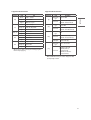 17
17
-
 18
18
-
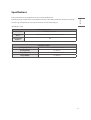 19
19
-
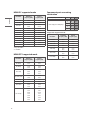 20
20
-
 21
21
-
 22
22
-
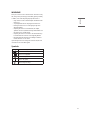 23
23
-
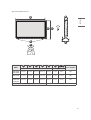 24
24
-
 25
25
-
 26
26
-
 27
27
-
 28
28
-
 29
29
-
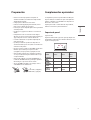 30
30
-
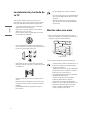 31
31
-
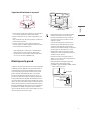 32
32
-
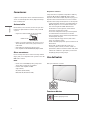 33
33
-
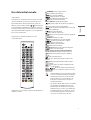 34
34
-
 35
35
-
 36
36
-
 37
37
-
 38
38
-
 39
39
-
 40
40
-
 41
41
-
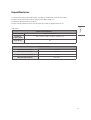 42
42
-
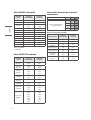 43
43
-
 44
44
-
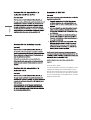 45
45
-
 46
46
-
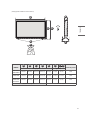 47
47
-
 48
48


LG 28TL430D-PU El manual del propietario
- Categoría
- Televisores LCD
- Tipo
- El manual del propietario
En otros idiomas
- English: LG 28TL430D-PU Owner's manual
Documentos relacionados
-
LG 28MT42DF-PU El manual del propietario
-
-
LG 28LJ400B-PD Manual de usuario
-
-
LG 32LJ500B El manual del propietario
-
LG 32LB555B El manual del propietario
-
LG 32LH510B El manual del propietario
-
LG 49UJ6500 El manual del propietario
-
LG 60UJ6580 El manual del propietario
-