
EN
Quick guide
1
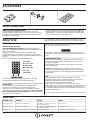
1. Indicator Leds (to display the current
temperature setpoint or the Super
Cool function)
2. Super Cool button /Temperature
button
CONTROL PANEL
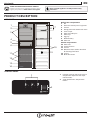
PRODUCT DESCRIPTION
APPLIANCE
1
2
2
3
4
6
11
5
7
10
8
9
15
12
13
14
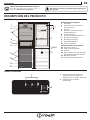
1
Refrigerator compartment
1. Fan
2. Electronic control panel / light unit
3. Shelves
4. Rating plate with commercial name
5. Fresh crisper
6. Door reversibility kit
7. Door trays
8. Egg tray
9. Bottle balcony
10. Door seal
Freezer compartment
10. Door seals
11. Freezer drawers
12. Shelves
13. Bottom drawer: coolest zone best
for freezing fresh food
14. Ice tray
15. Black Out Sensor
THANK YOU FOR BUYING AN INDESIT PRODUCT
In order to receive a more complete assistance, please
register your product on www . indesit . com/ register
Before using the appliance carefully read the Safety
Instruction.

2
DAILY USE
FUNCTIONS
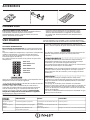
TEMPERATURE SETTING
Press the Temperature button on the control panel to
adjust the temperature from the warmest through the lower
to the coldest level.
Pressing the Temperature button, the temperature
setting will change cyclically. At rst plug-in of appliance
temperature setpoint is present at medium position (factory
setting).
Following table shows temperature setpoints:
HIGH TEMP.
MEDIUM TEMP.
LOW TEMP.
MEDHIGH TEMP.
MEDLOW TEMP.
SUPER COOL
Led on Led o
Note: Displayed set points correspond to the average
temperature throughout the whole refrigerator.
SUPER COOL
The use of the Super Cool function is recommended
to increase the cooling capacity of the refrigerator
compartment when placing a very high quantity of food
within it. To activate the Super Cool function, press and hold
for 3 seconds the Temperature button on the control panel
till all the 3 LEDs will turn on.
FIRST TIME USE
HOW TO START THE APPLIANCE
After plugging the appliance to the mains, it starts the
operation automatically. After starting the appliance, wait at
least 4-6 hours before placing food into the fridge and into
the freezer compartment.
When the appliance is connected to the power supply, the
display lights up and all the icons appear on the display for
approximately 1 second. The default (factory) values of the
fridge compartment settings light-up.
ACCESSORIES
See Use and Care Guide for more details on functions / see last
page for information on how to obtain the Use and Care Guide
The function is automatically deactivated after 24 hours and
return to previous selected set point.
!
!
!
The function can be manually deactivated by pressing and
holding for 3 seconds the Temperature button on the control
panel.
REFRIGERATOR LIGHT
The light system inside the refrigerator compartment uses
LEDs light, allowing a better lightning as well as a very low
energy consumption.
If the LED light system does not work, please contact the
Service to replace it.
Important: The refrigerator compartment light switches
on when the refrigerator door is opened. If the door is kept
open for more then 8 minutes the light will be automatically
switched o.
FAN
The Fan improves temperature distribution inside the
refrigerator compartment, allowing better preservation of
stored food. By default, the fan is switched on.
To turn o the fan press the button of fan.
Please note that when the fan is switched on it will not
continuously work. The fan will start/stop working depending
on the temperature and/or humidity level inside the fridge.
It is therefore absolutely normal if the fan does not move even
if the fan is switched on.
ALARM TABLE
EGG TRAY BOTTLE SEPARATOR IF PRESENT ICE TRAY
ALARM TYPE SIGNAL CAUSE CURE
Door open alarm Refrigerator Light blinks The door has remained open for
more than 5 minutes.
Close the door
Door open alarm Refrigerator Light OFF The door has remained open for
more than 8 minutes.
Close the door
Malfunction Any temperature indicators blinks Product malfunction. Contact the After-sales Service

EN
3
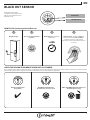
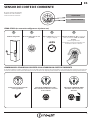
BLACK OUT SENSOR
Through the two liquids
contained, the black out sensor
will give you indication in case
blackout occurs.
2. YELLOW LIQUID
1. RED LIQUID
HOW TO USE (set up required at rst use)
Plug the fridge The sensor must be in this
position:
Wait 24 hours to make the
liquid frozen
+24h
24 hours later, you must rotate the
blackout sensor of 180° clockwise.
Now the sensor is ready to work.
Check the sensor to inform if black out is
occurred.
1 2 3 4
CHECK THE SENSOR TO INFORM IF BLACK OUT IS OCCURRED
If one or both of the liquids are dissolved, this is an indication of increased temperature in the freezer that could be caused by a blackout. Even the
partial melting of one of the 2 liquids can show and abnormal increase of the internal temperature.
RED + YELLOW liquid fault down: food
should be thrown away
YELLOW liquid fault down:
food must be eaten in a week
Default conguration:
No problem
ݲ

4
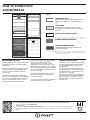
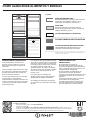
HOW TO STORE FOOD
AND BEVERAGE
Legend
TEMPERATE ZONE
Suggested for the storage of tropical fruit,
cans, drinks, eggs, sauces, pickles, butter,
jam
COOL ZONE
Suggested for storage of cheese, milk,
dairy food, delicatessen, yogurt, cold cuts,
desserts
FRUIT & VEGETABLE DRAWER
NORMAL FREEZER DRAWERS
FREEZING ZONE DRAWER
(MAX COOL ZONE) Suggested to freeze
fresh/cooked food.
Note: The Grey tone of the legend doesn’t match
with the color of drawers
FRIDGE COMPARTMENT
Use recyclable plastic, metal, aluminum
and glass containers and cling lm to
wrap foods.
Always use closed containers for liquids
and for food that may give o or be
tainted by odor or avor transfer or
cover them.
If you have a little quantity of food to
store in the refrigerator, we recommend
to use the shelves above the crisper for
fruits and vegetables since this is the
coolest area of the compartment.
Foods which give o a large amount
ethylene gas and those that are
sensitive to this gas, such as fruit,
vegetables and salad, should always
be separated or wrapped so as not to
reduce the storage life; for example do
not store tomatoes together with kiwi
fruits or cabbage.
To avoid bottles falling over, you can
use the bottle holder (available on
selected models).
Do not store food too close together to
enable sucient air circulation.
FREEZER COMPARTMENT
The freezer is the ideal storage location
for store frozen food, make ice cubes
and freeze fresh food in the freezer
compartment.
The maximum number of kilograms
of fresh food that can be frozen within
a 24-hour period is indicated on the
rating plate (…kg/24h).
If you have a little quantity of food to
store in the freezer, we recommend to
use the coldest areas of your freezer
compartment, corresponding to the
bottom area.
You can download the Safety Instructions, User Manual, Product Fiche and Energy data by:
• Visiting our website docs . indesit . eu
• Using QR Code
• Alternatively, contact our After-sales Service (See phone number in the warranty booklet). When
contacting our After-sales Service, please state the codes provided on your product's identication
plate.

ES
Guía rápida
1
1. Indicadores de LED (muestran
el punto de ajuste actual de la
temperatura o la función Súper frío)
2. Botón Súper frío / Botón
temperatura
PANEL DE CONTROL
DESCRIPCIÓN DEL PRODUCTO
APARATO
1
2
2
3
4
6
11
5
7
10
8
9
15
12
13
14
1
Compartimento frigoríco
1. Ventilador
2. Panel de control electrónico/
unidad de la luz
3. Estantes
4. Placa de características con el
nombre comercial
5. Cajón de frescos
6. Kit de reversibilidad de puertas
7. Bandejas de la puerta
8. Bandeja para huevos
9. Estante para botellas
10. Junta de la puerta
Compartimento del congelador
10. Juntas de la puerta
11. Cajones del congelador
12. Estantes
13. Cajón inferior: zona más fría ideal
para congelar alimentos frescos
14. Bandeja para hielo
15. Sensor de corte de corriente
GRACIAS POR COMPRAR UN PRODUCTO INDESIT
Para recibir una asistencia más completa, registre su
producto en www . indesit . com/ register
Antes de usar el aparato, lea atentamente las Instrucciones
de seguridad.

2
USO DIARIO
FUNCIONES
AJUSTE DE TEMPERATURA
Pulse el botón de Temperatura en el panel de control para
ajustar la temperatura desde el nivel más cálido hasta el más
frío.
Al pulsar el botón de Temperatura, el ajuste de la temperatura
cambiará cíclicamente. La primera vez que conecte el
aparato, el ajuste de la temperatura se ja en la posición
intermedia (ajuste de fábrica).
En la tabla siguiente se muestran los puntos de ajuste de la
temperatura:
TEMP. ALTA
TEMP. MEDIA
TEMP. BAJA
TEMP. MEDIAALTA
TEMP. MEDIABAJA
SÚPER FRÍO
LED
ENCENDIDO
LED
APAGADO
Nota: Los puntos de ajuste mostrados se corresponden con la
temperatura media en todo el frigoríco.
SUPER COOL SÚPER FRÍO
La función Súper frío se recomienda para aumentar la
capacidad de refrigeración del compartimento frigoríco
cuando coloque una gran cantidad de alimentos en el
interior. Para activar la función Súper frío, pulse el botón
Temperatura del panel de control durante 3 segundos
hasta que los tres LED se enciendan.
PRIMER USO
PUESTA EN MARCHA DEL APARATO
El electrodoméstico se pone en marcha automáticamente
al enchufarlo. Después de poner en marcha el
electrodoméstico, espere al menos 4-6 horas antes de
colocar alimentos en su interior.
Cuando el electrodoméstico está conectado a la red
eléctrica, el visor se ilumina y se ven todos los iconos
durante aproximadamente 1 segundo. Se encienden
los valores por defecto (de fábrica) del compartimento
frigoríco.
ACCESORIOS
Para una información más detallada acerca de las funciones
consulte la Guía de Uso y Cuidados / véase la última página para
más información acerca de cómo obtener la Guía de Uso y Cuidados
La función se desactiva automáticamente después de 24
horas y vuelve al punto de ajuste seleccionado anteriormente.
!
!
!
Esta función se puede desactivar de forma manual pulsando
el botón Temperatura del panel de control durante 3
segundos.
LUZ DEL FRIGORÍFICO
El sistema de iluminación del interior del compartimento
del frigoríco emplea luces LED, lo que permite una mejor
iluminación y un consumo energético muy bajo.
Si el sistema de luz LED no funciona, póngase en contacto con
Servicio de Asistencia para su sustitución.
Importante: La luz del compartimento frigoríco se enciende
cuando se abre la puerta del frigoríco. Si se deja la puerta
abierta durante más de 8 minutos, la luz se apaga de forma
automática.
VENTILADOR
El ventilador distribuye la temperatura de manera más
uniforme en el compartimento frigoríco y permite conservar
mejor los alimentos. De forma predeterminada, el ventilador
está encendido.
Para apagar el ventilador, pulse el botón del ventilador.
Tenga en cuenta que, cuando está encendido, el ventilador no
funciona continuamente. El ventilador se pone en marcha o
se para en función de la temperatura o del nivel de humedad
dentro del frigoríco.
Por tanto, es completamente normal que el ventilador no gire,
incluso si está encendido.
TABLA DE ALARMAS
BANDEJA PARA HUEVOS SEPARADOR DE BOTELLAS SI LO HAY BANDEJA PARA HIELO
TIPO DE
ALARMA
INDICACIÓN CAUSA SOLUCIÓN
Alarma de puerta
abierta
La luz del frigoríco parpadea La puerta ha estado abierta más de
5 minutos.
Cierre la puerta
Alarma de puerta
abierta
La luz del frigoríco está apagada La puerta ha estado abierta más de
8 minutos.
Cierre la puerta
Avería Alguno de los indicadores de
temperatura parpadea
Avería del producto. Póngase en contacto con el Servicio Postventa

ES
3
SENSOR DE CORTE DE CORRIENTE
El sensor contiene dos líquidos
mediante los cuales indicará si
ocurre un corte de corriente.
2. LÍQUIDO AMARILLO
1. LÍQUIDO ROJO
CÓMO SE USA (es necesario congurar en el primer uso)
Enchufe el frigoríco El sensor debe estar en esta
posición:
Espere 24 horas hasta que se
congele el líquido
+24h
Después de 24 horas, gire el sensor de
corte de corriente a 180° en sentido
horario.
El sensor ya funciona.
Comprobar el sensor para advertir si ha
ocurrido un corte de corriente.
1 2 3 4
COMPROBAR EL SENSOR PARA ADVERTIR SI HA OCURRIDO UN CORTE DE CORRIENTE
Si uno de los líquidos o ambos se disuelven, esto es una indicación del aumento de la temperatura en el congelador que podría ser provocado por
un corte de corriente. Incluso el derretimiento parcial de uno de los dos líquidos puede mostrar un aumento anómalo de la temperatura interna.
Fallo líquidos AMARILLO+ ROJO
derretidos: debe desechar los
alimentos
Fallo líquido AMARILLO derretido:
debe consumir los alimentos en menos
de una semana
Conguración predeterminada:
No hay problema
ݲ

4
CÓMO ALMACENAR ALIMENTOS Y BEBIDAS
Leyenda
ZONA DE TEMPERATURA
Recomendada para la conservación de frutas
tropicales, latas, bebidas, huevos, salsas,
encurtidos, mantequilla, mermelada
ZONA FRÍA
Recomendada para la conservación de
queso, leche, productos lácteos, charcutería,
yogures, ambres, postres
CAJÓN PARA FRUTAS Y VERDURAS
CAJONES NORMALES DEL CONGELADOR
CAJÓN DE LA ZONA DE CONGELACIÓN
(ZONA FRÍO MÁX.) Recomendada para
congelar alimentos frescos/cocinados.
Nota: el color gris de la leyenda no coincide con
el color de los cajones
COMPARTIMENTO FRIGORÍFICO
Utilice recipientes reciclables de
plástico, metal, aluminio y cristal o
lm transparente para envolver los
alimentos.
Utilice siempre contenedores con tapa
para líquidos y alimentos que puedan
desprender o tomar olor o sabor de
otros alimentos o cúbralos.
Si tiene que almacenar poca cantidad
de alimentos en el frigoríco,
recomendamos utilizar los estantes de
encima del cajón para frutas y verduras
ya que es la parte del compartimento
mejor refrigerada.
Los alimentos que desprenden mucho
gas etileno y aquellos que son sensibles
a este gas, como las frutas y verduras o
la lechuga, deben conservarse siempre
en compartimentos separados o
envolverse para no reducir su tiempo
de conservación. Por ejemplo, no debe
conservar los tomates junto con los
kiwis o la col.
Para evitar que se vuelquen las
botellas, puede utilizar portabotellas
(disponibles en algunos modelos).
No coloque los alimentos muy juntos
para permitir una adecuada circulación
de aire.
COMPARTIMENTO DEL
CONGELADOR
El congelador es el lugar de
almacenamiento ideal para dejar los
alimentos congelados, hacer cubitos de
hielo y congelar alimentos frescos en el
compartimento congelador.
El peso máximo en kilogramos de
alimentos frescos que se pueden
congelar en un periodo de 24 horas está
indicado en la placa de característica (…
kg/24 h).
Si tiene que almacenar poca cantidad
de alimentos en el congelador,
recomendamos utilizar las zonas más
frías del compartimento congelador,
que corresponden a la zona inferior.
400011401701
Puede descargarse las Instrucciones de seguridad, el Manual del usuario, la Ficha del producto y
los Datos de energía:
• Visitando nuestra página web docs . indesit . eu
• Usando el código QR
• También puede, ponerse en contacto con nuestro Servicio postventa (Consulte el número de
teléfono en el folleto de la garantía). Cuando se ponga en contacto con nuestro Servicio Postventa ,
deberá indicar los códigos que guran en la placa de características de su producto.
-
 1
1
-
 2
2
-
 3
3
-
 4
4
-
 5
5
-
 6
6
-
 7
7
-
 8
8


Indesit LR9 S2Q F W B Daily Reference Guide
- Tipo
- Daily Reference Guide
- Este manual también es adecuado para
en otros idiomas
- English: Indesit LR9 S2Q F W B