GE JK3800DH1BB El manual del propietario
- Categoría
- Microondas
- Tipo
- El manual del propietario

GEAppliances.com
m
E
L_
>
¢0
0
k_
0
lm
_Q
E
0
|
m
lm
Safety Information ............ 2
Warranty ........................ 8
Assistance / Accessories ...... 9
Using The Oven
Oven Controls .................... 10
Oven Settings .................... 11
Oven Options .................... 12
Upper Oven
Microwaving ..................... 13
Lower Oven
Cooking Modes .................. 17
Sabbath Mode ................... 18
Cooking Guide ................... 19
Racks ............................ 20
Aluminum Foil and Oven Liners... 21
Cookware ........................ 21
Care and Cleaning
Cleaning The Oven ............... 22
Lower Oven Maintenance ........ 24
Troubleshooting Tips ........ 25
JT3800 - 30" Double Wall Oven
JK3800 - 27" Double Wall Oven
For a Spanish version of this
manual visit our Website at
GEApp/iances.com.
Para consu/tar una version
en espaho/ de este manual
de instrucciones, visite
nuestro sitio de internet
GEApp/iances.com.
Write the model and serial
numbers here:
Model #
Serial #
You can find them on a label on the
side trim or on the front of the oven
behind the oven door.
Printed on
Recycled Paper
Printed in the United States 49-80737-1 06-14 GE

C:
cD
>
©
CD
CL
Z
©
m
©
LL
Z
m
>.,
t-=
L_
LL
IMPORTANT SAFETYINFORMATION.
READ ALL INSTRUCTIONS BEFOREUSING.
PRECAUTIONS TO AVOID POSSIBLE EXPOSURE
TO EXCESSIVEMICROWAVE ENERGY
(a) Do Not Attempt to operate this oven with (c)
the door open since open-door operation
can result in harmful exposure to microwave
energy. It is important not to defeat or tamper
with the safety interlocks.
(b) Do Not Place any object between the oven
front face and the door or allow soil or cleaner
residue to accumulate on sealing surfaces.
Do Not Operate the oven if it is damaged. It is
particularly important that the oven door close
properly and that there is no damage to the:
(1) door (bent),
(2) hinges and latches (broken or loosened),
(3) door seals and sealing surfaces.
(d) The Oven Should Not be adjusted or repaired
by anyone except properly qualified service
personnel.
To reduce the risk of burns, electric shock, fire, injury to persons or exposure to excessive microwave energy:
l,&WARNING !GENERALSAFETYINSTRUCTIONS
[] Read all instructions before using this
appliance. When using electrical appliances,
basic safety precautions should be followed,
including the following:
[] Read and follow the specific precautions in
the PRECAUTIONS TO AVOID POSSIBLE
EXPOSURE TO EXCESSIVE MICROWAVE
ENERGY section.
[] Be sure your appliance is properly installed
and grounded by a qualified technician in
accordance with the provided installation
instructions.
[] Install or locate this appliance only in
accordance with the provided installation
instructions.
SAVETHESEINSTRUCTIONS
49 80737 1

JAWARNING 1GENERALSAFETYINSTRUCTIONS
[] Some products such as whole eggs and sealed
containers--for example, closed jars--are
able to explode and should not be heated in
this oven. Such use of the oven could result in
injury.
[] Do not mount this appliance over a sink.
[] This oven is not approved or tested for marine
use.
[] This oven is UL listed for standard wall
installation.
[] Do not operate this appliance if it has been
damaged or dropped.
[] As with any appliance, close supervision is
necessary when used by children.
[] Use this appliance only for its intended use as
described in this manual.
[] Do not use corrosive chemicals or vapors in this
appliance.
[] This oven is specifically designed to heat, dry or
cook food and is not intended for laboratory or
industrial use.
[] This appliance must only be serviced by
qualified service personnel. Contact nearest
authorized service facility for examination, repair
or adjustment.
[] Do not cover or block any openings on the
appliance.
[] Do not store this appliance outdoors. Do not
use this product near water--for example, in a
wet basement, near a swimming pool, near a
sink or in similar locations.
[] See door surface cleaning instructions in the
Care and Cleaning of the Oven section of this
manual.
[] To reduce the risk of fire in the oven cavity:
-- Do not overcook food. Carefully attend
appliance when paper, plastic or other
combustible materials are placed inside the
oven while microwave cooking.
-- Remove wire twist-ties and metal handles
from paper or plastic containers before
placing them in the oven.
-- Do not use the oven for storage purposes.
Do not leave paper products, cooking
utensils or food in the oven when not in use.
-- If materials inside the oven ignite, keep the
oven door closed, turn the oven off and shut
off power at the fuse or circuit breaker panel.
If the door is opened, the fire may spread.
-- Do not use the Sensor Features twice in
succession on the same food portion. If food
is undercooked after the first countdown, use
COOK BY TIME for additional cooking time.
Do not operate the oven without the turntable in
place. The turntable must be unrestricted so it
can turn.
[] Potentially hot surfaces include the oven door,
floor, walls, oven rack and turntable.
[] Don't defrost frozen beverages in narrow-
necked bottles (especially carbonated
beverages). Even if the container is open,
pressure can build up. This can cause the
container to burst, possibly resulting in injury.
[] Foods cooked in liquids (such as pasta) may tend
to boil more rapidly than foods containing less
moisture. Should this occur, refer to the Care and
Cleaning of the oven section for instructions on
how to clean the inside of the oven.
[] Hot foods and steam can cause burns. Be
careful when opening any containers of hot food,
including popcorn bags, cooking pouches and
boxes. To prevent possible injury, direct steam
away from hands and face.
[] Do not overcook potatoes. They could dehydrate
and catch fire, causing damage to your oven.
[] Avoid heating baby food in glass jars, even with
the lid off. Make sure all infant food is thoroughly
cooked. Stir food to distribute the heat evenly.
Be careful to prevent scalding when warming
formula. The container may feel cooler than the
formula really is. Always test the formula before
feeding the baby.
[] Do not attempt to deep fry in the oven.
-<
m
Z
O
n
O
Z
C
"O
"O
d)
©
<
¢D
SAVETHESEINSTRUCTIONS
49 80737 1 3

C
>
©
Z
©
m
tY
©
EL
Z
m
>-
t--,
I,,tJ
o©
IMPORTANT SAFETYINFORMATION.
READ ALL INSTRUCTIONS BEFOREUSING.
IA WARNING INOTICE--PACEMAKERS
[] Most pacemakers are shielded from interference
from electronic products, including microwaves.
However, patients with pacemakers may wish to
consult their physicians if they have concerns.
[A WARNING IARCING
Arcing can occur during microwave cooking. If you see arcing, press the Clear/Off pad and correct the
problem.
Arcing is the microwave term for sparks in the
oven. Arcing is caused by:
[] Metal or foil touching the side of the oven.
[] Foil not molded to food (upturned edges act like
antennas).
[] Use foil only as recommended in this manual.
[] Metal cookware used during microwave cooking.
[] Metal, such as twist-ties, poultry pins, or gold-
rimmed dishes, in the oven.
[] Recycled paper towels containing small metal
pieces being used in the oven.
[A WARNING I FOODS
[] When microwaving, place all foods and
containers on the clear glass tray.
[] Do not pop popcorn in your oven unless in a
special microwave popcorn accessory or unless
you use popcorn labeled for use in microwave
ovens.
[] Do not boil eggs in this oven. Pressure will build
up inside egg yolk and will cause it to burst,
possibly resulting in injury.
[] Do not operate the oven without food inside.
This may cause damage to the oven. It
increases the heat around the magnetron and
can shorten the life of the oven.
[] Foods with unbroken outer "skin" such as
potatoes, hot dogs, sausages, tomatoes,
apples, chicken livers and other giblets, and
egg yolks should be pierced to allow steam to
escape during cooking.
[] SUPERHEATED WATER
Liquids, such as water, coffee or tea, are able to
be overheated beyond the boiling point without
appearing to be boiling. Visible bubbling or
boiling when the container is removed from the
microwave oven is not always present. THIS
COULD RESULT IN VERY HOT LIQUIDS
SUDDENLY BOILING OVER WHEN THE
CONTAINER IS DISTURBED OR A SPOON
OR OTHER UTENSIL IS INSERTED INTO THE
LIQUID.
To reduce the risk of injury to persons:
-- Do not overheat the liquid.
-- Stir the liquid both before and halfway
through heating it.
-- Do not use straight-sided containers with
narrow necks.
-- After heating, allow the container to stand in
the microwave oven for a short time before
removing the container.
-- Use extreme care when inserting a spoon or
other utensil into the container.
SAVETHESEINSTRUCTIONS
49 80737 1

(AWARNING1 MICROWAVE-SAFE COOKWARE
Make sure to use suitable cookware during microwave cooking. Most glass casseroles, cooking dishes,
measuring cups, custard cups, pottery or china dinnerware which does not have metallic trim or glaze with
a metallic sheen can be used. Some cookware is labeled "suitable for microwaving."
[]
[]
Place food or microwavable container directly
on the clear glass tray to cook your food.
Use of the non-stick metal tray during
microwave cooking will result in inferior cooking
performance.
If you are not sure if a dish is microwave-
safe, use this test: Place in the oven both the
dish you are testing
and a glass measuring
cup filled with 1 cup of
water--set the measuring
cup either in or next
to the dish. Microwave How to test for a
30-45 seconds at high. If microwave-safedish.
the dish heats, it should
not be used for microwaving.
If the dish remains cool and only the water in
the cup heats, then the dish is microwave-safe.
Cookware may become hot because of heat
transferred from the heated food. Oven mitts
may be needed to handle the cookware.
Do not use recycled paper products. Recycled
paper towels, napkins and waxed paper can
contain metal flecks which may cause arcing or
ignite. Paper products containing nylon or nylon
filaments should be avoided, as they may also
ignite.
Use foil only as directed in this manual. When
using foil in the oven, keep the foil at least 1"
away from the sides of the oven.
Do not use the oven to dry newspapers.
If you use a meat thermometer while cooking,
make sure it is safe for use in microwave ovens.
Some foam trays (like those that meat is
packaged on) have a thin strip of metal
embedded in the bottom. When microwaved,
the metal can burn the floor of the oven or ignite
a paper towel.
[] Paper towels, waxed paper and plastic wrap
can be used to cover dishes in order to retain
moisture and prevent spattering. Be sure to vent
plastic wrap so steam can escape.
[] Not all plastic wrap is suitable for use in
microwave ovens. Check the package for
proper use.
[] "Boilable" cooking pouches and tightly closed
plastic bags should be slit, pierced or vented
as directed by package. If they are not, plastic
could burst during or immediately after cooking,
possibly resulting in injury. Also, plastic storage
containers should be at least partially uncovered
because they form a tight seal. When cooking
with containers tightly covered with plastic wrap,
remove covering carefully and direct steam
away from hands and face.
[] Plastic cookware--Plastic cookware designed for
microwave cooking is very useful, but should be
used carefully. Even microwave-safe plastic may
not be as tolerant of overcooking conditions as
are glass or ceramic materials and may soften or
char if subjected to short periods of overcooking.
In longer exposures to overcooking, the food and
cookware could ignite.
Follow these guidelines:
1. Use microwave-safe plastics only and use
them in strict compliance with the cookware
manufacturer's recommendations.
2. Do not microwave empty containers.
3. Do not permit children to use plastic cookware
without complete supervision.
The turntable must always be
in place when using the oven.
The clear glass tray should
always be in place when
microwaving.
=m
rrl
-H
.<
m
Z
O
n
O
Z
C
tD
O
<
tD
SAVETHESEINSTRUCTIONS
49 80737 1 5

C
¢)
>
©
L_
O
__J
Z
©
m
tY
©
EL
Z
m
>.,
t--,
I,.tJ
o©
IMPORTANT SAFETYINFORMATION.
READ ALL INSTRUCTIONS BEFOREUSING.
iA WARNING i
Read all safety instructions before using the product. Failure to follow these instructions may result in fire,
electrical shock, serious injury or death.
STATEOF CALIFORNIA PROPOSITION65 WARNING
The California Safe Drinking Water and Toxic Enforcement Act requires the Governor of California to
publish a list of substances known to the state to cause cancer, birth defects or other reproductive harm,
and requires businesses to warn customers of potential exposure to such substances.
IAWARNING IThis product contains one or more chemical known to the State of California to
cause cancer, birth defects or other reproductive harm.
Self-clean ovens can cause low-level exposure to some of these substances, including carbon monoxide,
during the cleaning cycle. Exposure can be minimized by venting with an open window or using a
ventilation fan or hood.
l/k WARNING I GENERALSAFETYINSTRUCTIONS
[] Use this appliance only for its intended purpose
as described in this Owner's Manual.
[] Be sure your appliance is properly installed and
grounded by a qualified installer in accordance
with the provided installation instructions.
[] Do not attempt to repair or replace any part of
your oven unless it is specifically recommended
in this manual. All other servicing should be
transferred to a qualified technician.
[] Before performing any service, disconnect the
power supply at the household distribution panel
by removing the fuse or switching off the circuit
breaker.
[] Do not leave children alone--children should not
be left alone or unattended in an area where an
appliance is in use. They should never be allowed
to climb, sit or stand on any part of the appliance.
[]A CAUTION.Donotstoreitemsof
interest to children in cabinets above an oven
- children climbing on the oven to reach items
could be seriously injured.
[] Use only dry pot holders--moist or damp pot
holders on hot surfaces may result in burns from
steam. Do not let pot holders touch hot heating
elements. Do not use a towel or other bulky cloth
in place of pot holders.
[] Never use your appliance for warming or heating
the room.
[] Do not touch the heating elements or the interior
surface of the oven. These surfaces may be hot
enough to burn even though they are dark in
color. During and after use, do not touch, or let
clothing or other flammable materials contact any
interior area of the oven; allow sufficient time for
cooling first. Other surfaces of the appliance may
become hot enough to cause burns. Potentially
hot surfaces include the oven vent opening,
surfaces near the opening and crevices around
the oven door.
[] Do not heat unopened food containers. Pressure
could build up and the container could burst,
causing an injury.
[] Do not use any type of foil or liner to cover the
oven bottom or anywhere in the oven, except as
described in this manual. Oven liners can trap
heat or melt, resulting in damage to the product
and risk of shock, smoke or fire.
[] Avoid scratching or impacting glass doors or
control panels. Doing so may lead to glass
breakage. Do not cook on or in a product with
broken glass. Shock, fire or cuts may occur.
[] Cook meat and poultry thoroughly--meat to
at least an internal temperature of 160°F and
poultry to at least an internal temperature of
180°F. Cooking to these temperatures usually
protects against foodborne illness.
SAVETHESEINSTRUCTIONS
49 80737 1

iA WARNING i KEEPFLAMMABLEMATERIALSAWAY FROMTHE OVEN
[-- J
Failure to do so may result in fire or personal injury.
[] Do not store or use flammable materials in or near
an oven, including paper, plastic, pot holders,
linens, wall coverings, curtains, drapes and gasoline
or other flammable vapors and liquids.
[] Never wear loose-fitting or hanging garments while
using the appliance. These garments may ignite if
they contact hot surfaces, causing severe burns.
[] Do not let cooking grease or other flammable
materials accumulate in or near the oven. Grease
in the oven or near the oven may ignite.
i INTHE EVENTOF A FIRE,TAKETHE FOLLOWING
STEPSTOPREVENTINJURYAND FIRESPREADING
iAWARNING
[] Do not use water on grease fires. Never pick up
a flaming pan.
[] If there is a fire in the oven during baking,
smother the fire by closing the oven door and
turning the oven off or by using a multi-purpose
dry chemical or foam-type fire extinguisher.
O©
-4
-<
m
Z
'-r'!
©
n
©
Z
I"
If there is a fire in the oven during self-clean, turn O
the oven off and wait for the fire to go out. Do ,_
not force the door open. Introduction of fresh air
at self-clean temperatures may lead to a burst ('D
of flame from the oven. Failure to follow this
instruction may result in severe burns.
[,&WARNING i OVEN SAFETYINSTRUCTIONS
[] Stand away from the oven when opening the
oven door. Hot air or steam which escapes can
cause burns to hands, face and/or eyes.
[] Keep the oven vent unobstructed.
[] Keep the oven free from grease buildup. Grease
in the oven may ignite.
[] Place oven racks in desired location while oven is
cool. If rack must be moved while oven is hot, do not
let pot holder contact hot heating element in oven.
[] When using cooking or roasting bags in the
oven, follow the manufacturer's directions.
[] Pulling out the standard racks to their stop-locks
or the extension rack to its fully open position is
a convenience in lifting heavy foods. It is also
a precaution against burns from touching hot
surfaces of the door or oven walls.
[] Do not leave items such as paper, cooking
utensils or food in the oven when not in use.
Items stored in an oven can ignite.
[] Never place cooking utensils, pizza or baking
stones, or any type of foil or liner on the oven
floor. These items can trap heat or melt, resulting
in damage to the product and risk of shock,
smoke or fire.
ISELF-CLEANINGOVENSAFETYINSTRUCTIONSIA WARNING
The self-cleaning feature operates the oven at temperatures high enough to burn away food soils in the
amount of grease may ignite, leading to smoke
damage to your home.
[] If the self-cleaning mode malfunctions, turn the
oven off and disconnect the power supply. Have
it serviced by a qualified technician.
[] Do not clean the door gasket. The door gasket is
essential for a good seal. Care should be taken
not to rub, damage or move the gasket.
[] Do not use oven cleaners. No commercial oven
cleaner or oven liner protective coating of any kind
should be used in or around any part of the oven.
oven. Follow these instructions for safe operation.
[] Do not touch oven surfaces during self-clean
operation° Keep children away from the oven
during self-cleaning. Failure to follow these
instructions may cause burns.
[] Before self-cleaning the oven, remove shiny
silver colored oven racks (on some models), the
probe, any aluminum foil, and any broiler pan,
grid, and other cookware. Only porcelain coated
oven racks may be left in the oven.
[] Before operating the self-clean cycle, wipe
grease and food soils from the oven. Excessive
SAVETHESEINSTRUCTIONS
©
<
49 80737 1 7

>.,
p-.
Z
tY
tY
09
-,-- 4.--*
03
"_._o
rt_
O
tm OJ
w
.r._.."r3.
Thank You! ... for your purchase of a GEBrand appliance.
Register Your Appliance: Register your new appliance on-line at your convenience!
www.geappliances.com/service_and_support/register/
Timely product registration will allow for enhanced communication and prompt service under the terms of your warranty,
should the need arise. You may also mail in the pre-printed registration card included in the packing material.
GE Electric Range Warranty
GEAppliances.com
All warranty service is provided by our Factory Service Centers, or an authorized Customer Care®technician•
To schedule service, on-line, visit us at www.geappliances.com/service_and_support/, or call 800.GE.CARES
(800•432•2737)• Please have serial number and model number available when calling for service•
Servicing your appliance may require the use of the onboard data port for diagnostics• This gives a GE factory
service technician the ability to quickly diagnose any issues with your appliance and helps GE improve its products
by providing GE with information on your appliance• If you do not want your appliance data to be sent to GE, please
advise your technician not to submit the data to GE at the time of service•
For the period of one year from the date of the original purchase• GE will provide any part of the range which fails due
to a defect in materials or workmanship• During this limited one-year warranty, GE will also provide, free of charge, all
labor and in-home service to replace the defective part.
What GE will not cover:
[] Service trips to your home to teach you how to use
the product•
[] Improper installation, delivery or maintenance•
[] Failure of the product if it is abused, misused,
modified or used for other than the intended purpose
or used commercially•
[] Replacement of house fuses or resetting of circuit
breakers.
[] Damage to the product caused by accident, fire,
floods or acts of God.
[] Incidental or consequential damage caused by
possible defects with this appliance.
[] Damage caused after delivery.
[] Product not accessible to provide required service.
[] Service to repair or replace light bulbs, except for LED
lamps.
EXCLUSION OF IMPLIED WARRANTIES
Your sole and exclusive remedy is product repair as provided in this Limited Warranty. Any implied warranties,
including the implied warranties of merchantability or fitness for a particular purpose, are limited to one year or the
shortest period allowed by law.
This warranty is extended to the original purchaser and any succeeding owner for products purchased for home use
within the USA. If the product is located in an area where service by a GE Authorized Servicer is not available, you
may be responsible for a trip charge or you may be required to bring the product to an Authorized GE Service location
for service. In Alaska, the warranty excludes the cost of shipping or service calls to your home.
Some states do not allow the exclusion or limitation of incidental or consequential damages. This warranty gives you
specific legal rights, and you may also have other rights which vary from state to state. To know what your legal rights
are, consult your local or state consumer affairs office or your state's Attorney General.
Warrantor: General Electric Company. Louisville, KY 40225
Extended Warranties: Purchase a GE extended warranty and learn about special discounts that are available while
your warranty is still in effect. You can purchase it on-line anytime
www.geappliances.com/service_and_support/shop-for-extended-service-plans.htm
or call 800•626•2224 during normal business hours. GE Consumer Home Services will still be there after your
warranty expires.
49 80737 1

Have a question or need assistance with your appliance?
Try the GE Appliances Website (www.geappliances.comlservice_and_supportl) 24 hours a day, any day of the
year! For greater convenience and faster service, you can now download Owner's Manuals, order parts or even
schedule service on-line.
Schedule Service: Expert GE repair service is only one
step away from your door. Get on-line and schedule your
service at www.geappliances.com/service_and_support/
Or call 800.GE.CARES (800.432.2737) during normal
business hours.
Parts and Accessories: Individuals qualified to service
their own appliances can have parts or accessories sent
directly to their homes (VISA, MasterCard and Discover
cards are accepted).Order on-line today, 24 hours every
day or by phone at 800.626.2002 during normal business
hours.
Instructions contained in this manual cover procedures
to be performed by any user. Other servicing generally
should be referred to qualified service personnel. Caution
must be exercised, since improper servicing may cause
unsafe operation.
Accessories
Looking For Something More?
Real Life Design Studio: GE supports the Universal
Design concept of products, services and environments
that can be used by people of all ages, sizes and
capabilities. We recognize the need to design for a wide
range of physical and mental abilities and impairments.
For details of GE's Universal Design applications, including
kitchen design ideas for people with disabilities, check out
our Website today. For the hearing impaired, please call
800.TDD.GEAC (800.833.4322).
Contact Us: If you are not satisfied with the service you
receive from GE, contact us on our Website with all the
details including your phone number, or write to:
General Manager, Customer Relations
GE Appliances, Appliance Park Louisville, KY 40225
GE offers a variety of accessories to improve your cooking and maintenance experiences!
To place an order visit us online at:
www.GEApplianceParts.com (U.S.) or www.GEAppliances.ca (Canada)
or call 800.626.2002 (U.S.) 800.661.1616 (Canada)
The following products and more are available:
Accessories
Small Broiler Pan (8 ¾" x 1 1¼.x 13 ½ ") WB48X10055 (US) 222D2097G001 (Canada)
WB48X10056 (US) 222D2097G002 (Canada)
WB48X10057 (US) Not available in Canada
Large* Broiler Pan (12 ¾" x 1 1¼.x 16 ½ ")
XL** Broiler Pan (17 " x 1 1¼,,x 19 1/4")
Parts
Glass Tray [Part numbers vary by model
/
Turntable Part numbers vary by model
Oven racks Part numbers vary by model
Oven elements Part numbers vary by model
Light bulbs Part numbers vary by model
Cleaning Supplies
16 oz. Micro Bryte" Appliance Cleaner WX10X392
CitruShine Stainless Steel Wipes WX10X10007
CeramaBryte P_Stainless Steel Appliance Cleaner PM10X311
Graphite Lubricant WB02T10303
*The large broiler pan does not fit in 20"/24" ranges.
**The XL broiler pan does not fit in 24" wall ovens, 2T'drop ins or 20"/24" ranges
t,/)
m
Z
#b
r-t3
#b
r-t3
©
m
How to Remove Protective Shipping Film and Packaging Tape
Carefully grasp a corner of the protective shipping film To assure no damage is done to the finish of the
with your fingers and slowly peel it from the appliance product, the safest way to remove the adhesive from
surface. Do not use any sharp items to remove the film. packaging tape on new appliances is an application of
Remove all of the film before using the appliance for the a household liquid dishwashing detergent. Apply with a
first time. soft cloth and allow to soak.
NOTE: The adhesive must be removed from all parts. It
cannot be removed if it is baked on.
49 80737 1 9

GO
O
4-=J
c-
O
C.)
c-
Q
>
O
_J
©
i,L!
3=
p-.
Z
m
¢13
Oven Controls
Upper Oven
Controls
_ Upp_n _
Lock Controls
o ec
/
Common Controls
Lower Oven
Controls
Common Controls
1. Timer On/Off: Works as a countdown timer. Press
the Timer On/Off pad, select the timer type (hours and
minutes or minutes and seconds), use the selector dial to
set the time, and press the selector dial to start the timer
countdown. The oven will continue to operate when the
timer countdown is complete. To turn the timer off, press
the Timer On/Off pad.
2. Settings / Lock Controls: Find ovenoptionsfor:
Help, Clock Settings, Display Mode, Auto Conversion, Auto
Shut Off, Beeper Volume, Reminder, Temperature Units,
Thermostat Adjust and Oven Information under this selection.
See the Oven Settings section for more details. Press
and hold Settings pad for 3 seconds to lock or unlock the
controls. This locks out the control so that pressing any of
the control pads does not activate the feature. Clear/Off is
always active, even when the control is locked.
3. Selector Dial: The selector dial is used for both
the upper and lower ovens. Rotate dial to select oven
settings, upper/tower oven options and cooking options
then press to confirm the selection. Rotate dial to increase
or decrease temperatures or time and then press to
confirm the set temperature or time.
4. Back: Press this pad to go back a menu level in the
display.
5. Start/Pause: Press the StartlPause pad to start any
cooking, clean or timed function. Press the Start/Pause
pad to pause any upper oven features.
6. Display: Information about both the upper and lower
ovens is shown in this display window.
Upper Oven Controls
7. Microwave: Press the Microwave pad for microwaving
options. Use the selector dial to find the microwaving
option desired and press the selector dial to select it.
Options available include Cook by Time, Cook, Defrost,
Beverage, Popcorn, Melt, Reheat, Simmer and Soften.
Use the clear glass tray and microwave-safe cookware
when using the microwave features. See Upper Oven
Microwaving section for more detail.
8. Add 30 Sec: Press the Add 30 Sec pad for 30
seconds of microwave cooking time. Each time this pad
is pressed an additional 30 seconds is added to the
remaining cooking time. The oven starts immediately.
=
Defrost: Press the Defrost pad to defrost, rotate
selector dial to select the type of defrost and press to
select. Type of defrost available include; Defrost by Food
Type, Defrost by Time, Defrost by Weight, 1.0 lb. Quick
Defrost, Melt, and Soften. See the Microwaving section for
more information.
10. Reheat: Press the Reheat pad to reheat, rotate selector
dial to select food type to reheat and press to select.
Types of food available under the Reheat feature include;
Beverage, Casserole, Chicken, Pasta, Pizza, Plate of
Food, Rice, Soup, Steaks/Chops, and Vegetables.
11. Popcorn: Press the Popcorn pad to microwave
popcorn, press the selector dial to select. Popcorn feature
is a microwave sensor feature and automatically senses
when popcorn is done and shuts itself off. Do not use the
Sensor Features twice in succession on the same food
portion.
i2. Clear/Off: The Clear/Off pad cancels ALL upper oven
programs except the clock and timer.
Lower Oven Controls
13. Light: Press the Light pad to turn the oven light on or
off in the lower oven. Note that light in the lower oven will
not turn on if the oven is in a clean mode.
14. Bake: Press the Bake pad to bake, rotate selector dial
to select baking temperature and press to select.
i5. Broil: Press the Broil pad to broil, rotate selector dial to
select Hi/Lo and press to select.
i6. Options: Find the Delay Start, Proof, Sabbath, Self
Clean, Steam Clean and Warm features under this
selection. See the Oven Options section for more details.
17. Warm: Press the Warm pad to warm, press the selector
dial to select. Do not use Warm to cook or heat cold food.
See the Cooking Mode section for more information.
18. Clear/Off: The Clear/Off pad cancels ALL lower oven
programs except the clock and timer.
_0 49 80737 1

Oven Settings
Help
Use this feature to find out more about your oven and
its features by pressing the Settings pad and selecting
help. Turn the selector dial and press to select the
feature you want to find out more about.
NOTE: Not all features of help may be on your oven
model. Below are features found in the Help function:
Features found in the Help function.
Adding Time
Auto Conversion
Auto Shut-Off
Back
Bake
Beeper Volume
Beverage
Broil
Clear/Off
Clock
Control Lockout
Cook
Cook by Food
Cook by Time
Cook by Time 1 & 2
Cooking Options (Lower)
Cooking Options (Upper)
Defrost
Defrost by Food
Defrost by Time
Defrost by Weight
Delay Start (Lower)
Display Mode
Edit
Help
Melt
Micro 30 Secs
Microwave
My recipes
Probe
Proof
Reheat
Reminder
Repeat Last
Resume
Sabbath
Self Clean
Sensor Cooking
Simmer
Soften
Speed Cook
Start/Pause
Steam Clean
Temperature Units
Thermostat Adjust
Timer On/Off
Toast
Warm
Clock Settings
Use this feature to set the time of day and to specify
how the time of day will be displayed. You can select a
standard 12-hour clock (12 hr) or 24-hour military time
display (24 hr). Prior to the first use of your oven, the
clock must be set.
Display Mode
Use this feature to set Power Saver or Display Always
On display mode.
Auto Shut-Off
Use this feature to activate/deactivate Auto Shut-Off.
Activating the Auto Shut-Off feature will turn off the
lower oven after 12 hours of continuous operations.
The factory setting for Auto Shut-Off feature is
activated. When in Sabbath mode Auto Shut-Off will be
deactivated.
Beeper Volume
Use this feature to set Beeper Volume to Mute or Normal
NOTE: Some tones are not mutable.
Reminder
Use this feature to Set, Review, or Clear Reminder.
Temperature Units
Use this feature to set the display temperature unit to °F
(Fahrenheit) or °C (Celsius).
Thermostat Adjust
This feature allows the oven baking and convection
baking temperature to be adjusted up to 35°F hotter
or down to 35°F cooler on the lower oven. The upper
oven cannot be adjusted. Use this feature if you believe
your oven temperature is too hot or too cold and wish to
change it. This adjustment affects Bake modes. No other
cooking modes are affected.
Oven Information
This feature shows the Oven Model and Serial number,
C
m
Z
©
-4
I
r_
©
Z
= m
O
<
Oo
©
r-€
r-€
O0

O0
C
O
4--J
CL
O
c-
(D
>
O
L,I,J
©
ill
7-
t.--
©
Z
m
el)
Oven Options
Lower Oven Options
Delay Start
Use this feature to delay starting a Bake or Self Clean
feature. To use this feature select Delay Start and set
the time to start, then select cook mode. You can also
use the Delay Start feature while programming a Bake
cooking feature.
Proof
Use this feature to proof dough. See Lower Oven
Cooking Modes for more detail.
Sabbath
Use this feature to enter Sabbath mode. Sabbath mode
sets the oven for observance of the Jewish Sabbath
and Holidays. This feature conforms to the Star-K
Jewish Sabbath requirements. Sabbath mode disables
the oven lights (the oven light will not turn on when the
door is opened), all sounds (the control will not beep
when a button is pressed, but will still beep if certain
oven faults occur), and all upper oven functions and
lower oven functions, except lower oven Bake. During
Sabbath mode only lower oven Bake is available.
While in Sabbath mode, after setting/changing a bake
temperature, a random delay of approximately 30
seconds to 1 minute will occur before the oven will begin
baking. To stop cooking, press the Back pad and then
the Start/Pause pad. Your oven will shut off after a
random delay of approximately 30 seconds to 1 minute.
To immediately exit lower oven Bake, press the Clear/
Off pad at any time - cooking elements will immediately
turn off and Sabbath Bake will change to Sabbath on
the display, indicating that the oven has turned off. To
exit Sabbath mode press and hold the Back pad for 3
seconds. Do not press any other buttons until Sabbath
mode has exited, or Sabbath mode will be re-initialized
and will not exit. See Lower Oven Sabbath Mode for
more detail.
NOTE: If power outage occurs during Sabbath mode the
unit will remain in Sabbath mode but will no longer be
cooking when power is restored.
Self Clean
Use this feature to enter Self Clean mode. See Cleaning
The Oven section for more detail.
Steam Clean
Use this feature to enter Steam-Clean mode. See
Cleaning The Oven section for more detail.
Warm
Use this feature to warm. See Lower Oven Cooking
Modes for more detail.
12 49 80737 1

Microwaving
Using The Microwave Features
Make sure the turntable and clear glass tray are in place.
Place food or microwavable container directly on the
clear glass tray to cook your food.
The turntable must always be in
place when using the oven.
The clear glass tray should always
be in place when microwaving.
MICROWAVE PRESETSELECTIONS:
[] Beverage [] Melt
- Water (8-12 oz.) - Butter
- Coffee - Caramel
(8-12 oz.) - Cheese
- Tea (8-12 oz.) - Chocolate Chips
- Milk (8-12 oz.) - Marshmallow
- Hot Cocoa
(8-12 oz.) [] Simmer
[] Popcorn
- Popcorn Sensor
[] Cook
- By Food Type
- By Time
-ByTime 1 &2
[] Soften
- Butter
- Cream Cheese
- Frosting (16 oz.)
-Ice Cream
[] Defrost
- 1.0 Ib Quick
- By Time
- By Weight
- By Food Type
- Melt
- Soften
[] Reheat
- Beverage
- Casserole
- Chicken
- Pasta
- Pizza
- Plate of Food
- Rice
- Soup
- Steaks/Chops
- Vegetables
C
©
r"rl
Z
i m
Z
(b
O
DD
<
LC3
How To Use Pre-Set Microwave Selections
1. Press the Microwave pad.
If no selection is made within 15 seconds, the display will
revert back to the time of day.
2. Turn the selector dial to find the food or beverage
you want to cook, defrost, soften, melt, simmer or
reheat. Press the selector dial to enter.
3. Turn the selector dial to select the type, amount,
weight and/or size. (As required, the oven will prompt
you.) Press the selector dial after each selection.
4. Press the selector dial or the Start/Pause pad to
start cooking.
To review or edit settings during cooking, press the
selector dial.
If the door is opened during cooking, the oven will stop
and PAUSE will appear in the display. Close the door
and press Start/Pause pad to resume cooking.
If you enter an undesired selection at any time, simply
press the Back pad and reenter the desired selections.
[] When the oven is on, light may be visible around the
door or outer case.
[] The oven cavity light will come on during a
microwave cooking cycle.
[] Steam or vapor may escape from around the door.
Cook ByTime And Cook By Time 1 & 2
Use Cook By Time and Cook By Time 1 & 2 to
microwave food that is not in the recipe section and at
the time(s) you set.
[] The power level is automatically set at high, but you
can change it for more flexibility.
1. Press the Microwave pad.
2. Turn the selector dial to select Cook By Time or
Cook By Time 1 & 2 and press the selector dial to
enter.
3. Turn the selector dial to set the cook time and press
the selector dial to enter.
4. Select power level setting.
If you selected Cook By Time 1 & 2, turn the selector
dial to set the second cook time, second power level
setting and press the selector dial to enter.
5. Press the selector dial or the Start/Pause pad to
start cooking.
You may open the door during Cook By Time and Cook
By Time 1 & 2 to check the food. Close the door and
press Start/Pause to resume cooking.

ET)
r-
>
o3
O
U
Z
Ill
O
tY
ill
Microwaving (Cont.)
Microwave Power Level(s)
[] You can change the power level during most cooking
program.
1. Press the selector dial to edit
2. Rotate selector dial to change time and/or press
selector dial to enter.
3. Turn the selector dial clockwise to increase and
counterclockwise to decrease the power level. Press
the selector dial to enter.
Here are some examples of uses for various power levels:
High 10: Fish, bacon, vegetables, boiling liquids.
Med=High 7: Gentle cooking of meat and poultry; baking
casseroles and reheating.
Medium 5: Slow cooking and tenderizing for stews and
less tender cuts of meat.
Low 2 or 3: Defrosting, simmering, delicate sauces.
Warm 1: Keeping food warm, softening butter.
Defrost By Food Type
Auto Defrost automatically sets the defrosting times and
power levels to give even defrosting results for meats,
poultry and fish weighing up to 6 pounds.
1. Remove food from the package and place it on a
microwave=safe dish.
2. Press the Microwave pad and select defrost.
3. Turn the selector dial to Defrost By Food Type.
Press the selector dial to enter.
4. Turn the selector dial to select food type. Press the
selector dial to enter.
5. Turn the selector dial to the food weight, using the
Conversion Guide at the right. For example, dial 1.2
for 1.2 pounds (1 pound, 3 oz.) Press the selector
dial to enter.
6. Press the selector dial or Start/Pause pad to start
defrosting.
7. Turn the food over when the oven signals Turn Food
Over.
[] Remove defrosted meat or shield warm areas with
small pieces of foil for even defrosting.
[] After defrosting, most meats need to stand 5 minutes
to complete defrosting. Large roasts should stand for
about 30 minutes.
Conversion Guide
If the weight of food is stated in pounds and ounces, the
ounces must be converted to tenths (.1) of a pound.
Weight of Food Enter FoodWeight
in Ounces (tenths of a pound)
1-2 .1
3 .2
4-5 .3
6-7 .4
8 .5
9-10 .6
11 .7
12-13 .8
14-15 .9
Defrost By Time
Use Defrost By Time to defrost for a selected length of
time.
1. Press the Microwave pad and select defrost.
2. Turn the selector dial to Defrost By Time. Press the
selector dial to enter.
3. Turn the selector dial to select the time you want.
Press the selector dial to enter.
4. Press the selector dial or Start/Pause pad to start
defrosting.
5. Turn the food over when the oven signals Turn Food
Over.
Power level is automatically set at 3, but can be
changed. To change the power levels, see the
Microwave Power Level(s) section. You can defrost
small items quickly by raising the power level after
entering the time. Power level 7 cuts the total defrosting
time in about half; power level 10 cuts the total time to
about 1/3. When defrosting at high power levels, food
will need more frequent attention than usual.
4 49 80737 1

Microwaving (Cont.)
Defrost By Weight
Use Defrost By Weight to defrost for a selected length of
time.
1. Press the Microwave pad and select defrost.
2. Turn the selector dial to Defrost By Weight. Press the
selector dial to enter.
3. Turn the selector dial to select the weight you want.
Press the selector dial to enter.
4. Press the selector dial or Start/Pause pad to start
defrosting.
5. Turn the food over when the oven signals Turn Food
Over.
Power level cannot be changed during this setting.
1.0 lb. Quick Defrost
Use 1.0 lb. Quick Defrost for quick defrost of 1.0 lb. of
frozen food.
1. Press the Microwave pad and select 1.0 Lb. quick
defrost.
2. Press selector dial or Start/Pause pad to start
defrosting. Press the selector dial to enter.
3. Turn the food over when the oven signals Turn Food
Over.
Power level cannot be changed during this setting.
C
"D
"D
©
Z
i m
Z
Cb
O
CCb
Defrosting Tips
[] Foods frozen in paper or plastic can be time
defrosted in the package, but foods should be taken
out of the package when using Defrost By Food
Type. Closed packages should be slit, pierced or
vented after food has partially defrosted. Plastic
storage containers should be partially uncovered.
[] Family-size, prepackaged frozen dinners can be
defrosted and microwaved. If the food is in a foil
container, transfer it to a microwave-safe dish.
[] Foods that spoil easily should not be allowed to
sit out for more than one hour after defrosting.
Room temperature promotes the growth of harmful
bacteria.
[] For more even defrosting of larger foods, such as
roasts, use Defrost By Time. Be sure large meats
are completely defrosted before cooking.
[] When defrosted, food should be cool but softened in
all areas. If still slightly icy, return to the microwave
very briefly, or let it stand a few minutes.

E7)
r-
>
o3
O
LD
.i
Z
L.I,J
©
tY
ill
Microwaving (Cont.)
Microwave Sensor Cooking
The sensor feature detects the increasing humidity
released during cooking. The oven automatically adjusts
the cooking time to various types and amounts of food.
Do not use the Sensor Features twice in succession
on the same food portion-- it may result in severely
overcooked or burnt food. If food is undercooked after
the first countdown, use Cook By Time for additional
cooking time.
The proper containers and covers are essential for
best sensor cooking.
[] Always use microwave-safe containers and cover
them with lids or vented plastic wrap. Never use tight
sealing plastic containers--they can prevent steam
from escaping and cause food to overcook.
[] Be sure the outside of the cooking containers and
the inside of the oven are dry before placing food in
the oven. Beads of moisture turning into steam can
mislead the sensor.
[] Beverages are best heated uncovered.
Covered
Vented
Dry off dishes so they don't
mislead the sensor.
[] Ground Meat
[] Popcorn
[] Soup
[] Rice
MICROWAVE SENSOR PROGRAMS:
[] Vegetables [] Plate of Food Reheat
(Canned, Fresh, Frozen) [] Soup Reheat
[] Chicken Reheat [] Vegetable Reheat
[] Pasta Reheat
To Use All Sensor Programs
Upper Oven microwave mode features sensor cooking. It
automatically senses when food is done and shuts itself
off--eliminating the need to program cook times and
power levels.
1. Press the Microwave pad and turn the selector dial
to Cook By Food Type or Reheat. Press the selector
dial to enter.
2. Turn the selector dial to select the food you want.
Press the selector dial to enter.
3. Press the selector dial or press the Start/Pause pad
to start cooking.
Do not open the oven door until time is counting down
in the display or the microwave stop cooking. If the door
is opened, close it and press Start/Pause immediately.
If the food is not done enough, use Cook By Time in the
microwave selector to cook for more time.
NOTE: Do not use the Sensor Features twice in
succession on the same food portion--it may result in
severely overcooked or burnt food.
[] If you have been speedcooking and the oven is
already hot, it may indicate that it is too hot for
sensor cooking. Of course, you can always continue
with Cook By Time.
NOTE: If the oven is too hot then it will automatically
change to time cooking.
[] To shorten or lengthen the cook time, wait until the
time countdown shows in the display. Then turn the
selector dial to add or subtract time.
[] If you open the door while Sensor Cooking, Sensor
Error will appear. Close the door, press Start/Pause
to begin again.
Notes about the Reheat program:
Reheated foods may have wide variations in
temperature. Some areas may be extremely hot.
It is best to use Cook By Time and not Reheat for these
foods:
[] Bread products
[] Food that must be reheated uncovered.
[] Foods that need to be stirred or turned.
[] Foods calling for a dry look or crisp surface after
reheating.
6 49 80737 1

Cooking Modes
Your new oven has a variety of cooking modes to help you get the best results. These modes are described below. Refer
to the Cooking Guide section for recommendations for specific foods. Remember, your new oven may perform differently
than the oven it is replacing.
Baking and Roasting Modes
Select a mode for baking and roasting based on the type
and quantity of food you are preparing. When preparing
baked goods such as cakes, cookies, and pastries always
preheat the oven first. Follow recipe recommendations for
food placement. If no guidelines are provided, center food
in the oven.
Traditional Bake
The traditional bake mode is intended for single rack cooking.
This mode uses heat primarily from the lower element but
also from the upper element to cook food. To use this mode
press the Bake pad, turn the selector dial to set the oven
temperature and press to enter, then press Start Preheating
is generally recommended when using this mode.
Broiling Modes
Always broil with the door closed. The broil element in this
oven is very powerful. Monitor food closely while broiling.
Use caution when broiling on upper rack positions as
placing food closer to the broil element increases smoking,
spattering, and the possibility of fats igniting. BroiHing on
rack position 6 is not recommended.
Try broiling foods that you would normally grill. Adjust rack
positions to adjust the intensity of the heat to the food. Place
foods closer to the broil element when a seared surface
and rare interior is desired. Thicker foods and foods that
need to be cooked through should be broiled on a rack
position farther from the broiler or by using Broil Lo. For best
performance center food below the broil heating element.
Broil L©
The Traditional Broil L© mode uses less intense heat from
the upper element to cook food thoroughly while also
producing surface browning. Use Broil L©for thicker cuts of
meat and/or foods that you would like cooked all the way
through. To use this mode press the Broil pad, turn the
selector dial to L© and press to enter, and then press Start.
It is not necessary to preheat when using this mode.
Proof
Proof mode is designed for rising (fermenting and proofing)
bread dough. Press the Options pad, turn the selector
dial to select Proof and press to select, then press Start.
Cover dough well to prevent drying out. Bread will rise more
rapidly than at room temperature. Note that for double wall
ovens, proof cannot be run when running a clean mode in
the lower oven.
Warm
Warm mode is designed to keep hot foods hot for up to 3
hours. To use this mode, press the Options pad, turn the
selector dial to select Warm and press to select, or press
the Warm pad, then press Start. Cover foods that need to
remain moist and do not cover foods that should be crisp.
Preheating is not required. Do not use warm to heat cold
food other than crisping crackers, chips or dry cereal. It is
also recommended that food not be kept warm for more
than 2 hours.
Broil Hi
The Traditional Broil Hi mode uses intense heat from the
upper element to sear foods. Use Broil Hi for thinner cuts
of meat and/or foods you prefer less done on the interior.
To use this mode press the Broil pad, turn the selector
dial to Hi and press to enter, and then press Start. It is not
necessary to preheat when using this mode.
I"-
©
©
Z
i m
Cb
O
©
LQ
Z
O
¢b
dD
O0

Q
O
Z
r--
_Q
._Q
63
OO
©
tY
©
.,.,J
Sabbath Mode
Your new oven conforms to the Star=K Jewish Sabbath requirements with the Sabbath mode cooking feature. Below
describes the detail of Sabbath mode feature.
To Enter Sabbath Mode
Press the lower oven Options pad and turn the selector
dial to Sabbath and press to select. The display
will show "During Sabbath Mode the upper oven is
unavailable." Press the selector dial to continue. Any
upper oven features running will exit, and the lower oven
will immediately transition into Sabbath mode.
To Change Temperature
Once in Sabbath mode, in order to change oven
temperature or start a bake feature, the user can change
temperature to one of 10 pre-set temperatures as
indicated below:
UI Key Temp. (°F)
Left Side Keys (Upper Oven)
Microwave 170
Speed Cook/Defrost 200
Cooking Options/Popcorn 225
Add 30 Sec 250
Convection Bake/Reheat 300
Right Side Keys (Lower Oven)
Back 0
Clear/Off Cancels immediately
Light 325
Bake 350
Broil 375
Convection Bake/Warm 400
Options 450
Changing to one of the above temperatures requires the
user to press the keypad associated with the desired
temperature and then press the 8tart/Pause pad. For
example, to set a Bake 350°F, the user will press the Bake
pad on the lower oven and then press 8tart/Pause pad.
The Bake feature will start (or if already running, the
oven temperature will change) at a random time between
30 - 60 seconds after the Start/Pause pad is pressed,
with the exception of pressing the Clear/Off pad, which
will immediately cancel the cooking settings. (The unit
will remain in Sabbath mode). Change of temperature
may be executed at any time in the cooking cycle.
To Turn Oven Off
Press CleadOff pad or Back and then Start pads at
any time. The oven will immediately turn off but will stay
in Sabbath mode and return to the standby Sabbath
display screen.
To Exit Sabbath Mode
Press and hold the Back pad for 3 seconds. The oven
will shut down at a random time between 30 - 60
seconds after the Back pad is pressed and held.
NOTE: Do not press any other pads during this time, or
the Sabbath mode will be re=initialized and will not exit.
The oven will exit Sabbath mode and return to its default
screen.
Timed Cook Feature In Sabbath Mode
The Sabbath mode is not capable of running a timed
cook feature on its own. If there is a desire to run a
Timed Cook, the following steps must be followed:
1. Use the Settings pad to set your Beeper Volume to
Mute.
2. Use the Light pad to set your lower oven Light to On.
3. Use Bake to program a temperature. After
programming a temperature select a cook time and
enter your cook time. Press Start to start the oven.
4. Once the oven is started, do NOT open the door
until the oven has finished preheating and reached a
steady state temperature. Doing so prior to preheating
completing will result in the air distribution fan
de=energizing immediately upon door opening.
5. Once the food has been placed in the oven, do not
open the door until cooking has completed. Doing so
will result in the display on the screen changing to
prompt you to close your door.
6. Do NOT open the upper oven door. Doing so will turn
the light on immediately.
7. Do not press any additional buttons on the lower
oven controls once started or the display will change
immediately upon the button press.
NOTES
[] During Sabbath mode only lower oven Bake is
available. Broil, Warm, or other functions are not
available.
[] When in Sabbath mode, the 12=hour auto shutoff
is disabled regardless of the setting selected in the
Settings.
[] Sabbath mode can be entered only if no cooking
mode is running in the lower oven. Entering the
Sabbath Mode will cancel all functions in the lower
and upper oven (including timer and reminder).
[] When any buttons are pressed in Sabbath Mode,
there are no beeps or tones, no changes to lights or
change in the display. Also, when the door is opened
or closed in Sabbath Mode, there are no beeps or
tones, no changes to lights or change in the display.
[] If a power outage occurs during Sabbath mode
baking, the unit will return to Sabbath Mode when
power comes back, but will not return in the baking
mode.
8 49 80737 1

Cooking Guide
Baked Goods
Layer cakes, sheet cakes,
bundt cakes, muffins, quick
breads on a Single Rack
Layer cakes* on Multiple
Racks
Chiffon cakes (angel food)
Cookies, biscuits, scones
on a Single Rack
Bake
Use shiny cookware.
Ensure adequate airflow
Bake 2 and 4
(see illustration below).
Bake 1 Use shiny cookware.
Bake 3 Use shiny cookware.
For foods like sugar cookies, switch food location
on Multiple Racks Bake 2 and 4 partially through cooking for more even cooking
results between racks. Ensure adequate airflow.
Beef & Pork
Use a broil pan; move food down for more
doneness/less searing. Watch food
Hamburgers Broil Hi 5 closely when broiling. For best performance
center food below the broil heating element.
Use a broil pan; move food down for
more doneness/less searing. Watch food
Steaks & Chops Broil Hi 5 closely when broiling. For best performance
center food below the broil heating element.
Leave uncovered, use a low sided pan such
Bake 2 or 3
as a broil pan. Preheating is not necessary.
Bake 2 or 3
Broil Hi 1
Broil L©
Bake
Poultry
Whole chicken
Bone-in chicken breasts,
legs, thighs
Boneless chicken breasts Broil L© 1 (broil) or 3
Bake
Whole turkey Bake 1 or 2
Turkey Breast Bake 2 or 3
Fish Broil L© 5 (1/2 thick or less)
4 (>1/2 inch)
Casseroles Bake 3
Frozen Convenience Foods
Bake
Bake 2 and 4
Pizza. french fries, tator tots.
chicken nuggets, appetizers
on a Single Rack
Pizza. french fries, tator tots.
chicken nuggets, appetizers
on Multiple Racks
Use a low sided pan such as a broil pan.
If breaded or coated in sauce avoid Broil
Hi modes. Broil skin side down first.
Watch food closely when broiling. For best
performance when broiling, center food below
the broil heating element.
Move food down for more doneness/less
searing and up for greater searing/browning
when broiling. For best performance when broil-
ing, center food below the broil heating element.
Use a low sided pan such as a broil pan.
Use a low sided pan such as a broil pan.
Watch food closely when broiling. For best
performance center food below the broil heating
element.
Use shiny cookware.
Use shiny cookware.
Switch food location partially through
cooking for more even cooking results.
©
©
r'rl
Z
i m
Cb
O
©
LC3
C)
c-
CL
©
*When baking four cake layers at a time, use racks 2
and 4. Place the pans as shown so that one pan is not
directly above another.
Cook food thoroughly to help protect against food
borne illness. Minimum safe food temperature
recommendations for food safety can be found at
www.lsltDoneYet.gov. Make sure to use a food
thermometer to take food temperatures.
%
[]
%

Ch
,,,i
LD
rY
ill
©
tY
©
Racks
Your oven has six rack positions. Recommended rack
positions for various types of foods are provided in the
Cooking Guide. Adjusting rack position is one way to
impact cooking results. For example, if you would prefer
darker tops on cakes, muffins, or cookies, try moving
food one rack position higher. If you find foods are too
brown on top try moving them down next time.
When baking with multiple pans and on multiple racks,
ensure there is sufficient space between pans to allow
air to flow.
Fiat Racks
When placing and removing cookware, pull the rack out
to the bump (stop position) on the rack support.
To remove a rack, pull it toward you, tilt the front end up
and pull it out.
To replace, place the curved end of the rack (stop-locks)
onto the oven supports, tilt up the front of the rack and
push the rack in.
Racks may become difficult to slide, especially after a
self-clean. Put some vegetable oil on a soft cloth or
paper towel and rub onto the left and right edges.
0 49 80737 1

Aluminum Foil and Oven Liners
^,.,CAUTION: Donotuseanytypeoffo.oroven.nettocovertheovenbottomTheseitemscantrap
heat or melt, resulting in damage to the product and risk of shock, smoke or fire. Damage from improper use
of these items is not covered by the product warranty.
Foil may be used to catch spills by placing a sheet on a lower rack, several inches below the food. Do not use more
foil than necessary and never entirely cover an oven rack with aluminum foil. Keep foil at least 1-1/2" from oven walls
to prevent poor heat circulation.
Cookware
Cookware Guidelines
The material, finish, and size of cookware affect baking
performance.
Dark, coated and dull pans absorb heat more readily
than light, shiny pans. Pans that absorb heat more
readily can result in a browner, crisper, and thicker crust.
If using dark and coated cookware check food earlier
than minimum cook time. If undesirable results are
obtained with this type of cookware consider reducing
oven temperature by 25° F next time.
Shiny pans can produce more evenly cooked baked
goods such as cakes and cookies.
Glass and ceramic pans heat slowly but retain heat well.
These types of pans work well for dishes such as pies
and custards.
Air insulated pans heat slowly and can reduce bottom
browning.
Keep cookware clean to promote even heating.
i.m
O
I't3
O
Z
i m
3>
c-
c-
"1"3
O
G)
CL
O
<
('D
r-
q)
O0
Cb
O
©
""3
dD

t-
(1)
>
O
(1)
r-
ET)
r-
r-
G3
(13
LD
(5
Z
m
Z
<1:
I,.t,J
¢D
tm
z
LL!
tY
Cleaning The Oven
Be sure electrical power is off and all surfaces are cool before cleaning any part of the oven.
Helpful Hints
An occasional thorough wiping with a solution of
baking soda and water keeps the inside fresh. Also
we recommend against using cleaners with ammonia
or alcohol, as they can damage the appearance of
the oven. If you choose to use a common household
cleaner, first apply the cleaner directly to a clean cloth,
then wipe the soiled area.
Control Panel
It's a good idea to wipe the control panel after each use.
Clean with mild soap and water or vinegar and water,
rinse with clean water and polish dry with a soft cloth.
Do not use abrasive cleansers, strong liquid cleansers,
plastic scouring pads or oven cleaners on the control
panel--they will damage the finish.
Oven Exterior
Do not use oven cleaners, abrasive cleansers, strong
liquid cleansers, steel wool, plastic scouring pads, or
cleaning powders on the interior or exterior of the oven.
Clean with a mild soap and water or vinegar and water
solution. Rinse with clean water and dry with a soft cloth.
When cleaning surfaces, make sure that they are at
room temperature and not in direct sunlight.
If stain on the door vent trim is persistent, use a mild
abrasive cleaner and a sponge-scrubber for best results.
Spillage of marinades, fruit juices, tomato sauces and
basting liquids containing acids may cause discoloration
and should be wiped up immediately. Let hot surfaces
cool, then clean and rinse.
Stainless Steel Surfaces (on some models)
Do not use a steel wool pad; it will scratch the surface.
To clean the stainless steel surface, use warm sudsy
water or a stainless steel cleaner or polish. Always
wipe the surface in the direction of the grain. Follow
the cleaner instructions for cleaning the stainless steel
surface.
To inquire about purchasing cleaning products including
stainless steel appliance cleaner or polish, read the
Assistance and Accessories section at the beginning of
this manual.
How To Clean The Upper Oven interior
[::::::3EZZ::3E::::23 EZ:::Z3E::::::3r-7
Walls, Floor, Inside Window, Metal and
Plastic Parts on the Door
Clean the inside of the oven often for proper heating
performance.
Some spatters can be removed with a paper towel,
others may require a warm soapy cloth. Remove greasy
spatters with a sudsy cloth; then rinse with a damp cloth.
Do not use abrasive cleaners or sharp utensils on oven
walls.
Never use a commercial oven cleaner on any part of
your oven.
Do not clean the inside of the oven with metal scouring
pads. Pieces can break off the pad, causing electrical
shock.
Door Seal
It's important to keep the area clean where the door
seals against the oven. Use only mild, nonabrasive
detergents applied with a clean sponge or soft cloth.
Rinse well.
Removable Turntable
Turntable
Do not use the oven without the
turntable in place.
The area underneath the turntable should be cleaned
frequently to avoid odors and smoking during a cooking
cycle.
The turntable can be broken if dropped. Wash carefully
in warm, sudsy water. Dry completely and replace.
To replace the turntable, place its center over the spindle
in the center of the oven and turn it until it seats into place.
(Make sure the smooth side of the turntable is facing up
and that its center seats securely on the spindle.)
2 49 80737 1

Cleaning The Oven (Cont.)
How To Clean The Upper Oven interior (Cont.)
Cooking Trays And Baking Sheet
To prevent breakage, allow the trays to cool completely
before cleaning. Wash carefully in warm, sudsy water or
in the dishwasher.
Do not use metal scouring pads or abrasives, as they
may damage the finish. A soap-filled scouring pad may
be used to clean the trays.
Clear glass tray for microwaving
How To Clean The Lower Oven Interior
The interior of your new oven can be cleaned manually
or by using the Steam Clean or Self Clean modes.
Spillage of marinades, fruit juices, tomato sauces and
basting liquids containing acids may cause discoloration
and should be wiped up immediately. Let hot surfaces
cool, then clean and rinse.
Manual Cleaning
Do not use oven cleaners, abrasive cleaners, strong
liquid cleansers, steel wool, scouring pads, or cleaning
powders on the interior of the oven. Clean with a mild
soap and water or vinegar and water solution. Rinse with
clean water and dry with a soft cloth. When cleaning
surfaces, make sure that they are at room temperature.
Steam Clean Mode
Steam clean is intended to clean small spills using water
and a lower cleaning temperature than Self Clean.
To use the Steam Clean feature, wipe grease and soils
from the oven. Pour one cup of water into the bottom
of the oven. Close the door. Press the Options pad,
select Steam Clean, and then press Start. The oven
door will lock. You can not open the door during the
30 minute steam clean as this will decrease the steam
clean performance. At the end of the steam clean cycle
the door will unlock. Wipe out any excess water and any
remaining soil.
Self Clean Mode
Read Self-Cleaning Oven Safety Instructions at the
beginning of this manual before using Self Clean Mode.
Self-clean uses very high temperatures to clean the oven
interior. The oven door will lock when using this feature.
Before operating the self-clean cycle, wipe up grease
and soils from the oven. Remove all items from the
oven other than enameled (dark color) racks. Shiny or
silver racks and any cookware or other items should all
be removed from the oven before initiating a self-clean
cycle. Close the door. Press the Options pad, select
Self Clean, and a default self-clean time is displayed.
The clean time can be changed to 3:00, 4:00, or 5:00
hours by using the selector dial. For heavily soiled
ovens, the maximum 5 hour clean time is recommended.
If you wish to use the default time, press the Start pad
immediately after selecting the Self Clean. The oven
will turn off automatically when the self-clean cycle is
complete. The door will stay locked until the oven has
cooled down. After the oven has cooled down wipe any
ash out of the oven.
IMPORTANT: The health of some birds is extremely
sensitive to the fumes given off during the self-cleaning
cycle of any range. Move birds to another well-ventilated
room.
C3
:1=,
t"t3
Z
qb
r_
Z
Z
u"b
I I
d-b
I
(T)
I i
(_(3
:::3"-
©
0
<
Flat Racks
Flat racks can be left in the cavity during self-clean
(if enameled racks, not shiny) or can be washed with
warm, soapy water.
Racks may be more difficult to slide, especially after
a self-clean. Put some vegetable oil on a soft cloth or
paper towel and rub onto the left and right edges.

(33
L)
c-
d3
c-
dJ
4--J
c-
Z
c-
d)
>
O
L_
d)
O
_d
Z
m
Z
DLJ
Z
ELI
Lower Oven Maintenance
Lower Oven Light Replacement
[A ] SHOCK OR BURN HAZARD: Before replacing oven light bulb, disconnect the electrical..,- WARNING power to the oven at the main fuse or circuit breaker panel. Failure to do so may result in
electric shock or burn.
[ACAUTION BURN HAZARD: The glass cover and bulb should be removed when cool. Touching hotglass with bare hands or a damp cloth can cause burns.
1. Disconnect power at the main fuse or circuit breaker
panel.
2. Remove oven racks.
3. Slide a flat blade screwdriver between the housing
and the glass light cover.
4. Support the glass light cover with two fingers to
prevent the cover from falling to the bottom of the
oven. Be careful not to chip the oven coating.
5. Gently twist the screwdriver blade to loosen the
glass light cover.
6. Remove the glass light cover,
7. Remove the bulb by firmly grasping and sliding the
bulb straight out until the two prongs have cleared
the ceramic holder.
8. Do not touch the glass of the new replacement bulb
with your fingers. It will cause the bulb to fail when it
lights. Grasp the replacement bulb with a clean towel
or facial tissue with the prongs facing down. Align
the two prongs in the ceramic holder, pressing gently
until the bulb is securely in the ceramic socket.
9. Slide the protective lens into the holder and push
until the clips snap into the housing.
10. Reconnect power.
Lift-Off Lower Oven Door
The door is very heavy. Be careful when removing and lifting the door.
Do not lift the door by the handle,
To remove the door:
1. Fully open the door.
2. Pull the hinge locks down toward the door frame, to
the unlocked position. A tool, such as a small fiat-
blade screwdriver, may be required.
3. Firmly grasp both sides of the door at the top.
4. Close door to the door removal position. The door
should be open approximately 3" with no obstruction
above the door.
5. Lift door up and out until both hinge arms are clear of
the slots.
Slot
d_p
Hinge lock
Pull hinge locks down to unlock
Remova/ position
To replace the door:
1. Firmly grasp both sides of the door at the top.
2. Starting on the left side, with the door at the same
angle as the removal position, seat the indentation of
the hinge arm into the bottom edge of the hinge slot.
The notch in the hinge arm must be fully seated into
the bottom of the slot. Repeat for right side.
3. Fully open the door. If the door will not fully open, the
indentation is not seated correctly in the bottom edge
of the slot.
4. Push the hinge locks up against the front frame of the
oven cavity, to the locked position.
5. Close the oven door.
Hinge II!I__
Push hinge locks up to lock
Bottom
edge of
slot
\
Hinge arm
4 49 80737 1

Troubleshooting tips ... Before you call for service
Save time and money! Review the charts on the following pages first and you may not need to call for service.
..... i possibleCaose i WhatToDo
FAN
Fan continues to run after
cooking stops
Oven vent emits warm air
while oven is on
_
Fan comes on
automatically when using
the microwave
COOKING
The oven is cooling.
This is normal.
This is normal.
The fan will automatically shut off when the internal
parts of the oven have cooled.
The oven makes unusual
sounds while cooking
Smoke comes out of the
oven when I open the
door
Food is not fully cooked
or browned at the end of
a cooking program
SENSOR ERROR
displayed along with an
oven signal
Clicks and fans blowing are normal.
The relay board is turning the
components on and off.
Food is high in fat content. Aerosol
spray used on the pans.
Programmed times may not match
the size or amount of food you are
cooking.
Food amount or type placed in the
oven does not match the program
that was set.
Steam was not sensed by the oven
because plastic wrap was not
vented, a lid too tight was on the
dish or a liquid was covered.
These sounds are normal.
Smoke is normal when cooking high-fat foods.
Adjust time for doneness or adjust the upper or
lower lamps for browning and doneness.
Press the Clear/Off pad. Set the oven program to
match the food or liquid to be cooked or heated.
Vent plastic wrap, use a looser lid or uncover liquids
when cooking or heating.
DISPLAY
The display is blank
"Control is LOCKED"
appears in display
Control display is lit yet
oven will not start
Power saver mode may be
activated.
Check the Settings menu for clock display settings.
Turn the display on.
Replace the fuse or reset the circuit breaker.A fuse in your home may be blown or
the circuit breaker tripped.
Power outage or surge Reset the clock. If the oven was in use, you must
reset it by pressing the Clear/Off pad, setting the
clock and resetting any cooking function.
The control has been locked. Press and hold Settings pad for 3 seconds to unlock
the control.
Clock is not set. Set the clock.
Door not securely closed. Open the door and close securely.
Start/Pause pad or selector dial Press Start/Pause pad or selector dial.
not pressed after entering cooking
selection.
Another selection already entered Press Clear/Off pad.
in oven and Clear/Off pad not
pressed to cancel it.
Size, quantity or cooking time not Make sure you have entered cooking time after
entered after final selection, selecting.
Reset cooking program and press Start/Pause pad.Clear/Off pad was pressed
accidentally.
--4
©
C
W
r==
r_
€_o
:3:
©
©
-4
m
Z
©
-4
m
=!3
€_O
C
©
<
49 807371 2 5

C
>
©
¢/3
_L
m
©
Z
m
©
©
:3::
¢/3
,..J
©
rY,
Troubleshooting tips ... Before you call for service
I
OTHER PROBLEMS
The door and inside of
the oven feels hot
Oven will not start
Cannot edit cooking
features
Possible Cause
The heat lamps produce intense heat
in a small space.
A fuse in your home may be blown or
the circuit breaker tripped.
Some pro-programmed cooking
features may not be able to be edited
to prevent degradation of cooking
performance.
The control has locked out the use of
these pads and need to be reset.
I
What To Do
This is normal. Use oven mitts to remove food
when ready.
Replace fuse or reset circuit breaker.
This is normal.
The pads on one side Press and hold the Clear/Off pad on the other
of the control do not side of the display for 30 seconds. If this does not
function reset the control, it may be necessary to cycle the
circuit breaker.
FCC RADIO FREQUENCY INTERFERENCE
This equipment generates and uses ISM
frequency energy and if not installed and
used properly, that is in strict accordance with
the manufacturer's instructions, may cause
interference to radio and television reception. It
has been type tested and found to comply with
limits for an ISM Equipment pursuant to part 18
of FCC Rules, which are designed to provide
reasonable protection against such interference
in a residential installation. However, there is no
guarantee that interference will not occur in a
particular installation. If this equipment does cause
interference to radio or television reception, which
can be determined by turning the equipment off
and on, the user is encouraged to try to correct
the interference by one or more of the following:
[] Reorient the receiving antenna of radio or
television.
[] Relocate the Microwave oven with respect to
the receiver.
[] Move the microwave oven away from the
receiver.
[] Plug the microwave oven into a different outlet
so that microwave oven and receiver are on
different branch circuits.
The manufacturer is not responsible for any
radio or TV interference caused by unauthorized
modification to this microwave oven. It is
the responsibility of the user to correct such
interference.
6 49 80737 1

Troubleshooting tips ... Before you call for service
My new oven doesn't
cook like my old one.
is something wrong
with the temperature
settings?
Food does not bake
properly
Possible Cause What To Do
Your new oven has a different cooking
system from your old oven and
therefore may cook differently than your
old oven.
Oven controls improperly set.
Rack position is incorrect or rack is
not level.
Incorrect cookware or cookware of
For the first few uses, follow your recipe times
and temperatures carefully. If you still think your
new oven is too hot or too cold, you can adjust the
temperature yourself to meet your specific cooking
preference. NOTE: This adjustment affects Bake
temperatures; it will not affect Broil or Clean.
See the Cooking Modes section.
See the Cooking Modes section and Cooking Guide.
See the Cookware section.
II .
L improper size being used. J
Oven temperature needs adjustment. See the Settings section.
Ingredient substitution Substituting ingredients can change the recipe
outcome.
Make sure you select the appropriate broil mode.
See Cooking Guide for rack location suggestions.
Make sure cookware is cool.
Use a pan specifically designed for broiling.
If using aluminum foil conform to pan slits.
Preheat the broil element for 10 minutes.
See the Settings section.
Replace the fuse or reset the circuit breaker.
Food does not broil
Oven controls improperly set.
Improper rack position being used.
Food being cooked in a hot pan.
Cookware not suited for broiling.
Aluminum foil used on the broiling pan
and grid has not been fitted properly
and slit as recommended.
In some areas the power (voltage)
may be low.
Oven temperature too Oven temperature needs adjustment.
hot or too cold
Oven does not work or A fuse in your home may be blown or
appears not to work the circuit breaker tripped.
Oven is in Sabbath Mode.
"Crackling" or This is the sound of the metal heating
"popping" sound and cooling during both the cooking and
cleaning functions.
Your range has been designed to maintain
a tighter control over your oven's
temperature. You may hear your oven's
heating elements "click" on and off more
frequently than in older ovens to achieve
better results during baking, broiling,
convection, and self=clean cycles.
A fuse in your home may be blown or
the circuit breaker tripped.
Verify, that the oven is not in Sabbath Mode.
See the Sabbath Mode section.
This is normal.
This is normal.
why ismY range
making a ,cl!cking,!
noise when using my
oven?
Clock and timer do not Replace the fuse or reset the circuit breaker.
work
.-4
©
C
W
r==
t=t3
{,f)
::E
©
©
--4
m
Z
©
--4
m
t==,
O
©
<
tD
49 807371 2 7

C
>
©
O
==J
¢/3
m
p-
©
Z
m
N-
©
©
I
¢/3
LLJ
==J
©
rv,
p-
Troubleshooting tips ... Before you call for service
Possible Cause What To Do
Oven light does not Light bulb is loose or defective. Tighten or replace bulb.
work Pad operating light is broken. Call for service.
Oven will not self- The temperature is too high to set a Allow the oven to cool and reset the controls.
self-clean operation.
Oven controls improperly set. See the Cleaning the Oven section.
Excessive smoking Excessive soil or grease. Press the Clear/Off pad. Open the windows to rid the
during clean cycle room of smoke. Wait until the OVEN IS COOLING DOOR
IS LOCKED display goes off. Wipe up the excess soil
and reset the clean cycle.
Excessive smoking Food too close to burner element. Lower the rack position of the food.
during broiling
Oven door will not Oven too hot. Allow the oven to cool below locking temperature.
open after a clean
cycle
Oven not clean after , Oven controls improperly set. See the Cleaning the Oven section.
a clean cycle Oven was heavily soiled. Clean up heavy spillovers before starting the clean cycle.
Heavily soiled ovens may need to self-clean again or for
a longer period of time.
"CLOSE DOOR The door is open during a cooking or Close the oven door.
TO CONTINUE cleaning feature.
COOKING" show on
display section
"OVEN IS COOLING The oven door is locked because Press the Clear/Off pad. Allow the oven to cool.
DOOR iS LOCKED" the temperature inside the oven has
show on display not dropped below the unlocking
section temperature.
An oven error and You have a function error code. Press the Clear/Off pad. Allow the oven to cool for one
"SERVICE MAY BE hour. Put the oven back into operation.
NEEDED" show in If the function code repeats. Disconnect all power to the oven for at least 30 seconds
the display and then reconnect power. If the function error code
repeats, call for service.
"Burning" or "oily" This is normal in a new oven and will To speed the process, set a self-clean cycle for a
odor emitting from disappear in time. minimum of 3 hours. See the Cleaning the Oven section.
the vent
Strong odor An odor from the insulation around This is temporary and will go away after several uses or
the inside of the oven is normal for the a self-clean cycle.
first few times the oven is used.
Fan noise A cooling fan may automatically turn on. This is normal. The cooling fan wilt turn on to cool
internal parts. It may run for up to 1-1/2 hours after the
oven is turned off.
No. The inner oven glass is coated with
a heat barrier to reflect the heat back
into the oven to prevent heat loss and
keep the outer door cool while baking.
My oven door glass
appears to be
"tinted" or have a
"rainbow" color, is
this defective?
Sometimes the
oven takes longer to
preheat to the same
temperature
This is normal. Under certain light or angles, you may
see this tint or rainbow color.
Cookware or food in oven The cookware or food in the oven wilt cause the oven to
take longer to preheat. Remove items to reduce preheat
time.
Number of racks in oven Adding more racks to the oven will cause the oven to
take longer to preheat. Remove some racks.
8 49 80737 1

GEAppliances.com
0
0
3::
0
E
L,=
U3
0
0
_J
m_
'0
m_
E
0
0
0
"o
L_
0
m_
L.
0
Informacion de Seguridad ..... 2
Garantia .......................... 8
Asistencia / Accesorios ......... 9
Uso del Homo
Controles del Horno ................ 10
Configuraciones del Homo ......... 11
Opciones del Homo ................ 12
Horno Superior
Coccion con Microondas ........... 13
Horno Inferior
Modos de Coccion ................. 17
Modo Sabatico ..................... 18
Guia de Coccion .................... 19
Estantes ........................... 20
Paioel de Aluminio y
Cobertores del Homo ............. 21
Utensilios .......................... 21
Cuidado y Limpieza
Limpieza del Horno ................. 22
Mantenimiento del Homo Inferior... 24
Consejos para la
SoluciOn de Problemas ........ 25
Horno de Pared Doble JT3800 de 30"
Homo de Pared Doble JK3800 de 27"
Escriba los nt]meros de modelo
y de serie aquR
N° de Modelo
N° de Serie
Los podra encontrar en una etiqueta
en el borde lateral o en el frente del
homo detras de la puerta del homo,
Impreso en
Papel Reciclado
Impresoen EstadosUnidos 49-80737-1 06-14 GE

L_
O
um
L_
0
C
L
0
I
©
Z
,©
m
©
Z
m
INFORMACION IMPORTANTE DE SEGURIDAD
LEA TODAS LAS INSTRUCCIONES ANTES DE USAR
PRECAUCIONES PARA EVITAR LA POSIBLE
EXPOSICIONA ENERG|ADE MICROONDAS EXCESIVA
(a) No intente hacer funcionar el homo con la (c) No haga funcionar el homo si se encuentra
compuerta abierta ya que 6sto puede provocar da_ado. Es particularmente importante cerrar bien
exposici6n peligrosa a la energia de microondas, la compuerta del homo y que no haya da_os en:
Es importante no forzar ni da_ar los seguros. (1) la compuerta (doblada o curvada),
(b) No coloque ningL_nobjeto entre la parte frontal del (2) las bisagras y pestillos (rotos o fiojos),
homo y la compuerta, ni permita que se acumulen (3) sellos de la compuerta y superficies de sellado.
residuos de producto limpiador o detergente,
suciedad o polvo en las superficies de sellado. (d) El homo no debe ser ajustado o reparado
por ninguna persona, excepto por personal de
mantenimiento calificado.
Para reducir el riesgo dequemaduras, descargas electricas, incendio, lesiones o exposici6n a energia de microondas excesiva:
iZkADVERTENCIAjINSTRUCCIONESGENERALESDESEGURIDAD
[] Lea todas las instrucciones antes de utilizar
este aparato. Cuando utilice aparatos el_ctricos,
se deben seguir las precauciones de seguridad
b&sicas, entre las que se incluyen las siguientes:
[] Lea y siga las precauciones especificas descritas
en la secci6n PRECAUCIONES PARA EVITAR
LA POSIBLE EXPOSICION A ENERGiA DE
[] AsegOrese que su aparato este instalado y puesto a
tierra apropiadamente pot un t6cnico cualificado de
acuerdo a las instrucciones de instalaci6n suministradas.
[] Instale o ubique este aparato Onicamente de acuerdo
alas instrucciones de instalaci6n suministradas.
MICROONDAS EXCESIVA.
GUARDE ESTASINSTRUCCIONES
49 80737 1

IA ADVERTENCIAIINSTRUCCIONESGENERALESDE SEGURIDAD
[] Algunos productostales como huevos enteros y
contenedores sellados (por ejemplo, fiascos sellados) son
propensos a explotar y no deben calentarse en este homo.
Tal us©del homo puede resultar en lesiones personales.
[] No monte este aparato sobre el fregadero.
[] Este homo no ha sido aprobado ni probado para
utilizaci6n marina.
[] Este homo esta listado pot UL para la instalaci6n de
pared estandar.
[] No haga funcionar este aparato si ha sido da_ado o
dejado caer.
[] Como con cualquier aparato, cuando sea utilizado
pot ni_os es necesaria una estrecha vigilancia.
[] Utilice este aparato solamente para el fin previsto,
como se describe en este manual.
[] No utilice quimicos ni vapores corrosivos en este aparato.
[] Este homo esta especificamente dise_ado para calentar,
secar o cocinar alimentos y bebidas y no esta dise_ado
para usarse en un lab©rat©rio ni para us©industrial.
[] S61o personal cualificado debe reparar este
aparato. P6ngase en contact© con el centro de
mantenimiento autorizado mas cercano en caso de
necesitar revisi6n, reparaci6n o ajuste.
[] No cubra ni bloquee ninguna apertura de este aparato.
[] No almacene este aparato al aire libre. No utilice
este product© cerca del agua; por ejemplo, en un
s6tano h0medo, cerca de una piscina, cerca de un
lavabo o lugares similares.
[] Consulte las instrucciones de limpieza de la superficie
de la puerta en la secci6n de Mantenimiento y
limpieza del homo de este manual.
[] Para reducir el riesgo de incendio dentro del horn©:
-- No cocine excesivamente los alimentos. Vigile
cuidadosamente el aparato cuandose coloque
papel, plastic© u otros materiales combustibles
dentro del microondas mientras se cocina.
-- Quite las tiritas de seguridad (twist-ties) y asas
metalicas de los recipientes de papel o plastic©
antes de col©carlos dentro del microondas.
-- No utilice el horn© para prop6sitos de
almacenamiento. No deje productos de papel,
utensilios de cocina ni comestibles dentro del
homo cuando no se utilicen.
-- Si los materiales que se encuentran dentro del
horn© prenden fuego, mantenga la compuerta del
microondas cerrada, apague el homo y corte el
GUARDE ESTAS
suministro el6ctrico a nivel del fusible o del panel
de interruptores de su hogar. Puede propagar el
fuego si abre la compuerta del microondas.
-- No utilice las funciones del sensor dos veces
sucesivamente en la misma porci6n de aliment©. Si
el aliment© no se cocina completamente despu6s
del primer conteo regresivo, utilice la funci6n
COOK BY TIME (COCINAR POR TIEMPO) para
permitir tiempo de cocci6n adicional.
[] No haga funcionar el homo sin tener colocada en su
lugar la base giratoria. La base giratoria debe estar
libre de bloqueos para poder girar.
[] Entre las superficies potencialmente calientes
se incluye la compuerta, base, paredes, parrilla
y base giratoria del horn©.
[] No descongele bebidas en botellas con cuellos
angostos (especialmente bebidas gaseosas/
carbonatadas). Incluso si el recipiente se encuentra
abierto, se puede acumular presi6n. Esto puede
ocasionar que el recipiente explote, dando
posiblemente como resultando una lesi6n.
[] Los alimentos cocinados en liquidos (tales como
la pasta) pueden tener la tendencia de hervir mas
rapidamente que los alimentos que contienen menos
humedad. En caso de que ocurra esto, consulte la
secci6n de Mantenimiento y limpieza del horn© para
las instrucciones de c6mo limpiar el interior del homo.
[] Los alimentos calientes y el vapor pueden provocar
quemaduras. Tenga cuidado al abrir cualquier tip©
de recipiente que contenga alimentos calientes,
incluyendo bolsas de palomitas de maiz, bolsas
y cajas de cocina. Para prevenir la posibilidad de
lesiones, dirija el vapor en direcci6n contraria alas
manos y el rostro.
[] No cocine las papas excesivamente. Pueden
deshidratarse y provocar fuego, causando dados al
horn©.
[] Evite calentar los alimentos para beb6 en frascos de
vidrio, incluso sin la tapa. Aseg0rese de cocinar bien
toda la comida del beb6. Remueva los alimentos
para distribuir el calor uniformemente. Tenga cuidado
de evitar las escaldaduras al calentar la f6rmula.
El recipiente puede sentirse mas fr(o de Io que la
f6rmula realmente esta. Revise siempre la f6rmula
antes de alimentar al beb6.
[] Nunca intente freir en abundante aceite en el
microondas.
INSTRUCCIONES
49 80737 1
m
Z
"-rl
©
('b
n
0,
Z
t"t"l
t"t"l
©
C
m
I
O
O
C
O

O
um
L_
0
C
L
0
I
©
Z
,©
m
©
Z
m
INFORMACION IMPORTANTE DE SEGURIDAD
LEA TODAS LAS INSTRUCCIONES ANTES DE USAR
i ADVERTENCIA]AVISO: MARCAPASOS
[] La mayoria de los marcapasos se encuentran
protegidos contra la interferencia de productos
electr6nicos, incluyendo los microondas. Sin embargo,
los pacientes que tengan marcapasos deberian
consultar a sus m6dicos si tienen alguna duda.
iik ADVERTENClAiARQUEO VOLTAlCO
Se pueden producir arqueos voltaicos al cocinar con microondas. Si nota que ocurre arqueo voltaico, apriete el
bot6n tactil Clear/Off (Borrad Apagar) y corrija el problema.
El arqueo voltaico es el t6rmino t6cnico que define las []
chispas en el homo. El arqueo voltaico es causado por:
[] Metal o lamina de metal en contacto con el costado []
del homo.
[] Lamina de metal moldeada al alimento (los bordes
doblados hacia arriba actOan como antenas). []
[] Utilice la lamina de metal segOn las
recomendaciones de este manual.
Utensilios de metal usados durante la cocci6n con
microondas
Metal, tal como tiritas metalicas de seguridad,
sujetadores para came de ave o platos con borde de
oro en el homo.
Toallas de papel reciclado que contengan pedazos
de metal pequedos que se utilizan en el homo.
i/k ADVERTENClAiALIMENTOS
[] Cuando utilice el microondas, coloque todos los
alimentos y contenedores en la bandeja de vidrio
transparente.
[] No cocine palomitas de maiz en el homo a menos
que se coloquen en un accesorio de palomitas de
maiz para microondas especial o a menos que
utilice palomitas de maiz aptas para hornos de
microondas.
[] No hierva huevos en este homo. Se acumulara
presi6n dentro de la yema del huevo y causara que
explote, posiblemente causando lesiones.
[] No ponga a funcionar el homo sin alimentos en el
interior. Esto podda da_ar el horno. Aumenta el
calor alrededor del magnetr6n y puede acortar la
vida Qtildel microondas.
[] Alimentos con la cascara no cortada, como papas,
salchichas, embutidos, tomates, manzanas, higado
de polio y otras menudencias y yemas de huevo
deben perforarse para permitir que el vapor escape
durante la cocci6n.
AGUA SOBRECALENTADA
Liquidos, tales como agua, caf6 o t6, son capaces
de sobrecalentarse m_s all_ del punto de ebullici6n
sin parecer que est6n hirviendo. No siempre
hay burbujeo o hervor visible cuando se saca el
recipiente del homo microondas. ESTO PUEDE
RESULTAR EN LA EBULLICION REPENTINA DE
LiQUIDOS MUY CALIENTES CUANDO SE MUEVE
EL RECIPIENTE O SE INSERTA UNA CUCHARA U
OTRO UTENSlLIO DENTRO DEL LiQUIDO.
Para reducir el riesgo de lesi6n fisica:
-- No sobrecaliente el liquido.
-- Revuelva el liquido antes y a la mitad del tiempo
de calentamiento.
-- No utilice recipientes con costados rectos y
cuellos angostos.
-- Despu6s de calentar el recipiente, d6jelo en
el homo microondas por un periodo corto de
tiempo antes de sacarlo.
-- Tenga extrema precauci6n cuando introduzca
una cuchara u otro utensilio en el recipiente.
GUARDEESTASINSTRUCCIONES
49 80737 1

[A ADVERTENCIA! Recipientes de cocina seguros dise ados para microondas
AsegOrese de utilizar recipientes de cocina adecuados durante la cocci6n a microondas. Se pueden utilizar la mayoria
de las cacerolas, platos para cocinar, tazas de medir, tazas normales, ceramica o Ioza que no tengan bordes metalicos
o vidriados con un recubrimiento metalico. Algunos recipientes de cocina se encuentran marcados como adecuados
para microondas.
[] La utilizaci6n de la bandeja metalica antiadherente
durante la cocci6n en microondas puede producir
resultados insatisfactorios.
[] Si no esta seguro de que su recipiente de cocina
sea adecuado para microondas, realice la siguiente
prueba: coloque en el homo el plato que desee
probar y una taza de medida
de vidrio Ilena con 1 taza de
agua coloque la taza junto
o sobre el plato. Prenda el
microondas durante 30-45
segundos a alta potencia. Si
Q
Como probar si un envase
el plato se calienta, no debe esseguro para usarseenun
utilizarse en el microondas, homo de microondas
Si el plato permanece frio y
s61ose calienta el agua de la taza, entonces el plato
es adecuado para microondas.
[] Los utensilios de cocina pueden tornarse muy
calientes debido a la transferencia de calor
proveniente de los alimentos calentados. Podrian
requerirse guantes de cocina para manipular los
recipientes de cocina.
[] No utilice productos de papel reciclado. Las toallas,
servilletas y papel encerado fabricados de material
reciclado pueden contener particulas metalicas que
pueden causar arqueo voltaic© o prender fuego. Se
deben evitar los productos de papel que contienen
nylon o filamentos de nylon, ya que tambi6n pueden
incendiarse.
[] Utilice las laminas metalicas Qnicamente como se
indica en este manual. Cuando utilice la lamina de
metal en el homo, mantenga la lamina pot Io menos
1" alejada de los costados del homo.
[] No utilice el homo para secar peri6dicos.
[] Si utiliza un term6metro de came mientras cocina,
asegQrese que sea seguro para utilizarse en hornos
microondas.
[] Algunas bandejas de espuma (como aquellas en las
que se empaca la came) tienen una tirita de metal
delgada empotrada en la parte inferior. Cuando se
cocinan con microondas, el metal puede quemar el
fond© del homo o hacer que arda una toalla de papel.
m
Z
©
('b
n
0,
Z
[] Se puede utilizar toallas de papel, papel encerado
y las envolturas pl&sticas para cubrir los platos con rr'l
el prop6sito de mantener la humedad y prevenir
los salpicones. AsegOrese de ventilar cortando la
envoltura pl&stica para que pueda escapar el vapor, rr'l
[] No todas las cubiertas pl&sticas son adecuadas para
hornos microondas. Lea en la caja las instrucciones C
correspondientes.
[] Se deben cortar, perforar o ventilar como se indica
en la caja las bolsas de cocina "hervibles" y bolsas
plasticas cerradas herm6ticamente. De Io contrario, el
pl&stico puede reventarse durante o inmediatamente
despu6s de la cocci6n, resultando en una posible
lesi6n. Tambi6n, los recipientes de almacenamiento
plasticos deben al menos estar parcialmente O
descubiertos debido a que forman un sell© muy
:3
ajustado. AI cocinar con recipientes cubiertos con O
envoltura plastica de manera muy ajustada, quite
cuidadosamente la cubierta y dirija el vapor fuera y
alejado de manos y rostro. C
[] Recipientes de cocina plastic©s--Los recipientes
de cocina dise_ados para microondas son muy (1)
Qtiles, per© deben utilizarse con cuidado. Incluso --,
el plastic© dise_ado para microondas podda no O
tolerar condiciones de sobre cocci6n, asi como los
materiales de vidrio o ceramica y poddan suavizarse
o carbonizarse si se exponen a periodos cortos de
sobre cocci6n. En exposiciones mas prolongadas a la
sobrecocci6n, los alimentos y los recipientes
de cocina podrian coger fuego.
Siga las siguientes pautas:
1. Utilice plasticos seguros para microondas Qnicamente
y utilicelos estrictamente segQn
las especificaciones del fabricante.
2. No cocine en el microondas recipientes vacios.
3. No permita que los ni_os utilicen recipientes
de plastic© sin vigilarlos bien.
La bandeja de cristal
transparente siempre debera
estar en su lugar cuando se
cocina con microondas.
La base giratoria siempre debe
estar col©carla en su lugar cuando
se utiliza el homo.
GUARDE ESTASINSTRUCCIONES
49 80737 1 5

O
=m
L_
CD
r"
m
O
C
L.
O
3=
tm
tm
m
tY
©
ELI
DLJ
tm
z
,©
m
r,,,,
©
EL
Z
m
INFORMACION IMPORTANTE DE SEGURIDAD
LEA TODAS LAS INSTRUCCIONES ANTES DE USAR
IAADVERTENCIAI
Lea todas las instrucciones antes de usar el producto. Si no se siguen estas instrucciones se podr_n producir incendios,
descargas el6ctricas, lesiones graves o la muerte.
ADVERTENCIA DE LA PROPOSICiON 65 DEL ESTADO DE CALIFORNIA
La Ley sobre Agua Potable Inocua y Tratamiento de Residuos T6xicos de California (California Safe Drinking Water
and Toxic Enforcement Act) solicita al Gobernador de California que publique una lista de sustancias que el estado
reconoce que producen cancer, defectos de nacimiento u otros da_os reproductivos y solicita a los empresarios que
adviertan a sus clientes sobre la posible exposici6n a tales sustancias.
I,&ADVERTENClA IEste producto contiene uno o mas quimicos que el Estado de California entiende
que producen cancer, defectos en el nacimiento u otros dados reproductivos.
Los hornos con limpieza automatica pueden ocasionar exposiciones de bajo nivel a algunas de estas sustancias,
incluyendo mon6xido de carbono, durante el ciclo de limpieza. La exposici6n puede set minimizada si se ventila con
una ventana abierta o si se usa un ventilador o campana.
[ ADVERTENCIAi INSTRUCCIONESGENERALESDESEGURIDAD
[] Use este electrodomestico s61o para su prop6sito
original, como se describe en el Manual del Propietario.
[] Solicite que un instalador calificado instale su
electrodomestico y que este adecuadamente conectado
a tierra, de acuerdo con las instrucciones de instalaci6n
provistas.
[] No intente reparar o reemplazar ninguna parte del horno,
a menos que se recomiende especificamente en este
manual. Cualquier otra reparaci6n debera ser realizada
por un tecnico calificado.
[] Antes de realizar cualquier servicio tecnico, desconecte
el suministro de corriente desde el panel de distribuci6n
del hogar, retirando el fusible o desconectando el
disyuntor.
[] No deje a los ni_os solos - no se debera dejar a los
ni_os solos o fuera de su radio de atenci6n en el area
donde el electrodomestico se encuentre en uso. Nunca
se les debera permitir trepar, sentarse o pararse sobre
ninguna parte del electrodomestico.
[]A PRECAUCiON:.ocoloquearticulosde
inter6s para los ni_os sobre los gabinetes que estan
sobre un homo - si los ni_os se trepan sobre el horno
para Ilegar a estos articulos podrian sufrir lesiones
graves.
[] Use s61o mangos de ollas secas - los mangos hQmedos
sobre superficies calientes pueden producir quemaduras
debido al vapor. No deje que los mangos de las ollas
toquen los elementos que estan calientes. No use una
toalla u otra tela voluminosa para reemplazar el mango
de las cacerolas.
[] Nunca use el electrodomestico para calentar o
calefaccionar la habitaci6n.
GUARDEESTAS
[] No toque el elemento calentador ni la superficie interior
del horno. Es posible que estas superficies esten
demasiado calientes como para quemar, aunque su
color sea oscuro. Durante y despues del uso, no toque ni
permita que telas u otros materiales inflamables toquen
cualquier area interior del homo; espere a que haya
pasado un tiempo suficiente para que se enfrien. Otras
superficies del electrodomestico se podran calentar Io
suficiente como para ocasionar lesiones. Las superficies
potencialmente calientes incluyen la abertura de la
ventilaci6n del horno, superficies cercanas a la abertura y
grietas alrededor de la puerta del horno.
[] No caliente envases de comida que no hayan sido
abiertos. Se podria acumular presi6n y el envase podria
explotar, ocasionando una lesi6n.
[] No use ningQn tipo de aluminio o cobertor para cubrir
el fondo del horno o cualquier parte del horno, excepto
como se describe en este manual. Los cobertores de
homo pueden atrapar el calor o derretirse, ocasionando
da_os sobre el producto y el riesgo de descargas, humo
o incendios.
[] Evite las ralladuras o impactos sobre las puertas de vidrio
o los paneles de control. Hacer esto podra producir la
rotura de vidrios. No cocine sobre ni en un producto con
un vidrio roto. Es posible que se produzcan descargas,
incendios o cortes.
[] Cocine carnes y carnes de ave en forma completa - la
carne por Io menos a una temperatura interna de 1600 F
y la came de ave por Io menos a una temperatura interna
de 1800 F. Normalmente la cocci6n a estas temperaturas
es una protecci6n contra las enfermedades transmitidas
por la comida.
INSTRUCCIONES
49 80737 1

i_, i MANTENGALOSMATERIALESINFLAMABLESALEJADOSDELACOCINA
ADVERTENCIA estooose cumple,sepodran sufrirlesionespersonalesgraveso incendios.
[] No guarde ni use materiales inflamables en o cerca
de un homo, incluyendo papel, plastico, mangos de
ollas, trapos, cobertores de pared, cortinas, pa_os y
gasolina u otros vapores y liquidos inflamables.
[] Nunca use prendas holgadas o que cuelguen
mientras usa el electrodom6stico. Estas prendas se
podran incendiar si entran en contacto con superficies
calientes, ocasionando quemaduras graves.
No permita que la grasa de la cocci6n u otros
materiales inflamables se acumulen en o cerca del
homo. La grasa que esta en o cerca del horno se
podra incendiar.
i^ADVERTENCIA ilEN CASO DE INCENDIO,SIGALOS SIGUIENTESPASOS PARA
EVlTARLESIONESO LA PROPAGACION DEL FUEGO
[]
[]
No use agua sobre el fuego de la grasa. Nunca tome
una olla que se est6 incendiando.
Si hay un incendio en el homo durante el horneado,
ahogue el fuego cerrando la puerta del homo y
apagando el mismo o usando un quimico seco
multiprop6sito o un extintor de incendio con espuma.
En caso de que haya fuego en el homo durante el ciclo
de limpieza autom&tica, apague el horno y espere a que
el fuego se extinga. No fuerce la puerta para abrirla.
La entrada de aire fresco sobre las temperaturas de la
limpieza autom&tica podr& conducir a la producci6n de
llamas en el homo. Si no se siguen estas instrucciones,
se podr&n producir quemaduras graves.
iA ADVERTENCIAi INSTRUCCIONESDESEGURIDADDEL HORNO
[] Mant6ngase alejado del horno al abrir la puerta del
mismo. El aire caliente o el vapor que sale puede
causar quemaduras en las manos, rostro y/u ojos.
[] Mantenga desobstruida la ventilaci6n del homo.
[] Mantenga el homo libre de acumulaci6n de grasa. La
grasa del homo se puede incendiar.
[] Coloque los estantes del homo en la ubicaci6n
deseada mientras 6ste se encuentra fdo. Si es
necesario mover el estante mientras el homo esta
caliente, evite que el mango de la olla tenga contacto
con el elemento calentador en el homo.
[] AI usar las bolsas para cocinar o dorar en el homo,
siga las instrucciones del fabricante.
[] Es conveniente empujar hacia afuera los estantes
estandares hasta el tope o empujar el estante
extensible hasta la posici6n completamente abierta
para levantar comidas pesadas. Esto tambi6n es una
precauci6n contra quemaduras pot tocar superficies
calientes de la puerta o las paredes del homo.
[] No deje productos tales como papel, utensilios de
cocina ni comida en el homo cuando 6ste no se
encuentre en uso. Los articulos guardados en el
homo se pueden incendiar.
[] Nunca coloque los utensilios de cocina, piedras para
pizza u homeado o cualquier otro tipo de aluminio o
cobertor en la base del homo. Estos items pueden
atrapar el calor o derretirse, ocasionando da_os sobre
el producto y el riesgo de descargas, humo o incendios.
ADVERTENCIA IINSTRUCCIONES DE SEGURIDAD DEL HORNO CON LIMPIEZAAUTOMATICA
La funci6n de limpieza automatica usa el horno en temperaturas Io suficientemente altas como para consumir la
suciedad de comida que haya dentro del homo. Para un funcionamiento seguro, siga estas instrucciones.
[] No toque las superficies del homo durante el ciclo de
limpieza automatica. Mantenga a los nihos alejados
del homo durante la limpieza automatica. Si no
se siguen estas instrucciones, se podran producir
quemaduras.
[] Antes de usar el ciclo de limpieza automatica del
homo, retire los estantes de color gris brillante (en
algunos modelos), la sonda, cualquier papel de
aluminio, y cualquier bandeja para asar, rejilla, u otros
utensilios. S61ose pueden dejar dentro del homo los
estantes para homo cubiertos de porcelana.
[] Antes de utilizar el ciclo de limpieza automatica,
limpie la grasa y restos de comida que haya en el
homo. Una cantidad excesiva de grasa se puede
GUARDEESTAS
incendiar, Io cual puede producir dados con humo en
su hogar.
[] Si el modo de limpieza automatica funciona de
forma incorrecta, apague el homo y desconecte el
suministro de corriente. Solicite el servicio de un
t6cnico calificado.
[] No limpie la junta de la puerta. La junta de la puerta
es esencial para un buen sellado. Se debe tener
cuidado de no frotar, da_ar ni mover la junta.
[] No use limpiadores para homo. No se debera usar
limpiadores comerciales para homo ni revestimientos
de protecci6n para hornos de ningOn tipo en o
alrededor de cualquier parte del homo.
INSTRUCCIONES
49 80737 1
m
Z
"T'I
©
m
O,
Z
¢D
I"1"1
m
©
C
m
¢D
--r-
O
O
m
mm
O

k-
Z
tY
©
E
8.d
O £3.
t'2
o d)
o'_._
._0 ._
0
0
o o
_8
0_ L
CrO
n,m
®'E
o 03
iGracias! ... por su compra de un electrodomestico de la Marca GE
Registre su Electrodornestico: iRegistre su etectrodomestico nuevo a traves de Intemet, segQn su conveniencia!
www.geappliances .com/service_and_su pport/register/
Un registro puntual de su producto permitir_ una mejor comunicaci6n y un servicio m_s puntual de acuerdo con los t6rminos de su
garantia, en caso de surgir la necesidad. Tambien puede enviar una carta en la tarjeta de inscripci6n pre-impresa que se incluye con
et material embalado.
Garantia de la Cocina Electrica de GE
GEAppliances.com
Todo et servicio de garantia es provisto por nuestros Centros de Servicio de Fabricaci6n, o un tecnico autorizado de Servicio al
Ctiente (Customer Care®). Para programar una visita det servicio tecnico a traves de Intemet, visitenos en www.geappliances.
com/service_and_support/, o Ilame a1800.GE.CARES (800.432.2737). Cuando Ilame para solicitar el servicio, tenga los nQmeros
de serie y de modeto disponibles.
Para reatizar el servicio t6cnico de su electrodom6stico se podr_ requerir el uso de datos del puerto de abordaje para su
diagn6stico. Esto da al t6cnico del servicio de f_brica de GE la habilidad de diagnosticar de forma r_pida cualquier problema con
su electrodom_stico, y de ayudar a GE a mejorar sus productos al brindarle a GE la informaci6n sobre su electrodom_stico. Si no
desea que los datos de su electrodom_stico sean enviados a GE, solicitamos que le indique a su t_cnico no entregar los datos a
GE en el momento del servicio.
Durante el periodo de un ado desde la fecha original de compra. GE le brindar_ cuatquier parte de la cocina que fatle debido a
un defecto en los materiates o la fabricaci6n. Durante esta garantia timitada de un aSo, GE tambi6n proveer_, sin costo, todo el
trabajo y et servicio en et hogar retacionado con et reemplazo de la parte que presente defectos.
Que no cubrira GE:
[]
[]
[]
[]
[]
Viajes del tecnico del servlcio a su hogar para ense_arte
sobre c6mo usar el producto.
Instalaci6n, entrega o mantenimiento inadecuados.
Fallas del producto en caso de abuso, mal uso, modificaci6n
o uso para prop6sitos diferentes al original o uso comercial.
Reemplazo de fusibles de la casa o reinicio de disyuntores.
Dados ocasionados sobre el producto por accidente,
incendio, inundaciones o cat_strofes naturales.
[] Dados incidentates o consecuentes causados por posibtes
defectos sobre este producto.
[] Da_o causado despu_s de la entrega.
[] Producto no accesible para brindar el servicio requerido.
[] Solicite et servicio tecnico para reparar o reemplazar las
I_mparas, excepto las I_mparas LED.
EXCLUSION DE GARANTJAS IMPLICITAS
Su Qnica y exclusiva alternativa es la reparaci6n del producto, como se indica en la Garantia Limitada. Las garantias impticitas,
inctuyendo garantias implicitas de comerciabitidad o conveniencia sobre un prop6sito particular, se limitan a un a_o o al periodo
m_s corto permitido por la ley.
Esta garantia se extiende al comprador original y a cualquier due_o subsiguiente de productos comprados para uso hogare_o
dentro de EE.UU. Si el producto est_ en un _rea donde no se encuentra disponible un Proveedor Autorizado del Servicio T6cnico
de GE, usted ser_ responsable por el costo de un viaje o se podra requerir que traiga el producto a una ubicaci6n del Servicio
T_cnico de GE Autorizado para recibir el servicio. En Alaska, la garantia excluye el costo de envio o Ilamadas del servicio a su
hogar.
Algunos estados no permiten la exclusi6n o timitaci6n de da_os fortuitos o consecuentes. Esta garantia le da derechos tegales
especificos y es posibte que tenga otros derechos legales que varian entre un estado y otro. Para conocer curies son sus
derechos legales, consulte a la oficina de asuntos det consumidor local o estatal o al Fiscal de su estado.
Garante: General Electric Company. Louisville, KY 40225
GarantJas Extendidas: Adquiera una garantia extendida de GE y aprenda sobre descuentos especiates que est_n disponibles
mientras su garantia aQn est_ vigente. La puede adquirir en cuatquier momento a trav_s de Internet en
wwwgeappliancesc°m/service-and-supp°rt/sh°p-f°r-extended-service-planshtm
o Ilamando a1800.626.2224 durante el horario comerciat habitual. Los Servicios para el Consumidor Hogarefio de GE aQn estar_n
alli cuando su garantia caduque.
49 80737 1

Desea realizar una consulta o necesita ayuda con su electrodomestico?
iConsulte el Sitio Web de Etectrodom6sticos de GE (www.geappliances.com/servJce_and_support]) durante tas 24 horas, cual-
quier dia del aft©! Para mayor conveniencia y un servicio m_s r_pido, ahora puede descargar el Manual del Propietario, ordenar
piezas o inctuso programar et servicio tecnico a traves de Internet.
Servicio Programado: El servicio de reparaci6n de expertos de
GE est_ a s61o un paso de su puerta. Entre a Internet y programe
su servicio en www.geappliances.com/service_and_ support/o
Ilame al 800.GE.CARES (800.432.2737) durante el horario de
atenci6n comercial.
PJezas y Accesorios: Aquettas personas calificadas para
reatizar et servicio tecnico sobre sus propios electrodomesticos
podr_n soticitar el envio de piezas o accesorios directamente
a sus hogares (se aceptan las tarjetas VISA; MasterCard y
Discover). Ordene a trav6s de Internet hoy, durante las 24
horas o en forma tetef6nica al 800.626.2002 durante et horario
de atenci6n comercial.
Las instrucciones que figuran en este manual cubren los
procedimientos que ser_n realizados por cuatquier usuario.
Otros servicios tecnicos generalmente deberian ser
derivados a personal catificado del servicio. Se deber_ tener
cuidado, ya que una reparaci6n indebida podr_ hacer que el
funcionamiento no sea seguro.
Accesorios
LBusca Algo Mas?
Estudio de DJseSo de la Vida Real: GE apoya el concept©
de Disefio Universal en product©s, servicios y ambientes que
pueden ser usados por personas de todas tas edades, tamafios
y capacidades. Reconocemos la necesidad de realizar disefios
para una amplia gama de habilidades e incapacidades fisicas y
mentales. Para m_s detatles sobre las apticaciones de Disefio
Universal de GE, incluyendo ideas de disefio de cocinas para
personas con incapacidades, visite nuestro sitio web hoy. Sobre
casos de incapacidad auditiva, comuniquese at 800.TDD.GEAC
(800.833.4322).
Contactenos: Si no se encuentra satisfecho con et servicio
que recibi6 de GE, comuniquese con nosotros a trav6s de
nuestro sitio web con todos los detalles, incluyendo su nQmero
tetef6nico, o escriba a:
General Manager, Customer Relations
GE Appliances, Appliance Park Louisville, KY 40225
iGE ofrece una variedad de accesorios para mejorar sus experiencias de coccion y mantenimiento!
Para realizar una orden, visitenos a traves de Internet en:
www.GEApplJanceParts.com (EE.UU.) o en www.GEAppliances.ca (Canada)
o llame al 800.626.2002 (EE.UU.) 800.661.1616 (Canada)
Estos y otros productos est_n disponibtes:
Accesorios
Olla para Asar Pequefia (8 ¾" x 11/4"x 13 ½ ")
Olla para Asar Grande* (12 ¾" x 1 1/4"x 16 ½ ")
Olla para Asar Extra Grande* (17 ¾ " x 1 1/4"x 19 ½ ")
Piezas
Bandeja de Vidrio
Plato Giratorio
Estantes del horn©
Elementos del horn©
Lamparas de luz
Suministros de Limpieza
Limpiador para Electrodomesticos Micro Bryte®de 16 onzas
Limpiadores de Acero Inoxidable CitriShine
Limpiador de Electrodomesticos de Acero tnoxidable CeramaBryte _
Lubricante de Grafito
*The large broiler pan does not fit in 20"/24" ranges.
**The XL broiler pan does not fit in 24" wall ovens, 2T'drop ins or 20"/24" ranges
WB48X10055 (EE.UU.) 222D2097G001 (Canada)
WB48X10056 (EE.UU.) 222D2097G002 (Canada)
WB48X10057 (EE.UU.) No disponible en Canada
Los nQmeros de pieza varian segQn el model©
Los nQmeros de pieza varian segQn el model©
Los nQmeros de pieza varian segQn el model©
Los nQmeros de pieza varian segQn el model©
Los nQmeros de pieza varian segQn el model©
WX10X392
WX10X10007
PM10X311
WB02T10303
O©
m
-'4
FT'I
Z
C)
m
Cb
C)
©
;X3
m
©
O©
Corn© Retirar la Pelicula Protectora de Envio y la Cinta de Embalaje
Con cuidado tome un extremo de ta pelicuta protectora de envio
con los dedos y lentamente retire ta misma de ta superficie det
etectrodomestico.
No utiiice ningOn product© filoso para retirar la pelicula. Retire toda
la pelicula antes de usar el electrodomestico por primera vez.
Para asegurar que no haya dafios sobre et acabado det
product©, la forma m_s segura de retirar el adhesivo de la cinta
de embalaje en electrodomesticos nuevos es aplicando un
detergente liquid© hogarefio para lavar ptatos. Aplique con una
teta suave y deje que se seque.
NOTA: Et adhesivo deber_ ser eliminado de todas las partes.
No se puede retirar si se hornea con este dentro.
49 80737 1

O
c-
O
2E
m
(13
-(D
o©
(13
O
4--J
c-
O
r.D
d
Z
©
I
__J
©
Controles del Horn©
Controles del
Horn© Superior
Lock Controls
o ec
/
Controles Comunes
Controles del
Horn© Inferior
Controles Comunes
1. Timer On/Off (Tempodzador Encendido/Apagado):
Funciona come un temporizador con cuenta regresiva: Presione ta tecla
Timer On/Off (Temporizador Encendido/Apagado), seteccione el tipo
de temporizador (horas y minutos o minutes y segundos), use el dial de
selecci6n para configurar ta hora, y presione el dial del selector para iniciar
la cuenta regresiva del temporizador. El homo continuar& funcionando
cuando la cuenta regresiva del temporizador se haya completado. Para
apagar el temporizador, presione la tecla Timer On/Off (Temporizador
Encendido/Apagado).
2. Settings/Lock Controls (Controles de Configuraciones/
BIoqueo): Busque ias opciones del horn© para: Help (Ayuda),
Clock Settings (Configuraciones del Reloj), Display Mode (Modo de
Pantaila), Auto Conversion (Conversi6n Autom&tica), Auto Shut Off
(Apagado Automatic©), Beeper Volume (Volumen del Pitido), Reminder
(Recordatorio), Temperature Units (Unidades de Temperatura), Thermostat
Adjust (Ajustar el Termostato) y Oven information (Informaci6n del Homo)
bajo esta selecci6n. Para m_s detalles, consulte ia secci6n Oven Settings
(Configuraciones del Homo). Mantenga presionada la tecla Settings
(Configuraciones) durante 3 segundos para btoquear o desbloquear los
controles. Esto bloquea el control, de modo que al presionar las teclas de
control no se active esta funci6n. La funci6n Clear/Off (Borrar/Apagar)
siempre est_ activa, inciuso cuando el control esta bioqueado.
3. Selector Dial (Dial de Selection): Et dial de selecci6n se
usa tanto para el homo superior como para el inferior. Gire el dial para
seleccionar las configuraciones del homo, opciones del horno superior/
inferior y opciones de cocci6n, y tuego presione el mismo para confirmar
la selecci6n. Gire el dial para incrementar o reducir ias temperaturas o
el tiempo y luego presione el mismo para configurar la temperatura o el
tiempo configurados.
4. Back (Retroceder): Presione esta tecla para ir hacia atr_s en un
nivel delmenO en la pantalla.
5. Start/Pause (Iniciari Pausar): Presione la tecla Start/Pause
(Iniciad Pausar) para iniciar cualquier funci6n de cocci6n, limpieza o con
temporizador. Presione ta tecla Start/Pause (Iniciar/Pausar) para pausar
cualquier funci6n del homo superior.
6. Display (Pantalla): La informaci6n sobre el horn© superior y el
homo inferior se muestra en la ventana de esta pantalla.
Controles del Horn© Superior
7. Microwave (Cocinar con Microondas): Presione la tecla
Microwave (Cocinar con Microondas) para acceder alas opciones de
cocci6n con microondas. Use el dial de selecci6n para buscar la opci6n
de cocci6n con microondas deseada y presione el dial para seleccionar
la misma. Las opciones disponibles inciuyen Cook by Time (Cocinar por
Tiempo), Cook (Cocinar), Defrost (Descongelar), Beverage (Bebida),
Popcorn (Palomitas de Maiz), Melt (Derretir), Reheat (Recalentar),
Simmer (Hervir) y Soften (Abiandar). Use la bandeja de vidrio trasparente
y el utensilio para use seguro en el microondas al usar tas funciones
de cocci6n con microondas. Para m_s detalles, consulte la secci6n de
Cocci6n con microondas en el homo superior.
8. Add 30 See (Agregar 30 Segundos): Presione ta tecla Add
30 Sec (Agregar 30 Segundos) de tiempo de cocci6n en e! microondas.
Cada vez que se presiona esta tecta, se suman 30 segundos al tiempo de
cocci6n restante. El homo se inicia de inmediato.
9. Defrost (Descongelar): Presione la tecla Defrost (Descongelar)
para descongelar, gire el dial para seleccionar el tipo de descongelaci6n
y presione el dial para hacer ta selecci6n. El tip© de descongelaci6n
disponible inciuye: Defrost by Food Type (Descongelaci6n por Tip© de
Comida), Defrost by Time (Descongelaci6n por Tiempo), Defrost by
Weight (Descongelaci6n per Peso), 1.0 lb. Quick Defrost (Descongelaci6n
R_pida), Melt (Derretir), y Soften (Ablandar). Para m_s informaci6n,
consulte la secci6n Cocinar con el Microondas.
10. Reheat (Recalentar): Presione la tecla Reheat (Recalentar) para
recalentar, gire el dial para seleccionar el tip© de comida que desea
recaientar y presione el dial para hacer la seiecci6n. Los tipos de comidas
disponibles en la funci6n Reheat (Recalentar) incluyen: Beverage (Bebida),
Casserole (Cazuela), Chicken (Poll©), Pasta (Pasta), Pizza (Pizza), Plate of
Food (Plato de Comida), Rice (Arroz), Soup (Sopa), Steaks/Chops (Bifes/
Costitlas), y Vegetables (Verduras).
11. Popcorn (Palomitas de Maiz): Presione la tecta Popcorn
(Palomitas de Maiz) para cocinar palomitas de maiz con el microondas;
presione el dial para hacer la selecci6n. La funci6n Popcorn (Palomitas
de Maiz) es una funci6n con sensor de microondas y detecta de forma
autom_tica cu_ndo las palomitas de maiz est_n hechas y se apaga
autom&ticamente. No use las funciones del sensor dos veces seguidas
con la misma porci6n de comida.
12. Clear/Off (Borrad Apagar): La tecla Clear/Off (Borrari Apagar)
cancela TODOS los programas del homo superior, except© el reloj y el
temporizador.
Controles del Horn© Inferior
13. Light (LLIZ): Presione la tecla Light (Luz} para encender o apagar ta
luz del horno en el homo inferior. Observe que la tuz del homo inferior no
se encender_ si 6ste se encuentra en el modo de limpieza.
14. Bake (Hornear): Presione ta tecla Bake (Hornear) para hornear, gire
el dial para seleccionar la temperatura de horneado y presione el dial para
hacer la selecci6n.
15. Broil (Asar): Presione ta tecla Broil (Asar) para asar, gire el dial para
seleccionar Hi/L© (Alto/Bajo) y presione el dial para hacer la selecci6n.
16. Options (Opciones): Busque las funciones Delay Start (Retrasar
Inicio), Proof (Leudar), Sabbath (Sab&tico), Self Clean (Limpieza
Autom_tica), Steam Clean (Limpieza con Vapor) y Warm (Calentar) en
esta selecci6n. Para m_s detailes, consulte la secci6n Oven Options
(Opciones del Homo).
17. Warm (Calentar): Presione la tecta Warm (Calentar) para calentar;
presione el dial para hacer la selecci6n. No use la funci6n Warm
(Calentar) para cocinar o calentar comida fria. Para m_s informaci6n,
consulte ta secci6n de Modos de Cocci6n.
18. Clear/Off (Borrari Apagar): La tecla Clear/Off (BorrariApagar)
cancela TODOS los programas del homo inferior, except© el reloj y el
temporizador.
0 49 80737 1

Configuraciones del Homo
Ayuda
Use esta funci6n para saber m_s sobre su homo y sus
funciones, presionando ta tecta Settings (Configuraciones)
y seteccionando Help (Ayuda). (3ire el dial de selecci6n y
presione el mismo para seleccionar la funci6n sobre la cu_t
desee saber m_s.
NOTA: Es posibte que su homo no cuente con todas las
funciones de ayuda. A continuaci6n figuran funciones de la
funci6n Help (Ayuda):
Funciones que se encuentran en la funcion
Adding time
(ASadir tiempo)
Auto Convection
(Convecci6n
Automgltica)
Auto Shut-Off
(Apagado Autom_tico)
Back (Regresar)
Bake (Homear)
Beeper Volume
(Volumen de! Pitido)
Beverage (Bebida)
Broil (Asar)
Clear/Off
(Borrar/Apagar)
Clock (Reloj)
Control Lockout
(Bloqueo del Control)
Cook (Cocinar)
Cook by time
(Cocci6n por tiempo)
Cook by Time
(Cocinar per Tiempo)
Cook by Time 1 & 2
(Cocinar por Tiempo
ly2)
Cooking Options
(Opciones de Cocci6n)
(Inferior)
Cooking Options
(Opciones de Cocci6n)
(Superior)
Defrost (Descongelar)
Defrost by Food
(Descongelar por
Comida)
Defrost by Time
(Descongelaci6n por
tiempo)
HELP (AYUDA).
Defrost by Weight
(Descongelaci6n
per peso)
Delay Start (Lower)
(Retrasar Inicio,
Inferior)
Display Mode
(Mode de Pantalla)
Edit (Editar)
Help (Ayuda)
Melt (Derretir)
Micro 30 Secs (30
seg. de Microondas)
Microwave (Cocinar
con Microondas)
My recipes (Mis
recetas)
Probe (Sonda)
Proof (Leudar)
Reheat (Recalentar)
Reminder
(Recordatorio)
Repeat Last (Repetir
el Ultimo Paso)
Resume (Reiniciar)
Sabbath (Sab_tico)
Self Clean (Limpieza
Autom_tica)
Sensor Cooking
(Cocci6n por sensor)
Simmer (Hervir)
Soften (Ablandar)
Speed Cook
(Cocci6n R_pida)
Start/Pause (Iniciar/
Pausar)
Steam Clean
(Limpieza al Vapor)
Temperature Units
(Unidades de
Temperatura)
Thermostat Adjust
(Ajustar el Termos-
tato)
Timer On/Off
(Temporizador En-
cendido/Apagado)
Toast (Tostar)
Warm (Calentar)
Clock Settings (Configuraciones del Reloj)
Use esta funci6n para configurar la hora del dia y para especificar
c6mo 6sta ser_ exhibida. Puede seleccionar el reloj est_ndar de
12 horas (12 hrs.) o el reloj militar de 24 horas (24 hrs.). El reloj
deber_ ser configurado antes del primer uso del homo.
Display Mode (Modo de Pantalla)
Use esta funci6n para configurar et modo de pantalta Power
Saver (Ahorro de Energia) o Display Always (Mostrar
Siempre).
Auto Shut-Off (Apagado Automatico)
Use esta funci6n para activaff desactivar la funci6n Auto
Shut-Off (Apagado Autom_tico). Activar la funci6n Auto Shut-
Off (Apagado Autom_tico) apagar_ el homo inferior luego de
12 horas de funcionamiento continuo. Esta configuraci6n de
f_brica para la funci6n Auto Shut-Off (Apagado Autom_tico)
est_ activada. Cuando est6 en el modo Sabbath (Sab_tico), la
funci6n Auto Shut-Off (Apagado Autom_tico) ser_ desactivada.
Beeper Volume (Volumen del Pitido)
Use esta funci6n para configurar et volumen det pitido en Mute
(Mudo) o Normal (Normal).
NOTA: Algunos tonos no se pueden enmudecer.
Reminder (Recordatorio)
Use esta funci6n con Set (Configurar), Review (Revisar), o
Clear Reminder (Borrar Recordatorio).
Temperature Units (Unidades de Temperatura)
Use esta funci6n para configurar ta unidad de temperatura en
pantalta a °F (Fahrenheit) o °C (Celsius).
Thermostat Adjust (Ajustar el Termostato)
Esta funci6n permite que la temperatura de horneado del homo
y de horneado por convecci6n sean ajustadas hasta 35°F m_s
caliente o 35°F m_s fria en el homo inferior. El homo superior
no puede set ajustado. Use esta funci6n si piensa que la
temperatura de su homo es demasiado caliente o demasiado
fria y desea modificarta. Este ajuste afecta los modos Bake
(Hornear). NingQn otro modo de cocci6n se ve afectado.
Oven Information (Informacion del Horno)
Esta funci6n muestra et modeto y nQmero de serie det homo.
C
©
I'm
r"
I
©
Z
©
i m
(-b
O
--h
LQ
C
"'3
(7
O
('D
Ch
CD_
('D
-T-
O
--3
©

O
c--
O
-T-
m
Q
=o
U3
Q
O
LP
n
O
d
Z
t,/
©
"r"
.,.J
LI.J
tm
©
oO
Opciones del Homo
Opciones del Horno Inferior
Delay Start (Iniciar con Retraso)
Use esta funci6n para retrasar el inicio de las funciones Bake
(Homear) o Self Clean (Limpieza Autom_tica). Para usar esta
funci6n, seleccione Delay Start (Iniciar con Retraso) y configure
la hora de inicio, y luego seleccione el modo de cocci6n.
Tambi6n puede usar la funci6n Delay Start (Iniciar con Retraso),
mientras programa una funci6n de cocci6n con Bake (Hornear).
Proof (Leudar)
Use esta funci6n para leudar masa. Para m_s detalles,
consulte los Modos de Cocci6n en el Homo Inferior.
Sabbath (Modo Sabatico)
Use esta funci6n para ingresar el modo Sabbath (Sab_tico).
Este modo configura el homo para el Festejo Sab_tico Judio y
Feriados. Esta funci6n cumpte con los requisitos de ta Estretla
K del Festejo Sab_tico Judio. El modo sab_tico desactiva las
luces del homo (ta luz del homo no se encender_ cuando la
puerta sea abierta), todos los sonidos (el control no emitir_
ningOn pitido cuando un bot6n sea presionado, pero emitir_
un pitido si ciertas fallas det homo se producen), y todas las
funciones del horno superior e inferior, excepto Bake (Honear)
en el homo inferior. Durante el modo Sabbath (Sab_tico) s6to
Bake (Hornear) en et homo inferior est_ disponibte. Durante
este modo, luego de configurar/modificar una temperatura
de horneado, un retraso al azar de aproximadamente entre
30 segundos y 1 minuto se producir_, antes de que el homo
comience a hornear. Para detener la cocci6n, presione ta
tecla Back (Retroceder) y luego la tecla Start/Pause (Iniciad
Pausar). El homo se apagar_ luego de un retraso al azar
de aproximadamente entre 30 segundos y 1 minuto. Para
satir inmediatamente de Bake (Hornear) en el homo inferior,
presione la tecla Clear/Off (Borrad Apagar) en cualquier
momento; los elementos de cocci6n se apagar_n de forma
inmediata y Sabbath Bake (Homear en el Modo Sab_tico)
cambiar_ a Sabbath (Sab_tico) en la pantatla, indicando que
el homo fue apagado. Para salir del modo Sabbath (Sab_tico),
mantenga presionada la tecla Back (Retroceder) durante
3 segundos. No presione ningQn otro bot6n hasta que se
haya salido del modo Sabbath (Sab_tico), o el modo Sabbath
(Sab_tico) se votver_ a iniciar y no se saldr_ del mismo. Para
m_s detatles, consulte la secci6n de Modo Sab_tico en el
Homo Inferior.
NOTA: Si se produce un corte de corriente durante el modo
Sab_tico, la unidad permanecer_ en el modo Sab_tico pero
apagada cuando vuetva la corriente.
Self Clean (Limpieza Automatica)
Use esta funci6n para ingresar el modo Self Clean (Limpieza
Autom_tica). Para m_s detalles, consulte la secci6n de
Limpieza del Horno.
Steam Clean (Limpieza al Vapor)
Use esta funci6n para ingresar el modo Self Clean (Limpieza
Autom_tica). Para m_s detalles, consulte la secci6n de
Limpieza del Horno.
Warm (Calentar)
Use esta funci6n para calentar. Para m_s detatles, consulte los
Modos de Cocci6n en et Homo Inferior.
12 49 80737 1

CocciOn con Microondas
Como Utilizar las Funciones de Microondas
AsegQrese de que ta base giratoria y ta bandeja de vidrio
transparente se encuentran colocadas.
Coloque los alimentos o recipiente para microondas directamente
en la bandeja de vidrio transparente para cocinar sus alimentos.
La base giratoria siempre debe
estar colocada en su lugar
cuando se utiliza el homo.
La bandeja de cristal transparente
siempre deber_J estar en su lugar
cHando se cocina con microondas.
SELECCIONES MICROWAVE PRE-SET(_PREPROGRAMACIONESDE MICROONDAS}_
[] Bebidas [] Derretir [] Cocinar [] Descongelar [] Recalentar
- Agua (8-12 onzas) - Manteca - Pot tipo de - 1,0 lb. R_pido - Bebidas
- Cafe - Carameto alimento - Por tiempo - Cazueta
(8-12 onzas) - Queso - Por tiempo - Por peso - Polio
- Te (8-12 onzas) - Trozos de - Por tiempo 1 y 2 - Por tipo de - Pasta
- Leche Chocolate atimento - Pizza
(8-12 onzas) - Malvavisco [] Suavizar - Derretir - Plato de comida
- Cacao Caliente - Manteca - Suavizar - Arroz
(8-12 onzas) [] Hervir - Queso Crema - Sopa
- Glaseado - Bistecs/Chuletas
[] Palornitas de Maiz (16 onzas) -Verduras
- Helado
- Sensor de
palomitas de maiz
Como Utilizar las Selecciones de Microondas Preprogramadas
1. Presione la tecta Microwave (Cocinar con Microondas).
Si no se reatiza una seteccidn dentro det ptazo de 15
segundos, la pantalta regresar_ a la hora del dia.
2. Gire el dial de selecci6n para buscar la comida o bebida
que desee cocinar, descongetar, abtandar, derretir, hervir
o recalentar. Presione et dial de seleccidn para ingresar.
3. Gire el dial para seleccionar el tipo, cantidad, peso y/o
tama5o. (El homo le consultar_, en la medida que sea
necesario.) Presione et dial luego de cada setecci6n.
4. Presione et dial de setecci6n o ta tecta Start/Pause
(Iniciafl Pausar) para iniciar la cocci6n.
Para revisar o editar las configuraciones durante la cocci6n,
presione et dial de selecci6n.
Si se abre la compuerta durante ta cocci6n, el homo se
detendr_ y se mostrar_ Pause (Pausa) en la pantatla. Cierre
la compuerta y apriete el bot6n Start/Pause (Iniciar/Pausar
para continuar cocinando.
Si ingresa una setecci6n no deseada en cualquier momento
simplemente apriete el bot6n Back (Regresar) y reingrese las
setecciones deseadas.
[] Cuando el homo est_ encendido, se podr_ ver la luz
alrededor de ta compuerta o de ta cubierta extema.
[] La luz del interior del homo se encender_ durante un ciclo
de cocci6n por microondas.
[] Podria escapar vapor del rededor de la compuerta.
I
O
0
Oo
C
_D
===in=
0
= =
(-b
0
C)
(b
O,
(b
0
Z
('b
.=-_
0
0
O0
Cook By Time (Cocinar Por Tiempo) y Cook By Time 1 & 2 (Cocinar Por Tiempo 1 y 2)
Utilice las funciones de Cook By Time (Cocinar Por Tiempo) y
Cook By Time 1 & 2 para cocinar por microondas los atimentos
que no se encuentran en ta secci6n de recetas yen et tiempo
que program6.
[] El nivel de potencia se encuentra ajustado
autom_ticamente en High (Alto), pero puede cambiarlo
para dar mayor flexibitidad.
1. Presione la tecla Microwave (Cocinar con Microondas).
2. Gire el dial para seleccionar Cook By Time (Cocinar por
Tiempo) o Cook By Time 1 & 2 (Cocinar por Tiempo 1 y 2)
y presione et dial de selecci6n para ingresar.
3. Gire el dial de selecci6n para configurar el tiempo de
cocci6n y presione et mismo para ingresar.
4. Seteccione la configuraci6n det nivet de potencia.
Si seleccion6 Cook By Time 1 & 2 (Cocinar por Tiempo 1
y 2), gire et dial de selecci6n para configurar et segundo
tiempo de cocci6n, la segunda configuraci6n de nivel de
potencia y presione el dial para ingresar.
5. Presione el dial de setecci6n o ta tecta Start/Pause
(Iniciafl Pausar) para iniciar la cocci6n.
Durante las funciones de Cook By Time (Cocinar Por Tiempo)
o Cook By Time 1 & 2 (Cocinar Por Tiempo 1 & 2) puede abrir
la compuerta para revisar ta comida. Cierre ta compuerta y
apriete et bot6n Start/Pause (IniciadPausar) para continuar
cocinando.

OO
fZ
0
0
q.)
Z
C
0
c-
'0
0
r.D
L2
0
um
(D
0
C
0
:I=
Coccion con Microondas (ContinUa)
NJvel(es) De PotencJa Del Horno Microondas
[] Puede modificar el nivel de potencia durante la mayor
parte det programa de cocci6n.
1. Presione et dial de setecci6n para editar.
2. Gire el dial de selecci6n para cambiar la hora y/o presione
et dial de setecci6n para ingresar.
3. Gire el dial de selecci6n en direcci6n de las agujas del
reloj para incrementar et nivet de potencia y en contra de
las agujas det reloj para reducir et mismo. Presione et dial
de selecci6n para ingresar.
Aqui se presentan algunos ejemplos de utilizaciones para varios
niveles de potencia:
High (Alto) 10: Pescado, tocino, verduras, tiquidos hirvientes.
IVied (Mledio) - High (Alto) 7: Cocci6n moderada de came de
res y polio; hornear guisados y recalentamiento.
IVied (Mledio) 5: Cocci6n tenta y abtandamiento para guisados
y cortes de came de res menos suaves.
Low (Bajo) 2 o 3: Descongelaci6n; hervir a fuego lento; satsas
deticadas.
Warm (Caliente) 1: Mantener comidas calientes; suavizar
mantequitla.
Descongelacion Pot Tipo De Alimento
La funci6n Auto Defrost (Descongelaci6n autom_tica) ajusta
los tiempos de descongetaci6n y los nivetes de potencia para
ofrecer resultados de descongelaci6n uniformes para carnes
de res, polio y pescado de hasta 6 tibras de peso.
1. Saque los alimentos de la caja y col6quetos en un plato
adecuado para microondas.
2. Presione la tecla MIJcrowave (CocJnar con MIJcroondas)
y seleccione Defrost (Descongelar).
3. Gire el selector del dial a Defrost (Descongelar) y a Food
Type (Tipo de Comida). Presione et dial de selecci6n para
ingresar.
4. Gire el dial para seleccionar el tipo de comida. Presione el
dial de setecci6n para ingresar.
5. Gire el dial de selecci6n al peso de la comida, usando ta
Guia de Conversi6n que figura a la derecha. Por ejempto,
seteccione 1.2 para 1.2 libras (1 libra, 3 onzas). Presione
et dial de setecci6n para ingresar.
6. Presione et dial de setecci6n o la tecta Start/Pause
(InJcJad Pausar) para iniciar la descongetaci6n.
7. Gire los atimentos cuando el horno le indique Turn Food
Over (Dar Vuelta A Los Alimentos).
[] Saque la came descongelada o cubra las _reas calientes
con pedazos pequefios de I_mina de aluminio para Iograr
una descongetaci6n uniforme.
[] Despu6s de descongelar, la mayoria de las carnes
necesitan dejarse en reposo durante 5 minutos para
completar la descongelaci6n. Asados de mayor tamaSo
deben permanecer en reposo por cerca de 30 minutos.
Guia de conversion
Si se indica et peso de los atimentos en tibras y onzas, se
deben convertir las onzas a decimos (.1) de libra.
Ingresar el peso
Pesodel alimento del alimento
en onzas (decimos de libra)
1-2 ,1
3 ,2
4-5 ,3
6-7 ,4
8 ,5
9-10 ,6
11 ,7
12-13 ,8
14-15 ,9
Descongelacion Por Tiempo
Use Defrost By Time (Descongelar por Tiempo) para
descongetar durante un periodo de tiempo seteccionado.
1. Presione la tecta Mlicrowave (Cocinar con MiJcroondas)
y seleccione Defrost (Descongelar).
2. Gire el dial de selecci6n a Defrost By Time (Descongelar
pot Tiempo). Presione et dial de selecci6n para ingresar.
3. Gire el dial para seleccionar el tiempo que desee.
Presione et dial de setecci6n para ingresar.
4. Presione et dial de setecci6n o la tecta Start/Pause
(Iniciad Pausar) para iniciar la descongetaci6n.
5. Gire los atimentos cuando el homo le indique Turn Food
Over (Dar Vuelta A Los Alimentos).
Et nivel de potencia se ajusta autom_ticamente a 3, pero
puede cambiarse. Para cambiar los nivetes de potencia,
consutte la secci6n Nivet de potencia det microondas. Puede
descongelar atimentos peque_os aumentando el nivel de
potencia despu6s de ingresar el tiempo. El nivet de potencia 7
corta el tiempo de descongetaci6n total a cerca de la mitad; et
nivet de potencia 10 corta et tiempo total de descongetaci6n a
cerca de un tercio. Cuando descongeta a nivetes de potencia
m_s altos, los atimentos necesitar_n atenci6n m_s frecuente
de la normal.
4 49 80737 1

CocciOn con Microondas (ContinUa)
Defrost By Weight (Descongelar por Peso)
Use Defrost By Weight (Descongelar por Peso) para
descongetar durante un periodo de tiempo seteccionado.
1. Presione la tecla Microwave (CocJnar con MJcroondas) y
seleccione Defrost (Descongelar).
2. Gire el dial de selecci6n a Defrost By Weight (Descongelar
por Peso). Presione et dial de setecci6n para ingresar.
3. Gire el dial para seleccionar el peso que desee. Presione
et dial de setecci6n para ingresar.
4. Presione et dial de setecci6n o ta tecta Start/Pause (Iniciar/
Pausar) para iniciar la descongetaci6n.
5. Gire los alimentos cuando el homo le indique Turn Food
Over (Dar Vuelta A Los Alimentos).
El nivet de potencia no puede set modificado durante esta
configuraci6n.
Quick Defrost (DescongelacJ0n R4pida) con 1.0 Ibs.
Use Quick Defrost (Descongelaci6n R_pida) con 1.0 tbs. para
una descongelacidn r_pida de 1.0 Ibs. de comida congelada.
1. Presione ta tecla Microwave (CocJnar con MJcroondas)
y seleccione la descongelaci6n r_pida con 1.0 Ibs.
2. Presione et dial de setecci6n o la tecta Start/Pause
(InJcJad Pausar) para iniciar la descongelaci6n. Presione
et dial de selecci6n para ingresar.
3. Gire los alimentos cuando el homo le indique Turn Food
Over (Dar Vuelta A Los Alimentos).
Et nivet de potencia no puede set modificado durante esta
configuraci6n.
Consejos Para Descongelar
[] Se pueden descongelar alimentos congelados en papel o
pl_stico en et paquete cuando se utiliza ta funci6n Defrost
By Food Type (Descongelar Por Tipo De Comida). Se
deben cortar, perforar o ventitar los paquetes cerrados
despues de que se hayan descongetado los alimentos
parcialmente. Se deben descubrir parcialmente los
recipientes de atmacenamiento pt_sticos.
[] Se pueden descongelar y cocinar con microondas
las meriendas preempacadas, de tamaSo familiar,
congeladas. Si el atimento se encuentra en un recipiente
de I_mina de aluminio, transfi6rato a un plato adecuado
para microondas.
[] Los alimentos que se echan a perder f_citmente no se
deben dejar fuera del refrigerador durante m_s de una
hora despu6s descongelarse. La temperatura ambiente
promueve et crecimiento de bacterias nocivas.
[] Para una descongelaci6n m_s uniforme de alimentos m_s
grandes, tales como asados, utilice la funci6n Defrost By
Time (Descongelaci6n Pot Tiempo). AsegOrese que las
cames se encuentran completamente descongetadas
antes de cocinartas.
[] Cuando los alimentos se encuentran descongelados,
deben encontrarse frios pero suaves en todas las _reas.
Si ann se encuentran restos de hieto, vuetvalos a colocar
en el microondas pero por un periodo muy corto de tiempo
o dejelos reposar durante un par de minutos.
I
O
0
Oo
C
_D
_m
0
i m
0
O,
0
Z
0
0
C1
O0

OO
fZ
0
0
qD
Z
C
0
c-
'0
0
r.D
L2
0
=m
L_
(D
€3_
¢/3
O
r--
O
:I::
CocciOn con Microondas (ContinUa)
Cocci0n De MJcroondas Por Sensor
La funci6n de sensor detecta el aumento de humedad liberada
durante ta cocci6n. El homo ajusta et tiempo de cocci6n
autom_ticamente a los diferentes tipos y cantidades de comida.
No utitice las funciones de sensor dos veces en sucesi6n en la
misma porci6n de comida ya que puede tenet como resultado
comida severamente sobrecocinada o quemada. Si et alimento
no se cocina completamente despues det primer conteo
regresivo, utilice la funci6n de Cook By Time (Cocinar Por
Tiempo) para permitir tiempo de cocci6n adicional.
Los recipientes y tapas o cubiertas apropiadas son
esenciales para obtener los mejores resultados con la
cocci6n por sensor.
[] Utilice siempre recipientes adecuados para microondas y
cObralos con tapas o envoltura pl_stica ventilada. Nunca
utitice recipientes de pl_stico con sellado ajustado ya que
pueden prevenir que el vapor escape ocasionando que se
sobrecocinen los alimentos.
[] AsegOrese de que el exterior de los recipientes de
cocina y et interior del homo se encuentren secos antes
de colocar los atimentos en el homo. Las gotas de
humedad que se convierten en vapor pueden dar lecturas
incorrectas al sensor.
Las bebidas se catientan mejor descubiertas.
Cubiertas
Ventiladas
Seque los platos de modo que no
den lecturas incorrectas al sensor.
PROGRAMAS DE SENSOR PARA COCClON POR MICROONDAS:
[] Ground Meat (Carne molida)
[] Popcorn (Palomitas)
[] Soup (Sopa)
[] Rice (Arroz)
[] Vegetables (Verduras)
(enlatadas, frescas, congeladas)
[] Chicken Reheat (Recalentarniento
de polio)
[] Pasta Reheat
(Recalentamiento de pasta)
[] Plate of Food Reheat
(Plato de recalentamJento de comJda
[] Soup Reheat (Recalentarniento de
sopa)
[] Vegetable Reheat
(Recalentamiento de verduras)
Para Utilizar Todos Los Programas De Sensor
Et modo de microondas det homo superior cuenta con cocci6n
con sensor. De forma autom_tica, detecta cu_ndo la comida
est_ lista y se apaga, eliminando la necesidad de programar
tiempos de cocci6n y nivetes de potencia.
1. Presione la tecta Microwave (Cocinar con Microondas)
y gire el dial de selecci6n a Cook By Food Type (Cocinar
por Tipo de Comida) o Reheat (Recalentar). Presione et
dial de setecci6n para ingresar.
2. Gire el dial para seleccionar la comida que desee.
Presione et dial de setecci6n para ingresar.
3. Presione et dial de setecci6n o ta tecta StartlPause
(Iniciad Pausar) para iniciar ta cocci6n.
No abra la puerta det homo hasta que se este realizando ta
cuenta regresiva en la pantalla o hasta que et microondas
finalice la cocci6n. Si la compuerta se encuentra abierta, cierreta
y apriete Start/Pause (Iniciar/Pausar) inmediatamente. Si los
alimentos ann no se encuentran to suficientemente cocinados,
utilice la funci6n Cook By Time (Cocci6n Por Tiempo) en el
selector de microondas para cocinar por m_s tiempo.
NOTA: No utitice las funciones de sensor dos veces en
sucesi6n en ta misma porci6n de comida ya que puede dar
como resultado comida severamente sobrecocinada o quemada.
[] Si ha estado utilizando la funci6n de cocci6n r_pida y et
homo se encuentra caliente, esto puede set una indicaci6n
de que est_ demasiado caliente como para cocinar por
sensor. Por supuesto, siempre puede proceder a cocinar
con la funci6n Cook By Time (Cocci6n Por Tiempo).
NOTA: Si el homo se encuentra demasiado caliente, cambiar_
autom_ticamente a cocci6n por tiempo.
[] Para disminuir o aumentar el tiempo de cocci6n, espere
hasta que se muestre et conteo de tiempo regresivo en
la pantatta. Luego gire el dial de selecci6n para agregar o
restar tiempo.
[] Si abre la compuerta mientras se encuentra utilizando la
funci6n Sensor Cooking (Cocci6n Por Sensor), aparecer_
el mensaje Sensor Error (Error De Sensor). Cierre la
compuerta y apriete el bot6n Start/Pause (IniciarlPausar)
para comenzar nuevamente.
Notas sobre el programa de Recalentamiento:
Los alimentos recatentados podrian tener amplias variaciones
de temperatura. Atgunas _reas se pueden encontrar
extremadamente calientes.
Es mejor utilizar la funci6n Cook By Time (Cocci6n Por
Tiempo) y no Recalentar estos alimentos:
[] Productos de pan.
[] Los alimentos que deben recatentarse cubiertos.
[] Los atimentos que necesitan revolverse o vottearse.
[] Los atimentos que necesitan tener un aspecto seco o
superficie crujiente despues det recalentamiento.
16 49 80737 1

Modos de CocciOn
Su nuevo homo posee una variedad de modos de cocci6n para que pueda obtener los mejores resultados. Estos modos
se describen a continuaci6n. Para acceder a recomendaciones para comidas especificas, consulte ta secci6n de la Guia de
Cocci6n. Recuerde que es posibte que su nuevo horno funcione de manera diferente que aquel que est_ reemplazando.
Modos de Horneado y Dorado
Seleccione un modo para homear y dorar basado en et tipo y
cantidad de comida que est_ preparando. AI preparar comidas
horneadas tales como tartas, galletas y masas, siempre
precaliente et homo primero. Siga tas recomendaciones de
la receta sobre la colocaci6n de la comida. Si no se brindan
pautas, centre la comida en et homo.
Horneado Tradicional
Et modo de horneado tradicional est_ pensado para la cocci6n
en un solo estante. Este modo usa et calor principalmente
desde et etemento inferior, pero tambien desde et elemento
superior para cocinar la comida. Para usar este modo presione
la tecta Bake (Hornear), gire et dial de setecci6n para
configurar ta temperatura det homo y presione el dial para
ingresar, y luego presione Start (Iniciar). Et precalentamiento
generalmente se recomienda al usar este modo.
Modo para Asar
Siempre ase con ta puerta cerrada. El etemento para asar en
et homo es muy potente. Monitoree la comida de cerca al asar.
Tenga cuidado al asar en posiciones de estantes superiores,
ya que colocar la comida m_s cerca del elemento para asar
incrementa et humo, satpicaduras y la posibitidad de que se
incendien las grasas. No se reeomienda asar en el estante
de la position 6.
Intente asar tas comidas que normalmente haria a la parritla.
Ajuste tas posiciones de los estantes para ajustar ta intensidad
del calor a la comida. Cotoque las comidas m_s cerca det
elemento para asar, cuando se desee una superficie m_s
cocinada y un interior poco cocido. Las comidas m_s gruesas
y las comidas cuyo interior debe set cocinado deberian set
asadas en un estante en una posici6n alejada del usado
para asar, o usando las funciones Broil Lo (Asar Bajo). Para
un mejor rendimiento, centre la comida debajo det etemento
calentador para asar.
Asar Bajo
Et modo Broil Lo (Asar Bajo) usa menos calor intenso del
etemento superior para cocinar la comida completamente
mientras tambien se reatiza et dorado superficial. Use la
funci6n Broil Lo (Asado Bajo) para cortes de came m_s
gruesos y/o comidas que desee que queden completamente
cocinadas. Para usar este modo presione la tecla Broil (Asar),
gire el dial de selecci6n a Lo (Bajo) y presione el dial para ingresar,
y luego presione Start (Iniciar). No es necesario realizar et
precalentamiento al usar este modo.
Leudar
Et modo Proof (Leudar) est_ disefiado para elevar (fermentar y
leudar) masas de pan. Presione la tecla Options (Opeiones),
gire el dial para seleccionar Proof (Leudar) y presione el dial
para hacer la selecci6n, y luego presione Start (Iniciar). Cubra
bien la masa para evitar que se seque. El pan se elevar_ m_s
r_pidamente que a temperatura ambiente. Se deber_ observar
que con los hornos de pared doble, la funcidn para teudar no
se podr_ activar cuando se est6 usando un modo de limpieza
en et homo inferior.
Calentar
El modo Warm (Catentar) est_ disefiado para mantener
comidas calientes hasta durante 3 horas. Para usar este
modo, presione la tecta Options (Opciones), gire et dial para
seteccionar Warm (Caliente) y presione et dial para hacer la
setecci6n, y tuego presione Start (Iniciar). Cubra tas comidas
que necesitan mantener la humedad y no cubra aquettas
comidas que deberian quedar crocantes. No se requiere
precalentar las mismas. No use la funci6n Warm (Calentar)
para calentar comida fria, excepto galletas crujientes, papas
fritas o cereales secos. Tambien se recomienda que la comida
no se mantenga catiente por m_s de dos horas.
Asar Alto
Et modo Broil Hi (Asar Alto) usa cator intenso del elemento
superior para soasar las comidas. Use la funci6n Broil Hi
(Asado Alto) para cortes m_s delgados de came y/o comidas
que prefiera que quedan menos cocinadas en su interior.
Para usar este modo presione ta tecla Broil (Asar), gire el
dial de selecci6n a Hi (Alto) y presione el dial para ingresar,
y tuego presione Start (Iniciar). No es necesario realizar et
precalentamiento al usar este modo.
I
O
:3
O
m
:3
"'h
n=
O
= m
Z
O
Cz
O
O0
CL
©
Cb
O
O,

O
LD
4=M
._Q
6_
Or)
0
0
Z
L:
0
=m
qL
C
m
0
C
0
:Z:
18
Modo Sab4tico
Su nuevo homo cumple con los requisitos del Feriado Sab_tico Judio de la Estrella K, contando con la funci6n de cocci6n del
modo Sabbath (Sab_tico). A continuacidn se describe en detalle la funcidn del modo Sabbath (Sab_tico).
Para Ingresar a Sabbath Mode (Modo SabatJco)
Presione la tecla Options (Opciones) det homo inferior y gire
el dial a Sabbath (Sab_tico) y presione et mismo para hacer la
selecci6n. En la pantatta aparecer_ "During Sabbath Mode the
upper oven is unavailable" (Durante el Modo Sab_tico el homo
superior no est_ disponibte). Presione el dial de selecci6n
para continuar. Cualquier funci6n del homo superior que este
funcionando se detendr_, y el homo inferior har_ una transici6n
inmediata at modo Sabbath (Sab_tico).
Para CambJar la Temperatura
Una vez en el modo Sabbath (Sab_tico), a fin de modificar la
temperatura del homo o de iniciar una funci6n de horneado, el
usuario podr_ cambiar la temperatura a una de las 10 temperaturas
configuradas previamente, como se indica a continuaci6n:
Tecla UI
Teclas del Lado Izquierdo (Homo Superior)
Microwave (Cocinar en el Microondas)
Speed Cook/Defrost
(Cocci6n R_pida/Descongelar)
Cooking Options/Popcorn
(Opciones de Cocci6n/Palomitas de Maiz)
Add 30 Sec (Agregar 30 Segundos)
Convection Bake/Reheat
(Hornear por Convecci6n/Recalentar)
Teclas del Lado Derecho (Homo Inferior)
Back (Retroceder)
Clear/Off (Borrar/Apagar)
Light (Luz)
Bake (Homear)
Broil (Asar)
Convection Bake/Warm
(Homear por Convecci6n/Calentar)
Options (Opciones)
Temperatura (°F)
170
200
225
250
300
0
Se cancela inmediatamente
325
350
375
400
450
Et cambio a una de las temperaturas anteriores requiere que et
usuario presione ta tecla asociada con la temperatura deseada
y que luego presione la tecla Start/Pause (Iniciar/Pausar).
Por ejemplo, para configurar Homear 350°F, el usuario deber_
presionar la tecta Bake (Hornear) en et homo inferior y luego
presionar la tecla StartlPause (Iniciafl Pausar).
La funci6n Bake (Hornear) se iniciar_ (o si ya esta funcionando,
la temperatura del homo cambiar_) en un momento al azar entre
los 30 y 60 segundos luego de que la tecta Start/Pause (Iniciad
Pausar) haya sido presionada, con la excepci6n de presionar la
tecla Clear/Off (Borrad Apagar), Io cuat cancelar_ de inmediato
las configuraciones de cocci6n. (La unidad permanecer_ en el
modo Sab_tico). El cambio de temperatura puede ser ejecutado
en cualquier momento durante et ciclo de cocci6n.
Para Apagar el Horno
Presione la tecta Clear/Off (Borrar/Apagar) o Back
(Retroceder) y tuego la tecta Start (Iniciar) en cualquier
momento. Et homo se apagar_ de inmediato, pero
permanecer_ en el modo Sabbath (Sab_tico) y regresar_ a la
pantatla de suspensi6n de Sabbath (Sab_tico).
Para Salir del Modo SabatJco
Mantenga presionada ta tecla Back (Retroceder) durante
3 segundos. El homo se apagar_ en un momento al azar
entre los 30 y 60 segundos, luego de que la tecla Back
(Retroceder) se mantenga presionada.
NOTA: No presione ninguna otra tecla durante este momento,
ya que de to contrario el modo Sabbath (Sab_tico) ser_
reiniciado y no se podr_ salir del mismo.
Et homo saldr_ del modo Sabbath (Sab_tico) y regresar_ a la
pantalla por omisi6n.
Funcion de Coccion por TJempo en el Modo Sabatico
Et modo Sabbath (Sab_tico) no puede activar una funci6n de
cocci6n por tiempo por si solo. Si se desea activar Timed Cook
(Cocinar por Tiempo), se deber_n reatizar los siguientes pasos:
1. Use ta tecla Settings (Configuraciones) para configurar
Beeper Volumen (Volumen del Pitido) en Mute (Mudo).
2. Use la tecta Light (Luz) para configurar la luz de su homo
inferior en On (Encender).
3. Use Bake (Homear) para programar una temperatura.
Luego de programar una temperatura, seleccione un
tiempo de cocci6n e ingrese su tiempo de cocci6n.
Presione ta tecta Start (Iniciar) para iniciar et homo.
4. Una vez iniciado el homo, NO abra la puerta hasta que el
mismo se haya terminado de precalentar y haya alcanzado
una temperatura pareja. Hacer esto antes de que se complete
el precalentamiento har_ que el ventilador de distribuci6n del
aire pierda potencia de forma inmediata al abrir la puerta.
5. Una vez que ta comida fue cotocada en et homo, no abra
la puerta hasta que la cocci6n se haya completado. Hacer
esto har_ que la imagen de la pantalta cambie y le indique
que cierre la puerta.
6. NO abra la puerta del homo superior. Hacer esto
encender_ la luz de forma inmediata.
7. No presione ning0n bot6n adicional en los controles del homo
inferior una vez iniciada la cocci6n, ya que de Io contrario la
pantalla cambiar_ inmediatamente al presionar el botdn.
NOTAS
[] Durante la funcidn Sabbath Mode (Modo Sab_tico), s6to
Bake (Homear) en el homo inferior est_ disponible. Broil
(Asar), Warm (Calentar), u otras funciones no est_n
disponibles.
[] En el modo Sabbath (Sab_tico), el apagado autom_tico
luego de 12 horas est_ desactivado, sin importar
que configuraci6n fue seteccionada en Settings
(Configuraciones).
[] El modo Sabbath (Sab_tico) puede ser ingresado s61o si
ning0n modo de cocci6n est_ funcionando en el homo
inferior. Ingresar a Sabbath Modo (Modo Sab_tico)
cancelar_ todas las funciones del homo inferior y superior
(incluyendo et temporizador y et recordatorio).
[] Cuando un bot6n es presionado en Sabbath Mode (Modo
Sab_tico), no hay pitidos ni tonos, ni cambios en las luces
o en la pantalla. Adem_s, cuando la puerta es abierta o
cerrada en Sabbath Mode (Modo Sab_tico), no hay pitidos
ni tonos, ni cambios en tas tuces o en ta pantalla.
[] Si se produce un corte de corriente durante el homeado en
el modo Sabbath (Sab_tico), la unidad regresar_ a dicho
modo cuando el suministro de corriente sea restablecido,
pero no regresar_ at modo de horneado.
49 80737 1

Guia de Coccion
Productos Horneados
Tortas con capas, tortas rectan-
gulares, roscas, paneciilos, pan Homear 3 Use utensilios brillantes.
r&pido en un Solo Estante
Tortas con capas* en Meltiples Aseg_rese de que haya un flujo de aire adecuado
Estantes Homear 2 y 4 (Vea la ilustraci6n).
Tortas de grasa (pastel de &ngel) Homear 1 Use utensilios brillantes.
Galletas, galletitas, bizcochitos en Homear 3 Use utensilios brillantes.
un Solo Estante
Con corlfidas tales como ga]]etas con azucar, carnbie La ubi
Galletas, galletitas, bizcochitos en Homear 2 y 4
cation de la comma i)aidalrl/eHte du_al/te la cocciol/, a fin de
MQItiples Estantes 1, 3 y 5 log/a[ _esultados de coccion mas pa_e}os en[_e los estantes
Bife y Cerdo
Use una olla para asa; precaliente 5 minutos si usara el
Modo para Asar por Convecci6n. Mueva la comida hacia
Hamburguesas Asar Alto 5 abajo para que quede mas preparada y menos soasada.
Preste atenci6n a ta comida al asarla. Para un mejor rendi-
miento, centre ta comida debajo del elemento que emite
calor para asar.
Use una olla para asar; Mueva la comida hacia abajo
para que quede mas preparada y menos soasada. Preste
Bifes y Chuletas Asar Alto 5 atenci6n a la comida al asarla. Para un mejor rendimiento,
centre ta comida debajo del etemento que emite calor
para asar.
Deje sin cubrir, use una olla chata tal como una olla para
Dorados Homeai 2 o 3 asar. No se requiere precalentarla.
Ave
Polio entero Homear 2 o 3 Use una olla chata tal como una olla para asar.
Asar Alto 1 Si se empano o cubrio con salsa, evite los modos Broil Hi
(Asar Alto). Ase del lado de la piel hacia abajo primero.
Pechugas, patas, muslos con Preste atenci6n a la comida al asarla. Para un mejor rendi-
huesos Asado Bajo 3 miento, centre ta comida debajo del elemento que emite
Hornear calor para asar.
Mueva la comida mas abajo para que quede mas prepa-
Pechugas de polio deshuesadas Asado Bajo 3 rada y menos soasada y mas arriba para soasar/dorar al
Hornear asar. Para un mejor rendimiento, centre la comida debajo
del elemento que emite calor para asar.
Pavo entero Hornear 1 o 2 Usa una olla chata tal como una olla para asar.
Pechuga de Pavo Hornear 2 o 3 Use una olla chata tal como una olla para asar.
Precaliente 5 minutos al Asar por Convecci6n. Preste
Pescado Asado Bajo 5 (mitad del grosor o menos) atenci6n a la comida al asarla. Para un mejor rendimiento,
4 (>1/2 pulgada) centre ta comida debajo del etemento que emite calor
para asar.
CazueJas Hornear 3
Comidas Congeladas a Conven[encia
Pizza, papas fritas, tator tots
patitas de po!lo fntas, apentlvos en
un Solo Estante
Pizza, papas fritas, tator tots
patitas de polio fritas, apenuvos en
MUltiples Estantes
Hornear
Hornear
2y4
Use utensilios brillantes.
Use utensilios brillantes.
Cambie la ubicaci6n de la comida parcialmente durante
la cocci6n, a fin de obtener resultados de cocci6n mas
parejos.
I
O
:3
O
m
:3
"'h
nm
O
i m
C)
r-
m_
£D
£)_
(1)
db
O
O,
*AI hornear cuatro tortas con capas a la vez, use los estantes
2 y 4. Coloque tas ollas como se muestra, de modo que no
quede una olla encima de la otra.
Cocine la comida completamente para evitar que se produzcan
enfermedades a partir de ta comida. Puede encontrar
recomendaciones sobre temperatura minima para cocinar de
forma segura en www.lsltDoneYet.gov. Aseg_rese de usar
un term6metro de comidas para medir la temperatura de las
mismas.
[Z]
49807371 19

OO
(1)
4-J
r-
G3
4-_
GO
iii
L:
O
um
O
C
m
O
C
L_
O
3::
Estantes
Et homo cuenta con seis posiciones de estantes. En la Guia
de Cocci6n, se brindan recomendaciones de posiciones de
los estantes para diferentes tipos de comidas. Se ajusta
un estante en una direcci6n para afectar los resultados de
cocci6n. Por ejemplo, si se prefieren pares superiores m_s
oscuras en tartas, panecillos o galletas, pruebe moviendo
la comida a un estante que se encuentre una posici6n m_s
arriba. Si encuentra que tas comidas est_n demasiado doradas
en la parte superior, pruebe moviendo las mismas m_s abajo
la pr6xima vez.
AI homear con mOttiples ollas yen mOltiples estantes,
aseg0rese de que haya suficiente espacio entre las ollas para
que fluya et aire.
Flat Racks
AI colocar y retirar utensitios de coclna, empuje et estante
hacia afuera det tope (posici6n de detenci6n) sobre et soporte
det estante.
Para retirar el estante, empuje el mismo hacia usted,
incline el extremo frontal hacia arriba y empuje hacia
afuera.
Para hacer un reemplazo, coloque el extremo curvo del
estante (bloqueadores) en los soportes del homo, incline
hacia arriba el frente y empuje el estante hacia adentro.
Es posible que resulte dificil deslizar los estantes,
especialmente luego de la limpieza automatica. Coloque
aceite vegetal en una tela hOmeda o toalla de papel y
frote sobre los extremos izquierdo y derecho.
0 49 80737 1

Papel de Aluminio y Cobertores del Homo
^_ PREf'_ A Hf_' _RI_l"_U_ | UI_I : No use ningun tip© de aluminio o oobertor de homo pare oubrir el fond© del homo. l=stos
items pueden atrapar el calor o derretirse, ocasionando dafios sobre el producto y el riesgo de descargas, humo o incen=
dios. Los daffos por uso inadecuado de estos items no estan cubiertos por la garantia del producto.
Se podr_ usar atuminio para evitar derrames, colocando una hoja sobre un estante inferior varias pulgadas debajo de la comida.
No use m_s aluminio que el necesario y nunca cubra totalmente el estante de un homo con papel de atuminio. Mantenga el
aluminio a por 1omenos 1 1/2" de las paredes det homo, para evitar una circulaci6n deficiente det calor.
Utensilios
Pautas de Us© de Utensilios
El material, el acabado y el tama_o de los utensilios afectan el
horneado.
Las ollas oscuras, revestidas y opacas absorben el calor mas
rapidamente que las ollas claras y brillantes. AI usar ollas que
absorben el calor mas rapidamente, las comidas podran resultar
mas doradas, crocantes y con una capa mas gruesa.
Si utiliza utensilios oscuros y revestidos, controle la comida antes
del tiempo minimo de cocci6n. Si se obtienen resultados no
deseados con este tip© de utensilios, considere la posibilidad de
reducir la temperatura del homo en 25 ° F la pr6xima vez.
Las ollas brillantes pueden producir resultados de horneado mas
parejos en tortas y galletas.
Las ollas de vidrio y ceramica calientan con lentitud, per© retienen
bien el calor.
Estos tipos de ollas funcionan bien con platos tales como tartas y
postres con natilla.
Las ollas con aislante de aire calientan lentamente y pueden
producir fondos dorados.
Mantenga los utensilios limpios para una cocci6n mas pareja.
I
0
:3
0
m
::3
"-'h
na
0
= =
"TD
£D
"=(:3
CD
CL
('D
3>
c-
S
©
Cb
0
ET
('D
==3
¢"P
0
=='3
L/3
CL
CD
I
0
==3
©
¢--t-
('D
O0
0
L/3

O
c-
O
-1-
m
Q
"Z:3
N
Q
c%
E
_J
N
Ill
m
m
,...J
>..
©
tm
tm
m
¢D
Limpieza del Horno
Aseg0rese de que la corriente electrica este apagada y que todas las superficies esten frias antes de limpiar cualquier parte del homo.
Consejos 0tiles
Una timpieza minuciosa ocasional con un trapo empapado
de bicarbonato s6dico y agua mantendr_ el interior fresco.
Tambien recomendamos no usar timpiadores con amoniaco
o alcohol, ya que pueden dafiar et aspecto det homo. Si
etige usar un limpiador hogarefio comOn, primero aplique et
limpiador directamente sobre una teta seca, y luego limpie et
_rea que se encuentre sucia.
Panel de Control
Una buena idea es limpiar et panel de control tuego de cada
uso. Limpie con un jab6n suave y agua o vinagre y agua,
enjuague con agua timpia y pula en seco con una teta suave.
No use timpiadores abrasivos, limpiadores liquidos fuertes,
atmohadillas para fregar de pt_stico ni limpiadores de homo en
el panel de control; dafiar_n el acabado.
Exterior del Homo
No use timpiadores de homo, limpiadores abrasivos,
limpiadores tiquidos fuertes, estropajos de acero, almohaditlas
para fregar de pt_stico, ni potvos limpiadores en el interior
o el exterior del horno. Limpie el mismo con agua y jab6n o
una soluci6n de vinagre y agua. Enjuague con agua timpia y
seque con una teta seca. AI limpiar supeficies, asegQrese de
que esten a temperatura ambiente y fuera det contacto con
la tuz solar. Si las manchas en et borde de la ventana de ta
puerta son persistentes, use un limpiador abrasivo suave o
una esponja con estropajo para obtener un mejor resultado. El
derrame de adobo, jugos de fruta, salsas de tomate y liquidos
para humedecer que contengan _cidos pueden ocasionar
descoloraci6n y se deber_n limpiar de inmediato. Deje que las
superficies calientes se enfrien, y luego limpie y enjuague.
Superficies de Acero Inoxidable (en algunos modelos)
No use virutas de acero; 6stas dafiar_n la superficie. Para
limpiar ta superficie de acero inoxidable, use agua tibia
con jab6n o un limpiador o pulidor para acero inoxidable.
Siempre timpie la superficie en la direcci6n del veteado. Siga
las instrucciones del limpiador para limpiar la superficie de
acero inoxidabte. Para realizar consultas sobre ta adquisici6n
de productos, inctuyendo limpiadores o pulidores para
etectrodomesticos de acero inoxidabte, tea las secciones de
Asistencia y Accesorios, en et comienzo de este manual.
Como Limpiar el Interior del Homo
Paredes, piso, ventanilla interna, piezas
de metal y plastico en la compuerta
Superior
Sello de la compuerta
Es importante mantener el _rea limpia en el lugar donde
la compuerta se setta contra et homo. Utitice Qnicamente
detergentes de acci6n mediana, no abrasivos aplicados con
una esponja o trapo h0medo. Enju_guela bien.
Base Giratoria Desmontable
Limpie el interior del homo con frecuencia para que
caliente bien.
Se pueden remover algunas particulas con una toalla
de papel; otras pueden requerir un trapo caliente con
una soluci6n jabonosa. Elimine las particulas de grasa
con un trapo humedecido con agua jabonosa, luego
enjuague con un trapo h0medo.
No utilice limpiadores abrasivos o utensilios puntiagudos
en las paredes del horno.
Nunca utilice un limpiador de homo comercial en
ninguna pieza del homo.
No limpie el interior del homo con esponjillas metalicas
para fregar. Pueden desprenderse piezas de la esponjilla
metalica, ocasionando una descarga el6ctrica.
Base giratoria
No haga funcionar el homo sin tenet
colocada en su lugar la base giratoria.
Se debe limpiar con frecuencia el _rea Iocalizada debajo de
la base giratoria para evitar olores y humo durante un ciclo de
cocci6n.
Si se deja caer, ta base giratoria se puede romper.
L_vela cuidadosamente en agua tibia jabonosa. S6quela
completamente y vuetva a colocarta.
Para colocar la base giratoria, coloque su centro sobre et rotor
ubicado en et centro del homo y gireta hasta que se asiente
en su lugar. (AsegQrese de que la superficie lisa de la base
giratoria se encuentre colocada hacia arriba y que et centro se
encuentre asentado de manera segura en et rotor.)
2 49 80737 1

Limpieza del Homo (ContinL a)
How To Clean The Upper Oven Interior (ContinL_a)
Bandejas Para Cocinar Y Lamina De Hornear
Para evitar que se rompan tas bandejas, deje que se enfrien
completamente antes de limpiarlas. Lave las bandejas en
agua jabonosa tibia o en la m_quina lavaptatos.
No utilice esponjitlas met_licas para fregar o limpiadores
abrasivos, ya que pueden daSar et acabado. Se puede utitizar
una esponjitta cubierta de jab6n para limpiar las bandejas.
Bandeja de vidrio transparente
para la funcion de microondas
Corno Limpiar el Interior del Horno Inferior
El interior de su nuevo homo puede set limpiado de forma
manual o utilizando los modos Steam Clean (Limpieza con
Vapor) o Self Clean (Limpieza Autom_tica).
El derrame de adobo, jugos de fruta, salsas de tomate y
liquidos para humedecer que contengan _cidos pueden
ocasionar descotoraci6n y se deber_n limpiar de inmediato.
Espere a que las superficies calientes se enfrien, y luego
limpie y enjuague.
Limpieza Manual
No use limpiadores de homo, limpiadores abrasivos,
limpiadores tiquidos fuertes, estropajos de acero, atmohaditlas
para fregar, ni polvos timpiadores en et interior det homo.
Limpie el mismo con agua y jab6n o una soluci6n de vinagre
y agua. Enjuague con agua limpia y seque con una teta seca.
AI limpiar supeficies, asegOrese de que esten a temperatura
ambiente y fuera det contacto con la luz solar.
Modo de Limpieza con Vapor
La limpieza con vapor est_ pensada para limpiar pequefios
derrames usando agua y a una temperatura de limpieza m_s
baja que la funci6n Self Clean (Limpieza Autom_tica).
Para usar la funci6n Steam Clean (Limpieza con Vapor), limpie
las grasas y suciedades det homo. Vierta una taza de agua en
la parte inferior del homo. Cierre ta puerta. Presione ta tecla
Options (Opciones), seleccione Steam Clean (Limpieza con
Vapor), y luego presione Start (Iniciar). La puerta del homo
se trabar& No podr_ abrir la puerta durante los 30 minutos de
la limpieza con vapor, ya que esto reducir_ su rendimiento. At
finatizar el ciclo de limpieza al vapor, la puerta se destrabar&
Limpie cuatquier exceso de agua y cuatquier suciedad que
haya quedado.
Mode de Limpieza Automatica
Lea las Instrucciones de Seguridad del Horno con Limpieza
Autom_tica, en el comienzo de este manual antes de usar
el modo Self Clean (Limpieza Autom_tica). Este modo usa
temperaturas muy altas para limpiar et interior det homo.
Cuando use esta funci6n, la puerta del homo se trabar&
Antes de utilizar el ciclo de limpieza autom_tica, limpie la
grasa y restos de comida que haya en el homo. Retire todos
los articulos det homo, excepto los estantes esmaltados
(color oscuro). Los estantes brillantes o de plata y cuatquier
utensitio u otros articulos deberian ser retirados det homo
antes de iniciar un ciclo de limpieza autom_tica. Presione la
tecla Options (Opciones), seleccione Self Clean (Limpieza
Autom_tica) y se exhibir_ un tiempo de limpieza autom_tica
por omision. El tiempo de limpieza puede ser modificado a
3, 4 o 5 horas, usando el dial de selecci6n. Cuando el nivel
de suciedad en el homo sea muy alto, se recomienda usar el
tiempo de limpieza m_ximo de 5 horas. Si desea usar el tiempo
por omisi6n, presione la tecla Start (Iniciar) inmediatamente
luego de seleccionar la tecla Self Clean (Limpieza Autom_tica).
El homo se apagar_ de forma autom_tica cuando el ciclo de
limpieza autom_tica sea completado. La puerta permanecer_
bloqueada hasta que et homo se haya enfriado. Una vez que
et homo se haya enfriado, timpie cualquier ceniza que haya
quedado en et homo.
IMPORTANTE: Las emanaciones producidas por el ciclo de
autolimpieza de cualquier homo afectan ta salud de algunas
aves de manera notoria. Procure ltevar sus aves a otra
habitaci6n bien ventitada.
Estantes Pianos
Los estantes pianos se podr_n dejar en ta cavidad durante ta
limpieza autom_tica (si se trata de estantes esmattados, no
britlantes) o se podr_n lavar con agua catiente y jab6n.
Es posible que resulte m_s dificil deslizar los estantes,
especialmente luego de la limpieza autom_tica. Coloque
aceite vegetal en una teta hQmeda o toalta de papety frote
sobre los extremos izquierdo y derecho.
Cb
C
m
>
0
.<
rm
r_
N
>
i m
F--
dD
N
Cz
CD
©
0
©

L...
O
=i
L_
d)
c=
O
C-
L...
O
ZE
i
(1)
O
c-
(1)
=i
E
c-
(1)
c-
Z
N
m
m
>.
0
<
G5
MantenJmiento del Horno inferior
ReempJazo de Ja L4mpara deJ Horno inferior
iA ADVERTENCIA j PEL'G"ODEDESOA"GAOQUE"ADU"AS:Antesreemp'azar'a"mPara e'uz
del homo, desconecte ta conexi6n etectrica det homo del fusible principal o del panel det
disyuntor. Si esto no se cumple, se podr_ producir una descarga el6ctrica o un incendio.
IA[--PRECAUCl0NIJRII=SGO DE INCENDIO: La tapa de vidrio y la I_mpara de luz se deber_n retirar cuando
esten frias. Tocar et vidrio caliente sin protecci6n en las manos o con un trapo hOmedo
puede ocasionar quemaduras.
1. Desconecte la corriente desde el fusible principal o el panel
del disyuntor.
2. Retire los estantes det homo.
3. Destice un destorniltador de punta ptana entre la caja y la
tapa de luz de vidrio.
4. Apoye ta tapa de tuz de vidrio con dos dedos para evitar
que se caiga al fondo det homo. Tenga cuidado de no
astitlar ta cubierta det homo.
5. De forma suave, gire la punta del destornillador para aflojar
la tapa de luz de vidrio.
6. Retire la tapa de luz de vidrio.
7. Retire la l_mpara sosteniendo firmemente y deslizando
la misma hacia afuera, hasta que las dos clavijas hayan
dejado el soporte de cer_mica.
8. No toque el vidrio de la nueva I_mpara con los dedos. Esto
ha@ que la I_mpara falle at dar luz. Tome la I_mpara de
reemptzado con una toalta timpia o un pafiueto de papet
con tas clavijas hacia abajo. Alifie las dos ctavijas en et
soporte de cer_mica, presionando suavemente hasta que la
I_mpara quede asegurada en la ficha de cer_mica.
9. Deslice las lentes protectoras del soporte y presione hasta
que las pinzas queden enganchadas en la caja.
10.Vuetva a conectar la corriente.
Levante la Puerta del Homo inferior
La puerta es muy pesada. Tenga cuidado at retirar y levantar la puerta.
No levante la puerta usando la manija.
Para retirar la puerta:
1. Abra la puerta totalmente.
2. Empuje los bloqueos de la bisagra hacia abajo en
direcci6n a la estructura de la puerta, hasta la posici6n
desbtoqueada. Es posibte que necesite una herramienta tal
como un destornitlador pequeSo de punta plan&
3. Firmemente tome ambos lados de ta puerta por la parte
superior.
4. Cierre la puerta hasta ta posici6n de retiro de la misma.
La puerta deberia ser abierta aproximadamente a 3", sin
obstrucci6n sobre la misma.
5. Levante la puerta hacia arriba y afuera, hasta que los
brazos de las bisagras queden fuera de las ranuras.
Ranura
Bloqueo de la bisagra
EmpL_je los bloqueos de la bisagra
hacia abajo para desbloquear
Posicion de retiro
Para reemplazar la puerta:
1. Firmemente tome ambos tados de la puerta por la parte
superior.
2. Comenzando desde el tado izquierdo, con la puerta en el
mismo _ngulo de la posici6n de retiro, apoye la hendidura
det brazo de ta bisagra en et extremo inferior de ta ranura
de la bisagra. La abertura en el brazo de la bisagra deber_
estar totalmente apoyada en ta parte inferior de la ranura.
Repita et procedimiento det lado derecho.
3. Abra ta puerta totatmente. Si la puerta no se abre
totatmente, la hendidura no est_ correctamente apoyada en
et extremo inferior de la ranura.
4. Empuje los bloqueos de ta bisagra contra ta estructura
frontal de ta cavidad det homo, hasta la posici6n de
bloqueo.
5. Cierre la puerta det homo.
Empujeel
bloqueo de la
bisagra hacia
/1_1 __ arriba hasta
Brazo de que quede
la bisagra _/__, bloqueado\
Bloqueo de
la bisagra
Extremo inferior de la ranura
Brazo de la
bisagra
4 49 80737 1

Consejos para la SoluciOn de Problemas... Antes de solicitar el servicio tecnico
iAhorre tiempo y dinero! Primero revise los cuadros que aparecen en las siguientes paginas yes posible que no necesite
solicitar reparaciones.
Causa Posible I Qu@ Hacer
VENTILADOR
El ventilador continua
funcionando despu_s de
terminar de cocinar
El ventilador del homo
irradia aire caliente mientras
el homo se encuentra
encendido
Elventiladorse enciende
autom_ticamente cuando
utilizando el microondas
COCCldN
El homo hace sonidos
inusuales mientras se cocina
Se expulsa humo del homo
cuando abro la compuerta
La comida no est_
completamente cocinada
o dorada al finalizar un
programa de cocci6n
SENSOR ERROR {ERROR
DE SENSOR) mostrado junto
con una sehal del homo
m
PANTALLA
La pantalla se encuentra en
blanco
Control is LOCKED {Control
BLOQUEADO) aparece en la
pantalla
La pantalla de control est_
iluminada pero el homo no
se inicia
El homo se est& enfriando. El ventilador se apagar_ automaticamente cuando las
piezas internas del horno se hayan enfdado.
Esto es normal.
Esto es normal.
Chasquidos y ventiladores soplando
son normales. El tablero de rel_s
est& encendiendo y apagando los
componentes.
Los alimentos tienen alto contenido de
grasa. Pulverizador en aerosol utilizado
en las bandejas.
Los tiempos programados podrian no
corresponder al tamaho o cantidad de
comida que est_ cocinando.
Cantidad o tipo de comida colocado
en el homo no corresponde con la
programaci6n que fue elegido.
Vapor no detectado por el homo porque
la envoltura pl&stico no se ventil6, una
tapa muy ajustada estaba sobre el plato
o se cubri6 un liquido.
Estos sonidos son normales.
El humo es normal cuando se cocina alimentos con alto
contenido de grasa.
Ajustar el tiempo para nivel de cocci6n o ajuste las luces
superiores o inferiores para asar y para el nivel de cocci6n.
Apriete el bot6n Clear/Off (Borrari Apagar) Ajuste el
programa del homo corresponda con la comida o liquido a
ser cocinado o calentado.
Ventile la envoltura de pl_stico, utilice una tapa mas floja o
destape los liquidos cuando los cocine o caliente.
Es posible que el modo de ahorro de Revise el menu Settings (Configuraciones) para el reloj
corriente est_ activado, ajustes de la pantalla. Encienda la pantalla.
Es posible que un fusible de su hogar Reemplace el fusible o reinicie el disyuntor.
se haya quemado o que el disyuntor se
haya desconectado.
Corte o exceso de corriente Reinicie el reloj. Si el homo estuvo en uso, deber_ reiniciar
el mismo presionando la tecla Clear/Off (Borrari Apagar)
configurando el reloj y reiniciando cualquier funci6n de
cocci6n.
El control ha sido bloqueado. Mantenga presionada la tecla Settings (Configuraciones)
durante 3 segundos para desbloquear el control.
No se ha programado el reloj. Programe el reloj.
Compuerta no cerrada bien. Abra la compuerta y cierrela bien.
La tecla Start/Pause (Iniciari Pausar) Presione la tecla Start/Pause (Iniciari Pausar) o el dial de
no se presion6 luego de ingresar la selecci6n.
configuraci6n de la cocci6n.
Ya se ha ingresado otra selecci6n Presione la tecla Clear/Off (Borrari Apagar).
en el homo y no se ha apretado el
bot6n Clear/Off (Borrari Apagar) para
cancelarla.
Tamaho, cantidad o tiempo de cocci6n AsegL_rese que ha ingresado el tiempo despues de
no ingresado despu_s de la selecci6n seleccionar.
final.
Se apret6 Clear/Off (Borrari Apagar)
accidentalmente.
Reinicie el programa de cocci6n y presione la tecla Start/
Pause (Iniciari Pausar).
('b
©
Z
G_
!,...,
©
G_
g
©
t""
C
('b
m
©,
Z
l-m
©
r"
l-m
E
G_
I
0
0
C
n=
0

O
=m
L..
C:L
oO
O
r =
L_
O
"1"
LLJ
..,.J
O
tY
r_
L_
tm
z
'O
m
¢3
©
oO
t_L
Of)
©
==3
LLJ
¢/3
Z
O
¢3
Consejos para la SoluciOn de Problemas... Antes de solicitar el servicio tecnico
Causa Posible I Qu_ Hacer
OTROS PROBLEMAS
La compuerta y el interior del
homo se sienten calientes
El homo no enciende
No puede editar las
funciones de cocci6n
Las l&mparas t_rmicas producen calor intenso
en un espacio reducido.
Un fusible en su hogar puede haberse fundido
o el interruptor de circuitos fue activado.
Es posible que algunas funciones de cocci6n
programadas previamente no se puedan
editar a fin de evitar la degradaci6n del
rendimiento de la cocci6n,
Esto es normal. Use guantes termicos de cocina
para sacar la comida cuando este lista.
Reemplace el fusible o reinicie sus interruptores de
circuitos.
Esto es normal.
La teclas de este lado del El control bloque6 el uso de estas teclas y se Mantenga presionada la tecla Clear/Off (Borrad
control no funcionan debe reiniciar, Apagar) del otro lado de la pantalla durante 30
segundos. Si esto no reinicia el control, podr_ ser
necesario hacer que el disyuntor realice ciclos.
DECLARACION DE LA FCC SOBRE INTERFERENCIA DE
FRECUENCIAS RADIALES
Este equipo genera y usa potencia de frecuencia
ISM y si no es instalado y usado de forma adecuada,
en cumplimiento estricto con las instrucciones del
fabricante, se podran ocasionar interferencias en
la recepci6n de radio y televisi6n. Se realiz6 una
evaluaci6n pot tipo y se encontr6 en cumplimiento
con los limites de un equipo ISM, de acuerdo con la
parte 18 de las Reglas FCC, que fueron dise5adas
para brindar una protecci6n razonable contra dichas
interferencias en una instalaci6n residencial. Sin
embargo, no se garantiza que no se presenten
interferencias en una instalaci6n en particular. Si el
equipo provoca interferencias en la recepci6n de radio
o televisi6n, Io que se puede determinar encendiendo y
apagando el equipo, se aconseja al usuario que intente
corregir la interferencia a trav6s de una o mas de las
siguientes medidas:
[] Reoriente la antena receptora de radio o televisi6n.
[] Reubique el homo microondas con respecto al
receptor.
[] Ubique el homo microondas en una posici6n alejada
del receptor.
[] Enchufe el homo microondas en un tomacorriente
diferente, de modo que el homo microondas y el
receptor est6n en diferentes circuitos de empalmes.
El fabricante no es responsable por cualquier
interferencia de radio o TV ocasionada por una
modificaci6n no autorizada sobre este homo
microondas. Es responsabilidad del usuario corregir
dicha interferencia.
6 49 80737 1

Consejos para la SoluciOn de Problemas... Antes de solicitar el servicio tecnico
Mi homo nuevo no
cocina como el anterior.
_Hay alg_n problema con
las configuraciones de
temperatura?
m
La comida no se hornea
Causa Posible
Su homo nuevo cuenta con un sistema de cocci6n
diferente con relaci6n al anterior y, por 1otanto, es
posible que cocine de forma diferente.
Controles del homo configurados de forma
Qu_ Hacer
En los primeros us©s, use los tiempos y
temperaturas de su receta con cuidado. Si ann
piensa que su horn© nuevo cocina con demasiado
calor o demasiado frio, podra ajustar el termostato
usted mismo para aplicar su preferencia de
cocci6n especifica. NOTA: Este ajuste afecta las
temperaturas de la funci6n Bake (Hornear); no
afectara las funciones Broil (Asar) o Clean (Limpiar).
Consulte la secci6n Modos de Cocci6n.
de forma apropiada ' incorrecta.
La comida no asa de
La temperatura del homo
es demasiado caliente o
demasiado fria
El homo no funciona o
La posici6n del estante es incorrecta o el estante no
est_ nivelado.
Us© de una cacerola incorrecta o de una cacerola de
tamaSo incorrect©.
La temperatura del homo debe ser ajustada.
Sustituci6n de ingredientes
Controles del homo configurados de forma
incorrecta.
Se US©una posici6n incorrecta del estante.
Se cocin6 comida en una olla caliente.
Utensilio de cocina inadecuado para asar.
El papel de aluminio usado para la olla y la rejilla
para asar no se ajust6 ni cort6 de forma apropiada,
segQn 1o recomendado.
En algunas &teas, es posible que el nivel de corriente
(voltaje) sea bajo.
La temperatura del homo debe ser ajustada.
Es posible que un fusible de su hogar se haya
parece no funcionar quemado o que el disyuntor se haya desconectado.
SeConsulte la secci6n Modos de Cocci6n y la Guia
de Cocci6n.
Consulte la secci6n Utensilios.
Consulte la secci6n Settings (Configuraciones).
Sustituir ingredientes puede modificar el resultado
de la receta.
AsegOrese de seleccionar el modo correct© para
asar.
Para acceder a sugerencias de ubicaci6n de
estantes, consulte la Guia de Cocci6n.
AsegQrese de que el utensilio este frio
Use una olla especificamente dise_ada para asar
Si usar_ papel de aluminio, deber_ usarse
conforme con las aberturas de la olla.
Precaliente el element© para asar durante 10
minutos.
Consulte la secci6n Settings (Configuraciones).
Reemplace el fusible o reinicie el disyuntor.
Controles del homo configurados de forma Consulte la secci6n Us© del Homo.
incorrecta.
L
El homo se encuentra en Sabbath Mode (Modo Verifique que el homo no este en Sabbath Mode
Sab&tico) (Modo Sabatico). Consulte la secci6n del Modo
Sabatico.
Esto es normal.
Esto es normal.
Sonido de "chisporroteo"
o "traqueo"
_.Por qu_ la estufa hace
un sonido de "clic"
cuando us© el homo?
El reloj y el temporizador Reemplace el fusible o reinicie el disyuntor.
no funcionan
teste es el sonido de metal calent&ndose o enfri&ndose
durante las funciones de cocci6n y limpieza.
Su estufa fue diseSada para mantener un control m_s
ajustado sobre la temperatura del horn©. Es posible
que escuche que los elementos de calentamiento del
homo hagan sonidos de "clic" con mayor frecuencia
que con hornos m&s antiguos para lograr mejores
resultados durante los ciclos de horneado, asado,
convecci6n y limpieza autom&tica.
Es posible que un fusible de su hogar se haya
quemado o que el disyuntor se haya desconectado.
©
Z
t't3
©
r.=,
©
r =-
C
#b
n
©,
Z
i-m
©
D:J
r =-
i'm
I
0
0
m
$.
n=
0

O
=m
L_
r-
m
O
C
L
O
-r-
oO
_J
...J
n3
©
tY
LLI
tm
z
,0
m
¢D
...J
©
oO
5
O_
el)
©
ill
¢/3
Z
©
¢D
Consejos para la SoluciOn de Problemas... Antes de solicitar el servicio tecnico
Problema
La luz del homo no funciona
El rood© de limpieza
autom_tica del homo no
funciona
Causa Posible Qu_ Hacer
La I&mpara est& floja o presenta defectos. Ajuste o reemplace la lampara.
La luz de funcionamiento del interruptor Llame al servicio tecnico.
est& rota.
La temperatura del homo es demasiado Espere a que el horno se enfrie y reinicie los controles.
caliente corn© para configurar la Iimpieza
autom_tica.
Los controles del homo est_n configurados Consulte la secci6n de Limpieza del Homo.
de forma incorrecta.
Exceso de hum© durante un Suciedad o grasa e×cesiva.
ciclo de limpieza
Hum© excesivo al asar
La puerta del horn© no se
abrir_ luego de un ciclo de
limpieza
El horn© no limpia luego de
un ciclo de lirnpieza
Aparece "CLOSE DOOR TO
CONTINUE COOKING" (Cierre
la puerta para continuar
cocinando) en la secci6n de
pantalla
Aparece "OVEN IS COOLING
DOOR IS LOCKED" (El homo
se est_ enfriando; la puerta
est_ bloqueada) en la secci6n
de pantalla.
En la pantalla se muestra un
error del homo y "SERVICE
MAY BE NEEDED" (Es posible
que necesite el servicio
t_cnico).
Olor a "quemado" o "aceite"
desde la ventilaci6n
Olor fuerte
Ruido del ventilador
La puerta de vidrio del homo
parece estar "te5ida" o tenet
un color "arc©iris". _.Es esto
un defect©?
A veces el horn© tarda m&s
en precalentarse a la misma
temperatura
La comida est& demasiado cerca del
quemador.
El horn© est& demasiado caliente.
Los controles del homo est&n configurados
de forma incorrecta.
El homo estaba demasiado sucio.
La puerta est_ abierta durante una funci6n
de cocci6n o Iimpieza.
La puerta del horn© est& bloqueada debido
a que la temperatura interior del homo no
descendi6 por debajo de la temperatura de
bloqueo.
Tiene un c6digo de error de funci6n.
Si el c6digo de funci6n se repite.
Esto es normal en un homo nuevo y
deaaparecera con el tiempo.
Un olor en la aislaci6n alrededor del interior
del horn© es normal desde las primeras
vecea en que el homo ea usado.
Es posible que un ventilador de
enfriamiento ae active autom&ticamente.
No. El vidrio del homo intern© est_ cubierto
con una barrera de calor que refleja este
01tim© nuevamente hacia el homo, a fin de
evitar la p_rdida de calory de mantener fria
la puerta e×terna mientras se hornea.
Utensilio o comida en el horn©
Presione la tecla CleadOff (Borrad Apagar) Abra las
ventanas para liberar el humo en la habitacion. Espere
hasta que la pantalla OVEN IS COOLING; DOOR IS
LOCKED (El horn© se esta enfriando; la puerta esta
bloqueada) desaparezca. Limpie el exceso de suciedad y
reinicie el ciclo de limpieza.
Baje la posici6n del estante con comida.
Espere a que el horn© se enfrie per debajo de la
temperatura de bloqueo.
Consulte la seccidn de Limpieza del Homo.
Limpie derrames excesivos antes de iniciar el ciclo de
limpieza. Es posible que, en hornos con mucha suciedad,
sea necesado usar la limpieza automatica nuevamente o
usarla durante un periodo de tiempo mas prolongado.
Cierre la puerta del homo.
Presione la tecla Clear/Off (Borrar/Apagar) Deje que el
horno se enfde.
Presione la tecla Clear/Off (Borrar/Apagar) Permita que el
horno se enfrie durante una hera. Vuelva a poner el horno
en funcionamiento.
Desconecte totalmente la corriente de la cocina durante por Io
menos 30 minutes y vuelva a conectar la misma. Si el codigo
de error de funcion se repite, Ilame al servicio tecnico.
Para acelerar el preceso, configure un ciclo de limpieza
automatica por un minimo de 3 horas. Consulte la secci6n
de Limpieza del Homo.
Esto es temporado y desaparecera luego de varios usos o
de un ciclo de limpieza automatica.
Esto es normal. El ventilador de enfriamiento se encendera
para enfriar las partes internas. Es posible que funcione
hasta durante una hera y media, una vez que el horno se
haya apagado.
Esto es normal. Bajo ciertas luces y angulos, es posible que
visualice esta tinta o arcoiris.
El utensilio o la comida en el homo hara que este tarde
mas en precalentarse. Retire estos articulos para reducir el
tiempo de precalentamiento.
N0mero de estantes en el homo Agregar mas estantes al homo hara que este tarde mas en
precalentarse. Retire algunos estantes.
8 49 80737 1
-
 1
1
-
 2
2
-
 3
3
-
 4
4
-
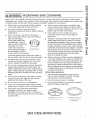 5
5
-
 6
6
-
 7
7
-
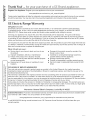 8
8
-
 9
9
-
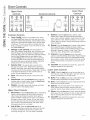 10
10
-
 11
11
-
 12
12
-
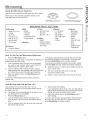 13
13
-
 14
14
-
 15
15
-
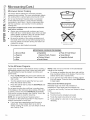 16
16
-
 17
17
-
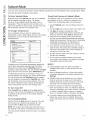 18
18
-
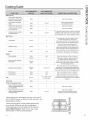 19
19
-
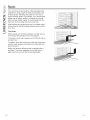 20
20
-
 21
21
-
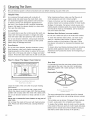 22
22
-
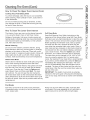 23
23
-
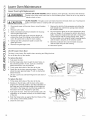 24
24
-
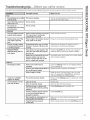 25
25
-
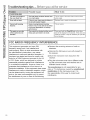 26
26
-
 27
27
-
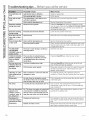 28
28
-
 29
29
-
 30
30
-
 31
31
-
 32
32
-
 33
33
-
 34
34
-
 35
35
-
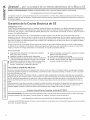 36
36
-
 37
37
-
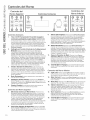 38
38
-
 39
39
-
 40
40
-
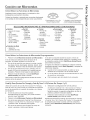 41
41
-
 42
42
-
 43
43
-
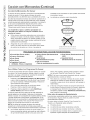 44
44
-
 45
45
-
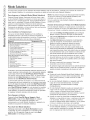 46
46
-
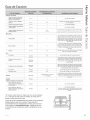 47
47
-
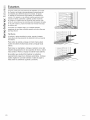 48
48
-
 49
49
-
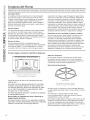 50
50
-
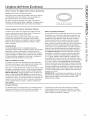 51
51
-
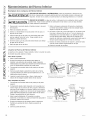 52
52
-
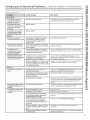 53
53
-
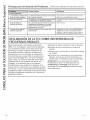 54
54
-
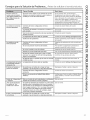 55
55
-
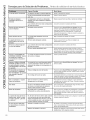 56
56


GE JK3800DH1BB El manual del propietario
- Categoría
- Microondas
- Tipo
- El manual del propietario
en otros idiomas
- English: GE JK3800DH1BB Owner's manual
Artículos relacionados
-
GE JT3800DHBB Guía del usuario
-
GE PVM1970DRCC Manual de usuario
-
GE Appliances JT3800SHSS El manual del propietario
-
-
-
GE PT7800DH5WW El manual del propietario
-
GE PT7800DH2BB El manual del propietario
-
-
GE Cafe Series PEB9159DJBB El manual del propietario
-
GE PEB9159SJSS El manual del propietario