
Step 1: Measure the distance between posts and cut the rails to
size. For even spacing between the balusters and posts, be sure to
cut from both ends of rails.
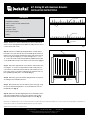
Step 2: Place the moulded cap rail upside down on a flat surface.
Next, place one of the 2x4 rails into the moulded cap rail channel so
that the holes are facing up. Starting from either end, fasten the top
2x4 to the cap rail using the (7) 3" screws through holes 1, 2, 5, 8,
11, 14, and 15. If rails are trimmed, predrill any additional holes with
a 1/8" drill bit and insert the screw into the next nearest hole. (Fig. 1)
Step 3: Attach the support block on the bottom of the bottom 2x4
rail using the 4" screw. The support block installs under hole 8. If
your rail was not trimmed evenly from both sides, find the closest
hole to the center to secure the support block. If that hole has not
been predrilled, predrill with a 1/8" drill bit. (Fig. 1)
Step 4: Attach the (4) 2x4 DeckoRail
®
railing brackets to the posts
according to the included instructions.
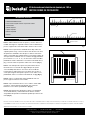
Step 5: Attach the bottom 2x4 rail, with the holes facing up, using
the 2x4 DeckoRail railing brackets. Insert the balusters into the
predrilled holes. (Fig. 2)
Step 6: Attach the cap rail by aligning the holes to the baluster at one
end of the rail and working your way to the opposite end, ensuring
that all of the balusters are secured between the two rails. (Fig. 2)
This brochure is for illustration purposes only. Use of this product must be in accordance with all local zoning and/or building codes. Consumer assumes all risks and liability associated with the use
of this product. For details on safe handling and warranty information, go to UFPI.com/ptinfo.
©2016 Universal Forest Products, Inc. All rights reserved.
Tools Needed
• Drill/power screwdriver
• Miter or circular saw with carbide-tip blade
• Tape measure
• Carpenter’s level
• Carpenter’s pencil
• Safety glasses/goggles
• Gloves
Procedures
6 ft. Railing Kit with Aluminum Balusters
INSTALLATION INSTRUCTIONS
Cap
123 456789101112131415
StrRail2.pdf
Top Insert Rail
•
•
123 456789101112131415
Bottom Rail
•
Support Block
•
Fig. 1
Bottom Rail
Support Block
Railing Brackets
Balusters
Cap Rail
•
•
•
•
•
StrRail3.ai
Fig. 2
2895 Progress Way • Woodburn, OR 97071 • 503-226-6240
DeckoRail is a registered trademark of Universal Forest Products, Inc. in the U.S.
Assembled in the USA with imported balusters. 8668_ENG_1/16

Paso 1: Mide la distancia entre los postes y corta los rieles a la
medida. Para lograr un espaciado uniforme entre los balaústres y
postes, asegúrate de cortar desde ambos extremos de los rieles.
Paso 2: Coloca el pasamanos moldeado boca abajo sobre una
superficie plana. Luego, coloca uno de los rieles de 2x4 en el canal
del pasamanos moldeado, de modo que los orificios miren hacia
arriba. Comenzando por cualquier extremo, une la parte superior de
2x4 al pasamanos moldeado con los 7 tornillos de 3 plg pasándolos
por los orificios 1, 2, 5, 8, 11, 14 y 15. Si los rieles están recortados,
pretaladra los orificios adicionales con una broca de taladro de 1/8
plg y coloca el tornillo en el próximo orificio más cercano. (Fig. 1)
Paso 3: Une el bloque de soporte en la parte inferior del riel
inferior de 2x4 con el tornillo de 4 plg. El bloque de soporte
se instala debajo del orificio 8. Si el riel no fue recortado de
forma pareja en ambos lados, busca el orificio más cercano al
centro para asegurar el bloque de soporte. Si ese orificio no fue
pretaladrado, hazlo con una broca de taladro de 1/8 plg. (Fig. 1)
Paso 4: Fija los 4 soportes del riel DeckoRail® de 2x4 a los
postes según las instrucciones incluidas.
Paso 5: Fija el riel inferior de 2x4, con los orificios hacia arriba,
usando los soportes del riel DeckoRail de 2x4. Inserta los
balaústres en los orificios pretaladrados. (Fig. 2)
Paso 6: Fija el pasamanos alineando los orificios con el balaústre
en un extremo del riel y continuando hacia el extremo contrario,
asegurándote de que todos los balaústres queden fijos entre los dos
rieles. (Fig. 2)
Este folleto sólo tiene fines ilustrativos. El uso de este producto debe estar en conformidad con todos los códigos locales de zonificación y/o construcción. El consumidor asume todos los riesgos y
responsabilidades asociados al uso de este producto. Para obtener más información de seguridad acerca de la manipulación e información de la garantía de este producto, visite UFPI.com/ptinfo.
©2016 Universal Forest Products, Inc. Todos los derechos reservados.
Herramientas necesarias
• Taladro destornillador eléctrico
• Sierra circular o angular con disco con puntas de carburo
• Cinta de medir
• Nivel de carpintero
• Lápiz de carpintero
• Gafas de seguridad
• Guantes
Procedimiento
Kit de baranda con balaústres de aluminio, de 1.83 m
INSTRUCCIONES DE INSTALACIÓN
Pasamanos
1 2 3 4 5 6 7 8 9 10 11 12 13 14 15
StrRail2_SPANISH.ai
Riel de inserción superior
•
•
1 2 3 4 5 6 7 8 9 10 11 12 13 14 15
Riel inferior
•
Bloque de soporte
•
Fig. 1
Riel inferior
Bloque de soporte
Soportes de baranda
Balaústres
Pasamanos
•
•
•
•
•
StrRail3_SPANISH.ai
Fig. 2
2895 Progress Way • Woodburn, OR 97071 • 503-226-6240
DeckoRail es una marca registrada de Universal Forest Products, Inc. en EE.UU.
Montado en los EE.UU. con balaustres importados. 8668_SPN_1/16
-
 1
1
-
 2
2

