Nilfisk-Advance SelectGloss 1500 Instructions For Use And Parts List
- Categoría
- Máquina de piso
- Tipo
- Instructions For Use And Parts List


4 - FORM NO. 56041447 / SelectGloss™ 1500
IMPORTANT SAFETY INSTRUCTIONS
This machine is only suitable for commercial use, for example in hotels, schools, hospitals, factories, shops and offices other than normal residential
housekeeping purposes.
When using an electrical appliance, basic precautions should always be followed, including the following:
Read all instructions before using.
WARNING!
To reduce risk of fire, electric shock, or injury:
*Do not leave the appliance when it is plugged in. Unplug the unit from the outlet when not in use and before servicing.
*To avoid electric shock, do not expose to rain. Store indoors.
*Do not allow to be used as a toy. Close attention is necessary when used by or near children.
*Use only as described in this manual. Use only manufacturer’s recommended attachments.
*Do not use with damaged cord or plug. If appliance is not working as it should, has been dropped, damaged, left outdoors, or dropped
into water, return it to a service center.
*Do not pull or carry by cord, use cord as a handle, close a door on a cord, or pull cord around sharp edges or corners. Do not run appliance
over cord. Keep cord away from heated surfaces.
*Do not unplug by pulling on cord. To unplug, grasp the plug, not the cord.
*Do not handle plug or appliance with wet hands.
*Do not put any object into openings. Do not use with any opening blocked; keep free of dust, lint, hair, and anything that may reduce air
flow.
*Keep hair, loose clothing, fingers, and all parts of body away from openings and moving parts.
*Turn off all controls before unplugging.
*Do not use with flammable or combustible liquids such as gasoline or use in areas where they may be present.
*Connect to a properly grounded outlet only. See Grounding Instructions.
SAVE THESE INSTRUCTIONS
INSTRUCCIONES DE SEGURIDAD IMPORTANTES
Esta máquina sólo está disponible para su uso comercial en, por ejemplo, hoteles, escuelas, hospitales, fábricas, tiendas y oficinas además de
su uso en domicilios particulares.
Al utilizar un electrodoméstico, se deben seguir siempre las precauciones básicas de seguridad, que incluyen lo siguiente:
Leer todas las instrucciones antes de utilizarlo.
¡ADVERTENCIA!
Para reducir el riesgo de fuego, descarga eléctrica, o lesiones:
*No dejar el electrodoméstico enchufado. Desenchufarlo cuando no se utilice y antes de realizar en él trabajos de mantenimiento o
reparación.
*Esta máquina sólo sirve para ser utiliza en seco y no debe utilizarse o almacenarse en el exterior bajo condiciones de humedad.
*Para evitar descargas eléctricas, no exponer a la lluvia. Almacenar en el interior.
*No permitir su uso como juguete. Es necesario prestar mucha atención cuando sea utilizada por o cerca de los niños.
*Utilizar sólo según las instrucciones del presente manual. Utilizar solamente accesorios recomendados por el fabricante.
*No utilizar con los cables dañados. En caso de no funcionar como debería, o bien si se ha caído, dañado, dejado en el exterior o caído
sobre el agua, devolver el electrodoméstico al centro de servicio.
*No tirar o arrastrar el electrodoméstico con el cable, ni utilizar el cable como maneta, o cerrar una puerta pinzando el cable o bien tirar
del cable sobre superficies o esquinas angulosas. No pasar el electrodoméstico sobre el cable. Mantener el cable alejado de las superficies
calentadas.
*No desenchufar tirando del cable. Para desenchufar se debe tirar del enchufe, no del cable.
*No coger el cable o el electrodoméstico con las manos mojadas.
*No colocar ningún objeto en las salidas. No utilizar cuando alguna salida esté bloqueada; mantenerlas libres de polvo, pelusa, pelos y
cualquier cosa que pueda reducir el flujo del aire.
*Mantener los cabellos, ropa suelta, dedos y todas las partes del cuerpo alejadas de las salidas y de las piezas mecánicas.
*Apagar todos los controles antes de desenchufar.
*No utilizar con líquidos inflamables o combustibles como, por ejemplo, la gasolina, ni utilizar en zonas en donde se hallen dichos líquidos.
*Este electrodoméstico está provisto con doble aislante. Utilizar sólo repuestos idénticos.
*Esta máquina no es adecuada para recoger polvo que ponga en peligro la salud.
*No utilizar sin bolsa de polvo / o filtros colocados en su lugar.
CONSERVE ESTAS INSTRUCCIONES
https://harrissupplyind.com - To Order Parts Call 608-268-8080

FORM NO. 56041447 / SelectGloss™ 1500 - 5
GROUNDING INSTRUCTIONS
This appliance must be grounded. If it should electrically malfunction, grounding provides a path of least resistance for electric current to reduce the risk of electric
shock. This appliance is equipped with a cord having an equipment-grounding conductor and grounding plug. The plug must be plugged into an appropriate outlet
that is properly installed and grounded in accordance with all local codes and ordinances.
DANGER!
Improper connection of the equipment-grounding conductor can result in a risk of electric shock. Check with a qualified electrician
or service person if you are in doubt as to whether the outlet is properly grounded. Do not modify the plug provided with the appliance.
If it will not fit the outlet, have a proper outlet installed by a qualified electrician.
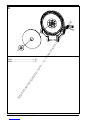
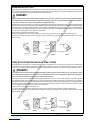
This appliance is for use on a nominal 120-volt circuit, and has a grounding plug that looks like the plug illustrated in Figure 1 below. A temporary adapter illustrated
in Figures 2 and 3 may be used to connect this plug to a 2-pole receptacle as shown in Figure 2 if a properly grounded outlet is not available. The temporary adapter
should be used only until a properly grounded outlet (Figure 1) can be installed by a qualified electrician. The green-colored rigid ear, tab, or the like extending
from the adapter must be connected to a permanent ground such as a properly grounded outlet box cover. Whenever the adapter is used, it must be held in place
by a metal screw. Grounding adapters are not approved for use in Canada.
Replace the plug if the grounding pin is damaged or broken.
The Green (or Green/Yellow) wire in the cord is the grounding wire. When replacing a plug, this wire must be attached to the grounding pin only.
Extension cords connected to this machine should be 12 gauge, three-wire cords with three-prong plugs and outlets. DO NOT use extension cords more than
50 feet (15 m) long.
120VAC INTRUCCIONES PARA HACER LA TOMA A TIERRA
Este aparato deberá ser conectado a tierra. En caso de malfuncionamiento o de desperfectos, la toma a tierra proporciona una vía de menor resistencia de la
corriente eléctrica para reducir el riesgo de choques eléctricos. Esta unidad viene equipada con un cordón con conductores para toma a tierra y con un enchufe
con toma a tierra. Ese enchufe deberá ser enchufado a un receptáculo en buen estado con instalación a tierra según los códigos y ordenanzas de la zona.
¡PELIGRO !
Si el conductor a tierra no está instalado correctamente pueden producirse riegos de choques eléctricos. En caso de duda, consulte
con un electricista o personal de servicio autorizados. No modifique el cordón provisto con el aparato. Si no calza en el receptáculo,
llame a un electricista calificado para que coloque un receptáculo adecuado.
Este aparato se usa con un circuito de 120-voltios nominales, y tiene un enchufe con toma a tierra tal como se muestra en la figura 1, a continuación. Se puede
usar un adaptador provisorio tal como se ve en las figuras 2 y 3 en caso de disponerse de un receptáculo sin toma a tierra como en la figura 2. Dicho adaptador
provisorio se usará solamente hasta que un electricista calificado instale un receptáculo con la toma a tierra correspondondiente (figura 1). La lengüeta de conexión
de color verde que sale del adaptador deberá ser conectada a una toma a tierra permanente como, por ejemplo, la caja del receptáculo con toma a tierra. Siempre
que se use el adaptador, hay que sostenerlo en su lugar con un tornillo de metal.
Sustituya el enchufe si la patilla de tierra está dañada o rota.
El hilo verde (o verde/amarillo) del cordón es el hilo de tierra. Cuando sustituya el enchufe, este hilo sólo debe ir conectado a la patilla de tierra.
Los cables alargadores conectados a esta máquina deben ser del calibre 12, trifilares, con tres patillas y tomas de pared adecuadas. NO UTILICE cables
alargadores de más de 15 m.
https://harrissupplyind.com - To Order Parts Call 608-268-8080

6 - FORM NO. 56041447 / SelectGloss™ 1500
INTRODUCTION
This manual will help you get the most from your Kent SelectGloss™ 1500.
Read it thoroughly before operating the machine.
This product is intended for commercial use only.
PARTS AND SERVICE
Repairs, when required, should be performed by your Authorized Kent Service
Center, who employs factory trained service personnel, and maintains an
inventory of Kent original replacement parts and accessories.
Call the KENT DEALER named below for repair parts or service. Please specify
the Model and Serial Number when discussing your machine.
(Dealer, affix service sticker here.)
NAME PLATE
The Model Number and Serial Number of your machine are shown on the
Nameplate on the front of the motor and on top of the motor shroud under the
cover. This information is often needed when ordering repair parts for the
machine. Use the space below to note the Model Number and Serial Number of
your machine for future reference.
MODEL NUMBER
SERIAL NUMBER
UNCRATING
When the machine is delivered, carefully inspect the shipping carton and the
machine for damage. If damage is evident, save the shipping carton so that it can
be inspected. Contact the Kent Customer Service Department immediately to file
a freight damage claim.
PREPARING THE FLOOR
Before each use of this machine, the floor must be clean and completely dry.
Clean the floor with an automatic floor scrubber or a damp mop, using a solution
of water and neutral cleaner.
CAUTION!
This machine should be used only on floors that are coated with a floor finish
suitable for burnishing. Contact your local Advance Distributor for further
information on floor finishing products.
PREPARING THE MACHINE FOR USE
WARNING!
Moving parts - To reduce the risk of injury, unplug before servicing.
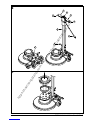
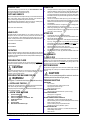
A - INSTALLING THE PAD
To install a pad, tip the machine back on it’s handle. Remove the Pad Retainer
(in the center of the pad holder) by turning clockwise to loosen.
Put the proper size pad on the pad holder. Re-install the Pad Retainer by turning
counter-clockwise to tighten.
B – KNOW YOUR MACHINE
1 Operator Handle Grips
2 Switch Lever Safety Lock Button
3 Switch Levers - Squeeze - ON / Release - OFF
4 Handle Release Latch
5 Power Cord
6 Operator Handle
7 Motor Brush Wear Indicator Light
OPERATION
1Unwrap the Power Cord and plug it into a properly grounded outlet.
2Unlatch the handle by pushing forward on the Handle Release Latch
with your foot. Continue to hold latch while pulling the handle back. It
is normal for the base of the machine to lift off of the floor slightly when
the handle is lowered. It will pull itself down against the floor as soon as
the motor is started.
3Hold one of the Operator Hand Grips firmly, push the Safety Lock
Button and then compress the switch levers to start the motor. NOTE:
When the dual controlled switch levers are released, the machine shuts
off immediately.
4Push the machine forward in a straight line, at a slow walking speed.
Overlap each pass about 1-3 inches (25-75 mm).
5When using a polishing pad, check every 15 minutes to see if the pad
is loaded up with wax and dirt. If it is, turn the pad over to expose the
clean side, or install a clean pad.
AFTER USE
1Lift the Handle until it locks in the upright position.
2Unplug the Power Cord and wrap it around the Handle Release Latch
and the right Operator Handle Grip.
3Remove the pad from the machine. Clean the pad or brush and hang
it up to dry. Allow buffing pads to dry completely before using again.
Store brushes and pad holders separate from the machine. Never store
the machine with the pad holder or brush on the machine.
4Wipe the entire machine with a clean, damp cloth.
5Inspect the entire machine and all accessories for damage. Perform
any required maintenance or repairs before storage.
6Store the machine in a clean, dry place with the Handle locked in the
upright position.
MAINTENANCE
C - AIR FILTER
The air filter on top of the motor must be cleaned once a week. To clean the filter,
turn the motor cover counter-clockwise and remove. Pull the filter off and wash
with warm water and allow it to dry completely before putting it back on the
machine (or blow clean with compressed air).
MOTOR BRUSHES
This machine is equipped with a motor brush wear indicator light. If this light
comes on during use, contact your local Advance distributor to have the motor
serviced. CAUTION!
The motor can be severely damaged if the machine is used for an
extended period of time with the light glowing.
TROUBLESHOOTING
SWIRL MARKS
• Floor not clean.
• Area not properly swept - debris in pad or brush.
• Improper pad or brush for the job.
• Moving the machine too fast.
CIRCLES ON THE FLOOR
• Machine standing still while the brush or pad is running.
FLOOR FINISH REMOVED
• Improper pad...too aggressive.
• Moving the machine too slowly.
MACHINE WOBBLES DURING OPERATION
• Defective pad... one side is more dense than the other.
• Machine left sitting on brush or pad for extended period of time causing
bristles or pad to “take a set”.
• Pad not “seated” properly into pad holder bristles.
• Warped block on brush or padholder - replace.
MACHINE DOES NOT RUN
• Check plug for proper connection - on machine and at wall outlet.
• Check building circuit breaker.
• Call for service.
https://harrissupplyind.com - To Order Parts Call 608-268-8080

FORM NO. 56041447 / SelectGloss™ 1500 - 7
INTRODUCCIÓN
Este manual le ayudará a obtener el máximo rendimiento de su Kent SelectGloss™ 1500.
Léalo por completo antes de poner en funcionamiento la máquina.
Este producto sólo está destinado a uso profesional.
PIEZAS Y SERVICIO
Las reparaciones, cuando sean necesarias, deben ser realizadas por el Centro de Servicio
Autorizado de Kent, que emplea personal entrenado en fábrica y mantiene un inventario
de accesorios y piezas de repuestos originales de Kent. Llame al REPRESENTANTE DE
KENT que se indica más abajo para obtener piezas de repuesto y servicio. Al referirse a
su máquina, indique el modelo y número de serie.
(Representante, coloque aquí su pegatina de servicio.)
PLACA DE IDENTIFICACIÓN
El número de modelo y el número de serie de su máquina se muestran en la placa de
identificación que está fijada a la máquina. Esta información es necesaria para pedir piezas
de repuesto para la máquina. Utilice el espacio reservado para anotar el número de modelo
y el número de serie de su máquina para futuras consultas.
NÚMERO DE MODELO
NÚMERO DE SERIE
DESEMBALAJE DE LA MÁQUINA
Cuando le entreguen la máquina, inspeccione cuidadosamente el cartón de embalaje y la
máquina para comprobar que no existen daños. Si existen daños evidentes, guarde el
cartón para que se pueda inspeccionar. Contacte inmediatamente con el Departamento
de Servicio al Cliente de Kent para cumplimentar una reclamación por daños durante el
transporte.
PREPARACIÓN DEL SUELO
Antes de cada utilización de esta máquina, el suelo debe estar limpio y completamente
seco. Limpie el suelo con una fregadora de suelos automática o con una fregona húmeda,
utilizando una solución de agua y un producto de limpieza neutro.
¡PRECAUCIÓN!
Esta máquina sólo debe utilizarse sobre suelos recubiertos con un
acabado apto para el pulido. Si desea más información sobre productos
de acabado del suelo, consulte a su Distribuidor Kent local.
PREPARACIÓN DE LA MÁQUINA PARA SU
USO ¡ADVERTENCIA!
Componentes móviles – Para reducir el peligro de lesión, desenchufe la
máquina antes de realizar cualquier operación de mantenimiento.
A - INSTALACIÓN DEL DISCO
Para instalar un disco, incline la máquina hacia atrás sobre el mango. Retire la sujeción del
disco (en el centro del portadiscos) girándola en el sentido de las agujas del reloj para
aflojarla.
Coloque el disco del tamaño adecuado en el portadiscos. Instale de nuevo la sujeción del
disco girándola en el sentido contrario a las agujas del reloj para apretarla.
B - CONTROLES DE UTILIZACIÓN
1 Manillar del operario
2 Botón de bloqueo de seguridad de las palancas de encendido
3 Palancas de encendido – Apretar: ENCENDIDO / Soltar: APAGADO
4 Pestillo de liberación del mango
5 Cable de alimentación
6 Mango del operario
7 Luz indicadora del desgaste de los cepillos de motor
UTILIZACIÓN
1Desenrolle el cable de alimentación y enchúfelo a una toma de corriente
debidamente conectada a tierra.
2Desbloquee el mango pisando sobre el pestillo de liberación del mango.
Mantenga pisado el pestillo mientras tira del mango hacia atrás. Es normal que
la base de la máquina se levante ligeramente del suelo cuando desciende el
mango; volverá a su posición normal sobre el suelo en cuanto el motor se ponga
en marcha.
3Sujete firmemente uno de los lados del manillar del operario, pulse el botón de
bloqueo de seguridad y oprima las palancas de encendido para poner en
marcha el motor. NOTA: Cuando suelte las palancas de encendido de control
doble, la máquina se apagará inmediatamente.
4Empuje la máquina hacia delante en línea recta, caminando a velocidad baja.
Cada pasada debe coincidir con la anterior en una banda de 25-75 mm de
ancho.
5Si utiliza un disco de pulido, compruebe cada 15 minutos si el disco está cargado
de cera y suciedad. En ese caso, dé la vuelta al disco para utilizar el lado limpio
o instale un disco limpia.
DESPUÉS DE LA UTILIZACIÓN
1Levante el mango hasta que quede sujeto en posición erguida.
2Desenchufe el cable de alimentación y enróllelo alrededor del pestillo de
liberación del mango y del lado derecho del manillar del operario.
3Retire el portadiscos o el cepillo de la máquina. Limpie el disco o el cepillo y
cuélguelo para que se seque. Deje secar completamente los discos de
abrillantamiento antes de volver a utilizarlos.
Guarde los cepillos y portadiscos desmontados de la máquina. No guarde
nunca la máquina con el portadiscos o el cepillo instalado.
4Limpie toda la máquina con un paño húmedo limpio.
5Examine la totalidad de la máquina y sus accesorios para comprobar si
presentan algún daño. Realice las operaciones de mantenimiento o las
reparaciones necesarias antes de guardar la máquina.
6Guarde la máquina en un lugar limpio y seco, con el mango fijo en posición
erguida.
MANTENIMIENTO
C - FILTRO DE AIRE
El filtro de aire situado en la parte superior del motor se debe limpiar una vez a la semana.
Para limpiar el filtro, retire la tapa del motor girándola en sentido contrario a las agujas del
reloj. Saque el filtro, lávelo con agua templada y déjelo secar completamente antes de
volver a colocarlo en la máquina (o bien límpielo con aire comprimido).
ESCOBILLAS DEL MOTOR
Esta máquina está equipada con una luz indicadora del desgaste de las escobillas del
motor. Si esta luz se enciende durante la utilización, póngase en contacto con su
distribuidor Kent local para que efectúe una revisión del motor.
¡PRECAUCIÓN!
El motor puede sufrir graves daños en caso de utilización de la máquina
durante un largo periodo de tiempo con la luz encendida.
LOCALIZACIÓN DE AVERÍAS
MARCAS DE GIRO
• Suelo sucio.
• Zona mal barrida – residuos en el disco o el cepillo.
• Disco o cepillo no adecuados para la operación.
• Movimiento demasiado rápido de la máquina.
CÍRCULOS EN EL SUELO
• Máquina detenida en un lugar con el cepillo o el disco en funcionamiento.
DESAPARICIÓN DEL ACABADO DEL SUELO
• Disco no adecuado... demasiado agresivo.
• Movimiento demasiado lento de la máquina.
OSCILACIÓN DE LA MÁQUINA DURANTE SU UTILIZACIÓN
• Disco defectuoso... un lado es más denso que el otro.
• Se ha dejado la máquina apoyada durante mucho tiempo sobre el cepillo o el
disco, aplastando las cerdas del cepillo o el disco.
• Instalación incorrecta del disco en el portadiscos.
• Bloque torcido sobre el cepillo o el portadiscos - cámbielo.
LA MÁQUINA NO SE PONE EN MARCHA
• Compruebe si la conexión del enchufe es correcta en la máquina y en la toma
de corriente de la pared.
• Examine el disyuntor automático del edificio.
• Llame al personal de servicio.
https://harrissupplyind.com - To Order Parts Call 608-268-8080


9
FORM NO. 56041447
SelectGloss™ 1500
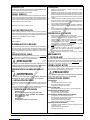
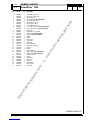
99-5 HANDLE SYSTEM
Item Ref. No. Qty Description
1 56001833 1 Scr, Hex Hd 1/4-20 x 1.50
2 56009003 1 Wsh, Flt .516 x .938 x .075
3 56002055 2 Wsh, Flt STD 3/8
4 56002098 6 Wsh, Flt SAE 1/4 (before SN 1400992)
5 56009241 1 Scr, Hex Hd 3/8-16 x 4.25
6 56002708 1 Nut, Hex Nyl Loc 1/4-20
7 56002769 2 Nut, Hex Nyl Loc 3/8-16
8 56002777 1 Scr, Hex Hd 3/8-16 x 7.00
9 56002786 6 Scr, Pan Phil 1/4-20 x 1.50 (before SN 1400992)
56002108 6 Scr, Pan Phil 1/4-20 x 2.00 (after SN 1400991)
10 56016064 1 Decal, Latch
11 56009001 1 Wsh, Bowed .51 x .90 x .008
12 56201056 1 Handle Tube (before SN 1400992)
56201509 1 Handle Tube (after SN 1400991)
13 56201016 2 Bushing
14 56201054 1 Handle
15 56201026 1 Handle Cover
16 56201027 2 Handle Lever
17 56201031 1 Button, Lock
18 56201033 1 Cord Assembly 14/3
19 56201034 1 Switch, N.O. SPST Snap
20 56478246 1 Cable Tie
21 56201523 2 Bracket
22 56201525 1 Mount, Cylinder
23 56201526 1 Weight, Handle (before SN 1400992)
56201507 1 Weight, Handle (after SN 1400991)
24 56201530 1 Cord Set, 14/3 x 75'
25 56201531 1 Bushing
26 56263648 1 Spring, Plate
27 56382818 1 Strain Relief
28 56388326 1 Bushing
29 56014828 1 Decal, Warning
30 56016350 1 Decal, Handle
31 56201592 1 Ball, 1/4 SS
00-8
https://harrissupplyind.com - To Order Parts Call 608-268-8080


11
FORM NO. 56041447
SelectGloss™ 1500
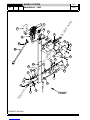
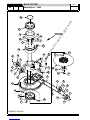
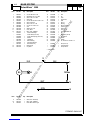
99-5 BASE SYSTEM
L
N
G
M~
S
120Vac
BLKBLK
WHT
GRN
H
Item Ref. No. Qty Description
1 56002271 4 Scr, Hex Hd 3/8-16 x .88
2 56009001 4 Wsh, Bowed .51 x .90 x .008
3 56009002 4 Wsh, Flt .26 x .90 x .008
4 56201522 1 Spring, Gas
5 56009201 2 Scr, Pan Phil Thd Form 10-24 x 1.00
6 56002063 4 Wsh, Flt SAE 3/8
7 56009096 2 Wsh, Flt .19 x .87 x .06
8 56003039 4 Scr, Hex Loc 1/4-20 x .50
9 56201089 1 Axle
10 56201018 4 Wheel 5.00 x 1.50
11 56201916 1 Cover, Motor
12 56201511 1 Motor, 120V, 1500RPM
* 56183577 1 Armature w/bearings
* 56183581 Carbon Brush (set of four)
* 56183580 1 Carbon Brush Springs (set of four)
* 56180163 1 Rectifier
* 56378380 1 Top Bearing
* 56372773 1 Bottom Bearing
* 56183016 1 Commutator Bracket
* 56201547 1 Brush Board Assy
13 56201512 1 Base Housing
14 56201513 1 Cup, Motor
Item Ref. No. Qty Description
15 56201088 1 Axle
16 56201515 2 Pin
17 56201516 1 Latch
18 56201572 1 Grip Surface
19 56201528 1 Filter
20 56201917 1 Shroud
21 56201521 2 Bushing
22 56201524 1 Mount, Cylinder
23 56249527 1 Indicator Light
24 56486116 1 Grommet
25 56016352 1 Decal, Cover
26 56016351 1 Decal, Brush Wear Ind.
27 56003238 1 Key
28 56505194 1 Pad Holder (#27-32)
29 56393567 1 Pad Retainer
30 56009022 1 Washer
31 56009057 1 Washer
32 56002956 1 Scr, Hex Hd Loc 5/16-18 x .75
** 56388354 1 Pad (case of 5)
** 56505551 1 Union Mix Brush
** 56505550 1 Tampico Brush
** = Not Included
Item Ref. No. Qty Description
S 56201034 1 Switch, N.O. SPST Snap
M 56201511 1 Motor, 120V, 1500RPM
H 56249527 1 Brush Wear Indicator Light
https://harrissupplyind.com - To Order Parts Call 608-268-8080

-
 1
1
-
 2
2
-
 3
3
-
 4
4
-
 5
5
-
 6
6
-
 7
7
-
 8
8
-
 9
9
-
 10
10
-
 11
11
-
 12
12


Nilfisk-Advance SelectGloss 1500 Instructions For Use And Parts List
- Categoría
- Máquina de piso
- Tipo
- Instructions For Use And Parts List
en otros idiomas
- English: Nilfisk-Advance SelectGloss 1500
Artículos relacionados
Otros documentos
-
KENT KF-1500F Operating Instructions Manual
-
Brady HSB2000DC Manual de usuario
-
Clarke ultra speed Manual de usuario
-
 Nilfisk-Advance America 01610A Manual de usuario
-
-
Nilfisk S15 El manual del propietario
-
-
-
Alto ALTO FM-1500HD Manual de usuario
