Char-Griller 56520 Manual de usuario
- Categoría
- Barbacoas
- Tipo
- Manual de usuario

OPERATING INSTRUCTIONS
Setting Up
Set grill up on solid, at surface with adequate wind shelter. Do not move grill while hot, and do not
leave unattended during operation.
This appliance is designed for use outdoors, away from any flammable materials. It is important that
there are no overhead obstructions and that there is a minimum distance of 15
feet (366 cm) from
the side or rear of the appliance. It is important that the ventilation openings of the appliance are not
obstructed. The barbecue must be used on a level, stable surface. The appliance should be protected
from direct drafts and positioned or protected against direct penetration by any trickling water (e.g. rain).
** PLEASE NOTE: NO RETURNS ON USED GRILLS **
Seasoning and Preparing the Grill
IMPORTANT! BEFORE YOU USE YOUR GRILL FOR THE FIRST TIME
YOU MUST SEASON THE CAST IRON COOKING GRATE.
Before you use your grill it is important to season it. Seasoning will burn off coating used to protect your
grill during shipping and help protect your cast iron grates from rusting while preparing them for use.
1. Wash your cooking grates in warm soapy water.
2. Rinse thoroughly and dry completely with a towel. DO NOT AIR DRY. NEVER PUT YOUR
COOKING GRATE OR ANY PART OF YOUR GRILL IN YOUR DISHWASHER.
3. Once your cooking grate is dry apply a coating of vegetable oil or shortening to your cooking grate,
be sure to coat both sides thoroughly.
4. Build a medium sized re on the re grate. Always put charcoal on top of the re grate and not
directly into the bottom of the grill. For best results, we recommend using Lump Charcoal.
5. After coals ash over, spread out coals, replace cooking grates, close lid and heat at approximately
400° F for an hour. This process will burn off any residue left from shipping and manufacturing as
well as season your cast iron cooking grate.
6. Seasoning should be done periodically to lengthen the life of your cooking grate.
TIP: Clean grates while warm using gloves and a baseball-sized aluminum foil ball.

Lighting Instructions
We recommend using Lump Charcoal because it contains no additives or llers. This makes for more
efcient burning, less ash and better tasting food than charcoal briquettes.
1. To start a charcoal re, stack 3 lbs of Lump Charcoal (50-60 briquettes) into a pyramid in the center
of the re grate.
2. Light coals in several places. Fire starters are helpful during this step.
NOTE: Do not use gasoline, kerosene or alcohol for lighting charcoal. Use of any of these or similar
products could cause an explosion possibly leading to severe bodily injury.
3. Leave lid open until coals are ignited and smoke burns white with no ames.
4. After coals are lit but before they turn white, start regulating internal dome temp with dampers.
(Or, if you wish, begin grilling.)
MORE AIR FLOW MEANS MORE HEAT.
Refer to the chart above to help control the temperature in your AKORN grill.
NOTE: Do not let temperature go higher than desired temp because it is harder to bring temperature
down than to go up.
ALWAYS FOLLOW CHARCOAL AND LIGHTER FLUID MANUFACTURERS’
INSTRUCTIONS AND WARNINGS. USE OUTDOORS ONLY ON NONCOMBUSTIBLE
SURFACE – 12’ AWAY FROM WOOD AND COMBUSTIBLE MATERIAL.
Grill Operation & Tips
• Control heat with amount and type of fuel, dual dampers, and (optional) adjustable re grate. Wood
burns hotter than coals and more airow equals more heat.
• Add water soaked hardwood chips for a smoked avor.
• Ashes left in bottom too long hold moisture and will rust through any thickness of steel. This grill is
made of steel and cast iron, which WILL RUST, ESPECIALLY IF NOT PROPERLY CARED FOR.
• Do not use self-starting charcoal as it will give unnatural avor. Burn lighter uid completely before
closing lid.
• After each use, coat vegetable oil on the interior grates to reduce rust.

For LOW, SLOW and LONG grilling & Smoking (200° to 350° F)
Use approx one pound of computer mouse size or larger
size pieces of LUMP CHARCOAL to build re in center of
re grate. Start re as described above. When coals ignite,
CLOSE LID and begin to regulate temp with dampers to
desired setting.
For HIGH Temp SEARING & grilling (350° to 650° F)
Use approx two - three pounds of mostly smaller golf ball
size pieces of LUMP CHARCOAL than normally to build
re in center of re grate. Start re as described above.
When coals ignite, CLOSE LID and begin to regulate
temp with dampers to desired setting.
For Smoking:
1. Follow instructions for lower temperature cooking (350˚F and below).
2. Pre-soak wood chips for 35 minutes. Soak chunks for 1 hour and 30 minutes, or until wood is
completely saturated.
3. After grill has reached desired temperature, sprinkle two handfuls of soaked wood chips or chunks
over the lit charcoals.
4. Let the chips begin to smoke by closing the lid.
5. You can begin cooking after a few minutes. More soaked chips may be added to the re later if
necessary,
Heat Gauge:
This heat gauge is accurate to +/- 10% of the actual temperature. We suggest verifying this with your
oven. If you require more precise temperature control, the use of a meat thermometer is recommended.
NOTE: Smoke may escape from areas other than the smokestack. This should not affect cooking.
NEVER EXCEED 700°F BECAUSE THIS WILL DAMAGE THE FINISH AND CONTRIBUTE TO RUST.
PAINT IS NOT WARRANTED AND WILL REQUIRE
TOUCH-UP. THIS UNIT IS NOT WARRANTED AGAINST RUST.
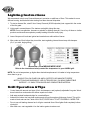
Light charcoal pile on TOP
for low re temperature
Light charcoal pile on
BOTTOM for high re temperature

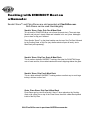
Cooking with INDIRECT Heat on
a Kamado:
Smokin’ Stone™ and Pizza Stones are sold separately at CharGriller.com.
Both Stones can be used interchangably.
Smokin’ Stone, Grate, Drip Pan & Meat Rack
This is ideal for ROASTING large cuts of meat (low and slow). The meat stays
avorful and juicy as it slowly roasts and is basted in it’s own juices. Add apple
juice or beer to drip pan if desired.
Place Smokin’ Stone™ on the three handles near the top of the Fire Bowl; followed
by the Cooking Grate, a Drip Pan (any shallow aluminum pan will work), and a
Meat Rack (sold separately).
Smokin’ Stone, Drip Pan, Grate & Meat Rack
This is another method of INDIRECT cooking. Also ideal for ROASTING large
cuts of meat and ribs, this method catches the meat’s drippings below the grate.
Smokin’ Stone, Drip Pan & Meat Rack
This is a third method of INDIRECT cooking and an excellent way to cook large
turkeys, chicken or other fowl.
Grate, Pizza Stone, Drip Pan & Meat Rack
Pizza Stone can be used as a Smokin’ Stone™ when placed on the Cooking
Grate; with a Drip Pan on top of the Pizza Stone; then with a Meat Rack placed
inside of the Drip Pan.
Visit CharGriller.com to purchase AKORN accessories.

Finishing Up
When your are nished grilling you can shut down your grill by closing both dampers and allowing the
re to suffocate. Be patient. This make take an hour or more.
Emptying the Ashes:
** ONLY EMPTY ASHES WHILE GRILL IS NOT IS USE **
After the re is completely extinguished you should wait several hours before emptying the ashes to
ensure they are not still hot and a burn hazard.
1. Knock any ashes that did not fall into the ash pan from the re grate. (If there are pieces of partially
burned charcoal on the re grate you can save them for next time. They are still good).
2. Tap the sides of the re bowl to knock loose any ash that is on the sides.
3. Unclip the ash pan from the bottom of the grill and slide out towards the front.
4. Give the ash pan a few rm taps to loosen any ash that may be stuck.
5. Place the ashes in a metal container and cover with water to ensure there are no lit coals then you
can dispose of the ashes.
IMPORTANT: Charcoal is porous and holds moisture. DO NOT leave charcoal in your grill while
you are not using it. Charcoal and ashes leftinside the ash pan may reduce the life of your grill.

INSTRUCCIONES OPERATIVAS
Instalación del Equipo
Coloque la parrillera en una supercie plana y sólida, resguardada del viento. No mueva la parrillera
mientras esté caliente y no la deje sin supervisión durante su operación.
Este equipo está diseñado para ser utilizado al aire libre, lejos de cualquier material inflamable. Es
importante que no existan obstrucciones superiores y que haya una distancia mínima de 15
pies (366 cm)
desde la parte lateral o trasera del equipo. Es importante que las aperturas de ventilación del equipo no sean
obstruidas. La parrillera debe ser usada en una supercie nivelada y estable. Debe evitar la exposición del
equipo a corrientes de aire; el equipo debe ser posicionado o protegido contra la penetración directa de agua
que gotee (como por ejemplo, la lluvia).
** ATENCIÓN: LAS PARRILLERAS USADAS NO TENDRÁN DEVOLUCIÓN **
Curando y Preparando la Parrillera
¡IMPORTANTE! ANTES DE UTILIZAR SU PARRILLERA POR PRIMERA VEZ,
DEBERÁ CURAR LA REJILLA DE COCCIÓN DE HIERRO FUNDIDO.
Es importante que cure su parrillera antes de comenzar a usarla. Curarla quemará el recubrimiento
usado para proteger su parrillera durante el envío, y ayudará a proteger sus rejillas de hierro fundido
de la oxidación mientras que las prepara para su uso.
1. Lave sus rejillas de cocción en agua tibia y jabonosa.
2. Enjuague abundantemente y seque completamente con una toalla. NO DEJE SECAR AL
AIRE. NUNCA COLOQUE SU REJILLA O NINGUNA PARTE DE SU PARRILLERA EN SU
LAVAPLATOS.
3. Una vez que su rejilla de cocción esté seca, aplique una cobertura de aceite o grasa vegetal en
su rejilla de cocción, asegurándose de cubrir ambos lados minuciosamente.
4. Encienda un fuego mediano en la rejilla de carbón. Siempre coloque carbón encima de la
rejilla de carbón y no directamente en el fondo de la parrillera. Para mejores resultados, le
recomendamos usar carbón vegetal.
5. Una vez que se cubran de cenizas, distribuya los carbones, reemplace las rejillas de cocción,
cierre la tapa y caliente a aproximadamente 400° F por una hora. Este proceso eliminará
cualquier residuo remanente del envío y manufactura, como también curará su rejilla de cocción
de hierro fundido.
6. El curado debe hacerse periódicamente para alargar la vida útil de su rejilla de cocción.
Consejo: Limpie las rejillas mientras que estén tibias utilizando un guante
y una pelota de papel de aluminio del tamaño de una pelota de
béisbol.

Instrucciones de Encendido
Le recomendamos utilizar Carbón Vegetal porque no contiene aditivos ni rellenos, brindándole un
encendido más eciente, menos ceniza y comidas más sabrosas que con las briquetas de carbón.
1. Para encender un fuego con carbón, apila 3 libras de Carbón Vegetal (50-60 briquetas) en una
pirámide en el centro de la rejilla de cocción.
2. Encienda los carbones en distintos lugares. Los iniciadores de fuego ayudan durante este paso.
NOTA: No use gasolina, querosén o alcohol para encender el carbón. El uso de cualquiera de
estos productos, o de similares, puede causar una explosión que posiblemente conlleve a graves
lesiones.
3. Deje la tapa abierta hasta que los carbones enciendan, el humo sea blanco, y no existan llamas.
4. Luego de que los carbones enciendan, pero antes de que se tornen blancos, comience a regular
la temperatura interna con las compuertas. (O, si lo desea, comience a asar.)
UN MAYOR FLUJO DE AIRE EQUIVALE A UNA MAYOR TEMPERATURA.
Utilice el gráco anterior para controlar la temperatura en su parrillera AKORN
NOTA: No permita que la temperatura aumente más allá de la deseada, porque es más difícil bajar la
temperatura que subirla.
SIEMPRE SIGA LAS INSTRUCCIONES Y ADVERTENCIAS DE LOS FABRICANTES
DE FLUIDOS DE ENCENDIDO. UTILICE EXCLUSIVAMENTE EN EXTERIORES Y EN
SUPERFICIES NO INFLAMABLES, AL MENOS A 12’ DE MADERA Y MATERIALES INFLAMABLES.
Uso de la Parrillera y Consejos
• Controle la temperatura por medio de la cantidad y tipo de combustible, con las compuertas
duales y (opcional) la rejilla de carbón ajustable. La madera calienta más que los carbones y
mayor ujo de aire equivale a mayor temperatura.
• Añada pedacitos de madera mojados para lograr un sabor ahumado.
• Las cenizas dejadas en el fondo por mucho tiempo, absorben humedad y oxidarán cualquier
acero sin importar su grosor. Esta parrillera está hecha de hierro fundido y acero, lo que SE
OXIDARÁ, ESPECIALMENTE SI NO SE LE DA EL CUIDADO REQUERIDO.
• No utilice carbón vegetal instantáneo ya que le aportará un sabor articial a lo que cocine.
Consuma completamente el uido de encendido antes de cerrar la tapa.
• Luego de cada uso, cubra las rejillas internas con aceite vegetal para reducir la oxidación.

Para asar y ahumar a BAJA TEMPERATURA, LENTA Y PROLONGADA
COCCIÓN (200° a 350° F)
Use aproximadamente 1 libra de CARBÓN VEGETAL del
tamaño de un ratón de computadora o de mayor tamaño
para generar un fuego en el centro de la rejilla de carbón.
Comience el fuego según lo descrito anteriormente.
Cuando el carbón encienda, CIERRE LA PUERTA y
comience a regular la temperatura con las compuertas
hasta el ajuste deseado.
Para SELLAR y asar a ALTA
Temperatura (350° a 650° F)
•Use aproximadamente 2-3 libras de PEDAZOS DE
CARBÓN VEGETAL del tamaño de una pelota de
golf, para generar un fuego en el centro de la rejilla
de carbón. Encienda el fuego según lo descrito
anteriormente. Cuando el carbón se encienda, CIERRE
LA PUERTA y comience a regular la temperatura con
las compuertas hasta el ajuste deseado.
Para Ahumar:
1. Siga las instrucciones para una cocción de menor temperatura (menor o igual a 350˚ F).
2. Pre-humedezca las virutas de madera por 35 minutos. Humedezca los pedazos por 1 ½ hora o
hasta que la madera se sature completamente.
3. Luego de que la parrillera haya alcanzado la temperatura deseada, esparza dos puñados de
virutas de madera humedecida o pedazos sobre los carbones vegetales encendidos.
4. Permita que las virutas comiencen a arder, cerrando la tapa.
5. Puede comenzar la cocción luego de pocos minutos. Las virutas humedecidas pueden añadirse
luego al fuego, de ser necesario.
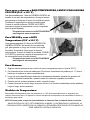
Medidor de Temperatura:
Este medidor de temperatura tiene una precisión de +/- 10% de la temperatura real. Le sugerimos que
verique esto con su horno. SI requiere un control más preciso de temperatura, se recomienda el uso de un
termómetro para carnes.
NOTA: El humo puede escapar de áreas distintas a la chimenea. Esto no debería afectar la cocción.
NUNCA EXCEDA LOS 700°F. ESTO DAÑARÍA EL ACABADO Y CONTRIBUIRÍA A LA OXIDACIÓN. LA
PINTURA NO ESTÁ CUBIERTA POR LA GARANTÍA Y REQUERIRÁ DE RETOQUES. ÉSTA UNIDAD NO
TIENE GARANTÍA CONTRA LA OXIDACIÓN.
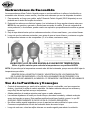
Pila pequeña de carbón en la PARTE SUPERIOR
para fuegos de menor temperatura
Pila pequeña de carbón en la PARTE INFERIOR
para fuegos de alta temperatura

Finalizando
Cuando termine de cocinar en la parrillera, podrá apagarla cerrando ambas compuertas y
permitiendo que el fuego se sofoque. Sea paciente. Esto tomará un hora o más.
Vaciado de Cenizas:
**SÓLO VACÍE LAS CENIZAS MIENTRAS LA PARRILLERA NO ESTÉ EN USO**
Luego de que el fuego esté completamente apagado, deberá esperar varias horas para vaciar las
cenizas, asegurando que ya no están calientes y no existe peligro de quemaduras.
1. Tumbe cualquier ceniza que no haya caído al recipiente de cenizas de la rejilla de carbón. (Si
encuentra pedazos de carbón parcialmente quemados en la rejilla de carbón, puede guardarlos
para la próxima vez. Todavía funcionan).
2. Golpee los lados del recipiente para soltar cualquier ceniza que pueda estar en los lados.
3. Retire el recipiente de cenizas del fondo de la parrillera, y deslícelo hacia el frente.
4. Golpee ligeramente el recipiente de cenizas para soltar cualquier ceniza que pueda permanecer
pegada.
5. Coloque las cenizas en un contenedor de metal y cubra con agua para garantizar que no se
encuentren brasas encendidas; luego podrá eliminar las cenizas.
IMPORTANTE: El carbón es poroso y conserva la humedad. NO deje carbón en
su parrillera cuando no la utilice. El carbón y cenizas dejados en recipiente de
cenizas pueden reducir la vida útil de su parrillera.
-
 1
1
-
 2
2
-
 3
3
-
 4
4
-
 5
5
-
 6
6
-
 7
7
-
 8
8
-
 9
9


Char-Griller 56520 Manual de usuario
- Categoría
- Barbacoas
- Tipo
- Manual de usuario
En otros idiomas
- English: Char-Griller 56520 User manual
Documentos relacionados

Otros documentos
-
CharGriller 6719 El manual del propietario
-
-
 Char Griller E56520 El manual del propietario
-
-
-
-
-
