Thulos TH-EXT12 El manual del propietario
- Tipo
- El manual del propietario

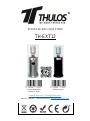
ESTUFA DE GAS - MANUAL DE INSTRUCCIONES
GAS STOVE - INSTRUCTIONS MANUAL
TH-EXT12
Leer atentamente este manual antes de utilizar el producto.
Guardar el manual para futuras consultas.
Read this manual carefully before using the apparatus.
Save the manual for future reference.
Atención / Attention:
Este aparato no es apto como sistema principal de calefacción.
This appliance is not suitable as a main heating system.

CONSEJOS
Antes de la puesta en funcionamiento de este aparato lea detenidamente el manual de
instrucciones y guárdelo para futuras consultas, así como la garantía, el recibo de pago y si
es posible también el embalaje exterior e interior. En caso de dejar el aparato a terceros,
también entregue el manual de instrucciones.
INSTRUCCIONES POR Y PARA SU SEGURIDAD
1. Este aparato pueden utilizarlo personas mayores de 18 años, personas con capacidades
físicas, sensoriales o mentales reducidas, con falta de experiencia y conocimiento,
si se les ha dado la supervisión o formación apropiadas respecto al uso del aparato de
una manera segura y comprenden los peligros que implica.
2. Los niños no deben jugar con el aparato. La limpieza y el mantenimiento a realizar por
el usuario no deben realizarlo los niños.
3. Se deberá supervisar a los niños para asegurarse de que no juegan con este aparato.
4. No deje material de embalaje (bolsas de plástico, cartón, polietileno, etc.) a su alcance.
5. No sumergir el aparato en agua o cualquier otro líquido.
6. ADVERTENCIA: NUNCA CUBRIR EL APARATO EN FUNCIONAMIENTO.
7. No situar el aparato próximo a mobiliario, entelado, cortinas, ropas de cama y otros
materiales inflamables ya que hay riesgo de incendio.
8. El aparato no debe utilizarse en sótanos, cuartos de baño o dormitorios de edificios de vivienda.
9. La rejilla de protección de este aparato está prevista para prevenir los riesgos de incendio o las
quemaduras, y ninguna parte debe desmontarse de forma permanente.
10. Mantener siempre distancia de seguridad para evitar accidentes graves y quemaduras.
11. La conexión de este aparato debe realizarse mediante un regulador con un tubo flexible.
12. Utilizar únicamente en lugares y zonas bien ventiladas.
13. No utilizar en vehículos tales como caravanas ó auto-caravanas.
14. Las botellas deben sustituirse de acuerdo con las instrucciones suministradas.
15. Después de su utilización, apagar el aparato cerrando la válvula de la botella.
16. En caso de fuga, cortar inmediatamente el gas desde el regulador de la botella.
17. El tubo flexible se debe revisar regularmente, y si es necesario debe sustituirse.
18. No utilice el aparato en ambientes inflamables (por ejemplo cerca de gases combustibles
o pulverizadores). ¡Riesgo de explosión y fuego!
19. No introduzca ningún tipo de objeto por las aberturas de la estufa.
20. No almacene ni utilice gasolina u otros vapores inflamables u otros líquidos cerca de este
aparato.
21. No almacene las bombonas que no se estén usando cerca de este aparato.
22. Apague la válvula del regulador de la bombona antes de mover el aparato.
23. El tubo de goma de la bombona debe ser cambiado según marcado y correspondiente
legislación vigente.
24. Utilice solo el tipo de gas y el tipo de bombona especificado por el fabricante.
25. La bombona de GLP utilizada en su estufa de terraza debe respetar las siguientes
características: Bombona de un máximo de 30,5cm de diámetro y 57,1cm de alto y un peso
máximo de 23 kg.
26. En caso de vientos fuertes, tomar precauciones para evitar la inclinación y caída de la
estufa.
27. El uso de este aparato en lugares cerrados puede ser peligroso y está prohibido.
28. El sistema de gas general, la manguera, el regulador, el montaje, las conexiones y
quemador deben ser inspeccionados en busca de fugas o daños antes de usar, y por lo
menos antes de cada temporada de uso.
29. Comprobar que el regulador y el tubo de goma están bien instalados con las
abrazaderas.
30. Cierre el paso de gas de la bombona cuando la estufa no esté en funcionamiento.
31. Si huele a gas:
- Apague la estufa y cierre el paso de la bombona
- Apague cualquier llama o punto de ignición y ventile la estancia
- Si el olor persiste, póngase en contacto con el servicio técnico.

POSICION Y UBICACIÓN
Esta estufa es para uso exterior y que esté techado exclusivamente.
Asegúrese de que tiene ventilación suficiente
Mantenga una distancia prudente entre la estufa y materiales combustibles Recomendado:
100 cm (superior) y 100 cm (lateral) mínimo. La estufa debe ser ubicada en un suelo firme y a
nivel.
Para proteger la estufa de fuertes vientos, asegure la base al suelo con tornillos.
CARACTERÍSTICAS DEL GAS
Utilice butano o propano solamente.
Recomendamos el uso de Propano, puesto que dispone de un punto de congelación más
bajo, adecuado para aparatos al aire libre. El regulador y el tubo de goma con abrazaderas
deben seguir la normativa vigente de cada país. La instalación debe ser bajo la normativa
local. En ausencia de esta, deberá realizarse según el estándar de almacenamiento y uso de
los Gases Licuados del Petróleo. Una bombona agrietada, oxidada o en mal estado puede
ser peligrosa y debe ser comprobada por el fabricante o suministrador. Nunca use una
bombona con una válvula en mal estado.
Las conexiones de gas de la estufa han sido comprobadas previamente por el fabricante
previo envío. Una comprobación de seguridad debe ser realizada durante la instalación
en el lugar de uso para evitar aflojamiento de piezas debido al envío.
COMPROBACIÓN DE FUGAS.
Realizar una solución jabonosa una parte de agua y una parte de jabón. La solución
jabonosa puede ser aplicada con un pulverizador, un cepillo o un trapo. Aparecerán
burbujas de jabón en caso de fuga. La estufa debe ser comprobada con una bombona
llena. Asegúrese que el mando está en posición de apagado. Abrir el paso de gas del
regulador. En caso de fuga cierre el paso de gas del regulador. Apriete las conexiones con
las abrazaderas correspondientes. Volver a abrir el paso de gas para comprobar de nuevo.
Repetir hasta que desaparezca la fuga. No fumar durante el test de fugas.


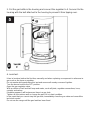
4.
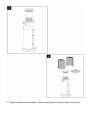
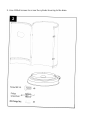
Coloque las rejillas sobre el quemador. Utilice la tuerca M6 para ajustar las rejillas en su posición

Tuerca M6
X 1
5.
Meta la botella de gas en la carcasa y conecte el regulador a ella. Asegúrela a la
carcasa con el cinturón que lleva ésta para evitar que se vuelque.
6.
Prueba de fugas. Tiene que hacerse antes del primer unos, manualmente y
cuando remplace algún componente en referencia al gas como la manguera o
regulador. No fume mientras esté realizando este test y quite todas las fuentes de
ignición cercanas. Coloque el mando del quemador en posición OFF. Abra la válvula
del regulador de gas. Con una solución de mitad y mitad de agua y jabón frote
todas las juntas, conexiones del regulador, manguera, mandos y válvulas. Si
aparecen burbujas será porque hay una fuga de gas. Apriete bien todas las
conexiones o cambie la pieza en el caso de que esté en mal estado. En el caso que
no pueda para la fuga de gas, cierre inmediatamente la válvula de gas y consulte al
servicio técnico. No utilice la estufa hasta que no se haya solucionado la fuga de
gas.

TABLA IDENTIFICATIVA.

ADVICE
Before putting this appliance into operation, carefully read the instruction manual and keep it
for future reference, as well as the warranty, the receipt of payment and, if possible, the
outer and inner packaging. If you leave the device to third parties, also hand over the
instruction manual.
INSTRUCTIONS BY AND FOR YOUR SAFETY
1. This appliance can be used by people over 18 years of age, people with abilities reduced
physical, sensory or mental, with lack of experience and knowledge, if they have been given
appropriate supervision or training regarding the use of the in a safe way and understand the
dangers involved.
2. Children must not play with the appliance. Cleaning and maintenance to be carried out by the
user should not be carried out by children.
3. Children should be supervised to ensure that they do not play with this appliance.
4. Do not leave packing material (plastic bags, cardboard, polyethylene, etc.) within reach.
5. Do not immerse the appliance in water or any other liquid.
6. WARNING: NEVER COVER THE APPLIANCE IN OPERATION.
7. Do not place the appliance near furniture, drapes, curtains, bedding and others. flammable
materials as there is a risk of fire.
8. The appliance must not be used in basements, bathrooms or bedrooms of residential
buildings.
9. The protective grill of this appliance is designed to prevent the risk of fire or burns, and no part
should be permanently disassembled.
10. Always keep a safe distance to avoid serious accidents and burns.
11. The connection of this appliance must be made by means of a regulator with a flexible tube.
12. Use only in well-ventilated areas and places.
13. Do not use in vehicles such as caravans or motorhomes.
14. The bottles must be replaced according to the instructions supplied.
15. After use, turn off the appliance by closing the bottle valve.
16. In the event of a leak, immediately shut off the gas from the cylinder regulator.
17. The flexible tube should be checked regularly, and if necessary it should be replaced.
18. Do not use the appliance in flammable environments (for example near combustible gases or
sprayers). Risk of explosion and fire!
19. Do not insert any type of object through the openings of the stove.
20. Do not store or use gasoline or other flammable vapors or other liquids in the vicinity of this
apparatus.
21. Do not store unused cylinders near this appliance.
22. Turn off the cylinder regulator valve before moving the appliance.
23. The rubber tube of the cylinder must be changed according to the marking and corresponding
current legislation.
24. Use only the type of gas and the type of cylinder specified by the manufacturer.
25. The LPG cylinder used in your terrace stove must respect the following characteristics:
Cylinder with a maximum diameter of 30.5cm and 57.1cm high and a maximum weight of 23 kg.
26. In case of strong winds, take precautions to avoid tilting and falling of the stove.
27. Using this appliance indoors can be dangerous and is prohibited.
28. The general gas system, hose, regulator, mounting, connections and burner should be
inspected for leaks or damage before use, and at least before each season of use.
29. Check that the regulator and rubber tube are properly installed with the clamps.
30. Close the gas supply to the bottle when the stove is not operating.
31. If you smell gas:
- Turn off the stove and close the gas cylinder
- Extinguish any flame or point of ignition and ventilate the room
- If the smell persists, contact the technical service.

POSITION AND LOCATION
This stove is for outdoor use and is covered exclusively.
Make sure you have sufficient ventilation Keep a safe distance between the stove and
combustible materials Recommended: 100 cm (top) and 100 cm (side) minimum.
The stove must be located on a firm and level floor.
To protect the stove from strong winds, secure the base to the floor with screws.
GAS CHARACTERISTICS
Use butane or propane only.
We recommend the use of Propane, since it has a lower freezing point, suitable for outdoor
appliances. The regulator and the rubber tube with clamps must follow the regulations in
force in each country. The installation must be under local regulations. In the absence of this,
it must be carried out according to the standard of storage and use of Liquefied Petroleum
Gases. A cracked, rusted or damaged cylinder can be dangerous and must be checked by
the manufacturer or supplier. Never use a cylinder with a bad valve.
The gas connections of the stove have been previously checked by the manufacturer before
shipment. A safety check should be performed during installation at the place of use to
avoid parts loosening due to shipment.
LEAK CHECK
Make a soapy solution one part water and one part soap.
The soapy solution can be applied with a spray bottle, brush or cloth.
Soap bubbles will appear in the event of a leak.
The stove must be checked with a full cylinder.
Make sure the knob is in the off position.
Open the gas flow from the regulator. In the event of a leak, close the gas supply to the
regulator. Tighten the connections with the corresponding clamps. Open the gas passage
again to check again. Repeat until the leak disappears.
Do not smoke during the leak test.

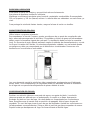
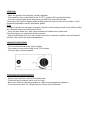
START UP
- Open the gas flow from the gas cylinder regulator.
- Press and turn the control knob to the "PILOT" position (90º counterclockwise).
- Press the control knob all the way down and hold it for about 60 seconds.
Then press the "Ignition" button while holding down the control knob until you hear a "click".
Repeat the operation until the pilot flame ignites.
Note.
If the gas cylinder has just been changed, keep the control knob pressed in the "pilot" position
for a few more seconds to bleed the circuit.
- Once the pilot flame is lit, wait a few seconds and release the control knob.
If the flame goes out, repeat the ignition process.
- After the pilot flame is lit, turn the control knob to the "maximum" position and wait about 5
minutes, then select the desired temperature.
TURN OFF THE STOVE
- Turn the control knob to the "pilot" position.
- Press and turn the control knob to the "Off" position.
- Close the gas cylinder regulator.
CLEANING AND MAINTENANCE
- Always clean with the stove off and totally cold.
- Clean dust from surfaces with a soft, dry cloth.
- Never use abrasive cleaning products or objects that damage the appliance.
- Cover the stove when it is not going to be used to free it from dust.


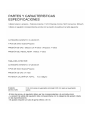
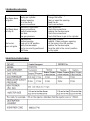
FEATURES / SPECIFICATIONS
- Use butane or propane.
- Max. Power: 11 kW.
- Min. Power: 5 kW.
- Consumption: 800 gr/h.
- Device category: 13+(28-30/37).
- Gas Type: Butane / Propane.
- Gas pressure: (Butane 28-30 mbar) / (Propane 37 mbar).
- Regulator pressure: 30-37 mbar.
- Total heating power: Kw (728 g/h)
- Injector Size: 1.55mm for Main burner // 0.22mm for pilot burner.
- The rubber tube and the regulator must correspond to the local regulations.
- The outlet pressure of the regulator must correspond to the category of the appliance
mentioned in the specifications.
- The device requires a rubber tube less than 0.5m.
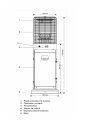
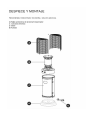
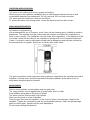
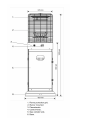
EXPLODED VIEW AND ASSEMBLY.
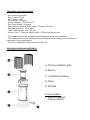
A. Flame protection grid.
B. Burner.
C. Cylindrical housing.
D. Base.
E. Wheels.
Tools needed:
- Star screwdriver.
- Soapy solution.

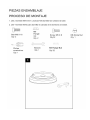
ASSEMBLY PROCESS
1. Use 2 M8x15mm bolts and M8 nuts to screw the wheels to the base.

2. Use 4 M5x8 screws to screw the cylinder housing to the base.

3. Use M5x8 screws to mount the burner on the cylinder shell.
4. Place grates on burner. Use the M6 nut to lock the louvers into position.

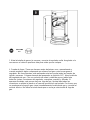
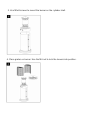
5. Put the gas bottle in the housing and connect the regulator to it. Secure it to the
housing with the belt attached to the housing to prevent it from tipping over.
6. Leak test.
It has to be done before the first few, manually and when replacing a component in reference to
gas such as the hose or regulator.
Do not smoke while performing this test and remove all nearby sources of ignition.
Turn the burner knob to the OFF position.
Open the gas regulator valve.
With a solution of half and half soap and water, scrub all joints, regulator connections, hose,
controls and valves.
If bubbles appear it will be because there is a gas leak.
Tighten all connections well or change the part if it is in bad condition.
In the event that you cannot stop the gas leak, immediately close the gas valve and consult the
technical service.
Do not use the range until the gas leak has been fixed.

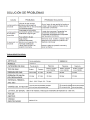
PROBLEMS SOLVING
Pilot flame does
not ignite
Gas valve closed.
Empty gas cylinder.
Blocked opening.
Air in the ducts.
Loose connections.
Open the gas passage.
Change the bottle.
Clean or open the opening.
Bleed the air.
Check connections.
Pilot flame does
not stay lit
Impurities in pilot tube.
Loose connections.
Faulty thermocouple.
Gas leak.
Low gas pressure.
Clean impurities.
Check the connections.
Replace the thermocouple.
Check the connections.
Check that there is gas in the cylinder.
The burner
does not ignite
Low pressure.
Blocked opening.
Knob not in ON position.
Faulty thermocouple.
Bent or incorrectly positioned
pilot flame
Empty gas cylinder.
Replace, Clean and open opening.
Put the knob in the ON position.
Replace the thermocouple.
Place the pilot in the correct position
and try again.
IDENTIFICATION TABLE

ESTUFA DE GAS // GAS STOVE
TH-EXT12
ACERO INOXIDABLE NEGRO / BLACK
STAINLESS STEEL
www.thulos.com / [email protected]
Servicio Técnico / Technical Service: [email protected]
-
 1
1
-
 2
2
-
 3
3
-
 4
4
-
 5
5
-
 6
6
-
 7
7
-
 8
8
-
 9
9
-
 10
10
-
 11
11
-
 12
12
-
 13
13
-
 14
14
-
 15
15
-
 16
16
-
 17
17
-
 18
18
-
 19
19
-
 20
20
-
 21
21
-
 22
22
-
 23
23


Thulos TH-EXT12 El manual del propietario
- Tipo
- El manual del propietario
En otros idiomas
- English: Thulos TH-EXT12 Owner's manual