Sony MDR-RF940RK Instrucciones de operación
- Tipo
- Instrucciones de operación

Operating Instructions
Manual de instrucciones
Wireless Stereo
Headphone System
Sony Corporation © 1996 Printed in Japan
MDR-RF940RK
3-858-839-12(1)
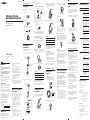
2 Insert two R6 (size AA) batteries by
matching the + and – on the batteries
to the + and – in the battery
compartment.
]
}
]
3 Close the battery compartment lid.
Battery life
When to replace the batteries
Replace both batteries with new ones
when the POWER indicator dims, and a
hissing noise increases.
Notes on batteries
To avoid damage to the system caused
by battery leakage and corrosion;
– Install the batteries with the correct
polarity.
– Do not try to recharge the batteries.
– Remove the batteries if the system is
not to be used for a long period of
time.
In case of battery leakage, wipe off any
deposit in the battery compartments
before installing new batteries.
( Operating the system
Listening to a
program
1 Select the radio frequency with the
CHANNEL selector switch.
Select the same channel on the
headphones and the transmitter.
CH2CH1
2 Turn on the audio/video equipment
then the transmitter.
POWER
3 Put on the headphones and the
power turns on automatically.
4 Adjust the volume.
Note
If the transmitter is connected to the headphones
jack of the source equipment, set the volume of
that equipment as high as possible without
distorting the audio signal.
Auto power on/off function
When you remove the headphones, the
power turns off automatically. Do not
apply pressure to the left ear pad when
not using the headphones, otherwise the
headphones will be switched on.
/
Mute function
If a hissing noise is heard when the
headphones are used outside of the
effective range (see the next section), the
mute function will be activated and the
sound will not be heard from the
headphones. To restore the sound,
move near toward the transmitter.
After listening to a program
Take the headphones off before turning
off the transmitter. If you turn off the
transmitter first, you may hear some
noise.
The effective areas
of the transmitter
The optimum distance is up to
approximately 130 feet (40m) without
the system picking up some interference.
However, the distance may vary
according to the surroundings and
environment. If the system picks up
some noise while using it within the
above mentioned distance, reduce the
distance between the transmitter unit
and the headphones, or select the other
channel.
Notes
•When you use the headphones inside the
effective areas of the transmitter, the transmitter
can be placed in any direction from the listener.
•Even within the signal reception area, there are
some spots (dead point) where the RF signal can
not be received. This characteristics is inherent to
RF signals, and does not indicate malfunction.
By slightly moving the transmitter, location of
the dead point can be changed.
Problem
No sound/
Muffled sound
Distortion
Loud
background
noise
Solution
Turn on the transmitter
first, then put on the
headphones.
Check the connection of the
audio/video equipment or
the AC power adaptor.
Check that the audio/video
equipment is turned on.
Turn up the volume on the
connected audio/video
equipment, if the
transmitter is connected to
the headphones jack.
The mute function is
activated.
Use the headphones near
the transmitter.
Replace both batteries of the
headphones.
Replace the batteries in the
transmitter if the
transmitter is used by
battery operation.
If the transmitter is
connected␣ to␣ the␣ headphones
jack, turn down the volume
of the connected audio/
video equipment.
Replace both batteries of the
headphones.
Replace the batteries in the
transmitter if the
transmitter is used by
battery operation.
Move closer to the
transmitter. As you move
away from the transmitter,
more noise is likely to be
heard.
If the transmitter is
connected to the
headphones jack, turn up
the volume of the connected
audio/video equipment.
If noise is heard when the
transmitter is hooked to the
TV headphones jack, try
connecting from LINE OUT.
Replace both batteries of the
headphones.
Replace the batteries in the
transmitter if the
transmitter is used by
battery operation.
TroubleshootingReplacing the ear
pads
When the ear pads become dirty or
damaged, you can get replacements
from your Sony dealer. Replace them as
illustrated below.
1 Remove the old ear pad by pulling it
out of the groove on the housing.
2 Place the new ear pad on the
housing and insert the edge of the
pad into the groove as illustrated.
Make sure that the entire edge of the ear
pad is securely inserted into the groove.
( Additional information
Precautions
• When the headphones are not to be
used for a long period of time, remove
the batteries to avoid damage caused
by battery leakage and subsequent
corrosion.
• When the transmitter is not to be used
for a long period of time, disconnect
the AC power adaptor from the AC
outlet holding the plug. Do not pull
on the cord.
Also remove the batteries to avoid
damage caused by battery leakage and
subsequent corrosion.
• Do not leave the wireless stereo
headphone system in a location subject
to direct sunlight, heat or moisture.
Notes on headphones
Preventing hearing damage
Avoid using headphones at high
volume. Hearing experts advise against
continuous, loud and extended play. If
you experience a ringing in your ears,
reduce the volume or discontinue use.
Caring for others
Keep the volume at a moderate level.
This will allow you to hear outside
sounds and to be considerate to the
people around you.
If you have any questions or problems
concerning the system that are not
covered in this manual, please consult
the nearest Sony dealer.
Be sure to bring the headphones and the
transmitter to the Sony dealer when
requiring repair work.
2 Connect the transmitter to a power
source.
To obtain power from an AC outlet
Notes
•When the AC power adaptor is connected to the
transmitter, internal batteries are automatically
disconnected.
•Use only the supplied AC power adaptor. Do
not use any other AC power adaptor.
•When you connect the connecting cord directly
to an earphone jack, the audio signal will not be
output through the right channel. In such a case,
use the separately sold PC-236HG plug adaptor.
To obtain power from batteries
The transmitter can also be operated by
use of four R6 (size AA) batteries.
1 Open the battery compartment lid
on the bottom of the transmitter.
2 Insert four R6 (size AA) batteries by
matching the + and – on the batteries
to the + and – in the battery
compartment.
3 Close the battery compartment.
Battery life
When to replace the batteries
Replace all the batteries with new ones
when the POWER indicator dims, and a
hissing noise increases.
Setting up the
headphones
1 Open the battery compartment lid
on the left inner side of the head
band.
Battery
Sony alkaline battery
LR6 (SG)
Sony battery R6P (SR)
Approx. hours
40
20
Battery
Sony alkaline battery
LR6 (SG)
Sony battery R6P (SR)
Approx. hours
40
20
to DC IN
4.5V jack
Transmitter
to an AC
outlet
AC power
adaptor
(supplied)
Polarity of the plug
( Getting started
Unpacking
Check that you have the following
items:
• The transmitter
• AC power adaptor
• Connecting cord (phono plugs ˜
stereo mini jack)
• The headphones
Setting up the
transmitter
1 Connect the transmitter to audio/
video equipment.
a To connect to a headphones jack
b To connect to LINE OUT or REC OUT
jacks
to headphones jack
(stereo mini jack)
Discman,
Walkman, TV,
VCR, etc.
Transmitter
Stereo system,
TV, VCR, etc.
Right
channel (red)
to LINE OUT or
REC OUT
Left channel
(white)
Connecting
cord (supplied)
Transmitter
Specifications
General
Carrier frequency
913.5 – 914.5 MHz
Channel Ch1, Ch2
Modulation FM stereo
Frequency response
18 – 22,000 Hz
Transmitter
RF Power Less than 94 dBµV/m at 3 m
Power source DC 4.5 V: supplied AC power
adaptor
DC 6 V: 4 x R6 (size AA) battery
Audio input stereo mini plug
Dimensions Approx. 90 mm dia x 35 mm
(3
5
/8 x 1
7
/16 in.) (w/h)
Mass Approx. 200 g (7.1 oz.)
incl.batteries
Headphones
Power source DC 3 V: 2 x R6 (size AA) battery
Mass Approx. 270 g (9.5 oz.) incl.
batteries
Optional accessories
Plug adaptor PC-236HG
(stereo mini jack ˜ monaural mini plug)
Design and specifications are subject to change
without notice.
thoroughly and retain it for future
reference.
Some features are:
• Wireless system that allows you to
listen to a program free from the
restriction of a cord within 130 feet
from the transmitter.
• High fidelity sound reproduction
• Compact transmitter which operates
on battery power and AC power
supplied through the supplied AC
power adaptor
• Comfortable Circum-aural
headphones
• Automatic ON/OFF function on
headphones to preserve battery power
• Mute function to avoid noise when no
audio signal is available.
Notes on receiving
performance
The system for this equipment utilizes very
high frequency signals in the 900 MHz band
so the receiving performance may deteriorate
due to the surroundings. The following
examples illustrate conditions that may
reduce the possible receiving range or cause
interference with reception.
• Inside a building with walls containing
steel beams.
• Area with many steel file cabinets, etc.
• Area with many electrical appliances
capable of generating electromagnetic
noise.
• Transmitter is placed on a metal
instrument.
• Area facing roadways.
• Noise or interfering signals exist in the
surroundings due to radio transceivers in
trucks, etc.
• Noise or interfering signals exist in the
surroundings due to wireless
communication systems installed along
roadways.
English
WARNING
To prevent fire or shock hazard,
do not expose the unit to rain or
moisture.
To avoid electrical shock, do not
open the cabinet. Refer servicing
to qualified personnel only.
WARNING
You are cautioned that any changes or
modifications not expressly approved in
this manual could void your authority to
operate this equipment.
Owner’s Record
The model number is located inside the
battery compartment of the transmitter
and the right inner side of the head
band.
The serial number is located inside the
battery compartment of the transmitter
and inside of the battery compartment of
the headphones.
Record these numbers in the spaces
provided below. Refer to them
whenever you call upon your Sony
dealer regarding this product.
Model No. MDR-RF940RK
Transmitter TMR-RF940R
Headphones MDR-RF940R
Serial No.
␣ Transmitter
Headphones
Welcome!
Thank you for purchasing the Sony
MDR-RF940RK Wireless Stereo
Headphone System. Before operating
the unit, please read this manual

Preparación de los
auriculares
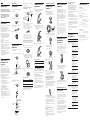
1 Abra la tapa del compartimiento de
las pilas de la parte interior
izquierda del casco.
2 Inserte dos pilas R6 (tamaño AA)
haciendo coincidir + y – de las
mismas con + y – del interior de su
compartimiento.
]
}
]
3 Cierre la tapa del compartimiento de
las pilas.
Duración de las pilas
Cuándo reemplazar las pilas
Cuando el indicador POWER se ilumine
débilmente, y aumente el ruido de siseo,
reemplace ambas pilas por otras nuevas.
Notas sobre las pilas
Para evitar los daños que podría causar
el electrólito de las pilas al sistema:
– Inserte las pilas con la polaridad
correcta.
– No trate de cargar las pilas.
– Cuando no vaya a utilizar el sistema
durante mucho tiempo, extráigale las
pilas.
Si se fuga el electrólito de las pilas,
limpie el compartimiento de las mismas
antes de insertar otras nuevas.
( Preparativos
Desembalaje
Compruebe si ha recibido lo siguiente:
• Transmisor
• Adaptador de alimentación de CA
• Cable conector (clavijas fono ˜
minitoma estéreo)
• Auriculares
Preparación del
transmisor
1 Conecte el transmisor al equipo de
audio/vídeo.
a Conexión a una toma para auriculares
b Conexión a las tomas LINE OUT o
REC OUT
2 Conecte el transmisor a una fuente
de alimentación.
Para obtener alimentación de un
tomacorriente de CA
Notas
•Cuando conecte el adaptador de alimentación de
CA al transmisor, las pilas internas se
desconectarán automáticamente.
•Utilice solamente el adaptador de alimentación
de CA suministrado. No utilice ningún otro tipo
de adaptador de alimentación de CA.
•Cuando haya conectado el cable conector
directamente a una toma para auriculares, la
señal de audio no saldrá a través del canal
derecho. En tal caso, utilice un adaptador de
clavija PC-236HG vendido aparte.
Para obtener alimentación de las pilas
El transmisor también podrá alimentarse
utilizando cuatro pilas R6 (tamaño AA).
1 Abra la tapa del compartimiento de
las pilas de la base del transmisor.
2 Inserte cuatro pilas R6 (tamaño AA)
haciendo coincidir + sus polos + y –
de con las marcas + y – del interior
del compartimiento de las mismas.
3 Cierre la tapa del compartimiento de
las pilas.
Duración de las pilas
Cuándo reemplazar las pilas
Cuando el indicador POWER se ilumine
débilmente, y aumente el ruido de siseo,
remplace todas las pilas por otras
nuevas.
Español
ADVERTENCIA
Para evitar incendios o el riesgo
de electrocución, no exponga la
unidad a la lluvia ni a la humedad.
Para evitar descargas eléctricas,
no abra la unidad. En caso de
avería, solicite los servicios de
personal cualificado.
¡Bienvenido!
Muchas gracias por la adquisición del
sistema de auriculares estéreo
inalámbrico MDR-RF940RK Sony.
Antes de utilizar el sistema, lea
detenidamente este manual y consérvelo
para futuras referencias.
Algunas de las características son:
• Sistema inalámbrico que le permitirá
escuchar un programa sin verse
restringido por un cable hasta una
distancia de 40 metros de los
transmisores.
• Reproducción de sonido de alta
fidelidad
• Transmisor compacto que funciona
con pilas y con CA a través del
adaptador de alimentación de CA
suministrado
• Auriculares Circum-aurales cómodos
• Función de conexión/desconexión de
los auriculares para conservar la
energía de las pilas
• Función de silenciamiento para evitar
el ruido cuando no haya señal de
audio disponible
Notas sobre el
rendimiento de
recepción
El sistema para este equipo utiliza
señales de frecuencia muy alta de la
banda de 900 MHz, motivo por el que el
rendimiento de la recepción puede
deteriorarse debido al medio ambiente.
En los ejemplos siguientes se indican las
condiciones que pueden reducir el
alcance de la recepción o causar
interferencias ella.
• Dentro de un edificio con paredes que
contengan vigas de acero.
• Área con muchos armarios
archivadores de acero, etc.
• Área con muchos aparatos eléctricos
capaces de generar ruido
electromagnético.
• Transmisor colocado sobre un
instrumento metálico.
• Área encarada hacia carreteras.
• Ruido o señales de interferencia en los
alrededores debido a transceptores de
radio de camiones, etc.
• Ruido o señales de interferencia en los
alrededores debido a sistmas de
comunicaciones instalados a lo largo
de carreteras.
Transmisor
Discman, Walkman, televisor,
videograbadora, etc.
a la toma para
auriculares
(minitoma estéreo)
Transmisor
Canal derecho
(roja)
Cable conector
(suministrado)
Canal izquierdo
(blanca)
a LINE OUT o
REC OUT
Sistema estéreo,
televisor,
videograbadora, etc.
a un
tomacorriente
de CA
Adaptador de
alimentación de
CA (suministrado)
a la toma
DC IN 4,5V
Transmisor
Polaridad de la clavija
Pilas
Pilas alcalinas LR6 (SG)
Sony
Pilas R6P (SR) Sony
Horas aprox.
40
20
Pilas
Pilas alcalinas LR6 (SG)
Sony
Pilas R6P (SR) Sony
Horas aprox.
40
20
( Utilización del sistema
Escucha de un
programa
1 Elija la radiofrecuencia con el
selector CHANNEL.
Elija el mismo canal en los
auriculares y en el transmisor.
CH2CH1
2 Conecte la alimentación del equipo
de audio/vídeo y después la del
transmisor.
POWER
3 Colóquese los auriculares, y su
alimentación se conectará
automáticamente.
4 Ajuste el volumen.
Nota
Si el transmisor está conectado a la toma para
auriculares del equipo fuente, ajuste el volumen de
tal equipo al nivel más alto posible sin que se
distorsione la señal de audio.
Función de conexión/desconexión
automática de la alimentación
Cuando se quite los auriculares, su
alimentación se desconectará
automáticamente. No aplique presión
sobre la almohadilla auricular izquierda
cuando no esté utilizando los
auriculares, ya que de lo contrario se
conectaría la alimentación de los
mismos.
/
Función de silenciamiento
Si se oye ruido de siseo aumenta, utilice
los auriculares fuera del alcance efectivo
(consulte la sección siguiente), se
activará la función de silenciamiento y
no se oirá sonido a través de los
auriculares.
Para restablecer el sonido, acérquese al
transmisor.
Después de haber escuchado un
programa
Quítese los auriculares antes de
desconectar la alimentación del
transmisor.
Si desconectase en primer lugar la
alimentación del transmisor, podría oír
cierto ruido.
Áreas efectivas del
transmisor
La distancia óptima es de
aproximadamente 40 metros sin que el
sistema capte interferencias. Sin
embargo, la distancia puede variar de
acuerdo con las condiciones
ambientales. Si el sistema capta ruido
cuando lo esté utilizando dentro de la
distancia mencionada, reduzca la
distancia entre el transmisor y los
auriculares, o seleccione otro canal.
Notas
•Cuando utilice los auriculares dentro del área
efectiva del transmisor, el transmisor podrá
colocarse en cualquier dirección con respecto al
oyente.
•Incluso dentro del área de recepción de señales,
pueden existir algunos puntos (puntos muertos)
en los que no se reciba la señal de RF. Esta
característica es inherente a las señales de RF, y
no indica mal funcionamiento. Moviendo
ligeramente el transmisor podrá cambiarse la
ubicación del punto muerto.
Reemplazo de las
almohadillas
auriculares
Cuando las almohadillas auriculares se
ensucien o dañen, adquiera otras en su
proveedor Sony. Reemplácelas como se
muestra en la ilustración siguiente.
1 Extraiga la almohadilla vieja
sacándola de la ranura del auricular.
2 Coloque la nueva almohadilla en el
auricular e inserte el borde de la
misma en la ranura, como se
muestra en la ilustración.
Cerciórese de que todo el borde de la
almohadilla haya quedado insertado con
seguridad en la ranura.
( Información adicional
Precauciones
• Cuando no vaya a utilizar los
auriculares durante mucho tiempo,
extraiga las pilas para evitar el daño
que podría causar el electrólito de las
mismas.
• Cuando no vaya a utilizar el
transmisor durante mucho tiempo,
desconecte el adaptador de
alimentación de CA del tomacorriente
de CA sujetando el enchufe.
Además, extraiga las pilas para evitar
el daño que podría causar el electrólito
de las mismas en caso de fugarse.
• No deje el sistema de auriculares
estéreo inalámbrico en un lugar
sometido a la luz solar directa, al calor,
ni a la humedad.
Notas sobre los auriculares
Cuidado de sus oídos
Evite utilizar los auriculares a gran
volumen. Los expertos en oídos
aconsejan no utilizar auriculares para
escuchar continuamente a gran
volumen. Si experimenta un silbido en
sus oídos, reduzca el volumen o deje de
utilizar los auriculares.
Respeto a los demás
Mantenga el volumen a un nivel
moderado. Esto le permitirá escuchar
los sonidos del exterior y no molestar a
quienes se encuentren a su alrededor.
Si tiene alguna pregunta o problema en
relación con este sistema que el manual
no pueda resolver, póngase en contacto
con su proveedor.
Cuando los auriculares o el transmisor
necesiten reparación, lleve ambos a su
proveedor Sony.
Solución de
problemas
Problema
Carencia de
sonido/sonido
amortiguado
Distorsión
Ruido fuerte
de fondo
Solución
Conecte en primer lugar la
alimentación del
transmisor, y después
colóquese los auriculares.
Compruebe la conexión del
equipo de audio/vídeo o
del adaptador de
alimentación de CA.
Compruebe si la
alimentación del equipo de
audio/vídeo está conectada.
Si el transmisor está
conectado a la toma para
auriculares, aumente el
volumen del equipo de
audio/vídeo.
La función de
silenciamiento está
activada.
Utilice los auriculares cerca
del transmisor.
Reemplace ambas pilas de
los auriculares.
Si está utilizando el
transmisor con pilas,
reemplácelas.
Si el transmisor está
conectado a una toma para
auriculares, reduzca el
volumen del equipo de
audio/vídeo conectado.
Reemplace ambas pilas de
los auriculares.
Si está utilizando el
transmisor con pilas,
reemplácelas.
Acérquese al transmisor. A
medida que se aleje del
transmisor, es posible que
oiga más ruido.
Si el transmisor está
conectado a la toma para
auriculares, aumente el
volumen del equipo de
audio/vídeo.
Si oye ruido cuando haya
conectado el transmisor a la
toma de auriculares de un
televisor, pruebe a
conectarlo a LINE OUT.
Reemplace ambas pilas de
los auriculares.
Si está utilizando el
transmisor con pilas,
reemplácelas.
Especificaciones
Generales
Frecuencia portadora
913,5 – 914,5 MHz
Canales 1 y 2
Modulación FM estéreo
Respuesta en frecuencia
18 – 22.000 Hz
Transmisor
Potencia de RF Menos de 94 dBµV/m a 3 m
Fuente de alimentación
DC 4,5V: Adaptador de
alimentación de CA (suministrado)
DC 6V: 4 pilas R6 (tamaño AA)
Entrada de audio
Minitoma estéreo
Dimensiones Aprox. 90 de diá. x 35 mm
(an/al/prf)
Masa Aprox. 200 g incluyendo las pilas
Auriculares
Fuente de alimentación
3 V CC: 2 pilas R6 (tamaño AA)
Masa Aprox. 270 g incluyendo las pilas
Accesorios opcionales
Adaptador de clavija PC-236HG
(minitoma estéreo ˜ miniclavija monoaural)
Diseño y especificaciones sujetos a cambio sin
previo aviso.
-
 1
1
-
 2
2


Sony MDR-RF940RK Instrucciones de operación
- Tipo
- Instrucciones de operación
en otros idiomas
Artículos relacionados
-
Sony MDR-RF930K Instrucciones de operación
-
-
-
-
-
-
-
-
-