Char Griller 1733 El manual del propietario
- Categoría
- Barbacoas
- Tipo
- El manual del propietario

OM 1733, E1733 E A.3
Contents of this manual are Trademarked and Copyrighted by Char-Griller
®
| A&J Manufacturing
Using the information contained in this manual without consent of Char-Griller
®
and/or A&J Manufacturing is strictly prohibited.
OWNER’S MANUAL
Keep your receipt with
this manual for Warranty.
CUSTOMER SERVICE
1-912-638-4724
Service@CharGriller.com
SMOKIN’ CHAMP
™
Model #1733, E1733

TABLE OF CONTENTS
Safety Warnings & Warranty............................... A-1
Assembly Instructions ..................................... B-1
Product Usage .................................................. C-1
Recipes .............................................................. D-1
Accessories ....................................................... E-1

A-1
IMPORTANT SAFETY WARNINGS
READ ALL SAFETY WARNINGS AND INSTRUCTIONS CAREFULLY BEFORE
ASSEMBLING AND OPERATING YOUR GRILL
Read the following instructions carefully and be sure your grill is properly assembled, installed, and
maintained. Failure to follow these instructions may result in serious bodily injury and/or property
damage. If you have any questions concerning assembly or operation, call 912-638-4724.
• Grill is for use outdoors and in well-ventilated areas, only.
• Use caution when assembling and operating your grill to avoid scrapes or cuts from sharp edges.
• Do not use lighter uid, gasoline, kerosene, alcohol or other accelerants to light charcoal. Use of any
of these or similar products could cause an explosion possibly leading to severe bodily injury.
• Do not leave a lit grill unattended. Keep children and pets away from grill at all times.
• Do not use grill in high winds.
• Use caution when moving grill to prevent strains.
• The use of alcohol, prescription or non-prescription drugs may impair the operator’s ability to
properly assemble or safely operate the grill.
• Use grill at least 3 ft. from any wall or surface. Maintain 10 ft. clearance to objects that can catch re
or sources of ignition such as pilot lights on water heaters, live electrical appliances, etc.
• When adding charcoal and/or wood, use extreme caution.
• Never move grill when it is in use or when it contains hot coals or ashes.
• Do not use grill for indoor cooking or heating. TOXIC fumes can accumulate and
cause asphyxiation.
• Do not use in or on boats or recreational vehicles.
• Make sure to empty grease can after every use once completely cooled.
• Do not place grill near ammable liquids, gases, or where ammable vapors may be present.
• When cooking with oil/grease, do not allow the oil/grease to exceed 350°F (177°C). Do not store or
use extra cooking oil in the vicinity of this or any other grill.
• Use caution since ames can are-up when fresh air suddenly comes in contact with re.
WARNING:
FUELS USED IN WOOD OR CHARCOAL BURNING APPLIANCES, AND THE PRODUCTS OF COMBUSTION OF SUCH FUELS, CAN EXPOSE
YOU TO CHEMICALS INCLUDING CARBON BLACK, WHICH IS KNOWN TO THE STATE OF CALIFORNIA TO CAUSE CANCER, AND CARBON MONOXIDE,
WHICH IS KNOWN TO THE STATE OF CALIFORNIA TO CAUSE BIRTH DEFECTS OR OTHER REPRODUCTIVE HARM. For more information go to:
www.P65Warnings.ca.gov.
ADVERTENCIA: LOS COMBUSTIBLES USADOS EN EQUIPOS PARA QUEMAR MADERA O CARBÓN, ASÍ COMO LOS PRODUCTOS DE TAL COMBUSTIÓN,
PUEDEN EXPONERTE A SUSTANCIAS QUÍMICAS, ENTRE ELLAS EL NEGRO DE HUMO Y EL MONÓXIDO DE CARBONO, QUE EL ESTADO DE CALIFORNIA
RECONOCE COMO CAUSA, RESPECTIVAMENTE, DE CÁNCER Y DE MALFORMACIONES CONGÉNITAS Y OTROS DAÑOS AL SISTEMA REPRODUCTOR.
Para más información, visite www.P65Warnings.ca.gov

A-2
• Do not lean over an open grill and be mindful of hands/ngers near the edge of the cooking area.
• When opening the lid, keep hands, face, and body safe from hot steam and ame are-ups.
• WARNING: To avoid injuries, gloves or other protective articles should be used when operating the grill.
• Do not exceed a temperature of 500°F.
• Do not allow charcoal and/ or wood to rest on the walls of grill. Doing so will greatly reduce the life
of the grill.
• Always wear grill gloves to protect hands from burns. Avoid touching hot surfaces.
• CAUTION: Exposed metal dampers on air vents and/or metal handles are hot during usage. Again,
always wear grill gloves when adjusting air ow to protect hands from burns.
• Do not alter this grill in any manner.
• When opening lid, make sure it is pushed all the way back so it rests against the lid support
brackets. Use extreme caution as hood could fall back to a closed position and cause bodily injury.
• Close lid and all dampers to help suffocate ame.
• Always hold an open lid from the handle to prevent it from closing unexpectedly.
• Never leave coals and ashes unattended. Before grill can be left unattended, coals and ashes must
be removed. Use caution to protect yourself and property.
• Carefully place remaining coals and ashes in a noncombustible metal container and saturate
completely with water. Allow coals and water to remain in a metal container for 24 hours prior
to disposing.
• To protect against bacteria that could cause illness, keep all meats refrigerated and thaw in
refrigerator or microwave. Keep raw meats separate from other foods, and wash everything that
comes in contact with raw meat.
• Cook meat thoroughly, and refrigerate leftovers immediately.
• Use a calibrated food thermometer and the USDA guidelines to ensure that meat, poultry, seafood,
and other cooked foods reach a safe minimum internal temperature.
• Always have a re extinguisher near at all times. Maintain and check your re extinguisher regularly.
THESE WARNINGS ALSO APPLY TO THE SIDE FIRE BOX.
IMPORTANT SAFETY WARNINGS
(Continued)

A-3
*** STOP! CALL FIRST! ***
Do NOT Return Product to Store.
This grill has been made according to the highest of quality standards. If you have any questions
not addressed in this manual or if you need parts please call our Customer Service Department at
1-912-638-4724 (USA) or email Char-Griller
®
at: Service@CharGriller.com and have your serial
number handy.
REGISTER YOUR GRILL:
To take full advantage of the Char-Griller
®
warranty be sure to register your
grill by visiting www.CharGriller.com/Register or calling Customer Service
at 1-912-638-4724.
Registration provides important protections:
1. Register your grill today to activate your warranty and get exclusive access
to product developments, updates, and recipes.
2. This allows us to help you get warrantied parts to your quickly and provide
enhanced customer service.
NOTE: You will need your model #, serial number, and a copy of the original sales
receipt when registering.
Document Your Serial Number HERE:
(Serial number is located on the back of the griddle body or on the leg.)
_________________________
(SERIAL #)
(example)

A-4
WARRANTY INFORMATION
A COPY OF THE DATED PROOF OF PURCHASE (RECEIPT) IS REQUIRED WHEN REGISTERING OR
SUBMITTING A WARRANTY* CLAIM. PLEASE RETAIN A COPY OF THE RECEIPT FOR YOUR RECORDS.
Char-Griller
®
will replace any defective part of its grillers/smokers, under warranty, as outlined below.
PLEASE READ THIS INFORMATION IN DETAIL AND IF YOU HAVE ANY QUESTIONS CONTACT CUSTOMER
SERVICE AT 912-638-4724 OR [email protected].
SURFACE RUST IS NOT CONSIDERED A MANUFACTURING OR MATERIALS DEFECT
Char-Griller
®
grills are made of steel and if exposed to the elements rust will occur naturally. Please refer to the
section entitled, “Usage” to review how to care for your grill properly.
Surface issues such as scratches, dents, corrosion or discoloring by heat, abrasive and chemical clearers, surface
rust or the discoloration of steel surfaces are NOT covered under these warranties.
Warranties are for the replacement of defective parts only. Char-Griller
®
is not responsible for damage resulting
from accident, alteration, misuse, abuse, hostile environments, improper installation, and installation not in
accordance with local codes of service of unit.
Excluded Under ALL Warranties
Paint; Surface Rust; Heat Damage; Incorrect Parts ordered by customer, including shipping; Worn Parts; Missing
or damaged parts not reported within two (2) months of purchase date; Defective parts not reported within one (1)
year of purchase date; Fading grill cover.
*NOTE: For warranty claims, photos and prepaid return of the item in question may be required. Misuse, abuse or
commercial use nullies all warranties.
Charcoal / Pellet / Kamado Grills
Grill - Hood AND Bottom
(excludes removable Ash Pan)
5 years from date of purchase for rust
through / burn through
Ash Pan AND Defective Parts
1 year from date of purchase
Gas Grills
Grill Hood (TOP half) AND Main Burner Tubes
(excludes Side Burner)
5 years from date of purchase for rust
through / burn through
Grill Body (BOTTOM half) AND Side Burner
AND Defective Parts
1 year from date of purchase
Dual Fuel Grills (Gas & Charcoal)
Charcoal Grill - Hood AND Bottom AND Gas
Grill Hood (TOP half) AND Main Burner Tubes
(excludes Ash Pan and Side Burner)
5 years from date of purchase for rust
through / burn through
Ash Pan AND Defective Parts AND Gas Grill
Body (BOTTOM half) AND Side Burner
1 year from date of purchase
Parts, Accessories, and Grill Covers 1 year from date of purchase
(seam tears only for covers)

B-1
ASSEMBLY INSTRUCTIONS
1 2 3
4
5
6
7
8
9
10
11
12
13
14
17
18
19
20
23
22
24
25
K
27
28
29
30
31
7
6
32
33
34 35 36
31
29
6
10
M
16
L
23
L
sold under license from w.c. bradley co.

B-2
PARTS LIST
Item QTY Part Name
1 1 SMOKESTACK
2 1 GRILL HOOD
3 1 LOGO PLATE
4 1 WARMING RACK
5 1 GRILL BODY
6 4 HOOD HANDLE BEZEL
7 2 HOOD HANDLE (INCLUDED IN HARDWARE PACK)
8 1 SIDE FIRE BOX
9 1 SIDE HANDLE
10 2 SIDE FIRE BOX COOKING GRATE
11 1 SIDE FIRE BOX CHARCOAL GRATE
12 1 DRAWER HANDLE
13 1 DRAWER DAMPER CIRCLE
14 1 DRAWER
M 2 SIDE FIRE BOX SPACER TUBE
16 1 REAR LONG LEG
17 2 LONG LEG CAP
18 1 FRONT LONG LEG
19 1 GREASE CUP HOLDER
20 1 BOTTOM SHELF
L 2 HUB CAPS (INCLUDED IN HARDWARE PACK)
22 1 AXLE ROD
23 2 WHEELS
24 1 FRONT SHORT LEG
25 1 REAR SHORT LEG
K 3 UTENSIL HOOKS
27 1 METAL SIDE SHELF
28 1 ASHPAN
29 2 ASHPAN HANGER
30 1 GRATE LIFTER
31 5 COOKING GRATE
32 1 THERMOMETER BEZEL
33 1 THERMOMETER
34 1 SMOKE STACK DAMPER
35 1 SMOKE STACK SPRING
36 1 AKORN NUT

B-3
Assembly: Requires 2 people. Tools Needed: Hammer, Phillips Head Screwdriver, Pliers,
and a 7/16” Nut Driver.
**NOTE: DO NOT tighten any bolts unless instructed to do so. Tightening too
soon may prohibit parts from tting together. All hex nuts should be on the
inside of the grill unless stated otherwise. Unpack all contents in a well cleared
and padded area.**
Estimated Time: 45 minutes
Hardware Pack #551161
HARDWARE NEEDED
Part No. Description Photo QTY
SHOULDER BOLT, 5/16 - 18 2
HEX BOLT 1/4 - 20 X 1/2”
30
HEX BOLT 1/4 - 20 X 3/4”
3
HEX BOLT 1/4 - 20 X 2”
2
FLANGE HEX NUT 1/4 - 20
19
LOCK WASHER 1/4”
15
FLAT WASHER 1/4”
2
FLAT WASHER 2/5”
2
HAIR COTTER PIN 1”
2
HAIR COTTER PIN 1.5”
2
UTENSIL HOOKS 3
HUB CAP 2
SIDE FIRE BOX SPACER TUBE 2
HEX BOLT 1/4 - 20 X 5.75” 2
A
G
C
I
B
H
D
J
K
L
M
N
E
F

B-4
STEP 1
x6
B
x6
F
F
B
B
5
F
25
16
17

B-5
STEP 2
x6
B
x6
F
B
F
B
F
24
18
17

B-6
STEP 3
x4
B
B
B
B
B
20

B-7
x2
J
x2
H
x2
L
STEP 4
J
H
J
H
L
L
J
H
22
23
ALTERNATIVE VIEW
L
23
22
23

B-8
x2
A
x2
I
STEP 5
A
I
A
I
A
I

B-9
STEP 6
33
32

B-10
STEP 7
6
7

B-11
E
E
B
1
34
36
34
1
REVERSE VIEW
STEP 8
x2
B
x2

B-12
STEP 9
x4
B
B
B
B
B
27

B-13
E
D
C
4
STEP 10A
x2
C
x2 x4
D E
D
E
E
E
E
D
C
C
ALTERNATIVE VIEW

B-14
STEP 10ASTEP 9
4
4
4

B-15
STEP 11
x6
B
x6 x2
E M
x2
N
8
B
N
N
M
M
B
E
E
DO NOT FULLY TIGHTEN BOLTS UNTIL
AFTER SPACER TUBES ARE INSTALLED

B-16
x2
B
STEP 12
x2
E
7
6
6
9
B
E
B

B-17
x3x1 x2
GEC
x3
F
STEP 13
12
13
14
C
G
G
F
F
F
E
E
E

B-18
STEP 14
14
11
10

B-19
STEP 15
29
29
28
29

B-20
19
19
31
Installed view of the Grease
Cup Holder.
K
STEP 15
x3
K

B-21
FULLY ASSEMBLED
GET STARTED WITH
THIS GRILLING GUIDE!
Installed view of the Grease
Cup Holder.

C-1
OPERATING INSTRUCTIONS
Setting Up
This grill is designed for use outdoors, away from any ammable materials. When in use, it is important
that there are no overhead obstructions and that the grill is at least 3 ft. from any wall or surface.
Maintain 12 ft. of clearance to objects that can catch fire or sources of ignition such as pilot lights on
water heaters, live electrical appliances, etc. It is important that the ventilation openings of the grill are
not obstructed.
The grill must be used on a level, stable surface. The grill should be protected from direct wind drafts
and protected from any trickling water (i.e. rain or water from gutters). Do not move the grill while hot,
and do not leave unattended during operation.
NEVER EXCEED 500°F BECAUSE THIS WILL DAMAGE THE FINISH AND
CONTRIBUTE TO RUST. PAINT IS NOT WARRANTED AND WILL REQUIRE TOUCH-UP
.
THIS UNIT IS NOT WARRANTED AGAINST RUST.
36 INCHES
(90 CM)
N
O
O
V
E
R
H
E
A
D
O
B
S
T
R
U
C
T
I
O
N
CAUTION
CAUTION
HOT
DO NOT MOVE
DO NOT MOVE

C-2
Lighting Instructions
There are a few methods to light your charcoal grill, depending on the materials you prefer to use.
Using a charcoal chimney is the Char-Griller
®
preferred method for speed and convenience but igniting
your lump charcoal or briquettes directly in the grill is a great way to get cooking as well.
NOTE:
• Do not use lighter uid, gasoline, kerosene, alcohol or other accelerant for lighting charcoal due to
ammability, risk of bodily injury and potential to leave a distasteful avor in your food.
• If necessary, use tongs to move coals for even heat.
• Always wear gloves when handling grill grates, chacoal grate, or adjusting coals.
Charcoal Chimney
1. Remove your grill grates and set them to side
2. Fill your charcoal chimney ¾ of the way full with
briquettes or lump charcoal
3. Set re starter on charcoal grate, light and then
place the charcoal chimney directly on top of the
re starter
4. Coals will re upward from bottom to top
5. After coals on top of chimney are ignited (usually
10-15 minutes) dump the coals over the charcoal
grate and replace your grill grates
Fire Starters
1. Remove your grill grates and set them to side
2. Pour approximately 3lbs (approx. 50-60 briquettes)
of charcoal directly on to your charcoal grate and
stack together in a pile
3. Insert re starter into the middle of the charcoal pile
so that it is slightly covered and light
4. After the charcoal has thoroughly ignited, typically
glowing red or gray in color, use tongs to spread
them out and replace your grill grates

C-3
Direct Heat
SEAR (HI-TEMP DIRECT HEAT) - 450°-500°F
Up to 3 lbs. Charcoal (50-60 Briquettes)
Chacoal Grate adjusted to highest setting or
close to the cooking grates
Indirect Heat Direct Heat
Grilling Styles
Your Char-Griller
®
grill can be used to smoke, grill or sear your food. By using temperature zones,
charcoal and wood avor, you can customize your culinary experience as desired. The following
descriptions provide four of the most common ways you can cook with your Char-Griller
®
charcoal grill.
Sear
Quickly cook with direct heat at high
temperatures (450°-500°F).
1. Set charcoal grate to high setting (closest
to grill grates) using adjustable charcoal
tray hangers
2. Prepare up to 3 lbs (approximately 50-60
briquettes) of lit charcoal spread evenly
across charcoal grate.
3. Once the grill is at the desired temperature,
you may begin to cook by placing food
directly over the coals.
4. Food will cook quickly. Cook each side
3-4 minutes and then bring to desired
internal temperature.
5. NOTE: Always sear with the grill lid open to
prevent damage to exterior nish.
Grill
Cook with direct and indirect heat at medium
temperatures (300°-450°F). Utilize a two zone
set up to cook at different speeds
and temperatures.
1. Set charcoal grate to medium setting
(halfway between grill grates and grill body)
using adjustable charcoal tray hangers
2. Prepare up to 2 lbs (approximately 30-40
briquettes) of lit charcoal spread evenly
across HALF the charcoal grate creating 2
Cooking Zones.
3. Once the grill is at the desired temperature,
you may begin to cook. First place food over
direct heat, cooking each side as desired.
After initially cooking over direct heat, move
to the cool zone (see picture at right) to bring
your food to the desired internal temperature.
4. NOTE: Wood chips, chunks or split logs may
be used in addition to charcoal to add smoke
avor as desired.
GRILL (Direct Heat) - 300°-450°F
Up to 2 lbs. Charcoal (30-40 Briquettes)
Chacoal Grate adjusted to medium setting
6. NOTE: Wood chips, chunks or split logs may
be used in addition to charcoal to add smoke
avor as desired.

C-4
Water Pan
(optional)
Drip Pan
(optional)
Smoke
Cook with indirect heat at low temperatures
(150°-250° F). Use wood chips, chunks, split
logs or pellets to add smoke avor
1. Set charcoal grate to low setting (farthest
from grill grates) using adjustable charcoal
tray hangers
2. Prepare up to 2 lbs (approximately 30-40
briquettes) of charcoal spread evenly
across HALF the charcoal grate creating
two cooking zones
3. Add wood chips, chunks, or split logs as
desired to add smoke avor
4. Once the grill is to desired temperature,
you may begin to cook
5. Keep food over cool side of grill to cook with
indirect heat over the duration of the cook
Cook with indirect heat from the side re box at
low temperatures (150°-250° F). Use split wood
logs, chips, chunks, or pellets to add smoke avor
1. Prepare up to 2 lbs (approximately 30-40
briquettes) of charcoal in the side re box
2. Add wood chips, chunks, split logs or pellets
as desired to add smoke avor
3. Once the grill is at the desired temperature,
begin to cook
4. Food placed closer to the side re box will
cook faster than food placed on the opposite
side of the grill
5. NOTE: Opening the smoking chamber will
extend cooking time.
OFFSET SMOKE (INDIRECT HEAT) - 150-250°F
Up to 2 lbs. Charcoal (30-40 Briquettes)
and or wood fuel in the side re box
Offset Smoke
Cool Zone
Water Pan
(optional)
6. NOTE: Opening the smoking chamber will
extend cooking time.
SMOKE (INDIRECT HEAT) -
Up to 2 lbs. Charcoal (30-40 Briquettes)
Chacoal Grate adjusted to lowest setting or
farthest from the cooking grates

C-5
Controlling Temperature
Controlling the temperature of your grill is all about controlling the air ow to the re. MORE AIR =
MORE HEAT. LESS AIR = LESS HEAT. By opening and closing the top and side dampers, you can
easily control the temperature of your grill. The amount of charcoal used when grilling can also greatly
impact your ability to control temperature. Dampers may need to be adjusted during the cook to account
for changes in weather like wind or to accommodate for more or less fuel. When rst learning how to
operate your grill, always use the same amount of charcoal to best learn your grill’s damper control.
SMOKE
150°-250°F
• Control airow as needed,
by adjusting dampers from
1/3-2/3 of the way open
• For best results, start with
up to 2 lbs. of charcoal
(30-40 Briquettes)
• Place coals on one half
of the charcoal grate -
adjust charcoal grate level
to the middle
SEAR
450°-500°F
• For maximum airow,
both dampers should be
open all the way with air
owing freely
• For best results, start with
up to 3 lbs. of charcoal
(50-60 Briquettes)
• Adjust the charcoal grate to
its highest setting or closest
to the cooking grates
• Start with dampers 1/4 or less
of the way open and adjust as
needed during cook
• For best results, start with
up to 2 lbs. of charcoal (30-40
Briquettes) and/or wood fuel
• Adjust the charcoal grate to
its lowest setting or farthest
from the cooking grates
GRILL
300°-450°F

C-6
Seasoning Your Grill
Seasoning is an important rst step before you start cooking on your new grill. This process will help
protect the interior and exterior grill nish, reduce food sticking to the grates, reduce unnatural avors,
and help prevent the grates from rusting. Char-Griller
®
recommends using axseed oil for seasoning
your grill but most food grade oils (canola, grapeseed, vegetable, safower, etc) will work as well.
STEP 1
LIGHTLY COAT
WITH OIL
1. Char-Griller
®
grills come
pre-coated with vegetable
oil. If this is the rst time
seasoning your grill, move
on to Step 2
2. If re-seasoning your grill,
lightly coat ALL interior
surfaces (including grates
and inside of barrel) of your
grill with axseed or other
vegetable oil
STEP 2
HEAT UP GRILL
1. Following the instructions for
lighting your charcoal (page
C-2) and controlling the
temperature (page C-6),
bring your grill to
approximately 450°F
2. Once at temperature, allow
grill surfaces to season for
20 minutes
STEP 3
RE-APPLY OIL TO
GRATES 5X
1. After 20 minutes, open your
grill and carefully remove
your grill grates with a
grate lifter
2. Using a brush, re-coat both
sides of your grates with
axseed or other vegetable
oil and return to your grill
3. Close lid and allow surfaces
to season for 20 minutes
4. Repeat this process up to
ve times (Add more
charcoal to maintain
temperature as needed)
5. Your grill is now ready
for use
NOTE:
• You can lightly coat the exterior of the grill body (while warm) with vegetable oil. This will extend the
life of the nish, much like waxing a car.

C-7
Care & Maintenance
In order to keep your grill in the best shape, it’s important to keep it clean and maintained. Continued
cleaning and care are key to ensuring a long life for your Char-Griller
®
grill. Have questions? Call, email
or chat online with Char-Griller
®
Customer Service!
** ONLY EMPTY ASHES WHILE GRILL IS NOT IS USE AND COOL TO TOUCH **
IMPORTANT: Charcoal is porous and holds moisture. DO NOT leave charcoal in your grill while you are
not using it. Charcoal and ashes left inside the ash pan may reduce the life of your grill.
FINISH UP
• When you are nished
grilling, clean your grates
with the Char-Griller
®
Grate
Scrape and then lightly coat
your grates with axseed or
other vegetable oil
• Next close both dampers
and the hood allowing the
re to suffocate
• Wait until coals and ash
have completely cooled
before attempting to clean
up or remove
CLEAN UP
• Wait until the re is
completely extinguished and
the grill is cool to the touch
before emptying the ashes
• Remove grates from grill with
grate lifter
• Remove ash pan from grill
• Give the ash pan a few rm
taps to loosen any ash that
may be stuck
• Dump the ashes in a metal
container and cover with
water to ensure there are
no lit coals, then you can
dispose of the ashes
COVER UP
• Extend the life of your grill by
using a Char-Griller
®
custom
t grill cover to protect it from
the elements
• Weather resistant polyester
material protects against
birds, dust, wind, rain
and snow

C-8
Control heat with amount and type of fuel, dual dampers, and adjustable re grate. Adjust re grate one
end at a time. Wood burns hotter than charcoal. More airow helps generate more heat.
Additional charcoal and/or smoking woods may be added while cook is in progress. Wear gloves and
apron when operating your grill.
Only use natural hardwoods intend for cooking. Appropriate selections can typically be found in grocery
stores and outdoor grilling retailers.
When utilizing a water pan, check the water level when cooking more than 4 hours or when you can’t
hear the water simmering. Add water by moving meat over and pouring water through cooking grates
into water pan.
To reduce are-ups, cook with hood in the down position.
When cooking with charcoal, leave the grill hood open during the initial start up and until coals ash over.
The grill hood must remain open anytime the temperature gauge is greater than 500°F.
Always put charcoal on top of the charcoal grate and not directly into the bottom of the grill.
Do not use self-starting charcoal as it will give food an unnatural avor.
Ashes left in grill too long between uses will absorb moisture and will cause rust. Be sure to empty ash
after grill has cooled. Uncoated steel and cast-iron will rust when not properly cared for.
On the EXTERIOR PAINT, remove rust with wire brush and touch up with a high heat paint, available at
most hardware/auto stores. Rustoleum
®
#241169 is the best color match.
Heat gauge may retain moisture, which will steam out during cooking. Gauge can be removed and
calibrated in oven.
For a more tightly sealed grill, ll unwanted holes with nuts and bolts (not included).
Attach a metal can to the grease cup holder or on bottom shelf under the hole in the grill to
catch drippings.
Smokestack and side dampers will be hot. Only touch using gloves or mitts.
Before you use your grill for the rst time you must season the cast iron cooking grates.
After each use, coat the interior grates and bare metal with vegetable oil while warm to reduce the
chance of rust. Proper and regular seasoning will protect against rust and extend the life of your grill and
cooking grates.
Grill will drip oil during the seasoning process and for several uses afterwards, this is normal.
Never exceed 500°F because this will damage the nish and contribute to rust.
Paint is not warranted and will require touch up.
This grill is not warranted against rust.
DO NOT use lighter uid, gasoline, kerosene, alcohol or other accelerant for lighting charcoal. Use of
any of these or similar products could cause an explosion possibly leading to severe bodily injury.
NOTE: Smoke may escape from areas other than the smokestack. This will not affect cooking
CHAR-GRILLER
®
DOES NOT ACCEPT RETURNS ON USED GRILLS.
General Grilling Tips & Warnings

C-9
ENHANCE FLAVOR
Wood Pairing Guide
Different wood varieties possess different avors and Char-Griller
®
recommends pairing your woods
with the meats you intend to cook.
WOOD FLAVOR
ALDER MILD
PECAN MEDIUM
STRONGMESQUITE
MILDMAPLE
MEDIUMOA K
STRONGHICKORY
MEDIUMAPPLE
MILDCHERRY
VEGGIES
SEAFOOD
POULTRYPORKBEEF

C-10
Cooking Guidelines
AVG. COOKING TIMEHEAT LEVELHEAT TYPE
SEAFOOD
LARGE
SHRIMP
4-6 MIN.
1 1/2 OUNCES
SCALLOP
4-6 MIN.
1-INCH THICK
FISH, FILET
5-10 MIN.
1 POUND
FISH, WHOLE
15-20 MIN.
AVG. COOKING TIMEHEAT LEVELHEAT TYPE
CHICKEN
4 OUNCES - BONELESS, SKINLESS
CHICKEN BREAST OR THIGH
8-12 MIN.
3-6 OUNCES - BONE-IN*
CHICKEN THIGH OR LEG
35-45 MIN.
10-12 OUNCES - BONE-IN*
CHICKEN BREAST
35-45 MIN.
8 POUNDS
WHOLE CHICKEN*
3-5 HOURS
AVG. COOKING TIMEHEAT LEVELHEAT TYPE
PORK
1-INCH THICK
PORK CHOP, MEDIUM
8-10 MIN.
8 POUNDS
PORK SHOULDER/BUTT
12 HOURS
3-OUNCE LINK
SAUSAGE
10-13 MIN.
1 POUND
PORK TENDERLOIN
15-20 MIN.
AVG. COOKING TIMEHEAT LEVELHEAT TYPE
BEEF
1-INCH THICK - FILET MIGNON, RIBEYE,
NEW YORK STRIP & PORTERHOUSE
STEAK, MEDIUM
6-8 MIN.
1-INCH THICK
SKIRT STEAK, MEDIUM
4-6 MIN.
3/4 - INCH THICK
BURGER
8-10 MIN.
4 OUNCES
HOT DOG
5-7 MIN.
1-INCH THICK
HANGER STEAK, MEDIUM
8-10 MIN.
*BONE-IN CHICKEN SHOULD INITIALLY BE COOKED OR “BROWNED” OVER DIRECT HEAT FOR SEVERAL MINUTES BEFORE BEING TRANSFERRED TO INDIRECT HEAT.
USDA SAFE MINIMAL
INTERNAL TEMPS
145°F
FISH & SHELLFISH:
160°F
GROUND BEEF OR PORK:
165°F
CHICKEN:
BEEF OR PORK STEAKS
OR CHOPS:
145°F
Cook times outlined in this
chart are general guidelines
that may vary depending or
desired doneness, thickness,
amount of each item being
cooked, grill or grilling style,
ambient temperature and/or
weather. Char-Griller
®
recommends always using
a cooking thermometer to
gauge the internal
temperature of all
meat products.
DIRECT
HEAT
INDIRECT
HEAT
LOW HEAT
150°-250°F
MEDIUM HEAT
300°-450°F
HIGH HEAT
450°-550°F+
SMOKE
HEAT KEY
APPROX. 90 MIN / LB.

D-1
Direct Heat Recipes
Direct Heat is a high heat method used to cook foods that take less than 25 minutes to cook. Typically
this includes foods that are relatively small or thin, such as steaks, chops, boneless chicken breasts, sh
llets, hamburgers, etc.
• Cooking with a MEAT THERMOMETER ensures food is fully cooked. Insert thermometer into the
thickest part of the meat, not touching bone, and allow 1 to 1 1/2 minutes to register temperature.
• USDA Safe Minimal Temperature is 165°F for chicken / poultry.
• USDA Safe Minimal Temperature is 145°F for Beef, Pork, Veal & Lamb (Steaks, chops, roasts).
GRILLING RECIPES
Ingredients:
1.5 Pound Flank Steak
1.5 tsp of Smoked Paprika
2 Garlic Cloves, Minced
Salt and Pepper to Taste
4 Ears of Corn
2 Large Zucchini, Cut in Half Lengthwise
1 Pint Cherry Tomatoes
3 Tbsp of Olive Oil
1.5 Tbsp of Fresh Rosemary, Chopped
1 Tbsp of Red Wine Vinegar
2 Garlic Cloves, Minced (Oil Dressing)
2 Tbsp of Canola Oil
Instructions:
1. Season ank steak with paprika and garlic.
Rub on all sides and season with salt and
pepper.
Brush with canola oil.
2. Brush corn, zucchini, and tomatoes with
canola oil and season with salt and pepper.
3. Preheat the grill to medium high heat.
4. Add ank steak to grill, ip once and cook to
desired internal temperature. About 4 to 6
minutes per side, let rest 5 minutes.
5. Add vegetables to grill and turn occasionally
until lightly charred all over.
6. Whisk olive oil, rosemary, red wine vinegar,
garlic and salt and pepper to taste in a
small bowl.
7. Brush steak and drizzle vegetables with olive
oil mixture and serve with steak immediately.
GRILLED FLANK STEAK WITH VEGETABLES
A vastly under-appreciated meat, the ank steak can be a avorful and fast meal for the weeknights.
Get dinner on the table in under 20 minutes and use a charcoal grill to get all the best avors of summer
with this ank steak recipe.
FIND MORE RECIPES
AT CHARGRILLER.COM

D-2
Meat Marinade
Ingredients:
1/2 cup Olive Oil
1/3 cup Soy Sauce
1/4 cup Red Wine Vinegar
2 tbsp. Lemon Juice
1 tsp. Dry Mustard
1 minced Garlic Clove
1 small Onion, minced
1/4 tsp. Pepper
Instructions:
1. Mix marinade ingredients in nonmetal dish.
2. Let steak stand in marinade for no less than 4
hours in refrigerator.
3. Sear each side over high heat for 5 minutes;
cook to desired internal temperature.
4. Cut steak diagonally across the grain into thin
slices before serving.
Ingredients:
2 Pork Tenderloins
2 tsp Paprika
1 tsp Garlic Powder
1 tsp Cilantro
1 tsp Oregano
Salt and Pepper to Taste
Olive Oil
Instructions:
1. Blend spices together in a bowl. Rub pork
with olive oil and then season liberally on both
sides with spice blend.
2. Set up your Char-Griller for direct cooking.
Ignite burners and turn to medium high.
3. Place pork on the grill and cook for 8 to
10 minutes per side or until the internal
temperature reads 165°F or until desired
internal temperature (USDA Safe Minimal
Temperature for Pork is 145°F).
4. Remove from the grill and let rest for
10 minutes.
CHAR-GRILLER
®
ORIGINAL MARINATED FLANK STEAK
QUICK AND EASY GRILLED PORK TENDERLOIN
Need dinner in a hurry? This quick and easy pork tenderloin recipe is a crowd pleaser. Pair with grilled
red potatoes and asparagus for a simple but avorful dinner!

D-3
Instructions:
1. Bring to room temperature before cooking.
2. Mix in chopped onions, green peppers, salt,
sear 3/4 inch patties on each side.
3. Cook over medium heat with lid down to
avoid are-ups.
4. Cook each side 3 to 7 minutes according to
desired temperature.
5. Ground meat will be done when juices run
clear (USDA Safe Minimal Temperature for
ground meat is 160F).
6. Burgers can be basted with marinade when
turning and/or other ingredients can be mixed
in with the ground beef such as chili sauce
or powder.
Ingredients:
1.5 lbs Ground Beef
1/2 Packet of Dry French Onion Soup Mix
1/4 Cup of French Dressing
2 Tbsp of Worcestershire
1/2 tsp of Salt
1/4 tsp of Black Pepper
Block of Cheddar Cheese
Instructions:
1. Slice cheese into blocks approximately ¼ inch
thick and 2 inches wide by 2 inches tall.
2. Add French Onion Soup Mix, Salt, Pepper,
French Dressing, and Worcestershire sauce to
ground beef and mix well.
3. Take a portion of the meat and form into
a patty.
4. Put the cheese block in the middle of the patty
and wrap the cheese completely with the beef.
Form a patty with the cheese inside.
5. Repeat with the remaining beef and cheese.
6. Preheat the grill to 400°F
7. Cook burgers for 3 minutes on the rst side
and then ip.
8. Cook the burgers for 6 minutes on
the other side. Ground meat will be done
when juices run clear (USDA Safe Minimal
Temperature for ground meat is 160F).
9. Add desired toppings and enjoy!
HAMBURGERS
Season to taste with Char-Griller
®
“Original” All-Purpose or Steak Seasoning.
You may also marinate by allowing to stand in marinade for 1 or 2 hours at room temperature before
cooking, or let stand in covered dish in refrigerator up to 24 hours.
JUICY LUCY HAMBURGERS
If you think there is no way that the classic hamburger could get better, just wait until you try the
Char-Griller
®
Juicy Lucy Burger. Packed with avor and melted cheese, these burgers are sure to be a
hit this summer.

D-4
SHRIMP (Peeled) & CRAYFISH
Instructions:
1. Place on skewers.
2. Coat with melted butter and garlic salt.
3. Grill 4 minutes on each side or until pink.
Cocktail sauce optional.
HOT DOGS
Instructions:
1. Grill with lid open for approximately 6 minutes.
2. Turn every few minutes.
Ingredients:
4 Jalapeños
Char-Griller Steak Rub to Taste
1/3 Cup Cream Cheese
3 Slices of Bacon
Shredded Cheese to Taste
Instructions:
1. Mix cream cheese, shredded cheese, Char-
Griller
®
Steak Rub in a bowl and set aside.
2. Slice jalapeños through the middle to make it
boat shaped.
3. Using a spoon remove the pith and seeds to
create room for the lling.
Tip: If you like heat then leave some seeds
behind. Seeds provide the heat.
4. Fill jalapeños with lling.
5. Slice bacon into small strips then lay it over the
lling on the jalapeños.
6. Sprinkle a small portion of the Char-Griller
®
Steak Rub on top of the bacon.
7. Fire up your Char-Griller Grill to 400°.
8. Place Jalapeño Bacon Blanket Poppers in the
grill/smoker and smoke for 30 minutes or when
the bacon is golden brown. Remove and enjoy!
JALAPEÑO BACON BLANKET POPPERS
Need and easy to make snack for this big game? These Jalapeno Bacon Blanket Poppers are a crowd
pleaser and are super easy to whip up on the grill. The bacon gets crispy quickly and doesn’t burn
easily since it’s just sitting on top of the cream cheese lling. Easy, delicious and the perfect size for an
appetizer, your friends and family will be asking you to make these again and again!

D-5
Indirect Heat Recipes
Ingredients:
6 Russet Potatoes
1 Pack of Cheddar Cheese Slices
1 Pack of Pepper Jack Slices
Chipotle Powder
Oregano
Salt and Pepper to Taste
Cooked Bacon (Diced)
Chives (Sliced)
Sour Cream
Instructions:
1. Set up your grill for indirect cooking.
2. Cut thin slices in the width of the potatoes, but
be careful to not slice all the way through.
3. Wrap the potatoes in foil and place on the side
of the grill away from the ames. Allow to cook
until tender. About 45 minutes to an hour.
4. Remove potatoes from the grill and unwrap.
5. Place alternating slices of cheddar and
pepperjack in the potato.
6. Season potatoes with chipotle powder, salt,
pepper, and oregano.
7. Place potatoes back on the grill unwrapped for
10 to 12 minutes or until cheese is melted.
8. Garnish with bacon, chives, sour cream
and serve.
Ingredients:
4 lbs. of Chicken Wings
16 oz. Bottle Italian dressing
1 Cup of Shredded Parmesan Cheese
1/2 Tbsp. Onion Salt
1/2 Tbsp. Black Pepper
1 Cup of Butter
1 Tbsp. Oregano
2 Tbsp. Garlic Powder
A pinch of rosemary
Instructions:
1. Marinate wings overnight or at least four hours
in Italian dressing
2. Add charcoal to one side of grill for indirect
grilling, or use Smokin’ Stone
™
and add
avored wood chips/chunks if desired
3. Let grill preheat to 275˚F
4. Place wings on indirect heat side of grill
5. Smoke wings for 45-60 minutes, until internal
temp reaches 170˚F
6. While wings are smoking, make garlic
Parmesan sauce by mixing Parmesan cheese,
garlic powder, onion salt, black pepper, butter,
oregano and rosemary
7. Remove wings from grill and toss in garlic
Parmesan sauce
HASSLEBACK POTATOES
A side dish that can basically be a meal in and of itself, these Hassleback Potatoes can be completely
customized with toppings and types of cheese!
GARLIC PARMESAN CHICKEN WINGS
Replicate the signature avors of your favorite wing spot with this marinated Garlic Parmesan Recipe.

D-6
Ingredients:
2 Cedar Planks
2 Salmon Filets
Olive Oil
Rosemary
Salt and Pepper to Taste
Instructions:
1. Soak cedar planks in water for at least 8 hours.
2. Set up your grill for Indirect cooking
3. Add 30 to 40 charcoal briquettes to one side of
the grill
4. Ignite charcoal with gas burners set to
medium high
5. Once charcoal is lit, turn off gas burners and
allow to fully ash over
6. Rub salmon on both sides with olive oil.
7. Season with salt and pepper, rosemary sprigs
and slices of lemon
8. Place salmon on the side of the grill away from
the charcoal
9. Cook salmon for 15 minutes or until akey.
CEDAR PLANK SALMON
Think you can’t get the perfect smoked salmon on a gas grill? Think again. With indirect grilling, you can
get the perfect cedar plank soaked salmon every time.
Ingredients:
3 Lbs Chicken Thighs
2 Tbsp Favorite BBQ Chili Seasoning
1 Lime
Chopped Cilantro for Garnish
1 Lime Juiced (Marinade)
1 - 12 oz Beer (Marinade)
Salt & Pepper to Taste (Marinade)
Instructions:
1. Trim excess fat off chicken thighs and place
in a large bowl. Add the marinade ingredients
and let sit in the refrigerator for 1-2 hours
before cooking.
2. Remove chicken from marinade and season
with your favorite BBQ chili seasoning. Get the
grill up to 375° F and place the chicken over
indirect heat.
*Tip: To get crispier chicken skin ip the
chicken over about half-way through
the cook and move to direct heat. Make
sure internal temp is at least 165F before
removing for the grill.*
3. Pull the chicken and garnish with chopped
cilantro and a squeeze of lime over the top.
4. Serve and enjoy!
CHILI-LIME CHICKEN THIGHS
Perfect for tacos, fajitas, nachos, or as a dish all on it’s own, this Chili-Lime Chicken Thighs Recipe,
prepared by our ambassador, BBQFiends, can be quickly cooked on a grill for a weeknight meal or
cooked with charcoal on the weekend to add just the right kick of smokey avor.
SWEET CORN IN HUSKS
Instructions:
1. Trim excess silk from end and soak in cold salted water 1 hour before grilling.
2. Grill 25 minutes – turning several times.

D-7
Smoking Recipes
Ingredients:
2 Pork Butts (6-10 lbs. each)
Apple juice
Your favorite rub/seasoning
Mustard
Preparing the Meat:
1. Remove the pork butt from the plastic wrap &
pat dry using a paper towel.
Tip: Choose a pork butt with a full fat cap.
This helps the meat while it’s smoking for a long
period of time.
2. Trim the excess fat that is loose and pulls up
easily. Score the fat cap 1/8 to 1/4-inch-deep
diagonally, spaced out 1/2 to 1 inch apart.
Tip: Scoring the meat allows the seasoning
and smoke to penetrate into the pork butt.
3. Fill the marinade injector with apple juice and
inject into the top and sides of the meat.
4. Spread a coating of mustard using a basting
brush all over the pork butt.
5. Tip: This allows the rub to stick to the pork butt.
6. Generously season the pork butt on all sides
with your favorite rub.
Tip: After seasoning, wrap in Saran Wrap
and store in the refrigerator overnight
or 8-10 hours. This allows the rubs to
penetrate and apple juice to tenderize the
pork butt.
Cooking Directions:
1. Ignite charcoal and preheat the smoker to
225°F.
2. Add boiling water to the drip pan and place
under the grill grate.
Tip: This will add moisture for the cook and
collect the drippings .
3. Smoke the pork butts for 2 hours per pound
at 225°F, until the meat reaches an internal
temperature of 160°F.
Tip: Maintain a 225°F temperature, check
re hourly or when needed. Also spritz
with apple juice every time you add fuel
to your re. Spritzing adds moisture and
avor. It prevents the pork butt from drying
out and helps to create the bark. Monitor
the temperature using a folding probe
thermometer and/or remote thermometer.
4. Remove the pork butts from the smoker and
double wrap in foil. Before closing the wrap,
add 1 Cup of apple juice and 1 stick of butter
for each pork butt, more seasoning and BBQ
sauce, to taste.
5. Place back in the smoker and cook until the
pork butt reaches an internal temperature of
199°F, then remove from the smoker.
Tip: Wrap pork butt in a large towel and
place in a cooler or just set to the side for
a minimum of 1-2 hours for resting. This
allows the meat to cook down and stop
cooking and is a major key in the process.
6. After resting, remove the towel and foil. Pull
apart the pork using two forks or meat claws.
Make pulled pork sandwiches and endless pulled
pork dishes. Enjoy!
“CERTIFIED” PORK BUTT
A great pork butt recipe perfect for beginners and pitmasters alike. This slow smoked pork butt recipe is
great shredded and piled high with coleslaw for a sandwich or eaten on it’s own straight out of the pan!

D-8
Ingredients:
4 Racks of Ribs
2 Cups of Apple Cider, 2 Additional Cups
in Spray Bottle
8 Tbsp of Salted Butter
1 Cup of Favorite BBQ Sauce
1 Cup Dark Brown Sugar
Char-Griller Rib Rub
4 Tbsp Honey
Instructions:
1. Prepare your Char-Griller
®
Offset Smoker for
smoking by starting half a chimney starter of
charcoal and adding it to the Side Fire Box.
Alternatively, prepare your grill for the indirect
method with coals arranged opposite where
you plan to place the ribs.
Tip: Add about half a chimney of unlit
charcoal to the Side Fire Box close to the
barrel before adding the lit charcoal next
to it. The lit charcoal will gradually light the
unlit charcoal to help maintain temperature
for longer.
2. Add three to four chunks of Apple Wood and
close the lid.
3. Allow the grill to heat up to about 200°F.
4. Remove the membrane from the ribs.
Tip: Start at the narrower end of the rack,
carefully work a paring knife under the
membrane to get it started, and remove the
membrane using a paper towel.
5. Liberally season both sides of the ribs with
Char-Griller
®
Rib Rub.
6. Open the grill and raise the adjustable re
grate to the top level. This ensures even
smoke distribution.
7. Place a drip pan(s) full of water under the
grates and on top of the re grate in the
main barrel.
8. Place ribs bone side down on the grates, close
the lid and allow to smoke for three hours.
Tip: Place the exposed bone side of the
rib rack towards the Side Fire Box to get
the meat to pull away from the bone better.
If using the indirect method, place ribs
opposite the coals.
9. Periodically check the temperature to ensure it
is holding steady at 200°F. If you have to add
charcoal, only add lit charcoal.
10. Every 30 minutes, spray the ribs with Apple
Cider and move the rib rack that is closest to
the Side Fire Box to the side of the grill that is
furthest from the Side Fire Box and move the
other rib racks closer to the Side Fire Box to
accommodate. Repeat the spray and rotate
method every 30 minutes.
11. Remove ribs from the grill after three hours.
12. Tear off a large sheet of heavy-duty aluminum
foil. (One for each rack of ribs.)
13. Place one rack of ribs bone side up on each
piece of aluminum foil.
14. Coat the bone side of ribs with brown sugar,
honey, and four pats of butter.
15. Pour over ½ cup of apple cider.
16. Fully crimp the edges of the foil together to
cover the ribs.
17. Fully crimp the edges of the foil together to
cover the ribs.
18. Repeat with the other three racks of ribs.
3-2-1 RIBS
The 3-2-1 rib method might be something you have seen thrown around on social media. It’s a popular
technique for smoking ribs that are tender, juicy, and come clean off the bone. Simple and easy to
follow, this is a surere way to guarantee your ribs are nger lickin’ good.
The 3-2-1 Method is a process that involves smoking the ribs for three hours, wrapping them in foil
and braising for two hours, and the smoking unwrapped for one hour. This not only helps the ribs cook
faster, it ensures an even smoke ring, and more tender meat.

D-9
Ingredients:
10 ½ lb. beef brisket
½ Cup paprika
¼ Cup packed light brown sugar
3 Tbsp. salt
3 Tbsp. coarse black pepper
3 Tbsp. Chili powder
Apple juice
Water
Instructions:
1. Using a sharp knife, trim the fat from the
brisket leaving an even, thin layer on the top.
2. In a medium bowl, combine paprika, light
brown sugar, Chili powder, salt and pepper
and mix well to make rub seasoning. Using
your hands, or a shaker, generously apply rub
all over.
3. Wrap the brisket in plastic wrap and refrigerate
for at least 12 hours.
4. When setting up the grill, add wood chips/
chunks to charcoal and add Smokin’ Stone
with an aluminum pan on top. Pour apple juice
and water into the pan, about halfway full.
Place a temperature probe at grate level and
heat grill to 220°F.
5. Place brisket on grates, fat side up, and allow
to smoke for 5 hours. After 5 hours, wrap the
brisket in butcher paper and return to grill
at 220°F. Brisket is done when the internal
temperature reaches 195°F. Allow the brisket
to rest for 1 hour.
6. Slice, serve and enjoy!
BRISKET
The brisket recipe is a traditional take on the smoked classic, promising tender, smoky results.
19. Transfer ribs back to the smoker and increase
the temperature to 225°F.
20. Do this by opening the dampers a little more
and adding another half a chimney of lit
charcoal if needed.
21. Allow ribs to braise for two hours.
22. Continue to rotate the ribs as outlined in step
8b to ensure that all of the racks get time close
and far away from the re.
23. Remove the ribs from the grill and foil. Place
back on the grill bone side down.
24. Brush ribs with your favorite BBQ sauce and
cook for one hour at 225°F.
25. Remove and enjoy!
Instructions for 3-2-1 RIBS, continued:

D-10
Ingredients:
1 Package of Elbow Macaroni
½ Stick of Butter
¼ Cup of All Purpose Flour
1 Cup of Heavy Cream
1 Cup of Milk
2 Cups of Cheddar Cheese (Shredded)
1 Cup of Gouda Cheese (Shredded)
1 Cup of Colby Jack Cheese (Shredded)
½ Cup of Cream Cheese
2 Tbsp of Black Pepper
1 Tsp of Cayenne Pepper
1 Large Cast Iron Skillet
Instructions:
1. Boil elbow macaroni according to package
instructions for al dente.
2. Preheat the smoker to 225°F using a fruity
hardwood like apple or cherry in the
Side Fire Box.
Tip: If your grill does not ha ve the Side
Fire Box attachment, easily turn it into a
smoker by arranging coals/wood
opposite of where you place the mac
and cheese pan. If you place the pan
on the right side of the grates, simply
place wood on the right side for an indirect
cooking experience.
3. Heat the cast iron skillet over medium heat,
then melt butter and whisk in our.
4. While continuing to whisk, add milk and heavy
cream bringing to a boil.
5. Reduce to low-medium heat and whisk in
cream cheese until smooth.
6. Whisk in the rest of the cheeses continuing to
stir until melted and smooth
7. Turn off the heat then stir in macaroni noodles
until thoroughly mixed with cheese sauce
Place the entire skillet in the smoker and cook for
1-2 hours until desired doneness. Keep in longer
for more smoky avor. Serve hot.
SMOKED MAC AND CHEESE
An all-time family favorite, this Smoked Mac & Cheese recipe elevates stovetop or oven baked mac &
cheese with avors sure to keep your smoker red up
Instructions:
1. Rinse pieces in cold water and pat dry with
paper towels.
2. Brush each piece with Olive Oil and season to
taste with salt and pepper.
3. Brown pieces directly above coals with lid
open and grill on high or medium heat for
several minutes.
4. Then place pieces on cooking grate in indirect
cooking area.
5. With the grill on low heat, cook with lid down
for 55 to 60 minutes or until done. Do not use
Olive Oil or salt and pepper if using marinade
SMOKED CHICKEN PARTS
AND HALVES

D-11
SMOKED TURKEY
Instructions:
1. Empty cavity rinse and pat dry with paper
towel.
2. Tuck wing tips under the back and tie legs
together.
3. Place in center of cooking grate directly above
foil drip pan of water.
4. Smoke for 12 minutes per pound. Allow
several extra minutes per pound if stuffed to
allow
for expansion.
Use a meat thermometer for best results
(190°F internal).
SMOKED BAKED HAM:
You can smoke fully cooked canned ham or smoked
and cured whole ham or shank or butt portion.
Glaze
1 cup of Light Brown Sugar, rmly packed
1/2 cup Orange Juice
1/2 cup Honey
Instructions:
1. Combine sugar, juice and honey. Let glaze sit
for at least 4 hours.
2. Remove rind and score fat diagonally to give a
diamond effect.
3. Insert a whole clove into the center of every
diamond.
4. Place ham with fat side up in center of cooking
grate. Close lid.
5. About 9 minutes per pound is suggested for
fully cooked hams. Smoked or cured ham,
which is not fully cooked, should be cooked to
an internal temperature of 160°F.
6. Baste with ham glaze 3 or 4 times during last
30 minutes of cooking time.
7. Garnish with pineapple rings about 15 minutes
before end of cooking time.
SMOKED STUFFED HOT DOGS:
1. Slit hot dogs lengthwise, within 1/4 inch of
each end.
2. Stuff hot dogs with cheese and relish and wrap
in bacon.
3. Place on cooking grate over drip pan and
smoke 15-20 minutes or until bacon is crisp.
SMOKED VENISON
WITH BACON
Venison Marinade
1 cup Balsamic or Red Wine Vinegar
1 cup Olive Oil
2 oz. Worcestershire
½ oz. Tabasco
2 Tbsp. Seasoning Salt
1-2 Chopped Jalapeños
3 oz. Soy Sauce
Bacon Marinade
2 oz. Red Wine Vinegar
2 oz. Worcestershire 4 dashes Tabasco
Instructions:
1. Place leg of venison in a container and
marinate for 2-4 days, turning daily.
2. Leave bacon to marinate overnight.
3. Remove leg from refrigerator at least an hour
before cooking.
4. Season generously with seasoned salt and
coarse ground black pepper.
5. Wrap 1 lb. bacon over the top of the leg, and
smoke 20-25 minutes per pound, or until
tender.
6. Do not overcook.

D-12
CHICKEN MARINADE
Ingredients:
½ Cup Soy Sauce
¼ Cup Olive Oil
¼ Cup Red Wine Vinegar
1 Tsp Oregano
½ Tsp Sweet Basil
½ Tsp Garlic Powder with Parsley
¼ Tsp Pepper
Instructions:
1. Pour over chicken pieces in non-metal dish
2. Cover and refrigerate overnight, turning
occasionally. Use marinade to baste chicken
while cooking.
MEAT MARINADE:
(For steaks, chops, and burgers)
Ingredients:
¼ Cup Soy Sauce
2 Large Onions
2 Garlic Cloves, crushed
2 Tsp Salt
2 Tsp Paprika
1 Tsp Fresh Ground Pepper
Instructions:
1. Combine ingredients in an electric blender,
cover, and process at high speed 1 minute or
until mixture is very smooth.
2. Allow meat to stand in marinade at room
temperature for 2 hours or refrigerate up to 24
hours in a covered dish.
3. Bring meat to room temperature before
cooking.
SHISH KABOB MARINADE
Ingredients:
1 Cup Soy Sauce
½ Cup Brown Sugar
½ Cup White Vinegar
½ Cup Pineapple Juice
2 Tsp Salt
½ Tsp Garlic Powder
Instructions:
1. Mix all ingredients together.
2. Marinate beef in mixture a minimum of 4 hours.
Marinades
FIND MORE RECIPES
AT CHARGRILLER.COM

E-1
Original All-Purpose
BBQ Rub
Pairs well with all types
of meat and sh
Quick Release
Chimney Starter
E-Z starter with patened
Trigger release
ABS handle with heat shield
Zinc coated galvanized steel
Makes starting charcoal grill
fast and easy
Char-Griller
®
Trucker Hat
Cotton-poly blended front
Nylon mesh back
Adjustable snapback closure
One Size Fits Most
Charcoal Basket
Connes Coals to One
Side for Smoking
Indirect Cooking
Custom Fit Cover
Weather Resistant
Protects Grill Finish
Folding Probe
Thermometer
Stainless steel
fast-read probe accurately
measures temperature
Easily switch from °F to °C
Auto ON/OFF feature for
extended battery life
Check chargriller.com for your
grill’s custom t cover
Model #6304
Model #19586
Model #70100
Model #9955
Model #85501
FOR MORE
SCAN
FAVORITE ACCESSORIES
FOR THE FULL LINE OF ACCESSORIES VISIT CHARGRILLER.COM

P.O. Box 30864
Sea Island, GA 31561
912-638-4724
www.CharGriller.com
Service@CharGriller.com

OM 1733, E1733 S A.3
SMOKIN’ CHAMP
™
Modelo #1733, E1733
El contenido de este manual está registrado y los derechos de autor son propiedad de Char-Griller® | A&J Manufacturing. El uso de la información contenida en
este manual sin el consentimiento de Char-Griller® y/o A&J Manufacturing está estrictamente prohibido.
MANUAL DEL PROPIETARIO
MANTENGA SU RECIBO
JUNTO CON ESTE MANUAL
PARA FINES
DE LA GARANTÍA.
SERVICIO AL CLIENTE
1-912-638-4724

TABLA DE CONTENIDO
Advertencias De Seguridad Y Garantía .......... A-1
Instrucciones De Montaje ................................ B-1
Uso Del Producto ............................................. C-1
Recetas .............................................................. D-1
Accesorios ........................................................ E-1

A-1
ADVERTENCIAS IMPORTANTES DE SEGURIDAD
LEA TODAS LAS INSTRUCCIONES Y ADVERTENCIAS DE SEGURIDAD
CUIDADOSAMENTE ANTES DE ENSAMBLAR Y OPERAR SU PARRILLERA
Lea todas las instrucciones cuidadosamente y asegúrese de que su parrillera esté ensamblada,
instalada y reciba mantenimiento apropiadamente. El incumplimiento de estas instrucciones puede
causar daños a la propiedad y/o lesiones severas. Si tiene alguna pregunta relacionada con la
instalación u operación, llame al 912-638-4724.
• Exclusivamente para el uso al aire libre y en áreas bien ventiladas.
• Sea precavido durante el ensamblaje y operación de la parrillera, para evitar rasguños y cortadas
con bordes losos.
• No utilice líquido de encendedor, gasolina, querosén o alcohol para encender el carbón. El uso
de cualquiera de esos o de productos similares podría causar una explosión que resulte en
lesiones severas.
• No deje una parrillera encendida sin supervisión. Mantenga a los niños y mascotas alejados de la
parrillera en todo momento.
• No use la parrilla quedo haya vientos fuertes.
• Tenga cuidado al mover la parrilla para evitar lastimarse.
• El consumo de alcohol, medicamentos recetados o no recetados puede afectar la capacidad del
operador para montar u operar la parrilla de forma segura.
• Use la parrilla al menos a 3 pies de cualquier pared o supercie. Mantenga una distancia de 10 pies
de los objetos que pueden incendiarse o fuentes de ignición, como luces piloto en calentadores de
agua, aparatos eléctricos con corriente, etc.
• Sea extremadamente cuidadoso al agregar carbón y/o madera.
• Nunca mueva la parrilla cuando se esté usando o cuando contenga brasas o cenizas calientes.
• NO use la parrilla a gas para cocinar o calentar en interiores. Se podrían acumular vapores
TÓXICOS y causar asxia. No usar en o sobre barcos en vehículos recreativos.
• Asegúrese de vaciar lata de grasa después de cada uso una vez que se haya enfriado por completo.
• No coloque la parrillera cerca de ningún líquido o gas inamable, ni donde puedan estar presente
vapores inamables.
• Al cocinar con aceite/grasa, no permita que el aceite/grasa supere los 350°F (177°C). No almacene
ni use aceite de cocina adicional cerca de este o cualquier otro aparato.
WARNING:
FUELS USED IN WOOD OR CHARCOAL BURNING APPLIANCES, AND THE PRODUCTS OF COMBUSTION OF SUCH FUELS, CAN EXPOSE
YOU TO CHEMICALS INCLUDING CARBON BLACK, WHICH IS KNOWN TO THE STATE OF CALIFORNIA TO CAUSE CANCER, AND CARBON MONOXIDE,
WHICH IS KNOWN TO THE STATE OF CALIFORNIA TO CAUSE BIRTH DEFECTS OR OTHER REPRODUCTIVE HARM. For more information go to:
www.P65Warnings.ca.gov.
ADVERTENCIA: LOS COMBUSTIBLES USADOS EN EQUIPOS PARA QUEMAR MADERA O CARBÓN, ASÍ COMO LOS PRODUCTOS DE TAL COMBUSTIÓN,
PUEDEN EXPONERTE A SUSTANCIAS QUÍMICAS, ENTRE ELLAS EL NEGRO DE HUMO Y EL MONÓXIDO DE CARBONO, QUE EL ESTADO DE CALIFORNIA
RECONOCE COMO CAUSA, RESPECTIVAMENTE, DE CÁNCER Y DE MALFORMACIONES CONGÉNITAS Y OTROS DAÑOS AL SISTEMA REPRODUCTOR.
Para más información, visite www.P65Warnings.ca.gov

A-2
• Sea precavido ya que las llamas pueden intensicarse y estallar cuando el aire fresco entra en
contacto con el fuego.
• NO se incline sobre una parrilla abierta y preste atención a donde pone las manos/dedos cerca del
borde del área para cocinar.
• Cuando abra la tapa, mantenga las manos, cara y cuerpo en resguardo del vapor caliente
y las llamaradas.
• ADVERTENCIA: Para prevenir lesiones utilice guantes o equipo de protección cuando
opera la parrilla.
• No exceda una temperatura de 500°F.
• No permita que el carbón y/o leña repose en las paredes de la parrillera. Esto reduciría
considerablemente la vida útil de la parrillera.
• Siempre utilice agarradores de horno para proteger las manos de quemaduras.
• Evite tocar supercies calientes.
• PRECAUCIÓN: Las compuertas de metal expuestas en los ductos de aire y/o manillas de metal se
calientan durante el uso de la parrillera. Use siempre los agarradores para horno cuando ajuste el
ujo de aire, para proteger las manos de quemaduras.
• No altere esta parrilla de ninguna manera.
• Cuando abra la tapa, asegúrese de empujarla completamente hasta que descanse sobre los
soportes de apoyo de la tapa. Tenga mucho cuidado ya que la cubierta podría caer a la posición de
cerrado, causando lesiones. Siempre sostenga una tapa abierta por el asa, para prevenir que se
cierre inesperadamente.
• Cierre la tapa y todas las rejillas para ayudar a extinguir la llama.
• No deje carbones y cenizas sin supervisión. Antes de dejar la parrillera sin supervisión, retire los
carbones y cenizas. Tome precauciones para protegerse a sí mismo y a la propiedad.
• Coloque los carbones y cenizas cuidadosamente en un contenedor de metal no combustible y
satúrale completamente con agua. Permita que los carbones y cenizas reposen por 24 horas en el
contenedor de metal previo a su desecho.
• Para protegerle de las bacterias que pueden causar enfermedades, mantenga todas las carnes
refrigeradas y descongélelas en el refrigerador o microondas. Mantenga las carnes crudas
separadas de otras comidas, y lave todo lo que entre en contacto con la carne cruda.
• Cocine las carnes cuidadosamente, y refrigere los excedentes inmediatamente.
• Utilice un termómetro para comida calibrado y los lineamientos del Departamento de Agricultura de
los EE.UU. para asegurarse de que la carne, aves, mariscos y otros alimentos cocidos alcancen
una temperatura mínima saludable para su ingesta.
ESTAS ADVERTENCIAS TAMBIÉN APLICAN PARA LA PARRILLERA LATERAL.
IMPORTANT SAFETY WARNINGS
ADVERTENCIAS IMPORTANTES DE SEGURIDAD
(Continuación)

A-3
NO Devuelva El Producto A La Tienda.
Esta parrilla se ha creado siguiendo las normas de calidad más altas. Si tiene preguntas que este
manual no aborda o si necesita piezas, llame a nuestro Departamento de Atención al Cliente al
1-912-638-4724 (EE.UU.) o escríbale un correo electrónico a Char-Griller
®
al: Service@CharGriller.com
y tenga su número de serie a mano.
REGISTRE SU PARRILLA:
Para aprovechar la garantía de Char-Griller
®
al máximo, asegúrese de registrar
su parrilla visitando www.CharGriller.com/Register o llame al departamento de
Servicio al Cliente al 1-912-638-4724.
Registrarse le aporta protecciones importantes:
1. Registre su parrilla hoy para activar su garantía y obtener acceso exclusivo a
desarrollos de productos, actualizaciones y recetas.
2. Esto nos permite ayudarlo a obtener piezas garantizadas rápidamente y brindar
un mejor servicio al cliente.
NOTA: Para registrarse, necesitará su número de modelo, número de serie y una copia del recibo de
compra original.
Documente su números de serie AQUÍ:
(Puede encontrar el modelo y el número de serie en la parte trasera de la carcasa de la parrilla o en la pata).
_________________________
(NO. DE SERIE)
(ejemplo)
***¡DETÉNGASE! ¡LLAME A PRIMERO!***
REGISTRARSE
AQUÍ!

A-4
LA OXIDACIÓN SUPERFICIAL NO SE CONSIDERA UN DEFECTO DE FABRICACIÓN O DE MATERIALES
Las parrillas Char-Griller están fabricadas de acero y la oxidación ocurrirá naturalmente si se exponen a los elementos.
Consulte la sección titulada “Uso” para repasar cómo cuidar su parrilla adecuadamente.
Estas garantías NO cubren problemas superciales, como raspones, abolladuras, corrosión o decoloración por calor,
limpiadores abrasivos y sustancias químicas, oxidación supercial o decoloración de las supercies de acero.
Las garantías son únicamente para reemplazar piezas defectuosas. Char-Griller no se hace responsable de los daños
causados por accidentes, alteraciones, mal uso, abuso, ambientes hostiles, instalación incorrecta e instalación que no
satisfaga los códigos locales de servicio para la unidad.
Se excluye bajo TODAS las garantías
Pintura; óxido de supercie; daño causado por el calor; piezas incorrectas que el cliente haya pedido, incluyendo el
envío; piezas desgastadas; piezas faltantes o dañadas que no se reporten dentro de los dos (2) meses después de la
fecha de compra; piezas defectuosas que no se reporten dentro de un (1) año de la fecha de compra; descoloración de
la cubierta de la parrilla.
*NOTA: Se pueden requerir fotos y el retorno prepago del artículo en cuestión para presentar reclamos de garantía.
El mal uso, abuso o uso comercial invalida todas las garantías.
SE NECESITA UNA COPIA DEL COMPROBANTE DE COMPRA CON FECHA (RECIBO) PARA REGISTRARSE O
PRESENTAR UN RECLAMO DE GARANTÍA*. CONSERVE UNA COPIA DEL RECIBO PARA SUS REGISTROS.
Char-Griller reemplazará cualquier pieza defectuosa de sus parrillas/ahumadores, bajo garantía, según se describe de abajo.
LEA ESTA INFORMACIÓN DETENIDAMENTE Y COMUNÍQUESE CON EL DEPARTAMENTO DE SERVICIO AL CLIENTE
MARCANDO 912-638-4724 O ESCRIBIENDO A SER[email protected]. SI TIENE ALGUNA PREGUNTA.
Parrillas de carbón / Pellet / Kamado
Parrilla - Cubierta Y Parte Inferior
(excluye el cenicero extraíble)
5 años a partir de la fecha de compra por
oxidación / quemaduras
Cenicero Y Piezas defectuosas
1 año desde la fecha de compra
Parrillas a Gas
Cubierta de la parrilla (mitad SUPERIOR) Y tubos de la
hornilla principal (excluye la Hornilla lateral)
5 años a partir de la fecha de compra por
oxidación / quemaduras
Carcasa de la parrilla (parte INFERIOR) Y hornilla lateral Y
piezas defectuosas
1 año desde la fecha de compra
Parrillas de Combustible Dual (Gas y Carbón)
Parrilla a carbón - Cubierta y parte inferior y Cubierta de
la parrilla a gas (mitad SUPERIOR) Y tubos de la hornilla
principal (excluye el cenicero y la hornilla lateral)
5 años a partir de la fecha de compra por
oxidación / quemaduras
Cenicero Y Piezas defectuosas y Carcasa de la parrilla a gas
(parte INFERIOR) Y hornilla lateral
1 año desde la fecha de compra
Piezas, Accesorios y Cobertores Para Parrilla 1 año a partir de la fecha de compra
(únicamente se cubren las roturas de costuras
para los cobertores)
INFORMACIÓN DE GARANTÍA

B-1
1 2 3
4
5
6
7
8
9
10
11
12
13
14
17
18
19
20
23
22
24
25
K
27
28
29
30
31
7
6
32
33
34 35 36
31
29
6
10
M
16
L
23
L
INSTRUCCIONES DE ENSAMBLAJE
vendido bajo licencia de w.c. bradley co.

B-2
Artículo Cantidad Nombre de Parte
1 1 CHIMENEA
2 1
CAMPANA DE PARRILLA
3 1 PLACA DE LOGOTIPO
4 1 RACK DE CALENTAMIENTO
5 1 CUERPO DE PARRILLA
6 4 BISEL DE MANGO CON CAPUCHA
7 2 MANGO CON CAPUCHA (INCLUIDO EN EL PAQUETE DE HARDWARE)
8 1 CAJA DE FUEGO LATERAL
9 1 MANGO LATERAL
10 2 REJILLA DE COCINA DE FUEGO LATERAL
11 1 REJILLA DE CARBÓN LATERAL
12 1 MANIJA DEL CAJÓN
13 1 CAJON CIRCULO DE AMORTIGUADOR
14 1 CAJÓN
M 2 TUBO ESPACIADOR DE CAJA DE FUEGO LATERAL
16 1 PIERNA LARGA TRASERA
17 2 TAPON LARGO
18 1 PIERNA LARGA DELANTERA
19 1 PORTA TAZA GRASA
20 1 ESTANTE INFERIOR
L 2 TAPAS DE HUB (INCLUIDAS EN EL PAQUETE DE HARDWARE)
22 1 BARRA DE EJE
23 2 RUEDAS
24 1 PATA CORTA DELANTERA
25 1 PIERNA CORTA TRASERA
K 3 GANCHOS DE UTENSILIO
27 1 ESTANTE LATERAL DE METAL
28 1 REJILLA PARA EL CARBÓN
29 2 PERCHA ASHPAN
30 1 ELEVADOR DE REJILLA
31 5 Rejilla de cocina
32 1 BISEL TERMÓMETRO
33 1 TERMÓMETRO
34 1 AMORTIGUADOR DE HUMO
35 1 RESORTE DE PILA DE HUMO
36 1 TUERCA CIEGA
LISTA DE PIEZAS

B-3
Artículo Descripcíon Foto Cantidad
PERNO DE HOMBRO, 5/16 - 18 2
PERNO HEXAGONAL 1/4-20 X 1/2” 30
PERNO HEXAGONAL 1/4-20 X 3/4” 3
HEX BOLT 1/4 - 20 X 2” 2
TUERCA HEXAGONAL, CON REBORDE, 1/4-
20
17
ARANDELA, FIJACIÓN, 1/4” 15
ARANDELA, PLANA, 1/4” 2
ARANDELA, PLANA 2/5” 2
PASADOR DE CHAVETA, 1” 2
PASADOR DE CHAVETA, 1.5” 2
GANCHOS PARA UTENSILIOS 3
TAPÓN 2
TUBO DE FUEGO LADO CAJA ESPACIADOR 2
PERNO HEXAGONAL 1/4 - 20 X 3.75” 2
A
G
C
I
B
H
D
J
K
L
M
N
E
F
Ensamblaje: Requiere 2 personas. Herramientas Necesarias: martillo, destornillador Phillips,
alicates, y un destornillador de tuerca de 7/16 “.
**NOTA: No apriete ningún tornillo o perno a menos que se indique explícitamente.
Apretar antes de tiempo puede impedir que las partes encajen. Todas las Tuercas
Hexagonales deben ir en la parte interna de la parrillera a menos que se indique lo
contrario. Desempaque todo el contenido en un área despejada y acolchada.**
Tiempo Estimado de Ensamblado: 45 minutos
Paquete De Hardware: #551161
HARDWARE NECESARIO

B-4
PASO 1
x6
B
x6
F
F
B
B
5
F
25
16
17

B-5
PASO 2
x6
B
x6
F
B
F
B
F
24
18
17

B-6
PASO 3
x4
B
B
B
B
B
20

B-7
x2
J
x2
H
x2
L
PASO 4
J
H
J
H
L
L
J
H
22
23
VISTA ALTERNATIVA
L
23
22
23

B-8
x2
A
x2
I
PASO 5
A
I
A
I
A
I

B-9
PASO 6
33
32

B-10
PASO 7
6
7

B-11
E
E
B
1
34
36
34
1
VISTA REVERSA
PASO 8
x2
B
x2

B-12
PASO 9
x4
B
B
B
B
B
27

B-13
E
D
C
4
PASO 10A
x2
C
x2 x4
D E
D
E
E
E
E
D
C
C
VISTA ALTERNATIVA

B-14
PASO 10B
4
4
4

B-15
PASO 11
x6
B
x6 x2
E M
x2
N
8
B
N
N
M
M
B
E
E

B-16
x2
B
PASO 12
x2
E
7
6
6
9
B
E
B

B-17
x3x1 x2
GEC
x3
F
PASO 13
12
13
14
C
G
G
F
F
F
E
E
E

B-18
PASO 14
14
11
10

B-19
PASO 15
29
29
28
29

B-20
19
19
31
Vista instalada del titular de la
taza de grasa
K
PASO 15
x3
K

B-21
TOTALMENTE ENSAMBLAMENTE
Vista instalada del titular de la
taza de grasa
EMPEZAR CON
ESTA GUÍA DE
PARRILLA!

C-1
INSTRUCCIONES OPERATIVAS
Instalación Del Equipo
Esta parrillera está diseñada para el uso en exteriores, lejos de cualquier material inamable. Es importante que
no exista ninguna obstrucción arriba del equipo y que se mantenga una distancia mínima de 36 pulgadas (91,4
cm) desde la parte lateral o trasera de la parrillera. Es importante que las aperturas de ventilación de la parrillera
no sean obstruidas.
La parrillera debe ser usada en una supercie nivelada y estable. La parrillera debe ser protegida de las
corrientes de viento directas y de cualquier goteo de agua (lluvia o agua residual de canaletas). No mueva la
parrillera mientras esté caliente y no la deje sin supervisión durante su operación.
NUNCA EXCEDA LOS 500 °F. ESTO DAÑARÍA EL ACABADO Y CONTRIBUIRÍA A LA OXIDACIÓN DEL
EQUIPO. LA PINTURA NO ESTÁ CUBIERTA POR LA GARANTÍA Y REQUERIRÁ DE RETOQUES. ESTA
UNIDAD NO TIENE GARANTÍA CONTRA LA OXIDACIÓN.
36 PULGADAS
(90 CM)
A
R
R
I
B
A
S
I
N
O
B
S
T
R
U
C
C
I
O
N
E
S
PRECAUCIÓN
PRECAUCIÓN
CALIENTE
NO MOVER
NO MOVER

C-2
Instrucciones De Encendido
Existen varios métodos para encender su parrillera a carbón, dependiendo del tipo de material que preera usar.
La chimenea de encendido a carbón es el método de encendido preferido de Char-Griller
®
debido a su rapidez
y practicidad pero encender carbón en trozos o briquetas directamente en la parrillera también es un excelente
método de encendido.
NOTA:
• No use uido de encendido, gasolina, querosén. alcohol u otro acelerador para encender el carbón,
debido a la inamabilidad, el riesgo de lesiones corporales y la posibilidad de dejar un sabor desagradable
en su comida.
• Si es necesario, utilice pinzas para mover las brasas para obtener un fuego uniforme.
• Siempre utilice guantes para manejar las rejillas de la parrillera, la rejilla del carbón o para mover las brasas.
Chimenea De Encendido
A Carbón
1. Retire las rejillas de la parrillera y colóquelas a un lado
2. Llene su chimenea de encendido a carbón con
briquetas o carbón en trozos hasta alcanzar ¾
de su capacidad
3. Coloque el encendedor en la rejilla de carbón, encienda
y luego posicione la chimenea de encendido a carbón
directamente sobre el encendedor
4. La brasa se encenderá en dirección ascendente, de
abajo a arriba
5. Después de que las brasas en la parte superior de la
chimenea se enciendan (usualmente en unos 10-15
minutos), vierta las brasas sobre la rejilla de carbón y
coloque nuevamente las rejillas de la parrillera
Encendedores
1. Retire las rejillas de la parrillera y colóquelas a un lado
2. Vierta aproximadamente 3 libras (aproximadamente 50
a 60 briquetas) de carbón directamente sobre la rejilla
de carbón y apílelo
3. Inserte el encendedor en el medio de la pila de carbón,
de modo que esté ligeramente cubierta y enciéndala
4. Una vez que el carbón se haya encendido por completo,
generalmente cuando esté de color rojo o gris, use las
pinzas para moverlo de lado al otro y coloque las rejillas
de la parrillera

C-3
Fuego directo
SELLADO (FUEGO DIRECTO A ALTA
TEMPERATURA) - 450°- 500°F
Hasta 3 libras de carbón (50 a 60 briquetas)
Rejilla de carbón ajustada a la posición más alta o
cerca de las rejillas de cocción
Fuego indirecto Fuego directo
Estilos De Parrilla O Asado
Su parrillera Char-Griller
®
puede ser usada para ahumar, asar o sellar su comida. Al usar las zonas de temperatura,
carbón y sabor a madera, puede personalizar la experiencia culinaria a su gusto. Las siguientes descripción le
explican las cuatro formas más comunes en que puede cocinar con su parrillera a carbón Char-Griller
®
.
Sellado
Cocine rápidamente con fuego directo a temperaturas
altas (450 °F a 500 °F).
1. Ajuste la rejilla de carbón a la posición alta (más
cerca de las rejillas de la parrillera) usando el
soporte de bandejas de carbón ajustable.
2. Prepare hasta 3 libras (aproximadamente 50 a
60 briquetas) de carbón encendido, repartiéndolo
equitativamente en la rejilla de carbón.
3. Una vez que la parrillera se encuentre a la
temperatura deseada, puede empezar a cocinar
al colocar los alimentos directamente sobre
las brasas.
4. Los alimentos se cocinarán rápidamente. Cocine
cada lado durante 3 o 4 minutos y luego llévelos
a la temperatura interna deseada.
5. NOTA: Siempre selle con la tapa de la parrillera
abierta para prevenir el daño al acabado exterior.
Asado A La Parrilla
Cocine con fuego directo e indirecto a temperaturas
medias (300 °F a 450 °F). Utilice una conguración
de dos zonas para cocinar a diferentes velocidades
y temperaturas.
1. Ajuste la rejilla de carbón a la posición
media (entre las rejillas y el cuerpo de la
parrillera) usando el soporte de bandejas de
carbón ajustable.
2. Prepare hasta 2 libras (aproximadamente 30 a
40 briquetas) de carbón encendido, repartiéndolo
equitativamente en una MITAD de la rejilla de
carbón, creando dos zonas de cocción.
3. Una vez que la parrillera se encuentre a la
temperatura deseada, puede empezar a
cocinar. Primero coloque los alimentos sobre
el fuego directo, cocinando cada lado según su
preferencia. Luego de la cocción inicial sobre
fuego directo, mueva los alimentos a la zona
fría (vea la foto a la derecha) para llevar sus
alimentos a la temperatura interna deseada.
4. NOTA: Puede usar virutas y trozos de madera
o troncos cortados, adicionales al carbón, para
agregar el sabor ahumado deseado.
ASADO (FUEGO DIRECTO) - 300°- 450°F
Hasta 2 libras de carbón (30 a 40 briquetas)
Rejilla de carbón ajustada a la posición media
6. NOTA: Puede usar virutas y trozos de madera
o troncos cortados, adicionales al carbón, para
agregar el sabor ahumado deseado.

C-4
Cool Zone
Bandeja de Agua
(opcional)
Bandeja de Agua
(opcional)
Bandeja colectora
(opcional)
Ahumado
Cocine con fuego indirecto a bajas temperaturas
(150°F a 250°F). Use virutas, trozos, pellets de
madera o troncos cortados para agregar
el sabor ahumado
1. Ajuste la rejilla de carbón a la posición baja
(posición más alejada de las rejillas de la
parrillera) usando el soporte de bandejas de
carbón ajustable.
2. Prepare hasta 2 libras (aproximadamente
30 a 40 briquetas) de carbón, repartiéndolo
equitativamente en una MITAD de la rejilla de
carbón, creando dos zonas de cocción.
3. Agregue virutas, trozos de madera o
troncos cortados para agregar el sabor
ahumado deseado
4. Una vez que la parrillera se encuentre a la
temperatura deseada, puede empezar a cocinar
5. Mantenga la comida sobre el lado más frío con
fuego indirecto durante toda la cocción.
Cocine con fuego indirecto de la parrillera lateral a
bajas temperaturas (150 °F a 250 °F). Use virutas,
trozos, pellets de madera o troncos cortados para
agregar el sabor ahumado.
1. Prepare hasta 2 libras (aproximadamente 30 a 40
briquetas) de carbón en la parrillera lateral.
2. Agregue virutas, trozos, pellets de madera o
troncos cortados para agregar el sabor
ahumado deseado.
3. Una vez que la parrillera se encuentre a la
temperatura deseada, empiece a cocinar.
4. Los alimentos ubicados más cerca de la
parrillera lateral se cocinarán más rápido que
los alimentos ubicados en el lado opuesto de la
parrillera lateral.
5. NOTA: Abrir la cámara de ahumado extenderá el
tiempo de cocción.
AHUMADO HORIZONTAL (FUEGO INDIRECTO) - 150-250°F
Hasta 2 libras de carbón (30 a 40 briquetas)
y/o madera como combustible en la parrillera lateral
Ahumado Horizontal
6. NOTA: Abrir la cámara de ahumado extenderá el
tiempo de cocción.
AHUMADO (FUEGO INDIRECTO) - 150°-250°F
Hasta 2 libras de carbón (30 a 40 briquetas)
Rejilla de carbón ajustada a la posición baja o la
posición más alejada de las rejillas de cocción

C-5
Controlando La Temperatura
El control de la temperatura de su parrillera se basa en el control del ujo del aire que llega al fuego. MÁS AIRE
= MÁS FUEGO. MENOS AIRE = MENOS FUEGO. Al abrir y cerrar la compuerta superior y las compuertas
laterales, puede controlar fácilmente la temperatura de su parrillera. La cantidad de carbón durante el asado
también puede inuir signicativamente en su capacidad de control de temperatura. Durante la cocción, puede
ser necesario ajustar las compuertas para responder ante cualquier cambio en el tiempo meteorológico como
vientos o variaciones del combustible. Cuando aprenda a operar su parrillera, use siempre la misma cantidad de
carbón para que conozca cómo controlar las compuertas de su parrillera.
AHUMADO
150°-250°F
• Controle el ujo de aire, según
sea necesario, ajustando la
apertura de las compuertas
entre 1/3 a 2/3.
• Para obtener mejores
resultados, comiencen con no
más de 2 libras de carbón (30 a
40 briquetas)
• Coloque los carbones en una
mitad de la rejilla de carbón:
ajuste la rejilla de carbón a la
posición media.
SELLADO
450°-500°F
• Para tener el máximo ujo de
aire, ambas compuertas deben
estar totalmente abiertas.
• Para obtener mejores
resultados, comiencen con no
más de 3 libras de carbón (50 a
60 briquetas)
• Ajuste la rejilla de carbón a la
posición más alta o cercana a
las rejillas de cocción.
• Comience ajustando la apertura
de las compuertas a una
apertura igual o menor a 1/4 y
ajuste durante la cocción, según
sea necesario.
• Para obtener mejores
resultados, comience con no
más de 2 libras de carbón (30 a
40 briquetas) y/o madera
de combustible
• Ajuste la rejilla de carbón a la
posición más baja o alejada de
las rejillas de cocción
ASADO A LA PARRILLA
300°-450°F

C-6
Curando Su Parrillera
Curar la parrilla es un paso importante que llevar a cabo antes de comenzar a cocinar en su nueva parrillera.
Este proceso ayudará a proteger el acabado interior y exterior de la parrillera, reducirá la cantidad de alimentos
pegados a las rejillas, reducirá los sabores poco naturales y ayudará a evitar la oxidación de las rejillas.
Char-Griller
®
recomienda el uso de aceite de linaza para curar su parrillera, pero la mayoría de los aceites
de grado alimenticio (canola, semilla de uva, vegetal, cártamo, etc.) funcionarán.
PASO 1
CUBRA LIGERAMENTE
CON ACEITE
1. Las parrilleras Char-Griller
®
están cubiertas con aceite
vegetal. Si es la primera vez
que cura a su parrillera, pase
al Paso 2.
2. Si está volviendo a curar su
parrillera, cubra ligeramente
TODAS las supercies interiores
(incluyendo rejillas e interior del
barril) de su parrillera con aceite
de linaza u otro aceite vegetal.
PASO 2
CALIENTE LA
PARRILLERA
1. Siga las instrucciones para
encender su carbón (página
C-2) y controlar la temperatura
(página C-6) y lleve su parrillera
a una temperatura aproximada
de 450 °F.
2. Una vez que alcance la
temperatura, permita que las
supercies de la parrillera se
curen durante 20 minutos.
PASO 3
VUELVA A APLICAR
ACEITE A LAS REJILLAS
(REPITA 5 VECES)
1. Después de 20 minutos,
abra su parrillera y retire
cuidadosamente las rejillas con
un levantador de rejillas.
2. Vuelva a aplicar aceite de linaza
u otro aceite vegetal sobre
ambas caras de las rejillas y
vuélvalas a colocar dentro
de la parrillera.
3. Cierre la tapa y permita que las
supercies se curen durante
20 minutos
4. Repita este procedimiento
hasta cinco veces (agregue
más carbón para mantener la
temperatura, según
sea necesario).
5. Su parrillera está lista para
ser utilizada.
NOTA:
• Usted puede cubrir ligeramente el exterior del cuerpo de la parrillera (mientras está caliente) con
aceite vegetal. Esto extenderá la vida útil del acabado, similar a cuando pule un carro.

C-7
Cuidado Y Mantenimiento
Para mantener la parrillera en condiciones óptimas, es importante mantenerla limpia y cuidada. El
cuidado y limpieza continua son la clave para garantizar la larga vida útil de las parrilleras Char-Griller
®
¿Tiene alguna pregunta? ¡Llame, envíe un correo electrónico o chatee en línea con el departamento de
atención al cliente de Char-Griller
®
!
** SOLO VACÍE LAS CENIZAS MIENTRAS LA PARRILLERA NO SE USE Y ESTE FRÍA AL TACTO **
IMPORTANTE: El carbón es poroso y conserva la humedad. NO deje carbón en su parrillera cuando no la
utilice. El carbón y cenizas dejados en la bandeja de cenizas pueden reducir la vida útil de su parrillera.
FINALIZANDO
• Cuando termine de cocinar en
la parrillera, limpie sus rejillas
con el Raspador de rejillas de
Char-Griller® y luego cubra
ligeramente sus rejillas con
aceite de linaza u otro
aceite vegetal.
• Luego, cierre las dos
compuertas y la tapa para que
el fuego se apague.
• Espere a que las brasas y
las cenizas se enfríen por
completo antes de intentar
limpiar la parrillera o remover
los residuos
LIMPIEZA
• Espere que el fuego se haya
extinguido por completo y la
parrilla esté fría al tacto antes
de vaciar las cenizas.
• Retire las rejillas de la parrillera
con el levantador de rejillas.
• Retire la bandeja de cenizas de
la parrillera.
• Golpee ligeramente la
bandeja de cenizas para soltar
cualquier ceniza que pueda
permanecer pegada.
• Vierta las cenizas en un
contenedor de metal y
cubra con agua para
garantizar que ninguna brasa
está encendida; luego podrá
eliminar las cenizas.
CUBIERTA
• Extienda la vida de su
parrillera al usar una cubierta
Char-Griller® a la medida
para proteger a su parrillera
de la intemperie.
• El material de poliéster
resistente a la intemperie
protege contra las aves, el
polvo, el viento, la lluvia
y la nieve.

C-8
Controle la temperatura mediante la cantidad y tipo de combustible, las compuertas duales y la rejilla ajustable
para combustible. Ajuste un extremo de la rejilla a la vez. La madera calienta más que el carbón. Un mayor ujo
de aire equivale a una mayor temperatura.
Puede agregar carbón y/o leña para ahumar mientras cocine. Use guantes y delantal cuando opere su parrillera.
Solo use leñas naturales destinadas para la cocina. Generalmente, puede encontrar leña seleccionada en tiendas
de comestibles y minoristas de artículos para parrillas al aire libre.
Si utiliza una bandeja de agua, revise el nivel del agua cuando cocina durante más de cuatro horas o cuando no
puede escuchar el agua hervir. Agregue agua moviendo la carne hacia un lado y vertiendo el agua a la bandeja
de agua a través de las rejillas de cocción.
Para reducir las llamaradas, cocine con la tapa cerrada.
Cuando cocine con carbón, deje la tapa de la parrillera abierta durante el encendido y hasta que las cenizas
de las brasas se acumulen. La tapa de la parrillera debe permanecer abierta cada vez que el medidor de
temperatura marca más de 500 °F.
Siempre coloque el carbón sobre la rejilla de carbón y no directamente en el fondo de la parrillera.
No use carbón instantáneo ya que le dará un sabor poco natural a la comida.
Las cenizas dejadas en el parrillera durante mucho tiempo absorberán la humedad y se oxidarán. Asegúrese de
vaciar la bandeja de cenizas después de que la parrillera se ha enfriado. El hierro fundido y el acero sin cubrir se
oxidarán si no se le da el cuidado adecuado.
En la PINTURA EXTERIOR, remueva el óxido con un cepillo de alambre y retoque con una pintura para altas
temperaturas, disponible en la mayoría de las tiendas de herramientas/vehículos. Rustoleum® #241169 es el
color de pintura más parecido.
El medidor de temperatura puede humedecerse, lo que causará que se empañe durante la cocción. Puede retirar
el medidor y calibrarlo en el horno.
Para una parrillera más hermética, llene cualquier hueco no deseado con pernos y tuercas extras (no incluidos).
Coloque un recipiente metálico en el recipiente de grasa o en la repisa inferior debajo del agujero de la parrilla
para recoger cualquier gota.
La chimenea y las compuertas laterales estarán calientes. Solo tóquelas usando guantes.
Antes de usar la parrillera por primera vez, debe curar las rejillas de cocción de hierro colado.
Luego de cada uso, cubra las rejillas internas y el metal desnudo con aceite vegetal, mientras estén calientes,
para reducir la oxidación. El curado adecuado y regular protegerá la parrilla contrala oxidación y extenderá la vida
de su parrillera y rejillas de cocción.
La parrillera goteará aceite durante el proceso de curado y durante los siguientes usos. Esto es normal.
Nunca exceda los 500 °F. Esto dañaría el acabado y contribuiría con la oxidación.
La pintura no está cubierta por la garantía y requerirá de retoques.
Esta parrillera no tiene garantía contra el óxido.
No use uido de encendido, gasolina, querosén. alcohol u otro acelerador para encender el carbón. El uso de
cualquiera de estos productos, o de productos similares, puede causar una explosión que posiblemente conlleve
a graves lesiones.
Consejos Y Advertencias Generales Sobre La Parrillera
NOTA: El humo puede escapar de áreas distintas a la chimenea de la parrillera. Eso no afectará la cocción.
CHAR-GRILLER
®
NO ACEPTA DEVOLUCIONES DE PARRILLERAS USADAS.

C-9
MEJORE EL SABOR
Guía Para Combinar Leñas
Las distintas variedades de leña poseen diferentes sabores y Char-Griller
®
recomienda combinar su
leña con las carnes que desea cocinar.
LEÑA SABOR
ALISO SUAVE
PECAN MEDIO
FUERTE MEZQUITE
SUAVE ARCE
MEDIO ROBLE
FUERTE JICORIA
MEDIO MANZANO
SUAVE CEREZO
VEGETALES
PRODUCTOS DEL MAR
POLLO CERDO CARNE DE RES

C-10
Guía De Cocción
PRODUCTOS
DEL MAR
GRANDE
CAMARÓN
4 A 6 MINUTOS
1,5 ONZAS
VIEIRA
4 A 6 MINUTOS
1 PULGADA DE GROSOR
PESCADO, FILET
5 A 10 MINUTOS
1 LIBRA
PESCADO, ENTERO
15 A 20 MINUTOS
TIEMPO DE COCCIÓN
PROMEDIO
NIVEL DE CALOR TIPO DE CALOR
POLLO
4 ONZAS - SIN HUESO, SIN PIEL
PEC HUGA O ANTEMUSLO
DE POLLO
8 A 12 MINUTOS
3 A 6 ONZAS - CON HUESO*
ANTEMUSLO O MUSLO DE POLLO
35 A 45 MINUTOS
10 A 12 ONZAS - CON HUESO*
PECHUGA DE POLLO
35 A 45 MINUTOS
8 LIBRAS
POLLO ENTERO*
3 A 5 HORAS
TIEMPO DE COCCIÓN
PROMEDIO
NIVEL DE CALOR TIPO DE CALOR
CERDO
1 PULGADA DE GROSOR
CHULETA DE CERDO, MEDIANA
8 A 10 MINUTOS
8 POUNDS
PALETA/CABEZAS DE LOMO
DE CERDO
12 HORAS
TIRA DE 3 ONZAS
CHORIZO
10 A 13 MINUTOS
1 LIBRA
LOMO DE CERDO
15 A 20 MINUTOS
TIEMPO DE COCCIÓN
PROMEDIO
NIVEL DE CALOR TIPO DE CALOR
TIEMPO DE COCCIÓN
PROMEDIO
NIVEL DE CALOR TIPO DE CALOR
RES
1 PULGADA DE GROSOR - FILET MIGNON,
RIBEYE, NEW YORK STRIP Y PORTERHOUSE
BISTEC, MEDIANO
6 A 8 MINUTOS
1 PULGADA DE GROSOR
BISTEC DE FALDA, MEDIANO
4 A 6 MINUTOS
3/4 DE PULGADA DE GROSOR
HAMBURGUESA
8 A 10 MINUTOS
4 ONZAS
SALCHICHA
5 A 7 MINUTOS
1 PULGADA DE GROSOR
BISTEC DE ARRACHERA GALLO O HANGER STEAK, MEDIANO
8 A 10 MINUTOS
*EL POLLO CON HUESO SE DEBE COCINAR O “DORAR” PRIMERO A FUEGO DIRECTO POR UNOS MINUTOS ANTES DE PASARLO A FUEGO INDIRECTO.
TEMPERATURAS INTERNAS
MÍNIMAS ADECUADAS
RECOMENDADAS POR EL USDA
145°F
PESCADOS Y MARISCOS:
165°F
POLLO:
BISTECS O CHULETAS DE
RES O CERDO:
145°F
CARNE DE RES O CERDO
MOLIDA:
160°F
Los tiempos de cocción
mostrados en este gráfico
representan una guía y
pueden variar en función de
la cocción deseada, el grosor,
la cantidad de cada tipo de
alimento que se está
cocinando, la parrillera o el
estilo de parrilla, la
temperatura ambiental y/o el
tiempo atmosférico.
Char-Griller
®
recomienda
usar siempre un termómetro
de cocina para medir la
temperatura interna de todos
los productos cárnicos.
FUEGO
DIRECTO
FUEGO
INDIRECTO
FUEGO BAJO
150°- 250°F
FUEGO MEDIO
300°- 450°F
FUEGO ALTO
450°- 550°F+
AHUMADO
LEYENDA DE FUEGO
APROX. 90 MINUTOS POR LIBRA

D-1
Recetas De Calor Directo
El Calor directo es un método de calor alto que se usa para cocinar aquellas comidas que tardan menos
de 25 minutos en cocinarse. Por lo general, esto se reere a aquellas comidas que son relativamente
pequeñas o delgadas, como bistec, chuletas, pechugas de pollo sin huesos, letes de pescado,
hamburguesas, etc.
• Usar un TERMÓMETRO DE CARNE al cocinar garantiza que las comidas estén completamente
cocidas. Inserte el termómetro en la parte más gruesa de la carne, sin tocar el hueso, y espere de 1
a 1 minuto y ½ para que registre la temperatura.
• La temperatura mínima segura del USDA es de 165 ° F para pollos / aves de corral.
• La temperatura mínima segura del USDA es de 145 ° F para carne de res, cerdo, ternera y cordero
(letes, chuletas, asados).
RECETAS PARA LA PARRILLA
Ingredientes:
680 g. de carne de arrachera
1 cucharilla y ½ de pimentón ahumado
2 gajos de ajo troceados
Sal y pimienta al gusto
4 mazorcas de maíz
2 calabacines grandes, cortados por
la mitad a lo largo
400 g. de tomates cherry
3 cucharas de aceite de oliva
1.5 cucharas de romero fresco, troceado
1 cucharada de vinagre de vino rojo
2 gajos de ajo troceados y con aceite
2 cucharadas de aceite de canola
Instrucciones:
1. Adreza la carne de arrachera con el pimentón
y el ajo. Adrézala por ambos lados y
salpimiéntala. Úntala de aceite de canola.
2. Unta el maíz, el calabacín y los tomates con
aceite de canola y adrézalos con sal y pimienta.
3. Precalienta la parrilla a temperatura media-alta.
4. Añade la carne de arrachera a la parrilla, dale
la vuelta una vez y cocínala al punto deseado
de cocción. Entre 4 y 6 minutos por lado, luego
dejar reposar unos 5 minutos.
5. Añade las verduras a la parrilla y dales la vuelta
de vez en cuando hasta que estén cocinadas.
6. Mezcla aceite de oliva, romero, vinagre de vino
rojo, ajo, sal y pimienta al gusto en
un pequeño bol.
7. Unta la carne y las verduras con la mezcla de
aceite de oliva y sírvelo todo inmediatamente.
CARNE DE ARRACHERA A LA PARRILLA CON VERDURAS
Una carne muy infravalorada como la arrachera puede convertirse en una comida rápida y gustosa
para las noches de entresemana. Pon la cena en la mesa en menos de 20 minutos, y usa una parrilla
de carbón para conseguir el mejor sabor del verano con esta receta de carne de arrachera.
ENCUENTRA
MÁS RECETAS EN
CHARGRILLER.COM

D-2
CHAR-GRILLER
®
ARRACHERA ADOBADA
Ingredientes De Adobo De Carne:
½ taza de aceite de oliva
1/3 de taza de salsa de soja
¼ de taza de vinagre de vino tinto
2 cucharadas de jugo de limón
1 cucharadita de mostaza seca
1 diente de ajo picado
1 cebolla pequeña, picada
¼ de cucharadita de pimienta
Instrucciones:
1. Mezcle los ingredientes del adobo en un plato
que no sea de metal.
2. Permita que la carne repose en el adobo por
no menos de 4 horas en el refrigerador.
3. Soase cada lado a fuego alto por 5 minutos; la
parte de adentro aún debe estar cruda.
4. Corte la carne diagonalmente contra el grano
en rodajas nas antes de servir.
SOLOMILLO DE CERDO A LA
PARRILLA FÁCIL Y RÁPIDO
¿Necesitas preparar una cena rápida? Esta
receta de solomillo de cerdo a la parrilla es fácil
y rápida, y hará las delicias de tus comensales.
¡Acompáñalo de patatas rojas a la parrilla y
espárragos para una cena simple y sabrosa!\
Ingredientes:
2 solomillos de cerdo
2 cucharaditas de pimentón
1 cucharadita de ajo en polvo
1 cucharadita de cilantro
1 cucharadita de orégano
Sal y pimienta al gusto
Aceite de oliva
Instrucciones:
5. Mezcla las especias todas juntas en un bol.
Unta el cerdo con aceite de oliva y luego
adereza ambos lados con la mezcla de
especias.
6. Congura tu parrilla para cocina directa.
Enciende los fogones y ponlos a intensidad
media-alta.
7. Coloca el cerdo en la parrilla y cocínalo de 8
a 10 minutos por cada lado, o hasta que la
temperatura interna sea de 73ºC.
8. Retíralo de la parrilla y déjalo reposar durante
10 minutos.

D-3
HAMBURGUESAS
Sazone al gusto con Char-Griller
®
“Original”
All-Purpose o Steak Seasoning.
Además, puede adobar permitiendo que repose
en el adobo por 1 o 2 horas a temperatura
ambiente antes de cocinar, o permitir que repose
en un recipiente cubierto en el refrigerador por
hasta 24 horas.
Instrucciones:
1. Permita que alcance la temperatura ambiente
antes de cocinar.
2. Mezcle las cebollas picadas, los pimientos
verdes, la sal, y soase los patis de ¾ de
pulgada de cada lado.
3. Cocine a fuego medio con la tapa cerrada
para evitar que se enciendan.
4. Cocine de cada lado de 3 a 7 minutos según
la temperatura deseada.
5. Para prevenir e-coli, cocine la carne picada
a 150°f internamente o hasta que el jugo
salga limpio (Libre de sangre).
6. Las hamburguesas se pueden lardear con
adobo al rotarlas y/o se pueden mezclar otros
ingredientes con la carne picada, como la
salsa o polvo de chili.
HAMBURGUESAS JUGOSAS
DE LUCY
Si crees que es imposible mejorar la hamburguesa
clásica, espera a probar las jugosas
hamburguesas a la parrilla de Lucy. Llenas de
sabor y queso fundido, estas hamburguesas
seguro que serán el hit del verano.
Ingredientes:
680 g. de ternera picada
½ paquete de mix de sopa de cebolla seca
francesa
¼ de vaso de vinagreta
2 cucharas grandes de Worcestershire
1/2 cucharillas de sal
1/4 cucharilla de pimienta negra
1 taco de queso Cheddar
Instrucciones:
7. Corta el queso en lonchas de 60 mm. de
grosor aproximadamente y de 5cm. de ancho
por 5 cm de alto.
8. Añade el mix de sopa de cebolla francesa, sal,
pimienta, vinagreta y la salsa Worcestershire a
la ternera picada y mézclalo a conciencia.
9. Toma una porción de carne y dale forma de
hamburguesa.
10. Pon la loncha de queso en el centro de la
hamburguesa y cubre el queso completamente
con la ternera. Forma una hamburguesa con
el queso en el interior.
11. Repite con la ternera y el queso restante.
12. Precalienta la parrilla a 200 grados.
13. Cocina las hamburguesas durante 3 minutos
en un lado y luego dale la vuelta.
14. Cocina las hamburguesas durante 6 minutos
en el otro lado.
15. Añade los complementos que más te gusten
y, ¡disfrutad!

D-4
MILHOJAS DE JALAPEÑO
Y BEICON
¿Necesitas una merienda fácil y fácil para este
gran juego? Estos Jalapeno Bacon Blanket
Poppers son un placer para la multitud y son
súper fáciles de preparar en la parrilla. El tocino
se pone crujiente rápidamente y no se quema
fácilmente, ya que se encuentra encima del
relleno de queso crema. Fácil, delicioso y del
tamaño perfecto para un aperitivo, ¡tus amigos y
familiares te pedirán que los hagas una y otra vez!
Ingredientes:
4 jalapeños
Condimentos de carne a la parrilla al gusto
1/3 de vaso de crema de queso
3 lonchas de beicon
Queso rallado al gusto
Instrucciones:
1. Mezcla la crema de queso, el queso rallado y
el condimento de carne a la parrilla en un bol y
déjalo aparte.
2. Corta los jalapeños por el medio para darles
forma de barca.
3. Usa una cucharilla para quitar las semillas del
jalapeño y hacer hueco para el relleno
Consejo: si te gusta el picante deja
algunas semillas. Las semillas son las que
pican.
4. Rellena los jalapeños con el relleno.
5. Trocea el beicon en tiras pequeñas y ponlas
encima del relleno del jalapeño.
6. Esparce un poco de condimento para carne a
la parrilla por encima del beicon.
7. Pon la parrilla a 200º.
8. Coloca los milhojas de jalapeño y beicon en
la parrilla/ahumador y ahúmalos durante 30
minutos, o hasta que el beicon adquiera un
tono marrón dorado.
9. ¡Retíralos del fuego y disfruta!
CAMARONES (pelados) y
CANGREJO DE RÍO:
Instrucciones:
1. Póngalos en brochetas.
2. Cubra con mantequilla derretida y sal de ajo.
3. Ase por 4 minutos de cada lado o hasta que
estén rosados. La salsa de cóctel es opcional.
PERRITOS CALIENTES:
Instrucciones:
1. Ase con la tapa abierta por aproximadamente
6 minutos.
2. Rote cada vez que pasen unos minutos.

D-5
Recetas De Calor Indirecto
PATATAS HASSLEBACK
Un acompañamiento que puede ser un plato por
sí mismo, ¡estas patatas Hasslebackl se pueden
combinar con cualquier tipo de complemento
o queso!
Ingredientes:
6 patatas Russet
1 paquete de queso Cheddar en lonchas
1 paquete Pepper Jack Slices
Chile chipotle en polvo
Orégano
Sal y pimienta al gusto
Beicon troceado (cocinado)
Cebollino (a rodajas)
Crema agria
Instrucciones:
1. Congura tu parrilla para cocina indirecta.
Enciende los fogones y ponlos a intensidad
media-alta.
2. Corta nas lonchas a lo ancho de la patata,
pero con cuidado de no terminar de cortar
hasta el nal.
3. Envuelve las patatas con papel de aluminio y
colócalas en un lado alejadas de los fogones.
Deja que se cocinen hasta estar tiernas. De 45
minutos a 1 hora.
4. Retira las patatas de la parrilla y
desenvuélvelas.
5. Coloca lonchas alternadas de queso Cheddar
y pepperjacks en la patata.
6. Adreza las patatas con chipotle en polvo, sal,
pimienta y orégano.
7. Coloca de nuevo las patatas en la parrilla sin
papel de aluminio, de 10 a 12 minutos, o hasta
que el queso se haya fundido.
8. Añade de guarnición beicon, cebollino y crema
agria, y ya pueden ser servidas.
ALITAS DE POLLO CON
PARMESANO Y AJO
Reproduce los sabores de tu sitio favorito de alitas
con esta receta de marinada de parmesano y ajo.
Ingredientes:
1.8 Kg. de alitas de pollo
½ litro de adrezo italiano en bote
1 vaso de queso parmesano rallado
1/2 cucharada de sal de cebolla
1/2 cucharada de pimienta negra
1 vaso de mantequilla
1 cuchara de orégano
2 cucharada de ajo en polvo
Una pizca de romero
Instrucciones:
1. Marinar las alitas durante toda la noche
o por lo menos durante cuatro horas con
adrezo italiano.
2. Añadir carbón a un lado de la parrilla para
cocina indirecta, o usa una Smokin’ Stone y
añade trocitos de madera aromática
si lo preeres.
3. Precalentar la parrilla a 135ºC.
4. Coloca las alitas en el lado de la parrilla de
calor indirecto.
5. Ahúma las alitas entre 45 y 60 minutos, hasta
que la temperatura interna alcance los 76ºC.
6. Mientras se ahúman las alitas, haz salsa
de parmesano y ajo mezclando el queso
parmesano, el ajo en polvo, sal de cebolla,
pimienta negra, mantequilla, orégano
y romero.
7. Retira las alitas de la parrilla y añádeles la
salsa de ajo y parmesano.

D-6
SALMÓN A LA TABLA DE
CEDRO
¿Crees que no puedes conseguir el salmón
ahumado perfecto en una cocina? Pues piénsalo
bien. Con la parrilla indirecta puedes cocinar el
salmón a la tabla de cedro perfecto siempre.
Ingredientes:
2 tablas de cedro
2 letes de salmón
Aceite de oliva
Romero
Sal y pimienta al gusto.
Instrucciones:
1. Pon las tablas de cedro a remojo durante al
menos 8 horas.
2. Congura tu parrilla para cocina indirecta.
3. Añade 30 o 40 trozos de carbón a un lado de
la parrilla.
4. Cuando el carbón esté encendido, permite que
el carbón se haga ascua.
5. Unta el salmón con aceite de oliva por ambos
lados.
6. Adrézalo con sal, pimienta, romero y rodajas
de limón.
7. Coloca el salmón a un lado de la parrilla, lejos
del carbón.
8. Cocina el salmón durante 15 minutos o hasta
el punto deseado.
MAÍZ DULCE CON CÁSCARA
Instrucciones:
1. Recorte el exceso del extremo y remoje en
agua fría con sal 1 hora antes de asar.
2. Ase por 25 minutos, girando varias veces.
MUSLOS DE POLLO CON
CHILI Y LIMA
Perfectos para tus tacos, fajitas, nachos o como
plato único, esta receta de muslos de pollo con
chili y lima, preparada por nuestro embajador
BBQFiends, puede ser cocinada en un momento
en una parrilla de gas para una cena de entre
semana o cocinada con carbón durante el
n de semana para añadir el ese punto de
sabor ahumado.
Ingredientes:
1.3 Kg. de muslos de pollo
2 cucharas de tu adrezo favorito de Chili BBQ
1 Lima
Cilantro troceado como guarnición
1 zumo de lima (marinado)
1 lata de cerveza (marinado)
Sal y pimienta al gusto (Marinado)
Instrucciones:
1. Cortar el exceso de grasa de los muslos de
pollo y colocarlos en un bol largo. Añadir los
ingredientes para marinar, y dejar reposar
en la nevera durante 1 o 2 horas antes de
cocinar.
2. Retirar el pollo del marinado y condimentar
con vuestro adrezo de chili BBQ favorito.
Poner la parrilla a 190ºC y colocar el pollo en
el lugar de cocina indirecta.
*Consejo: Para conseguir una piel de
pollo crujiente, dar la vuelta al pollo cuando
este a medio cocinar, y ponerlo en calor
directo. Asegúrate que la temperatura
interna es de al menos 73ºC antes de
retirarlo de la parrilla.
3. Coloca el pollo y adórnalo con el cilantro
troceado, y exprime una lima por encima.
¡Sirve y disfruta!

D-7
Recetas De Ahumado
TRASERO DE CERDO
“CERTIFICADO”
Nuestro veterano embajador Certied Creole
BBQ, lo ha vuelto a hacer con su receta de
trasero de cerdo certicado. Ahumado lentamente,
condimentado generosamente y desmigado, esta
receta de cerdo es perfecta para usarla en platos
sin n. Desde sándwich de cerdo desmigado, hasta
acompañamiento para huevos o disfrutado con
verduras, esta receta seguro hará las delicias de
tus comensales.
Ingredientes:
2 traseros de cerdo (de 2,7 a 4,5 Kg cada uno)
Zumo de manzana
Tus condimentos preferidos
Mostaza
Preparando La Carne
1. Retira el trasero de cerdo del envoltorio de
plástico y sécalo con papel de cocina.
Consejo: Elige un trasero de cerdo con una
buena capa de grasa. Esto es bueno para
cocinar durante periodos largos la
carne ahumada.
2. Retira el exceso de grasa que se desprende
con facilidad. Haz cortes de medio centímetro
de profundidad en diagonal en la capa de grasa,
separados entre 1 y 2 centímetros.
Consejo: Los cortes ayudan a que el condimento
y el ahumado penetren en la carne de cerdo.
3. Rellena el inyector de marinado con zumo de
manzana, e inyéctalo en la parte superior y
lateral de la carne.
4. Esparce la mostaza con un pincel por todo el
trasero del cerdo.
Consejo: Esto permite que el condimento se
adhiera al trasero de cerdo.
5. Condimenta ambos lados de la carne de cerdo
con tu adrezo favorito.
Consejo: Después de condimentar, envuélvelo en Saran
Wrap y déjalo toda la noche en la nevera o al menos de
8 a 10 horas. Esto permite que los condimentos penetren
y que el zumo de manzana enternezca la carne
de cerdo.
Instrucciones De Cocinado
1. Enciende el carbón y precalienta el ahumador
a 107ºC.
2. Añade agua hirviendo a una sartén de goteo y
colócala bajo la rejilla.
Consejo: Esto añadirá humedad al cocinado y
recogerá lo que se desprenda.
3. Ahúma los traseros de cerdo durante 2 horas
por libra a 107ºC, hasta que la carne alcance
una temperatura interna de 70ºC.
4. Consejo: mantén la temperatura a 107ºC,
comprueba el fuego cada hora o cuando sea
necesario. También vaporea con zumo de
manzana cada vez que añadas combustible
al fuego. Esto humedece y da sabor. También
evita que el cerdo se seque y ayuda a crear la
corteza. Monitoriza la temperatura usando un
termómetro interior o remoto.
5. Retira los traseros de cerdo del ahumador,
y envuélvelos con dos capas de papel de
aluminio. Antes de cerrar, añade 1 vaso de
zumo de manzana y una barra de mantequilla a
cada trasero de cerdo, más condimento y salsa
BBQ al gusto.
6. Colócalos otra vez en el ahumador y cocínalos
hasta que los traseros de cerdo alcancen una
temperatura interna de 92ºC, luego sácalos
del ahumador.
7. Consejo: Envuelve el trasero de cerdo en un
paño largo y colócalo en un refrigerador o
simplemente déjalo reposar durante 1 o 2 horas.
Esto permite que la carne se deje de cocinar y
es un momento clave en el proceso.
8. Tras reposar, retira el paño y el aluminio.
Trocea el cerdo usando dos tenedores o
garras de cocina.
9. Haz sándwiches de cerdo desmigado y un sinfín
de platos de cerdo, ¡disfruta!

D-8
3-2-1 COSTILLAS
Puede que hayas oído hablar del método 3-2-1
costillas en las redes sociales. Es una técnica muy
popular para ahumar costillas para que queden
tiernas, jugosas y donde salen limpias del hueso.
Fácil y simple de seguir, este es un método que
garantiza que te quedaran unas costillas para
chuparse los dedos.
El método 3-2-1 es un proceso que implica
ahumar las costillas durante 3 horas, envolverlas
en papel de aluminio y brasear durante 2 horas, y
el ahumado sin envoltura durante 1 hora. Esto no
solo hace que las costillas se cocinen más rápido,
esto te asegura una carne más tierna.
Ingredientes:
4 costillares
2 vasos de sidra de manzana,
2 vasos adicionales en botella de spray
8 cucharas de mantequilla salada
1 vaso de tu salsa BBQ favorita
1 vaso de azúcar moreno
Adrezo para costilla a la parrilla
4 cucharas de miel
Instrucciones:
1. Prepara tu parrilla de carbón y ahumador
encendiendo media chimenea de carbón y
añadiéndolo a la caja de fuego lateral.
- Como alternativa, prepara tu parrilla para
cocina indirecta con carbón colocado en el
lugar opuesto donde quieres colocar
las costillas.
Consejo: Añade media chimenea de
carbón sin encender a la caja de fuego
lateral cerca del barril antes de añadir el
carbón encendido a su lado. El carbón
encendido encenderá progresivamente
el carbón sin encender y así ayudará
a mantener la temperatura durante
más tiempo.
2. Añade 4 trozos de madera de manzano y
cierra el compartimento.
3. Deja que la parrilla se caliente a unos 90ºC.
4. Retira las membranas de las costillas.
Consejo: empieza por el lado estrecho
del costillar, y con un cuchillo corta por
debajo de las membranas con cuidado
para empezar, luego ve retirando las
membranas con una servilleta de papel.
5. Condimenta ambos lados de las costillas con
el adrezo para costillas a la parrilla.
6. Abre la parrilla y alza la rejilla ajustable al
nivel más alto. Esto permite un ahumado
homogéneo.
7. Coloca una sartén de goteo llena de agua
bajo las rejillas y encima del fuego en el barril
principal.
8. Coloca los huesos de las costillas boca abajo
en las rejillas, cierra la tapa y deja que se
ahúme durante 3 horas.
Consejo: Coloca el lado expuesto del
hueso de la costilla hacia la caja de fuego
lateral para que la carne se desprenda
mejor del hueso. Si usas el método
indirecto, coloca las costillas al lado
contrario del carbón.
9. De vez en cuando comprueba la temperatura
y asegúrate que se mantiene constante en
90ªC. Si tienes que añadir carbón, que sea
carbón ya encendido.
10. Cada 30 minutos, vaporea las costillas con
sidra de manzana y mueve el costillar que
está más cerca de la caja de fuego lateral al
lado de la parrilla que está más lejos de la caja
lateral de fuego y mueve los otros costillares
hacia la caja. Repite esta rotación cada 30
minutos.
11. Retira las costillas de la parrilla al cabo de
3 horas.
12. Consigue una tira larga de papel de aluminio
grueso. (Una por cada costillar.)
13. Coloca cada costillar con el hueso hacia arriba
en cada tira de papel de aluminio.

D-9
Instrucciones para 3-2-1 RIBS,
continuación:
14. Añade azúcar moreno, miel y mantequilla al
lado con hueso de las costillas.
15. Añade ½ vaso de sidra de manzana.
16. Pliega los bordes del papel de aluminio para
cubrir completamente las costillas.
17. Repite con los otros tres costillares.
18. Vuelve a colocar las costillas en el ahumador y
aumenta la temperatura a 107ºC.
19. Esto se consigue abriendo el regulador de
tiro un poco más y añadiendo otra media
chimenea de carbón encendido si
es necesario.
20. Deja que las costillas se cocinen durante
dos horas.
21. Continúa con la rotación de costillas como se
ha mencionado en el punto 8, para que todas
las costillas estén un rato cerca y un rato lejos
del fuego.
22. Retira las costillas de la parrilla y del papel de
aluminio. Colócalas en la parrilla con el hueso
boca abajo.
23. Unta las costillas con tu salsa BBQ favorita y
cocínalas durante una hora a 107ºC.
24. ¡Retíralas y disfruta!
BRISKET DE TERNERA
Esta receta de brisket de res, desarrollada en
colaboración con nuestro amigo James Rhodes,
es una elección tradicional entre los clásicos de la
carne tierna ahumada.
Ingredientes:
4.75 Kg. de brisket de ternera
½ vaso de pimentón
¼ vaso de azúcar moreno ligero
3 cuchara de sal
3 cuchara de pimienta negra
3 cuchara de chili en polvo
Zumo de manzana
Agua
Instrucciones:
1. Con un cuchillo alado, retira la grasa de
la ternera dejando una na capa en la parte
superior.
2. En medio bol, combina pimentón, azúcar
moreno ligero, chili en polvo, sal, pimienta y
mézclalo bien para hacer un condimento. Usa
tus manos o un dispensador para condimentar
generosamente la carne.
3. Envuelve el brisket con plástico y ponlo en la
nevera durante al menos 12 horas.
4. Al preparar la parrilla, añade desconches de
madera o trozos de carbón y coloca piedra de
ahumar con una sartén de aluminio encima
suya. Pon zumo de manzana y agua en la
sartén, más o menos a la mitad. Coloca un
comprobador de temperatura en la rejilla y
calienta la parrilla a 105ºC.
5. Coloca el brisket en la rejilla, con la grasa
hacia arriba, y deja que se ahúme durante
5 horas. Después de 5 horas, envuelve el
brisket con papel de charcutero y devolver
a la parrilla a 105ºC. El brisket estará hecho
cuando la temperatura interna alcance 90ºC.
Deja reposar el brisket durante 1 hora.
6. ¡Corta, sirve y disfruta!

D-10
MACARRONES CON QUESO
AHUMADOS
Un favorito de todas las familias desde siempre,
esta receta de macarrones con queso ahumados
suben el listón de los macarrones con queso al
horno con sabores que harán que tu ahumador no
pare de funcionar.
Ingredientes:
1 paquete de Elbow Macaroni
1/2 barra de mantequilla
1/4 de harina para todo uso
1 vaso de nata de cocinar
1 vaso de leche
2 vasos de queso Cheddar rallado
1 vaso de queso Gouda rallado
1 vaso de queso Colby Jack rallado
1/2 vaso de crema de queso
2 cucharas de pimienta negra
1 cuchara de pimienta de cayena
1 sartén redonda de hierro fundido
Instrucciones:
1. 1Hierve los macarrones al dente siguiendo las
instrucciones del paquete.
2. Precalienta el ahumador a 107ºC usando
madera afrutada en la caja de ahumado, como
de cerezo o manzano.
3. Si tu parrilla no tiene el complemento de caja
de ahumado, conviértelo en uno fácilmente
colocando madera o carbón en el lado opuesto
a la sartén. Si colocas la sartén en el lado
derecho de la rejilla, coloca la madera en el
lado derecho para crear una cocina indirecta.
4. Calienta la sartén a intensidad media, luego
funde la mantequilla y añade harina.
5. Mientras añades harina, añade leche y nata
de cocinar y haz que hierva.
6. Reduce la intensidad a media-baja y añade
crema de queso hasta que se suavice.
7. Añade el resto de quesos y remueve hasta
que se fundan y quede meloso.
8. Apaga el fuego y remueve los macarrones
hasta que se mezcle homogéneamente con la
salsa de queso.
9. Coloca la sartén en el ahumador y deja que
se cocine durante 1 o 2 horas hasta el punto
deseado. Déjalo durante más tiempo si te
gusta el sabor a ahumado.
10. Servir caliente.
TROZOS Y MITADES DE
POLLO AHUMADOS
Instrucciones:
1. Enjuague los trozos en agua fría y séquelos
con toallas de papel.
2. Pincele cada trozo con aceite de oliva y
sazone al gusto con sal y pimienta.
3. Dore los trozos directamente sobre las brasas
con la tapa abierta y ase a fuego alto o medio
por varios minutos.
4. Posteriormente, coloque las piezas en la rejilla
para cocinar en un área para cocinar indirecta.
5. Cocine con la tapa cerrada con la parrilla
a fuego lento por 55 a 60 minutos o hasta
que esté listo. No use aceite de oliva o sal y
pimienta si usa adobo.
PERRITOS CALIENTES
RELLENOS AHUMADOS
1. Corte las salchichas a lo largo, a ¼ de pulgada
de cada extremo.
2. Rellene las salchichas con queso y salsa de
pepinillos y envuelva en tocino.
3. Coloque sobre la rejilla para cocinar sobre
la bandeja de goteo y ahúme por 15 a 20
minutos o hasta que el tocino esté crujiente.

D-11
PAVO AHUMADO
Instrucciones:
1. Vacíe el espacio contenedor, enjuague y
seque con una toalla de papel.
2. Meta las puntas de las alas debajo de la
espalda y ate las patas juntas.
3. Póngalo en el centro de la rejilla para cocinar
directamente encima de la bandeja de goteo
de aluminio que tiene agua.
4. Ahúme por 12 minutos por libra. Si está
relleno, permita varios minutos adicionales por
libra para permitir la expansión.
5. Use un termómetro para carne para obtener
mejores resultados (190°F interno).
JAMÓN AL HORNO AHUMADO
Puede ahumar jamón enlatado completamente
cocido o jamón entero o ahumado y curado, pata o
una porción de culata.
Glaseado
1 taza de azúcar morena clara, bien apretada
½ taza de jugo de naranja
½ taza de miel de abeja
Instrucciones:
1. Combine el azúcar, jugo y miel. Permita que el
glaseado repose por al menos 4 horas.
2. Quite la corteza y corte la grasa de forma
diagonal para dar un efecto de diamante.
3. Inserte un diente entero en el centro de cada
diamante.
4. Ponga el jamón con la grasa hacia arriba en el
centro de la rejilla para cocinar. Cierra la tapa.
5. Se sugiere cocinar por aproximadamente 9
minutos por libra para jamones completamente
cocidos. El jamón ahumado o curado, que no
esté completamente cocido, debe cocinarse a
una temperatura interna de 160°F.
6. Lardee con glaseado para jamón unas 3 o
4 veces durante los últimos 30 minutos de
cocción.
7. Adorne con rodajas de piña unos 15 minutos
antes de que se acabe el tiempo de cocción.
CARNE DE VENADO AHUMADA
CON TOCINO
Adobo Para Carne De Venado
1 taza de vinagre balsámico o de vino tinto
1 taza de aceite de oliva
2 onzas de Worcestershire
½ onza de Tabasco
2 cucharadas de sal condimentada
1 a 2 jalapeños picados
3 onzas de salsa de soja
Adobo Para Tocino
2 onzas de vinagre de vino tinto
2 onzas de Worcestershire
4 raciones de Tabasco
Instrucciones:
1. Ponga la pata de venado en un recipiente y
permita que se adobe por 2 a 4 días, rotándola
diariamente. Deje adobar el tocino durante la
noche.
2. Quite la pata del refrigerador al menos una
hora antes de cocinar.
3. Sazone generosamente con sal condimentada
y pimienta negra molida gruesa.
4. Envuelva 1 libra de tocino sobre la parte
superior de la pata y ahúme por 20 a 25
minutos por libra, o hasta que esté tierna. No
cocine de más.

D-12
ADOBO PARA POLLO
Ingredientes:
½ taza de salsa de soja
¼ de taza de aceite de oliva
¼ de taza de vinagre de vino tinto
1 cucharadita de orégano
½ cucharadita de albahaca dulce
½ cucharadita de ajo en polvo con perejil ¼ de
cucharadita de pimienta
Instrucciones:
1. Vierta sobre los trozos de pollo en un plato que
no sea de metal
2. Cubra y refrigere durante la noche, volteando
ocasionalmente. Use el adobo para lardear el
pollo mientras lo cocina.
ADOBO PARA CARNE
(For steaks, chops, and burgers)
Ingredientes:
¼ taza de salsa de soja
2 cebollas grandes
2 dientes de ajo, triturados
2 cucharaditas de sal
2 cucharaditas de pimentón
1 cucharadita de pimienta molida fresca
Instrucciones:
1. Combine los ingredientes en una licuadora
eléctrica, cubra y procese a alta velocidad por
1 minuto o hasta que la mezcla esté
muy suave.
2. Agregue ¼ de taza de jugo de carne (Kitchen
Bouquet y Gravy Master) y 2 cucharaditas
de condimento Beau Monde (o sustituya 1
cucharadita de MSG y 1 cucharadita de sal
condimentada).
3. Permita que la carne repose en el adobo a
temperatura ambiente por 2 horas o refrigere
hasta 24 horas en un plato cubierto.
4. Permita que la carne alcance la temperatura
ambiente antes de cocinar.
ADOBO PARA BROCHETAS
Ingredientes:
1 taza de salsa de soja
½ taza de azúcar morena
½ taza de vinagre blanco
½ taza de jugo de piña
2 cucharaditas de sal
½ cucharadita de ajo en polvo
Instrucciones:
1. Mezcle los ingredientes y hierva.
2. Adobe la carne en la mezcla por un mínimo
de 4 horas.
Adobos
ENCUENTRA
MÁS RECETAS EN
CHARGRILLER.COM

E-1
Condimento original
para todo tipo de
barbacoas
Acompaña bien todo tipo de
carnes y pescados
Encendedor de Rápida
Liberación para
Chimeneas
Fácil encendido con liberación
de gatillo patentada
Mango de ABS para protegerle
del calor
Acero galvanizado
Permite encender la parrillera a
carbón rápida y fácilmente
Gorra Char-Griller
®
Frente hecho en mezcla de
algodón y poliéster con malla de
nylon en la parte posterior
Cierre ajustable a presión
Un tamaño que se adapta a todos
Cesta para Carbón
Mantiene los Carbones a un
Lado para Ahumar
Cocción Indirecta
Cubierta a la Medida
Resistente al Clima
Protege el Acabado La Cubierta
se Adapta al Estante Lateral o la
Parrillera Lateral
Termómetro de
sensor plegable
El sensor de acero inoxidable para
lectura rápida mide con precisión
la temperatura
Se cambia fácilmente de °F a °C
Función de ENCENDIDO/
APAGADO automático para una
mayor duración de la batería
Visite chargriller.com para ver
la cubierta personalizada de
su parrilla
Modelo #6304
Modelo #19586
Modelo #70100
Modelo #9955
Modelo #85501
ACCESORIOS FAVORITOS
PARA LA VISITA COMPLETA DE ACCESORIOS CHARGRILLER.COM
PARA VER MÁS!
¡ESCANEE
EL CÓDIGO

P.O. Box 30864
Sea Island, GA 31561
912-638-4724
www.CharGriller.com
Service@CharGriller.com
-
 1
1
-
 2
2
-
 3
3
-
 4
4
-
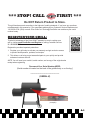 5
5
-
 6
6
-
 7
7
-
 8
8
-
 9
9
-
 10
10
-
 11
11
-
 12
12
-
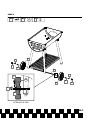 13
13
-
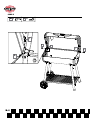 14
14
-
 15
15
-
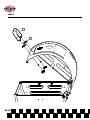 16
16
-
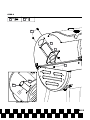 17
17
-
 18
18
-
 19
19
-
 20
20
-
 21
21
-
 22
22
-
 23
23
-
 24
24
-
 25
25
-
 26
26
-
 27
27
-
 28
28
-
 29
29
-
 30
30
-
 31
31
-
 32
32
-
 33
33
-
 34
34
-
 35
35
-
 36
36
-
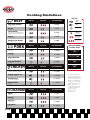 37
37
-
 38
38
-
 39
39
-
 40
40
-
 41
41
-
 42
42
-
 43
43
-
 44
44
-
 45
45
-
 46
46
-
 47
47
-
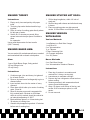 48
48
-
 49
49
-
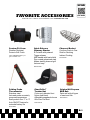 50
50
-
 51
51
-
 52
52
-
 53
53
-
 54
54
-
 55
55
-
 56
56
-
 57
57
-
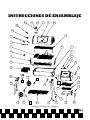 58
58
-
 59
59
-
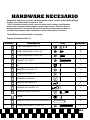 60
60
-
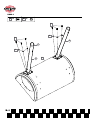 61
61
-
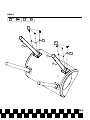 62
62
-
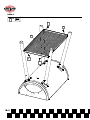 63
63
-
 64
64
-
 65
65
-
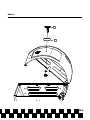 66
66
-
 67
67
-
 68
68
-
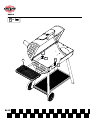 69
69
-
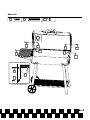 70
70
-
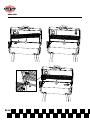 71
71
-
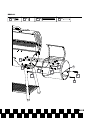 72
72
-
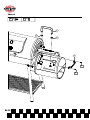 73
73
-
 74
74
-
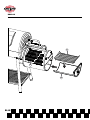 75
75
-
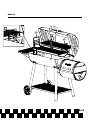 76
76
-
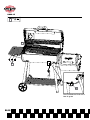 77
77
-
 78
78
-
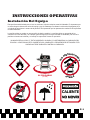 79
79
-
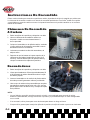 80
80
-
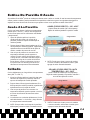 81
81
-
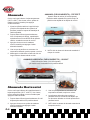 82
82
-
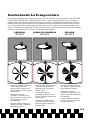 83
83
-
 84
84
-
 85
85
-
 86
86
-
 87
87
-
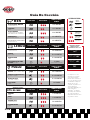 88
88
-
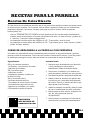 89
89
-
 90
90
-
 91
91
-
 92
92
-
 93
93
-
 94
94
-
 95
95
-
 96
96
-
 97
97
-
 98
98
-
 99
99
-
 100
100
-
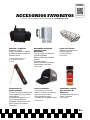 101
101
-
 102
102


Char Griller 1733 El manual del propietario
- Categoría
- Barbacoas
- Tipo
- El manual del propietario
en otros idiomas
- English: Char Griller 1733 Owner's manual
Artículos relacionados
-
 Char Griller 2799 El manual del propietario
-
 Char Griller 8250 El manual del propietario
-
CharGriller E1416 El manual del propietario
-
-
 Char Griller E1016 El manual del propietario
-
-
-
-
 Char Griller E56520 El manual del propietario


Otros documentos
-
 Char-Griller 22424 Instrucciones de operación
-
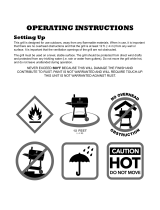 Char-Griller 789792021218 Manual de usuario
-
Charbroil 463724512 El manual del propietario
-
Char-Broil 463724512 Manual de usuario
-
 Char-Griller AKORN 16820 El manual del propietario
-
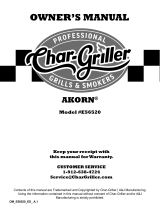 Char-Griller 56520 Manual de usuario
-
 Nexgrill 680-0002 Manual de usuario
-
Weber SMOKEY MOUNTAIN COOKER 47 cm noir El manual del propietario
-
AMERICANA 2130.4.111 Manual de usuario
-
Bradley Smoker BTISCE240EU Manual de usuario


