LG WM2016CW/00 El manual del propietario
- Categoría
- Lavadoras
- Tipo
- El manual del propietario
Este manual también es adecuado para

1-800-243-0000
24 HOURS A DAY,7 DAYSA WEEK FOR LGCUSTOMER SERVICE
_,L,_,,_, _ r,r,,,.Jrl,irly _,, , , ,_,.
[_l_ __' "r_, '_ 'J_,
,' _!:i_ ,r_'_,,,_,_,,; ',,_
Washing Machi
...... ru,:'_ !7
WM2016CW
Please read this manual carefully. It provides
instructions on safe installation, use, and maintenance.
Retain it for future reference.
Record the model and serial numbers of your machine
and report this information to your dealer if your machine
requires service.
Designed specially to use only
HE (High Efficiency) detergent

[] Direct Drive System
The advanced Brushless DC motor directly drives the drum without
belt and pulley.
[] Tilted Drum and Extra Large Door Opening
Tilted drum and extra large opening make it possible to load
and unload clothing more easily.
[] Automatic Wash Load Detection
Automatically detects the load and optimizes the washing time.
[] Child Lock
The Child lock prevents children from pressing any button to change the
settings during operation.
The LED Display
The LED display shows the settings, estimated time remaining, options, and
status messages for your washer. When the washer is turned on, the light in
the display will illuminate.
Important Safety Information .......................................................................................................................... 3
Specifications .................................................................................................................................................. 4
Installation Instructions ................................................................................................................................... 5
Preparation Before Washing ......................................................................................................................... 10
Using the Dispenser ...................................................................................................................................... 11
Cycles ........................................................................................................................................................... 13
How to Use the Washer ................................................................................................................................ 14
Maintenance ................................................................................................................................................. 17
Troubleshooting Guide .................................................................................................................................. 20
Warranty ....................................................................................................................................................... 23

READ ALLINSTRUCTIONS BEFOREUSE
,A, WARNING!
For your safety, the information in this manual must be followed to minimize the risk of fire or
explosion, electric shock, or to prevent property damage, personal injury, or loss of life.
IMPORTANT SAFETY INSTRUCTIONS
A I/V,ARNING: To reduce the risk of fire, electric shock, or injury to persons when using the washer, follow basic
precautions, including the following:
• Read all instructions before using the washer.
• Do not wash articles that have been previously
cleaned in, washed in, soaked in, or spotted with
gasoline, dry cleaning solvents, or other
flammable or explosive substances, as they give
off vapors that could ignite or explode.
• Do not add gasoline, dry cleaning solvents, or
other flammable or explosive substances to the
wash water. These substances give off vapors that
could ignite or explode.
• Under certain conditions, hydrogen gas may be
produced in a hot water system that has not been
used for 2 weeks or more. HYDROGEN GAS IS
EXPLOSIVE. ff the hot water system has not been
used for such a period, before using the washing
machine, turn on all hot water faucets and let the
water flow from each for several minutes. This will
release any accumulated hydrogen gas. As the gas
is flammable, do not smoke or use an open flame
during this time.
• Do not allow children to play on or in the washer.
Close supervision of children is necessary when
the washer is used near children.
• Before the washer is removed from service or
discarded, remove the door to prevent children
from hiding inside.
• Do not install or store the washer where it will be
exposed to the weather.
• Do not tamper with controls.
• Do not repair or replace any part of the washer or
attempt any servicing unless specifically
recommended in the user-maintenance
instructions or published user-repair instructions
that you understand and have the skills to carry
out.
• See Installation Instructions for grounding
requirements.
•AL WAYS follow the fabric care instructions
supplied by the garment manufacturer.
• Do not place items exposed to cooking oil in your
washer. Items contaminated with cooking oils may
contribute to a chemical reaction that could cause
a load to catch fire.
• Do not use fabric softeners or products to
eliminate static unless recommended by the
manufacturer of the fabric softener or product.
SAVE THESE INSTRUCTIONS
GROUNDING iNSTRUCTIONS
This appliance must be grounded. In the event of malfunction or breakdown, grounding will reduce the risk
of electric shock by providing a path of least resistance for electric current. This appliance is equipped with
a cord having an equipment-grounding conductor and grounding plug. The plug must be plugged into an
appropriate outlet that is properly installed and grounded in accordance with all local codes and ordinances.
• Do not use an adapter or extension cord.
• Do not remove ground prong.
• If you don't have the proper outlet, consult an electrician.
_1_ I/V,AJI:_NING: Improper connection of the equipment-grounding conductor can result in risk of electric shock.
Check with a qualified electrician or serviceman if you are in doubt as to whether the appliance is
properly grounded. Do not modify the plug provided with the appliance - if it does not fit the outlet,
have a proper outlet installed by a qualified electrician.

ShippingBolts
Power Plug
• Ifthe supply cord is damaged,
it must be replaced by the
manufacturer or its authorized
service technician in order to
avoid a hazard.
Panel
Drain Hose--
Dispenser
Door
Lower Cover Cap
Drain Plug
Adjustable Feet
Drain Pump Filter
im
Cold Water Inlet
Air Vent for Safety
• Name:
• Power supply:
• Size:
• Weight:
• Wash capacity:
• Spin speed:
Front-loading Washing Machine
120V~ 60Hz
68.6 cm (W) X 75.6 cm (D) X 98.3 cm (H), 129.1 cm (D, door open)
27"(W) X 293/4"(D ) X 3811/16"(H ), 5013/16"(D, door open)
179 Ibs. (81 kg)
3.03 cu. ft. (IEC: 3.50 cu. ft.) 1)
1100 rpm max.
Permissible water pressure: 14.5-116 psi(100~800kPa)
* Specifications subject to change by manufacturer.
• Accessories
Hose retainer
Hot/Cold (1 each)
Hose
Hole Cap (4EA)
Wrench
for removing shipping bolts
and leveling the washer
HE (Detergent)
Tie strap
to secure drain hose to standpipe,
inlet hose, or laundry tub
4 1) Per lEG 60456, washes the equivalent of a 3.50 cu.ft, agitator washer

A WARNING :Two or more people may be need to install and move the appliance.
Install or store unit where it will not be exposed to temperatures below freezing or
exposed to outside weather conditions.
Properly ground washer to conform with all governing codes and ordinances.
To reduce the risk of electric shock, do not install the washer in humid spaces.
The base opening must not be obstructed by carpeting when the washing machine is installed on a carpeted floor.
In countries where there are areas which may be subject to infestation by cockroaches or other vermin, pay
particular attention to keeping the appliance and its surroundings in clean condition at all times.
Damage caused by cockroaches or other vermin will not be covered by the appliance warranty.
[] Shipping bolts
The appliance is fitted with shipping bolts to prevent
internal damage during transportation.
Packing and all shipping bolts must be removed
before using the washer.
_- When unpacking the base, be sure to remove
the additional packing support in the middle of
the base packing.
Base Packing
g Support
[] Removing shipping bolts
1. To prevent internal damage during transport,
4 locking bolts are installed. Before operating
the washer, remove the bolts and braces.
• If they are not removed, it may cause severe
vibration, noise, and malfunction.
2. Unscrew the 4 bolts with the wrench supplied.
Do first lower side to remove easily. One of the
bolts retains the power cord of the washer to
prevent operating without removing bolts.
3. Take out the 4 bolts and braces by twisting
the braces slightly. Keep the 4 bolts, braces
and the wrench for future use.
• Whenever the appliance is transported, the
shipping bolts and braces must be reinstalled.
4. Close the holes with the caps supplied.

• Installation clearances
The location must be large enough to fully open
the washer door.
• Washer dimensions
3811/16"
(98.3 cm)
29 3/4"
(75.6 cm)
• Most installations require a minimum 4 in.
(10 cm) clearance behind the washer.
• Minimum installation spacing for
recessed area installation.
The following dimensions shown are for the minimum
spacing allowed.
Additional spacing should be considered for
installation and servicing.
• Additional clearances might be required for wall,
door and floor moldings.
• Additional spacing of 1 in. (2.5 cm) on all sides of
the washer is recommended to reduce noise
transfer.
Companion appliance spacing should also be
considered.
6
(75.6 cm) (10 cm)
[Side view]
1" _ 27"
(2.5 cm) (68.6 cm)
[Front view]
iiiiiiiiiiiiiii!
(2.5 cm)
• Level floor
• Allowable slope under entire washer is 1°.
• To minimize noise and vibration, the washer
MUST be installed on a solidly constructed
floor.
• Carpeting and soft tile surfaces are not
recommended.
• Never install the washer on a platform or weakly
supported structure.
NOTE: A firm, solid floor is even more critical to a
front-loading washer than to a top-loader.
If your floor is wood and/or frame
construction, you may need to reinforce it.
Front-loaders use substantially faster spin
speeds than top-loaders, causing greater
vibration. If the floor is not solid, your washer
will vibrate. You will hear and feel the
vibration throughout your house.
• Power outlet
• Must be within 60 in. (1.5 m) of either side of the
washer. Do not overload the outlet with more
than one appliance.
• Time-delay fuse or circuit breaker is recommended.
NOTE: It is tile personal responsibility and obligation
of the customer to have a proper outlet
installed by a qualified electrician.

• Electrical connection
• Do not use an extension cord or double adapter.
• If the supply cord is damaged, it must be replaced by a qualified person in order to avoid a hazard.
• If the machine will not be used for an extended time, unplug it and shut off the water supply.
• Connect the machine to a grounded outlet in accordance with current wiring regulations.
• The appliance must be positioned so that the plug is easily accessible.
• Connecting water supply hose
t
Hot
Cold
water
tap
Sealing
• Water supply pressure must be between
14.5 and 116 psi(lOON800 kPa).
• Do not crossthread when connecting inlet hose to
the valve.
• If the water supply pressure is more than 116 psi,
a pressure reducing device should be installed.
• Two Sealing washers are supplied with the water
inlet hoses to prevent water leaks.
• Check for leakage of washing machine connections
by turning the tap completely on.
• Periodically check the condition of the hose and
replace the hose if necessary.
• Make sure that there is no kink in the hose and that
it is not crushed.
• Be sure that the two water input ports are connected
to the correct water faucets. The connector for hot
water is colored red.
NOTE: Washing Machine is to be connected to the water mains using new hoses.
Old hoses should not be used.
Repairs to the washing machine must only be carried out by qualified personnel. Repairs carried out by
inexperienced persons may cause injury or serious malfunctioning. Contact your local service center.
Do not install your washing machine in a room where temperatures below freezing may occur.
Frozen hoses may burst under pressure. The reliability of the electronic control unit may be impaired
at temperatures below the freezing point.
If the appliance is delivered in the winter months and temperatures are below freezing,
store the washing machine at room temperature for a few hours before putting it into operation.
7

• Installation of drain hose
about 70"
• Place the end of the drain hose in the hole of the
floor drain system.
Laundrytub
Hose
m)
• The drain hose should not be placed higher than
96 in. from the bottom of the washer.
• Properly securing the drain hose will protect the
floor from damage due to water leakage.
• When installing the drain hose at a sink, secure it
so it cannot break away and cause flooding and
damage.
• Properly securing the drain hose will protect the
floor from damage due to water leakage.
This equipment is not designed for maritime use or for mobile installations such as in RV's, aircraft, etc.
Turn off the faucet if the machine is to be left for an extended period of time (e.g. holiday).
When disposing of the appliance, cut off the power cable, and destroy the plug.
Disable the door lock to prevent young children being trapped inside.
Packaging material (e.g. Films, Styrofoam) can be dangerous for children. There is a risk of suffocation! Keep all
packaging from children.

• Level adjustment
Adjustable feet
lig her
Adjustable feet Adjustable feet
• Leveling the washing machine properly prevents
excessive noise and vibration.
Install the appliance on a solid and level floor surface,
preferably in a corner of the room.
• If the floor is uneven, adjust the adjustable feet as
required. (Do not insert pieces of wood, etc. under the
feet.)
NOTE: Extend tile feet no more than necessary to level
the washer. The more the feet are extended, the
more the washer will vibrate.
• Make sure that all four feet are stable and resting on
the floor and then check that the appliance is perfectly
level (Use a level).
• After the washer is level, tighten the lock nuts up
against of the base of the washer. All lock nuts must
be tightened.
• It is critical to adjust the feet perfectly. This must be
done while the washer is spinning with a load. Use the
wrench (supplied) to adjust the feet until there is no
vibration. Then tighten the lock nuts to prevent further
adjustment.
NOTE: If there are vibration and noise during the spin
cycle, re-check the leveling of the washer, adjust
the feet as required, and tighten the lock nuts
securely to prevent changes in adjustment.
Run the washer with a test load to make certain
your washer is properly leveled. Put
approximately 6 pounds of laundry in the
machine. Then, press POWER, RINSE+SPIN, and
START/PAUSE, in that order. When the machine
spins at high speed, verify that it is stable. If not,
adjust the feet accordingly.
* Diagonal Check
When pushing down the edges of the washing machine
top plate diagonally, the machine should not move up
and down at all. (Please, check both directions.)
ff the machine rocks when pushing the machine top plate
diagonally, adjust the Jeet again.

To reduce the risk of fire, electric shock, or injury to persons, read the IMPORTANT SAFETY
INSTRUCTIONS before operating this appliance.
1. Fabric Care Labels
Look for a care label on your clothes. This will tell you about the fabric content of your garment and how it should
be washed.
2. Sorting
To get the best results, sort clothes into loads that can be washed with the same wash cycle.
Different fabrics need to be washed in different ways.
Always sort dark colors from pale colors and whites. Wash separately as dye and lint transfer can occur causing
discoloration of white clothing. If possible, do not wash heavily soiled items with lightly soiled ones.
Soil (Heavy, Normal, Light) Separate clothes according to amount of soil.
Color (White, Lights, Darks) Separate white fabrics from colored fabrics.
Lint (Lint Producers, Collectors) Wash lint producers and lint collectors separately.
3. Check before loading
Combine large and small items in a load. Load large items first.
Large items should not be more than half the total wash load.
Do not wash single items. This may cause an out-of-balance load. Add one or two similar items.
• Check all the pockets to make sure that they are
empty. Things such as clip, matches, pens,
coins, and keys can damage both your washer
and your clothes.
• Close zippers, hooks, and strings to make sure
that these items do not snag on other clothes.
• Pretreat dirt and stains by brushing a little
detergent dissolved in water onto stains like
collars and cuffs to help lift dirt.
NOTE: Do not wash or spin water-proof clothes.
10

The automatic dispenser consists of four compartments which hold 1) liquid chlorine bleach, 2) liquid fabric
softener, 3) liquid or powdered detergent for prewash and 4) liquid or powdered detergent
and color safe bleach for main wash.
All laundry products can be added at once in their respective dispenser compartments.
They will be dispensed at the appropriate time for most effective cleaning. After loading the laundry
additives into the dispenser, close the dispenser drawer.
Add detergent, bleach and fabric softener to the automatic dispenser following these steps:
1. Open the dispenser drawer.
2. Load the laundry products into the appropriate compartments.
3. Close the dispenser drawer.
• About detergent
Designed specially to use only
HE(High Efficiency) detergent
Your LG TROMM washer is designed to use only High Efficiency (HE) detergents.
HE detergents are formulated specifically for front load washers and contain suds reducing components.
HE detergents make less suds, improve washing and rinsing performance, and help to keep the interior
of your LG TROMM washer clean. Use the manufacture's recommend amount.
If a regular detergent is used, it may cause oversudsing and unsatisfactory performance.
For the best washing and rinsing performance, low-sudsing HE detergents are strongly recommended.
\
\
\
Liquid Chlorine
Bleach
Compartment
Liquid Fabric
Softener
Compartment
Prewash
Compartment
Main Wash
Compartment
1. Prewash Detergent Compartment
• Add detergent to this compartment when using
the Prewash option. Liquid or powdered
detergent may be used in this compartment. The
detergent will automatically be dispensed during
Prewash if the Prewash option is selected.
• Add 1/2 the recommended amount of detergent
to the Prewash compartment and the
recommended amount of detergent to the main
wash compartment.
NOTE : Liquid detergent will drain into tile washer
drum as it is added.
11

2. Main Wash Detergent Compartment
• Add measured detergent to this compartment for
Main wash. Detergent is flushed from the
dispenser at the beginning of the cycle. Either
powdered or liquid detergent can be used.
• Liquid or powdered color-safe bleach may be
added to the main wash compartment along with
the same type of liquid or powdered detergent.
NOTE: If you are using the Prewash option, powdered
detergent must be used in the main wash
compartment. Liquid detergent will drain into
the washer drum as it is added.
3. Liquid Bleach Compartment
• Add measured liquid chlorine bleach to this
compartment. The bleach will be automatically
dispensed at the proper time during the wash
cycle.
• Do not exceed the maximum fill line. Overfilling can
cause early dispensing of the bleach which could
result in damaged clothes.
• Do not pour undiluted liquid chlorine bleach directly
onto the load or into the drum. Fabric damage can
occur.
• Do not use powdered bleach in this compartment.
Designed specially to use only
HE(High Efficiency) detergent
4. Fabric Softener Compartment
• Add recommended amount of fabric softener to
this compartment.
• Dilute concentrated softeners with warm water to
the fill line.
• Do not exceed the maximum fill line. Overfilling can
cause early dispensing of the fabric softener which
could result in stained clothes.
• Do not pour fabric softener directly on the wash
load.
• The fabric softener will be automatically dispensed
during the last rinse cycle.
NOTE: Do not place, store, or spill laundry products
(soap, detergent, bleach, softener, etc.) on the
top of your washer or dryer. These products
can damage the finish or controls if left there
too long.
12

• Select cycles designed for different types of fabric and soil levels.
Cotton/ Cotton, linen,
Towels towels, shirts,
sheets
Normal
Mixed loads,
work clothes,
jeans, shirts
Dress shirts/
Perm pants, wrinkle free
Press clothing, poly/
cotton blend
clothing, table cloths
Delicates
Dress shirts/
blouses, nylons,
sheer or
lacy garment
Hand Items labeled
Wash "hand washable"
Warm/Cold
Warm/Warm
Hot/Cold
Tap Cold/Cold
CoWCold
Warm/Cold
Warm/Warm
Hot/Cold
Tap Cold/Cold
Cold/Cold
Warm/Cold
Warm/Warm
Hot/Cold
Tap Cold/Cold
Cold/Cold
Cold/Cold
Warm/Cold
Warm/Warm
Tap Cold/Cold
Cold/Cold
Warm/Cold
Warm/Warm
Tap Cold/Cold
Extra High Normal
No Spin Heavy
Low Light
Medium
High
High Normal
Extra High Heavy
No Spin Light
Low
Medium
0 0 0 0 0 0
0 0 0 0 0 0
Medium Normal
High Heavy
No Spin Light
Low
0 0 0 0 0 0
Medium Normal
No Spin Heavy
Low Light 0
0 0 0 0
Low Normal
Medium Light
No Spin
0 0 0 0
/3

COTTON/TOWELS •
= DELICATES DELAY
WASH
O HOTJCOLD O EXTRAHIGH O HEAVY G' HIGH O PRE-WASH
0 WARMtWARM Q N!GH 0 _ 0 R!NSE_PIN
O WARMiCOLD 0 MEDIUM 0 NORMAL 0 LOW 0 QUICK CYCLE
OCOLD/COLD GLOW 0 _ 0 STAINCYCLE
OTAPEOLDJCOU) 0 NOSPIN 0 LIGHT 0 OFF 0 TUBCLEAN
1. Power
• Use this button to turn the Power On/Off.
2. Cycles
• Rotate the Cycle selector knob to select cycle
designed for different types of fabric and soil
levels.
• Each cycle has a preset Water Temperature, Spin
Speed, Soil Level, and Option (See page 13).
• The preset settings can be changed anytime
before Start.
NOTE: This front load washer requires longer cycle time
and gets clothes much cleaner, yet is more gentle
on the fabrics, than top load washers. Washing
time can be reduced significantly for small loads
or lightly soiled loads by selecting Speed Wash
cycle and setting the Soil Level button at Light.
!
3. Start/Pause
• Use this button to start/stop the washer.
NOTE: If you do not press the Start/Pause button
within 4 minutes of selecting a cycle, the washer
automatically turns off.
14
4. Delay Wash
• Allows the start of any cycle to be delayed for
1N12 hours.
• Choose the wash cycle for your load, and then
press the Delay Wash button once for one hour or
press the button again to increase the delay wash
time up to 12 hours in one hour increments.
5. Water Plus
• Adds extra water to the wash and rinse cycles for
superior results.
6. SPINSENSE TM
• SPINSENSE TM can be used when there is a vibration
problem, especially on wood floor installations.
• To operate SPINSENSE TM press and hold the Water
Plus button for 3 seconds when the washing machine
is running on any cycle.
• When SPINSENSE TM has been selected, the Spin
Speed button light will blink on and off continually to
indicate that the SPINSENSE TM function has been
selected.
• Push and hold the Water Plus button again for 3
seconds to cancel SPINSENSE TM.
• Once SPINSENSE TM has been selected, if will continue
to function even if interrupted by a power failure.
• 'SPINSENSE' option cannot be selected during the
spinning cycle.
7. Extra Rinse
• This option provides an additional rinse.
• Use this option to ensure the removal of detergent
or bleach residue from garments.

8. Wash/Rinse Temperature
• Select a water temperature based on the type of
load you are washing.
• Follow the fabric care label and chart below for
best results.
LED DISPLAY
Cold
77°F (25°C)
Brightlycolored items,
washable woolens
• Warm rinses leave the loads dryer than cold
rinses. Warm rinses increase wrinkling.
• In cold climates, a warm rinse makes the load
more comfortable to handle.
• Cold rinses save energy.
• The Cold rinse temperatures depend on the cold
water at your faucet.
• Warm rinses are regulated at approximately
86°F (30°C).
• For the Tap Cold/Cold setting, both wash and rinse
temperatures depend on the cold water at your
faucet.
9. Spin speed
• To change the spin speed, press the Spin Speed
button repeatedly to cycle through available
options.
• To start Drain/Spin cycle:
1. Press Power _ button to turn on.
2. Press Spin Speed button only.
3. Press Start/Pause ((_'_button.
10. Soil Level
• To change the soil level, press the Soil Level
button repeatedly until the desired setting is on.
11. Beeper
• Press repeatedly to adjust the volume of the
Beeper.
1. DOOR LOCK INDICATOR
Indicates that the door is locked. The washer
door will lock while the washer is operating. The
door can be unlocked by pressing the START/
PAUSE button to stop the washer.
2. ESTIMATED TIME REMAINING
When the START/PAUSE button is pressed, the
washer automatically detects the wash load
(weight) and optimizes the washing time, based
on the selected cycle and options. The display
will then indicate the estimated time remaining
for the selected wash cycle.
NOTE: The cycle time displayed may appear much
longer than that of a top-loading washer.
The displayed time is for the complete cycle,
rather than just the agitation portion of the
cycle, as is typically shown on a top-loading
washer.
3. CYCLE COMPLETION INDICATOR
Shows how much of the current wash cycle has
been completed.
4. STATUS/CYCLE DISPLAY
This portion of the display shows the selected
cycle, operating status, and special messages.
If a cycle has special instructions, they will also
be displayed in this area.

1. Prewash
• Use this option for loads that need pretreatment.
Adds 16 minutes prewash and drain.
2. Rinse+Spin
• Use this option to rinse and then spin.
3. Quick Cycle
• The Quick Cycle offers a quick cycle time.
• Suggested uses includefreshening newly purchased
clothes, or clothing that has been packedaway.
4. Stain cycle
• Adds time to the wash and rinse for better stain
removal.
• Automatically provides a rinse.
5. Tub Clean
1. Remove any clothing or items from the washer
and close the door.
2. Open the dispenser drawer and add liquid
chlorine bleach to the bleach compartment.
NOTE: Do not add any detergent to tile detergent
compartments. Excessive suds may be
produced and leak from the washer.
3. Close the dispenser drawer slowly.
4. Power on the machine, press the "option" and
then select the "Tub Clean".
5. Press the Start/Pause button to start.
6. After the cycle is complete, leave the door open
to dry around the washer door opening, door
seal and door glass.
_1_ CAUTION: If there are small children in the
house, care must be taken so that
they can not climb into or play
inside the washer while it is open
for drying.
16
• This display shows:
a) the estimated time remaining in the cycle when
operating,
b) the error code when an error has been
detected.
• These lights show which portion of the cycle the
washer is operating. (See page 15)
OPTION
pl_ s,_& HOLD_ SEC
TO$_ tHaW I.I_CK
• Use this option to prevent unwanted use of the
washer. Press and hold OPTION button for 3
seconds to lock/unlock control.
• When Child lock is set, _.Lr'blinks and all buttons
are disabled except the Power (_) button.
You can lock the washer while it is operating.
• Lights whenever the door of the washer is locked.
• The door can be unlocked by pressing the
Start/Pause_ button to stop the washer.
NOTE: If the water temperature or the level is too
high, the door cannot be unlocked.
Do not try to force the door open when
DOOR LOCKED lights on.

Beforecleaning the washer interior, unplug the electrical power cord to avoid electrical shock hazards.
When disposing of the appliance, cut off the power cable, destroy the plug, and disable the door lock to prevent
young children from being trapped inside.
[] The water inlet filter
• " IE " error message will blink on the control panel when water does not enter the dispenser.
• If your water is very hard or contains traces of lime deposit, the water inlet filter may become clogged.
We recommend cleaning it every few months.
1. Turn off the 2. Unscrew
water tap. the water
inlet hose.
3. Clean the
filter using
a hard
bristle
brush.
4. Tighten
the inlet
hose.
[] The drain pump filter
o The drain filter collects threads and small objects left in the laundry.
Check regularly that the filter isclean to ensure smooth running of your machine.
Drain, using the drain hose, before opening the pump filter to remove objects.
Be careful when draining if the water is hot.
o Allow the water to cool down before cleaning the drain pump filter.
1. Open the lower cover cap (_).
Turn the drain plug ((.27)to pull
out the hose.
2. Unplug the drain plug C2_,
allowing the water to flow out.
At this time use a vessel to
prevent water from flowing
onto the floor. When water does
not flow any more, turn the
pump filter _ open to the left.
3. Remove any foreign objects from
the pump filter _. After cleaning,
turn the pump filter _ clockwise
and insert the drain plug @ to the
original place. Close the lower
cover cap_.
17

• Cleaning the Dispenser
• The dispenser may need to be cleaned periodically due to laundry additive build-up.
Pull the dispenser
drawer out until it stops.
/
Press down the lock tab
on the bleach insert.
Remove the drawer.
Remove the liquid detergent
box, softener and bleach
inserts from their
compartments.
• Run warm water and use a soft brush or cloth on the drawer, liquid detergent box and inserts to remove any excess
laundry additives.
• Clean the drawer opening using water and a small brush.
• Follow the illustrations in reverse order to replace the parts to their proper location.
NOTE: Do not use any cleaning substance on tile drawer opening other than water because it will drain into tile tub.
If this should happen, set the washer for a rinse and spin cycle to remove any cleaning substance from the
washer before doing a load of laundry.
• The washing drum
• If you live in a hard water area, lime scale can continuously build up in places where it cannot be seen
and it is not easily removed from the drum.
Over time the build-up of scale clogs appliances, and if it is not kept in check, these will eventually
have to be replaced.
• Although the washing drum is made of Stainless steel, specks of rust can be caused by small metal articles
(paper clips, safety pins, etc.) which have been left in the drum.
• The washing drum should be cleaned from time to time.
• If you use descaling agents, dyes, or bleaches, make sure they are suitable for washing machine use.
• Descaler could contain components that can damage part of your washing machine.
• Remove the spots with a stainless steel cleaning agent.
• Never use steel wool.
18

• Cleaning your washer
1. Exterior
Proper care of your washer can extend its life.
The outside of the machine can be cleaned with warm water and a neutral, non-abrasive
household detergent.
Immediately wipe off any spills. Wipe with a damp cloth.
Try not to damage the surface with sharp objects.
• IMPORTANT: Do not use methylated spirit, solvents or similar products.
2. Interior
Dry around the washer door opening, flexible gasket and door glass. These areas should always be clean to
ensure a water-tight seal.
Run washer through a complete cycle using hot water.
Repeat process if necessary.
• To start the TUB CLEAN cycle:
1. Remove any clothing or items from the washer and close the door.
2. Open the dispenser drawer and add liquid chlorine bleach to the bleach compartment.
NOTE: Do not add any detergent to tile detergent compartments. Excessive suds may be produced and leak
from the washer.
3. Close the dispenser drawer slowly.
4. Power on the machine, press the "option" and then select the "Tub Clean".
5. Press the Start/Pause button to start.
6. After the cycle is complete, leave the door open to dry around the washer door opening, door seal and
door glass.
,_, CAUTION: If there are small children in the house, care must be taken so that they can not climb into or
play inside the washer while it is open for drying.
NOTE: Remove hard water deposits using only cleaners labeled as safe for washing machines.
• Winterizing instructions
If the washer is stored in an area where freezing can occur or moved in freezing temperatures, follow these
winterizing instructions to prevent damage to the washer:
1. Turn off water supply tap.
2. Disconnect hoses from water supply and drain water from hoses.
3. Plug electrical cord into a properly grounded electrical outlet.
4. Add 1 gallon (3.8 _ ) nontoxic recreational vehicle (RV) antifreeze to empty wash drum. Close door.
5. Set spin cycle and let washer spin for 1 minute to drain out all the water.
Not all of the RV antifreeze will be expelled.
6. Unplug electrical power cord, dry drum interior, and close door.
7. Remove the two-compartment container from the Dispenser. Drain any water in compartments and dry the
compartments.
8. Store washer in an upright position.
9. To remove antifreeze from washer after storage, run empty washer through a complete cycle using detergent.
Do not add laundry.
19

This washing machine is equipped with automatic safety functions which detect and diagnose problems at an
early stage and react appropriately. When the machine does not function properly or does not function at all,
check the following points before you call the Service Department.
Rattling and clanking noise
Thumping sound
Vibrating noise
• Foreign objects such as coins
or safety pins may be in drum
or pump.
• Heavy wash loads may
produce a thumping sound.
This is normal.
Water leaks
• Have all the transit bolts and
packing been removed?
• Wash load may be unevenly
distributed in the drum.
• Are all the feet resting firmly
on the ground?
• Fill hose connection is loose at
tap or washer.
• House drain pipes are
clogged.
• Too much detergent or
unsuitable detergent.
Excessive suds
Stop washer and check drum and drain
filter.
If noise continues after washer is restarted,
call for service.
If sound continues, washer is probably out
of balance. Stop and redistribute wash
load.
See Installation Instructions for removing
shipping bolts.
Stop washer and rearrange wash load.
Adjust the leveling feet.
Make sure all four feet are in firm contact
with the floor, while the washer is in the
spin cycle with load.
Check and tighten hose connections.
Unclog drain pipe. Contact plumber if
necessary.
Reduce detergent amount or use HE
(High Efficiency) detergent.
_!_ esigned specially to use only
HE(High Efficiency) detergent
20

Water does not enter
washer or it enters slowly
Water in the washer does
not drain or drains slowly
Washer does not start
Washer won't spin
Wash cycle time delayed
• Water supply is not adequate
in area.
• Water supply tap is not
completely open.
• Water inlet hose is bent.
• The filter of the inlet hose
clogged.
• Drain hose is bent or clogged.
• The drain filter is clogged.
• Electrical power cord may not
be plugged in or connection
may be loose.
• House fuse is blown, circuit
breaker tripped, or a power
outage has occurred.
• Water supply tap is not turned
on.
• Check that the door is firmly
shut.
• The washing time may vary by
the amount of laundry, water
pressure, water temperature,
and other using conditions.
Check another tap in the house.
Fully open tap.
Straighten hose.
Check the filter of the inlet hose.
Clean and straighten the drain hose.
Clean the drain filter.
Make sure plug fits tightly in wall
outlet.
Reset circuit breaker or replace fuse.
Do not increase fuse capacity.
If problem is a circuit overload, have
it corrected by a qualified electrician.
Turn on water supply tap.
Close the door and press the
Start/Pause button. After pressing the
Start/Pause button, it may take a few
moments before the clothes washer
begins to spin. The door must lock before
spin can be achieved.
If the imbalance is detected or if the
suds removing program operates, the
wash time shall be increased.
21

• Water supply is not adequate in
area.
• Water supply taps are not
completely open.
• Water inlet hose is bent.
• The filter of the inlet hose clogged.
• Drain hose is bent
or clogged.
• The drain filter is clogged.
• Load is too small.
• Load is out of balance.
• The appliance has an imbalance
detection and correction system. If
individual heavy articles are loaded
(bath mat, bath robe, etc.) and the
imbalance is too great, after several
attempts to restart the spin cycle the
machine will stop and the error code
will be displayed.
• Is the door opened or not
completely closed?
• The water overfills due to the
faulty water valve.
• The water level sensor
malfunction.
Check another tap in the house.
Fully open tap.
Straighten hose.
Check the filter of the inlet hose.
Clean and straighten the drain hose.
Clean the drain filter.
Add 1 or 2 similar items to help
balance the load.
Rearrange load to allow proper
spinning.
Close the door completely.
If it is not released, call for service.
Unplug the power plug and call for service.
Close the water tap.
Unplug the power plug.
Call for service.
• Overload in motor. Restart the cycle after 30 minutes. If LE is
not released, call for service.
Restart the cycle.
• The washer experienced a power
failure.
22

Your LG Washing Machine will be repaired or replaced, at LG's option, if it proves to be defective in material or
workmanship under normal use, during the warranty period ("Warranty Period") set forth below, effective from the
date ("Date of Purchase") of original consumer purchase of the product. This warranty is good only to the original
purchaser of the product and effective only when used in the United States, including Alaska, Hawaii, and U.S.
Territories.
WARRANTY PERIOD:
LABOR: One Year from the Date of Purchase.
PARTS (_t as listed below): One Year from the
Date of Purchase.
Electronic Control Board: 2 Years from the Date of
Purchase.
Drum Motor: 7 Years from the Date of Purchase.
Stainless Steel Drum: Lifetime
Replacement Units and Repair Parts may be new or
factory remanufactured.
Replacement Units and Repair Parts are warranted for the
remaining portion of the original unit's warranty period.
HOW SERVICE IS HANDLED:
In=Home Service: Please retain dealer's dated bill
of sale or delivery ticket as evidence of the Date of
Purchase for proof of warranty, and submit a copy of
the bill of sale to the service person at the time
warranty service is provided.
Please call 1-800-243-0000 and choose the
appropriate option to locate your nearest LG
Authorized Service Center.
Or visit our website at: http://www.lgservice.com
THiS WARRANTY iS IN LiEU OF ANY OTHER WARRANTY, EXPRESS OR iMPLiED, iNCLUDiNG WITHOUT
LiMiTATiON, ANY WARRANTY OF MERCHANTABiLiTY OR FITNESS FOR A PARTICULAR PURPOSE. TO THE
EXTENT ANY iMPLiED WARRANTY iS REQUIRED BY LAW, iT IS LiMiTED IN DURATION TO THE EXPRESS
WARRANTY PERIOD ABOVE. NEITHER THE MANUFACTURER NOR iTS U.S. DiSTRiBUTOR SHALL BE
LIABLE FOR ANY iNCiDENTAL, CONSEQUENTIAL, iNDiRECT, SPECIAL, OR PUNiTiVE DAMAGES OF ANY
NATURE, iNCLUDiNG WITHOUT LIMITATION, LOST REVENUES OR PROFITS, OR ANY OTHER DAMAGE
WHETHER BASED iN CONTRACT, TORT, OR OTHERWISE. Some states do not allow the exclusion or limitation
of incidental or consequential damages or limitations on how long an implied warranty lasts, so the above exclusion
or limitation may not apply to you. This warranty gives you specific legal rights and you may also have other rights
that vary from state to state.
THiS LIMITED WARRANTY DOES NOT APPLY TO:
• Service trips to your home to deliver, pick up, and/or instamlthe product, instruct, or replace house fuses or
correct wiring, or correction of unauthorized repairs.
• Damages or operating problems that result from misuse, abuse, operation outside environmental
specifications or contrary to the requirements of precautions in the Operating Guide, accident, vermin, fire,
flood, improper installation, acts of God, unauthorized modification or alteration, incorrect electrical current or
voltage, or commercial use, or use for other than intended purpose.
The cost of repair or replacement under these excluded circumstances shall be borne by the consumer.
CUSTOMER INTERACTIVE CENTER NUMBERS
To obtain Customer Assistance, Product Infor=
mation, or Dealer or Authorized Service Center
location:
TO CONTACT LG ELECTRONICS BY MAIL:
LG Customer Interactive Center
P. O. Box 240007
201 James Record Road
Huntsville, Alabama 35824
ATTN: ClC
Call 1=800=243=0000(24 hours a day, 365 days per year)
and select the appropriate option from the menu.
Or visit our website at: http://www, gservice,com
23


_' 1-800-243-0000
para el Servicio LG (Atenci6n al Cliente) 24 horas al dia, 7 dias a la semana
Lavadora
WM2016CW
,idadosamente. Le proveer6
instalaci6n, uso y mantenimiento
ra futuras referencias. Cite esta
si requiere de servicio.
ii
especialmente para utilizar
,nte detergente HE (Alta eficiencia)

[] Sistema DD Inverfidor.
El avanzado motor de DC sin cepillo que mueve directamente el
cilindro sin cintur6n ni polea.
[] Cilindro Inc|inado y Abertura Extra Grande.
El cilindro inciinado y [a abertura extra grande, hacen m&s
fAcil la carga y descarga.
[] Detecci6n de |a carga de lavado autom&tico
Autom&ticamente detecta [a carga y optimiza el fiempo de [avado.
[] Seguro de Ni_os.
El seguro de niSos previene que los niSos presionen los botones y
cambien la configuraci6n durante la operaci6n.
LA PANTALLA DE LED
La pantalla LED los ajustes, el tiempo restante estimado, las
opciones y los mensajes de estado correspondientes a su
lavadora. Cuando se enciende la lavadora, se iluminara la luz de la
pantalla.
Informaci6n Importante de Seguridad .......................................................................................................... 27
Especificaciones ........................................................................................................................................... 28
Instrucciones de Instalaci6n ......................................................................................................................... 29
Preparaci6n Antes de Lavar ......................................................................................................................... 34
Usando el Distribuidor .................................................................................................................................. 35
Ciclos ........................................................................................................................................................... 37
Como Usar la Lavadora ................................................................................................................................ 38
Mantenimiento .............................................................................................................................................. 41
Gufa para la Detecci6n de Problemas .......................................................................................................... 44
Garantia ........................................................................................................................................................ 47
26

LEATODAS LASINSTRUCCIONESANTESDE USARLA.
A ADV£RTENCIA!
Para su seguridad, la informaci6n en estemanual debe ser seguida para mlnimizar el riesgo de incendio6
explosi6n, descarga el_ctrlca, 6 para prevenb dahos a su propledad, a su persona 6 p_rdida de la vlda.
In rmaci6n Importante de Seguridad
,A ,ADVERTENCI, A: Para reducir el riesgo de incendio, descarga el6ctrica, 6 heridas, al usar la lavadora, siga
las precauciones b_.sicasincluyendo las siguientes:
• Lea todas las instrucciones antes de usar la lavadora.
•No lave articulos que hayan sido previamente
limpiados con, lavados con, mojados con, 6
manchados con gasolina, solventes para lavado en
seco, u otra sustancia flamable 6 explosiva, ya que
estas despiden vapores que pueden incendiarse 6
explotar.
•No agregue gasolina, solventes para lavado en seco 6
cualquier otra sustancia flamable 6 explosiva al agua
de lavado. Estas sustancias despiden vapores que
pueden incendiarse 6 explotar.
•Bajo ciertas condiciones, se puede producir gas de
hidrSgeno en sistemas de agua caliente que no han
sido usados por 2 semanas 6 mas. EL GAS DE
HIDROGENO E$ EXPLOSIVO. $i el sistema deagua
caliente no ha sido usado por 2 semanas 6 mas, antes
de usar la lavadora, abra todas las Ilaves del agua
caliente y deje el agua correr por algunos minutos.
Esto liberarb cualquier rastro de gas de hidrSgeno
acumulado. Como el gas es flamable, no fume 6 use
ninguna flama abierta durante este tiempo.
• No permita que los ni_os jueguen sobre 6 dentro de la
lavadora. Deberb cuidar de cerca a los ni_os cuando
la lavadora sea usada cerca de ellos.
• Antes deretirar la lavadora para servicio 6 desecharla,
retire la puerta para prevenir que los ni_os se
escondan dentro.
•No instale 6 almacene la lavadora donde est_
expuesta a la intemperie.
•No estropee los controles.
•No intente reparar ni reemplazar ninguna parte de la
lavadora ni intente dar servicio a menos que sea
recomendado especfficamente en las instrucciones de
mantenimiento del usuario 6 publicado en las
instrucciones de reparacidn para el usuario que usted
entienda y tenga la habilidad de Ilevar a cabo.
• Vealas instrucciones de instalacidn para los
requerimientos de conexidn a tierra.
•SIEMPRE siga las instrucciones de cuidado de la te/a
provistas por el fabricante de la prenda.
•No coloque articulos manchados de aceite de cocina
en su /avadora. Los artfculos contaminados con aceite
de cocina pueden contribuir a una reaccidn quimica
que provoque el incendio de una carga.
•No use suavizantes de telas ni productos
eliminadores de estbtica amenos que sea
recomendado por el fabricante del suavizante de telas
6 el producto.
GUARDE ESTAS INSTRUCCIONES
INSTRUCCIONES DE CONECCIONA TIERRA
Este aparato debe set conectado a tierra. Dado el caso de descompostura 6 ma/ funcionamiento, /a conexi6n a tierra
reduce el riesgo de recibir unadescarga el_ctrica proveyendo una via de menor resistencia a la corriente e/_ctrica.
Este aparato esta equipado con un cable que tiene un conductor de equipo a tierra y una clavija de tierra. La clavija
debe set conectada en una toma de corriente adecuada que est_ propiamente instalada y conectada a tierra de
acuerdo con los c6digos y ordenanzas locales.
oNo use un adaptador ni un cable e/_ctrico de extensidn.
oNo quite el terminal de conexidn atierra.
o$i no cuenta con la toma de corriente adecuada, consulte a un electricista.
A ADVERTENOIA: Unaconexi6n inapropiada del conductorde equipo a tierra puede resultar en riesgo de recibiruna
descarga electrica. Verifique con un electricista calificado si tiene dudas sobre si el aparato esta
correctamente conectado a tierra. No modifique la clavija provista con el aparato. Si no encajacon
la toma de corriente, haga instalar una toma de corriente adecuada por un electricistacalificado.
27

Perno para Transportaei6n
Clavija de Energia
" Si el cable de suministro est_
dahado, debe ser reemplazado
por el fabricante 6 sus agentes
de servicio, 6 alguna persona
calificada en orden a evitar
cualquier riesgo.
Control
Manguera de Desagiie
Distribuidor
Puerta
Tapa Inferior de Cubierta
Cilindro
Entrada de Agua Frla
Ventilad6n p0r Seguridad Entrada de AguaCaliente
Paras Ajustables
Conexi6n de Desagfie --
Filtro de Bomba de Desagiie
m Nombre:
m Suministro de Energia:
m Dimensiones:
m
m
m
m
Peso:
Capacidad de Lavado:
Maquina Lavadora de Carga por el Frontal
120V ~ 60Hz
68.6cm (Ancho)X 78.6cm (Profundidad)X 98.3cm (Altura), 129.1cm (P,puertaabierta)
27"(A) X 293/4"(P ) X 3811/16"(A ), 5013/16"(P, puerta abierta)
179 Ibs. (81 kg)
3.03 pies cQbicos (IEC: 3.50 pies cQbicos) 1)
Velocidad de la Revoluci6n: 1100 rpm max.
Presi6n de Agua Permitida: 14.5-116 psi(100~800kPa)
* Especificaciones sujetas a cambio pot el fabricante.
• ACCESORIOS
Soporte de manguera
Manguera de Agua Caliente /
Fria (1 de c/u)
Tap6n (4 de c/u)
Llave
para quitar los tornillos de
transportaci6n y nivelar la lavadora
Tide HE(Detergente)
Pl_.stico sujetador
Cinta Sujetadora de Manguera
de Desag0e
1) Por cada 60456 IEC lava el equivalente de una agitador de 3.50 pies ct]bicos.
28

,gk ADVERTENCIA : Dos o mas personas pueden Ilegar a necesitar la instalaci6n y mover el artfculo.
Instale 6 almacene ell un lugar donde no est6 expuesta a temperaturas inferiores a la congelad6n ni expuesta a la
intemperie.
Conecte a tierra correctamente y cumpliendo con todos los c6digos y ordenanzas guberuamentales.
Para reducir los riesgos de electrocuci6n, no instale la lavadora en lugares hfimedos.
La abertura de la base no debe set obstruida pot al[bmbra cuando est6 instalada sobre un piso con alfombra.
Ell parses donde haya Areas que puedan estar sujetas a plagas de cucarachas 6 algdn otto bicho, ponga atend6n
particular a mantener el aparato y sus alrededores en condiciones limpias todo el tiempo. Cualquier dafio que pueda
haber sido causado pot cucarachas 6 algfin otto bicho, no serA cubierto pot la garantfa de este aparato.
[] Pernos de Transportaci6n
El artfculo esta ajustado con unos tornillos
desde el embalaje para prevenir dafios
internos durante la transportacidn. El empaque
y los tornillos deben ser removidos antes de
usarse la lavadora.
_- Cuando desempaque la base, aseg_rese
de remover los empaque adicionales que
se encuentran a la mitad de la base.
Lavadora
Embalaje Bajo.
Que Embala
[] Remover los Pernos de Transportaci6n
•Cuatro pernos estan instalados para proteger la
lavadora durante el transporte. Antes de operar
la lavadora, retire los pernos y abrazaderas.
• Si no son retirados, pueden causar fuertes
vibraciones, ruido y mal funcionamiento.
2. Desatornille los 4 pernos con la Ilave Provista.
Haga primero la parte baja para hacer los
movimientos de manera mas sencilla. Uno de
los tornillos detiene el cable de la energfa para
prevenir que tenga operaci6n antes de haber
retirado todos los tornillos.
Tap6n
€"
S
3. Retire los 4 pernos y abrazaderas dandoles
vuelta lentamente alas abrazaderas. Conserve
los 4 pernos, las abrazaderas y la Ilave para su
uso futuro.
• Cuando el aparato sea transportado, los pernos
y abrazaderas deber_.n ser reinstalada.
4. Tape los orificios con las tapas provistas.
29

• Espacios Libres de instalaci6n
El lugar debe ser Io suficientemente grande para
abrir en su totalidad la puerta de la lavadora.
• Dimensiones de la lavadora
, tj'%,_ •\
3811/16"
(98.3 cm)
29 3/4"
(75.6 cm)
• La mayoria de las instalaciones requieren un
minimo de 10 cm. Libres detras de la lavadora.
• Espacio minimo de instalacion para
area reducida instalacion.
Las dimensiones mostradas a continuaci6n son el
espaciado minimo permitido.
Un espacio adicional debe ser considerado para la
instalaci6n y el mantenimiento.
• Un espacio libre adicional puede ser requerido para
molduras de pared, puerta y piso.
• Un espacio adicional de 2.5 cm a todos los lades de
la lavadora es recomendado para reducir la
transferencia de ruido.
El espacio para una aplicaciSn complementaria
tambien debe ser considerado.
(75.6 cm) (10 cm)
[Vista lateral]
1" _ 27" _1"
(2.5 cm) (68.6 cm) (2.5 cm)
[Vista frontal]
• Nivele el Piso
• La inclinaci6n admisible debajo de la lavadora
completa es de 1°.
• Pare reducir ruido y vibraci6n, la lavadora
debe ser instalada en un piso construido
sblidamente.
• Superficies con alfombras y azulejos no son
recomendadas.
• Nunca instale la lavadora en una plataforma o
en una estructura debil.
NOTA: Un piso firme y s61idoes m_isnecesario para una
Carga Frontal que para una Carga Superior. Si su
piso es de madera o est_ien construcci6n, puede
set que necesite reforzarlo. Las Cargas Frontales
tienen mayor revoluci6n que las Cargas
Superiores, causando m_isvibraci6n. Siel piso no
ess61ido,su lavadora va a vibrar. Va a oil"y
sentir la vibraci6n en toda su casa.
• Toma de Corriente
• Debe ser de 1.5 m (60 in) hacia cualquier lade
de la lavadora. No sobrecargue la toma de
corriente con mas de un aparato.
• Se recomienda usar un regulador de voltaje
para evitar da_os por descarga electrica.
NOTA: Es responsabilidad y obligaci6n del
consumidor tenet propiamente instalado su
producto pot un electricista calificado.
3O

• Conexibn EI6ctrica
• No use un cable de extensi6n ni un adaptador doble.
• Si el cord6n proveedor de energia es dafiado, debe ser repuesto por una persona calificada para evitar peligros.
• Si la lavadora no va a ser usada en un periodo largo de tiempo, deconectela de la energia y de la corriente de agua.
• Conecte la lavadora a una toma de corriente correctamente conectada a tierra de acuerdo con las
regulaciones de cableado locales.
• El aparato debe estar posicionado de manera que la conexi6n a la corriente sea de f_.cilacceso.
[] Conectando la manguera de suministro de agua.
Grifo de agua caliente
Conector de
manguera
Grifo de agua
fria
• La presi6n de suministro de agua debe estar entre
14.5 y 116 psi (100 y 800 kPa).
• No corte ni desgarre la manguera de entrada a la
v_lvula.
• Si la presi6n de suministro de agua es
mayor a 116 psi, debera instalarse un dispositivo
reductor de presi6n.
• Dos empaques selladores son provistos con las
mangueras de entrada de agua para prevenir fugas.
• Revise cualquier gotera de las conexiones de la
lavadora.
• Verifique peri6dicamente la condici6n de las
mangueras y reemplgtcelas de ser necesario.
• AsegQrese de que la manguera no este torcida
ni rota.
• AsegQrese de que las conexiones de agua est_n
correctamente colocadas. La conexi6n de agua
caliente es de color rojo.
NOTA: La Lavadora serA conectada alas lineas principales del agua usando mangueras nuevas.
No se deben usar mangueras usadas.
Las reparaciones a la lavadora deber_in ser Ilevadas a cabo tlnicamente por personal calificado. Las
reparaciones Ilevadas a cabo pot personas sin experiencia pueden causarle heridas 6 malfuncionamiento.
No instale su lavadora en habitaciones donde puedan darse temperaturas inferiores a la congelaci6n. Una
manguera congelada puede reventarse bajo presi6n. La fiabilidad de la unidad de control electr6nica puede
ser deteriorada a temperaturas por debajo del punto de congelaci6n.
Si el aparato es entregado en los meses de invierno y las temperaturas andan por debajo de la congelaci6n,
mantenga la lavadora a temperatura del interior pot algunas horas antes de ponerla en operaci6n.
31

• Instalacibn de la Manguera de Desagiie
Aprox. 55'
• Ubique el extremo de la manguera de desagQe
en el orificio del sistema de drenaje en el piso.
Tina de ropa sucia
Soporte de
manguera
max. 96"
(2.4 m)
• La manguera de desagQe no debe ubicarse a
mas de 96" desde la base de la lavadora.
• Asegurar adecuadamente la manguera de
desagQe protegera su piso de da_os debidos a
fugas de agua.
• Cuando dirija la manguera de desagQe a un
lavabo 6 tina, asegure el extremo de salida para
evitar que se suelte accidentalmente y ocasione
una inundaci6n 6 da_os.
• Asegurar adecuadamente la manguera de
desagQe protegera su piso de da_os debidos a
fugas de agua.
Este equipo no est_i disefiado para uso maritimo ni para su uso en instalaciones m6viles tales como campers,
aeronave$, etc.
Cierre el grifo de la m_iquina si se va a dejar por un periodo largo de tiempo (ej. Vacaciones).
AI desechar el aparato, corte el cable de energia y destruya la clavija.
Deshabilite el seguro de la puerta para evitar que alg6n nifio pequefio quede atrapado dentro.
El material de empaque (ej. envoltura pl_istica, styrofoam) puede set peligroso para los nifios, iExiste el riesgo de
asfixia! Mantenga todo el material de empaque lejos del alcance de los nifios.
32

• Nivelar
Pie ajustable
Pie ajustable
• Nivelar correctamente la lavadora previene el ruido y
las vibraciones excesivos. Instale el aparato sobre un
piso s61idoy parejo y preferentemente en una esquina
de la habitaci6n.
• Si el piso esta disparejo, ajuste las patas ajustables segun
Io requiera (No inserte piezas de madera, etc. debajo de
las patas).
NOTA: No extienda las patas niveladoras m_isde lo necesario.
Mientras mAs extendidas est6n, mAsvibraci6n puede
haber.
• Asegurese de que las cuatro patas est6n estables y que
reposen sobre el piso, despu6s verifique que el aparato
est6 bien nivelado (Utilice una herramienta verificadora de
nivel).
• Despu6s de que la lavadora est6 nivelada, apretar la
tuerca de seguro hacia la base de la lavadora.
Asegurarse de que todas las tuercas est6n apretadas.
• Es critico que ajuste las patas correctamente. Esto debe
hacerse mientras la lavadora est6 girando con una carga.
Use la Ilave (abastecida) para ajustar las patas hasta que
no haya vibraci6n. Luego asegure los tornillos para evitar
cambios en el nuevo ajuste.
NOTA: Si existe una vibraci6n o ruido durante el
centrifugado, vuelva a revisar el nivel de balance de
la lavadora. Ajuste las patas hasta donde 1orequiera
y asegure los tornillos para evitar cambios en el nuevo
ajuste. Inicie el lavado con una prueba de lavado para
asegurarse que estAbien nivelada. Cargue
aproximadamente 6 libras de ropa en la lavadora.
Luego presione ENCENDIDO, ENJUAGUE+GIRO e
INICIAR/PAUSA, en ese orden. Cuando la lavadora
est6 girando a su mayor velocidad verifique siestA
estable. Si no, ajuste nuevamente las patas.
* VerificaciSn Diagonal
A1 empujar hacia abajo los extremos de la tapa superior
de la lavadora dej[brma diagonal esta no debe moverse
haeia arriba y haeia abajo para nada (Veri¢_quelo en
ambas direeeione#.
Si la mdquina se tambalea al empujar diagonalmente los
extremos haeia abajo, ajuste las patas nuevamente.
33

Para reducir el riesgo de incendio, descarga electrica 6 dafio a personas, lea las Instrucciones
Importantes de Seguridad antes de operar este aparato.
1. Etiquetas de Cuidado
Busque etiquetas de cuidado en sus prendas. Esto le dira sobre el contenido de las telas de su ropa y como
debe ser lavada.
2. Clasificando
Para obtener los mejores resultados, clasifique al ropa en cargas que puedan ser lavadas con el mismo ciclo
de lavado. Las diferentes telas deben ser lavadas con ciclos diferentes.
Siempre clasifique los colores oscuros de los palidos y los blancos. Lave por separado ya que puede ocurrir
una transferencia de tinte y pelusa, coloreando los blancos, etc. De ser posible, lave las prendas mas sucias
separadas de las que Io esten menos.
I Suciedad (Pesada, Normal, Poca) Separe las prendas de acuerdo a la cantidad de suciedad.
Color (Blancos, PAlidos, Oscuros) Separe las telas blancas de las de color.
Pelusa (Productores de Pelusa, Recolectores) Lave pot separado las prendas que producen pelusa de las que la recolectan.
3. Verifique antes de Cargar
Combine artfculos peque_os y grandes en una carga. Cargue los artfculos grandes primero. Los artfculos grandes
no deben ser mas de la mitad de la carga total de lavado.
No lave artfculos solos. Esto puede causar una carga desbalanceada. ASada una 6 dos prendas de igual tamaSo.
• Verifique todos los bolsillos para asegurarse de
que estan vacios. Objetos como clavos,
pasadores, cerillos, plumas, monedas y Ilaves,
pueden daSar tanto su ropa como su lavadora.
• Cierre los cierres, ganchos, y cintas para
asegurar que no se atoren con otras prendas.
• Trate las manchas y suciedad antes de lavar,
cepillando con un poco de detergente disuelto en
agua para aminorar la suciedad.
NOTA: No lave ni centrifugue prendas impermeables (contra agua).
34

El distribuidor autom_tico consiste de cuatro compartimentos que retienen 1) cloro llquido blanqueador, 2)
suavizante de telas llquido, 3) detergente llquido 6 en polvo para el prelavado y 4) detergente en polvo 6 llquido y
blanqueador seguro para los colores para el lavado principal.
Todos los productos de lavanderla pueden set a6adidos al mismo tiempo en su compartimiento distribuidor. Estos se
distribuir_n a su debido tiempo para Iograr la limpieza mas efectiva. Despu_s de cargar los aditivos de lavanderla en
el distribuidor, cierre la tapa.
Afiada detergente, blanqueador y suavizante de telas al distribuidor automfitico de
acuerdo con los siguientes pasos:
1. Abra el caj6n distribuidor.
2. Cargue los productos de lavado en los compartimentos correspondientes.
3. Cierre el caj6n distribuidor.
• Acerca del Detergente
Disehada especialmente para utilizar
solamente detergente HE (Alta eficiencia)
Su lavadora LG TROMM esta disefiada para usar solamente detergentes de Alta Calidad (HE).
Los detergentes tienen una formula especial que se requiere solo en las cargas frontales ya que reducen
componentes de la espuma.
Dicho detergente hace menos espuma, mejora el lavado y el centrifugado y ayuda a mantener el interior de su
lavadora LG TROMM en perfectas condiciones.
Si suele utilizar jabones regulares, puede ocasionar un alto nivel de espuma y de insatisfacci6n.
Para el mejor proceso de lavado y centrifugado, bajo nivel de espuma. Se recomienda ampliamente utilizar
detergentes de Alta Calidad (HE).
NOTA: El detergente llquido ser_i drenado al cilindro de la lavadora al ser afadido al distribuidor.
de cloro Ifquido
blanqueador.
aartimiento
de suavizante de
telas liquido.
Compartimiento
prelavado.
_ Compartimiento
de lavado
principal.
1.Compartimientode DetergenteparaPrelavado
• Afiada detergente a este compartimiento cuando
use la opci6n de Prelavado. En este
compartimiento se puede usar detergente tanto
Ifquido como en polvo. El detergente sera
distribuido automaticamente durante el
Prelavado si este fue seleccionado en las
opciones.
• Afiada la mitad de la cantidad recomendada para
el Prelavado y la cantidad completa
recomendada para el Lavado Principal.
3_

2. Compartimiento de Detergente del
Lavado Principal
• ASada el detergente con medida a este
compartimiento para el lavado Principal.
El detergente es drenado del distribuidor al
comenzar el ciclo. Puede usarse tanto detergente
liquido como en polvo.
• Puede aSadirse blanqueador que cuide los colores
al compartimiento del Lavado Principal junto con el
mismo tipo de detergente, liquido 6 en polvo.
NOTA: Si estrl usando la opci6n de Prelavado con el
lavado Principal, deber_i usar detergente en
polvo para el compartimiento de lavado
Principal, ya que el detergente liquido ser_i
drenado inmediatamente al cilindro al set
afiadido.
Disefiada especialmente para utilizar
solamente detergente HE (Alta eficiencia)
m
3. Compartimiento de Blanqueador Liquido
• A_ada cloro liquido blanqueador a este
compartimiento.
El blanqueador sera distribuido automaticamente
a su debido tiempo durante el ciclo.
• No rebase la linea de Ilenado maximo.
El sobrellenado puede causar derrames
tempranos de blanqueador, Io que puede resultar
en prendas da_adas.
• No vierta cloro liquido sin diluir directamente en el
cilindro 6 sobre la ropa. Puede ocurrir da_o alas
telas.
• No use blanqueador en polvo en este
compartimiento.
4. Compartimiento de Suavizante de Telas
• A_ada la cantidad recomendada de suavizante de
telas a este compartimiento.
• Diluya suavizantes concentrados con agua tibia
hasta Ilegar a la linea de Ilenado.
• No exceda la linea de Ilenado maximo.
El sobrellenado puede causar derrames
tempranos de suavizante, Io que puede resultar en
prendas sucias.
• No vierta el suavizante de telas directamente
sobre la carga de lavado.
• El suavizante de telas sera distribuido
automaticamente durante el Oltimo ciclo de
enjuague.
NOTA: No coloque, guarde o derrame productos de
lavado (iab6n, detergente, blanqueador,
suavizante, etc.) en la parte superior de su
lavadora o secadora. Estos productos
pueden dafiar el terminado o los controles si
se deja por mucho tiempo ahi.
36

• Usted puede seleccionar ciclos disehados para diferentes tipos de telas y niveles de suciedad.
iiiiiiiiiiiiiiiiiiiiiijiiiiiii i!iiii !iliii iiiiiiiiiiiiiiii!i!ii!ii!ii!ii!iiii!ii!!i!i!i!!!i!i!!!i i ! i i i !i!i iiiii!!i i !i!!ii!i!il!i!i!i!i!i!i iiuii ii !iiii i !i !iiiiil
................................................................................................................................................................!i! !
Tibia/Frfa Extra Alto Normal
Algodon/ Algoddn,
Toallas Lino, Tibia/Tibia No Exprimido Pesado
(Cotton/ Toallas, Caliente/Fria Bajo Ligero
Towels) Camisetas LigeramenteFria/Fria Mediano
Fria/Fria Alto
0 0 0 0 0 0
Tibia/Fria Alto Normal
Cargas mixtas,
Normal ropa de trabajo, Tibia/Tibia Extra Alto Pesado
jeans, Caliente/Fria No Exprimido Ligero
(Normal) camisas LigeramenteFria/Fria Bajo
Fria/Fria Mediano
Pantalones, Tibia/Fria Mediano Normal
Planchado camisas de vestir, Tibia/Tibia Alto Pesado
Permanente ropa sin arrugas, Caliente/Fria No Exprimido Ligero
(Perm mezclas de poly/ LigeramenteFria/Fria Bajo
Press) algod6n, etc. Fria/Fria
Fria/Fria Mediano Normal
0 0 0 0 0 0
0 0 0 0 0 0
Camisas de vestir,
Delicados blusas, Tibia/Fria No Exprimido Pesado
(Delicates) nylon, Tibia/Tibia Bajo Ligero
prendas con encaje LigeramenteFria/Fria
0 0 0 0 0
Lavado a Fria/Fria Bajo Normal
Mano Articulos Etiquetados
(Hand Wash para lavado a mano Tibia/Fria Mediano
Tibia/Tibia No Exprimido Ligero
LigeramenteFria/Fria
0 0 0 0
37

NORMAL
COTTON/TOWELS•
DELICATES
WATER PLUS
O HOT/COLD 0 EXTRAHiGH 0 HEAVY _) HIGH Q PRE-WASH
Q WARM'WARMO H!GH O _ Q RINSE÷$p!N
OWARMiCOLD OMEDIGM 0 NORMAL 0 LOW 0 QUICKCYCLE
OCGLD/COLO (_) LOW 0 _ Q STAINCYCLE
QTAPC_LD/COLD0 NOSPIN 0 LIGHT 0 OFF 0 TUBCLEAN
Selector de Ciclo
1. Encendido (Power)
• Use este bot6n para Encender y Apagar la lavadora.
2. Ciclos
• Presione la Selector de Ciclo para seleccionar el ciclo
diseSadopara losdiferentes tipos de telas y niveles de
suciedad.
• Cada ciclo tiene una temperatura, velocidad de giros,
nivel de suciedad y Opciones predeterminadas
(V6ase pa.gina 37).
• La configuraci6n predeterminada puede ser cambiada
en cualquier memento antes de comenzar el ciclo,
NOTA: Esta lavadora de carga frontal requiere un tiempo de
ciclo mAs largo, y obtendrA una mejor limpieza, aun
es mAsgentil en las prendas, que las lavadoras de
carga superior. El tiempo de lavado se puede reducir
significativamente para cargas pequefias o para
prendas ligeramente sucias, solo seleccionando el
"Ciclo RApido" con el bot6n "Opci6n" y
programando el bot6n de "Nivel de Suciedad",
iluminAndose la opci6n.
3. Iniciar/Pausa (Start/Pause)
• Use este bot6n para iniciar y pausar la lavadora.
NOTA: Si usted no presiona el bot6n Iniciar/Pausa en
los llmites de 4 minutos que se dan para
seleccionar el ciclo, el lavado autom_itico se
apagara.
38
4. Lavado Diferido (Delay Wash)
• Permite el comienzo de un ciclo con una demora desde
1 hasta 12 horas.
• Haga la selecci6n apropiada para su carga, despu6s
presione el bot6n de Terminado de Retraso (Delay
Wash) una vez pot una hera 6 de nuevo hasta 12 horas
de demora en el Terminado de Retraso.
5. Agua Mds (Water Plus)
• ASade agua adicional a los ciclos de lavado y de
enjuagado para mejores resultados.
6. SPINSENSE TM
•SPINSENSEpuedeserusadocuandoel pisoes
de maderao cuandounotienela preocupaci6n
deque vibrela lavadora.
•Presioneel bot6nStaincyclepor 3 segpara
operarSPINSENSE
•Cuandoseescogela opci6nde Spin Speedla luzen el
bot6nseencenderay apagar_,continuamente.
•Presioneel bot6ndel ciclo Stainpor 3 segde nuevopara
cancelarel ciclo SPINSENSE.
•Si el ciclo SPINSENSErueseleccionado,el ciclo
continuaraaplicandosemientrasla lavadoraest,.en use.
•La opci6n'SPINSENSE'no puedeserseleccionado
duranteciclode centrifugado.
7. Enjuague Extra (Extra Rinse)
• Esta opci6n provee un enjuague adicional.
• Use esta opci6n para asegurar la eliminaci6n de
residuos de detergente 6 blanqueador de las
prendas.

8. Temperatura de Lavado/Enjuague
(Wash/Rinse)
• Seleccione la temperatura del agua basandose en
el tipo de carga que este lavando.
• Siga las instrucciones de cuidado de las prendas y
clasifiquelas segQn la tabla de abajo para mejores
resultados.
l LAPANTALLADELED(LEDDISPLAY)
Frfa Lanaslavables,artfculos
77°F(25°C) decoloresbrillantes.
• Un enjuague tibio deja las carga mas seca que un
enjuague frio. Un enjuague tibio incrementa las
arrugas.
• En climas frios, un enjuague tibio hace la carga
mas c6moda de manejar.
• Un enjuague frio ahorra energia.
• Las temperaturas de los enjuagues frios dependen
de la temperatura del agua fria de su grifo.
• Los enjuagues tibios estan regulados a 86°F
(30°C) aproximadamente.
• Para el ajuste Tap Cold/Cold (Fria/Fria del grifo),
tanto la temperatura del lavado como del enjuague
depende de la temperatura del agua fria de su grifo.
9.VelocidaddeGiro(SpinSpeed)-CiclodelDrenar/Giro
• Para cambiar la velocidad de giro, presione el
bot6n de Velocidad de Giro (Spin Speed) hasta
configurar la velocidad deseada.
• Para comenzar el ciclo del Drenar/Giro:
1. Presione Encendido para girarse.
2. Presioneel bot6n de velocidad de Giro (Spin Speed)
3. Presione Iniciar/Pausa.
10. Nivel de Suciedad (Soil Level)
• Para cambiar el nivel de suciedad, presione el
bot6n de Nivel de Suciedad (Soil Level)
repetidamente hasta que el nivel deseado se haya
conseguido.
11. Beeper
• Use este bot6n para activar o apagar la Alarma.
1. INDICADOR DE SEGURO DE LA COMPUERTA
Indica que la compuerta esta asegurada.
La compuerta de la lavadora se asegurara
mientras la lavadora se encuentra funcionando.
Se puede liberar la compuerta apretando el bot6n
INIClO/PAUSA ubicado en la parte superior de
la lavadora.
2.ESTIMATEDTIMEREMAINING(TEMPORESTANTEESTIMADO)
Cuando se aprieta el bot6n INICIO/PAUSA, la
lavadora detecta automaticamente la carga de
lavado (peso) y optimiza el tiempo de lavado, en
base al ciclo y las opciones seleccionados. Luego
la pantalla indicara el tiempo restante estimado
para dicho ciclo.
NOTA: El tiempo de ciclo mostrado puede mostrarse
mucho mAs largo que el de una lavadora de
carga superior. El tiempo mostrado corresponde
al ciclo completo, y no solo la porci6n de
agitaci6n del ciclo, como se muestra tlpicamente
en una lavadora de carga superior.
3. IDICADOR DE COMPLETACION DE CICLO
Muestra la porci6n del ciclo de lavado actual que
se ha completado.
4. PANTALLA DE ESTADO/CICLO
Esta porci6n de la pantalla muestra el ciclo
seleccionado, el estado de funcionamiento y los
mensajes especiales. Si el ciclo tiene instrucciones
especiales, tambien se mostraran en esta Area.
39

OPClONES (OPTION)
1. Prelavado (Prewash)
• Use esta opci6n para cargas que requieran
tratamiento previo. A_ade 16 minutos de prelavado
y desagQe.
NOTA: Cuando use la opci6n de Prelavado, no use
detergente llquido en el compartimiento de
Lavado Principal. Use detergente en polvo.
2. Enjuague+Giro (Rinse+Spin)
• Use esta opciSn para enjuagar y luego girar.
3. Ciclo R_pido (Quick Cycle)
• El Ciclo Rapido ofrece un ciclo de tiempo rapido.
• Su uso se sugiere para refrescar prendas recien
adquiridas 5 prendas que han sido
empacadas por un tiempo.
4. Ciclo de Manchas (Stain Cycle)
• ASade mas tiempo a los ciclos de lavado y
enjuagado para mejor remociSn de manchas.
• Provee un enjuague automaticamente.
5. Lavar de Tonel (Tub Clean)
1. Retire toda la ropa que se encuentre en el interior
de la lavadora y cierre la puerta.
2. Abra el despachador de detergentes y agregue
blanqueador a su compartimiento.
NOTA:
No agregue detergente al compartimiento del
detergente. Tenga cuidado si usted coloca demasiado
puede ocasionar goteras dentro de la lavadora.
3. Cierre el despachador de detergente
suavemente.
4. Para prender la maquina, presionar el bot6n
'Option' y luego seleccionar la opci6n 'Tub Clean'.
5. Presione el bot6n de Iniciar/Pausa (Start/Pause).
6. Una vez que el ciclo concluy6, deje la puerta abierta
y seque alrededor de la puerta, su puerta de vidrio.
_, PRECAUCl0N:
Si hay algQn niSo pequeSo, tenga cuidado de no
dejar la puerta abierta.
NOTA:
Remueva dep6sitos de agua dura usando
6nicamente productos queen la etiqueta digan que
es seguro su uso en lavadoras.
4O
• Esta pantalla muestra:
a) El tiempo restante estimado en el ciclo cuando
este esta operando.
b) El cSdigo de error cuando este ha sido
detectado.
• Estas luces se_alan en que parte del ciclo se esta
operando. (Vease pagina 34)
OPTION
P_ESS& HOLD_ SEC
TO S£TCHILDLOCK
• Use esta opci6n para prevenir el uso no deseado de
la lavadora. Presione y sostenga el bot6n de
Option por 3 segundos para bloquear/desbloquear
el control.
• Cuando este puesto el seguro para niSos,
parpadean las letras " LL'-'" Ytodos los botones son
lisiados excepto en boton de Encendido (Power).
• Se enciende siempre que la puerta de la lavadora
esterasegurada.
• La puerta puede desasegurarse presionando el bot6n
Iniciar/Pausa para detener la lavadora.
NOTA: Si la temperatura o nivel del agua son muy
altas, la puerta no puede set desbloqueada.
No trate de forzar la puerta para abrirla
cuando la luz de PUERTA ASEGURADA
(DOOR LOCKED) estd encendida.

Antesdelimpiarelinteriordelalavadora,descon6cteladelsuministroel6ctricoparaevitarrecibirunadescargael6ctrica.
Cuandodesecheelaparato,corteelcabledecorrienteydestruyalaclavija.
Deshabiliteelsegurodelapuertaparaevitarquealgfinnifiopequefioquedeatrapadodentro.
• El Filtro de Entrada de Agua.
• El mensaje de error "IE "parpadeara en el panel de control cuando no entre agua al compartimiento de detergente.
• Si su agua es muy dura 6 contiene residuos de cal, el filtro de entrada de agua puede obstruirse. De tal modo que
resulta bueno limpiarlo de vez en cuando.
1. Cierre la
Ilave del
agua.
3. Limpie el
filtro
usando un
cepillo de
cerdas
duras.
2. Desatornille
la manguera
!
de la entrada
de agua.
4. Apriete
fuerte la
manguera
a la
entrada.
[] El Filtro de La Bomba de Drenaje
o El filtro de drenaje recolecta fibras y objetos peque_os olvidados en la ropa sucia. Verifique
regularmente que el filtro est6 limpio para asegurar un funcionamiento suave de su lavadora.
Primero drene usando la manguera de desagi3e y despues abra el filtro de la bomba para
retirar fibras u objetos.
• Permita que el agua se enfrie antes de limpiar la bomba de drenaje.
1. Abra la tapa de la cubierta
inferior (_). Gire la conexi6n
de la manguera de drenaje
(@) para sacarla.
2. Desconecte laconexi6n del
drenaje _ permitiendo que el
agua salga. AI mismo tiempo use
un recipiente para evitar que el
agua caiga al piso. Cuando deje
de correr el agua, abra el filtro de
la bomba 3_ hada la izquierda.
3. Retire cualquier material extraSo
del filtro de la bomba 3_. Despu_s
de limpiar el filtro 3_,gfrelo segQn
las manecillas del reloj e inserte la
conexi6n del desag(Je '_2_a su lugar
original. Cierre la tapa de la
cubierta inferior _1_.
41

• Limpiando el Distribuidor
• El distribuidor puede necesitar que Io limpie peri6dicamente debido a los residuos de los aditivos de lavanderia.
Presione abajo la
lengQeta de la cerradura
en el relleno del blanqueo.
Quite el caj6n.
!
Remueva la blanqueador y
suavizante de sus
compartimentos.
• Ponga agua caliente junto con un cepillo suave o alguna prenda sobre el caj6n, para eliminar los excesos de
detergente y cualquier aditivo de lavaderia.
• Limpie el caj6n usando agua y un cepillo peque_o.
• Siga las ilustraciones del reverso para reemplazar las piezas en su ubicaci6n correcta.
NOTA: No use ninguna sustancia de limpieza en la apertura del caj6n m_is que agua porque se drenar_i al tina.
Si esto sucediera, ponga la lavadora a realizar un ciclo de enjuague y giro para remover cualquier residuo de
la sustancia antes de lavar ropa.
• El Cilindro de Lavado
• Si usted vive en un Area de agua dura, continuamente se genera la acumulaci6n de residuos de cal en
lugares donde no se ve con facilidad yes dificil remover. Con el tiempo esto puede obstruir su aparato y si no
se verifica peri6dicamente, podria tener que reemplazarlo.
• Aunque el cilindro de lavado este hecho de acero inoxidable, pueden Ilegar a aparecer puntos de 6xido
causados por otros articulos peque_os de metal (clips, seguros, etc.) que hayan sido dejados en el cilindro.
• El cilindro de lavado debera ser lavado de vez en cuando.
• Si usa agentes para remover la cal, asegQrese de que pueden usarse en una lavadora.
• Los agentes para remover la cal pueden contener componentes que da_en su lavadora.
• Remueva las manchas con un agente limpiador de acero inoxidable.
• Nunca use libra de acero.
42

• Limpiando su Lavadora
1. Exterior
El cuidado adecuado de su lavadora puede extender su vida.
El exterior de la maquina puede ser limpiado con agua tibia y un detergente casero neutral, no-abrasivo.
Limpie inmediatamente cualquier derrame. Limpie con un trapo hOmedo.
Trate de no golpear la superficie con objetos filosos 6 puntiagudos.
• IMPORTANTE: No use esencia de metilo, solventes 6 productos similares.
2. Interior
Seque alrededor de la abertura de la puerta de la lavadora, la junta flexible y el vidrio de la puerta.
Estas Areas deben estar siempre limpias para asegurar un sellado hermetico.
LAVAR DE TONEL es un ciclo especial para limpiar el interior de la lavadora. Este ciclo utiliza un
alto nivel de agua con una velocidad fuerte. Haciendo un ciclo normal.
• Para comenzar el ciclo:
1. Retire toda la ropa que se encuentre en el interior de la lavadora y cierre la puerta.
2. Abra el despachador de detergentes y agregue blanqueador a su compartimiento.
NOTA: No agregue detergente al compartimiento del detergente. Tenga cuidado si usted coloca
demasiado puede ocasionar goteras dentro de la lavadora.
3. Cierre el despachador de detergente suavemente.
4. Para prender la maquina, presionar el bot6n 'Option' y luego seleccionar la opci6n 'Tub Clean'.
5. Presione el bot6n de Iniciar/Pausa (Start/Pause).
6. Una vez que el ciclo concluy6, deje la puerta abierta y seque alrededor de la puerta, su puerta
de vidrio.
,_ PRECAUCION: Si hay algOn nifio pequefio, tenga cuidado de no dejar la puerta abierta.
NOTA: Remueva dep6sitos de agua dura usando tlnicamente productos queen la etiqueta digan que es
seguro su uso en lavadoras.
• Instrucciones de Invierno
Si la lavadora es almacenada en un lugar donde pueda ocurrir congelaci6n, 6 es movida a un lugar con
temperaturas de congelaci6n, siga las siguientes instrucciones de invierno para prevenir dafios a su lavadora:
1. Cierre la Ilave de suministro de agua.
2. Desconecte las mangueras del suministro de agua y del drenaje.
3. Conecte el cable de suministro de energia a una toma de corriente propiamente conectada a tierra.
4. Afiada 1 gal6n (3.8 /J) de anticongelante no-t6xJco para veh[culo de recreo para vaciar el cilindro de
lavado. Cierre la puerta.
5. Configure el ciclo de gJro y deje girar a la lavadora per 1 minuto para drenar toda el agua. No todo el
anticongelante sera expulsado.
6. Desconecte el cable de suministro de energia, seque el interior del cilindro y cierre la puerta.
7. Retire el contenedor del distribuidor. Drene el agua que haya en los compartimientos y seque los
componentes.
8. AImacene la lavadora en posici6n parada derecha.
9. Para remover el antJcongelante de la lavadora despu6s de almacenada, op6rela vacia per un ciclo
complete de lavado usando detergente. No afiada ropa.
'/3

Esta lavadora est_ equipada con funciones de seguridad automAticas que detectan y diagnostican fallas
tempranamente y reaccionan apropiadamente. Cuando la m_quina no funcione apropiadamente 6 no funcione
para nada, verifique los puntos siguientes antes de Ilamar al Departamento de Servicio.
Ruido de golpeteo
metalico
Ruido Sordo
Ruido vibrante
Fugas de agua
Exceso de espuma
AlgtJn objeto externo como
monedas 6 seguros pueden
estar en el cilindro 6 en la
bomba de drenaje.
• Cargas pesadas de ropa
pueden causar este sonido.
Esto es normal.
• sHa retirado los pernos de
transportaci6n y la envoltura
por completo?
• sEstan todas las patas
reposando sobre el piso
firmemente?
La manguera de suministro de
agua esta suelta en la Ilave 6
en la entrada de la maquina.
Las mangueras de drenaje de
la casa estan obstruidas.
&Demasiado detergente 6
detergente no compatible?
Detenga la lavadora y revise el cilindro y el
filtro de desagQe. Si el ruido persiste
despues de reiniciar la lavadora, Ilame a
Servicio.
Si el sonido persiste, talvez la lavadora
este desbalanceada. Detengala y
redistribuya el peso de la carga.
Vease Instalaci6n para remover los pernos
de transportaci6n.
Si la carga esta mal distribuida en el
cilindro de lavado, detenga la lavadora y
redistribuya la carga de manera equitativa.
Ajuste las patas.
AsegtJrese que las cuatro patas esten en
firme contacto con el suelo, mientras que
la lavadora esta en ciclo de la giro con la
carga.
Verifique y apriete las conexiones.
Descongestione los tubos de drenaje.
Contacte a un plomero de ser necesario.
Reduzca la cantidad de detergente o
utilice detergente de HE (Alta eficiencia)
Disefiada especialmente para
utilizar solamente detergente HE
(Alta eficiencia)
44

iiiiiiiiiiiiiiiiiiiiiiiiiiiiiiiiiiiiiiiiiiiiiiiiiiiiiiiiiiiiiiiiiiiiiiiii i i! i !! !i !i !i !i !i !i!!i!!i!!i!!i!!i!!i!!i!!i!!i!!i!!i!!i!!i!!i!!i!!i!!i!!i!!i!!i!!i!!i!!i!!i!!i!!i!!i!!i!!i!!i!!i!!i!!i!!i!!i!!i!!i!!i!!!i!i ¸¸iiiiiiiiiiiiiiiiiiiiiiiiiiiiiiiiiiiiiiiiiiiiiiiiiiiiiiiiiiiiiiiiiiiiiiiiiiiiiiiiiiiiiiiiiiiiiii I l ! i!!i i!!i ! i i i i i i i i i i i i i i i i i i i i i i i i i i i i i i i i i i i i i i i i i i i i !i .............................................................................................................................................................................................................
El Agua no entra a la
lavadora 5 entra
lentamente
El agua de la lavadora no
se va 5 se va lentamente
La lavadora no enciende
La lavadora no gira
El tiempo de lavado se
retrasa
• El suministro de agua no es el
correcto en el Area.
• La Ilave de suministro de agua
no esta bien abierta.
• La manguera de suministro de
agua esta torcida.
• El filtro del suministro de agua
esta obstruido.
• La manguera de desagQe esta
torcida.
• El filtro de desagQe esta
obstruido.
• El cable de suministro de
energia puede no estar
conectado 6 esta suelto.
• El fusible de la casa puede
estar fundido, 6 se bot6 el
interruptor de circuito, 6 no
hay luz.
• La Ilave de suministro de agua
no esta abierta.
• Verifique que la puerta este
bien cerrada.
• El tiempo de lavado puede
variar de acuerdo con la
cantidad de ropa, presi6n del
agua, temperatura del agua y
otras condiciones de uso.
Verifique con otra Ilave en la casa.
Abra completamente la Ilave.
Enderece la manguera.
Verifique el filtro en la manguera.
Limpie y enderece la manguera.
Limpie el filtro de desagQe
AsegOrese de que este bien conectado.
Reemplace el fusible 6 reinicie el
interruptor de circuito.
No incremente la capacidad del fusible.
Si el problema es una sobrecarga en el
circuito, hagalo corregir por un electricista
calificado.
Abra la Ilave del suministro de agua.
Cierre la puerta y presione el bot6n de
Iniciar/Pausa. Despues de presionar el
bot6n de Iniciar/Pausa, puede tomar unos
momentos antes de que la ropa comience
a girar. La puerta debe cerrar con seguro
antes de iniciar los giros.
Si el desequilibrio es detectado 6 si el
programa eliminador de espuma operan, el
tiempo de lavado puede aumentar.
4_

iiiiiiiiiiiiiiiiiiiiiiiiiiiiiiiiiiiiiiiiiiiiiiiiiiiiiiiiiiiiiiiiiiiiiiiiiiiiiiiiiiiiiiiiiiiiiiiiiiiiiiiiiiiiiiiiiiiiiiiiiiiiiiiiiiiiiiiiiiiiiiiiiiiiiiiiiiiiiiiiiiiiiiiiii!14!ii;;;;;;!;;;iii ; ;;! iii11¸¸¸¸ "'
• El suministro de agua no es
adecuado en el Area.
• Las Ilaves del agua no estan
completamente abiertas.
• Las mangueras de entrada de
agua estan torcidas.
• El filtro de la manguera de
entrada esta obstruido.
• La manguera de desagQe esta
torcida u obstruida.
• El filtro de desagQe esta
obstruido.
• La carga es muy pequeSa.
• La carga esta desbalanceada.
• El aparato tiene un sistema de
detecci6n de desequilibrio y
correcci6n. Si son cargados
articulos individuales pesados
(ej. Bata de baSo, colchas,
etc.) este sistema puede
detener el ciclo si el
desequilibrio es muy grande
aun despues de un rato.
• _,Esta la puerta abierta 6 no
esta bien cerrada?
• El agua sobrellena hasta la
valvula de falla de agua.
• Hay una falla en el sensor de
nivel de agua.
• Sobrecarga en el Motor.
• La lavadora estuvo sometida a
una falla de alimentaci6n
electrica.
Verifique con otra Ilave de agua en la casa.
Abra bien las Ilaves del agua.
Enderece las mangueras.
Verifique el filtro de las mangueras de
entrada de agua.
Limpie y enderece la manguera.
Limpie el filtro de desagQe
ASada 1 6 2 prendas similares a la carga.
Reacomode la carga para balancearla.
Cierre bien la puerta.
Si el mensaje persiste Ilame a Servicio.
Desconecte el suministro de energia
y Ilame a Servicio.
Cierre la Ilave del agua.
Desconecte la clavija de energia.
Llame a servicio.
Vuelva a comenzar el ciclo.
'/6

Sulavadora LG serai reparada o reemplazada, a consideraciOn de LG, siprueba ser defectuosa en material o en ejecucion dentro de
un uso normal, dentro del periodo de garantia ("periodo de garantia") descrito en la parte inferior, efectivo desde la fecha ("fecha de
compra") de la compra del producto por el consumidor. Esta garantia limitada es efectiva Linicamente para el comprador original del
producto, y efectivo unicamente siha sido usado en los Estados Unidos, incluyendo Alaska, Hawai y territorio norteamericano.
PERiODO DE GARANTiA:
Vigencia: 1 aflo desde la fecha de compra.
PARTES(exceptuando la siguiente lista/:
1a#o desde la fecha de compra.
Piezas para el panel de control electronico:
2 afios desde la fecha de compra.
Piezas para el motor de tina Drum:
7 afios desde la fecha de compra.
Piezas para la tina Drum de acero inoxidable: [a vida.
Las unidades reemplazadas y reparadas pueden set
nuevas o refabricadas por la f_]brica.
Las unidades reemplazadas y reparadas tienen la misma
porcion de garantia que la garantia original de la compra
del producto durante el mismo periodo.
COMO SEMANEJA ELSERVIClO:
Servicio a domicilio: Por favor conserve el recibo del lugar
donde realizO sucompra como evidencia de la fecha en
que el producto fue adquirido para validar el periodo de
garantia, y tenga una copia del recibo para la persona de
servicio que la atienda en el momento en que necesite
aplicar su garantia.
Pot favor Ilame al 1-800-243-0000 y escoja la opcion
apropiada para Iocalizar el Centro de Servicio Autorizado [G
m_is cercano a usted.
O visite nuestra p_gina de internet en
http://www.lgservice.com
ESTAGARANTiAREEMPLAZACUALQUIEROTRAGARANTiA,EXPRESAO IMPLiCITA,INCLUYENDOSINLIMITACIONCUALQUIER
GARANTiADEVENTADEMERCANCiAO CONVENIENClAPARAPROPOSITOSPARTICULARES.ENELEXTENDIDOCUALQUIERGARANTiA
IMPLiClTAESREQUERIDAPORLEY,ESLIMITADAENDURACIONAL PERiODODEGARANTiAEXPRESAENLA PARTEINFERIOR.
NI ELFABRICANTENI SUSDISTRUBUIDORESENLOSEUAPUEDENSERRESPONSABLESDENINGUNDANO INCIDENTAL,CONSECUENClAL,
INDIRECTO,ESPECIALO PUNITIVODENINGUNANATURALEZA,INCLUYENDOSINLIMITAClON,PERDIDASDEGANANClAS O
CUALQUIEROTRODAI_OAUNQUEESTEBASADOENCONTRATOO AGRAVIO. Algunos estados no permiten la exclusion o limitation
de daflos incidentales o consecuenciales en el tiempo v_'_lidode la garantia asique la exclusion mencionada en la parte de
arriba puede que no aplique para usted. Estagarantia le da derechos legales especificos y puede que usted tenga otros
derechos adem_'Jsde losmencionados que varian de estado en estado.
ESTAGARANTiALIMITADANOAPLICA A:
• Viajes de Servicio a sucasa para Ilevar, recoger y/o instalar el producto, instruiro reponer fusibleso conectar correctamente
cables, o la correccion de piezasdesautorizadas; y
• Daflos o problemas operacionales como resultado de un mal uso, abuso, operacion dentro de un ambiente no especificado o
contrario a losrequerimientos o precauciones en la Guia Operacional, accidente, plagas, incendios, inundaciones, instalacion
inapropiada, actos de Dios,alteraciones o modificaciones desautorizadas, voltaje incorrecto, usocomercial, o para el uso de
otros fines que no sean los propOsitosintencionados.
Elcosto de reparaciones o reemplazos que son exchidos de estascircunstancias, deben ser asumidos por el consumidor.
NUMEROSCENTRALESINTERACTIVOSPARA ELCLIENTE
Para obtener Asistencia al Consumidor,
Informacion de Producto, O centros de Servicio
Autorizados:
[lame al 1-800-243-0000 (24 horas por dia, 365 dias por ano) y
seleccione la opcion apropiada del menLi.
o visite nuestra pagina de Intemet en http://www.lgservice.com.
PARACONI[ACTAR A LG Electronics POR MAIL
LG Customer Interactive Center
P.O. Box 240007
201James Record Road
Huntsville, Alabama 35824
ATTN:CIC
4Z

O LG Electronics Inc.
P/No. :MFL31245110
-
 1
1
-
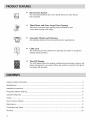 2
2
-
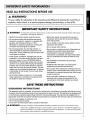 3
3
-
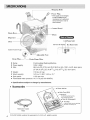 4
4
-
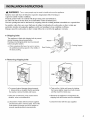 5
5
-
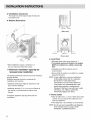 6
6
-
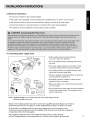 7
7
-
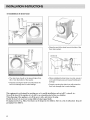 8
8
-
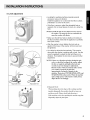 9
9
-
 10
10
-
 11
11
-
 12
12
-
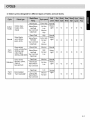 13
13
-
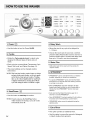 14
14
-
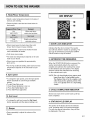 15
15
-
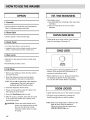 16
16
-
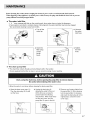 17
17
-
 18
18
-
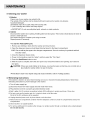 19
19
-
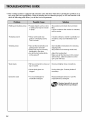 20
20
-
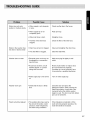 21
21
-
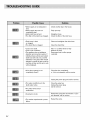 22
22
-
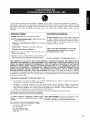 23
23
-
 24
24
-
 25
25
-
 26
26
-
 27
27
-
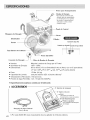 28
28
-
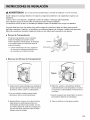 29
29
-
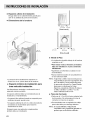 30
30
-
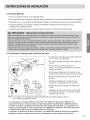 31
31
-
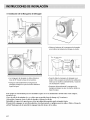 32
32
-
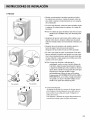 33
33
-
 34
34
-
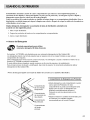 35
35
-
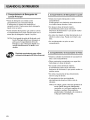 36
36
-
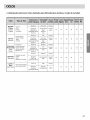 37
37
-
 38
38
-
 39
39
-
 40
40
-
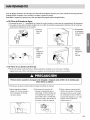 41
41
-
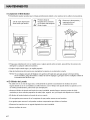 42
42
-
 43
43
-
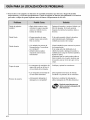 44
44
-
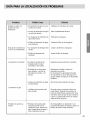 45
45
-
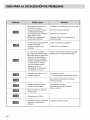 46
46
-
 47
47
-
 48
48


LG WM2016CW/00 El manual del propietario
- Categoría
- Lavadoras
- Tipo
- El manual del propietario
- Este manual también es adecuado para
en otros idiomas
- English: LG WM2016CW/00 Owner's manual