Haier LE24M600M80 Manual de usuario
- Categoría
- Televisores LED
- Tipo
- Manual de usuario
Este manual también es adecuado para

LED
User Manual / Manual de Usuario
Models / Modelos:
LE24M600M80(24”/60.96 cm)/LE32M600M80(32”/81.28 cm)
LE39M600M80(39”/99.06 cm)/LE48M600M80(48”/121.92 cm)
LE50M600M80(50”/127 cm)/LE55M600M80(55”/139.70 cm)

C
-2-
ontents
Safety and warnings.......................................................................................
Introduction..................................................................................................
......................................................................................
Installation................................................................................
...................
Remote Control.............................................................................................
Operation.....................................................................................................
Troubleshooting...........................................................................................
Base stand assembly
3-4
5
6
9-16
17
18-20
21
ENGLISH

-3-
SAF E T Y AND WAR NI NGS
IMPORTANT SAFETY INSTRUCTION
TO REDUCE THE RISK OF ELECTRIC SHOCK, DO
NOT REMOVE COVER (OR BACK).NO USER
SERVICEABLE PARTS INSIDE. REFER SERVICING
TO QUALIFIED SERVICE PERSONNEL.
R ISK OF EL EC T R IC SHOCK
DO NOT OPE N!
C A UT I O N
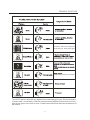
CAUTION
The symbol indicates that dangerous voltages
constituting a risk of electric shock are present
within this unit.
The symbol indicates that there are important
operating and maintenance instructions in the
literaturaccompanying this unit.
To reduce the risk of fire or electric shock, do
not expose this
Television to rain or moisture.
WA R NI NG :
1) Read these instructions.
2) Keep these instructions.
3) Heed all warnings.
4) Follow all instructions.
5) Do not use this Television near water.
6) Clean only with dry cloth.
7) Do not block any ventilation openings, install in
accordance with the instructions.
8) Do not install near any heat sources such as radiations,
heat registers, stoves, or other Television (including
amplifiers) that produce heat.
9) Do not defeat the safety purpose of the polarized p
lug.
If the provided plug does not fit into your outlet, consult
an electrician for replacement of the obsolete outlet.
10) Protected the power cord from being walked on or
pinched particularly at plugs, convenience receptacles,
and the point where they exit from the Television.
11) Only use attachments/accessories specified by the
manufacturer.
12) Unplug this Television during lighting storms or
when unused for long periods of time.
13) Refer all servicing to qualified service personnel.
Servicing is required when the Television has been
damaged in a
ny way, such as; power-supply cord or plug
is damaged, liquid has been spilled or objects have fallen
into the Television, the Television has been exposed to
rain or moisture, does not operate normally, or has been
dropped.
14) Mains plug is used as the disconnect device, the
disconnect device shall remain readily operable.
15) The ventilation should not be impeded by covering
the ventilation openings with items, such as newspapers,
table-cloth, curtains, etc.
16) No naked flame sources, such as lighted candles,
should be placed on the Television.
17) Atten
tion should be drawn to the environmental
aspects of battery disposal.
18) The use of Television in moderate climate.
19) The Television shall not be exposed to dripping or
splashing and that no objects filled with liquids, such as
vases, shall be placed on the Television.
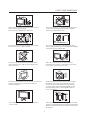
This symbol indicates that this product incorporates
double insulation between hazardous mains voltage and
user accessible parts. When servicing use only
identical replacement parts.
This marking indicates that this product should not be
disposed wi
th other household wastes throughout the
EU. To prevent possible harm to the environment or
human health from uncontrolled waste disposal,
recycle it responsibly to promote the sustainable
reuse of material resources. To return your used
device, please use the return and collection systems or
contact the retailer where the product was purchased.
They can take this product for environmental safe
recycling.
The batteries shall not be exposed to excessive heat
such as sunshine, fire or the like.
WA R NI NG :
The excessive sound pressure from earphones and
headphones can cause hearing loss.
WA R NI NG :
Haier is committed to safely recycling electronic
products and product materials. Please check for a
local recycling location in the United States at:
1800RECYCLING.COM or call 1.800.RECYCLING.
20)
please always ensure the whole product was placed
within the table surface in horizontal.
To avoid any injury caused by lean of the product,

-4-
High voltages are used in the operation of this television
receiver. Do not the cabinet.
Refer servicing to qualified service personnel.
open
SAF E T Y A N D WAR NI NG S
To prevent fire or electrical shock hazard, do not expose
the television receiver to rain or moisture.
Do not drop or push objects into the television cabinet
slots or openings. Never spill any kind of liquid on the
television receiver.
Do not block the ventilation holes on the back cover .
Adequate ventilation is essential to prevent failure of
electrical components.
of the TV
Do not trap the power supply cord under the television
receiver s .' stand
Never stand on, lean on, or suddenly push the television or
its stand. You should pay special attention to children.
Serious injury may result if it falls.
Do not place your television on an unstable cart, stand,
shelf or table. Serious injury to an individual and damage
to the television may result if it falls.
/or
When the television receiver is not used for an
extended period of time, it is advisable to disconnect
the AC power cord from the AC outlet.
Avoid exposing the television receiver to direct sunlight
and other sources of heat. Do not stand the television
receiver directly on other products which give off heat,
e.g. video cassette players and audio amplifiers. Do not
place naked flame sources, such as lighted candles on
the television. or near
Dim:5 15*320m m(不包括 底座)
If the television is to be built into a compartment or similar
enclosure, the minimum distances must be maintained. Heat
build-up can reduce the life of your television, and can also
be dangerous.

-5-
I NT R ODUCT I ON
Main features
Accessories
Infrared Remote Control....................
1
User’s M anual .................................
1
Battery(AAA)................................... 2
Accessories
Power cable...................................
1
■ Integrated ATSC TV tuner for HDTV broadcast reception
■ High brightness provides a vivid and brilliant picture
■ Deeper blacks and brighter whites with high contrast
■ Wide Screen aspect ratio (16:9) for a complete home
theater experience
■ HDMI input for true digital connection
■ VGA port for connection to PC
■
Built-in stereo speaker system
■ Full-function Remote Control
HDMI, the HDMI logo and High-Definition Multimedia Interface are trademarks or registered
trademarks of HDMI Licensing LLC.
Viewing Picture Size (Diagonal)
24 inches 32 inches 39 inches 48 inches 50 inches 55 inches
1920 x 1080 1366 x 768 1920 x 1080 1920 x 1080 1920 x 1080
AC 100-240V
50/60Hz
AC 100-240V
50/60Hz
AC 100-240V
50/60Hz
AC 100-240V
50/60Hz
AC 100-240V
50/60Hz
1920 x 1080
AC 100-240V
50/60Hz
40W 50W 70W 72W 120W 135W
2x3W 2x8W 2x8W 2x10W 2x10W
16:9 16:9 16:9 16:9 16:9
ATSC Digital system and
NTSC Analog system
ATSC Digital system and
NTSC Analog system
ATSC Digital system and
NTSC Analog system
ATSC Digital system and
NTSC Analog system
ATSC Digital system and
NTSC Analog system
NTSC NTSC NTSC NTSC NTSC
Cable: 1-135/Air:2-69
(ATV&DTV)
Cable: 1-135/Air:2-69
(ATV&DTV)
Cable: 1-135/Air:2-69
(ATV&DTV)
Cable: 1-135/Air:2-69
(ATV&DTV)
Cable: 1-135/Air:2-69
(ATV&DTV)
x2 (1 HDMI input
is MHL enabled)
x3 (1 HDMI input
is MHL enabled)
x3 (1 HDMI input
is MHL enabled)
x3 (1 HDMI input
is MHL enabled)
x3 (1 HDMI input
is MHL enabled)
x1
x1
x1
x1
x1
x1
x1
x1
x1
x1
x1
x1
Composite Video Input >=350
Video Input >=400
Component YPbPr) >=400
Composite Video Input >=350
Video Input >=400
Component YPbPr) >=400
Composite Video Input >=350
Video Input >=400
Component YPbPr) >=400
Composite Video Input >=350
Video Input >=400
Component YPbPr) >=400
Composite Video Input >=350
Video Input >=400
Component YPbPr) >=400
x2 x2
x1
x1
x1
x1
x1
x1
x2
x1
x1
x1
x1
x1
x1
x2
x1
x1
x1
x1
x1
x1
x2
2x10W
16:9
ATSC Digital system and
NTSC Analog system
NTSC
Cable: 1-135/Air:2-69
(ATV&DTV)
x3 (1 HDMI input
is MHL enabled)
Composite Video Input >=350
Video Input >=400
Component YPbPr) >=400
x1
x1
x1
x1
x1
x1
x2
Resolution
Power Supply
Power consumption
Aspect Ratio
TV System
Video Signal System
Receiving Channel
HDMI Port Input
Component /YPbPr) Input
Composite Video Input
Analog RGB (VGA) Input
Audio Input
Headphone Output
Coaxial Output
USB Input
Horizontal definition (TV line)
Audio Output Power (THD 7%)
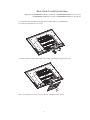
VI

-6-
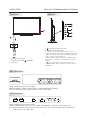
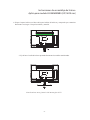
2. Attach the base stand to the stand neck firmly tightening the supplied screws.
Note: This stand is not a swivel stand. Do not attempt to rotate the TV.
Base Stand Assembly Instruction
1. Locate the bottom bracket into the gap in the bottom of the TV, and check that
it is securely held in place by its screws.
Applies for LE24M600M80 model (24”/60.96 cm)

-7-
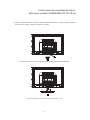
2. Attach the base stand to the stand neck firmly tightening the supplied screws.
Note: This stand is not a swivel stand. Do not attempt to rotate the TV.
Base Stand Assembly Instruction
Applies for LE32M600M20 model (32”/81.28 cm)
1.- Locate the bottom bracker into the gap in the bottom of the TV, and check that
it is securely held in place by its screws.

-8-
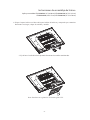
2. Attach the base stand to the stand neck firmly tightening the supplied screws.
Note: This stand is not a swivel stand. Do not attempt to rotate the TV.
1. Locate the bottom bracket into the gap in the bottom of the TV, and check that
it is securely held in place by its screws.
Base Stand Assembly Instruction
Applies for LE39M600M80 model (39 "/99.06 cm) / LE48M600M80 model (48 "/121.92 cm)
LE50M600M80 model (50 "/127 cm) / LE55M600M80 model (55 "/139.70 cm)

-9-
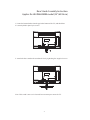
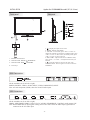
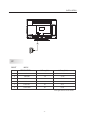
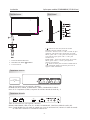
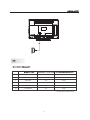
Front panel
Side panel
REAR Connections
1: Remote control sensor.
3:
2: Indicator LED: RED STANDBY.
Panel keys
1. : Display the input source menu.
2. M E NU: Display main MENU.
3. C H +/C H -: In TV mode, press "CH+" or "CH-" to
change the channel up and down. In MENU mode, press
"CH+" or "CH-" to select items; In standby mode, press
"CH+" or "CH-" to turn on the TV.
4. V OL +/V OL -: Adjust sound level. In MENU mode,
press "VOL+ " or "VOL- " to adjust the item that you
selected.
5. : Press this button to turn the unit ON from
STANDBY mode. Press it again to turn the set back to
STANDBY.
SIDE Connections
All the terminals are (from left to right):
HDMI1, MHL/HDMI2, USB, VGA, PC AUDIO, HEADPHONE, .
Note: When HDMI has an input signal coming from a DVI source then the audio input signal must be
connected to the PC audio input.
COAXIAL (audio output), RF
All the terminals are (from left to right):
POWER SOCKET, VIDEO, AUDIO INPUT, .
Note: AV and component (YPbPr) share the R and L audio inputs.
YPbPr INPUT(COMPONENT)
3
Applies for LE24M600M80 model (24”/60.96cm)
INSTALLATION

-10-
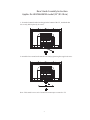
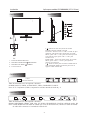
Front panel
Side panel
REAR Connections
1: Remote control sensor.
2: Indicator LED: POWER ON.
4:
WHITE
3: Indicator LED: RED STANDBY.
Panel keys
1. : Display the input source menu.
2. M E NU: Display main MENU.
3. C H +/C H -: In TV mode, press "CH+" or "CH-" to
change the channel up and down. In MENU mode, press
"CH+" or "CH-" to select items; In standby mode, press
"CH+" or "CH-" to turn on the TV.
4. V OL +/V OL -: Adjust sound level. In MENU mode,
press "VOL+ " or "VOL- " to adjust the item that you
selected.
5. : Press this button to turn the unit ON from
STANDBY mode. Press it again to turn the set back to
STANDBY.
30 30
1
4
2
3
SIDE Connections
All the terminals are (from left to right):
HDMI1, MHL/HDMI2, HDMI3, USB, VGA, PC AUDIO, HEADPHONE, .
Note: When HDMI has an input signal coming from a DVI source then the audio input signal must be
connected to the PC audio input.
COAXIAL (audio output), RF
All the terminals are (from left to right):
POWER SOCKET, VIDEO, AUDIO INPUT, .
Note: AV and component (YPbPr) share the R and L audio inputs.
YPbPr INPUT(COMPONENT)
INSTALLATION Applies for LE32M600M20 model (32”/81.28 cm)

-11-
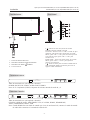
Front panel
Side panel
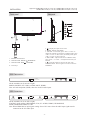
REAR Connections
1: Remote control sensor.
2: Indicator LED: POWER ON.
4:
WHITE
3: Indicator LED: RED STANDBY.
Panel keys
1. : Display the input source menu.
2. M E NU: Display main MENU.
3. C H +/C H -: In TV mode, press "CH+" or "CH-" to
change the channel up and down. In MENU mode, press
"CH+" or "CH-" to select items; In standby mode, press
"CH+" or "CH-" to turn on the TV.
4. V OL +/V OL -: Adjust sound level. In MENU mode,
press "VOL+ " or "VOL- " to adjust the item that you
selected.
5. : Press this button to turn the unit ON from
STANDBY mode. Press it again to turn the set back to
STANDBY.
SIDE Connections
All the terminals are (from left to right):
MHL/HDMI2, HDMI3,
.
Note: When HDMI has an input signal coming from a DVI source then the audio input signal must be
connected to the PC audio input.
COAXIAL (audio output)
(COMPONENT)
, VGA, PC AUDIO, HEADPHONE,
YPbPr INPUT, USB
All the terminals are (from left to right):
POWER SOCKET, RF, VIDEO, AUDIO INPUT, HDMI1.
Note: AV and component (YPbPr) share the R and L audio inputs.
30 30
1
4
2
3
COAXIAL VGA PC AUDIO
HDMI3
HEADPHONE
Y
Pb
Pr
USB
COMPONENT
MHL
HDMI2
AC-INPUT
100-240V~50/60Hz
R F
VIDEO L R
HDMI1
COMPOSITE
INSTALLATION
Applies for LE39M600M80 model (39 "/99.06 cm) / LE48M600M80 model (48 "/121.92 cm)
LE50M600M80 model (50 "/127 cm) / LE55M600M80 model (55 "/139.70 cm)

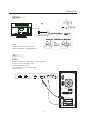
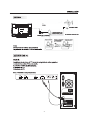
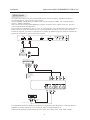
ANTENNA
INSTALLATION
Note:
Aerial connections: IEC (female).
Input impendance: 75 unbalanced.
STEPS:
PC
Be sure both the TV and computer are powered off.
1.Connect a VGA and audio cable.
2.Connect the power cord.
3.Turn on the TV, switch to PC mode.
4.Turn on the PC.
-12-

PC
-13-
1
2
3
4
5
6
640*480
800*600
1024*768
1280*1024
60
60
60
60
31.47
37.88
48.36
63.98
1366*768
1920*1080
60
60
47.71
67.50
RESOLUTION
*Not applicable for the 24 "model
*
INSTALLATION
PRESET MODE
V. Freq. (Hz) H. Freq. (kHz)

-14-
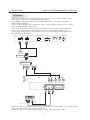
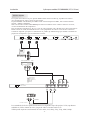
AV EQUIPMENT
There are two HDMI ports located on the back of your TV. You can connect a Blu-ray player,
DVD player, or other video equipment through these ports.
There is one component (Y, Pb, Pr) and one composite (AV) video input located on the back
of your TV. You can connect a VCR, cable box, or other video equipment to these jacks.
Please see the diagram below. You may also need to refer to the owner's manual of the device
that you are trying to connect.
The HDMI2 port is MHL enabled. You ca
n connect MHL devices, such as the compatible
mobile phones and tablets.
NOTE: a USB to HDMI cable is required to connect a mobile phone or tablet to the TV. Please
check the documentation of your device.
The television's inputs can be connected to the following types of equipment: VCR, multi disc player,
DVD, camcorder, video game or stereo system, etc.....
YPbPr can support these video formats:480i,576i,480p,576p,720p,1080i, 1080p.
HDMI
Yellow (video)
White(audio L)
Red(audio R or Pr)
Y
W
R
W R
G B R
Blue(Pb)
Green(Y)
B
G
VIDEO EQUIPMENT with YPbPr
W
R
G
B
R
W
R
W R
T O A U DI O O U T P UT S
V ID E O E Q U IP ME N T
T O V I D E O
O U T P U T S
INSTALLATION Applies for LE24M600M80 model (24”/60.96 cm)

-15-
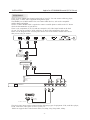
AV EQUIPMENT
There are three HDMI ports located on the back of your TV. You can connect a Blu-ray player,
DVD player, or other video equipment through these ports.
There is one component (Y, Pb, Pr) and one composite (AV) video input located on the back
of your TV. You can connect a VCR, cable box, or other video equipment to these jacks.
Please see the diagram below. You may also need to refer to the owner's manual of the device
that you are trying to connect.
The HDMI2 port is MHL enabled. You
can connect MHL devices, such as the compatible
mobile phones and tablets.
NOTE: a USB to HDMI cable is required to connect a mobile phone or tablet to the TV. Please
check the documentation of your device.
The television's inputs can be connected to the following types of equipment: VCR, multi disc player,
DVD, camcorder, video game or stereo system, etc.....
YPbPr can support these video formats:480i,576i,480p,576p,720p,1080i, 1080p.
HDMI
Yellow (video)
White(audio L)
Red(audio R or Pr)
Y
W
R
W R
G B R
Blue(Pb)
Green(Y)
B
G
VIDEO EQUIPMENT with YPbPr
W
R
G
B
R
W
R
W R
T O A U DI O O U T P UT S
V ID E O E Q U IP ME N T
T O V I D E O
O U T P U T S
AC-INPUT
100-240V~50/60Hz
VIDEO L R
COMPOSITE
Y
Pb
Pr
COMPONENT
INSTALLATION Applies for LE32M600M20 model (32”/81.28 cm)

-16-
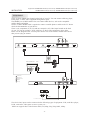
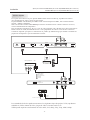
AV EQUIPMENT
There are three HDMI ports located on the back of your TV. You can connect a Blu-ray player,
DVD player, or other video equipment through these ports.
There is one component (Y, Pb, Pr) and one composite (AV) video input located on the back
of your TV. You can connect a VCR, cable box, or other video equipment to these jacks.
Please see the diagram below. You may also need to refer to the owner's manual of the device
that you are trying to connect.
The HDMI2 port is MHL enabled. You
can connect MHL devices, such as the compatible
mobile phones and tablets.
NOTE: a USB to HDMI cable is required to connect a mobile phone or tablet to the TV. Please
check the documentation of your device.
The television's inputs can be connected to the following types of equipment: VCR, multi disc player,
DVD, camcorder, video game or stereo system, etc.....
YPbPr can support these video formats:480i,576i,480p,576p,720p,1080i, 1080p.
Yellow (video)
White(audio L)
Red(audio R or Pr)
Y
W
R
Blue(Pb)
Green(Y)
B
G
VIDEO EQUIPMENT with YPbPr
T O A U D IO OU T P U T S
V ID E O E Q U I P
M
EN T
T O VI D E O
O U T P UT S
COAXIAL VGA PC AUDIO
HDMI3
HEADPHONE
Y
Pb
Pr
USB
COMPONENT
MHL
HDMI2
INSTALLATION
Applies for LE39M600M80 model (39 "/99.06 cm) / LE48M600M80 model (48 "/121.92 cm)
LE50M600M80 model (50 "/127 cm) / LE55M600M80 model (55 "/139.70 cm)

-17-
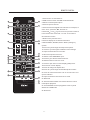
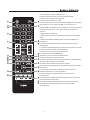
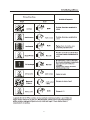
REMOTE CONTROL
1.Press to turn on and off the TV.
2.USB: Press to launch the USB multimedia mode.
3.Select a closed caption option.
4.Press to input a channel.
5.Press to select the digital sub-channels.For example, to
enter “54-3”, press“54”,“●”, and then “3”.
6.Press CH or CH to go to the next or previous channel
in the channel list. Press VOL+ or VOL- to increase or
decrease the volume.
7.Return to the menu.
8.Press to display the TV status information.
9.Select MONO, STEREO, SAP in NTSC (analog TV)
system.
10.Press to the sleep timer options.
11.Press to cycle through the diffe
rent sound settings.
12.Open the channel list in TV mode.
13.Show the input source menu.
14.Switch to
15.Press to go to the last viewed channel.
16.Switches the TV sound on or off.
17.Press to open the on-screen menu.
18.Exit
19.Press to change the aspect ratio.
20.Press to cycle through the available picture modes.
21.Press to confirm selections in an on-screen menu or to
open a submenu.
22.Open the favorite channel list in TV mode.
previous
cycle through
the HDMI2/MHL input.
display (OSD)
the on-screen display.
23.Reserved.
24. Reverse/Fast for
ward: Use these buttons to control
music/photo playback.
25. PLAY/PAUSE: Press to play/pause music or photo
slideshow in USB mode.
26. Reserved.
1
2
3
4
5
6
7
8
9
10
11
12
13
14
15
16
17
18
19
20
21
22
23
*
25
24
26

-18-
CC Mode CC On
Basic Selection CC1
Advanced Selection Servicel
Option
OK
VGA Setting
H-Pos
V-Pos
Clock
Phase
Auto
50
38
50
17
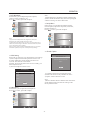
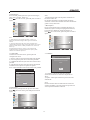
MENU
In this menu, you can adjust the picture options,
such as contrast, brightness, etc.
Press to select, press OK to adjust.
When a PC is connected, you can adjust the VGA settings.
1) H-Pos: Adjust the horizontal position of the screen.
2) V-Pos: Adjust the vertical position of the screen.
3) Clock: Fine tune the screen width.
4) Phase: Fine tune the phase of the screen. Usually you
don't adjust this item.
5) Auto: Auto adjust to fit the screen.
Note:
1) If you want to adjust contrast, brightness, color, and
sharpness, the picture mode be set to .will user
2) Cool to give the white c
olors
a blue tint, Normal to give the white colors a neutral tint, Warm
to give the white colors a red tint.
picture
Adjust the color tempertaure to
Energy Saving mode is the default setting, if you select
some other options, the power consumption may change.
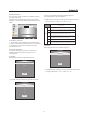
In this menu, you can ajust the sound options.
Press to select, press to adjust.OK
In this menu, you can adjust the Menu language,
Closed Caption,
Press to select, press to adjust.
adjust the sleep timer, time zone,
Restore Default, etc.
OK
Note:
1)
2)
Audio language is available in ATSC/TVmode only.
Auto volume is available only when the input signal
volume is too large or there is distortion.
1) CC Mode: Switch the closed caption mode.
2) Advanced selection: only available in ATSC.
3) Option: Used to edit the CC font.
Note:
1) Restore Default: Restore Default will clear all the
and reset all the settings to
default values.
saved channels of the
factory
Audio
Setup
TV
Picture
Lock
Picture Mode
Contrast
Brightness
Sharpness
Tint
Color
Color Temperature
Advanced Video
Energy Saving
50
50
50
50
50
Back Move
ENTER
MENU
OK
Setup
TV
Picture
Lock
Sound Mode
Bass
Treble
Balance
MTS
Digital Output
Surround Sound
Audio
Auto Volume
Only Off
Standard
50
50
50
Stereo
RAW
Off
Off
Audio
Back Move
ENTER
MENU
OK
TV
Picture
Lock
Menu
Language
Closed
Caption
Steep
Timer
Time
Zone
DST
Time
Format
Clock
Restor
Default
Software
Update
English
off
Pacific
off
12 hour
Setup
Audio
Back Move
ENTER
MENU
OK
OPERATION
1. PICTURE MENU
1.1 VGA Setting
3. Set Up Menu
3.1 Closed Caption
2. Audio Menu

-19-
And use the key to lock/unlock
.
OK Parental
Controls
2) MPAA: Switching the movie-rating control level;
N/A, G, PG, PG-13, R, NC-17, X.
Rating
Description
Age
G General audiences, All Ages admitted
PG
Parental Guidance suggested. Some material may not be
Suitable for children.
PG-13
Parents strongly cautioned. Some material .may be
Inappropriate for children under 13.
R
NC-17
X
Restrict. Under 17 requires accompanying parent or adult
guardian(age varies in some jurisdictions)
No one 17 and under admitted.
X is an older rating that is unified with NC-17 but may be
encoded in the data of older movies.
1) Canada English: Switching the English rating control
level: EXEMPT, C, C8+, G, PG
, 14+, 18+.
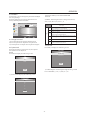
In this menu, you can change the password and adjust
the vchip settings.
Enter the password, to enter the lock menu. The
factory default password is 0000.
1) old password: Input the old password.
2) new password: Input the new password.
3)Confirm password: Input the new password again.
Enter
Enter
When the System Lock switch is ON, the options
listed below can be adjusted.
Press to display the following screen.OK
1) TV: Press display the following screen.OK
Press , to display the following screen.OK
TV
Picture
Lock
Enter Password
System
Lock
US
Canada
RRT
Setting
Reset
RRT
Change
Password
Setup
Audio
OK
-----
Back Move
ENTER
MENU
OK
MPAA
TV
US
MENU
FV
V
S
L
D
ALL
TV RATING
MENU
Canada
Canada Eng
Canada Fre
MENU
OPERATION
4. Lock Menu
4.1 Change Password
4.2 System Lock
4.3 US
4.4 Canada

-20-
Rating
Description
Age
E Exempt: Includes news, sports, documents and other information
programming: talk shows, music videos, and variety programming.
C Children: Intended for younger children under the age of 8 years.
Pays careful attention to themes that could threaten their sense of
securityand well-being.
C8+ Children over 8 years old: Contains no portrayal of violence as the
preferred, acceptable, or only way to resolve conflict; nor encourage
children to imitate dangerous acts which they may see on the screen .
G General: Considered acceptable fo
r all age groups, Appropriate
viewing for the entire family, contains very little violence, physical,
verbal or emotional.
PG Parental Guidance: Intended for a general audience, but may not be
suitable for younger children (under the age of 8) because it could
contain controversial themes or issues.
14+ Over 14 Years: Could contain themes where violence is one of the
dominant elements of the storyline But it must be integral to the
devel opment of plot or character. Language usage could be profane
and nudity , present within the context of theme.
18+ Adults: Intended for vi
ewers 18 years and older and might contain
depictions of violence, which while related to the development of
plot, character or themes, are intended for adult viewing. Could
contain graphic language and portrayals of secretary and nudity.
2) Canada French: Switching the French-rating control
level: E, G, 8ANS+, 13 ANS+, 16ANS+, 18ANS+.
Rating
Description
Age
E Exempt programming
G General: All ages and children, contains minimal direct violence,
but may be integrated into the plot in a humorous or unrealistic
manner.
8ans+ General but inadvisable for young children :May be viewed by a
wide public audience, but could contain scenes disturbing to
children under 8 who cannot distinguish between imaginary and
real situations. Recommended for viewing with paren.
13ans+ Over 13 years: Could contain scenes of frequent violent scenes
and in tense violence.
16ans+ Over 16 years: Could contain fr
equent violent scenes and violence.
18ans+ Over 18 years: Only for adult viewing. Could contain frequent
violent scenes and extreme violence.
ATSC digital TV mode, it can be adjusted
Press
In
to reset the RRT settings to the factory
default values.
OK
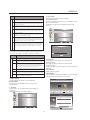
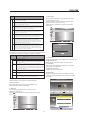
In this menu, you can adjust digital and analog TV
Channels.
Press to select, press to adjust.OK
Select Air TV signal cable TV signal.
If it's the first time you use the TV, you should scan all
the TV channels first.
Press to confirm to display the following
screen.
or
andOK
Press to choose/delete favorite channels.
5.4 S how/H ide
Press to display/ hide the current channel.
5.5 D T V signal
Display DTV signal . It can't be selected or
adjusted.
OK
OK
Display the user guide.
the strength
Lock
Setup
Audio
TV
Picture
Air/Cable
Favorite
Show/Hide
DTV Signal
ChannelS can
e-Manual
Enter
Cable
MENU
Status Scanning
Analog Channels:
Digital Channels:
0
0
5
%...
Air/Cable
Favorite
Show/Hide
DTV Signal
Channel Scan
e-Manual
Cable
Lock
Setup
Audio
TV
Picture
Back
Move
ENTER
MENU
OK
Back Move
ENTER
MENU
OK
MUSIC
Back
E X I T
Move Select
O K
James Blunt-you are beautiful.mp3
Return
Up Folder
A-Lin-.mp3
.mp3
.mp3
00:04:22
P l ay
00:04:22
You can display the Music and Photo fil s by using the
USB port that is located on the rear panel:
e
PHOTO MUSIC
Haier Innovation Life
USB2.0 Back
E X I T
Move Select
O K
OPERATION
4.5 RRT Setting
5.1 Air/Cable:
5.2 Channel Scan:
5.3 Favorite:
5.6 e-Manual
6 Multimedia
4.6 Reset RRT
5. Tv Menu

T R OU B L E S H OOT I NG
-21-
The LCD TV panel is built with very high precision technology giving you fine picture details
in vibrant color. Occasionally, a few non-active pixels may appear on the screen as a fixed
point of red, green, blue, black or white. Please note this does not affect the performance of
the product.
Component (Y Pb Pr) connections
microwave, electronic equipment,
car/motorcycle, fluorescent light

-22-
29-36
23-24
25
26-28
37
41
38-40
ESPAÑOL

-23-
INSTRUCCIONES IMPORTANTES DE SEGURIDAD
PARA REDUCIR EL RIESGO DE DESCARGA ELÉCTRICA.
NO RETIRE LA CUBIERTA (O LA PARTE POSTERIOR). NO
CONTIENE PIEZAS INTERNAS QUE EL USUARIO PUEDA
REPARAR. REMITA LA REPARACIÓN A PERSONAL DE
SERVICIO CALIFICADO.
R IE SGO DE DESCAR GA EL ÉC T R ICA
¡NO ABR IR!
PR E C A U C I ÓN
PRECAUCIÓN
El símbolo indica que en esta unidad hay tensión
peligrosa que constituye riesgo de descarga
eléctrica.
El símbolo indica que hay instrucciones de
operación y de mantenimiento importantes en el
material de lectura que acompaña a esta unidad.
Para reducir el riesgo de incendio o de choques
eléctricos, no exponga este televisor a la lluvia ni a
la humedad.
1) Lea estas instrucciones.
2) Conserve estas instrucciones.
3) Preste atención a todas las advertencias.
4) Siga todas las instrucciones.
5) No utilice este televisor cerca del agua.
6) Limpie sólo con un paño seco.
7) No bloquee las aberturas de ventilación. Instale de
acuerdo con las instrucciones.
8) No lo instale cerca de ninguna fuente de calor tales como
radiadores, registros de calor, cocinas ni otros televisores
(incluyendo amplificadores) q
ue produzcan calor.
9) No anule el propósito de seguridad del enchufe
polarizado. Si el enchufe que se proporciona no se ajusta a su
tomacorriente, consulte con un electricista acerca del cambio
del tomacorriente obsoleto.
10) Proteja el cable de alimentación evitando que se le
camine por encima o que se lastime, principalmente en los
enchufes, en los tomacorrientes y en los puntos donde emerge
del televisor.
11) Sólo utilice accesorios adjuntos especificados por el
fabricante.
12) Desconecte el televisor durante las tormentas eléctricas o
cuando vaya a estar mucho tiempo sin utilizar
se.
13) Remita todas las reparaciones a personal de servicio
calificado. Es necesario darle servicio cuando el aparato ha
sufrido daños de alguna forma, en el cable de alimentación o
en el enchufe, se ha derramado líquido o han caído objetos en
el interior del televisor, ha sido expuesto a la lluvia o a la
humedad, no funciona con normalidad, o si se ha caído.
14) El enchufe eléctrico funciona como dispositivo de
desconexión. El dispositivo de desconexión debe permanecer
fácilmente operable.
15) La ventilación no debe bloquearse cubriendo los orificios
de ventilación c
on elementos, tales como diarios, manteles,
cortinas, etc.
16) No se deben colocar sobre el televisor fuentes de llama
abierta, tales como velas encendidas.
17) Debe prestarse atención a los aspectos ambientales en
relación con el desecho de baterías.
18) Utilice el televisor en climas moderados.
19) El televisor no se expondrá al goteo ni a las salpicaduras;
sobre él no se colocarán objetos que contengan líquidos, tales
como vasos.
El símbolo indica que este producto tiene aislamiento
doble entre la tensión peligrosa de la red y las piezas a
l
as que pueda acceder el usuario. Al realizar
reparaciones, sólo utilice piezas de reemplazo
idénticas.
Esta marca indica que este producto no debe
desecharse junto con otros residuos domésticos.
A fin de prevenir un posible daño al medio
ambiente o a la salud humana por el desecho no
controlado de residuos, recíclelo en forma
responsable para promover la reutilización
sustentable de recursos materiales. Para devolver este
aparato usado, tenga a bien usar los sistemas de
devolución y de recolección.
Las baterías no deben exponerse a calor excesivo,
tal como luz solar, fuego o algo semejante.
La presión acústica excesiva procedente de los
audífonos puede causar pérdida auditiva.
ADVERTENCIA
ADVERTENCIA
ADVERTENCIA
20) Para evitar cualquier lesión causada por la caída del
producto, asegúrese siempre de colocarlo completamente
dentro de la superficie de la mesa en posición horizontal.

24

-25-
Características principales
Mando a Distancia Infrarrojo..............
1
Manual de Usuario.............................
1
Batería (AAA) .................................. 2
Accesorios
Cable de alimentación.......................
1
■ Sintonizador integrado para TV ATSC para la recepción
de transmisiones de HDTV
■ El elevado brillo proporciona una imagen viva y brillante
■ Negros profundos y los blancos más brillantes con elevado
contraste
■ Relación de aspecto de pantalla ancha (16:9) para una
experiencia total de teatro doméstico
■ Entrada HDMI para una conexión digital verdadera
■ Puerto VGA para conexión a la PC
■ Sistema de altavoces estereofónicos incorporados
■ Mando a distancia con plena funcionalidad
HDMI, el logotipo HDMI y High Definition Multimedia Interface son marcas comerciales o
marcas comerciales registradas de HDMI licensing LLC.
Tamaño de la imagen (Diagonal)
24 pulgadas (60.96 cm) 32 pulgadas (81.28 cm) 39 pulgadas (99.06 cm) 48 pulgadas (121.92 cm) 50 pulgadas (127 cm) 55 pulgadas (139.70 cm)
1920 x 1080 1366 x 768 1920 x 1080 1920 x 1080 1920 x 1080
c.a. 100V-240V
50Hz/60Hz
c.a. 100V-240V
50Hz/60Hz
c.a. 100V-240V
50Hz/60Hz
c.a. 100V-240V
50Hz/60Hz
c.a. 100V-240V
50Hz/60Hz
1920 x 1080
c.a. 100V-240V
50Hz/60Hz
40W 50W 70W 72W 120W 135W
2Wx3W 2Wx8W 2Wx8W 2Wx10W 2Wx10W
16:9 16:9 16:9 16:9 16:9
Sistema digital ATSC y
Sistema analógico NTSC
Sistema digital ATSC y
Sistema analógico NTSC
Sistema digital ATSC y
Sistema analógico NTSC
Sistema digital ATSC y
Sistema analógico NTSC
Sistema digital ATSC y
Sistema analógico NTSC
NTSC NTSC NTSC NTSC NTSC
Cable: 1-135/Antena:2-69
(ATV&DTV)
Cable: 1-135/Antena:2-69
(ATV&DTV)
Cable: 1-135/Antena:2-69
(ATV&DTV)
Cable: 1-135/Antena:2-69
(ATV&DTV)
Cable: 1-135/Antena:2-69
(ATV&DTV)
x2 (1 entrada HDMI está
habilitada para MHL)
x3 (1 entrada HDMI está
habilitada para MHL)
x3 (1 entrada HDMI está
habilitada para MHL)
x3 (1 entrada HDMI está
habilitada para MHL)
x3 (1 entrada HDMI está
habilitada para MHL)
x1
x1
x1
x1
x1
x1
x1
x1
x1
x1
x1
x1
Entrada de video compuesto >=350
Entrada de video >=400
Componente (YPbPr) >=400
Entrada de video compuesto >=350
Entrada de video >=400
Componente (YPbPr) >=400
Entrada de video compuesto >=350
Entrada de video >=400
Componente (YPbPr) >=400
Entrada de video compuesto >=350
Entrada de video >=400
Componente (YPbPr) >=400
Entrada de video compuesto >=350
Entrada de video >=400
Componente (YPbPr) >=400
x2 x2
x1
x1
x1
x1
x1
x1
x2
x1
x1
x1
x1
x1
x1
x2
x1
x1
x1
x1
x1
x1
x2
2Wx10W
16:9
Sistema digital ATSC y
Sistema analógico NTSC
NTSC
Cable: 1-135/Antena:2-69
(ATV&DTV)
x3 (1 entrada HDMI está
habilitada para MHL)
Entrada de video compuesto >=350
Entrada de video >=400
Componente (YPbPr) >=400
x1
x1
x1
x1
x1
x1
x2
Resolución
Fuente de Alimentación
Consumo de energía
Relación de Aspecto
Sistema de TV
Sistema de señal de video
Canales de recepción
Puerto de entrada HDMI
Entrada de Componente (YPbPr)
Entrada de Video compuesto
Entrada analógica RGB (VGA)
Entrada de Audio
Salida para audífonos
Salida Coaxial
Entrada USB
Definición Horizontal (línea de T.V.)
Potencia de salida de audio (THD 7%)
VI

-26-
Nota: Esta base no es giratoria. No intente girar el TV.
Instrucciones de ensamblaje de la base
Aplica para modelo LE24M600M80 (24”/60.96 cm)
1.- Ubique el soporte inferior en el hueco de la parte inferior del televisor y compruebe que se mantiene
firmemente en su lugar. Coloque los tornillos y atornille.
2. Fije la base al cuello de la base apretando firmemente los tornillos suministrados.

-27-
Instrucciones de ensamblaje de la base
Aplica para modelo LE32M600M80 (32”/81.28 cm)
1.- Ubique el soporte inferior en el hueco de la parte inferior del televisor y compruebe que se mantiene
firmemente en su lugar, coloque los tornillos y atornille.
Nota: Esta base no es giratoria. No intente girar el TV.
2. Fije la base al cuello de la base apretando firmemente los tornillos suministrados.

-28-
Nota: Esta base no es giratoria. No intente girar el TV.
Instrucciones de ensamblaje de la base
1.- Ubique el soporte inferior en el hueco de la parte inferior del televisor y compruebe que se mantiene
firmemente en su lugar, coloque los tornillos y atornille.
2. Fije la base al cuello de la base apretando firmemente los tornillos suministrados.
Aplica para modelo LE39M600M80 (39”/99.06 cm)/LE48M600M80 (48”/121.92 cm)
LE50M600M80 (50”/127 cm)/LE55M600M80 (55”/139.70 cm)

-29-
Panel delantero
Panel lateral
1: Sensor del mando a distancia.
2:
3:
Indicador LED: ROJO
ESPERA.
Teclas del Panel.
1. : Muestra el menú de la fuente de entrada.
2.M E NU: Muestra el MENÚ principal.
3.C H +/C H -: Presione "CH+" o "CH-" en modo TV para
cambiar el canal hacia arriba y hacia abajo. En modo
MENU, pulse "CH+" o "CH-" para seleccionar opciones
en el modo de espera, pulse "CH+" o "CH-" para
encender el TV.
4.V OL +/V OL -: Ajusta el nivel del sonido. En el modo
MENU, pulse "VOL+" o "VOL-" para ajustar las
opciones que seleccionó.
5. : Pulse este botón para encender la unidad desde el
modo
STAND BY. Púlselo nuevamente para volver el
equipo al estado STAND BY.
Todas las terminales son (de izquierda a derecha):
HDMI1, MHL/HDMI2 USB, , HEADPHONE,
Nota: Cuando HDMI tiene una señal de entrada que viene de una fuente DVI, entonces la señal de entrada
de audio debe conectarse a la entrada de audio de PC.
, VGA, PC AUDIO COAXIAL (Salida de audio), RF.
Todas las terminales son (de izquierda a derecha):
POWER SOCKET, VIDEO, AUDIO INPUT, .
Nota: AV Y Componente (YPbPr) comparten las mismas entradas de audio R y L.
YPbPr (COMPONENT) INPUT
3
Conexiones traseras
Conexiones laterales
Aplica para modelo LE24M600M80 (24”/60.96 cm)Instalación
c.a. Input
100V-240V 50Hz/60Hz

-30-
Panel delantero
Panel lateral
Conexiones traseras
1: Sensor del mando a distancia.
2: Indicador LED: ENCENDIDO.
4:
3: Indicador LED: ROJO
ESPERA.
Teclas del Panel.
1. : Muestra el menú de la fuente de entrada.
2.M E NU: Muestra el MENÚ principal.
3.C H +/C H -: Presione "CH+" o "CH-" en modo TV para
cambiar el canal hacia arriba y hacia abajo. En modo
MENU, pulse "CH+" o "CH-" para seleccionar opciones
en el modo de espera, pulse "CH+" o "CH-" para
encender el TV.
4.V OL +/V OL -: Ajusta el nivel del sonido. En el modo
MENU, pulse "VOL+" o "VOL-" para ajustar las
opciones que seleccionó.
5. : Pulse este botón para encender la unidad desde el
modo
STAND BY. Púlselo nuevamente para volver el
equipo al estado STAND BY.
Conexiones laterales
Todas las terminales son (de izquierda a derecha):
HDMI1, MHL/HDMI2 , USB, , HEADPHONE,
Nota: Cuando HDMI tiene una señal de entrada que viene de una fuente DVI, entonces la señal de entrada
de audio debe conectarse a la entrada de audio de PC.
, HDMI3 VGA, PC AUDIO COAXIAL (Salida de audio), RF.
Todas las terminales son (de izquierda a derecha):
POWER SOCKET, VIDEO, AUDIO INPUT, .
Nota: AV Y Componente (YPbPr) comparten las mismas entradas de audio R y L.
YPbPr (COMPONEN
T) INPUT
30 30
1
4
2
3
Aplica para modelo LE32M600M80 (32”/81.28 cm)Instalación
BLANCO
c.a. Input
100V-240V 50Hz/60Hz

-31-
Panel delantero
Panel lateral
Conexiones traseras
1: Sensor del mando a distancia.
2: Indicador LED: E NCENDIDO.
4:
3: Indicador LED: ROJO
ESPERA.
Teclas del Panel.
1. : Muestra el menú de la fuente de entrada.
2.M E NU: Muestra el MENÚ principal.
3.C H +/C H -: Presione "CH+" o "CH-" en modo TV para
cambiar el canal hacia arriba y hacia abajo. En modo
MENU, pulse "CH+" o "CH-" para seleccionar opciones
en el modo de espera, pulse "CH+" o "CH-" para
encender el TV.
4.V OL +/V OL -: Ajusta el nivel del sonido. En el modo
MENU, pulse "VOL+" o "VOL-" para ajustar las
opciones que seleccionó.
5. : Pulse este botón para encender la unidad desde el
modo
STAND BY. Púlselo nuevamente para volver el
equipo al estado STAND BY.
Conexiones laterales
Todas las terminales son (de izquierda a derecha):
MHL/HDMI2 , HEADPHONE,
Nota: Cuando HDMI tiene una señal de entrada que viene de una fuente DVI, entonces la señal de entrada
de audio debe conectarse a la entrada de audio de PC.
COAXIAL (Salida de audio), VGA, PC AUDIO,
YPbPr (COMPONENT) INPUT, USB
, HDMI3
.
Todas las terminales son (de izquierda a derecha):
POWER SOCKET, VIDEO, AUDIO INPUT, HDMI1.
Nota: AV Y Componente (YPbPr) comparten las mismas entradas de audio R
y L.
RF,
30 30
1
4
2
3
COAXIAL VGA PC AUDIO
HDMI3
HEADPHONE
Y
Pb
Pr
USB
COMPONENT
MHL
HDMI2
~
R F
VIDEO
L R
HDMI1
COMPOSITE
Instalación
Aplica para modelo LE39M600M80 (39”/99.06 cm)/LE48M600M80 (48”/121.92 cm)
LE50M600M80 (50”/127 cm)/LE55M600M80 (55”/139.70 cm)
BLANCO
c.a. Input
100V-240V 50Hz/60Hz

-32-
cambie al modo PC.

-33-
1
2
3
4
5
6*
* No aplica para modelo de 24”
640*480
800*600
1024*768
1280*1024
60
60
60
60
31.47
37.88
48.36
63.98
1366*768
1920*1080
60
60
47.71
67.50

-34-
AV DEL EQUIPO
En la parte trasera del TV hay dos puertos HDMI. Puede conectar un Blu-ray, reproductor de DVD u
otro equipamiento de vídeo a través de estos puertos.
Hay una entrada Componente (Y, Pb, Pr) y otra de video compuesto (AV) ubicadas en la parte trasera del TV.
Puede conectar un VCR, decodificador de TV u otro equipamiento de vídeo a través de estos conectores.
Consulte el diagrama que aparece a continuación. Es posible que también tenga que consultar el manual del
propietar
io del dispositivo que esté tratando de conectar.
El puerto HDMI1 está habilitado para MHL. Puede conectar dispositivos MHL, tales como los teléfonos
móviles y tabletas compatibles.
conectar un teléfono móvil o tablet al televisor. Por favor,
L
revise la documentación de su dispositivo.
as entradas del televisor pueden conectarse a los siguientes tipos de equipos: VCR, reproductor
multidiscos, DVD, cámara de video, juegos de video o sistemas estéreo, etc.
YPbPr puede soportar estos formatos de video: 480i, 576i, 480p, 576p, 720p, 1080i, 1080p.
T O A U D IO O UT P UT S
T O VI D E O
O U T P UT S
V ID E O E Q U IP ME N T
VIDEO EQUIPMENT with YPbPr
Aplica para modelo LE24M600M80 (24”/60.96 cm)
Instalación
NOTA: Es necesario un cable USB a HDMI para
Amarillo (Video)
Blanco (Audio L)
Rojo (Audio R o Pr)
Azul (Pb)
Verde (Y)
Y
W
R
B
G

-35-
AV DEL EQUIPO
En la parte trasera del TV hay tres puertos HDMI. Puede conectar un Blu-ray, reproductor de DVD u
otro equipamiento de vídeo a través de estos puertos.
Hay una entrada Componente (Y, Pb, Pr) y otra de video compuesto (AV) ubicadas en la parte trasera del TV.
Puede conectar un VCR, decodificador de TV u otro equipamiento de vídeo a través de estos conectores.
Consulte el diagrama que aparece a continuación. Es posible que también tenga que consultar el manual del
propieta
rio del dispositivo que esté tratando de conectar.
El puerto HDMI1 está habilitado para MHL. Puede conectar dispositivos MHL, tales como
los
teléfonos
móviles y tabletas compatibles.
conectar un teléfono móvil o tablet al televisor. Por favor,
Las entradas del televisor pueden conectarse a los siguientes tipos de equipos: VCR, reproductor
multidiscos, DVD, cámara de video, juegos de video o sistemas estéreo, etc.
YPbPr puede soportar estos formatos de video: 480i, 576i, 480p, 576p, 720p, 1080i, 1080p.
HDMI
W R
G
B
R
VIDEO EQUIPMENT with YPbPr
W
R
G
B
R
W
R
W R
T O A U DI O OU T P U T S
V I DE O E Q U IP ME N T
T O V I DE O
O U T P U T S
~
VIDEO L R
COMPOSIT E
Y
Pb
Pr
COMPONENT
Aplica para modelo LE32M600M80 (32”/81.28 cm)Instalación
NOTA: Es necesario un cable USB a HDMI para
Amarillo (Video)
Blanco (Audio L)
Rojo (Audio R o Pr)
Azul (Pb)
Verde (Y)
Y
W
R
B
G
a.c. Input
100V-240V 50Hz/60Hz
revise la documentación de su dispositivo.

-36-
AV DEL EQUIPO
En la parte trasera del TV hay tres puertos HDMI. Puede conectar un Blu-ray, reproductor de DVD u
otro equipamiento de vídeo a través de estos puertos.
Hay una entrada Componente (Y, Pb, Pr) y otra de video compuesto (AV) ubicadas en la parte trasera del TV.
Puede conectar un VCR, decodificador de TV u otro equipamiento de vídeo a través de estos conectores.
Consulte el diagrama que aparece a continuación. Es posible que también tenga que consultar el manual del
propieta
rio del dispositivo que esté tratando de conectar.
El puerto HDMI1 está habilitado para MHL. Puede conectar dispositivos MHL, tales como los teléfonos
móviles y tabletas compatibles.
conectar un teléfono móvil o tablet al televisor. Por favor,
Las entradas del televisor pueden conectarse a los siguientes tipos de equipos: VCR, reproductor
multidiscos, DVD, cámara de video, juegos de video o sistemas estéreo, etc.
YPbPr puede soportar estos formatos de video: 480i, 576i, 480p, 576p, 720p, 1080i, 1080p.
T O A U D IO OU T P U T S
V ID E O E Q UIP ME N T
T O V IDE O
O U T P UT S
VIDEO EQUIPMENT with YPbPr
COAXIAL VGA PC AUDIO
HDMI3
HEADPHONE
Y
Pb
Pr
USB
COMPONENT
MHL
HDMI2
Instalación
Aplica para modelo LE39M600M80 (39”/99.06 cm)/LE48M600M80 (48”/ 121.92 cm)
LE50M600M80 (50”/127 cm)/LE55M600M80 (55”/139.70 cm)
NOTA: Es necesario un cable USB a HDMI para
Amarillo (Video)
Blanco (Audio L)
Rojo (Audio R o Pr)
Azul (Pb)
Verde (Y)
Y
W
R
B
G
c.a. Input
100V-240V 50Hz/60Hz
revise la documentación de su dispositivo.

-37-
1.Púlselo para encender y apagar el TV.
2.USB: Púlselo para iniciar el modo multimedia USB.
3.Selecciona una opción de subtítulos.
4.Púlselo para introducir un canal.
5.Púlselo para seleccionar los subcanales digitales. Por ejemplo,
para introducir “54-3”, pulse“54”,“●”, y a continuación “3”.
6.Pulse CH o CH para ir al canal siguiente o anterior de la lista
de canales. Pulse VOL+ o VOL- para aumentar disminuir el
volumen.
7.Regresa al menú anterior.
8.Púlselo para mostrar en la pantalla la información del estado
del TV.
9.Seleccione MONO, STEREO, SAP e
n el sistema NTSC (TV
analógica).
10.Púlselo para desplazarse por las diferentes opciones de
temporizador.
11.Púlselo para desplazarse por los diferentes ajustes de sonido.
12.Abra la lista de canales en el modo de TV.
13.Muestra el menú de la fuente de entrada.
14.Cambia a la entrada
15.Púlselo para ir al canal visto últimamente.
16.Activa o desactiva el sonido del TV.
17.Púlselo para abrir el menú de visualización en pantalla .
18.Sale de la visualización en pantalla.
19.Púlselo para cambiar la relación de aspecto.
20.Púlselo para desplazarse por los di
ferentes modos de imagen
disponibles.
21.Púlselo para confirmar las selecciones en un menú en
pantalla o para abrir un menú secundario.
22.Abra la lista de canales favoritos en el modo de TV.
HDMI2/MHL.
(OSD)
23.Reservado.
24. Atrás/Avance rápido: Utilice estos botones para controlar la
música/reproducción de fotos.
25. PLAY / PAUSE: Pulse para reproducir/pausar la música o
presentación de diapositivas de fotos en el modo USB.
26. Reservado.
1
2
3
4
5
6
7
8
9
10
11
12
13
14
15
16
17
18
19
20
21
22
23
*
25
24
26

-38-
En este menú, puede ajustar las opciones de imagen,
tales como contraste, brillo, etc.
Pulse para seleccionar, pulse OK para efectuar el
ajuste.
Cuando está conectado un PC, puede ajustar la
configuración VGA.
1) H-Pos: Ajuste la posición horizontal de la pantalla.
2) V-Pos: Ajuste la posición vertical de la pantalla.
3) Cuadrante: Realiza el ajuste fino de la anchura de la
pantalla.
4) Fase: Realiza el ajuste fino de la fase de la pantalla.
Usualmente esta opción no requiere de ajuste.
Auto: Ajusta automáticamente la anchura de la pantalla.
Nota:
1) Si desea ajust
ar el contraste, el brillo, el color y la
definición, el modo de imagen debe regresar al modo de
usuario.
2) Ajuste la temperatura de color a Frío para darles a los
colores blancos un matiz azul, Normal para darles a los colores
blancos un matiz neutral, Cálido para darles a los colores un
matiz rojo.
El modo de imagen Energy Saving es la configuración
predeterminada; si selecciona alguna otra opción, puede
cambiar el consumo de potencia.
En este menú, puede ajustar las opciones de sonido.
Pulse para seleccionar, pulse OK para efectuar el
ajuste.
En este menú puede ajustar el idioma del Menú, los
Subtítulos, ajustar el tiempo de apagado automático,
la zona horaria, Restaurar predeterminados, etc.
Pulse para seleccionar, pulse OK para efectuar el
ajuste.
Nota:
1) El Idioma del audio está disponible solamente en
los modos ATSC/TV.
El volumen automático está disponible solamente
cuando el volumen de la señal de entrada es demasiado
grande o si hay distorsión.
1) CC Mode: Conmuta al modo de subtítulos.
2) Advanced selection: solamente disponible en
ATSC.
3) Opción: Usada para editar los tipos de letras del
subtitulado.
Nota:
Restore Default: Restore Default borrará todos los
canales guardados y reiniciará todos los ajustes a los
valores predeterminados de fábrica.
Modo Subtítulos Encendido
Selección Básica Subtítulos
Servicio de Selección avanzada
Opción
OK
Ajuste VGA
H-Pos
V-Pos
Cuadrante
Fase
Auto
50
38
50
17
MENU
Audio
Ajustes
TV
Imagen
Bloqueo
Modo de Imagen
Contraste
Brillo
Definición
Tinte
Color
Color de temperatura
Video Avanzado
Ahorrador de Energia
50
50
50
50
50
Atrás Mover
Entrar
MENU
OK
Ajustes
TV
Imagen
Bloqueo
Modo de sonido
Bajo
Treble
Balance
MTS
Salida Digital
Sonido Envolvente
Sólo Audio
Auto Volúmen
Off
Standard
50
50
50
Stereo
RAW
Off
Off
Audio
Atrás Mover
Entrar
MENU
OK
TV
Imagen
Bloqueo
Menú de Lenguaje
Subtítulos
Temporizador
Zona Horaria
DST
Formato de Hora
Reloj
Restaurar valores
Actualización de Software
English
off
Pacific
off
12 hour
Ajustes
Audio
Atrás Mover
Entrar
MENU
OK
1. Menú Imagen
3. Menú Ajustes
3.1 Subtítulos
1.1 Ajuste VGA
2. Menú Audio

-39-
Y utilice la tecla OK para bloquear/desbloquear la
funcionalidad de Control de Adultos.
2) MPAA: Seleccione el nivel de control de clasificación de
la película; N/A, G, PG, PG-13, R, NC-17, X.
Clasificación
Descripción
Edad
G Público en general, admitidas todas las edades
PG
Se sugiere ver en Compañía de Adultos. Algún material
puede no ser adecuado para los niños.
PG-13
Advertencia seria a los adultos. Algún material puede
ser inapropiado para niños menores de 13 años.
R
NC-17
X
Restringido. Por debajo de los 17 años se requiere que se
vea en Compañía de Adultos.
(Las edades varían en algunas jurisdicciones).
No se admite público de 17 años o menor.
X es una clasificación anterior unificada con NC-17,
pero puede codificarse en los d
atos de las películas más viejas.
1) Canada English: Cambio al nivel de control de clasificación
en Inglés: EXENTO, C, C8+, G, PG, 14+, 18+.
4. Menú de Bloqueo
4.1 Cambiar contraseña
4.2 Sistema de Bloqueo
4.3 E.E.U.U.
4.4 Canadá
En este menú, puede cambiar la contraseña y ajustar
los ajustes de vchip.
Introduzca la contraseña para entrar en el menú de
Bloqueo. La contraseña predeterminada de fábrica es
0000.
1) Contraseña vieja: Introduzca la contraseña vieja.
2) Nueva Contraseña: Introduzca la nueva contraseña.
3) Confirme la Contraseña: Introduzca la nueva
contraseña otra vez.
Cuando el interruptor Syst
em Lock está en ON,
pueden ajustarse las opciones que aparecen a
continuación.
Pulse OK para mostrar la pantalla siguiente.
1) TV: Pulse OK para mostrar la pantalla siguiente.
Pulse OK para mostrar la pantalla siguiente.
TV
Imagen
Bloqueo
Ingrese contraseña
Sistema de Bloqueo
E.E. U.U.
Canadá
RRT para ajustar
Reajustar RRT
Cambiar contraseña
Ajustes
Audio
OK
-----
Regresar
Mover
ENTRAR
MENU
OK
MPAA
TV
E.E.U.U.
MENU
FV
V
S
L
D
ALL
TV RATING
MENU
Canada
Canada Eng
Canada Fre
MENU

-40-
Clasificación
Descripción
Edad
E Exento: Incluye noticias, deportes, documentales y otra programación
informativa: programas de participación, videos musicales y
programación de variedades.
C Niños: Para los niños más pequeños, con edades inferiores a los 8
años. Presta especial atención a los temas que pudieran amenazar
su sentido se seguridad y bienestar.
C8+ Niños con edades superiores a los 8 años: No contiene actuaciones
violentas como elemento de preferencia, son aceptables o la única
manera de resolver los conflic
tos; no estimula a los niños a imitar
actos peligrosos que pudieran ver en la pantalla.
G General: Considerada aceptable para todos los grupos de edades.
Apropiada para toda la familia, contiene muy poca violencia, ya
sea física, verbal o emocional.
PG Compañía de Adultos: Para una audiencia general, pero puede no
ser adecuada para los niños más pequeños (por debajo de los 8 años)
porque pudiera contener temas o cuestiones controversiales.
14+ Más de 14 años: Pudiera contener temas donde la violencia sea uno
de los elementos dominantes de la trama, pero esta debe ser
coheren
te con el desarrollo del tema o del personaje. El lenguaje
utilizado pudiera ser profano y existir la presencia de escenas de
desnudos dentro del contexto del tema.
18+ Adultos: Destinada para espectadores de 18 años y mayores;
pudiera contener representaciones de violencia, las cuales, aunque
estén relacionadas con el desarrollo de la trama, los personajes o
los temas, sean adecuadas para un público adulto. Pudiera contener
un lenguaje gráfico y escenas de nudismo.
2) Canada French: Cambio al nivel de control de clasificación
francesa: E, G, 8ANS+, 13 ANS+, 16ANS+
, 18ANS+.
Clasificación
Descripción
Edad
E Programación exenta
G General: Todas las edades y niños, contiene violencia directa
mínima, pero puede ser coherente con la trama de una forma
humorística o irreal.
8ans+ General pero no recomendable para los niños más pequeños:
Puede verse por un público amplio, pero pudiera contener escenas
que perturben a niños con menos de 8 años que no pueden distinguir
entre las situaciones reales e imaginarias. Recomendada para ver
en compañía de adultos.
13ans+ Más de 13 años: Pudiera contener escenas frecuentes de violencia
y viole
ncia intensa.
16ans+ Más de 16 años: Pudiera contener violencia y frecuentes escenas
de violencia.
18ans+ Más de 18 años: Sólo para espectadores adultos. Pudiera contener
escenas frecuentes de violencia y violencia extrema.
4.5 Ajuste RRT
Puede ajustarse en el modo de TV digital ATSC
4.6 Reiniciar RRT
5.1 Aire/Cable
5.2 Escaneo de Canales
Pulse OK para reiniciar los ajustes de RRT a los
valores predeterminados de fábrica.
E
5. Menú T.V.
n este menú, puede ajustar los canales de TV
digitales y analógicos.
Pulse para seleccionar, pulse OK para efectuar el
ajuste.
Selecciona la señal de TV por antena o por cable.
Si es la primera vez que usa el TV, primero debe
explorar todos los canales de TV.
Pulse OK para confirmar y mostrar la pantalla
siguiente.
5.3 Favoritos
Pulse OK para seleccionar/eliminar el canal favorito.
5.4 Mostrar/Ocultar
Pulse OK para mostrar/ocultar el canal actual.
5.5 Señal DTV
Muestra la intensidad de la señal DTV. No puede
seleccionarse ni ajustarse.
5.6 Manual electrónico
6. Multimedia
Empleo de la guía de usuario.
MENU
Estado de Escaneo
Canales Análogos:
Canales Digitales:
0
0
5
%...
Aire/Cable
Favorito
Mostrar/Ocultar
Señal DTV
Escaneo de Canal
Manual Electrónico
Cable
Bloquear
Ajustes
Audio
TV
Imagen
Regresar
Mover
Entrar
MENU
OK
Bloquear
Ajustes
Audio
TV
Imagen
Aire/Cable
Favorito
Mostrar/Ocultar
Señal DTV
Escaneo de canales
Manual electrónico
OK
Cable
Regresar
Mover
Entrar
MENU
OK
MUSIC
Back
E X I T
Move Select
O K
James Blunt-you are beautiful.mp3
Return
Up Folder
A-Lin-.mp3
.mp3
.mp3
00:04:22
P l ay
00:04:22
Puede visualizar los archivos de música y fotos a
través del puerto USB que se encuentra en el panel
posterior:
PHOTO MUSIC
Haier Innovation Life
USB2.0 Back
E X I T
Move Select
O K

-41-

NOTAS

NOTAS

Haier garantíza este producto, contra fallas en su funcionamiento o defectos de fabricación en todas sus partes,
componentes y mano de obra, por un periódo de 1 año para la unidad principal, y control remoto o mando a
distancia por tres meses, contando a partir de la fecha de compra indicada en la presente póliza de garantía,
siempre y cuando sea dentro del territorio de los Estados Unidos Mexicanos.
1.- Para la validación de ésta se deberá presentar el producto defectuoso junto con la presente póliza de garantía
completamente llenada y sellada por el distribuidor que realizó la venta, en el lugar donde fué adquirido el
producto, o en cualquier Centro de Servicio Autorizado Haier.
2.- En el caso que esta póliza se extravíe o no se
encuentre completa o debidamente llenada y sellada por el
distribuidor, se podrá validar el periódo de garantía con la factura original expedida en la venta del producto,
siempre y cuando dicha factura, incluya el número de serie del producto.
3.- El tiempo de reparación en ningún caso podrá exceder treinta dias calendario contados a partir de la fecha de
recepción del producto en cualquiera de los Centros de Servicio Autorizados Haier, los cuales puede encontrar
en el siguiente apartado de su página web www.haierelectronic.com.mx/centro_servicio
EXCLUSIONES.- Haier se exime de hacer efectiva esta póliza de garantía en los siguientes casos:
· Cuando el producto se hubiese utilizado en condiciones distintas a las
normales.
· Cuando el producto no hubiese sido operado de acuerdo con el instructivo de uso que lo acompaña.
· Cuando el producto hubiese sido alterado, o reparado por personas no autorizadas por Haier.
Nombre del Propietario
Nombre del Distribuidor
Producto
Modelo
No. de Serie
Fecha de compra
Sello del Distribuidor
Manufacturado por: Comercializadora de
Valor Agregado S.A. de C.V.
Av. Mariano Otero #2489 Col. Jardines
de la Victoria. C.P. 44900
Guadalajara Jalisco
R.F.C. CVA9904266T9
Póliza de Garantía
Para adquirir componentes y accesorios, pueden solicitar
información al 01 800 40 HAIER (42437) o bien dirigirse a cualquier
Centro de Servicio Autorizado Haier, los cuales puedes encontr
ar en el
siguiente apartado de su página web www.haierelectronic.mx/centro_servicio
Haier cubrirá los gastos de transportación que se deriven del cumplimiento
de la garantía.
Villahermosa
Niños Heroes #505
Col. Atasta.
C.P. 86100 Villahermosa, Tab.
Conmutador: (993) 3543 950
Aguascalientes
Av. Fundición # 1103
Col. Altavista, C.P. 20040,
Aguascalientes, Aguascalientes
Tel: (449)153 0433
Veracrúz
Av. Pino Suarez #2488
Col. Centro.
C.P. 91700 Veracruz, Ver
Conmutador: (229) 178 1626
Tuxtla Gtz.
Av. San Roque #135,
Fracc. San Roque.
C.P. 29040 Tuxtla Gtz, Chis.
Conmutador: (961) 611 1846
Usted puede hacer válida su Garantía y obtener Soporte en los Centros de Servicio Autorizados Haier
Hermosillo
Av.Campeche #484
Col. Pimentel.
C.P. 83188 Hermosillo, Son.
Conmutador: (662) 236 6150
Tepic
Calle San Luis 269 Sur,
Col. San Antonio,
C.P. 63159 Tepic, Nay.
Tel: (311)2134626
Morelia
Rio Amatlán #700
Col. Ventura Puente.
C.P. 58020 Morelia, Mich.
Conmutador: (443) 315 0015
Culiacán
Calle Ignacio Ramírez # 958 Pte
Col. Jorge Almada, C.P. 80200
Culiacán, Sin.
Tel: (667) 7157940
Cancún
Tonina #24 Bodega 2
Zona Industrial Región 97,
CP 77520 Cancún, Q. Roo.
Tel: (99) 8886 9090
Querétaro
Calle Reforma Agraria #99
Col. Casa Blanca.
C.P. 76030 Querétaro, Qro.
Conmutador: (442) 2155616
México D.F. Héroes
Héroes de 1914 #36,
Col. San Pedro de los Pinos
Conmutador: (0155) 5262-9960
México D.F.
México D.F. Taller
Av. del Taller # 92 Col. Transito,
C.P. 06820 Del. Cuauhtémoc
Tel: (55)5132 0282
México D.F.
Torreón
Av. Lerdo de Tejada #1508 Ote.
Col. Centro.
C.P. 27000 Torreón, Coah.
Conmutador: (871) 722 4285
Monterrey
Blvd. Diaz Ordaz #3937
Col.Santa María.
C.P. 64650 Monterrey NL.
Conmutador: (818) 333 3880
León Gto.
Blvd. Hilario Medina #7001
Col. San José Del Consuelo.
C.P. 37200 León, Guanajuato.
Conmutador: (477) 776 9252
Guadalajara
Av. Mariano Otero #2489
Col. Jardines de la Victoria.
C.P. 44900 Guadalajara, Jalisco.
Conmutador: (33) 3812 1413
Puebla
Blvd. San Felipe 1010
Col. Real del Monte
C.P. 72060 Puebla, Pue.
Conmutador: (222) 230 4470
Mérida Yucatán
Calle 59-A Jacinto Canec 10069-A
Entre las calles 138 y 140
Col. El Porvenir CP. 97000
Conmutador:01 (999) 912 2200
San Luis Potosí
Calle García Diego #129
Col. Los Angeles C.P. 78230
San Luis Potosi, S.L.P.
01 800 40 HAIER (42437)
* Para conocer los cambios y aperturas de nuevos
centros de servicio Haier, consulta la página web
en el siguiente apartado:
www.haierelectronic.com.mx/centro_servicio
-
 1
1
-
 2
2
-
 3
3
-
 4
4
-
 5
5
-
 6
6
-
 7
7
-
 8
8
-
 9
9
-
 10
10
-
 11
11
-
 12
12
-
 13
13
-
 14
14
-
 15
15
-
 16
16
-
 17
17
-
 18
18
-
 19
19
-
 20
20
-
 21
21
-
 22
22
-
 23
23
-
 24
24
-
 25
25
-
 26
26
-
 27
27
-
 28
28
-
 29
29
-
 30
30
-
 31
31
-
 32
32
-
 33
33
-
 34
34
-
 35
35
-
 36
36
-
 37
37
-
 38
38
-
 39
39
-
 40
40
-
 41
41
-
 42
42
-
 43
43
-
 44
44


Haier LE24M600M80 Manual de usuario
- Categoría
- Televisores LED
- Tipo
- Manual de usuario
- Este manual también es adecuado para
en otros idiomas
- English: Haier LE24M600M80 User manual
Artículos relacionados
-
Haier LEC24B3320 Manual de usuario
-
-
Haier 55D3550 Manual de usuario
-
Haier LE55F32800 Manual de usuario
-
Haier 32D3000 Manual de usuario
-
-
-
-
-