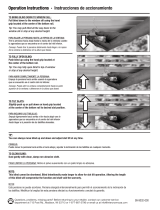
1. How to Raise and Lower your cordless Blind:
Hold the bottom rail in the middle (as shown here)
To raise, lift the bottom rail.
To lower, gently pull the bottom rail down.
Your cordless blind will simply stay in the position you
move the bottom rail to.
If your blind hangs un-evenly, repeat the steps above,
ensuring you are lifting or lowering from the middle.
2. Adjust the slat angle: (after installation of the wand in step
8) turn the wand until the slats are at the desired position
It is that easy!
1. Cómo subir y bajar la persiana sin cuerda: Tenga el carril
inferior en el medio (como el dibujo) Para elevar, levante el
riel inferior. Para bajar, tire suavemente el riel inferior hacia
abajo. Su persiana permanecerá en la posición donde usted
ha dejado el riel inferior.
Si su persiana pende de manera desigual, repita los pasos
anteriores, asegurando que está levantando o bajando desde el centro.
2. Ajustar el ángulo de las tablillas: (después de la instalación de la en el paso 8) Gire la varilla
de inclinación hasta que las tablillas están en la position deseada.
¡Es así de fácil!
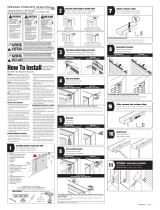
Everything needed to install your blind
Todo lo necesario para instalar su persiana
Determine inside/ceiling or outside mount
Determine el montaje de techo/interior, exterior o montaje lateral
Use the template provided to mark screw locations
Utilice la plantilla proporcionada para marcar las ubicaciones
de los tornillos
HOW TO OPERATE A CORDLESS BLIND
CÓMO OPERAR SU PERSIANA SIN CUERDA
HOW TO INSTALL A CORDLESS BLIND
CÓMO INSTALAR UNA PERSIANA SIN CUERDA
Thank you
for choosing a cordless mini blind. Your cordless window treatment has
been manufactured with the highest standards and craftsmanship.
Follow these easy step-by step instructions to install your cordless mini-blind. If you
need additional support you can contact customer service at 800-748-5732.
Gracias
por elegir una persiana sin cuerda. Esto producto ha sido fabricado con los
más altos estándares de calidad.
Siga estas instrucciones para instalar su persiana. Si necesita apoyo adicional, por
favor llame al servicio al cliente: 800-748-5732.
IMPORTANT SAFETY INFORMATION:
• Read all instructions, warning tags and labels provided with your product to avoid injury.
Keep this manual.
• Although this blind is cordless and is the best available safety option, children can
accidentally be strangled on cords used in the inner function of the blind.
• Keep children away from the corded ladder which holds each louver in place.
IMPORTANTE INFORMACION DE SEGURIDAD:
• Lea todas las instrucciones, rótulos de precaución, y las etiquetas que se suministran con su
producto para evitar lesiones. Conserve este manual.
• Aunque esta persiana es sin cuerda y es la mejor opción de seguridad disponible, los niños
pueden hacerse accidentalmente estrangulados en las cuerdas internas de este producto.
• Mantenga a los niños lejos de las cuerdas internas en todo momento.
8
1,6 mm
1
2
3
Montaje de Techo/Interior • Pose intérieure/au plafond Montaje Exterior • Pose extérieure
Montaje de Techo/Interior • Pose intérieure/au plafond Montaje Exterior • Pose extérieure
Montaje de Techo/Interior • Pose intérieure/au plafond
Montaje Exterior • Pose extérieure
Montaje de Techo/Interior • Pose intérieure/au plafond
Montaje Exterior • Pose extérieure
2
1
1/16”
1
2
3
1
Blind (1)
2
Brackets (2) / Screws (8)*
3
Tilt Wand (1)
* Quantities vary by size/blind
1
Persiana (1)
2
Soportes (2) / Tornillos (8)
3
Varilla de inclinación (1)
*Las cantidades varían por
tamaño/persiana
Tools Needed • Herramientas necesarias
8
1,6 mm
1
2
3
Montaje de Techo/Interior • Pose intérieure/au plafond Montaje Exterior • Pose extérieure
Montaje de Techo/Interior • Pose intérieure/au plafond Montaje Exterior • Pose extérieure
Montaje de Techo/Interior • Pose intérieure/au plafond
Montaje Exterior • Pose extérieure
Montaje de Techo/Interior • Pose intérieure/au plafond
Montaje Exterior • Pose extérieure
2
1
1/16”
Inside/Ceiling Mount
Montaje de Techo/Interior
Outside Mount
Montaje Exterior
Inside/Ceiling Mount
Montaje de Techo/Interior
Outside Mount
Montaje Exterior
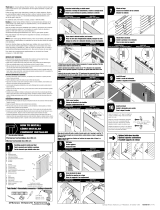
Place the template provided in one corner of the window. Mark screw holes in area shown on the
template. Repeat for the other side.
Ponga la plantilla proporcionada en una esquina de la ventana. Marque las ubicaciones de los
tornillos como esta mostrada en la plantilla. Repita para el otro lado.
Bottom Rail
2
1

WARRANTY
This warranty is provided to you by Designer’s Touch. This warranty applies only to
1. You are the original retail purchaser of the product;
2. The product was purchased after April 1, 2015
3. The product was properly installed in a residential dwelling, and;
4. The product was made or assembled exclusively from Designer’s Touch materials
and components
Warranty: Designer’s Touch warrants the product against original defects in material or workmanship
for one year. Our sole obligation under the warranty is to repair or replace defective products or
components without charge. Designer’s Touch is not responsible for transportation costs to or from the
retailer or costs for measuring and installing the products. If repairs are made under this warranty, the
repairs will be made with like or similar parts. Conditions or damages caused by accidents, alterations,
misuse or failure to follow instructions for measurement, installation, cleaning, or maintenance are
excluded from the warranty. In addition, normal wear and tear are not covered by the warranty.
This Warranty is exclusive and in lieu of all other written or oral warranties or obligations and
liabilities. No person is authorized to extend or alter this warranty. Designer’s Touch shall have no
liability whatsoever for incidental or consequential damages. Some states do not allow the exclusion
or limitation of incidental or consequential damages, so this limitation or exclusion may not apply to
you. This warranty gives you specific legal rights, and you may also have other rights which vary from
state to state
Service: If you believe a product is defective, please return the product with your original sales
receipt to Home Depot. This store will arrange for inspection of the product and replacement, if
warranted. If you need further assistance regarding the warranty, you may email Designer’s Touch at
GARANTÍA
Esta garantía se la ofrece de Designer’s Touch. Esta garantía se aplica solamente a productos que
cumplen con las siguientes condiciones:
1. Si usted es el comprador original del producto;
2. Si el producto fue comprado después del 15 de abril de 2015;
3. Si el producto fue instalado en forma adecuada en un hogar residencial, y;
4. Si el producto fue fabricado y ensamblado exclusivamente con materiales y componentes de by
Designer’s Touch.
Garantía: Designer’s Touch garantiza este producto contra defectos originales en los materiales
o en la fabricación por el período de un año. Nuestra única obligación bajo esta garantía es la de
reparar o reemplazar productos o componentes defectuosos sin cargo alguno. Designer’s Touch no
es responsable del costos de transporte desde y hacia el comerciante o de costos por instalación y
medición del producto. Si se efectúan reparaciones bajo esta garantía, las reparaciones se harán con
piezas iguales o similares. Los daños o condiciones causados por accidentes, alteraciones, mal uso o
por no seguir las instrucciones de medición, instalación, limpieza o m antenimiento están excluidas de
esta garantía. Además, esta garantía no cubre problemas causados por el uso normal.
Esta garantía es exclusiva y en lugar de todas las otras garantías escritas o verbales u otras
obligaciones o responsabilidades. Ninguna persona tiene autorización para extender o alterar esta
garantía. Designer’s Touch no va a tener responsabilidad de ninguna manera de los daños incidentales
o consequentes. Algunos estados no permite la exclusión o limitación de daños incidentales o
consecuentes, de modo que esta limitación o exclusión puede no aplicarse a usted. Esta garantía le
da a usted derechos legales específicos y usted puede también tener otros derechos que varían de un
estado a otro.
Servicio: Si usted cree que el producto está defectuoso, por favor devuelva el producto con su recibo
de venta original a Home Depot. Este almacén se encargará de inspeccionar el producto y reemplazarlo,
si está garantizado. Si necesita ayuda adicional respecto a esta garantía, por favor envíe un correo
electronico a Jumbo: customerservice@ jumbo-window.com
8
1,6 mm
1
2
3
Montaje de Techo/Interior • Pose intérieure/au plafond Montaje Exterior • Pose extérieure
Montaje de Techo/Interior • Pose intérieure/au plafond Montaje Exterior • Pose extérieure
Montaje de Techo/Interior • Pose intérieure/au plafond
Montaje Exterior • Pose extérieure
Montaje de Techo/Interior • Pose intérieure/au plafond
Montaje Exterior • Pose extérieure
2
1
1/16”
For Blind sizes 46” Wide and greater
Por persiana 46” de anchos y mas grandes
Drill holes
Perfore agujeros
4
5
Inside/Ceiling Mount
Montaje de Techo/Interior
Outside Mount
Montaje Exterior
Inside/Ceiling Mount
Montaje de Techo/Interior
Outside Mount
Montaje Exterior
Mark screw holes in the center between those in Step 3
Marque la ubicación de los tornillos en el centro entre aquellos en paso 3
Note: If there is no stud behind the installation, use plastic screw anchors (not included) to secure
into drywall
8
1,6 mm
1
2
3
Montaje de Techo/Interior • Pose intérieure/au plafond Montaje Exterior • Pose extérieure
Montaje de Techo/Interior • Pose intérieure/au plafond Montaje Exterior • Pose extérieure
Montaje de Techo/Interior • Pose intérieure/au plafond
Montaje Exterior • Pose extérieure
Montaje de Techo/Interior • Pose intérieure/au plafond
Montaje Exterior • Pose extérieure
2
1
1/16”
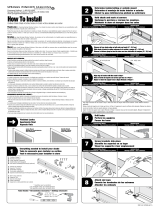
Screw brackets into place
Atornille los soportes en su lugar
6
Inside/Ceiling Mount
Montaje de Techo/Interior
Outside Mount
Montaje Exterior
8
1,6 mm
1
2
3
Montaje de Techo/Interior • Pose intérieure/au plafond Montaje Exterior • Pose extérieure
Montaje de Techo/Interior • Pose intérieure/au plafond Montaje Exterior • Pose extérieure
Montaje de Techo/Interior • Pose intérieure/au plafond
Montaje Exterior • Pose extérieure
Montaje de Techo/Interior • Pose intérieure/au plafond
Montaje Exterior • Pose extérieure
2
1
1/16”
Mount blind in brackets
Instale la persiana en las ménsulas
7
Inside/Ceiling Mount
Montaje de Techo/Interior
Outside Mount
Montaje Exterior
8
1,6 mm
1
2
3
Montaje de Techo/Interior • Pose intérieure/au plafond Montaje Exterior • Pose extérieure
Montaje de Techo/Interior • Pose intérieure/au plafond Montaje Exterior • Pose extérieure
Montaje de Techo/Interior • Pose intérieure/au plafond
Montaje Exterior • Pose extérieure
Montaje de Techo/Interior • Pose intérieure/au plafond
Montaje Exterior • Pose extérieure
2
1
1/16”
Install tilt wand
Instale la varilla de inclinación
8
Inside/Ceiling Mount
Montaje de Techo/Interior
Outside Mount
Montaje Exterior
-
 1
1
-
 2
2
Designer's Touch 201809127 Guía de instalación
- Tipo
- Guía de instalación
- Este manual también es adecuado para
en otros idiomas
Otros documentos
-
 Intercrown 09-8017-001 Troubleshooting guide
-
Bali Cut-to-Size 76-3156-27-24-72 Guía de instalación
-
Bali Grab-n-Go 201407056 Guía de instalación
-
 Bali Cut-to-Size 76-1112-944-42-48 Guía de instalación
-
Bali Cut-to-Size 25.5x72crdlsvl Guía de instalación
-
 Bali Today 014764472 Guía de instalación
-
Bali Cut-to-Size wtb50.5X72 Guía de instalación
-
 Bali Cut-to-Size prntw24X72 Guía de instalación


