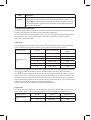
KPS CONFORTLINE CRONO RF El manual del propietario
- Categoría
- Termostatos
- Tipo
- El manual del propietario

Cronotermostato digital por radiofrecuencia
RF Digital programmable thermostat
CONFORTLINE
CRONO RF
Manual de usuario
User manual

2
ÍNDICE
Descripción ....................................................................................................................................... 3
Datos técnicos ................................................................................................................................. 3
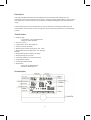
Visualización de la pantalla ........................................................................................................ 3
Funcionamiento de las teclas ..................................................................................................... 4
Modos de funcionamiento .......................................................................................................... 4
Programación automática .......................................................................................................... 5
Ajuste de hora ..................................................................................................................................6
Opciones vanzadas ........................................................................................................................ 6
Comunicación entre emisor y receptor .................................................................................7
Receptor ............................................................................................................................................ 7
Diagrama de cableado .................................................................................................................. 8
INDEX
Description ....................................................................................................................................... 9
Technical data .................................................................................................................................. 9
Screen display .................................................................................................................................. 9
Key operation .................................................................................................................................10
Main setting screen .....................................................................................................................10
Automatic programs ...................................................................................................................11
Time setting ....................................................................................................................................12
Advanced options .........................................................................................................................13
Reciver ..............................................................................................................................................13
Wiring diagram ..............................................................................................................................14

3
Descripción
Este cronotermostato digital ha sido diseñado para el control de los sistemas de calefacción o
refrigeración. El cronotermostato consta de un emisor y un receptor comunicados por radio
frecuencia con un alcance de hasta 100 metros en espacios abierto (superior a 30 metros en el
interior de edicios, ya que las paredes reducen el alcance).
La unidad emisora realiza la medición de temperatura y la comparación con la de referencia
ajustada y da la orden a la unidad receptora que es la que realiza la actuación sobre la caldera o aire
acondicionado.
Datos técnicos
• Alimentación:
o Unidad emisora: 2 pilas AA 1,5V
o Unidad receptora: 230V 50/60Hz
• Precisión: ±0.5ºC
• Sensor de temperatura: NTC (10k) 1%
• Capacidad del contacto: 5A/230V
• Temperatura de funcionamiento: 0ºC – 50ºC
• Rango de ajuste de temperatura: 5ºC-35ºC (por defecto)
• Rango de temperatura medida: 0ºC-40ºC
• Salida: Contacto conmutado
• Condición de aislamiento: ambiente normal.
• Programación: semanal.
• Instalación: montaje supercial en pared.
• Dimensiones:
o Unidad emisora: 86x86x29 mm
o Unidad receptora: 86x86x29 mm
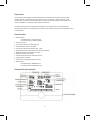
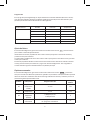
Visualización de la pantalla

4
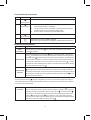
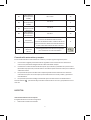
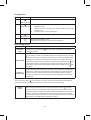
Funcionamiento de las teclas
No. Símbolo Descripción
A
Tecla rotativa
Rotación en el sentido horario para incrementar el valor
B
Tecla rotativa
1. Con el cronotermostato encendido, una pulsación corta alterna
entre el modo manual y automático.
2. Con el cronotermostato encendido, una pulsación larga (3 segun-
dos) permite entrar en el menú de con guración.
3. En otros menús, actúa como tecla de con rmación.
C
Tecla rotativa
Rotación en sentido anti horario para disminuir el valor.
DPulsación corta para encendido / apagado
Pulsación larga (3 segundos) para bloqueo o desbloqueo de la pantalla.
Modos de funcionamiento
Modo Explicación
Modo
automático
Una pulsación corta de la tecla activará el modo automático, mostrando el
icono en pantalla.
Modo manual
Una nueva pulsación corta de la tecla activará el modo manual, mostrando el
icono en pantalla. En este modo se puede ajustar la temperatura de referencia
girando la tecla en sentido horario (aumentando la temperatura) o antihorario
(reduciendo la temperatura). Cuando la temperatura de la habitación es inferior a
la temperatura ajustada, se cerrará el contacto (se mostrara el icono ) y cuando
la temperatura de la habitación sea superior a la temperatura ajustada se abrirá el
contacto (desaparecerá el icono )
Modo manual
temporal
En el modo automático y pantalla desbloqueada, al actuar sobre la rueda giratoria
para ajustar la temperatura de referencia, se entrará en el modo manual tem-
poral. Este modo temporal estará activo hasta el siguiente periodo programado. Si
desea regresar al modo manual o al modo automático, presione la tecla una o
dos veces respectivamente.
Presione la tecla rotativa durante 3 segundos para entrar en el menú de con guración. Elija el
icono adecuado en función del ajuste que desee realizar y presione la tecla rotativa para con rmar
el acceso a ese menú de ajuste.
Modo
vacaciones
Seleccione ON para activar el modo vacaciones y presione la tecla para con r-
mar. A continuación ajuste el número de días (cuenta atrás de días hasta regresar
al modo automático) girando de nuevo la tecla rotativa y presione la tecla
para con rmar. Finalmente ajuste la temperatura de referencia girando la tecla
rotativa y presione la tecla para con rmar y salir a la pantalla principal.
Para cancelar el modo vacaciones debe regresar a la pantalla de con guración de
vacaciones, seleccionar OFF y presionar la tecla .

5
Modo Explicación
Bloqueo de
pantalla
Presionando la tecla de encendido / apagado durante 3 segundos se activará el
bloqueo de la pantalla y se mostrará el icono de bloqueo. En este modo la tecla
rotativa estará desactivada. Para regresar al modo normal, vuelva a presionar
la tecla de encendido / apagado durante 3 segundos. En ese momento desapare-
cerá el icono de bloqueo.
Programación automática
El cronotermostato ofrece 3 programas automáticos P1, P2 y P3. El programa P1 es congurable por
el usuario y los programas P2 y P3 son programas jos precongurados.
Una vez seleccionado el modo automático, entre en el menú de conguración, gire la rueda selectora
hasta elegir uno de los programas automáticos disponibles: P1, P2, P3 y presione la tecla para
seleccionar el programa elegido.
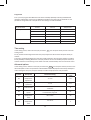
Programa P1:
Es un programa semanal congurable día a día en 6 diferentes periodos diarios en los que se puede
ajustar la temperatura deseada. Por defecto, viene congurado según la tabla siguiente:
Día de la semana Periodo Intervalo por defecto Temperatura por
defecto
Cualquiera de los 7
días
1 0:00-6:00 15ºC
2 6:00-9:00 21ºC
3 9:00—12:00 15ºC
4 12:00—14:00 21ºC
5 14:00—17:30 15ºC
6 17:30—23:59 21ºC
Para congurar este programa, en el menú de conguración gire la tecla rotativa hasta seleccionar el
icono PROG
TIME
ADVANCED
y presione la tecla para acceder al menú de conguración del programa automático.
Una vez en el menú de programación, seleccione el día cuya programación desea cambiar y presione
la tecla. Se entrará en la pantalla de conguración de los periodos de ese día seleccionado. Para cada
periodo ha de ajustar la temperatura de referencia deseada y la hora de nalización. Presionando la
tecla se conrmará los ajustes de un periodo y se avanzará al periodo siguiente y una vez conrmados
todos los periodos del día se regresará al menú de conguración.
Se ha de repetir este procedimiento para todos los días de la semana.
Programa P2:
Es un programa precongurado jo, con dos diferentes periodos para cada día de la semana. No se
puede realizar ningún cambio en periodos o temperaturas. Está ajustado de la siguiente manera:
Día de la semana Periodo Intervalo Temperatura
Cualquiera de los 7
días
1 6:00-22:00 21ºC
2 22:00-6:00 17ºC

6
Programa P3:
Es un programa precongurado jo, en el que se diferencia entre días laborales (de lunes a viernes)
y n de semana (sábado y domingo). Se denen 4 diferentes periodos para los días laborales y dos
periodos para el n de semana de acuerdo a la tabla siguiente:
Día de la semana Periodo Intervalo Temperatura
Día laborable 1 22:00—6:00 17ºC
2 6:00—8:00 21ºC
38:00—16:00 17ºC
4 16:00—22:00 21ºC
Fin de semana 1 6:00-22:00 21ºC
2 22:00-6:00 17ºC
Ajuste de la hora
En el menú de conguración gire la tecla rotativa hasta seleccionar el icono
PROG
TIME
ADVANCED
y presione la tecla
para acceder al menú de ajuste de la hora.
Inicialmente los minutos parpadearan. Gire la tecla rotativa para ajustar el valor de los minutos y
presione la tecla para conrmar.
A continuación parpadean las horas. Gire la tecla rotativa para ajustar el valor de las horas y presione
la tecla para conrmar.
Finalmente parpadea el día de la semana. Gire la tecla rotativa hasta seleccionar el día de la semana
actual y presione la Tecla para conrmar y regresar al menú de conguración. Tras 5 segundos el
cronotermostato regresara automáticamente a la pantalla principal.
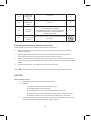
Opciones avanzadas
En el menú de conguración, gire la tecla rotativa hasta seleccionar el icono
PROG
TIME
ADVANCED y presione la
tecla para acceder a los diferentes parámetros ajustables. Lo parámetros irán apareciendo en pantalla
de forma consecutiva. Cambie el valor de los mismos girando la tecla rotativa y conrme y avance al
parámetro siguiente presionando la tecla.
Símbolo Descripción Rango de selección Valor por
defecto
A1
Ajuste de la
temperatura
medida
-9-+9 ºC 0.0
A2 Histéresis de
temperatura 1-9 ºC 0.5
A3
Función de
bloqueo de
pantalla
0: Bloqueo parcial
1: Bloqueo total 0
A4 Opciones
automáticas
--: sin programas automáticos
01: programas automáticos 01

7
A5
Valor superior
de temperatura
medida
35 ºC-70 ºC 35
A6
Valor inferior
de temperatura
medida
5 ºC-10 ºC 5
A7
Valor inferior de
temperatura de
referencia
1 ºC-10 ºC 5
A8
Valor superior
de temperatura
de referencia
20-70 ºC 35
A9 Función de
descalcicación
0:función de descalcificación desactivada;
1: función de descalcificación activada;
Función de descalcificación: cuando la válvula ha
permane-cido cerrada durante más de 100 horas,
se abrirá automáticamente durante 3 minutos.
0
AA
Reajustar a
valores de
fábrica
Mantenga pulsada la tecla durante 3 segundos
para restablecer los valores de fábrica.
Comunicación entre emisor y receptor
Para la realización de la comunicación entre emisor y receptor sigua los siguientes pasos:
1. Con el emisor apagado, presione durante 3 segundos la tecla rotativa. En ese momento se
entrara en la pantalla de conguración de la dirección IP del receptor.
2. Introduzca los valores de la dirección IP superior (H) e inferior (L) indicados en la parte trasera
(abriendo la tapa posterior) tanto del emisor como del receptor. Presione la tecla para conrmar
ambas direcciones.
3. En la pantalla le aparecerá la dirección completa ajustada anteriormente. En ese momento
encienda el receptor con el interruptor (se encenderán las luces verde y ámbar) y presione la
tecla del emisor.
4. En la pantalla aparecerá el código 55 indicando que la comunicación ha resultado exitosa.
Nota: El símbolo
PROG
TIME
ADVANCED
permanecerá jo cuando la comunicación es correcta y parpadeará si esta es
anormal.
RECEPTOR
Indicaciones luminosas en el receptor
El signicado de las luces Led es el siguiente:
• LED verde: se ilumina al encender.

8
• LED rojo:
A. Se ilumina de forma continua al activarse la salida.
B. Parpadea cuando se produce algún fallo.
C. Hay un doble parpadeo cada 2 segundos cuando la dirección IP es incorrecta.
D. Hay un parpadeo triple cada 2 segundos cuando no se recibe señal por radiofrecuencia
durante una hora.
E. Hay un parpadeo cuádruple cada 2 segundos al fallar el sensor de temperatura.
• LED ámbar: se ilumina durante 10 segundos al encender el receptor. Ese es el tiempo durante el
que se puede realizar la comunicación después del encendido del receptor.
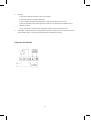
Diagrama del cableado

9
Description
This programmable thermostat has been designed to control heating and cooling units. The
thermostat consists of a transmitter and a receiver, communicated via radio frequency, having a range
of up 100 meters in open areas (more than 30 meters inside the buildings because walls reduce the
range).
The transmitter gets the room temperature via sensor, compares it with setting temperature and
send the order to the receiver to act on change-over contact switching on boilers or air conditioning
systems.
Technical data
• Power supply:
o Transmitter: 1,5V x 2 AA batteries
o Receiver: 230V 50/60Hz
• Accuracy: ±0.5ºC
•Temperature sensor: NTC (10k) 1%
• Contact capacity: 5A/230V
• Working environment temperature: 0ºC – 50ºC
•Range of temperature adjustment : 5ºC-35ºC (by
default)
• Range of temperature display: 0ºC-40ºC
• Output: Change-over contact
• Insulating condition: normal environment.
• Programming: weekly.
• Installation: Wall mounted.
• Dimensions:
o Transmitter: 86x86x29 mm
o Receiver: 86x86x29 mm
Screen display

10
Key operation
No. Symbol Description
A
Rotary button
Clockwise rotation for increasing the value
B
Rotary button
1. Under turn on state, a short press switches between manual and
automatic mode.
2. Under turn on state, a long press (3 seconds) allows to enter in the
setting screen.
3. In other screens, it acts as con rm key.
C
Rotary button
Anticlockwise rotation for decreasing the value
DShort press for power on / off.
Long press (3 seconds) for screen locking or unlocking.
Main setting screen
Modo Explicación
Automátic
mode
Una pulsación corta de la tecla activará el modo automático, mostrando el
icono en pantalla.
Manual mode
Other short press of the rotary button enables the manual mode, displaying the
icon. Under this mode, it is possible to adjust the set temperature by rotating
the button clockwise (increasing the temperature) or anticlockwise (decreasing
the temperature). When room temperature is lower than setting temperature,
the heating contact will be closed and the cooling contact will be opened ( icon
is displayed) and when room temperature is higher than setting temperature,
the heating contact will be opened and the cooling contact will be closed ( will
disappear)
Temporary
manual mode
Under automatic mode and unlock state, when rotating the button to adjust the
temperature, it will enter into temporary manual mode. This temporary mode
works to next interval when it will return to the automatic mode. If you want
to return to automatic or manual mode, please press the button once or twice
respectively.
Press the rotary button for 3 second for entering in the setting screen. Rotates the button to
select the required icon and press the button to con rm the access to that setting.
Holidays
mode
After entering into setting screen, rotate rotary button to select icon and
press the key to enter into holiday mode setting. Select ON in order to enable
the holiday mode. Then adjust the number of days (countdown until returning to
automatic mode) by rotating again the rotary key and press the key to con rm.
Finally and exit to the main screen. To cancel the holiday mode return the holiday
mode setting, select OFF and press the key to con rm.

11
Modo Explicación
Screen lock Press the power on/off key for 3 seconds and the screen lock will be enabled and
the lock icon will be displayed. Under this mode, the rotary key will be disenabled.
In order to return to the normal mode, press again the power on/off key for 3
seconds. The lock icon will disappear.
Automatic programs
The programmable thermostat offers 3 automatic programs: P1, P2 and P3. The program P1 is
congurable by the user and P2 and P3 are pre-set non-modiable programs.
After selecting the automatic mode, enter into setting screen, rotate the rotary key to choose one
program between P1, P2 and P3 and press the key to conrm the desired program.
Program P1:
P1 is a day-by-day weekly program with 6 different daily intervals. By default, the conguration is as
indicated below:
Day of the week Period Default interval Default temperature
7 days per week
1 0:00-6:00 15ºC
2 6:00-9:00 21ºC
3 9:00—12:00 15ºC
4 12:00—14:00 21ºC
5 14:00—17:30 15ºC
6 17:30—23:59 21ºC
In order to change this program, in the setting screen, rotate the rotary key to choose PROG
TIME
ADVANCED
icon and
press the key to enter into automatic programming.
After selecting the day whose program you want to change, setting screen for that day will be displa-
yed. For each period, adjust the setting temperature and the end time of the interval and press the key
to conrm, jumping to the next period. When all the periods of the day were conrmed, it will return
to the setting menu.
It is needed to repeat this procedure for those days whose program you want to modify.
Program P2:
P2 is a pre-set program, with 2 different intervals for each day of the week. It is not possible to modify
intervals or temperatures. The setting is as indicated below:
Day of the week Period Interval Temperature
7 days per week 1 6:00-22:00 21ºC
2 22:00-6:00 17ºC

12
Program P3:
P3 is a pre-set program with different intervals for workdays (Monday to Friday) and weekends
(Saturday and Sunday). 4 intervals are dened for workdays and 2 intervals for weekend. It is not
possible to change intervals or temperatures. The setting is as indicated below:
Day of the week Period Interval Temperature
Workday 1 22:00—6:00 17ºC
2 6:00—8:00 21ºC
38:00—16:00 17ºC
4 16:00—22:00 21ºC
Weekend 1 6:00-22:00 21ºC
22:00-6:00 17ºC
Time setting
In the setting screen, rotate the rotary key to choose
PROG
TIME
ADVANCED
icon and press the key to enter into time
setting screen.
Firstly, minutes are ashing. Rotate the rotary key to adjust the minute value and press the key to
conrm.
Then, hours are ashing. Rotate the rotary key to adjust the hour value and press the key to conrm.
Finally weekday is ashing. Rotate the rotary key to select the current weekday and press the key to
conrm and return to the setting screen. After 5 seconds, it automatically returns to the main screen.
Advanced options
In the setting screen, rotate the rotary key to choose the
PROG
TIME
ADVANCED icon and press the key to enter in the
advanced option screen. The parameters indicated below will be displayed consecutively. Modify the
value rotating the rotary key and press the key to conrm and jump to the next parameter.
Symbol Description Parameter setting Default
value
A1
Measured
temperature
adjustment
-9-+9 ºC 0.0
A2 Temperature
hysteresis 1-9 ºC 0.5
A3 Lock function 0: Half lock
1: Full lock 0
A4 Automatic
option
--: no automatic programs
01: automatic programs 01
A5
High measured
temperature
value
35 ºC-70 ºC 35
A6
Low measured
temperature
value
5 ºC-10 ºC 5

13
A7
Low setting
temperature
value
1 ºC-10 ºC 5
A8
High setting
temperature
value
20-70 ºC 35
A9 Descaling
function
0:descaling function disabled;
1:descaling function enabled;
Descaling function: when valve is continuously
closed over 100 hours, it will be opened for 3
minutes automatically.
0
AA
Restore to
Factory default
setting
Press rotary key for 3 seconds to reset the default
parameters.
Communication between transmitter and receiver
Follow the next step in order to communicate transmitter and receiver:
4. When the transmitter is switched off, press the rotary key for 3 seconds to enter in setting
screen for IP address.
5. Adjust IP high and low addresses according to the info indicated in both, transmitter and
receiver (open the back cover to nd the info) and press the key to conrm.
6. The thermostat displays the complete address. At this point, turn on the receiver by operating
the switch (green and amber LEDs light on) and press the rotary key in the transmitter to send IP
address.
7. The thermostat displays “55” indicating a successful communication.
Note:
PROG
TIME
ADVANCED
icon is permanent in normal communication and ashing in abnormal communication.
RECEIVER
LED warnings in receiver
• Green LED: it light son when switching on the receiver.
• Red LED:
A. It lights on constantly when load output is active.
B. It is blinking when a fault is detected.
C. It blinks twice every 2 seconds when the IP address is incorrect.
D. It blinks three times every 2 seconds when the RF signal is missing for one hour.
E. It blinks four times every 2 seconds when the temperature sensor fails.
• Amber LED: it lights on for 10 seconds when switching on the receiver. This is the time
when it is possible to match the transmitter and the receiver.

14
Wiring diagram

14
Wiring diagram
15

16
Fabricante (Art.10, Directiva 2014/35/UE):
MGL EUMAN, S.L.
Parque Empresarial de Argame,
C/ Picu Castiellu, Parcelas i-1 a i-4
E-33163 Argame, Morcín, Asturias, España (Spain)
www.kps-soluciones.es
-
 1
1
-
 2
2
-
 3
3
-
 4
4
-
 5
5
-
 6
6
-
 7
7
-
 8
8
-
 9
9
-
 10
10
-
 11
11
-
 12
12
-
 13
13
-
 14
14
-
 15
15
-
 16
16


KPS CONFORTLINE CRONO RF El manual del propietario
- Categoría
- Termostatos
- Tipo
- El manual del propietario
en otros idiomas
Otros documentos
-
Orbegozo RRE 510 Electric Radiator Manual de usuario
-
-
Haverland RCTT El manual del propietario
-
Rointe CT. 2 El manual del propietario
-
-
 Fahrenheat FSSWH2004 Manual de usuario
-
DeDietrich DKP825X El manual del propietario
