
THANK YOU
We appreciate the trust and condence you have placed in Glacier Bay through the purchase of this wall cabinet.
We strive to continually create quality products designed to enhance your home. Visit us online to see our full line of products
available for your home improvement needs. Thank you for choosing Glacier Bay!
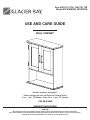
USE AND CARE GUIDE
WALL CABINET
Questions, problems, missing parts?
Before returning to the store, call Glacier Bay Customer Service
8 a.m. - 7 p.m., EST, Monday - Friday, 9 a.m. - 6 p.m., EST, Saturday
1-855-HD-GLACIER
HOMEDEPOT.COM/GLACIERBAY
Item #1004 101 724, 1004 101 708
Model #5318WWHD, 5318GYHD

2
Table of Contents
Safety Information
Table of Contents ...................................2
Safety Information ..................................2
Warranty ..........................................2
Pre-Assembly ......................................3
Planning Assembly .................................3
Package Contents .................................5
Assembly. . . . . . . . . . . . . . . . . . . . . . . . . . . . . . . . . . . . . . . . . . 7
Installation .......................................14
Care & Cleaning ...................................19
□ Read through this entire manual prior to assembly and installation.
Warranty
ONE YEAR LIMITED WARRANTY
WHAT IS COVERED
Glacier Bay products are manufactured with superior quality standards and workmanship and are backed by our limited lifetime warranty.
Glacier Bay products are warranted to the original consumer purchaser to be free of defects in materials or workmanship. We will replace
FREE OF CHARGE any product or parts that proves defective. Simply return the product/part to any of The Home Depot retail locations or
call 1-855-HD-GLACIER to receive the replacement item. Proof of purchase (original sales receipt) from the original consumer purchaser
must be made available for all Glacier Bay warranty claims.
WHAT IS NOT COVERED
This warranty excludes incidental/inconsequential damages and failures due to misuse, abuse, or normal wear and tear. This warranty
excludes all industrial, commercial, and business usage, whose purchasers are hereby extended a ve year limited warranty from the
date of purchase, with all other terms of this warranty applying except the duration of warranty.
Some states and provinces do not allow the exclusion or limitation of incidental or consequential damages, so the above limitations
may not apply to you. This warranty gives you specic legal rights and you may also have other rights that vary from state to state and
province to province. Please see a store or contact 1-855-HD-GLACIER for more details.
CAUTION: Before cutting, drilling, or hammering into any wall
surface, verify the location of electrical, plumbing, and gas lines.
Cutting any of these may cause serious injury.

3 HOMEDEPOT.COM/GLACIERBAY
Please contact 1-855-HD-GLACIER for further assistance.
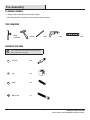
Pre-Assembly
PLANNING ASSEMBLY
□ Identify all parts and hardware pieces before you begin.
□ When laying out parts, place them on a soft surface to prevent scratching.
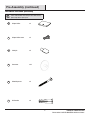
TOOLS REQUIRED
Phillips
screwdriver
Hammer Pencil Drill Level
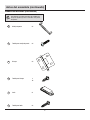
HARDWARE INCLUDED
NOTE: Hardware not shown to actual size.
Some of the hardware offered may be more than needed,
please keep them as spare parts.
AA Cam bolt x 10
BB Cam x 10
CC Dowel x 10
DD Wood screw x 4

4
[Heading goes here]
Pre-Assembly (continued)
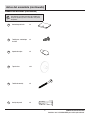
HARDWARE INCLUDED
(continued)
NOTE: Hardware not shown to actual size.
Some of the hardware offered may be more than needed,
please keep them as spare parts.
EE Door handle x 2
FF Door handle screw x 4
GG Hinge x 4
HH Hinge screw x 16
II
Magnet x 1
JJ Magnet screw x 2

5 HOMEDEPOT.COM/GLACIERBAY
Please contact 1-855-HD-GLACIER for further assistance.
[Heading goes here]
Pre-Assembly (continued)
HARDWARE INCLUDED (continued)
NOTE: Hardware not shown to actual size.
Some of the hardware offered may be more than needed,
please keep them as spare parts.
KK Magnet strike x 2
LL Magnet strike screw x 2
MM Shelf pin x 4
NN Cam cover x 10
OO Mounting screw x 4
PP Wall anchor x 4

6
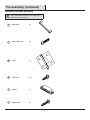
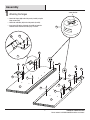
Pre-Assembly (continued)
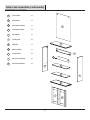
PACKAGE CONTENTS
A Top Panel x 1
B Bottom Panel x 1
C Left Side Panel x 1
D Right Side Panel x 1
E Hanging Rail x 1
F Wall Cleat x 1
G Fixed Shelf x 1
H Adjustable Shelf x 1
I
Back Panel x 1
J Left Side Door x 1
K Right Side Door x 1
I
E
C
D
A
H
G
B
J
K
F

7 HOMEDEPOT.COM/GLACIERBAY
Please contact 1-855-HD-GLACIER for further assistance.
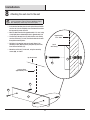
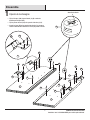
Assembly (continued)
1
Attaching the hinges
□ Attach the hinges (GG) to the side panel (C and D) using the
hinge screws (HH).
□ Attach the cam bolts (AA) to the side panels (C and D).
□ Insert cams (BB) to the side panels (C and D) and note the
direction of the arrow on the cams (BB), as shown.
arrow direction
C
D
BB
AA
AA
AA
AA
AA
BB
BB
HH
GG
HH
GG
HH
HH
GG
C
GG

8
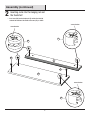
Assembly (continued)
2
Inserting cams into the hanging rail and
the xed shelf
□ Insert cams (BB) into the hanging rail (E) and the xed shelf (G)
and note the direction of the arrow on the cams (BB), as shown.
arrow direction
arrow direction
arrow direction
E
G
BB
BB
BB
BB
BB

9 HOMEDEPOT.COM/GLACIERBAY
Please contact 1-855-HD-GLACIER for further assistance.
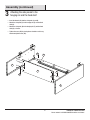
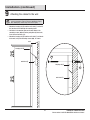
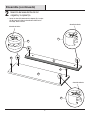
Assembly (continued)
3
Attaching the side panels to the
hanging rail and the
xed shelf
□ Insert the dowels (CC) into the side panels (C and D).
□ Attach the side panel (C) to the hanging rail (E) and the xed
shelf (G).
□ Attach the side panel (D) to the hanging rail (E) and the xed
shelf (G), as shown.
□ Tighten the cams (BB) by turning them clockwise until snug,
do not overtighten cams (BB).
G
E
C
D
BB
BB
CC
CC
BB
CC

10
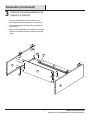
[Heading goes here]
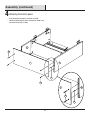
4
Attaching the bottom panel
□ Insert the dowels (CC) into the side panels (C and D).
□ Attach the bottom panel (B) to the side panels (C and D) using
the wood screws (DD), as shown.
Assembly (continued)
C
D
B
CC
DD
DD
DD
CC
B D

11 HOMEDEPOT.COM/GLACIERBAY
Please contact 1-855-HD-GLACIER for further assistance.
[Heading goes here]
Assembly (continued)
5
Inserting the back panel
□ With the tape side of the back panel (I) facing out, slide it down the
notch on the side panels (C and D), as shown.
□ Then insert the back panel (I) into the notch on the bottom panel (B).
notch in the side
panels (C and D)
C
D
I
I
C
B
tape side of the
back panel (I) facing out

12
[Heading goes here]
Assembly (continued)
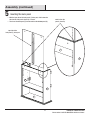
6
Attaching the magnet to top panel
□ Attach the cam bolts (AA) to the top panel (A).
□ Attach the magnet (II) to the top panel (A) using the
magnet screws (JJ), as shown.
A
AA
AA
AA
AA
JJ
II

13 HOMEDEPOT.COM/GLACIERBAY
Please contact 1-855-HD-GLACIER for further assistance.
[Heading goes here]
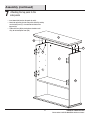
Assembly (continued)
7
Attaching the top panel to the
side panels
□ Insert dowels (CC) into the side panels (C and D).
□ Attach the top panel (A) to the side panels (C and D), making
sure the back panel (I) is inserted into the notch of the
top panel (A).
□ Tighten the cams (BB) by turning them clockwise until
snug, do not overtighten cams (BB).
A
CC
CC
BB
I
C
D

14
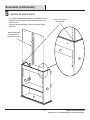
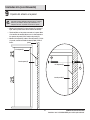
[Heading goes here]
Installation
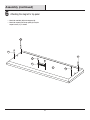
8
Attaching the wall cleat to the wall
NOTE: Before cutting, drilling, or hammering into any wall
surface, verify the location of electrical, plumbing, and gas
lines. Cutting any of these may cause serious injury.
□ In the desired location place the unit against the wall. Make
sure the unit is level and lightly draw a horizontal line where
the top panel (A) meets the wall.
□ Measure down from that line approximately 3.5 in. and, using
a level, lightly draw a horizontal line that is approximately 12 in.
□ Line the top of the wall cleat (F) with that line and, making
sure the wall cleat (F) is level, mark the location on the wall
through the mounting holes.
□ Drill holes in the marked spots on the wall. Note, if the
mounting screws (OO) will not be going directly into studs,
insert the wall anchors (PP).
□ Mount the wall cleat (F) to the wall, using the mounting
screws (OO), as shown.
top of
wall cleat (F)
approximately
3.5 in. down
F
F
PP
PP
OO
OO
top of unit mark
measure down
approximately 3.5 in.

15 HOMEDEPOT.COM/GLACIERBAY
Please contact 1-855-HD-GLACIER for further assistance.
[Heading goes here]
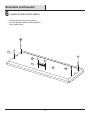
Installation (continued)
9
Attaching the cabinet to the wall
NOTE: Before cutting, drilling, or hammering into any wall
surface, verify the location of electrical, plumbing, and gas
lines. Cutting any of these may cause serious injury.
□ Mount the hanging rail (E) onto the wall cleat (F) and mark
the location on wall through the mounting holes.
□ Drill holes in the marked spots on the wall. Note, if the
mounting screws (OO) will not be going directly into studs,
insert the wall anchors (PP).
□ Mount the hanging rail (E) onto the wall cleat (F) and attach
to the wall, using the mounting screws (OO), as shown.
wall cleat (F)
hanging rail (E)
hanging rail (E)
wall cleat (F)
OO
PP
wall

16
[Heading goes here]
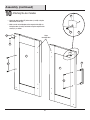
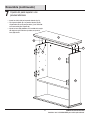
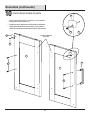
Assembly (continued)
10
□ Attach the door handles (EE) to the doors (J and K) using the
door handle screws (FF).
□ Make sure the raised dimples on the magnet strike (KK) are
facing the doors (J and K) and attach using the magnet strike
screw (LL), as shown.
Attaching the door handles
hinge
mounting holes
J
K
FF
KK
FF
EE
LL
KK
LL
K

17 HOMEDEPOT.COM/GLACIERBAY
Please contact 1-855-HD-GLACIER for further assistance.
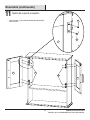
[Heading goes here]
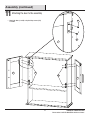
Assembly (continued)
11
□ Attach the doors (J and K) using the hinge screws (HH),
as shown.
Attaching the door to the assembly
K
J
HH
HH
J
HH
HH

18
[Heading goes here]
Assembly (continued)
12
□ To make horizontal adjustments see gure 1.
□ To make vertical adjustments see gure 2.
Adjusting the doors
door
door
hinge
hinge
gure 1
(horizontal adjustment)
gure 2
(vertical adjustment)

19 HOMEDEPOT.COM/GLACIERBAY
Please contact 1-855-HD-GLACIER for further assistance.
[Heading goes here]
Care and Cleaning
□ Cleaning with a dry cloth may be sufcient.
□ For other stains or marks, wipe gently with a damp cloth.
□ Do not use strong detergents or abrasive cleaners; they may damage the surface of this product.
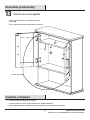
cam covers (NN)
13
□ Insert the adjustable shelf (H), using the shelf pins (MM).
□ Use the cam covers (NN) to cover all cams (BB).
Inserting adjustable shelf
Assembly (continued)
H
MM
MM

Questions, problems, missing parts?
Before returning to the store, call Glacier Bay Customer Service
8 a.m. - 7 p.m., EST, Monday - Friday, 9 a.m. - 6 p.m., EST, Saturday
1-855-HD-GLACIER
HOMEDEPOT.COM/GLACIERBAY
Retain this manual for future use.
IS5318-I

GRACIAS
Agradecemos la conanza que ha depositado en Glacier Bay a través de la adquisición de este armario de pared. Nos esforzamos constantemente
en crear productos de calidad diseñados para embellecer su hogar. Visítenos en línea y vea nuestra línea completa de productos para realizar
mejoras en su hogar. ¡Gracias por elegir Glacier Bay!
GUÍA DE USO Y CUIDADO
ARMARIO DE PARED
¿Tiene preguntas, problemas, le faltan piezas?
Antes de regresar a la tienda, llame al Servicio al Cliente de Glacier Bay, de 8 a.m. - 7 p.m.,
Hora Estándar del Este, de lunes a viernes, de 9 a.m. - 6 p.m., Hora Estándar del Este, sábado
1-855-HD-GLACIER
HOMEDEPOT.COM/GLACIERBAY
Ítem #1004 101 724, 1004 101 708
Modelo #5318WWHD, 5318GYHD

2
Tabla de contenido
Información de seguridad
Tabla de contenido ..................................2
Información de seguridad ............................2
Garantía. . . . . . . . . . . . . . . . . . . . . . . . . . . . . . . . . . . . . . . . . . . 2
Antes del ensamble .................................3
Planicación del ensamble ..........................3
Contenido del paquete ..............................5
Ensamble .........................................7
Instalación .......................................14
Cuidado y limpieza .................................19
□ Lea todo el manual antes del ensamblaje y la instalación.
Garantía
UN AÑO DE GARANTÍA LIMITADA
COBERTURA
Los productos Glacier Bay están fabricados con normas y manufactura de calidad superior y están respaldados por nuestra garantía
limitada de por vida. Los productos Glacier Bay garantizan al comprador consumidor original que están libres de defectos en materiales o
manufactura. Reemplazaremos SIN CARGO cualquier producto o partes que estén defectuosas. Simplemente devuelva el producto o pieza
a cualquiera de los lugares de venta por menor de The Home Depot o llame al 1-855-HD-GLACIER para recibir la parte de reemplazo. Se
debe presentar un comprobante de compra (recibo de venta original) para todos los reclamos bajo garantía de Glacier Bay.
ESTA GARANTÍA NO CUBRE
Esta garantía excluye daños y fallas incidentales o emergentes debido a uso indebido, abuso o desgaste normal. Esta garantía excluye
todo uso industrial, comercial o institucional realizado por los compradores a los que se les extiende esta garantía limitada de cinco años
a partir de la fecha de compra, siendo de aplicación todos los demás términos de esta garantía, excepto la duración de la misma. Algunos
estados y provincias no permiten la exclusión o limitación de daños incidentales o emergentes, por ello las limitaciones previamente
enunciadas pueden no serles aplicables. Esta garantía le conere derechos legales especícos y es posible que tenga otros derechos que pueden
variar de estado a estado y de provincia a provincia. Para ver más detalles concurra a una tienda o contacte a 1-855-HD-GLACIER.
PRECAUCIÓN: Antes de cortar, taladrar o martillar cualquier
supercie de pared, verique la ubicación de los conductos
eléctricos y las tuberías de agua y gas. Al interferir con
cualquiera de estas, se podrían causar lesiones graves.

3 HOMEDEPOT.COM /GLACIERBAY
Contáctese con 1-855-HD-GLACIER para recibir ayuda adicional.
Antes del ensamble
PLANIFICACIÓN DEL ENSAMBLE
□ Identique todas las piezas y las piezas de tornillería antes de comenzar.
□ Al esparcir las partes, colóquelas sobre una supercie suave para evitar que se rayen.
HERRAMIENTAS NECESARIAS
Destornillador
Phillips
Martillo Lápiz Taladro Nivel
ELEMENTOS INCLUIDOS
NOTA: La tornillería no se ilustra en su tamaño real.
Es posible que se provean más piezas de tornillería que
las que se requieren, por favor consérvelas como piezas
de repuesto.
AA Perno de leva x 10
BB Leva x 10
CC Clavija x 10
DD Tornillo para madera x 4

4
[Heading goes here]
Antes del ensamble (continuado)
ELEMENTOS INCLUIDOS (CONTINUADO)
NOTA: La tornillería no se ilustra en su tamaño real.
Es posible que se provean más piezas de tornillería que
las que se requieren, por favor consérvelas como piezas
de repuesto.
EE Manija de puerta x 2
FF Tornillo para manija de puerta x 4
GG Bisagra x 4
HH Tornillo para bisagra x
16
II
Imán x 1
JJ Tornillo para imán x 2

5 HOMEDEPOT.COM /GLACIERBAY
Contáctese con 1-855-HD-GLACIER para recibir ayuda adicional.
[Heading goes here]
Antes del ensamble (continuado)
ELEMENTOS INCLUIDOS (CONTINUADO)
NOTA: La tornillería no se ilustra en su tamaño real.
Es posible que se provean más piezas de tornillería que
las que se requieren, por favor consérvelas como piezas
de repuesto.
KK Contrachapa de imán x 2
LL Tornillo para contrachapa
de imán
x 2
MM Soporte de repisa x 4
NN Tapa de leva x 10
OO Tornillo de montaje x 4
PP Anclaje de pared x 4

6
Antes del ensamble (continuado)
CONTENIDO DEL PAQUETE
A Panel superior x 1
B Panel inferior x 1
C Panel lateral izquierdo x 1
D Panel lateral derecho x 1
E Riel colgante x 1
F Taco de pared x 1
G Repisa ja x 1
H Repisa regulable x 1
I
Panel posterior x 1
J Puerta lateral izquierda x 1
K Puerta lateral derecha x 1
I
E
C
D
A
H
G
B
J
K
F

7 HOMEDEPOT.COM /GLACIERBAY
Contáctese con 1-855-HD-GLACIER para recibir ayuda adicional.
Ensamble (continuado)
1
Fijación de las bisagras
□ Fije las bisagras (GG) al panel lateral (C y D) usando los
tornillos para bisagra (HH).
□ Fije los pernos de leva (AA) a los paneles laterales (C y D).
□ Inserte las levas (BB) en los paneles laterales (C y D), y tenga en
cuenta la dirección de la echa en las levas (BB), como se ilustra.
dirección de echa
C
D
BB
AA
AA
AA
AA
AA
BB
BB
HH
GG
HH
GG
HH
HH
GG
C
GG

8
Ensamble (continuado)
2
Inserción de levas dentro del riel
colgante y la repisa ja
□ Inserte las levas (BB) dentro del riel colgante (E) y la repisa
ja (G) y tenga en cuenta la dirección de la echa en las
levas (BB), como se ilustra.
dirección de echa
dirección de echa
dirección de echa
E
G
BB
BB
BB
BB
BB

9 HOMEDEPOT.COM /GLACIERBAY
Contáctese con 1-855-HD-GLACIER para recibir ayuda adicional.
Ensamble (continuado)
3
Fijación de los paneles laterales al riel
colgante y la repisa ja
□ Inserte las clavijas (CC) en los paneles laterales (C y D).
□ Fije el panel lateral (C) al riel colgante (E) y la repisa ja (G).
□ Fije el panel lateral (D) al riel colgante (E) y la repisa ja (G),
como se ilustra.
□ Ajuste las levas (BB) girándolas en el sentido de las agujas del
reloj hasta que estén bien ajustadas; no ajuste las levas (BB)
de más.
G
E
C
D
BB
BB
CC
CC
BB
CC

10
[Heading goes here]
4
Fijación del panel inferior
□ Inserte las clavijas (CC) en los paneles laterales (C y D).
□ Fije el panel inferior (B) a los paneles laterales (C y D), usando
los tornillos para madera (DD), como se ilustra.
Ensamble (continuado)
C
D
B
CC
DD
DD
DD
CC
B D

11 HOMEDEPOT.COM /GLACIERBAY
Contáctese con 1-855-HD-GLACIER para recibir ayuda adicional.
[Heading goes here]
Ensamble (continuado)
5
Inserción del panel posterior
□ Con el lateral recubierto del panel posterior (I) orientado hacia afuera,
deslícelo a lo largo de la muesca sobre los paneles laterales (C y D),
como se ilustra.
□ Luego inserte el panel posterior (I) por la muesca sobre el panel
inferior (B).
muesca en los paneles
laterales (C y D)
C
D
I
C
B
lateral recubierto del
panel posterior (I)
orientado hacia afuera
I

12
[Heading goes here]
Ensamble (continuado)
6
Fijación del imán al panel superior
□ Fije los pernos de leva (AA) al panel superior (A).
□ Fije el imán (II) al panel superior (A) usando los tornillos del
imán (JJ), como se ilustra.
A
AA
AA
AA
AA
JJ
II

13 HOMEDEPOT.COM /GLACIERBAY
Contáctese con 1-855-HD-GLACIER para recibir ayuda adicional.
[Heading goes here]
Ensamble (continuado)
7
Fijación del panel superior a los
paneles lateraless
□ Inserte las clavijas (CC) en los paneles laterales (C y D).
□ Fije el panel superior (A) a los paneles laterales (C y D),
asegurándose de que el panel posterior (I) esté insertado
en la muesca del panel superior (A).
□ Ajuste las levas (BB) girándolas en el sentido de las agujas
del reloj hasta que estén bien ajustadas; no ajuste las
levas (BB) de más.
A
CC
CC
BB
I
C
D

14
[Heading goes here]
Instalación
8
Fijación del taco de pared a la pared
NOTA: Antes de cortar, taladrar o martillar cualquier
supercie de pared, verique la ubicación de los conductos
eléctricos y las tuberías de agua y gas. Al interferir con
cualquiera de estas, se podrían causar lesiones graves.
□ Coloque la unidad contra la pared en el lugar deseado.
Asegúrese de que la unidad esté a nivel y trace ligeramente una
línea horizontal donde el panel superior (A) se une a la pared.
□ Mida hacia abajo desde esa línea aproximadamente 3,5 pulg.,
con un nivel, trace ligeramente una línea horizontal que tenga
aproximadamente 12 pulgadas.
□ Alinee la parte superior del taco de pared (F) con esa línea,
y asegurándose de que el taco de pared (F) esté a nivel,
marque la ubicación en la pared a través de los oricios de
montaje.
□ Taladre oricios en los puntos marcados en la pared. Nota:
si los tornillos de montaje (OO) no van a ir directamente en
los soportes de pared, inserte anclajes de pared (PP).
□ Monte el taco de pared (F) a la pared, usando los tornillos de
montaje (OO), como se ilustra.
parte superior del
taco de pared (F)
aproximadamente
3,5 pulg. hacia abajo
F
F
PP
PP
OO
OO
marca superior de la unidad
mida aproximadamente
3,5 pulg. hacia abajo

15 HOMEDEPOT.COM /GLACIERBAY
Contáctese con 1-855-HD-GLACIER para recibir ayuda adicional.
[Heading goes here]
Instalación (continuado)
9
Fijación del armario a la pared
NOTA: Antes de cortar, taladrar o martillar cualquier
supercie de pared, verique la ubicación de los conductos
eléctricos y las tuberías de agua y gas. Al interferir con
cualquiera de estas, se podrían causar lesiones graves.
□ Montel el riel colgante (E) al taco de pared (F) y marque el
lugar sobre la pared a través de los oricios de montaje.
□ Taladre oricios en los puntos marcados en la pared. Nota:
si los tornillos de montaje (OO) no van a ir directamente en
los soportes de pared, inserte anclajes de pared (PP).
□ Monte el riel colgante (E) sobre el taco de pared (F), y fíjelo
a la pared, usando los tornillos de montaje (OO), como se
ilustra.
taco de pared (F)
riel colgante (E)
riel colgante (E)
taco de pared (F)
OO
PP
pared

16
[Heading goes here]
Ensamble (continuado)
10
□ Fije las manijas de puerta (EE) a las puertas (J y K) usando los
tornillos para manija de puerta (FF).
□ Asegúrese de que las depresiones con relieve sobre la contrachapa
de imán (KK) estén orientadas hacia las puertas (J y K) y realice la
jación con el tornillo para contrachapa de imán (LL), como se ilustra.
Fijación de las manijas de puerta
oricios de montaje
de bisagra
J
K
FF
KK
FF
EE
LL
KK
LL
K

17 HOMEDEPOT.COM /GLACIERBAY
Contáctese con 1-855-HD-GLACIER para recibir ayuda adicional.
[Heading goes here]
Ensamble (continuado)
11
□ Fije las puertas (J y K) usando los tornillos para bisagra (HH),
como se ilustra.
Fijación de la puerta al conjunto
K
J
HH
HH
J
HH
HH

18
[Heading goes here]
Ensamble (continuado)
12
□ Consulte la gura 1 para realizar ajustes horizontales.
□ Consulte la gura 2 para realizar ajustes verticales.
Ajuste de la puerta
puerta
puerta
bisagra
bisagra
gura 1
(ajuste horizontal)
gura 2
(ajuste vertical)

19 HOMEDEPOT.COM /GLACIERBAY
Contáctese con 1-855-HD-GLACIER para recibir ayuda adicional.
[Heading goes here]
Cuidado y limpieza
□ Limpiar con un paño seco puede ser suciente.
□ Para otras manchas o marcas, limpie suavemente con un paño humedecido.
□ No use detergentes fuertes o limpiadores abrasivos; pueden dañar la supercie de este producto.
tapas de levas (NN)
13
□ Inserte la repisa regulable (H), usando los soportes de
repisa (MM).
□ Use las tapas de levas (NN) para tapar todas las levas (BB).
Inserción de la repisa regulable
Ensamble (continuado)
H
MM
MM

¿Tiene preguntas, problemas, le faltan piezas?
Antes de regresar a la tienda, llame al Servicio al Cliente de Glacier Bay
8 a.m. - 7 p.m., Hora Estándar del Este, de lunes a viernes, de 9 a.m. - 6 p.m., Hora Estándar del Este, sábado
1-855-HD-GLACIER
HOMEDEPOT.COM/GLACIERBAY
Conserve este manual para consultar en el futuro.
IS5318-I
-
 1
1
-
 2
2
-
 3
3
-
 4
4
-
 5
5
-
 6
6
-
 7
7
-
 8
8
-
 9
9
-
 10
10
-
 11
11
-
 12
12
-
 13
13
-
 14
14
-
 15
15
-
 16
16
-
 17
17
-
 18
18
-
 19
19
-
 20
20
-
 21
21
-
 22
22
-
 23
23
-
 24
24
-
 25
25
-
 26
26
-
 27
27
-
 28
28
-
 29
29
-
 30
30
-
 31
31
-
 32
32
-
 33
33
-
 34
34
-
 35
35
-
 36
36
-
 37
37
-
 38
38
-
 39
39
-
 40
40


Glacier Bay 5318WWHD Guía de instalación
- Tipo
- Guía de instalación
- Este manual también es adecuado para
en otros idiomas
Artículos relacionados
-
Glacier Bay 5348GYHD Guía de instalación
-
-
-
-
-
-
-
-
-