
THANK YOU
We appreciate the trust and condence you have placed in Glacier Bay through the purchase of this over-the-toilet spacesaver.
We strive to continually create quality products designed to enhance your home. Visit us online to see our full line of products
available for your home improvement needs. Thank you for choosing Glacier Bay!
USE AND CARE GUIDE
OVER-THE-TOILET SPACESAVER
Questions, problems, missing parts?
Before returning to the store, call Glacier Bay Customer Service
8 a.m. - 6 p.m., EST, Monday - Friday
1-855-HD-GLACIER
HOMEDEPOT.COM
Item #1000 017 517
Model #2923SSHD

2
Table of Contents
Safety Information
Table of Contents ...................................2
Safety Information ..................................2
Warranty ..........................................2
Pre-Installation .....................................3
Planning Installation ...............................3
Package Contents .................................4
Installation ........................................5
Care & Cleaning ....................................9
□ Read through this entire manual prior to assembly and installation.
Warranty
ONE YEAR LIMITED WARRANTY
WHAT IS COVERED
The manufacturer warrants to the original purchaser that this product will be free from defects in materials or workmanship for a period
of one year from the date of original purchase. This warranty only covers the proper and intended use of this product. In the event of and
bona de warranty claim relating to this product, the manufacturer will, at its election and sole discretion, provide a replacement product
or a substantially similar product. This replacement is the sole and exclusive remedy with respect to any warranty claim relating to this
product. Under no circumstances will the manufacturer’s liability exceed the purchase price of this product.
WHAT IS NOT COVERED
All costs of removing and reinstalling the product are the purchaser’s responsibility. Any alteration of this product or use of this product
in any manner other than its intended use is not covered by this warranty. The manufacturer assumes no responsibility whatsoever for
product installation during the limited one year warranty.
The manufacturer disclaims any and all warranties. The duration of any implied warranty which cannot be disclaimed is limited to the
time period as specied in the expressed warranty. The manufacturer shall not be liable for incidental, consequential, or special damages
arising out of or in connection with product use or performance, except as may otherwise be accorded by law. This warranty gives
specic rights, and you may have other rights which vary from state to state.
The manufacturer shall not be liable for any special, incidental, and/or consequentail damages.
To obtain warranty service, call our customer service department at 1-855-HD-GLACIER for return authorization and shipping instructions
so that we may repair or replace the product. No warranty claim will be processed without a copy of the receipt as proof of purchase.

3 HOMEDEPOT.COM
Please contact 1-855-HD-GLACIER for further assistance.
PLANNING INSTALLATION
□ Please identify all the parts and hardware pieces before you begin.
□ When laying out the parts, place them on a soft surface to prevent scratching.
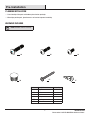
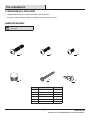
HARDWARE INCLUDED
NOTE: Hardware shown to actual size.
Pre-Installation
Part Description Quantity
AA Large screw 8
BB Medium screw 6
CC Small screw 4
DD End cap 8
EE Mounting screw 2
FF Wall anchor 2
CC
DD
FF
BBAA
EE

4
Pre-Installation (continued)
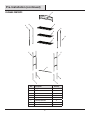
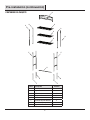
PACKAGE CONTENTS
Part Description Quantity
A Top piece 1
B Shelf 3
C Front tube 2
D Rear tube 2
E Leg 2
F Front leg extension 2
G Rear leg extension 2
H Bottom brace 1
H
A
B
E
C
D
E
C
D
B
B
F
G
F
G

5 HOMEDEPOT.COM
Please contact 1-855-HD-GLACIER for further assistance.
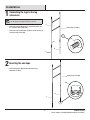
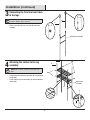
Installation (continued)
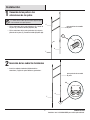
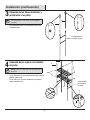
2
Inserting the end caps
□ Insert the end caps (DD) into the front and rear leg
extensions (F and G).
1
Connecting the legs to the leg
extensions
□ Fasten the front leg extensions (F) to the front of the legs
(E), using the small screws (CC).
□ Fasten the rear leg extensions (G) to the rear of the legs (E),
using the small screws (CC).
E
CC
NOTE: Be sure to orient legs (E) so that the screw holes
for the small screws (CC) are located on the back.
F
G
DD
F
G
back of legs assembly
back of legs assembly

6
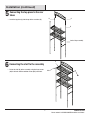
Installation (continued)
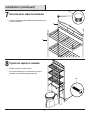
3
Connecting the front and rear tubes
to the legs
□ Fasten a front tube (C) and a rear tube (D) to each leg
assembly.
4
Attaching the shelves to the leg
assembly
NOTE: The crosswires should be on the bottom of the
shelf.
□ Fasten two shelves (B) to the rear tubes (D) using the large
screws (AA).
□ Fasten shelves (B) to the front tubes (C) using the medium
screws (BB).
C
back of legs assembly
BB
AA
D
NOTE: Be sure to orient the front tube (C) so that the end
with the “dimpled” hole is on the top.
back of legs
assembly
B
B
C
C
D

7 HOMEDEPOT.COM
Please contact 1-855-HD-GLACIER for further assistance.
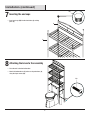
Installation (continued)
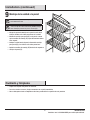
6
Connecting the shelf to the assembly
□ Fasten the shelf (B) to the assembly, using the large screws
(AA) in the back and the medium screws (BB) in the front.
5
Connecting the top piece to the rear
tubes
□ Insert the top piece (A) into the top of the rear tubes (D).
D
back of legs assembly
A
D
AA
BB
B

8
[Heading goes here]
Installation (continued)
7
Inserting the end caps
□ Insert end caps (DD) into the front tubes (C) and top
piece (A).
8
Attaching the brace to the assembly
□ Place the unit in the desired location.
□ Attach the bottom brace (H) to the rear leg extensions (G),
using the large screws (AA).
DD
C
A
AA
H

9 HOMEDEPOT.COM
Please contact 1-855-HD-GLACIER for further assistance.
[Heading goes here]
Installation (continued)
9
Mounting the unit to the wall
□ Mark the mounting points on the wall through the holes in
the rear tubes of the unit.
□ Hammer wall anchors (FF) into the wall, unless the mounting
screws (EE) will go directly into a stud.
□ Place the unit against the wall, lining up the wall
anchors (FF) and the holes in the rear tubes.
□ Tighten the mounting screws (EE) into studs or wall
anchors (FF).
NOTE: For safety reasons, it is imperative that this unit
be mounted to the wall.
NOTE: Before cutting, drilling or hammering into any wall
surface, verify the location of electrical, plumbing and gas
lines. Cutting any of these may cause serious injury.
EE
FF
Care and Cleaning
□ Cleaning with a dry cloth may be sufcient.
□ For other stains or marks, wipe gently with a damp cloth.
□ Do not use strong detergents or abrasive cleaners; they may damage the surface of this product.

Questions, problems, missing parts?
Before returning to the store, call Glacier Bay Customer Service
8 a.m. - 6 p.m., EST, Monday - Friday
1-855-HD-GLACIER
HOMEDEPOT.COM
Retain this manual for future use.
IS02923-I

GRACIAS
Agradecemos la conanza que ha depositado en Glacier Bay a través de la adquisición de esta barra organizadora Premium.
Nos esforzamos constantemente en crear productos de calidad diseñados para embellecer su hogar. Visítenos en línea y vea nuestra línea completa
de productos para realizar mejoras en su hogar. ¡Gracias por elegir Glacier Bay!
GUÍA DE USO Y CUIDADO
ORGANIZADOR DE ESPACIO SOBRE INODORO
¿Tiene preguntas, problemas, le faltan piezas?
Antes de regresar a la tienda, llame al Servicio al Cliente de Glacier Bay
de 8 a.m. — 6 p.m, Hora Estándar del Este, de lunes a viernes
1-855-HD-GLACIER
HOMEDEPOT.COM
Item N.°1000 017 517
Modelo N.°2923SSHD

2
Tabla de contenido
Información de seguridad
Tabla de contenido ..................................2
Información de seguridad ............................2
Garantía. . . . . . . . . . . . . . . . . . . . . . . . . . . . . . . . . . . . . . . . . . . 2
Pre-instalación .....................................3
Planicación de la instalación ........................3
Contenido del paquete ..............................4
Instalación ........................................5
Cuidado y limpieza ..................................9
□ Lea todo el manual antes del ensamblaje y la instalación.
Garantía
UN AÑO DE GARANTÍA LIMITADA
COBERTURA
El fabricante garantiza al comprador original de este producto que dicho producto está libre de defectos en materiales o mano de obra por
un período de un año a partir de la fecha de compra original. Esta garantía cubre solamente el uso adecuado y debido de este producto.
En el caso de un reclamo de garantía de buena fe relacionado con este producto, el fabricante, a su elección y a su exclusiva discreción,
proporcionará un reemplazo del mismo o de un producto sustancialmente similar. Este reemplazo constituirá el único recurso exclusivo
con respecto a reclamos bajo garantía en relación con este producto. La responsabilidad del fabricante en ningún caso excederá el precio
de compra del producto.
ESTA GARANTÍA NO CUBRE
Los costos de retirar y reinstalar el producto son responsabilidad del comprador. No están cubiertos por esta garantía la modicación de
este producto ni el uso del mismo de una manera que no sea la debida. El fabricante no asume responsabilidad alguna por la instalación
del producto durante la garantía limitada de un año.
El fabricante no se hace responsable de ninguna garantía. La duración de cualquier garantía implícita que no se puede excluir está
limitada al lapso convenido según se indica en la garantía expresa. El fabricante no será responsable de ningún daño incidental o
consecuente, o daños especiales que se produzcan o estén relacionados con la utilización del producto o su desempeño excepto que la
ley indique lo contrario. Esta garantía le otorga derechos legales especícos, y usted además puede tener otros derechos que varían de
estado a estado.
El fabricante no será responsable de ningún daño especial, incidental o consecuente.
Para obtener servicio de garantía, llame a nuestro Servicio al Cliente al 1-855-HD-GLACIER para recibir instrucciones sobre la autorización de
devolución y envío de modo que podamos reparar o reemplazar el producto. Ninguna reclamación de garantía será procesada sin copia
del recibo como comprobante de compra.

3 HOMEDEPOT.COM
Contáctese con 1-855-HD-GLACIER para recibir ayuda adicional.
PLANIFICACIÓN DE LA INSTALACIÓN
□ Identique todas las piezas y las piezas de tornillería antes de comenzar.
□ Al esparcir las partes, colóquelas sobre una supercie suave para evitar que se rayen.
ELEMENTOS INCLUIDOS
NOTA: La tornillería se ilustra en su
tamaño real.
Pre-instalación
Pieza Descripción Cantidad
AA Tornillo grande 8
BB Tornillo mediano 6
CC Tornillo pequeño 4
DD Cubierta terminal 8
EE Tornillo de montaje 2
FF Anclaje para pared 2
CC
DD
FF
BBAA
EE

4
Pre-instalación (continuación)
CONTENIDO DEL PAQUETE
Pieza Descripción Cantidad
A Pieza superior 1
B Repisa 3
C Tubo delantero 2
D Tubo posterior 2
E Pata 2
F Extensión de pata delantera 2
G Extensión de pata posterior 2
H Soporte inferior 1
H
A
B
E
C
D
E
C
D
B
B
F
G
F
G

5 HOMEDEPOT.COM
Contáctese con 1-855-HD-GLACIER para recibir ayuda adicional.
Instalación (continuación)
2
Inserción de las cubiertas terminales
□ Inserte las cubiertas terminales (DD) dentro de las
extensiones (F y G) de las patas delanteras y posteriores.
1
Conexión de las patas a las
extensiones de las patas
□ Fije las extensiones de las patas delanteras (F) al frente de
las patas (E), usando los tornillos pequeños (CC).
□ Fije las extensiones de las patas posteriores (G) a la parte
posterior de las patas (E), usando los tornillos pequeños (CC).
E
CC
NOTA: : Asegúrese de orientar las patas (E) de modo que
los oricios de los tornillos para los tornillos pequeños (CC)
estén localizados en la parte posterior.
F
G
DD
F
G
parte posterior de ensamble
de patas
parte posterior de ensamble
de patas

6
Instalación (continuación)
3
Conexión de los tubos delanteros y
posteriores a las patas
□ Fije un tubo delantero (C) y un tubo posterior (D) a cada
ensamble de pata.
4
Conexión de las repisas al ensamble
de patas
NOTA: El centro de la equis debe estar en la parte inferior
de la repisa.
□ Fije las dos repisas (B) a los tubos posteriores (D) usando los
tornillos grandes (AA).
□ Fije las repisas (B) a los tubos delanteros (C) usando los
tornillos medianos (BB).
C
BB
AA
D
NOTA: Asegúrese de orientar el tubo delantero (C) de
modo que el extremo con el oricio con una “depresión”
esté arriba.
B
B
C
C
D
parte posterior de
ensamble de patas
parte posterior
de ensamble
de patas

7 HOMEDEPOT.COM
Contáctese con 1-855-HD-GLACIER para recibir ayuda adicional.
Instalación (continuación)
6
Conexión de la repisa al ensamble
□ Fije la repisa (B) al ensamble, usando los tornillos grandes (AA)
en la parte posterior y los medianos (BB) en la parte
delantera.
5
Conexión de la pieza superior a los
tubos posteriores
□ Inserte la pieza superior (A) dentro de la parte superior de
los tubos posteriores (D).
D
A
D
AA
BB
B
parte posterior
de ensamble
de patas
parte posterior de
ensamble de patas

8
[Heading goes here]
Installation (continued)
7
Inserción de las cubiertas terminales
□ Inserte las cubiertas terminales (DD) en los tubos delanteros (C)
y la pieza superior (A).
8
Fijación del soporte al ensamble
□ Coloque la unidad en el lugar deseado.
□ Fije el soporte inferior (H) a las extensiones de las patas
posteriores (G) usando los tornillos grandes (AA).
DD
C
A
AA
H

9 HOMEDEPOT.COM
Contáctese con 1-855-HD-GLACIER para recibir ayuda adicional.
[Heading goes here]
Installation (continued)
9
Montaje de la unidad a la pared
□ Marque los puntos de montaje en la pared a través de los
oricios situados en los tubos posteriores de la unidad.
□ Martille los anclajes para pared (FF) en la pared, a menos
que los tornillos de montaje (EE) vayan directamente dentro
de un soporte.
□ Coloque la unidad contra la pared, alineando los anclajes
para pared (FF) y los oricios en los tubos posteriores.
□ Apriete los tornillos de montaje (EE) dentro de los soportes o
□ anclajes de pared (FF).
NOTA: For safety reasons, it is imperative that this unit
be mounted to the wall.
NOTA: Before cutting, drilling or hammering into any wall
surface, verify the location of electrical, plumbing and gas
lines. Cutting any of these may cause serious injury.
EE
FF
Cuidado y limpieza
□ Limpiar con un paño seco puede ser suciente.
□ Para otras manchas o marcas, limpie suavemente con un paño humedecido.
□ No use detergentes fuertes o limpiadores abrasivos; pueden dañar la supercie de este producto.

¿Tiene preguntas, problemas, le faltan piezas?
Antes de regresar a la tienda, llame al Servicio al Cliente de Glacier Bay
de 8 a.m. — 6 p.m, Hora Estándar del Este, de lunes a viernes
1-855-HD-GLACIER
HOMEDEPOT.COM
Conserve este manual para uso futuro.
IS02923-I
-
 1
1
-
 2
2
-
 3
3
-
 4
4
-
 5
5
-
 6
6
-
 7
7
-
 8
8
-
 9
9
-
 10
10
-
 11
11
-
 12
12
-
 13
13
-
 14
14
-
 15
15
-
 16
16
-
 17
17
-
 18
18
-
 19
19
-
 20
20


En otros idiomas
Documentos relacionados
-
Glacier Bay 2265NNHD Guía de instalación
-
-
-
-
-
-
-
-
-