
PRINTED IN USA
Part
#
321888-000
• Fits 1 in. & 2 in. Cavity (
#
0362341)
• Fits 3 in. Cavity or Less (
#
0186669)
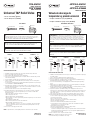
Universal T&P Relief Valve
WARNING: The T&P valve sensing probe must extend into the top 6 in. of the water heater tank.
Water heaters have different amounts of insulation between the tank and jacket. There are various
shank length T&P valves. Be sure to choose the correct one for your water heater. Failure to do so
could result in DEATH, SERIOUS BODILY INJURY AND/OR PROPERTY DAMAGE.
INSTALLATION INSTRUCTIONS
1. SHUT OFF electricity (electric water heater) or gas supply (gas water heater) to water heater.
2. Shut off inlet cold water supply to the water heater.
3. Open a nearby hot water faucet and leave open to allow draining.
4. Connect a hose (not included) that terminates to an adequate drain to the drain valve and open drain
valve to allow tank draining.
5. Disconnect drain line (if equipped) from the temperature-pressure relief valve.
6. Turning counterclockwise, use an adjustable wrench (not included) to remove the old temperature-
pressure relief valve.
7. Screw the replacement T&P valve (A) into the tank; tighten with an adjustable wrench (not included) to
ensure a watertight seal. (DO NOT OVERTIGHTEN)
8. After making sure the drain valve is closed (turning clockwise), open the cold water inlet valve to the
water heater and allow all trapped air to escape from the open hot water faucet until there is a constant
flow of water for several minutes.
9. Shut off the hot water faucet, then check for leaks and tighten accordingly.
10. Reinstall the T&P drain line. If the temperature & pressure relief valve is not piped to an adequate
drain now (check local codes), pipe the temperature & pressure relief valve to a suitable drain.
Note the discharge pipe:
• Must not be smaller in size than the outlet pipe size of the valve.
• Must not be plugged or blocked.
• Must be a material listed for hot water distribution.
• Must be installed so as to allow complete draining of both the temperature-pressure relief valve and
the discharge pipe.
• Must terminate at an adequate drain.
• Must not have any valve between the relief valve and the tank.
• Must be manually operated at least once a year.
Caution should be taken to ensure (1) no one is in front of or around the outlet of the temperature
& pressure relief valve discharge line, and (2) the water manually discharged will not cause any
property damage.
11. Turn on electric or gas supply to the water heater.
NOTE: For gas water heaters, follow the lighting instructions located next to the gas control valve.
TOOLS NEEDED:
Adjustable Wrench
WARNING: HAZARD OF ELECTRIC SHOCK! Before removing any access panels or servicing the
water heater, make sure the electrical supply to the water heater is turned “OFF”. Failure to do
this could result in DEATH, SERIOUS BODILY INJURY, AND/OR PROPERTY DAMAGE.
WARNING: Before servicing, turn off the gas supply to the water heater. Failure to do so could
result in DEATH, SERIOUS BODILY INJURY, AND/OR PROPERTY DAMAGE.
Cold
Inlet
Hot
Outlet
Tank
CORRECT CORRECT INCORRECT
Cold
Inlet
Hot
Outlet
Cold
Inlet
Hot
Outlet
Tank Tank
6”
6”
ITEM
#
0362341
MODEL #9008076046
ITEM
#
0186669
MODEL #9008082046
Garden Hose
Thread Tape
ADJETIVO EN EN EE.UU.
Pieza
#
321888-000
• Se adapta a cavidades de 1 y 2 pulg. (#0362341)
• Se adapta a cavidades de 3 pulg. o menos (#0186669)
Válvula de descarga de
temperatura y presión universal
ADVERTENCIA: La sonda de detección de la válvula de temperatura y presión se debe extender
en los 15,24 cm superiores del tanque del calentador de agua. Los calentadores de agua tienen
distintas cantidades de aislantes entre el tanque y el recubrimiento. Existen válvulas de temperatura
y presión con varios largos de vástago. Asegúrese de escoger el correcto para su calentador de
agua. No hacerlo podría provocar LA MUERTE, GRAVES LESIONES CORPORALES Y/O DAÑO A LA
PROPIEDAD.
INSTRUCCIONES DE INSTALACIÓN
1. CORTE la electricidad (calentador eléctrico de agua) o el suministro de gas (calentador de agua a gas)
al calentador de agua.
2. Corte el suministro de entrada de agua fría del calentador de agua.
3. Abra un grifo de agua caliente cercano y déjelo abierto para dejar drenar.
4. Conecte una manguera (no incluida) que termine en un drenaje adecuado a la válvula de drenaje y
abra la válvula de drenaje para permitir que el tanque se drene.
5. Desconecte la tubería de drenaje (si está equipada) desde la válvula de descarga de temperatura y
presión.
6. Girando en dirección contraria a las manecillas del reloj, use una llave ajustable (no incluida) para
retirar la válvula de descarga de temperatura y presión antigua.
7. Atornille la válvula de T&P de repuesto (A) en el tanque; apriete con una llave ajustable (no incluida)
para garantizar un sello hermético. (NO APRIETE DEMASIADO)
8. Después de asegurarse de que la válvula de drenaje esté cerrada (girando en dirección de las
manecillas del reloj), abra la válvula de entrada de agua fría del calentador de agua y permita que todo
el aire atrapado se purgue por el grifo de agua caliente abierto hasta que haya un flujo constante de
agua por varios minutos.
9. Cierre el grifo de agua caliente, luego verifique que no haya fugas y apriete según corresponda.
10. Vuelva a instalar la tubería de drenaje de T&P. Si la válvula de descarga de temperatura y presión
no está conectada con ningún drenaje apropiado en este momento (verifique los códigos locales),
conéctela a un drenaje adecuado.
Tenga en consideración que el tubo de descarga:
• No debe ser más pequeño que el tamaño del tubo de salida de la válvula.
• No debe estar obstruido ni bloqueado.
• Debe ser de un material clasicado para la distribución de agua caliente.
• Se debe instalar de modo que permita un drenaje completo tanto de la válvula de descarga de
temperatura y presión como del tubo de descarga.
• Debe terminar en un drenaje apropiado.
• No debe tener ninguna válvula entre la válvula de descarga y el tanque.
• Se debe operar manualmente al menos una vez al año.
Se debe tener cuidado para asegurarse de que (1) no haya nadie enfrente ni alrededor de la salida
de la válvula de descarga de temperatura y presión y (2) que el agua descargada manualmente no
cause ningún daño a la propiedad.
11. Active el suministro eléctrico o de gas del calentador de agua.
NOTA: Para los calentadores de agua a gas, siga las instrucciones
de encendido ubicadas junto a la válvula de control de gas.
HERRAMIENTAS NECESARIAS:
Llave ajustable
ADVERTENCIA: ¡PELIGRO DE DESCARGA ELÉCTRICA! Antes de retirar cualquier panel de
acceso o de realizar servicio al calentador de agua, asegúrese de que se haya apagado el suministro
eléctrico al calentador de agua. No hacerlo podría provocar LA MUERTE, GRAVES LESIONES
CORPORALES Y/O DAÑO A LA PROPIEDAD.
ADVERTENCIA: Antes de realizar servicio, corte el suministro de gas del calentador de agua.
No hacerlo podría provocar LA MUERTE, GRAVES LESIONES CORPORALES Y/O DAÑO A LA
PROPIEDAD.
Entrada De
Agua Fría
Salida
De Agua
Caliente
Tanque
CORRECTO CORRECTO
INCORRECTO
Tanque Tanque
6”
6”
ARTÍCULO
#
0362341
MODELO #9008076046
ARTÍCULO
#
0186669
MODELO #9008082046
Manguera para jardín
Cinta para roscas
Entrada De
Agua Fría
Salida
De Agua
Caliente
Entrada De
Agua Fría
Salida
De Agua
Caliente
-
 1
1

En otros idiomas
Documentos relacionados

Otros documentos
-
GE GE40T10BAM El manual del propietario
-
GE GE40T08BAM01 El manual del propietario
-
STIEBEL ELTRON SHC 2.5 Manual de usuario
-
-
STIEBEL ELTRON SHC 4 Guía de instalación
-
-
GE GE30S10BLM Guía del usuario
-
 GE Appliances GE30T12BLM El manual del propietario
-
Bradford White RE2H65T10 Manual de usuario
