
THANK YOU
to continually create quality products designed to enhance your home. Visit us online to see our full line of products available for your home
improvement needs. Thank you for choosing Hampton Bay!
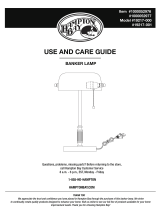
Item #1000052976
#1000052977
Model #19217-000
#19217-001
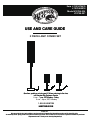
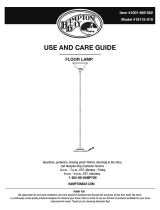
USE AND CARE GUIDE
3 PIECE LAMP COMBO SET
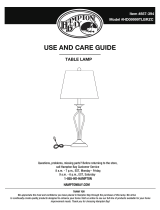
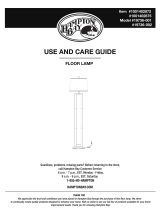
Questions, problems, missing parts? Before returning to the store,
call Hampton Bay Customer Service
8 a.m. - 7 p.m., EST, Monday - Friday
HAMPTONBAY.COM
to continually c
We appreciate the trust and condence you have placed in Hampton Bay through the purchase of this lamp. We striveWe appreciate the trust and condence you have placed in Hampton Bay through the purchase of this lamp. We strive
reate quality products designed to enhance your home. Visit us online to see our full line of products available for your home
improvement needs. Thank you for choosing Hampton Bay!
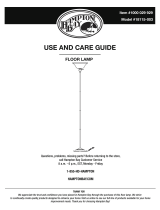
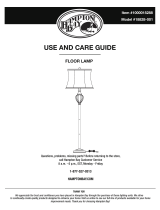
Item # 1001475475
# 1001669918
Model #19795-004
#19795-007
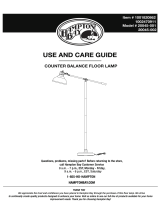
USE AND CARE GUIDE
Questions, problems, missing parts? Before returning to the store,
call Hampton Bay Customer Service
p.m., EST, Monday - Friday,
1-855-HD-HAMPTON
HAMPTONBAY.COM
9 a.m. - 6 p.m., EST, Saturday

Table of Contents
Table of Contents . . . . . . . . . . . . . . . . . . . . . . . . . . . . . . . . . . . 2
Safety Information . . . . . . . . . . . . . . . . . . . . . . . . . . . . . . . . . . 2
Warranty . . . . . . . . . . . . . . . . . . . . . . . . . . . . . . . . . . . . . . . . . . 2
Pre-Assembly . . . . . . . . . . . . . . . . . . . . . . . . . . . . . . . . . . . . . 3
Assembly . . . . . . . . . . . . . . . . . . . . . . . . . . . . . . . . . . . . . . . . 4-5
Care and Cleaning . . . . . . . . . . . . . . . . . . . . . . . . . . . . . . . . . . 6
Safety Information
Warranty
Troubleshooting
. . . . . . . . . . . . . . . . . . . . . . . . . . . . . . . . . . 6 . .
2
ONE YEAR MANUFACTURER WARRANTY
WHAT IS COVERED
The manufacturer warrants this unit to be free from defects in materials and workmanship for a period of one (1) year from date of purchase.
This warranty applies only to the original consumer purchaser and only to products used in normal use and service. If this product is found to be
defective, the manufacturer’s only obligation, and your exclusive remedy, is the repair or replacement of the product at the manufacturer’s
discretion, provided that the product has not been damaged through misuse, abuse, accident, modifications, alterations, neglect, or mishandling.
This warranty shall not apply to any product that is found to have been improperly installed, setup, or used in any way not in accordance with the
instructions supplied with the product. This warranty shall not apply to a failuree of the product as a result of an accident, misuse, abuse,
negligence, alteration, faulty installation, or any other failure not relating to faulty material or workmanship.
This warranty shall not apply to the finish on any portion of the product, such as surface and/or weathering, as this is considered normal wear
and tear.
WHAT IS NOT COVERED
The manufacturer does not warrant and specifically disclaims any warranty, whether express or implied, of fitness for a particular purpose,
other than the warranty contained herein. The manufacturer specifically disclaims any liability and shall not be liable for any consequential
or incidental loss or damage, including but not limited to any labor/ expense costs involved in the replacement or repair of said product.
Contact the Customer Service Team at 1-855-HD-HAMPTON or visit www.hamptonbay.com.
To reduce the risk of electrical shock,
WARNING:
this lamp has a polarized plug (one blade is longer than the
other).
The plug will fit in a polarized outlet only one way.
If the plug still does not fit, contact a qualified electrician.
Never use an extension cord unless the plug can be fully
inserted. Do not alter the plug.
If the plug does not fit fully into the outlet, reverse the plug.
IMPORTANT SAFETY INSTRUCTIONS
WARNING: Do not attempt to replace the bulb while the
lamp is plugged into a wall receptacle.

3
Pre-Assembly
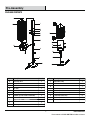
PACKAGE CONTENTS
HAMPTONBAY.COM
Please contact 1-855-HD-HAMPTON for further assistance.
O
Q
P
R
G
M
N
K
L
I
J
A
B
C
D
E
F
H
G
noitpircseDtraP
1A
Floor lamp base
Floor lamp shade
LED bulb (just for model # 19795-007)
Table lamp shade
C
Floor lamp socket assembly
Table lamp socket assembly
Floor lamp socket ring
Table lamp socket ring
Bottom shade frame
1
B
1
Bottom tube
Middle tube
Top tube
D
Table lamp tube
1
1
1
3
1
1
1
1
I
H
G
F
E
Quantity
noitpircseDtraP
1
J
Adjustable clamp
L
Screw
1
K
1
Shade hook
M
Table lamp base
2
2
2
2
2
2
R
S
T
Q
P
O
N
Upper shade frame
Table lamp shade frame
Finial
S
T
Quantity

4
1
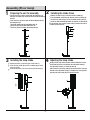
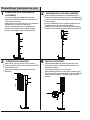
Preparing the unit for assembly
3
4
Adjusting the lamp shade
Installing the lamp shade
Pull out any excess power cord through the lamp base (A)
during all assembly steps to prevent the cord from becoming
twisted.
Place lamp base (A) on the floor and thread bottom tube (B)
onto lamp base (A).
Thread the middle tube (C) onto bottom tube (B).
Thread the top tube (D) onto middle tube (C).
Thread the socket assembly (E) onto top tube (D).
Assembly (Floor lamp)
2
Installing the shade frame
Remove the socket ring (F) from the socket assembly (E).
Remove the finial (J) from the upper shade frame (I)
Gently pull the lamp shade (K) down until the bottome bar of the
shade hook (M) can be inserted onto the adjustable clamp (L).
The adjustable clamp (L) is located on tube (D).
B
C
E
A
D
Place the bottom shade frame (H) onto the socket assembly (E).
Re-attach the socket ring (F) to secure bottom shade frame (H).
Install one 100-watt MAX type A bulb or 23W CFL or LED bulb (G).
Place the two ends of upper shade frame (I) into the two ends of
bottom shade frame (H).
N
M
L
K
Place the lamp shade (K) over the assembled upper shade
frame (I) and (H).
Re-attach the finial (J) to secure the lamp shade frame (K)
Adjust tension on the lamp shade (K) by loosenning the screw (N)
located on the adjustable clamp (L). Retighten the screw (N) after
adjusting the lamp shade (K) to the desired tension.
I
F
H
G
E
J
I
K
H

5
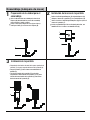
1
Preparing the unit for assembly
3
Installing the lamp shade
Pull out any excess power cord through the lamp base (O)
during all assembly steps to prevent the cord from becoming
twisted.
Place Table lamp base (O) on the floor and thread tube (P)
onto lamp base (O).
Assembly (Table lamp)
2
Installing the shade frame
Remove the socket ring (R) from the socket assembly (Q).
Hook the two metal clasps on the top of the shade (T) to the
top of shade frame (S).
Place the shade frame (T) onto the socket assembly (Q).
Re-attach the socket ring (R) to secure the shade frame (T).
Install one 60-watt MAX type A bulb or 13-watt CFL bulb or
LED bulb (S).
Place the lamp shade (T) over the assembled shade frame (S).
Pull the bottom of the shade (T) down, securing the bottom
ring of the shade (T) to the bottom of the lower shade
frame (S) with the two metal clasps on shade (S).
O
P
T
Q
S
R
S
T

HAMPTONBAY.COM
Please contact 1-855-HD-HAMPTON for further assistance.
6
Care and Cleaning
Clean the unit with a soft, dry cloth.
Do not use any cleaners with chemicals, solvents, or harsh abrasives.
Troubleshooting
Problem
Possible Cause
SOLUTION
The bulb will not light.
The bulb is burned out.
There is an exposed wire.
Replace the light bulb.
The power is off.
Ensure the power supply is on.
The cord is not plugged in.
The circuit breaker is off.
Ensure the cord is plugged into the outlet.
Ensure the circuit breaker is in the ON position.
The fuse or circuit breaker
blows when the light is turned on.
Discontinue use of the lamp.
Unplug the unit from the wall.
Contact a qualified electrician or call the
Customer Service
Solution
Team at 1-855-HD-HAMPTON.

Questions, problems, missing parts? Before returning to the store,
call Hampton Bay Customer Service
8 a.m.-7 p.m., EST, Monday-Friday
1-855-HD-HAMPTON
HAMPTONBAY.COM
Retain this manual for future use.
9 a.m. - 6 p.m., EST, Saturday

GUÍA DE USO Y CUIDADO
Artículos No. 1001475475
1001669918
Modelos No. 19795-004
19795-007
JUEGO COMBINADO DE LÁMPARA CON 3 PIEZAS
1-855-HD-HAMPTON
HAMPTONBAY.COM
GRACIAS
Apreciamos la conanza que ha depositado en Hampton Bay por la compra de estas unidades de iluminación. Nos esforzamos por crear
continuamente productos de calidad diseñados para mejorar su hogar. Visítenos en internet para ver nuestra línea completa de productos
disponibles para sus necesidades de mejorar su hogar. ¡Gracias por elegir a Hampton Bay!
¿Tiene preguntas, problemas o faltan piezas? Antes de regresar a la tienda,
llame a Servicio al Cliente de Hampton Bay
de lunes a viernes de 8 a.m. a 7 p.m.,
sábado de 9 a.m. a 6 p.m., hora local del Este.

Información de seguridad
2
ADVERTENCIA: Para reducir el riesgo de descarga eléctrica,
esta lámpara cuenta con un enchufe polarizado (una pata es
más ancha que la otra). El enchufe polarizado puede insertarse
en una toma de corriente de una sola manera. Si el enchufe no
entra bien en la toma de corriente, inviértalo. Si aún así no entra
alargador si el enchufe no puede insertarse en él por completo.
No altere el enchufe.
INSTRUCCIONES IMPORTANTES DE
SEGURIDAD
ADVERTENCIA: No intente cambiar la bombilla sin antes
desenchufar la lámpara.
Índice
Índice . . . . . . . . . . . . . . . . . . . . . . . . . . . . . . . . . . . . . . . . . . . . 2
Información de seguridad . . . . . . . . . . . . . . . . . . . . . . . . . . . . 2
Garantía. . . . . . . . . . . . . . . . . . . . . . . . . . . . . . . . . . . . . . . . . . . 2
Previo al ensamblaje . . . . . . . . . . . . . . . . . . . . . . . . . . . . . . . 3
Ensamblaje . . . . . . . . . . . . . . . . . . . . . . . . . . . . . . . . . . . . . . . . 4-5
Cuidado y limpieza . . . . . . .
. . . . . . . . . . . . . . . . . . . . . . . . . 6 . .
Resolución de problemas . . . . . . . . . . . . . . . . . . . . . . . . . . . . 6
Garantía
GARANTÍA DE UN AÑO DEL FABRICANTE
QUÉ CUBRE
El fabricante garantiza esta unidad contra defectos de materiales y de mano de obra por un período de un (1) año a contar de la fecha
de compra.
Esta garantía aplica sólo al consumidor comprador original y sólo a productos que han tenido un uso y servicio normal. Si este producto
tiene fallas, la única obligación del fabricante, y el único recurso del consumidor, será la reparación o el reemplazo del producto, a discreción
raciones,
abandono o maltrato. Esta garantía no aplica a ningún producto que haya sido instalado o montado indebidamente, o utilizado de una manera
que no aparezca indicada en las instrucciones que vienen con el producto. Esta garantía no aplicará a un producto cuya falla se deba a accidente,
mal uso, abuso, abandono, alteración, instalación defectuosa o cualquier otra falla que no se relacione con defectos de materiales o de mano de
r los elementos,
ya que esto se considera un desgaste normal.
QUÉ NO CUBRE
para un propósito
ponsable de
cualquier pérdida o daño consiguiente o secundario, que incluya pero no se limite a cualquier costo de mano de obra o gastos incurridos para
reemplazar o reparar el producto en cuestión.
Llame al Equipo de Atención al Cliente al 1-855-HD-HAMPTON o visite www.hamptonbay.com.

3
Pre-ensamblaje
CONTENIDO DEL EMPAQUE
HAMPTONBAY.COM
Por favor llame al 1-855-HD-HAMPTON si requiere mayor
atención.
O
Q
P
R
G
M
N
K
L
I
J
A
B
C
D
E
F
H
G
Pieza
1
A
Base para lámpara de pie
Pantalla de la lámpara de pie
Bombilla LED (modelo # 19795-007)
Pantalla para lámpara de mesa
C
Portalámparas de la lámpara de pie
Portalámparas para lámpara de mesa
Anillo del portalámparas de la lámpara de pie
Anillo del portalámparas para lámpara de mesa
Marco inferior de la pantalla
1
B
1
Tubo inferior
Tubo del medio
Tubo superior
D
Tubo para lámpara de mesa
1
1
1
3
1
1
1
1
I
H
G
F
E
1
J
Abrazadera ajustable
L
Tornillo
1
K
1
Gancho de la pantalla
M
Base para lámpara de mesa
2
2
2
2
2
2
R
S
T
Q
P
O
N
Marco superior de la pantalla
Marco de la pantalla para lámpara de mesa
Florón
S
T
Cantidad
Cantidad
Descripción
DescripciónPieza

B
C
E
A
D
N
M
L
K
4
1
Preparación de la unidad para el
ensamblaje
3
4
Ajuste de la pantalla
Instalación de la pantalla
Jale el cable eléctrico con cuidado por la base de la
lámpara (A) durante todos los pasos del ensamblaje para
evitar que el cable se tuerza.
Coloque la base de la lámpara (A) en el suelo y enrosque el
tubo inferior (B) en la base de la lámpara (A).
Enrosque el tubo del medio (C) en el tubo inferior (B).
Ensamblaje (Lámpara de pie)
2
Instalación del marco de la pantalla
Retire el anillo del portalámparas (F) del portalámparas (E).
Quite el florón (J) del marco superior de la pantalla (I).
Presione cuidadosamente la pantalla (K) hasta que la barra
inferior del gancho de la pantalla (M) pueda insertarse en la
abrazadera ajustable (L).
La abrazadera ajustable (L) está en el tubo (D).
Enrosque el portalámparas (E) en el tubo superior (D).
Enrosque el tubo superior (D) en el tubo del medio (C).
Ponga el marco inferior de la pantalla (H) en el portalámparas (E).
Instale una bombilla tipo A de un máximo de 100 vatios o una
bombilla CFL de 23 vatios o una bombilla LED (G).
Vuelva a instalar el anillo del portalámparas (F) al marco inferior
de la pantalla (H).
Coloque los dos extremos del marco superior de la pantalla (I)
dentro de los dos extremos del marco inferior de la pantalla (H).
Vuelva a poner el florón (J) para ajustar el marco de la
pantalla (K).
Ponga la pantalla (K) sobre el marco superior de la pantalla,
ya ensamblado (I) y (H).
Afloje el tornillo (N) ubicado en la abrazadera ajustable (L) para
ajustar la tensión de la pantalla (K). Vuelva a ajustar el tornillo (N)
luego de ajustar la pantalla de la lámpara (K) con la tensión
deseada.
I
F
H
G
E
J
I
K
H

O
P
5
1
Preparación de la unidad para el
ensamblaje
3
Instalación de la pantalla
Jale el cable eléctrico con cuidado por la base de la
lámpara (O) durante todos los pasos del ensamblaje
para evitar que el cable se tuerza.
Ponga la base para lámpara de mesa (O) en el piso y
enrosque el tubo (P) en la base de la lámpara (O).
Ensamblaje (Lámpara de mesa)
2
Instalación del marco de la pantalla
Retire el anillo del portalámparas (R) del portalámparas (Q).
Enganche los dos bucles de metal de la parte superior de la
pantalla (T) a la parte superior del marco de la pantalla (S).
Coloque el marco de la pantalla (T) en el portalámparas (Q).
Instale una bombilla tipo A de un máximo de 60 vatios, una
bombilla CFL de 13 vatios o una bombilla LED (G).
Vuelva a instalar el anillo del portalámparas (R) para ajustar el
marco de la pantalla (T).
Jale la parte inferior de la pantalla (T) hacia abajo,
asegurando el anillo inferior de la pantalla (T) a la parte
inferior del marco inferior de la pantalla (S) con los dos
bucles de metal de la pantalla (S).
Ponga la pantalla (T) sobre el marco ensamblado de la
pantalla (S).
T
Q
G
R
S
T

6
Cuidado y limpieza
Limpie la unidad con un paño suave y seco.
No utilice limpiadores con químicos, solventes o abrasivos fuertes.
Resolución de problemas
PROBLEM
Causa Posible
Solución
La bombilla no se enciende.
La bombilla se quemó.
Hay un hilo expuesto
No hay corriente.
Cambie la bombilla.
El cable no está enchufado.
El interruptor de circuitos
está apagado.
Verifique que el cable esté enchufado en una
toma de corriente..
Verifique que el interruptor de circuitos
esté encendido.
El fusible está fundido o el
interruptor de circuitos se
dispara cuando se enciende la luz.
Suspenda el uso de la lámpara.
Desenchufe la unidad de la pared.
Comuníquese con un electricista calificado
o llame al Equipo de Servicio al Cliente
al 1-855-HD-HAMPTON.
Verifique que la corriente esté dada.
Problema
HAMPTONBAY.COM
Por favor llame al 1-855-HD-HAMPTON si requiere mayor
atención.

1-855-HD-HAMPTON
Conserve este manual para uso futuro.
¿Tiene preguntas, problemas o faltan piezas? Antes de regresar a la tienda,
llame a Servicio al Cliente de Hampton Bay
de lunes a viernes de 8 a.m. a 7 p.m.,
sábado de 9 a.m. a 6 p.m., hora local del Este.
HAMPTONBAY.COM
-
 1
1
-
 2
2
-
 3
3
-
 4
4
-
 5
5
-
 6
6
-
 7
7
-
 8
8
-
 9
9
-
 10
10
-
 11
11
-
 12
12
-
 13
13
-
 14
14


Hampton Bay 19217-001 Instrucciones de operación
- Tipo
- Instrucciones de operación
- Este manual también es adecuado para
en otros idiomas
Artículos relacionados
-
 Hampton Bay 18115-010 Guía de instalación
-
 Alsy 20045-001 Instrucciones de operación
-
 Hampton Bay HD09999FRBRZC Instrucciones de operación
-
 Hampton Bay HD09999TLBRZC Instrucciones de operación
-
 Hampton Bay 19736-001 Instrucciones de operación
-
 Hampton Bay 19217-000 Instrucciones de operación
-
 Hampton Bay 18115-003 Guía de instalación
-
 Hampton Bay 19712-000 Instrucciones de operación
-
 Hampton Bay 18824-001 Instrucciones de operación
-
 Hampton Bay 18828-001 Instrucciones de operación


