
Gabinete de pared para almacenamiento
instrucciones de ensamble
WoodCrafters Home Products, LLC
2700 Camino de Verdad
Weslaco, TX 78596
1.800.235.7747
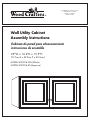
Wall Utility Cabinet
Assembly Instructions
MODEL WU2916-WH (White)
MODEL WU2916-ES (Espresso)
®
29"W x 16.6"D x 15.9"H
73.7cm A x 42.2cm P x 40.3cm L

Before you begin
1. Check for damaged or missing parts. (see hardware and components).
2. To help prevent damage during assembly the carton can be unfolded and used as the assembly surface.
3. Gather all tools necessary prior to assembly.
4. Read the instructions before you begin assembly to familiarize yourself with the parts.
5. Follow all manufacturer’s instructions on tools used.
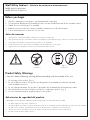
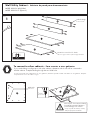
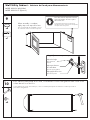
1. Do not hang on this product. (Fig.1)
2. Do not modify this product. This product was designed to be assembled in the manner indicated
in the assembly instructions.
3. Do not substitute hardware. This product is designed to be assembled with the hardware provided.
4. The wall and floor must be structurally soun
d prior to installing the product. (Fig. 2)
5. Do not exceed the maximum weight limitations of this product.
1. No debe colgarse de este producto. (Ilustración 1)
2. No debe modificar este producto. El diseño del producto exige que se ensamble de la manera indicada en las instrucciones de ensamble.
3. No debe sustituir el herraje. Se ha diseñado este producto de manera que se ensamble con el herraje incluido.
4. Tanto el muro como el suelo deben estar en buen estado estructural antes de instalar el producto. (Ilustración 2)
5. No debe exceder los límites máximos de peso.
Antes de comenzar
1. Revise para ver si hay piezas dañadas o faltantes (vea el herraje y componentes).
2. Para ayudar a prevenir que ocurran daños durante el ensamblado, puede desdoblar la caja y usarla como superficie para ensamblar.
3. Junte todas las herramientas necesarias antes de proceder con el ensamblado.
4. Lea las instrucciones antes de comenzar el ensamblado a fin de familiarizarse con las piezas.
5. Siga las instrucciones de fábrica en cuanto a cuales herramientas deben de usarse.
!
Product Safety Warnings
Fig. 1
Ilustración 1
Advertencias de seguridad del producto
Fig. 2
Ilustración 2
• You must read the following warnings before proceeding with the assembly of this unit.
• Usted debe leer las siguientes advertencias antes de proceder con el armado de esta unidad.
MODEL WU2916-WH (White)
MODEL WU2916-ES (Espresso)
Wall Utility Cabinet - Gabinete de pared para almacenamiento

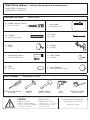
HARDWARE INCLUDED Herraje incluido
TOOLS REQUIRED Herramientas necesarias
CAUTION PRECAUCIÓN
DO NOT exceed the
maximum weight limitations.
Doing so can result in damage,
serious injury or death.
30 lbs (13.6 kg.)
Individual Shelf Load Capacity
Capacidad de carga individual
Hammer
Martillo
Drill
Taladro
Phillips Screw Driver
Desarmador
Rubber Mallet
Martillo de Goma
8 - Double Locking Screws
8 - Tornillos de llave
16 - Dowels
16 - Espigas de madera
4 - Door Bumpers
4 - Amortiguadores de puerta
22 - Nails
22 - Clavos
8 - Caps
8 - Cubiertas
4 - Hinges
4 - Bisagras
4 - Nail Glides
4 - Tachuelas
2 - Connecting Screws
2 - Tornillos de Conección
2 - Knobs
2 - Perillas
Measuring Tape
Cinta de medir
NO DEBE exceder lo límites
maximos de peso. Si los ignora,
pueden haber daños, lesiones
graves, o la muerte.
1 - Door Label
1 - Etiqueta de Puerta
MODEL WU2916-WH (White)
MODEL WU2916-ES (Espresso)
Wall Utility Cabinet - Gabinete de pared para almacenamiento

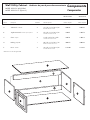
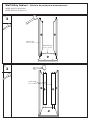
Components
Componentes
WU2916-WH WU2916-ES
Item Description Quantitiy Piece Size Part Number Part Number
Artículo Descripción Cantidad Tamaño de pieza Número de parte Número de parte
D Backing - Respaldo 1 100373 10038928 7/8" x 15 3/4" x 1/8"
C Cleat -
Soporte 2 140781 1408194 1/4" x 27 3/4" x 5/8"
B Top/Bottom Panels -
Panel superior/inferior 2 120471 12057827 3/4" x 15 3/4" x 5/8"
A Side Panels
- Laterales 2 220685 22072615 7/8" x 15 3/4" x 5/8"
40.3cm x 40cm x 1.6cm
70.5cm x 39.9cm x 1.6 cm
10.7cm x 70.5cm x 1.6cm
40cm x 73.4cm x .25 - .3cm
36.5cm x 40cm x 1.6cm
E
*Dimensions in inches are approximate.
Doors - Puertas 2 14 3/8" x 15 3/4" x 5/8" 516680 516683
MODEL WU2916-WH (White)
MODEL WU2916-ES (Espresso)
Wall Utility Cabinet - Gabinete de pared para almacenamiento

1
Step
Paso
Unfinished Edge
Borde sin acabado
Blind Holes
Perforaciones
MODEL WU2916-WH (White)
MODEL WU2916-ES (Espresso)
Wall Utility Cabinet - Gabinete de pared para almacenamiento
Do NOT use outer holes for dowels.
NO use los agujeros externos para las espigas de madera.
Coloque un pedazo de madera (no incluído)
debajo del panel para evitar dañarlo.
Place a piece of wood (not included)
beneath the board when drilling to
prevent damage to the surface.
If you are building a configuration with other cabinets, determine which side will be connected to
another cabinet. Complete drilling through the two blind holes.
Si está construyendo una configuración con otros gabinetes, determine qué lado estarán conectados con otro gabinete. Complete
las perforaciones en los dos orificios ciegos.
To connect to other cabinets - Para conectar a otros gabinetes
5
⁄16" bit
Broca de 8mm
11mm
7
⁄16"

2
Step
Paso
3
Step
Paso
Unfinished edge
Borde sin acabado
Finished edge
Borde con acabado
Finished edge
Borde con acabado
MODEL WU2916-WH (White)
MODEL WU2916-ES (Espresso)
Wall Utility Cabinet - Gabinete de pared para almacenamiento

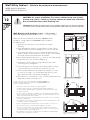
4
Step
Paso
5
Step
Paso
E
MODEL WU2916-WH (White)
MODEL WU2916-ES (Espresso)
Wall Utility Cabinet - Gabinete de pared para almacenamiento
Unfinished Side
Lado sin acabado
E
Unfinished Side
Lado sin acabado
x8
x22
Screw in four double locking
screws on each side panel A.
Atornille quatro tornillos de conección
en cada panel A.
4"
Center backing D over cabinet and
place a nail in each corner.
Distribute remaining 18 nails
around edges.
Centre el respaldo D sobre el gabinete y
coloque un clavo en cada esquina.
Distribuya 18 clavos restantes alrededor de
los bordes.

3
⁄16" bit
Broca de 5mm
Place a piece of wood
(not included) on the
outside of the door when
drilling knob holes to
prevent damage to
the surface.
Coloque un pedazo de madera
(no incluido) en la parte exterior
de la puerta para evitar dañarla
cuando perforando los orificios
para la parilla .
6
Step
Paso
7
Step
Paso
8
Step
Paso
MODEL WU2916-WH (White)
MODEL WU2916-ES (Espresso)
Wall Utility Cabinet - Gabinete de pared para almacenamiento
Rotate cabinet and
repeat with second door.
Voltee el gabinete y repita
los pasos anteriores con la
otra puerta.
Place a door E, aligning hinge plates with holes and tightening screws.
Coloque una puerta E, alineando las placas de las bisagras con los orificios apriéte los tornillos.
x4
x4
Hinges lock in place.
Do not remove from
door once installed.
Las bisagras entran a
presión. No remueva la
bisagra de la puerta una
vez instalada.
x1
Note: The knob can be installed in the
blind hole on either the top or the
bottom of the door.
Nota: La perilla puede ser instalada en el orificio
preperforado en la parte superior o inferior de
la puerta.
IMPORTANT — IMPORTANTE

9
Step
Paso
10
Step
Paso
When assembly is complete,
apply caps over exposed screws.
Una vez terminado de ensamblar, coloque
las cubiertas sobre los tornillos expuestos.
If this cabinet will be placed at floor level, use a hammer to insert a nail glide into each corner of the
surface that will sit on the floor.
Si este gabinete va a estar al nivel del piso, utilice un martillo para aplicar las tachuelas en cada esquina de la
parte inferior del gabinete.
MODEL WU2916-WH (White)
MODEL WU2916-ES (Espresso)
Wall Utility Cabinet - Gabinete de Pared para Almacenamiento
x8
x1
x4
Door label includes important customer
service information. Be sure to place
label inside door.
La etiqueta para la puerta incluye información
importante de servicio al cliente. Favor de aplicarla
en la parte interior de la puerta.
Hinge Adjustment —
Ajuste de Bisagras
Adjust gaps between doors
Adjust space between
door and cabinet
Adjust door height
Ajuste entre las puertas
Ajuste entre puerta y gabinete
Ajuste de altura de
la puerta

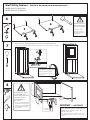
Direct Wall Mounting Installation | Instalación para montar directo a la pared
11
Step
Paso
This cabinet includes two cleats for installation.
1. Determine the exact area on the wall
where the cabinet(s) will hang.
2. Locate and mark two studs for single
cabinet or three studs for adjacent
cabinets.
3. If you are going to connect this cabinet to
tower or double stacked base units, draw
a level line at 72" from the floor. This
will mark the height at which this unit
should be installed.
4. Mark the location of the studs on the
cleats inside cabinet and drill holes.
5. For single cabinet, center on the two
studs and attach with four
3
⁄16" screws
(not included) per stud. (Diagram 1)
If hanging a second cabinet, attach it to
the wall with four
3
⁄16" screws per stud
next to the first unit and join them using
connecting screws.
(Diagram 2)
Este gabinete incluye 2 soportes para su instalación.
1. Determine el area exacta en donde va a colgar el
(los) gabinete(s).
2. Localice y marque la ubicación de dos barrotes para
instalación de un gabinete o tres barrotes para
instalación de dos gabinetes adyacentes.
3. Si va a conectar este gabinete a un gabinete torre o
dos gabinetes de base apilados, dibuje una línea
recta a 72” del piso. Esto marcará la altura a la
cual cada gabinete debe de ser instalado.
4. Marque la ubicación de los barrotes en los soportes
dentro del gabinete y perfore.
5. Si va a colocar solo un gabinete, céntrelo entre los
dos barrotes y sujételo a la pared con quatro
tornillos de
3
⁄16" (no incluidos) por barrote.
(Diagrama 1)
SI va a colocar un segundo gabinete, sujételo a la
pared al lado de la primera unidad y únalos
utilizando los tornillos de conección. (Diagrama 2)
DIAGRAM 1
Diagrama 1
72"
MODEL WU2916-WH (White)
MODEL WU2916-ES (Espresso)
Wall Utility Cabinet - Gabinete de pared para almacenamiento
DIAGRAM 2: Adjacent cabinets
Diagrama 2: Gabinetes adyacentes

Wall Mounting with brackets (530717 — sold separately) |
Para montar al pared con soportes metálicos (530717 — se vende por separado)
12
Step
Paso
When it needs to be extended from the wall, 2 brackets will be
needed for a single cabinet and 3 brackets will be needed for
two adjacent units.
1. Determine the exact area on the wall where the cabinet
will hang.
2. Locate and mark two studs for a single cabinets or three for two
adjacent cabinets. Each bracket MUST be secured to a wall stud.
3. If connecting this cabinet to tower or double stacked based units,
draw a level line on the wall at 72
1
⁄
8
" from the floor. This will mark
the height at which each bracket must be installed.
4. Mount each bracket by driving six
3
⁄
16
" screws (not included) through
the bracket’s holes into each stud. (Diagram 3)
5. If attaching to another wall unit, align cabinets and join with
connecting screws. (Diagram 2)
6. Insert cabinet(s) into the opening of the brackets. When inserting
connected wall units, two people are required for this step.
7. Position and fix cabinet(s) to
the brackets by driving four screw
s
(
3
⁄
16
" dia. x
5
⁄
8
" length — not included) through the holes in the
upper and lower arms of the bracket. (Diagram 4)
8. If the cabinet is to be attached to tower or double stacked base units,
align and join with connecting screws.
Cuando es necesario que se separe de la pared, 2 soportes metálicos son
necesarios para la instalación de un gabinete y 3 soportes metálicos para
instalar dos unidades adyacentes.
1. Determine el área exacta en donde va a colgar el gabinete.
2. Localice y marque la ubicación de dos barrotespara instalar un gabinete o
tres barrotes para instalar dos gabinetes adyacentes. Cada soporte metálico debe
ser fijado a un barrote.
3. Si va a conectar este gabinete a un gabinete torre o dos gabinetes de base apilados,
dibuje una línea recta en
la pared a 72
1
⁄
8
” del piso. Esto marcara la altura a la cual
cada soporte metálico debe de ser instalado.
4. Monte cada soporte metálico a la pared utilizando seis tornillos de
3
⁄
16
" (no incluidos)
por barrote. (Diagrama 3)
5. Si el gabinete va a ser unido a otra unidad de pared, alinee ambos gabinetes y únalos
con tornillos de conección. (Diagrama 2)
6. Inserte el (los) gabinete(s) en la abertura de los soportes metálicos. Se require dos
personas para este paso si está insertando dos gabinetes conectados.
7. Posicione y sujete el gabinete a los soportes metálicos utilizando cuatro tornillos
(
3
⁄
16
” dia. x
5
⁄
8
” largo — no incluídos) a travez de los agujeros en los brazos superior
e inferior del soporte metálico. (Diagrama 4)
8. Si el gabinete va a ser unido a un gabinete torre o dos gabinetes de base apilados,
alinee y únalos con tornillos de conección.
MODEL WU2916-WH (White)
MODEL WU2916-ES (Espresso)
Wall Utility Cabinet - Gabinete de pared para almacenamiento
DIAGRAM 2: Adjacent cabinets
Diagrama 2: Gabinetes adyacentes
Diagram 3: Bracket installation
Diagrama 3: Para instalar los soportes metálicos
72
1
⁄8"
Diagram 4: Cabinet Mounting
Diagrama 4: Para montar el gabinete
2 Brackets
3 Brackets
CAUTION: For proper installation, first secure cabinet to top arm of each
bracket with screws. Follow by securing cabinet to bottom arm of bracket.
Use all available holes when attaching unit.
PRECAUCIÓN: Para instalar correctamente, primero sujete el gabinete al brazo superior de cada soporte metálico
con tornillos; proceda a sujetarlo al brazo inferior del soporte metálico. Utilize todas los perforaciones disponibles.

For Customer Assistance | Para servicio al cliente | Hablamos español
Call: 1.800.235.7747
E-mail: customerservice@woodcrafters-tx.com
Care & Maintenance:
To clean surface of door or cabinet, use non-abrasive cleansers only.
Cuidado y Mantenimiento:
Utilicen sólo limpiadores no-abrasivas para limpiar la superficie.
Limited Lifetime Warranty
The product has been manufactured by WoodCrafters Home Products, LLC and is warranted under normal use and
service, to be free from defects in material and workmanship for the life of the product from the date purchased.
During this warranty period, WoodCrafters Home Products, LLC will repair or replace at WoodCrafters Home
Products, LLC sole option, free of charge, any defective part or parts returned with shipping charges prepaid to the
distribution center listed below. Please include the original receipt with date of purchase and the nature of the
problem. Merchandise not returned prepaid will be refused. Our warranty does not cover damage or failure
caused by abuse, misuse, abnormal usage, faulty installation, improper maintenance or any repair other than those
by WoodCrafters Home Products, LLC. There are no obligations or liabilities on the part of WoodCrafters Home
Products, LLC for consequential damage arising out of or in connection with the use or performance of the product
or any indirect damages included, but not limited to labor charges for installation or removal. This warranty gives
you specific legal rights, and you may also have other rights that may vary from state to state. Further information
regarding this warranty may be obtained without charge by contacting WoodCrafters Home Products, LLC
Customer Service. If any parts are missing or damaged, please call WoodCrafters Home Products, LLC Customer
Service at 800.235.7747, between 8:00 AM and 5:00 PM C.S.T.
Garantia Limitada
El producto ha sido fabricado por WoodCrafters Home Products LLC y tiene garantía, bajo uso y servicio normales, lo que garantiza al
producto por defectos de materiales y fabricación. Durante este periodo, WoodCrafters Home Products LLC reparará o reemplazará, bajo
su propio costo, cualquier parte o partes defectuosas, que sean enviadas con gastos de envío pagados, al centro de distribución que se
enlista al final de este párrafo. Favor de incluir el recibo original de compra, que indique la fecha de compra y la causa del problema. No
se recibirá mercancía enviada por cobrar. Nuestra garantía no cubre daños, por el uso inapropiado o abuso que le den al producto, así
como ningún cargo de instalación. Esta garantía tiene específicos derechos legales, así como los derechos que lleguen a cambiar de
estado a estado. Si faltará alguna parte o estuviera dañada, favor de llamar al Centro de Atención al Cliente, al número de teléfono sin
costo, dentro de los Estado Unidos de América, 800.235.7747, en el horario de 8:00 AM a 5:00 PM Tiempo del Centro. Para mayor
información relacionada a esta garantía, favor de comunicarse al Centro de Atención al Cliente.
WoodCrafters Home Products, LLC
2700 Camino de Verdad, Weslaco, TX 78596-1266
551212
MODEL WU2916-WH (White)
MODEL WU2916-ES (Espresso)
Wall Utility Cabinet - Gabinete de pared para almacenamiento
-
 1
1
-
 2
2
-
 3
3
-
 4
4
-
 5
5
-
 6
6
-
 7
7
-
 8
8
-
 9
9
-
 10
10
-
 11
11
-
 12
12


Ready Kitchen RKWC15COM-WH Guía de instalación
- Tipo
- Guía de instalación
- Este manual también es adecuado para
en otros idiomas
Otros documentos
-
Hampton Bay BT9704T-WH Guía de instalación
-
Hampton Bay BT2736L-RC Guía de instalación
-
Unbranded CM1835D-DK Guía de instalación
-
Hampton Bay CM2435B-DK Guía de instalación
-
Glacier Bay TC1576-WH Instrucciones de operación
-
St. Paul AU60P2V10-GP Guía de instalación
-
Domani GB18P2-WH Guía de instalación
-
-
Glacier Bay DR54P3V8-PG Guía de instalación
-
 Pac Trim 3868PMDFSL10PK Instrucciones de operación
