
C6S (93170AW)
C6R (93171AW)
C6TS (93172AW)
C6TR (93173AW)
C6PS (93174AW)
C6PR (93175AW)
C6HTS (93176AW)
C6HTR (93177AW)
Xpelair Simply Silent
Contour
™
EnglishNederlandsFrançais
Español
Installation and Maintenance Instructions
Installatie - en Onderhoudsinstructies
Instructions d’installation et d’entretien
Istruzioni per installazione e manutenzione
Instrucciones de instalación y mantenimiento


• Doreadtheentireinstructionleaetbeforecommencinginstallation.
• Doinstalleachfanwithameansfordisconnectioninallpolesinthexedwiring.
• Domakesurethemainssupplyisswitchedobeforeattemptingtomakeelectrical
connectionsorcarryoutanymaintenanceorcleaning.
• Pleaseleavethisleaetwiththefanforthebenetoftheuser.
Standard
C6S (93170AW)
C6R (93171AW)
Timer
C6TS (93172AW)
C6TR (93173AW)
PullCord
C6PS (93174AW)
C6PR (93175AW)
Humidistat,Timer
C6HTS (93176AW)
C6HTR (93177AW)
Installation and Maintenance Instructions
English

Thisapplianceisintendedfor
connectiontoxedwiring.Checkthat
theelectricalratingshownoneach
fanmatchesthemainssupply.
THE APPLIANCE IS DOUBLE INSULATED
AND DOES NOT REQUIRE AN EARTH
CONNECTION.
Allinstallationsmustbesupervisedbya
qualiedelectrician.Installationsandwiringmust
conformtocurrentIEERegulations(UK),localor
appropriateregulations(othercountries).
This appliance can be used
by children aged from 8 years
and above and persons with
reduced physical, sensory
capabilities or lack of
experience and knowledge
if they have been given
supervision or instruction
concerning the use of the
appliance in a safe way and
understand the hazards
involved. Children shall not
play with the appliance.
Cleaning and maintenance
of the appliance shall not be
made by children.
AllXpelairSimplySilentTMContour
ACfanshavethefollowingfeatures:
• Twospeedextraction
(Selectableatinstallation)
• Built-inbackdraughtshutter
C6S/C6R - Operatethefanusinganon/o
switch(notsupplied).
C6PS/C6PR - Operatethefanusinganintegral
pull-cord.
C6TS/C6TR* - Built-intimeroperatesfanfora
presetdelayfrom30secondsto30minutes.
C6HTS/C6HTR* - Operateswhentriggered
automaticallybytheintegralhumiditysensor,orby
usinganexternalon/oswitch(notsupplied).
In automatic mode: thebuilt-intimer
automaticallyoperatesthefanforapre-set
delaytimefrom30secondsto30minutes
oncehumiditydropsbelowthepre-setRelative
Humidity(RH)value.
External operation:Whenswitchedousingthe
externalon/oswitchthefancontinuestorunfor
thepresetdelayfrom30secondsto30minutes.
* Factory settings: Timer15minutes,RH75%
Where to locate the fan.
• Locateitashighaspossible.
• Atleast110mmfromtheedgesof
themountingsurfacetothecentre
ofthehole.
• Asfarawayaspossiblefromandoppositeto
themainsourceofairreplacementtoensure
airowacrosstheroom(e.g.oppositethe
internaldoorway).
• Nearthesourceofsteamorodours.
•Notwhereambienttemperatures
are likely to exceed 50°C.
•Ifinstalledinakitchenfansmust
not be mounted immediately above
a cooker hob, or eye level grill.
• Ifinstallinginaroomcontainingafuel
burning device which has a non-balanced
flue, it is the installer’s responsibility to
ensure that there is enough replacement air
to prevent fumes being drawn down the flue
when the fan is operating up to maximum
extract. Refer to Building Regulations for
specific requirements.
• Exhaustairmustnotbedischargedinto
a flue used for exhausting of fumes from
appliances supplied with energy other than
electric. Requirements of all authorities
concerned must be observed for exhaust air
discharge and intake flow rates.
• Notsuitableforuseinpossiblechemical
corrosive atmospheres.
What the installer will need.
•3mmelectrician’sscrewdriver
andNo.1or2Pozidrive
screwdrivers.
If wall mounting the fan, you will also need:
• A150mmdiameterpreparedhole.
• AnappropriateexternalWallGrilleand
Ø150mmwallsleeveduct.KitRef91233AW.
If ceiling mounting the fan, you will also need:
• A150mmdiameterpreparedhole.
• Appropriateancillariesfortermination.These
itemsareavailablefromXpelair:
• 3mexibleductingRef:89665AA.Iftheduct
passesthroughacoldspaceuseinsulated
ductref:91461AA.
English

Back plate
fixing positions
Wall tube
quick fit clamps
A B
Front Cover Removal
IMPORTANT – PLEASE READ
Adjusting the humidity setting
Adjusting the run on timer setting
C D
Overall Dimensions (mm)
QUICKFIT
CLAMP
DEPRESSCOVERLATCH
WITHTOOL&REMOVE
COVER&BAFFLECOMPLETE
Fanswitcheson
atlowerlevelof
condensation
(anti-clockwise)
MORESENTITIVE
(RH=50%)
Fanrunsonfora
shortertimewhen
theexternalswitch
isturnedo
Fandoesnot
switchonuntil
higherlevelof
condensation
(clockwise)
LESSSENTITIVE
(RH=95%)
Fanrunsonfora
longertimewhen
theexternalswitch
isturnedo
Factory settings:
Timer15minutes,RH75%
Maximum30minutesMinimum30seconds
English

+
-
+
-
+
-
Wiring and setting up
E
SEEDETAILA
SEEDETAILB
SEEDETAILD
SEEDETAILC
SEEDETAILE
LOW
SPEED
LOW
SPEED
LOW
SPEED
HIGH
HIGH
HIGH
HIGH
HIGH
HIGH
LOW
LOW
LOW
LOW
LOW
LOW
H.M.
TIMER
HIGH
SPEED
HIGH
SPEED
HIGH
SPEED
DETAIL A
SCALE 2.000
DETAIL C
SCALE 2.000
DETAIL E
SCALE 2.000
DETAIL B
SCALE 2.000
DETAIL D
SCALE 2.000
C6S / C6R
C6PS / C6PR
C6TS / C6TR
C6HTS / C6HTR
CUSTOMER
CONNECTION
TERMINAL
CUSTOMER
CONNECTION
TERMINAL
CUSTOMER
CONNECTION
TERMINAL
TIMER
English

Installing the isolating switch
and cables.
Ameansfordisconnectioninallpoles
mustbeincorporatedinthexedwiring
inaccordancewithwiringregulations
• Ifmetalswitchboxesareused,earthing
regulations must be followed.
• Thecross-sectionalareaofthesupplycord
usedshouldberangedfrom1-1.5mm².
• C6S/C6R/C6PS/C6PR–2core,C6TS/
C6TR/C6HTS/C6HTR–3core.
• C6TS/C6TR/C6HTS/C6HTR.Awallor
ceilingOn/Oswitch(withindicatorlight)is
recommended
1.Checkthattheelectricalratingshowninside
theback-platematchesyourmainssupply.
2.Checktherearenoburiedpipesorcables
e.g.electricity,gas,waterbehindtheswitch
location(inthewallorabovetheceiling).Ifin
doubt,seekprofessionaladvice.
3.Isolatethemainssupply.
4.Layinthecablefromtheisolatingswitch
tothefanlocationviatheon/oswitch(if
required).
5.Layinthecablefromtheisolatingswitchto
thepointofconnectiontothemainssupply.
Warning: Do not make any
connections to the electrical supply
at this stage.
6. Installtheisolatingswitch
andon/oswitch(ifrequired).
7.Makeallconnectionswithintheisolating
switchandtheon/oswitch(ifrequired).
Wet Rooms: On/Off switch must
be situated so that it cannot be
touched by persons making use of
the bath or shower.
For Australia Only – C6S /C6R / C6PS / C6PR
Connectiontothesupplycanbemadebya
exible2-corecablecompletewith3pinplug
forinsertionintoanapproved10AGPOor
directlywiredthroughanapproved10Awall
mountedsurfaceswitchwithatleast3mm
clearancebetweencontacts.
For Australia Only – C6TS / C6TR / C6HTS / C6HTR
Thesemodelsarepermanentlyconnectedtothe
supplyandoperationiscontrolledbyaremote
switch.Theyshouldbedirectlywiredtothe
supplythroughanapproved10Awallmounted
surfaceswitchwithatleast3mmclearance
betweencontacts.
Preparing the Fan for installation.
1. Removethefrontcover/baeassemblyby
depressingthelatchontheundersideofthe
coverandpullingothefrontcover/bae
fromthebottom(SeeFigureC).
If working above ground floor
level, safety precautions must be
observed.
Mark the position of the back-plate
2. Holdtheback-platesothatthelevelline
markedonitisorientatedhorizontally.
3. Carefullyinsertthefantubeintothewall
duct.
4. Markonthewallthepositionsofthexing
holesintheback-plate.
5. Removethebackplatefromtheducting.
6. Drillscrewholesinthesepositionsif
necessary,andtwallplugsandscrewsas
required.Thefanmayalsobexedtoawall
tubeusingtheclampingbrackets.See9
below.
If installing in a ceiling, appropriate
termination ancillaries are required.
Follow instructions provided.
Mount the back-plate.
7. Feedthemainscablethroughthecable
entryholeinthebackplatetotheterminals.
8. Insertthefantubeoftheback-plateintothe
wallduct/ceilingasbefore.
9. Fastentheback-platetothewall/ceiling
usingappropriatefasteners.SeegureA.
10. Ifusingscrews,donotovertighten.Thefan
mayalsobexedtoawalltubeusingthe
clampingbrackets.Tightenthescrewsuntil
thefanisrmlysecuredtothetube–see
gureB.
Wire the electrical connections.
11. Makesurethemainssupplyisisolated.
Switchothemainselectricalsupplyand
removefuses.
12. Feedthecabletotheterminalblock.Wire
thefanasshowninFigureFusingthe
diagramappropriatetothefanmodel.
13. Connectthecablefromtheisolatingswitch
totheelectricalsupplywiring.
English

Fan Settings
SPEED SETTING
Thefansarefactorysettolowspeed,buthave
twospeedsettingsfordierentapplications.
Selecteitherhighorlowspeedbyconnecting
thejumperbetweenthecentreandhighorlow
speedpinonthejumper(seeFigureE)
C6TS / C6TR Only.
• Toadjusttheover-runperiodturnthecontrol
(T)clockwisetoincreaseandanti-clockwise
todecrease–seeFigureD.
C6HTS /C6HTR Only – see figures D and E.
• Thepre-sethumidityoperationisfactoryset
atapproximately75%RelativeHumidity(RH),
butcanbeadjustedbetween65%and85%
RHbycontrolH.
• Theover-runtimerisfactorysetat15minutes
butcanbeadjustedfrom30secondsto30
minutesbycontrolT.
• TurnthecontrolsclockwisetoincreaseRHor
timeandanti-clockwisetodecrease.
Using the fan
C6S / C6R Only
• Operatethefanusingtheon/oswitch(not
supplied).Repeattoswitcho.
C6PS / C6PR Only
• Operatethefanbypullingandreleasingthe
cord.Repeattoswitcho.
C6TS /C6TR Only
• Operatethefanusinganon/oswitch(not
supplied).Whentheswitchisturnedo,
thefancontinuestooperateforthesettime
delay.Toadjusttheover-runperiod,turnthe
control“T”clockwisetoincreaseandanti-
clockwisetodecrease–seeFigureF.
C6HTS /C6HTR Only.
• Automatic mode-Thefanautomatically
adjusts
toslow
changesinnaturalhumidity
levelswithoutoperatingthefan.Ifthehumidity
levelsincreaseatarateslowerthan5%RH
in5minutes,uptothepre-sethumiditylevel,
thefanwillnotbetriggeredbyhumidity.This
istopreventnuisancetriggeringofthefan.If
humiditylevelsincreasequickerthan5%RH
in5minutesthefanwilloperate.Whenrelative
humiditydropsthefancontinuestooperatefor
theadjustabletimedelay.
• External operation-Usetheexternalon/o
switch.Whenthefanisswitchedo,thefan
continuestooperatefortheadjustabletime
delaythengoesintoautomaticmode.
All Fans
Re-tthefrontcover/baeassemblybyhooking
inthetoprst,andthenswingthecoverdown
toclipintoplace.
English
C6S/C6R
C6PS/C6PR
C6TS/C6TR
C6HTS/C6HTR
F
FAN
TERMINALS
FAN
TERMINALS
DOUBLEPOLE
ISOLATINGSWITCH
DOUBLEPOLE
ISOLATINGSWITCH
ON/OFF
SWITCH
LAMP
(IFREQUIRED)
FUSE
FUSE
•Forxedwiringcircuitstheprotectivefusefortheappliancemustnotexceed5A.
•TerminalEcanbeusedasaparkingterminalforanearthwire(ifrequired)

Cleaning
(recommendedonceamonth)
1.Beforecleaning,isolatethefancompletely
fromthemainssupply.
2.Removethefrontcover/baeassemblyby
depressingthelatchontheundersideofthe
coverandpullingothefrontcover/bae
fromthebottom.
3.Tocleanthefrontcover/baeassembly,
eitherwipeitwithadamp,lintfreeclothor
washitwithwarmsoapywater.Thoroughly
drythefrontcoverandret.
4.Donotimmersethefaninwaterorother
liquidstocleananyotherpartsofthefan.
5.Donotusestrongdetergents,solventsor
chemicalcleaners
6.Allowfantodrythoroughlybeforeuse.
7.Apartfromcleaning,noothermaintenanceis
required.
Disposal
Thisproductshouldnotbedisposed
ofwithhouseholdwaste.
Pleaserecyclewherefacilitiesexist.
Checkwithyourlocalauthorityfor
recyclingadvice.
Guarantee
UK only
We,RedringXpelairGroupLimited,providea
guaranteeagainstfaultypartsandmanufacture
foraperiodof2yearsfromthedateof
purchase.Intheunlikelyeventofaproduct
breakdownduringtheguaranteeperiodthe
productshouldbereturnedtotheplaceof
purchaseortoRedringXpelairGroupLimited.
Exclusions
• Thisguaranteedoesnotcovercompensation
forthelossoftheproductorconsequential
lossofanykind.
• Damageordefectstotheproductarising
fromincorrectinstallationorlackof
maintenance.
• Transportationcosts.
This guarantee does not affect your
statutory rights
Technical advice
and service
Customers outside UK -
see international below.
United Kingdom
Xpelairhaveacomprehensiverangeofservices
including:
• Freetechnicaladvicehelp-deskfrom
Engineersonallaspectsofventilation.
• Freedesignservice,quotationsandsite
surveys.
• Serviceandmaintenancecontractstosuitall
requirements.
Pleaseaskfordetails:
• BytelephoneonTechline:
+44(0)8443727766
• ByfaxonTechfax:+44(0)8443727767
• Attheaddressbelow
Head Office, UK Sales Office and Spares
RedringXpelairGroupLtd,
NewcombeHouse,NewcombeWay,
OrtonSouthgate,Peterborough,
PE26SEEngland
Telephone:+44(0)8443727761
Fax:+44(0)8443727762
Sales/SparesHotline:+44(0)8443727750
Sales/SparesFaxline:+44(0)8443727760
www.xpelair.co.uk
International.
• Guarantee:Contactyourlocaldistributoror
Xpelairdirectfordetails.
• TechnicalAdviceandService:Contactyour
localXpelairdistributor.
English

• Leeshetheleinstructieboekjevoordatumetdeinstallatiebegint.
• Installeerelkeventilatormeteenwerktuigomallepolenindevastebedradinglos
tekoppelen.
• Zorgervoordatdenetvoedingisuitgeschakeldvoordatuprobeertelektrische
verbindingentemakenofonderhoudofreiniginguittevoeren.
• Bewaarditboekjebijdeventilatortenbehoevevandegebruiker.
Standaard
C6S (93170AW)
C6R (93171AW)
Timer
C6TS (93172AW)
C6TR (93173AW)
Trekaanhetsnoer
C6PS (93174AW)
C6PR (93175AW)
Hygrostaat,Timer
C6HTS (93176AW)
C6HTR (93177AW)
Installatie - en Onderhoudsinstructies
Nederlands

Ditapparaatisbedoeldvoor
aansluitingopeenvastebedrading.
Controleerofdeelektrische
classicatieopelkeventilator
overeenkomtmetdenetvoeding.
HET APPARAAT IS DUBBEL GEÏSOLEERD
EN VEREIST GEEN AARDE-AANSLUITING
Alleinstallatiesmoetenondertoezichtstaan
vaneengekwaliceerdeelektricien.Installaties
enbedradingenmoetenvoldoenaanvan
toepassingzijndevoorschriften.
Dit apparaat kan worden
gebruikt door kinderen van
8 jaar en ouder en door
personen met verminderde
fysieke, zintuiglijke vermogens
of gebrek aan ervaring en
kennis, als ze onder toezicht
staan of instructies hebben
gekregen betreffende het
gebruik van het apparaat op
een veilige manier en ze de
betreffende gevaren begrijpen.
Kinderen mogen niet spelen
met het apparaat.
Reiniging en onderhoud van
het apparaat mogen niet door
kinderen worden gedaan.
AlleXpelairSimplySilentTMContour
ACventilatorenhebbendevolgende
kenmerken:
• Tweesnelhedenvanafzuiging
(Selecteerbaarbijdeinstallatie)
• Ingebouwdeterugslagklep
C6S/C6R - Bediendeventilatormetbehulp
vaneenaan/uit-schakelaar(nietbijgeleverd).
C6PS/C6PR - Bediendeventilatormetbehulp
vaneenintegraaltrekkoord.
C6TS/C6TR* - Deingebouwdetimerlaat
deventilatorwerkengedurendeeenvooraf
ingesteldeuitsteltijdvan30secondentot30
minuten.
C6HTS/C6HTR* - Werktwanneer
automatischgeactiveerddoordeintegrale
vochtigheidssensorofdoorgebruiktemaken
vaneenexterneaan/uit-schakelaar(niet
bijgeleverd).
In de automatische modus: deingebouwde
timerlaatdeventilatorautomatischwerken
gedurendeeenvoorafingesteldeuitsteltijd
van30secondentot30minutenzodra
devochtigheiddaalttotonderdevooraf
ingesteldewaardevoordeRelatieve
Vochtigheid(RV).
Externe bediening:Indienuitgeschakeldmet
behulpvandeexterneaan/uit-schakelaar,
blijftdeventilatordraaiengedurendedevooraf
ingesteldeuitsteltijdvan30secondentot30
minuten.
* Fabrieksinstellingen: Timer15minuten,RV75%
Waar moet de ventilator geplaatst
worden.
• Plaatshemzohoogmogelijk.
• Tenminste110mmvanafde
hoekenvanhetinstallatie-oppervlaktothet
middenvanhetgat.
• Zovermogelijkwegentegenoverde
hoofdbronvanluchtvervangingomeen
luchtstroomdoorderuimtetegaranderen
(bijv.tegenoverdebinnendeur).
• Dichtbijdebronvanstoomofgeurtjes.
• Nietwaarkansisdat
omgevingstemperaturen boven
de 50°C komen.
• Indiengeïnstalleerdineen
keuken, moeten ventilatoren niet direct
boven een kookplaat of een grill op
ooghoogte bevestigd worden.
• Alshijgeïnstalleerdwordtineenruimte
die een branstofverbrandingsapparaat
bevat dat geen gebalanceerde schoorsteen
heeft, is het de verantwoordelijkheid van
de installateur om te garanderen dat er
voldoende vervangende lucht is om te
voorkomen dat rook uit de schoorsteen
wordt getrokken wanneer de ventilator op
maximale afzuiging werkt. Raadpleeg de
Bouwvoorschriften voor specifieke vereisten.
• Uitgeblazenluchtmagnietworden
ontladen in een schoorsteen die wordt
gebruikt voor het uitblazen van rook
van apparaten die worden voorzien
van energie anders dan elektrische. De
vereisten van alle betreffende autoriteiten
moeten worden bekeken voor uitgeblazen
luchtafvoer en innamestroomsnelheden.
• Nietgeschiktvoorgebruikinmogelijk
chemisch corrosieve atmosfeer.
Nederlands

Bevestigingsposities
achterplaat
Wandbuis
quick-fit klemmen
A B
Verwijderen van het
frontpaneel
BELANGRIJK - GELIEVE TE LEZEN
AANpassen van de vochtigheidsinstelling
Aanpassen van de instelling van de inschakeltimer
C D
Totale afmetingen (mm)
QUICK-FIT
KLEM
DRUKOPDEHENDELVANHET
PANEELMETGEREEDSCHAP
&VERWIJDERHETDEKSEL&
SCHERMHELEMAAL
Deventilatorwordt
ingeschakeldbijeen
lagerniveauvan
condensatie(tegen
deklokin)
GEVOELIGER
(RV=50%)
Deventilatordraait
korterwanneerde
externeschakelaar
isuitgeschakeld
Deventilatorwordt
nietingeschakeld
toteenhogerniveau
vancondensatie
(metdeklokmee)
MINDERGEVOELIG
(RV=95%)
Deventilatordraait
langerwanneerde
externeschakelaar
isuitgeschakeld
Fabrieksinstellingen:
Timer15minuten,RV75%
Maximaal30minutenMinimaal30seconden
Nederlands

+
-
+
-
+
-
Bedrading en opzetten
E
ZIEDETAILA
ZIEDETAILB
ZIEDETAILD
ZIEDETAILC
ZIEDETAILE
LAGE
SNELHEID
LAGE
SNELHEID
LAGE
SNELHEID
HOOG
HOOG
HOOG
HOOG
HOOG
HOOG
LAAG
LAAG
LAAG
LAAG
LAAG
LAAG
H.M.
TIMER
HOGE
SNELHEID
HOGE
SNELHEID
HOGE
SNELHEID
DETAIL A
SCHAAL 2.000
DETAIL C
SCHAAL 2.000
DETAIL E
SCHAAL 2.000
DETAIL B
SCHAAL 2.000
DETAIL D
SCHAAL 2.000
C6S/C6R
C6PS/C6PR
C6TS/C6TR
C6HTS/C6HTR
KLANT
AANSLUITKLEM
KLANT
AANSLUITKLEM
KLANT
AANSLUITKLEM
TIMER
Nederlands

Wat de installateur nodig zal hebben.
• Een3mm
elektriciteitsschroevendraaier
enNr.1en2Pozidrive
schroevendraaiers.
Als de ventilator aan een wand wordt
gemonteerd, heeft u ook nodig:
• Eenvoorgeboordgatmeteendiametervan
150mm.
• EengeschiktexternWandroosterenronde
wandbuismeteenØvan150mm.KitRef
91233AW.
Als de ventilator aan het plafond wordt
gemonteerd, heeft u ook nodig:
• Eenvoorgeboordgatmeteendiametervan
150mm.
• Geschiktehulpmiddelenomaftesluiten.
DezeitemszijnverkrijgbaarbijXpelair:
• 3mexibelebuisRef:89665AAAlsde
buisdooreenkouderuimtegaat,gebruikdan
geïsoleerdebuisref:91461AA
Installeren van de isolerende
schakelaar en kabels.
Eenhulpmiddelvoorontkoppeling
inallepolenmoetworden
ingebouwdindevastebedrading
overeenkomstigbedradingsvoorschriften
• Alsmetalenschakelkastenworden
gebruikt, moeten de voorschriften voor
aarding worden gevolgd.
• Dedoorsnedevanhetgebruikte
voedingssnoermoetliggentussen1-1,5mm².
• C6S/C6R/C6PS/C6PR–2kernen,C6TS
/C6TR/C6HTS/C6HTR–3kernen.
• C6TS/C6TR/C6HTS/C6HTR.EenAan/
Uit-schakelaaropwandofplafond(met
indicatorlampje)wordtaanbevolen
1.Controleerofdeelektrischeclassicatiedie
staatbinnenindeachterplaatovereenkomt
metuwnetvoeding.
2.Controleerofergeenverborgenleidingen
ofkabels,bijv.voorelektriciteit,gas,water,
achterdeplaatsvoordeschakelaarzitten(in
dewandofbovenhetplafond).Alsutwijfelt,
vraagdanprofessioneeladvies.
3.Isoleerdenetvoeding.
4.Plaatsindekabelvanafdeisolerende
schakelaarnaardeplaatsvandeventilator
viadeaan/uit-schakelaar(indiennodig).
5.Plaatsindekabelvanafdeisolerende
schakelaarnaarhetverbindingspuntnaarde
netvoeding.
Waarschuwing: Maak in dit
stadium geen verbinding met de
elektrische voeding.
6.Installeerdeisolerendeschakelaarende
aan/uit-schakelaar(indiennodig).
7.Maakalleverbindingenindeisolerende
schakelaarendeaan/uit-schakelaar(indien
nodig).
Natte ruimtes: Aan/Uit-schakelaar
moet zo geplaatst worden dat hij
niet kan worden aangeraakt door
personen die gebruik maken van
het bad of de douche.
Voorbereiden van de ventilator voor
installatie.
1. Verwijderhetfrontpaneel/
roosterassemblagedooropdehendelaan
deonderkantvanhetpaneeltedrukkenen
hetfrontpaneel/roostervanafdebodem
eruittetrekken(ZieFiguurC).
Als u boven vloerniveau werkt,
moeten veiligheidsmaatregelen in
acht genomen worden.
Markeer de positie van de
achterplaat
2. Houddeachterplaatzodatdestellijn
dieeropgemarkeerdis,horizontaal
georiënteerdis.
3. Schuifdeventilatorbuisvoorzichtiginhet
wandkanaal.
4. Markeeropdewanddepositiesvande
bevestigingsgatenindeachterplaat.
5. Verwijderdeachterplaatvandekanalen.
6. Boorschroefgatenopdezeposities,
indiennodig,enplaatserwandpluggenen
schroeveninzoalsnodig.Deventilatorkan
ookwordenbevestigdopeenwandbuis
metbehulpvanklemhaken.Zie9
hieronder.
Als hij in een plafond wordt
geïnstalleerd,zijngeschikte
eindhulpstukken vereist. Volg de
bijgeleverde instucties.
Monteer de achterplaat.
7. Leiddevoedingskabeldoorhet
kabelinvoergatindeachterplaatnaarde
aansluitklemmen.
8. Plaatsdeventilatorbuisvandeachterplaat
inhetwandkanaal/plafondzoalshiervoor.
9. Zetdeachterplaatvastopdewand/
hetplafondmetbehulpvangeschikte
bevestigingsmiddelen.ZieFiguurA.
Nederlands

10.Alsschroevenwordengebruikt,draaize
danniettevastaan.Deventilatorkanook
wordenbevestigdopeenwandbuismet
behulpvanklemhaken..Draaideschroeven
vasttotdatdeventilatorstevigisgezekerd
opdebuis-zieFiguurB.
Bedrading van de elektrische aansluitingen.
11.Zorgdatdenetvoedinggeïsoleerdis.
Schakeldeelektrischenetvoedinguiten
verwijderzekeringen.
12.Leiddekabelnaarhetklemmenblok.
Bedraaddeventilatorzoalsgetoondin
FiguurFmetbehulppvanhetschemadat
hoortbijhetventilatormodel.
13.Verbinddekabelvandeisolerendeschakelaar
metdeelektrischevoedingsdraad.
Ventilator Instellingen
SNELHEID INSTELLING
Deventilatorenzijnindefabriekingesteld
oplagesnelheid,maarzehebbentwee
snelheidsinstellingenvoorverschillende
toepassingen.Selecteerofwelhogeoflage
snelheiddoordejumpertussendemidden-of
hogeoflagesnelheidspinopdejumperaante
sluiten(zieFiguurE)
Alleen C6TS / C6TR.
• Omdeperiodevantelangdraaienaante
passen,draaituderegelknop(T)metdeklok
meeomdezeteverhogenentegendeklok
inomteverlagen-zieFiguurD.
Alleen C6HTS /C6HTR – zie Figuur D en E.
• Devoorafingesteldevochtigheidswerkingisin
defabriekingesteldopongeveer75%Relatieve
Vochtigheid(RV),maarkanworfdenaangepast
tussen65%en85%RVmetregelknopH.
• Detimervoorovermatigdraaienisinde
fabriek
ingesteldop15minuten,maarkan
wordenaangepastvan30secondentot30
minutenmetregelknopT.
• Draaideregelknoppenmetdeklokmeerom
RVoftijdteverhogenentegendeklokinom
zeteverlagen.
Gebruiken van
de ventilator
Alleen C6S / C6R
• Bediendeventilatormetbehulpvandeaan/
uit-schakelaar(nietbijgeleverd).Herhaalom
uitteschakelen.
Nederlands
VENTILATOR
AANSLUITKLEMMEN
ZEKERING
C6S/C6R
C6PS/C6PR
F
DUBBELEPOOL
ISOLERENDESCHAKELAAR
•Voorvastebedradingscircuitsmagdebeschermendezekeringvoorhet
apparaat niet hoger zijn dan 5A.
•KlemEkanwordengebruiktalseengereserveerdeklemvooreenaarddraad(indiennodig)
VENTILATOR
AANSLUITKLEMMEN
AAN/UIT-
SCHAKELAAR
LAMP
(INDIENNODIG)
ZEKERING
C6TS/C6TR
C6HTS/C6HTR
DUBBELEPOOL
ISOLERENDESCHAKELAAR

Alleen C6PS / C6PR
• Bediendeventilatordooraanhetkoordte
trekkenenweerlostelaten.Herhaalomuit
teschakelen.
Alleen C6TS /C6TR
• Bediendeventilatormetbehulpvaneenaan/
uit-schakelaar(nietbijgeleverd).Wanneer
deschakelaaruituitgeschakeld,blijftde
ventilatorgedurendedeingesteldeuitsteltijd
werken.Omdeperiodevoorlangerdraaien
aantepassen,draaituderegelknop“T”met
deklokmeeomdezeteverhogenentegen
deklokinomteverlagen-zieFiguurF.
Alleen C6HTS /C6HTR.
• Automatische modus-Deventilator
pastzichautomatischaanlangzame
veranderingenindenatuurlijke
vochtigheidsniveauszonderdeventilator
tebedienen.Alsdevochtigheidsniveaus
toenemenmeteensnelheidlagerdan5%
RVin5minuten,tothetvoorafingestelde
vochtigheidsniveau,zaldeventilatorniet
doorvochtigheidgeactiveerdworden.Dit
isomhinderlijkactiverenvandeventilator
tevoorkomen.Alsdevochtigheidsniveaus
snellertoenemendan5%RVin5minuten,
zaldeventilatorgaanwerkenWanneerde
relatievevochtigheiddaalt,blijftdeventilator
werkengedurendedeinstelbareuitsteltijd.
• Externe bediening-Gebruikdeexterne
aan/uit-schakelaar.Wanneerdeventilator
wordtuitgeschakeld,blijftdeventilator
werkengedurendedeinstelbareuitsteltijden
gaatdaarnaoverindeautomatischemodus.
Alle ventilatoren
Herplaatshetfrontpaneel/roosterassemblage
dooreerstdebovenkantvasttehakenen
daarnahetpaneelomlaagtedraaienomhem
opzijnplaatsteklikken.
Reinigen
(eenkeerpermaandaanbevolen)
1.Vóórhetreinigenhaaltudeventilator
helemaallosvandenetvoeding.
2.Verwijderhetfrontpaneel/roosterassemblage
doortedrukkenopdehendelaande
onderkantvanhetpaneelenhetfrontpaneel
/roosterervanafdeonderkantuittetrekken.
3.Omhetfrontpaneel/roosterassemblagete
reinigen,veegtudezeafmeteenvochtige,
pluisvrijedoekofuwastzemetwarm
zeepsop.Drooghetfrontpaneelgrondigen
plaatsterug.
4.Dompeldeventilatornietinwaterofandere
vloeistoenomonderdelenvandeventilator
tereinigen.
5.Gebruikgeensterkeschoonmaakmiddelen,
oplosmiddelenofchemische
reinigingsmiddelen.
6.Laatdeventilatorgrondigdrogenvóór
gebruik.
7.Naasthetreinigenisgeenanderonderhoud
nodig.
Verwijdering
Ditproductmagnietverwijderd
wordenmethethuishoudelijkafval.
Recycleeralsdezefaciliteiten
bestaan.
Vraagnabijuwlokaleoverheid
voorrecycleeradvies.
Technisch advies
en service
Internationaal.
• Garantie:Neemcontactopmetuwlokale
distributeurofdirectmetXpelairvoordetails.
• TechnischAdviesenService:Neemcontact
opmetuwlokaleXpelairdistributeur.
Nederlands

• Lireentièrementlanoticed'utilisationavantdeprocéderàl'installation.
• Installerchaqueventilateuravecundispositifdedéconnexionsurtouslespôlesducâblage
xe.
• S’assurerquel'alimentationélectriqueestcoupéeavanttoutbranchementélectriqueoutoute
opérationd'entretienouencoredenettoyage.
• Prièredeconservercettenoticeavecleventilateurpourquel'utilisateurpuisses'yréférerulté-
rieurement.
Standard
C6S (93170AW)
C6R (93171AW)
Minuteur
C6TS (93172AW)
C6TR (93173AW)
Câbledetraction
C6PS (93174AW)
C6PR (93175AW)
Humidistat,Minuteur
C6HTS (93176AW)
C6HTR (93177AW)
Instructions d'installation et d'entretien
Français

Cetappareilestdestinéau
branchementsurcâblagexe.Vérier
quelescaractéristiquesélectriques
achéessurchaqueventilateur
correspondentàcellesduréseauélectrique.
IL S'AGIT D'UN APPAREIL À DOUBLE
ISOLATION QUI NE REQUIERT PAS DE
CONNEXION DE MISE A LA TERRE.
Touteslesinstallationsdoiventêtresupervisées
parunélectricienqualié.Lesinstallationset
lecâblagedoiventêtreconformesauxnormes
envigueur.
Cet appareil peut être utilisé
par les enfants âgés de 8 ans
et plus et par des personnes
souffrant de déficiences
physiques ou sensorielles ou
encore par des personnes
sans aucune expérience ni
connaissances si ces derniers
sont assistés ou reçoivent
des instructions relatives à
l'utilisation de cet appareil en
toute sécurité et comprennent
les risques encourus. Il est
interdit aux enfants de jouer
avec cet appareil.
Le nettoyage et l'entretien de
l'appareil ne doivent pas être
effectués par les enfants.
TouslesventilateursXpelairSimply
SilentTMContourACpossèdentles
caractéristiquessuivantes:
• Extractiondeuxvitesses(à
sélectionnerlorsdel'installation)
•Obturateurdecourantd'airintégré
C6S/C6R - Fairefonctionnerleventilateuren
utilisantl'interrupteurMarche/Arrêt(nonfourni).
C6PS/C6PR - Fairefonctionnerleventilateurà
l'aided'uncâbledetractionintégral.
C6TS/C6TR* - Leminuteurintégréfait
fonctionnerleventilateuravecundécalagepré-
régléde30secondesà30minutes.
C6HTS/C6HTR* - fonctionneunefois
déclenchéautomatiquementparlecapteur
d'humiditéintégralouàl'aided'uninterrupteur
Marche/Arrêt(nonfourni).
En mode automatique : leminuteurautomatique
intégréfaitfonctionnerleventilateuravecun
décalagepré-réglécomprisentre30secondeset
30minutesunefoisquel'humiditévaendeçàde
lavaleurd'humiditérelative(RH)pré-réglée
Fonctionnement externe :Lorsqu'ilestéteint
àl'aidedel'interrupteurexterneMarche/Arrêt
leventilateurcontinuedefonctionneravecun
décalagepré-réglécomprisentre30secondes
et30minutes.
* Réglages d'usine : Minuteur15minutes,RH
75%
Emplacement du ventilateur.
• Leplacerleplushautpossible.
• Àunedistanceminimalede
110mmentrelesextrémitésdela
surfacedemontageetlecentre
dutrou.
• Aussiloinquepossibledeetenfacedela
principalesourcederenouvellementd'air
pourassurerlacirculationdel'airdansla
pièce(exempleenfacedel'entréeinterne).
• Prèsdelasourcedevapeuroud'odeurs
• Pasàdesendroitsoùles
températures ambiantes sont
susceptibles d'être supérieures à
50°C.
• Siinstallésdansunecuisine,les
ventilateurs ne doivent pas être fixés
directement au-dessus d'une table de
cuisson, ou d'un four à hauteur des yeux.
• S'ilestinstallédansunepiècecontenant
un appareil à combustion possédant un
conduit déséquilibré, l'installateur doit
s'assurer que le renouvellement d'air est
suffisant afin d'éviter que les fumées ne
descendent vers le conduit lorsque le
ventilateur fonctionne à plein régime. Se
référer aux normes de construction pour
les exigences spécifiques.
• L'airévacuénedoitpaspasserpar
un conduit utilisé pour l'évacuation de
fumées issues d'appareils fonctionnant
avec une énergie autre que l'énergie
électrique. Les exigences de toutes
les autorités concernées doivent être
respectées en ce qui concerne les débits
d'évacuation et d'amenée d'air.
• Nedoitpasêtreutilisédansdepotentiels
milieux à corrosion chimique.
Français

Positions de fixation
delaplaquearrière
Conduit mural
Colliers de serrage rapide
A B
Retrait du couvercle avant
IMPORTANT – BIEN VOULOIR LIRE
Réglage de l'humidité
Réglage du fonctionnement du minuteur
C D
Dimensions générales (mm)
COLLIERDE
SERRAGE
RAPIDE
RABATTRELELOQUETAVEC
L'OUTILETENLEVERL'ENSEMBLE
COUVERCLEETDÉFLECTEUR
Leventilateursemet
enmarcheàunfaible
niveaudecondensa-
tion(danslesens
inversedesaiguilles
d'unemontre)
PLUSSENSIBLE
(RH=50%)
Leventilateurfonc-
tionnependantune
périodedetemps
pluscourtelorsque
l'interrupteurexterne
estàl'arrêt.
Leventilateurnese
metpasenmarche
tantqu'unniveaude
condensationplus
élevésoitatteint(dans
lesensdesaiguilles
d'unemontre)
MOINSSENSIBLE
(RH=95%)
Leventilateur
fonctionneplus
longtempslorsque
l'interrupteurexterne
estàl'arrêt
Réglages d'usine :
Minuterie15minutes,RH75%
Maximum30minutesMinimum30secondes
Français

+
-
+
-
+
-
Câblage et installation
E
VOIRSCHÉMAA
VOIRSCHÉMAB
VOIRSCHÉMAD
VOIRSCHÉMAC
VOIRSCHÉMAE
VITESSE
RÉDUITE
VITESSE
RÉDUITE
VITESSE
RÉDUITE
HAUTE
HAUTE
HAUTE
HAUTE
HAUTE
HAUTE
BASSE
BASSE
BASSE
BASSE
BASSE
BASSE
H.M.
MINUTEUR
GRANDE
VITESSE
GRANDE
VITESSE
GRANDE
VITESSE
SCHÉMA A
ÉCHELLE 2 000
SCHÉMA C
ÉCHELLE 2 000
SCHÉMA E
ÉCHELLE 2 000
SCHÉMA B
ÉCHELLE 2 000
SCHÉMA D
ÉCHELLE 2 000
C6S / C6R
C6PS / C6PR
C6TS / C6TR
C6HTS / C6HTR
BORNEDE
RACCORDEMENT
DUCLIENT
BORNEDE
RACCORDEMENT
DUCLIENT
BORNEDE
RACCORDEMENT
DUCLIENT
MINUTEUR
Français

Le nécessaire de l’installateur.
• untournevisd’électriciende
3mmetdestournevispozidriv
N°1ou2.
Si le ventilateur est fixé sur un mur, ce qui
suit est nécessaire :
• untroupréparéde150mmdediamètre.
• unegrillemuraleextérieureetunegainede
manchonmuralde150mmdediamètre.Kit
Réf91233AW.
Si le ventilateur est monté au niveau
du plafond, ce qui suit est également
nécessaire :
• untroupréparéde150mmdediamètre.
• desaccessoiresdenitionappropriés.Ces
élémentssontdisponibleschezXpelair;
• gaineexiblede3mRéf:89665AA.Sila
gainepasseàtraversunespacefroid,utiliser
unegaineisoléeréf:91461AA.
Installation de l'interrupteur
d'isolement et des câbles.
Undispositifdedéconnexionde
touslespôlesdoitêtreincorporéau
câblagexeconformémentaux
normesdecâblage
• Sidescoffretsd'interrupteurmétalliques
sont utilisés, les normes de mise à la terre
doivent être respectées.
• Lapartietransversaleducâble
d'alimentationutilisédoitvarierde1à
1,5mm².
• C6S/C6R/C6PS/C6PR–core2,C6TS/
C6TR/C6HTS/C6HTR–core3.
• C6TS/C6TR/C6HTS/C6HTR.Un
interrupteurMarche/Arrêtmuralou
deplafond(avecsignallumineux)est
recommandé.
1.Vérierquelescaractéristiquesélectriques
achéessurlaplaquearrièrecorrespondent
àvotrealimentationélectrique.
2.Vérierqu'iln'yaaucuneconduiteou
câblesouterraintelqu'uncâbleélectrique,
degazouuneconduited'eau,derrière
l'emplacementdel'interrupteur(danslemur
ouau-dessusduplafond).Encasdedoute,
seréféreràunprofessionnel.
3.Isolerl'alimentationélectrique.
4.Insérerlecâbledepuisl'interrupteur
d'isolementjusqu'àl'emplacementdu
ventilateurenpassantparl'interrupteur
Marche/Arrêt(sinécessaire).
5.Insérerlecâbledepuisl'interrupteur
d'isolementjusqu'aupointderaccordement
àl'alimentationélectrique.
Attention : À ce niveau,
n'effectuer aucun branchement à
l'alimentation électrique.
6.Installerl'interrupteurd'isolementet
l'interrupteurMarche/Arrêt(sinécessaire).
7.Eectuertouslesraccordementsdans
l'interrupteurd'isolementetl'interrupteur
Marche/Arrêt(sinécessaire).
Pièceshumides:L'interrupteur
Marche/Arrêt doit être placé de
tellemanièrequ'ilnepuisseêtre
touché par les utilisateurs de la
baignoire ou de la douche.
Préparation du ventilateur à l'installation.
1. Retirerl'ensemblecouvercleavant/
déecteurenrabattantleloquetsurla
partieinférieureducouvercleetentirant
l'ensemblecouvercle/déecteurparlebas
(voirImageC)
Si le travail s'effectue au-dessus
du niveau du sol, des mesures de
sécurité doivent être prises.
Marquerlapositiondelaplaquearrière
2. Maintenirlaplaquearrièredetellesorte
quelalignederéférencequiyestmarquée
soithorizontale.
3. Insérersoigneusementleconduitdu
ventilateurdanslagainemurale.
4. Indiquersurlemurlespositionsdestrous
dexationdanslaplaquearrière.
5. Retirerlaplaquearrièredelagaine.
6. Fairedestrousdevissagedansces
positionssinécessaireetinsérerdes
chevillesetdesvisadaptéesausupport
muraltelquerequis.Leventilateurpeut
égalementêtrexéàunconduitmural
grâceàdescolliersdeserrage.Voirpoint9
ci-dessous.
Si l'installation se fait sur un
plafond, des accessoires de finition
appropriés sont nécessaires. Suivre
les instructions fournies.
Fixerlaplaquearrière.
7. Alimenterlesprincipauxcâblesàtravers
l'oriced'entréeducâbledanslaplaque
arrièrejusqu'auxbornes.
8. Insérerleconduitduventilateurdela
plaquearrièredanslagainemurale/de
plafondcommeprécédemment.
9. Fixerlaplaquearrièreaumur/plafondà
l'aidedexationsappropriées.VoirImageA
Français

10.Encasd’utilisationdevis,nepastroples
serrer.Leventilateurpeutégalementêtre
xéàunconduitmuralgrâceàdescolliers
deserrage.Serrerlesvisjusqu’àcequele
ventilateurtiennefermementetensécurité
surleconduit-voirimageB.
Raccorder les connexions électriques.
11.S’assurerquel’alimentationélectriqueest
isolée.Couperl’alimentationélectrique
secteuretenleverlesfusibles.
12.Alimenterlecâblejusqu’aubornier.
Raccorderleventilateurtelqueprésenté
surleSchémaFenutilisantlediagramme
appropriéaumodèledeventilateur.
13.Raccorderlecâbledepuisl’interrupteur
d’isolementjusqu’aubranchementde
l’alimentationélectrique.
Réglage du
ventilateur
REGLAGE DE VITESSE
Àl'usine,lesventilateurssontréglésà
unevitesseréduite,maisilspossèdent
deuxréglagesdevitessepourdiérentes
applications.Sélectionnerlagrandevitesse
oulavitesseréduiteenconnectantle
commutateurentrelecentreetlabrocheà
grandeouàfaiblevitessesurlecommutateur
(voirSchémaE)
C6TS / C6TR Uniquement.
• Pourréglerlapériodedefonctionnement,
tournerlacommande(T)danslesensdes
aiguillesd'unemontreandel'augmenter
etdanslesensinverseausensdesaiguilles
d'unemontrepourlaréduire–voirschémaD.
C6HTS /C6HTR Uniquement – voir schémas
D et E.
• Lemodehumideestpré-régléàl'usine
àenviron75%d'humiditérelative(HR),
maispeutêtrerégléàunehumiditérelative
compriseentre65%et85%avecla
commandeH.
• Lefonctionnementduminuteurestréglé
à15minutesàl'usinemaispeutêtreréglé
de30secondesà30minutesavecla
commandeT.
• Tournerlescommandesdanslesensdes
aiguillesd'unemontrepouraugmenterlaRH
ouletempsetdanslesensinverseausens
desaiguillesd'unemontrepourlesréduire.
Français
C6S/C6R
C6PS/C6PR
C6TS/C6TR
C6HTS/C6HTR
VENTILATEUR
BORNES
VENTILATEUR
BORNES
BIPOLAIRE
INTERRUPTEURD'ISOLEMENT
BIPOLAIRE
INTERRUPTEURD'ISOLEMENT
INTERRUPTEUR
MARCHE/ARRÊT
LAMPE
(SINÉCESSAIRE)
FUSIBLE
FUSIBLE
F
•Pourlescircuitsderaccordementxes,l'intensitédufusibledeprotectionde
l'appareil ne doit pas dépasser 5A.
•L’extrémitéEpeutêtreutiliséecommepointd’attachepouruncâbledemiseàlaterre.

Utilisation du
ventilateur
C6S / C6R Uniquement
• Mettreleventilateurenmarcheenutilisant
l'interrupteurMarche/Arrêt(nonfourni).
Procéderdelamêmemanièrepourlamiseà
l'arrêt.
C6PS / C6PR Uniquement
• Mettreleventilateurenmarcheentirantet
enrelâchantlecâble.Procéderdelamême
manièrepourlamiseàl'arrêt.
C6TS /C6TR Uniquement
• Fairefonctionnerleventilateurenutilisant
l'interrupteurMarche/Arrêt(nonfourni)
Lorsquel'interrupteurestàl'arrêt,le
ventilateurcontinuedefonctionnerpendant
letempsdedécalagedéterminé.Pourrégler
letempsdefonctionnement,tournerla
commande«T»danslesensdesaiguilles
d'unemontrepourl'augmenteretdansle
sensinverseausensdesaiguillesd'une
montrepourleréduire–voirSchémaF.
C6HTS /C6HTR Uniquement.
• Mode automatique-Leventilateurserègle
automatiquementauxlentesvariations
desniveauxnaturelsd'humiditésansfaire
fonctionnerleventilateur.Silesniveaux
d'humiditéaugmententàuntauxinférieur
à5%deRHen5minutes,jusqu'auniveau
d'humiditépré-réglé,leventilateurnesera
pasdéclenchéparl'humidité.Cecipermet
d'éviterledéclenchementperturbateur
duventilateur.Silesniveauxd'humidité
augmententplusvitequeletauxde5%de
RHen5minutesleventilateursemettraen
marche.Lorsquel'humiditérelativebaisse,le
ventilateurcontinuedefonctionnerpendant
letempsdedécalageréglable.
• Fonctionnement externe-Utiliser
l'interrupteurMarche/Arrêt.Lorsquele
ventilateurestmisàl'arrêt,ilcontinuede
fonctionnerpendantletempsdedécalage
réglablepuisvireenmodeautomatique.
Tous les ventilateurs
Remonterl'ensemblecouvercleavant/
déecteurenaccrochantpremièrementla
partiesupérieure,puisenfaisantpivoterle
couvercleverslebaspourleremettreenplace.
Nettoyage
(recommandéunefoisparmois)
1.Avantlenettoyage,isolercomplètementle
ventilateurdel’alimentationélectrique.
2.Retirerl’ensemblecouvercleavant/déecteur
enrabattantleloquetsurlapartieinférieure
ducouvercleetentirantsurl’ensemble
couvercleavant/déecteurparlebas.
3.Pournettoyerl’ensemblecouvercleavant/
déecteur,l’essuyeravecunchionnon
pelucheuxhumideoulelaveravecdel’eau
chaudesavonneuse.Séchersoigneusement
lecouvercleavantetleremettreenplace.
4.Nepasimmergerleventilateurdansdel’eau
oudansd’autresliquidespournettoyer
d’autrescomposantsduventilateur.
5.N’utilisernidétergents,solvantsou
nettoyantschimiquesagressifs
6.Laisserleventilateurséchercomplètement
avantutilisation.
7.Outrelenettoyage,aucunautreentretien
n’estrequis.
Évacuation
Ceproduitnedoitpasêtrejeté
aveclesorduresménagères.
Prièredelerecycleroùdes
servicesexistent.
Serapprocherdevotreautorité
localepourrecevoirdesconseils
surlerecyclage.
Équipe et service
technique
International.
• Garantie:Contactervotredistributeur
localouXpelairdirectementpourtoute
information.
• Équipeetservicetechniques:Contacter
votredistributeurXpelair.
Français

• Leggerel'interomanualediistruzioneprimadiiniziarel'installazione.
• Installareilventilatoreconunostrumentodiscollegamentodituttiipolinelcablaggio
sso.
• Assicurarsichel'alimentazionesiadisattivataprimadicercaredieseguireicollegamenti
elettriciodieseguireeventualemanutenzioneopulizia.
• Lasciarequestomanualeassiemealventilatorea disposizionedell'utilizzatore.
Standard
C6S (93170AW)
C6R (93171AW)
Timer
C6TS (93172AW)
C6TR (93173AW)
Tirante
C6PS (93174AW)
C6PR (93175AW)
Umidistato,Timer
C6HTS (93176AW)
C6HTR (93177AW)
Istruzioni per installazione e manutenzione

Questoapparecchioèconcepito
peresserecollegatoalcablaggio
sso.Controllarecheleinformazioni
elettrichepresentisuciascun
ventilatorecorrispondano
all'alimentazionedirete.
QUESTO APPARECCHIO È DOTATO DI
DOPPIO ISOLAMENTO E NON RICHIEDE LA
MESSA A TERRA.
Tutteleinstallazionidevonoriceverela
supervisionediunelettricistaqualicato.
Installazioniecablaggiodevonoessereconformi
airegolamentiappropriati.
Questo apparecchio può
essere usato da bambini dagli
8 anni in su e da persone
con ridotte capacità fisiche
e sensoriali o mancata
esperienza o conoscenze
solo sotto supervisione o con
istruzioni riguardanti l’uso
dell’apparecchio in modo
sicuro e se comprendono i
rischi che comporta. I bambini
non devono giocare con
l’apparecchio.
La pulizia e la manutenzione
dell'apparecchio non devono
essere effettuate dai bambini.
TuttiiventilatoriXpelairSimply
SilentTMContourACsonodotatidelle
seguenticaratteristiche:
• Dueopzionidivelocità(selezionabili
almomentodell'installazione)
• Serrandaanti-ritornointegrata
C6S/C6R - Azionareilventilatoreutilizzandoun
interruttorediaccensione/spegnimento(nonin
dotazione).
C6PS/C6PR - Azionareilventilatoreutilizzando
untirante.
C6TS/C6TR* - Iltimerintegratoazionail
ventilatoreconunritardopreimpostatoda30
secondia30minuti.
C6HTS/C6HTR* - Siattivaquandoinnescato
automaticamentedalsensoreintegrato
dell'umiditàoutilizzandouninterruttoredi
accensione/spegnimento(nonindotazione).
In modalità automatica: iltimerintegratoaziona
automaticamenteilventilatoreconunritardoda
30secondia30minutiquandol'umiditàscende
aldisottodelvalorediumiditàrelativa(UR)
preimpostato.
Funzionamento esterno:Sespentomediante
l'interruttorediaccensione/spegnimentoesterno,
ilventilatorecontinuaafunzionareperiltempo
preimpostatoda30secondia30minuti.
* Impostazioni di fabbrica: Timer15minuti,
UR75%
Dove posizionare il ventilatore.
• Collocarloquantopiùinaltopossibile.
• Almeno110mmdaibordidella
superciedimontaggioalcentro
delforo.
• Quantopiùlontanopossibiledallafonte
principalediaria,edifronteadessa,per
assicurareilussodiarianellastanza(peres.
difronteallaportainterna).
• Vicinoafontedivaporeododori.
• Noninluoghiincuivisiala
possibilità che le temperature
superino i 50°C.
• Seinstallatoincucina,ilventilatore
non deve essere montato
immediatamente sopra al piano
cottura o al grill a livello occhi.
• Sesiinstallainunastanzacontenente
un dispositivo che brucia carburante
chenonhauntubobilanciato,è
responsabilità dell'installatore assicurare
che vi sia abbastanza aria in movimento che
impedisca l'aspirazione dei fumi nel tubo
quando il ventilatore opera alla sua massima
velocità. Vedere le norme dell'edificio per i
requisiti specifici.
• L'ariadisatonondeveesserescaricata
in un tubo utilizzato per lo sfiato di fumi da
apparecchi alimentati da energia diversa da
quella elettrica. I requisiti di tutte le autorità
interessate devono essere osservati per i
tassi di flusso dello scarico dell'aria di sfiato
e dell'aria in ingresso.
• Utilizzononidoneoinatmosferechimiche
potenzialmente corrosive.
L’installatore avrà necessità di
quanto segue.
• Cacciavitedaelettricistada3mm
ecacciavitiPozidriveN.1o2.

Posizioni di fissaggio
della piastra posteriore
Morsetti per il
montaggio veloce del
tubo a parete
A B
Rimozione della
copertura anteriore
IMPORTANTE – LEGGERE
Regolazione dell'impostazione di umidità
Regolazione del funzionamento mediante impostazione
del timer
C D
Dimensioni complessive (mm)
MORSETTI
MONTAGGIO
VELOCE
PREMERELACHIUSURADELLA
COPERTURACONUNOSTRU-
MENTO,RIMUOVEREDELTUTTO
LACOPERTURAEILDIAFRAMMA
Ilventilatoresi
accendeallivellopiù
bassodicondensa
(sensoantiorario)
MAGGIORE
SENSIBILITÀ
(UR=50%)
Ilventilatorefun-
zionaperuntempo
piùbrevequando
l'interruttoreesterno
vienespento
Ilventilatorenonsi
accendenoaun
livellosuperioredi
condensa(senso
orario)
MINORE
SENSIBILITÀ
(UR=95%)
Ilventilatorefun-
zionaperuntempo
piùlungoquando
l'interruttoreesterno
vienespento
Impostazioni di fabbrica:
Timer15minuti,UR75%
Massimo30minutiMinimo30secondi

+
-
+
-
+
-
Cablaggio e configurazione
E
VEDEREDETTAGLIOA
VEDEREDETTAGLIOB
VEDEREDETTAGLIOD
VEDEREDETTAGLIOC
VEDEREDETTAGLIOE
BASSA
VELOCITÀ
BASSA
VELOCITÀ
BASSA
VELOCITÀ
ALTO
ALTO
ALTO
ALTO
ALTO
ALTO
BASSO
BASSO
BASSO
BASSO
BASSO
BASSO
H.M.
TIMER
ALTA
VELOCITÀ
ALTA
VELOCITÀ
ALTAVE-
LOCITÀ
DETTAGLIO A
SCALA 2.000
DETTAGLIO C
SCALA 2.000
DETTAGLIO E
SCALA 2.000
DETTAGLIO B
SCALA 2.000
DETTAGLIO D
SCALA 2.000
C6S / C6R
C6PS / C6PR
C6TS / C6TR
C6HTS / C6HTR
MORSETTODI
CONNESSIONE
PERSONALIZZATO
MORSETTODI
CONNESSIONE
PERSONALIZZATO
MORSETTODI
CONNESSIONE
PERSONALIZZATO
TIMER

Se il ventilatore viene montato a parete, si avrà
anche bisogno di:
• Unforopre-trapanatoda150mm.
• Unagrigliaapareteesternaappropriataeun
condottoconguainaaparetediØ150mm.Rif.
kit91233AW.
Se il ventilatore viene montato a soffitto, si
avrà anche bisogno di:
• Unforopre-trapanatoda150mm.
• Accessoriappropriatiperilcompletamento.
QuestiarticolisonodisponibilipressoXpelair:
• Condottoessibileda3mRif.:89665AA.Se
ilcondottopassaattraversounspaziofreddo,
utilizzareilrif.condottoisolato:91461AA.
Installazione di interruttore di
isolamento e cavi.
Unostrumentoperloscollegamento
dituttiipolideveessereintegratonel
cablaggiossosecondolenormedi
cablaggio
• Sesiutilizzanocommutatorimetallici,
bisogna rispettare le norme per la messa
a terra.
• L'areadisezionetrasversaledelcavodi
alimentazioneutilizzatodeveesseredi
1-1,5mm².
• C6S/C6R/C6PS/C6PR–2nuclei,C6TS/
C6TR/C6HTS/C6HTR–3nuclei.
• C6TS/C6TR/C6HTS/C6HTR.Si
raccomandauninterruttorediaccensionea
pareteoasotto(conindicatoreluminoso)
1.Controllarecheleinformazionielettriche
mostrateall'internodellapiastraposteriore
corrispondanoall'alimentazionedirete.
2.Controllarechenoncisianotubiocavi
interrati,peres.elettricità,gas,acqua,dietro
allacollocazionedell'interruttore(nelmuroo
nelsotto).Incasodidubbi,rivolgersiaun
professionista.
3.Isolarel'alimentazionedirete.
4.Farscorrereilcavodall'interruttoredi
isolamentoallaposizionedelventilatore
mediantel'interruttorediaccensione/
spegnimento(senecessario).
5.Farscorrereilcavodall'interruttoredi
isolamentoalpuntodicollegamento
dell'alimentazionedirete.
Avvertenza: In questa fase,
non eseguire collegamenti
all'alimentazione elettrica.
6.Installarel'interruttorediisolamentoel'interruttore
diaccensione/spegnimento(senecessario).
7.Eseguiretuttiicollegamentodell'interruttore
diisolamentoedell'interruttoredi
accensione/spegnimento(senecessario).
Ambienti umidi: L'interruttore di
accensione/spegnimento deve
essere posizionato in modo che
non possa essere toccato da
persone che usano bagni o docce.
Preparazione del ventilatore per l'installazione.
1. Rimuovereilgruppocoperturaanteriore/
diaframmapremendolachiusurasullato
inferioredellacoperturaetirandocopertura
anteriore/diaframmadalfondo(vederela
FiguraC).
Seilfunzionamentoèaldisopra
del livello del pavimento, bisogna
osservare le precauzioni di
sicurezza.
Contrassegnare la posizione della
piastra posteriore
2. Tenerelapiastraposterioreinmodochela
lineadilivellocontrassegnatasudiessasia
orientatainorizzontale.
3. Inserireconattenzioneiltubodel
ventilatorenelcondottoaparete.
4. Contrassegnaresullapareteleposizionidei
foridissaggionellapiastraposteriore.
5. Rimuoverelapiastraposterioredalcondotto.
6. Trapanareiforiinquesteposizioni,se
necessario,emontarespineevitiaparete,
secondonecessità.Ilventilatorepotrebbe
ancheesseressatoauntuboaparete
utilizzandolestaedissaggio.Vedere
9sotto.
Se si installa a soffitto, sono
necessari accessori appropriati.
Seguire le istruzioni fornite.
Montare la piastra posteriore.
7. Instradareilcavodireteattraversoilforodi
ingressoperilcavonellapiastraposteriore
aimorsetti.
8. Inserireiltubodelventilatoredellapiastra
posteriorenelcondottoaparete/sotto,
comeprima.
9. Fissarelapiastraposterioreaparete/
sottoutilizzandossaggiappropriati.
VederelaFiguraA.
10.Sesiutilizzanoviti,nonstringeretroppo.
Ilventilatorepotrebbeancheessere
ssatoauntuboapareteutilizzandole
staedissaggio.Stringerelevitinchéil
ventilatorenonèssatoinmodosicuroal
tubo-vederelaFiguraB.

Collegamenti elettrici.
11.Assicurarsichel'alimentazionediretesia
isolata.Disattivarel'alimentazionediretee
rimuovereifusibili.
12.Farpassareilcavonoallamorsettiera.
Collegareilventilatorecomemostrato
nellaFiguraFutilizzandoildiagramma
appropriatoalmodellodiventilatore.
13.Collegareilcavodall'interruttoredi
isolamentoall'alimentazioneelettrica.
Impostazioni
ventilatore
IMPOSTAZIONE VELOCITÀ
Iventilatorisonoimpostatiinfabbricaabassa
velocità,mahannodueimpostazionidivelocità
perapplicazionidiverse.Selezionarevelocità
altaobassacollegandoilponticellotrail
centroeilpernodell’altaobassavelocitàsul
ponticello(vederelaFiguraE)
Solo C6TS / C6TR.
• Perregolareilperiododisuperamento,
ruotareilcomando(T)insensoorarioper
aumentareeinsensoantiorarioperdiminuire
–vederelaFiguraD.
Solo C6HTS /C6HTR – vedere le figure D ed E.
• L’umiditàpreimpostatainfabbricaècirca75%
umiditàrelativa(UR),mapuòessereregolata
tra65%e85%URmedianteilcomandoH.
• Iltimerdisuperamentoèimpostatoinfabbrica
a15minutimapuòessereregolatoda30
secondia30minutimedianteilcomandoT.
• Ruotareicomandiinsensoorarioper
aumentarel’URoiltempoeinsenso
antiorarioperdiminuire.
Utilizzo del
ventilatore
Solo C6S / C6R
• Azionareilventilatoreutilizzandol’interruttore
diaccensione/spegnimento(nonin
dotazione).Ripetereperspegnere.
Solo C6PS / C6PR
• Azionareilventilatoretirandoerilasciandoil
cavo.Ripetereperspegnere.
Solo C6TS /C6TR
• Azionareilventilatoreutilizzandol’interruttore
diaccensione/spegnimento(nonin
dotazione).Quandol’interruttoreviene
spento,ilventilatorecontinuaafunzionare
C6S/C6R
C6PS/C6PR
C6TS/C6TR
C6HTS/C6HTR
VENTILATORE
MORSETTI
VENTILATORE
MORSETTI
POLODOPPIO
INTERRUTTOREDIISOLAMENTO
POLODOPPIO
INTERRUTTOREDIISOLAMENTO
INTERRUTTOREDI
ACCENSIONE/SPEGNIMENTO
LAMPADINA
(SENECESSARIO)
FUSIBILE
FUSIBILE
F
•Percircuitidicablaggiossi,ilfusibilediprotezioneperl’apparecchionondeve
superare 5A.
•IlTerminaleEpuòessereutilizzatocometerminalediparcheggiopercavodi
terra (se necessario).

periltempoimpostato.Perregolareil
periododisuperamento,ruotareilcomando
“T”insensoorarioperaumentareeinsenso
antiorarioperdiminuire–vederelaFiguraF.
Solo C6HTS /C6HTR.
• Modalità automatica-Ilventilatoresi
regolaautomaticamentesecondopiccoli
cambiamentineilivellidiumiditànaturale
senzaazionareilventilatore.Seilivelli
diumiditàcresconoauntassopiùlento
del5%diURin5minuti,noallivello
dell’umiditàpreimpostata,ilventilatorenon
vieneinnescatodall’umidità.Questoserve
perimpedireuninnescofastidiosodel
ventilatore.Seilivellidiumiditàcrescono
piùrapidamentedel5%diURin5minuti,il
ventilatoresiavvia.Quandol’umiditàrelativa
scende,ilventilatorecontinuaafunzionare
periltemporegolato.
• Funzionamento esterno-Utilizzare
l’interruttorediaccensione/spegnimento
esterno.Quandoilventilatoreèspento,esso
continuaafunzionareperiltemporegolatoe
poipassainmodalitàautomatica.
Tutti i ventilatori
Rimontareilgruppocoperturaanteriore/
diaframmaagganciandoprimalaparte
superiore,poifareoscillarelacoperturaper
ssarlainposizione.
Pulizia
(raccomandataunavoltaalmese)
1.Primadellapulizia,isolarecompletamenteil
ventilatoredall’alimentazionedirete.
2.Rimuovereilgruppocoperturaanteriore/
diaframmapremendolachiusurasullato
inferioredellacoperturaetirandocopertura
anteriore/diaframmadalfondo.
3.Perpulireilgruppocoperturaanteriore/
diaframma,pulireconunpannoumidosenza
peliolavareconacquacaldasaponata.
Asciugarebenelacoperturaanterioree
rimontare.
4.Nonimmergereilventilatoreinacquaoaltri
liquidiperpulirelealtrepartidelventilatore.
5.Nonutilizzaredetersiviforti,solventiopulitori
chimici
6.Lasciareasciugarebeneilventilatoreprima
dell’uso.
7.Apartelapulizia,nonènecessariaalcuna
altramanutenzione.
Smaltimento
Questoelettrodomesticonon
deveesseresmaltitoconiriuti
domestici.
Riciclarenellestruttureapposite.
Controllareconleautoritàlocaliper
ilriciclo.
Consulenza e
assistenza tecnica
Internazionale.
• Garanzia:Perdettagli,contattareil
distributorelocaleoXpelairdirettamente.
• Consulenzaeassistenzatecnica:Contattare
ildistributorelocaleXpelair.

• Leaelfolletodeinstruccionesantesdecomenzarlainstalación.
• Instalecadaventiladorconunmediodedesconexiónentodoslospolosenelcableadojo.
• Asegúresedequeelsuministroeléctricoestédesconectadoantesdeintentarrealizar
conexioneseléctricasoderealizarcualquiertareademantenimientoolimpieza.
• Dejeestefolletoconelventiladorenbeneciodelusuario.
Estándar
C6S (93170AW)
C6R (93171AW)
Temporizador
C6TS (93172AW)
C6TR (93173AW)
Cabletractor
C6PS (93174AW)
C6PR (93175AW)
Higrostato,Temporizador
C6HTS (93176AW)
C6HTR (93177AW)
Instrucciones de instalación y mantenimiento
Español

Esteaparatoestádestinado
paraconectarseacableadojo.
Compruebequelaclasicación
eléctricaindicadaencadaventilador
coincidaconelsuministroeléctrico.
EL APARATO TIENE DOBLE AISLAMIENTO Y
NO REQUIERE UNA CONEXIÓN A TIERRA.
Todaslasinstalacionesdebensersupervisadas
porunelectricistacalicado.Lasinstalaciones
yelcableadodebencumplirconlas
regulacionesapropiadas.
Este aparato puede ser
utilizado por niños y niñas
de 8 años en adelante
y por personas con
capacidades sensoriales
físicas reducidas o falta de
experiencia y conocimiento,
si son supervisadas o si se les
instruye acerca del uso del
aparato de una manera segura
y entienden los riesgos que
conlleva. Los pequeños no
deben jugar con el aparato.
Las tareas de limpieza y
mantenimiento del aparato no
deben ser realizadas por niños
o niñas.
TodoslosventiladoresXpelairSimply
SilentTMContourACtienenlas
siguientescaracterísticas:
• Extraccióndedosvelocidades
(seleccionableenlainstalación).
• Obturadorantirretornoincorporado.
C6S/C6R - Useelventiladormedianteuninterruptor
deencendido/apagado(nosuministrado).
C6PS/C6PR - Useelventiladormedianteun
cabletractorintegral.
C6TS/C6TR* - Eltemporizadorincorporado
hacefuncionarelventiladorconunretardo
preestablecidode30segundosa30minutos.
C6HTS/C6HTR* - Actúacuandoesactivado
automáticamenteporelsensordehumedad
integral,outilizandouninterruptorexternode
encendido/apagado(nosuministrado).
En modo automático: eltemporizador
incorporadohacequeelventiladorfuncione
automáticamente,duranteuntiempoderetardo
preestablecidode30segundosa30minutos,
unavezquelahumedadcaepordebajodel
valorpreestablecidodehumedadrelativa(HR).
Funcionamiento externo:cuandoseapaga
conelinterruptorexternodeencendido/
apagado,elventiladorcontinúafuncionando
duranteelretardopreestablecidode30
segundosa30minutos.
* Ajustes de fábrica: temporizador15minutos,
HR75%
Dónde colocar el ventilador:
• Colóquelolomásaltoposible.
• Almenos110mmdesdelos
bordesdelasuperciede
montajealcentrodeloricio.
• Tanlejoscomoseaposibledelaprincipal
fuentedereemplazodeaireyfrentealamisma
paraasegurarelujodeaireporlahabitación
(porejemplo,frentealapuertainterna).
• Juntoalafuentedevaporuolores.
• Nodondelatemperatura
ambiente pueda ser mayor
de 50 °C.
• Siseinstalaenunacocina,los
ventiladores no deben montarse
justo por encima de una encimera o en
una parrilla a la altura de los ojos.
• Siseinstalaenunasalaquecontenga
un dispositivo de combustión con
una chimenea no balanceada, es
responsabilidad del instalador asegurarse
de que haya suficiente aire de reemplazo
para evitar que los humos bajen por la
chimenea cuando el ventilador funcione
con extracción máxima. Consulte
las normas de construcción para ver
requisitos específicos.
• Elairedesalidanodebedescargarse
en una chimenea usada para el escape
de humos de aparatos que usen energía
que no sea eléctrica. Se deben tener
en cuenta los requisitos de todas las
autoridades implicadas para descargar
aire de salida y tomar caudales.
• Noesadecuadoparasuusoenposibles
ambientes corrosivos químicos.
Qué necesitará el instalador:
• Destornilladordeelectricistade
3mmydestornilladores
PozidriveN.º1o2.
Español

Posiciones de fijación
de placas posteriores
Abrazaderas de
ajuste rápido
del tubo de pared
A B
IMPORTANTE (POR FAVOR, LÉALO)
Ajuste la configuración de humedad
Ajuste la ejecución en configuración de temporizador
C D
Dimensiones generales (mm)
ABRAZADERA
DEAJUSTE
RÁPIDO
PRESIONEELPESTILLODELA
CUBIERTACONLAHERRAMI-
ENTAYRETIRELATAPAYEL
DEFLECTORCOMPLETO
Elventiladorse
enciendeaun
nivelmásbajode
condensación(sen-
tidocontrariodelas
agujasdelreloj)
MÁSSENSIBLE
(HR=50%)
Elventilador
funcionadurante
menostiempo
cuandoseapagael
interruptorexterno
Elventiladorno
seenciendehasta
alcanzarunnivelmás
altodecondensación
(sentidodelas
agujasdelreloj)
MENOSSENSIBLE
(HR=95%)
Elventiladorfun-
cionadurantemás
tiempocuandose
apagaelinterruptor
externo
Ajustes de fábrica:
temporizador15minutos,
HR75%
Máximo30minutosMínimo30segundos
Extracción de la
cubierta frontal
Español

+
-
+
-
+
-
Cableado y configuración
E
VERDETALLEA
VERDETALLEB
VERDETALLED
VERDETALLEC
VERDETALLEE
VELOCIDAD
BAJA
VELOCIDAD
BAJA
VELOCIDAD
BAJA
ALTA
ALTA
ALTA
ALTA
ALTA
ALTA
BAJA
BAJA
BAJA
BAJA
BAJA
BAJA
H.M.
TEMPORIZADOR
VELOCI-
DADALTA
VELOCIDAD
ALTA
VELOCIDAD
ALTA
DETALLE A
ESCALA 2.000
DETALLE C
ESCALA 2.000
DETALLE E
ESCALA 2.000
DETALLE B
ESCALA 2.000
DETALLE D
ESCALA 2.000
C6S / C6R
C6PS / C6PR
C6TS / C6TR
C6HTS / C6HTR
TERMINALDE
CONEXIÓNDEL
CLIENTE
TERMINALDE
CONEXIÓNDEL
CLIENTE
TERMINALDE
CONEXIÓNDEL
CLIENTE
TEMPORI-
ZADOR
Español

Si monta el ventilador en la pared, también
necesitará:
• Unoriciopreparadode150mmde
diámetro.
• Unarejilladeparedexternaadecuadayun
conductodemanguitodepareddeØ150
mm.ref.delkit91233AW.
Si monta el ventilador en el techo, también
necesitará:
• Unoriciopreparadode150mmde
diámetro.
• Elementosauxiliaresapropiadosparala
terminación.Estosartículosestándisponibles
deXpelair:
• Conductoexibleen3mref.:89665AA.Siel
conductopasaatravésdeunespaciofrío,use
unconductoaisladoref.:91461AA.
Instalación del interruptor y los
cables de aislamiento:
Sedebeincorporarunmediode
desconexiónentodoslospolosenel
cableadojosegúnlasregulaciones
sobrecableado.
• Siseusancajasdeconexionesdemetal,
se deben seguir las regulaciones sobre
puesta a tierra.
• Eláreadeseccióntransversaldelcablede
alimentaciónutilizadodebeserde1-1,5mm².
• C6S/C6R/C6PS/C6PR–2núcleos,C6TS
/C6TR/C6HTS/C6HTR–3núcleos.
• C6TS/C6TR/C6HTS/C6HTR.Se
recomiendauninterruptordeencendido/
apagadodeparedodetecho(conluz
indicadora)
1.Compruebequelaclasicacióneléctricaque
semuestraenelinteriordelaparteposterior
delaplacacoincidaconsusuministro
eléctrico.
2.Compruebequenohayatuberíaso
cablesenterradoscomo,porejemplo,
deelectricidad,gasoaguadetrásdela
ubicacióndelinterruptor(enlaparedosobre
eltecho).Encasodeduda,consulteconun
profesional.
3.Aísleelsuministroeléctrico.
4.Coloqueelcabledesdeelinterruptorde
aislamientohastalaubicacióndelventilador
atravésdelinterruptordeencendido/
apagado(siesnecesario).
5.Coloqueelcabledesdeelinterruptorde
aislamientohastaelpuntodeconexiónal
suministroeléctrico.
Advertencia: No realice ninguna
conexión al suministro eléctrico en
esta fase.
6.Instaleelinterruptordeaislamientoyel
interruptordeencendido/apagado(sies
necesario).
7.Realicetodaslasconexionesdentrodel
interruptordeaislamientoyelinterruptorde
encendido/apagado(siesnecesario).
Salas húmedas: el interruptor
de encendido/apagado debe
colocarse de manera que no lo
toquen personas que estén usando
la ducha o la bañera.
Preparación del ventilador para su
instalación:
1. Retirelacubiertafrontal/deector
presionandoelpestilloenlaparteinferiorde
lacubiertaytirandodelacubiertafrontal/
deectordesdelabase(vealaFiguraC).
Si se trabaja en la planta baja,
es necesario tomar medidas de
seguridad.
Marque la posición de la placa posterior:
2. Sujetelaplacaposteriordemanera
quelalíneamarcadaestéorientada
horizontalmente.
3. Introduzcaconcuidadoeltubodel
ventiladorenelconductodelapared.
4. Marqueenlaparedlasposicionesdelos
oriciosdejaciónenlaplacaposterior.
5. Retirelaplacaposteriordelconducto.
6. Perforelosoriciosdelostornillosenestas
posiciones,siesnecesario,ycoloque
tacosytornillossegúnseanecesario.El
ventiladortambiénpuedeestarjadoaun
tubodeparedutilizandolossoportesde
sujeción.Véase9acontinuación.
Si se instala en el techo, son
necesarios elementos auxiliar
es
adecuados. Siga las instrucciones
proporcionadas.
Monte la placa posterior:
7. Paseelcablederedatravésdeloriciode
entradadecablesenlaplacaposterioralos
terminales.
8. Introduzcaeltubodelventiladordelaplaca
posteriorenelconductodepared/techo
comoantes.
9. Fijelaplacaposterioralapared/techocon
sujecionesadecuadas.VéaselaFiguraA.
Español

10.Siseusantornillos,nolosapriete
demasiado.Elventiladortambiénpuede
estarjadoauntubodeparedutilizandolos
soportesdesujeción.Aprietelostornillos
hastaqueelventiladorestérmemente
jadoaltubo(véaselaFiguraB).
Conecte las conexiones eléctricas:
11.Asegúresedequeelsuministroeléctrico
estéaislado.Apagueelsuministroeléctrico
yretirelosfusibles.
12.Conduzcaelcablehaciaelbloquede
terminales.Conecteelventiladorcomose
muestraenlaFiguraFusandoeldiagrama
apropiadoparaelmodelodeventilador.
13.Conecteelcabledesdeelinterruptorde
aislamientoalcableadodelsuministroeléctrico.
Configuración del
ventilador
CONFIGURACIÓN DE VELOCIDAD
Losventiladoresvienenabajavelocidadde
fábrica,perotienendosajustesdevelocidad
paradiferentesaplicaciones.Seleccionela
velocidadaltaobajaconectandoelpuente
entreelcentroyelpolodealtaobaja
velocidadenelpuente(véaselaFiguraE).
Solo C6TS / C6TR.
• Paraajustarelperíododerebasamiento
gireelcontrol(T),hacialaderecha,para
aumentary,hacialaizquierda,paradisminuir
(véaselaFiguraD).
Solo C6HTS /C6HTR (véase las figuras D y E).
• Elfuncionamientoenhumedadestá
preestablecidodefábricaenaproximadamente
un75%dehumedadrelativa(HR),pero
sepuedeajustarentreel65%y85%de
humedadrelativamedianteelcontrolH.
• Eltemporizadorderebasamientoestá
preestablecidodefábricaen15minutos,
perosepuedeajustardesde30segundosa
30minutosmedianteelcontrolT.
• Gireloscontrolesenladireccióndelas
agujasdelreloj,paraaumentarlaHRoel
tiempo,yenelsentidocontrariodelas
agujasdelreloj,paradisminuir.
Uso del ventilador
Solo C6S / C6R
• Hagafuncionarelventiladorconel
interruptordeencendido/apagado(no
suministrado).Repitaparaapagarlo.
Solo C6PS / C6PR
• Hagafuncionarelventiladortirandoy
soltandoelcable.Repitaparaapagarlo.
Español
C6S/C6R
C6PS/C6PR
C6TS/C6TR
C6HTS/C6HTR
VENTILADOR
TERMINALES
VENTILADOR
TERMINALES
BIPOLARINTERRUPTOR
DEAISLAMIENTO
BIPOLARINTERRUPTOR
DEAISLAMIENTO
INTERRUPTOR
ENCENDIDO/
APAGADO
BOMBILLA
(SIESNECESARIO)
FUSIBLE
FUSIBLE
F
•Paraloscircuitosconcableadojo,elfusibledeprotecciónparaelaparatono
debe ser superior a 5A.
•LaTerminalEpuedeusarsecomoterminalparauncableatierra(siesnecesario)

Solo C6TS / C6TR
• Hagafuncionarelventiladorconun
interruptordeencendido/apagado(no
suministrado).Cuandoelinterruptorse
apaga,elventiladorsiguefuncionando
duranteelretardodetiempoestablecido.
Paraajustarelperíododerebasamiento
gireelcontrol"T",hacialaderecha,para
aumentary,hacialaizquierda,paradisminuir
(véaselaFiguraF).
Solo C6HTS /C6HTR.
• Modo automático-Elventiladorseajusta
automáticamenteacambioslentosenlos
nivelesnaturalesdehumedadsinoperar
elventilador.Silosnivelesdehumedad
aumentanaunritmomáslentoqueel5
%deHRen5minutos,hastaelnivelde
humedadpreestablecido,elventiladornose
activaráporlahumedad.Estoesparaevitar
elruidodeactivacióndelventilador.Silos
nivelesdehumedadaumentanmásrápido
queel5%deHRen5minutos,elventilador
seactivará.Cuandolahumedadrelativacae,
elventiladorsiguefuncionandoduranteel
retardodetiempoajustable.
• Funcionamiento externo-Useel
interruptordeencendido/apagadoexterno.
Cuandoelventiladorseapaga,elventilador
siguefuncionandoduranteelretardode
tiempoajustabley,luego,cambiaamodo
automático.
Todos los ventiladores
Vuelvaacolocarlacubiertafrontal/deector
enganchándolaprimeroenlapartesuperiory,
luego,bajandolacubiertaparaqueseajuste
ensulugar.
Limpieza
(serecomiendaunavezalmes)
1.Antesdelalimpieza,aíslecompletamenteel
ventiladordelsuministroeléctrico.
2.Retirelacubiertafrontal/deector
presionandoelpestilloenlaparteinferiorde
lacubiertaytirandodelacubiertafrontal/
deectordesdelabase.
3.Paralimpiarlacubiertafrontal/deector,
frótelaconunpañohúmedoysinpelusa,
olímpielaconaguatibiayjabón.Seque
totalmentelacubiertayvuelvaacolocarla.
4.Nosumerjaelventiladorenaguauotros
líquidosparalimpiarcualquierotrapiezadel
ventilador.
5.Noutilicedetergentesfuertes,disolventesni
productosquímicosdelimpieza.
6.Dejequeelventiladorseseque
completamenteantesdeusarlo.
7.Apartedelimpiarlo,noesnecesarianinguna
otraaccióndemantenimiento.
Eliminación
Esteproductonosedebedesechar
conlosresiduosdomésticos.
Porfavorrecíclelodondeexistan
centrosparaello.
Consultealasautoridadeslocales
sobreelreciclado.
Asesoramiento y
servicio técnico
Internacional.
• Garantía:contacteconsudistribuidorlocalo
conXpelairparaconocermásdetalles.
• Asesoramientoyserviciotécnico:contacte
consudistribuidorlocaldeXpelair.
Español


8
C6S/C6R
C6PS/C6PR
C6TS/C6TR
3030
C6HTS/C6HTR
3030
3030
75%15
110
3
.21
150
Ø150
.
150
:Xpelair
3
.

B
D
C
)50%
)95%
75%15
3030

+
-
+
-
+
-
E
B
D
C
E
C
E
B
D

.²1-1.5
1
2
3
4
5
6
7
1
.)C
2
3
4
5
6
9
7
8
9
10
.B
11
12
F
13

E
.D
.ED
75%
85%65%
.
15
3030
.
.F
55%
55%
C6S/C6R
C6PS/C6PR
C6TS/C6TR
C6HTS/C6HTR
F
E

1
2
3
4
5
6
7
Xpelair
.Xpelair

C6S (93170AW)
C6R (93171AW)
C6TS (93172AW)
C6TR (93173AW)
C6PS (93174AW)
C6PR (93175AW)
C6HTS (93176AW)
C6HTR (93177AW)

8
()
C6S/C6R -
C6PS/C6PR -
C6TS/C6TR* -
C6HTS/C6HTR* -
:
:
*
:
50°C
,
,
:
:

A B
-
‘ ’
C D
()
:

+
-
+
-
+
-
E
A
2.000
C
2.000
E
2.000
B
2.000
D
2.000
C6S / C6R
C6PS / C6PR
C6TS / C6TR
C6HTS / C6HTR

: /
,
-
(
)
-

C6TS / C6TR
C6HTS /C6HTR - D E.
C6S / C6R
C6PS / C6PR
C6TS /C6TR
C6HTS /C6HTR
C6S/C6R
C6PS/C6PR
C6TS/C6TR
C6HTS/C6HTR
F


PartNo.25332AA(RevisionD)
Head Office, UK Sales Office and Spares
RedringXpelairGroupLtd,
NewcombeHouse,NewcombeWay,
OrtonSouthgate,Peterborough,
PE26SEEngland
Telephone:+44(0)8443727761
www.xpelair.co.uk
www.xpelair.co.uk/international
FM02118 ISO 9001: 2000
Transcripción de documentos
English Nederlands ™ تعليمات التركيب والصيانة ُ الع َر ِب ية َ Installation and Maintenance Instructions Installatie - en Onderhoudsinstructies Instructions d’installation et d’entretien Istruzioni per installazione e manutenzione Instrucciones de instalación y mantenimiento Español İtaliano Français Xpelair Simply Silent Contour स्थापना एवं रखरखाव के िनदेर् श C6TS (93172AW) C6TR (93173AW) C6PS (93174AW) C6PR (93175AW) C6HTS (93176AW) C6HTR (93177AW) िहन्दी C6S (93170AW) C6R (93171AW) English Installation and Maintenance Instructions Standard C6S (93170AW) C6R (93171AW) • • • • Timer C6TS (93172AW) C6TR (93173AW) Pull Cord C6PS (93174AW) C6PR (93175AW) Humidistat, Timer C6HTS (93176AW) C6HTR (93177AW) Do read the entire instruction leaflet before commencing installation. Do install each fan with a means for disconnection in all poles in the fixed wiring. Do make sure the mains supply is switched off before attempting to make electrical connections or carry out any maintenance or cleaning. Please leave this leaflet with the fan for the benefit of the user. English This appliance is intended for connection to fixed wiring. Check that the electrical rating shown on each fan matches the mains supply. THE APPLIANCE IS DOUBLE INSULATED AND DOES NOT REQUIRE AN EARTH CONNECTION. All installations must be supervised by a qualified electrician. Installations and wiring must conform to current IEE Regulations (UK), local or appropriate regulations (other countries). This appliance can be used by children aged from 8 years and above and persons with reduced physical, sensory capabilities or lack of experience and knowledge if they have been given supervision or instruction concerning the use of the appliance in a safe way and understand the hazards involved. Children shall not play with the appliance. Cleaning and maintenance of the appliance shall not be made by children. All Xpelair Simply SilentTM Contour AC fans have the following features: • Two speed extraction (Selectable at installation) • Built-in back draught shutter C6S/C6R - Operate the fan using an on/off switch (not supplied). C6PS/C6PR - Operate the fan using an integral pull-cord. C6TS/C6TR* - Built-in timer operates fan for a preset delay from 30 seconds to 30 minutes. C6HTS/C6HTR* - Operates when triggered automatically by the integral humidity sensor, or by using an external on/off switch (not supplied). In automatic mode: the built-in timer automatically operates the fan for a pre-set delay time from 30 seconds to 30 minutes once humidity drops below the pre-set Relative Humidity (RH) value. External operation: When switched off using the external on/off switch the fan continues to run for the preset delay from 30 seconds to 30 minutes. * Factory settings: Timer 15 minutes, RH 75% Where to locate the fan. • Locate it as high as possible. • At least 110mm from the edges of the mounting surface to the centre of the hole. • As far away as possible from and opposite to the main source of air replacement to ensure airflow across the room (e.g. opposite the internal doorway). • Near the source of steam or odours. • Not where ambient temperatures are likely to exceed 50°C. • If installed in a kitchen fans must not be mounted immediately above a cooker hob, or eye level grill. • If installing in a room containing a fuel burning device which has a non-balanced flue, it is the installer’s responsibility to ensure that there is enough replacement air to prevent fumes being drawn down the flue when the fan is operating up to maximum extract. Refer to Building Regulations for specific requirements. • Exhaust air must not be discharged into a flue used for exhausting of fumes from appliances supplied with energy other than electric. Requirements of all authorities concerned must be observed for exhaust air discharge and intake flow rates. • Not suitable for use in possible chemical corrosive atmospheres. What the installer will need. • 3mm electrician’s screwdriver and No.1 or 2 Pozidrive screwdrivers. If wall mounting the fan, you will also need: • A 150mm diameter prepared hole. • An appropriate external Wall Grille and Ø150mm wall sleeve duct. Kit Ref 91233AW. If ceiling mounting the fan, you will also need: • A 150mm diameter prepared hole. • Appropriate ancillaries for termination. These items are available from Xpelair: • 3m flexible ducting Ref: 89665AA. If the duct passes through a cold space use insulated duct ref: 91461AA. A Back plate fixing positions English Overall Dimensions (mm) B Wall tube quick fit clamps QUICK FIT CLAMP C Front Cover Removal D IMPORTANT – PLEASE READ Adjusting the humidity setting Fan switches on at lower level of condensation (anti-clockwise) Fan does not switch on until higher level of condensation (clockwise) MORE SENTITIVE (RH = 50%) LESS SENTITIVE (RH = 95%) Factory settings: Timer 15 minutes, RH 75% Adjusting the run on timer setting DEPRESS COVER LATCH WITH TOOL & REMOVE COVER & BAFFLE COMPLETE Fan runs on for a shorter time when the external switch is turned off Minimum 30 seconds Fan runs on for a longer time when the external switch is turned off Maximum 30 minutes English E Wiring and setting up DETAIL A SCALE 2.000 SEE DETAIL A HIG CUSTOMER CONNECTION TERMINAL H W LO H HIG LOW SPEED W LO HIGH SPEED C6S / C6R C6PS / C6PR DETAIL C SCALE 2.000 SEE DETAIL C SEE DETAIL B + - CUSTOMER CONNECTION TERMINAL TIMER DETAIL B SCALE 2.000 H HIG W LO H HIG W LO LOW SPEED HIGH SPEED C6TS / C6TR DETAIL E SCALE 2.000 + SEE DETAIL E SEE DETAIL D + - H.M . DETAIL D SCALE 2.000 TIMER HIG H W LO HIG H W LO LOW SPEED HIGH SPEED C6HTS / C6HTR CUSTOMER CONNECTION TERMINAL • • • 1. Check that the electrical rating shown inside the back-plate matches your mains supply. 2. Check there are no buried pipes or cables e.g. electricity, gas, water behind the switch location (in the wall or above the ceiling). If in doubt, seek professional advice. 3. Isolate the mains supply. 4. Lay in the cable from the isolating switch to the fan location via the on/off switch (if required). 5. Lay in the cable from the isolating switch to the point of connection to the mains supply. Warning: Do not make any connections to the electrical supply at this stage. 6. Install the isolating switch and on/off switch (if required). 7. Make all connections within the isolating switch and the on/off switch (if required). Wet Rooms: On/Off switch must be situated so that it cannot be touched by persons making use of the bath or shower. For Australia Only – C6S /C6R / C6PS / C6PR Connection to the supply can be made by a flexible 2-core cable complete with 3 pin plug for insertion into an approved 10A GPO or directly wired through an approved 10A wall mounted surface switch with at least 3mm clearance between contacts. For Australia Only – C6TS / C6TR / C6HTS / C6HTR These models are permanently connected to the supply and operation is controlled by a remote switch. They should be directly wired to the supply through an approved 10A wall mounted surface switch with at least 3mm clearance between contacts. Preparing the Fan for installation. 1. Remove the front cover/baffle assembly by depressing the latch on the underside of the cover and pulling off the front cover / baffle from the bottom (See Figure C). If working above ground floor level, safety precautions must be observed. Mark the position of the back-plate 2. Hold the back-plate so that the level line marked on it is orientated horizontally. 3. Carefully insert the fan tube into the wall duct. 4. Mark on the wall the positions of the fixing holes in the back-plate. 5. Remove the back plate from the ducting. 6. Drill screw holes in these positions if necessary, and fit wall plugs and screws as required. The fan may also be fixed to a wall tube using the clamping brackets. See 9 below. If installing in a ceiling, appropriate termination ancillaries are required. Follow instructions provided. Mount the back-plate. 7. Feed the mains cable through the cable entry hole in the back plate to the terminals. 8. Insert the fan tube of the back-plate into the wall duct/ceiling as before. 9. Fasten the back-plate to the wall/ceiling using appropriate fasteners. See figure A. 10. If using screws, do not over tighten. The fan may also be fixed to a wall tube using the clamping brackets. Tighten the screws until the fan is firmly secured to the tube – see figure B. Wire the electrical connections. 11. Make sure the mains supply is isolated. Switch off the mains electrical supply and remove fuses. 12. Feed the cable to the terminal block. Wire the fan as shown in Figure F using the diagram appropriate to the fan model. 13. Connect the cable from the isolating switch to the electrical supply wiring. English • Installing the isolating switch and cables. A means for disconnection in all poles must be incorporated in the fixed wiring in accordance with wiring regulations If metal switch boxes are used, earthing regulations must be followed. The cross-sectional area of the supply cord used should be ranged from 1-1.5mm². C6S / C6R / C6PS / C6PR – 2 core, C6TS / C6TR / C6HTS / C6HTR – 3 core. C6TS / C6TR / C6HTS / C6HTR. A wall or ceiling On/Off switch (with indicator light) is recommended English F C6S/C6R C6PS/C6PR FAN TERMINALS DOUBLE POLE ISOLATING SWITCH FUSE • For fixed wiring circuits the protective fuse for the appliance must not exceed 5A. • Terminal E can be used as a parking terminal for an earth wire (if required) FAN TERMINALS C6TS/C6TR C6HTS/C6HTR ON/OFF SWITCH DOUBLE POLE ISOLATING SWITCH LAMP (IF REQUIRED) FUSE Fan Settings SPEED SETTING The fans are factory set to low speed, but have two speed settings for different applications. Select either high or low speed by connecting the jumper between the centre and high or low speed pin on the jumper (see Figure E) C6TS / C6TR Only. • To adjust the over-run period turn the control (T) clockwise to increase and anti-clockwise to decrease – see Figure D. C6HTS /C6HTR Only – see figures D and E. • The pre-set humidity operation is factory set at approximately 75% Relative Humidity (RH), but can be adjusted between 65% and 85% RH by control H. • The over-run timer is factory set at 15 minutes but can be adjusted from 30 seconds to 30 minutes by control T. • Turn the controls clockwise to increase RH or time and anti-clockwise to decrease. Using the fan C6S / C6R Only • Operate the fan using the on/off switch (not supplied). Repeat to switch off. C6PS / C6PR Only • Operate the fan by pulling and releasing the cord. Repeat to switch off. C6TS /C6TR Only • Operate the fan using an on/off switch (not supplied). When the switch is turned off, the fan continues to operate for the set time delay. To adjust the over-run period, turn the control “T” clockwise to increase and anticlockwise to decrease – see Figure F. C6HTS /C6HTR Only. • Automatic mode - The fan automatically adjusts to slow changes in natural humidity levels without operating the fan. If the humidity levels increase at a rate slower than 5% RH in 5 minutes, up to the pre-set humidity level, the fan will not be triggered by humidity. This is to prevent nuisance triggering of the fan. If humidity levels increase quicker than 5% RH in 5 minutes the fan will operate. When relative humidity drops the fan continues to operate for the adjustable time delay. • External operation - Use the external on/off switch. When the fan is switched off, the fan continues to operate for the adjustable time delay then goes into automatic mode. All Fans Re-fit the front cover/baffle assembly by hooking in the top first, and then swing the cover down to clip into place. (recommended once a month) 1. Before cleaning, isolate the fan completely from the mains supply. 2. Remove the front cover/baffle assembly by depressing the latch on the underside of the cover and pulling off the front cover / baffle from the bottom. 3. To clean the front cover/baffle assembly, either wipe it with a damp, lint free cloth or wash it with warm soapy water. Thoroughly dry the front cover and refit. 4. Do not immerse the fan in water or other liquids to clean any other parts of the fan. 5. Do not use strong detergents, solvents or chemical cleaners 6. Allow fan to dry thoroughly before use. 7. Apart from cleaning, no other maintenance is required. Disposal This product should not be disposed of with household waste. Please recycle where facilities exist. Check with your local authority for recycling advice. Guarantee UK only We, Redring Xpelair Group Limited, provide a guarantee against faulty parts and manufacture for a period of 2 years from the date of purchase. In the unlikely event of a product breakdown during the guarantee period the product should be returned to the place of purchase or to Redring Xpelair Group Limited. Exclusions • This guarantee does not cover compensation for the loss of the product or consequential loss of any kind. • Damage or defects to the product arising from incorrect installation or lack of maintenance. • Transportation costs. This guarantee does not affect your statutory rights Technical advice and service Customers outside UK see international below. United Kingdom Xpelair have a comprehensive range of services including: • Free technical advice help-desk from Engineers on all aspects of ventilation. • Free design service, quotations and site surveys. • Service and maintenance contracts to suit all requirements. Please ask for details: • By telephone on Techline: +44 (0) 844 372 7766 • By fax on Techfax: +44 (0) 844 372 7767 • At the address below Head Office, UK Sales Office and Spares Redring Xpelair Group Ltd, Newcombe House, Newcombe Way, Orton Southgate, Peterborough, PE2 6SE England Telephone: +44 (0) 844 372 7761 Fax: +44 (0) 844 372 7762 Sales/Spares Hotline: +44 (0) 844 372 7750 Sales/Spares Faxline: +44 (0) 844 372 7760 www.xpelair.co.uk International. • Guarantee: Contact your local distributor or Xpelair direct for details. • Technical Advice and Service: Contact your local Xpelair distributor. English Cleaning Nederlands Installatie - en Onderhoudsinstructies Standaard C6S (93170AW) C6R (93171AW) • • • • Timer C6TS (93172AW) C6TR (93173AW) Trek aan het snoer C6PS (93174AW) C6PR (93175AW) Hygrostaat, Timer C6HTS (93176AW) C6HTR (93177AW) Lees het hele instructieboekje voordat u met de installatie begint. Installeer elke ventilator met een werktuig om alle polen in de vaste bedrading los te koppelen. Zorg ervoor dat de netvoeding is uitgeschakeld voordat u probeert elektrische verbindingen te maken of onderhoud of reiniging uit te voeren. Bewaar dit boekje bij de ventilator ten behoeve van de gebruiker. Dit apparaat kan worden gebruikt door kinderen van 8 jaar en ouder en door personen met verminderde fysieke, zintuiglijke vermogens of gebrek aan ervaring en kennis, als ze onder toezicht staan of instructies hebben gekregen betreffende het gebruik van het apparaat op een veilige manier en ze de betreffende gevaren begrijpen. Kinderen mogen niet spelen met het apparaat. Reiniging en onderhoud van het apparaat mogen niet door kinderen worden gedaan. • Alle Xpelair Simply SilentTM Contour AC ventilatoren hebben de volgende kenmerken: • Twee snelheden van afzuiging (Selecteerbaar bij de installatie) Ingebouwde terugslagklep C6S/C6R - Bedien de ventilator met behulp van een aan/uit-schakelaar (niet bijgeleverd). C6PS/C6PR - Bedien de ventilator met behulp van een integraal trekkoord. C6TS/C6TR* - De ingebouwde timer laat de ventilator werken gedurende een vooraf ingestelde uitsteltijd van 30 seconden tot 30 minuten. C6HTS/C6HTR* - Werkt wanneer automatisch geactiveerd door de integrale vochtigheidssensor of door gebruik te maken van een externe aan/uit-schakelaar (niet bijgeleverd). In de automatische modus: de ingebouwde timer laat de ventilator automatisch werken gedurende een vooraf ingestelde uitsteltijd van 30 seconden tot 30 minuten zodra de vochtigheid daalt tot onder de vooraf ingestelde waarde voor de Relatieve Vochtigheid (RV). Externe bediening: Indien uitgeschakeld met behulp van de externe aan/uit-schakelaar, blijft de ventilator draaien gedurende de vooraf ingestelde uitsteltijd van 30 seconden tot 30 minuten. * Fabrieksinstellingen: Timer 15 minuten, RV 75% Waar moet de ventilator geplaatst worden. • Plaats hem zo hoog mogelijk. • Ten minste 110mm vanaf de hoeken van het installatie-oppervlak tot het midden van het gat. • Zo ver mogelijk weg en tegenover de hoofdbron van luchtvervanging om een luchtstroom door de ruimte te garanderen (bijv. tegenover de binnendeur). • Dichtbij de bron van stoom of geurtjes. • Niet waar kans is dat omgevingstemperaturen boven de 50°C komen. • Indien geïnstalleerd in een keuken, moeten ventilatoren niet direct boven een kookplaat of een grill op ooghoogte bevestigd worden. • Als hij geïnstalleerd wordt in een ruimte die een branstofverbrandingsapparaat bevat dat geen gebalanceerde schoorsteen heeft, is het de verantwoordelijkheid van de installateur om te garanderen dat er voldoende vervangende lucht is om te voorkomen dat rook uit de schoorsteen wordt getrokken wanneer de ventilator op maximale afzuiging werkt. Raadpleeg de Bouwvoorschriften voor specifieke vereisten. • Uitgeblazen lucht mag niet worden ontladen in een schoorsteen die wordt gebruikt voor het uitblazen van rook van apparaten die worden voorzien van energie anders dan elektrische. De vereisten van alle betreffende autoriteiten moeten worden bekeken voor uitgeblazen luchtafvoer en innamestroomsnelheden. • Niet geschikt voor gebruik in mogelijk chemisch corrosieve atmosfeer. Nederlands Dit apparaat is bedoeld voor aansluiting op een vaste bedrading. Controleer of de elektrische classificatie op elke ventilator overeenkomt met de netvoeding. HET APPARAAT IS DUBBEL GEÏSOLEERD EN VEREIST GEEN AARDE-AANSLUITING Alle installaties moeten onder toezicht staan van een gekwalificeerde elektricien. Installaties en bedradingen moeten voldoen aan van toepassing zijnde voorschriften. Nederlands Totale afmetingen (mm) A Bevestigingsposities achterplaat B Wandbuis quick-fit klemmen QUICK-FIT KLEM C Verwijderen van het frontpaneel D BELANGRIJK - GELIEVE TE LEZEN AANpassen van de vochtigheidsinstelling De ventilator wordt ingeschakeld bij een lager niveau van condensatie (tegen de klok in) De ventilator wordt niet ingeschakeld tot een hoger niveau van condensatie (met de klok mee) GEVOELIGER (RV = 50%) MINDER GEVOELIG (RV = 95%) Fabrieksinstellingen: Timer 15 minuten, RV 75% Aanpassen van de instelling van de inschakeltimer DRUK OP DE HENDEL VAN HET PANEEL MET GEREEDSCHAP & VERWIJDER HET DEKSEL & SCHERM HELEMAAL De ventilator draait korter wanneer de externe schakelaar is uitgeschakeld Minimaal 30 seconden De ventilator draait langer wanneer de externe schakelaar is uitgeschakeld Maximaal 30 minuten E Bedrading en opzetten ZIE DETAIL A DETAIL A SCHAAL 2.000 KLANT AANSLUITKLEM G O HO AG Nederlands LA G O HO LAGE SNELHEID AG LA HOGE SNELHEID C6S/C6R C6PS/C6PR DETAIL C SCHAAL 2.000 ZIE DETAIL C ZIE DETAIL B + - KLANT AANSLUITKLEM TIMER DETAIL B SCHAAL 2.000 OG HO AG LA OG HO AG LA LAGE SNELHEID HOGE SNELHEID C6TS/C6TR DETAIL E SCHAAL 2.000 ZIE DETAIL E ZIE DETAIL D + + - TIMER . H.M DETAIL D SCHAAL 2.000 OG HO AG LA OG HO G A LA LAGE SNELHEID HOGE SNELHEID C6HTS/C6HTR KLANT AANSLUITKLEM Nederlands Wat de installateur nodig zal hebben. • Een 3mm elektriciteitsschroevendraaier en Nr. 1 en 2 Pozidrive schroevendraaiers. Als de ventilator aan een wand wordt gemonteerd, heeft u ook nodig: • Een voorgeboord gat met een diameter van 150mm. • Een geschikt extern Wandrooster en ronde wandbuis met een Ø van 150mm. Kit Ref 91233AW. Als de ventilator aan het plafond wordt gemonteerd, heeft u ook nodig: • Een voorgeboord gat met een diameter van 150mm. • Geschikte hulpmiddelen om af te sluiten. Deze items zijn verkrijgbaar bij Xpelair: • 3m flexibele buis Ref: 89665AA Als de buis door een koude ruimte gaat, gebruik dan geïsoleerde buis ref: 91461AA Installeren van de isolerende schakelaar en kabels. Een hulpmiddel voor ontkoppeling in alle polen moet worden ingebouwd in de vaste bedrading overeenkomstig bedradingsvoorschriften • Als metalen schakelkasten worden gebruikt, moeten de voorschriften voor aarding worden gevolgd. • De doorsnede van het gebruikte voedingssnoer moet liggen tussen 1-1,5mm². • C6S / C6R / C6PS / C6PR – 2 kernen, C6TS / C6TR / C6HTS / C6HTR – 3 kernen. • C6TS / C6TR / C6HTS / C6HTR. Een Aan/ Uit-schakelaar op wand of plafond (met indicatorlampje) wordt aanbevolen 1. Controleer of de elektrische classificatie die staat binnenin de achterplaat overeenkomt met uw netvoeding. 2. Controleer of er geen verborgen leidingen of kabels, bijv. voor elektriciteit, gas, water, achter de plaats voor de schakelaar zitten (in de wand of boven het plafond). Als u twijfelt, vraag dan professioneel advies. 3. Isoleer de netvoeding. 4. Plaats in de kabel vanaf de isolerende schakelaar naar de plaats van de ventilator via de aan/uit-schakelaar (indien nodig). 5. Plaats in de kabel vanaf de isolerende schakelaar naar het verbindingspunt naar de netvoeding. Waarschuwing: Maak in dit stadium geen verbinding met de elektrische voeding. 6. Installeer de isolerende schakelaar en de aan/uit-schakelaar (indien nodig). 7. Maak alle verbindingen in de isolerende schakelaar en de aan/uit-schakelaar (indien nodig). Natte ruimtes: Aan/Uit-schakelaar moet zo geplaatst worden dat hij niet kan worden aangeraakt door personen die gebruik maken van het bad of de douche. Voorbereiden van de ventilator voor installatie. 1. Verwijder het frontpaneel/ roosterassemblage door op de hendel aan de onderkant van het paneel te drukken en het frontpaneel / rooster vanaf de bodem eruit te trekken (Zie Figuur C). Als u boven vloerniveau werkt, moeten veiligheidsmaatregelen in acht genomen worden. 2. 3. 4. 5. 6. Markeer de positie van de achterplaat Houd de achterplaat zo dat de stellijn die erop gemarkeerd is, horizontaal georiënteerd is. Schuif de ventilatorbuis voorzichtig in het wandkanaal. Markeer op de wand de posities van de bevestigingsgaten in de achterplaat. Verwijder de achterplaat van de kanalen. Boor schroefgaten op deze posities, indien nodig, en plaats er wandpluggen en schroeven in zoals nodig. De ventilator kan ook worden bevestigd op een wandbuis met behulp van klemhaken. Zie 9 hieronder. Als hij in een plafond wordt geïnstalleerd, zijn geschikte eindhulpstukken vereist. Volg de bijgeleverde instucties. Monteer de achterplaat. 7. Leid de voedingskabel door het kabelinvoergat in de achterplaat naar de aansluitklemmen. 8. Plaats de ventilatorbuis van de achterplaat in het wandkanaal/plafond zoals hiervoor. 9. Zet de achterplaat vast op de wand/ het plafond met behulp van geschikte bevestigingsmiddelen. Zie Figuur A. F C6S/C6R C6PS/C6PR VENTILATOR AANSLUITKLEMMEN DUBBELE POOL ISOLERENDE SCHAKELAAR • Voor vaste bedradingscircuits mag de beschermende zekering voor het apparaat niet hoger zijn dan 5A. • Klem E kan worden gebruikt als een gereserveerde klem voor een aarddraad (indien nodig) VENTILATOR AANSLUITKLEMMEN AAN/UITSCHAKELAAR LAMP (INDIEN NODIG) C6TS/C6TR C6HTS/C6HTR DUBBELE POOL ISOLERENDE SCHAKELAAR ZEKERING 10. Als schroeven worden gebruikt, draai ze dan niet te vast aan. De ventilator kan ook worden bevestigd op een wandbuis met behulp van klemhaken.. Draai de schroeven vast totdat de ventilator stevig is gezekerd op de buis - zie Figuur B. Bedrading van de elektrische aansluitingen. 11. Zorg dat de netvoeding geïsoleerd is. Schakel de elektrische netvoeding uit en verwijder zekeringen. 12. Leid de kabel naar het klemmenblok. Bedraad de ventilator zoals getoond in Figuur F met behulpp van het schema dat hoort bij het ventilatormodel. 13.Verbind de kabel van de isolerende schakelaar met de elektrische voedingsdraad. Alleen C6TS / C6TR. • Om de periode van te lang draaien aan te passen, draait u de regelknop (T) met de klok mee om deze te verhogen en tegen de klok in om te verlagen - zie Figuur D. Alleen C6HTS /C6HTR – zie Figuur D en E. • De vooraf ingestelde vochtigheidswerking is in de fabriek ingesteld op ongeveer 75% Relatieve Vochtigheid (RV), maar kan worfden aangepast tussen 65% en 85% RV met regelknop H. • De timer voor overmatig draaien is in de fabriek ingesteld op 15 minuten, maar kan worden aangepast van 30 seconden tot 30 minuten met regelknop T. • Draai de regelknoppen met de klok meer om RV of tijd te verhogen en tegen de klok in om ze te verlagen. Ventilator Instellingen Gebruiken van SNELHEID INSTELLING De ventilatoren zijn in de fabriek ingesteld de ventilator op lage snelheid, maar ze hebben twee snelheidsinstellingen voor verschillende toepassingen. Selecteer ofwel hoge of lage snelheid door de jumper tussen de midden- of hoge of lage snelheidspin op de jumper aan te sluiten (zie Figuur E) Alleen C6S / C6R • Bedien de ventilator met behulp van de aan/ uit-schakelaar (niet bijgeleverd). Herhaal om uit te schakelen. Nederlands ZEKERING Nederlands Alleen C6PS / C6PR • Bedien de ventilator door aan het koord te trekken en weer los te laten. Herhaal om uit te schakelen. Alleen C6TS /C6TR • Bedien de ventilator met behulp van een aan/ uit-schakelaar (niet bijgeleverd). Wanneer de schakelaar uit uitgeschakeld, blijft de ventilator gedurende de ingestelde uitsteltijd werken. Om de periode voor langer draaien aan te passen, draait u de regelknop “T” met de klok mee om deze te verhogen en tegen de klok in om te verlagen - zie Figuur F. Alleen C6HTS /C6HTR. • Automatische modus - De ventilator past zich automatisch aan langzame veranderingen in de natuurlijke vochtigheidsniveaus zonder de ventilator te bedienen. Als de vochtigheidsniveaus toenemen met een snelheid lager dan 5% RV in 5 minuten, tot het vooraf ingestelde vochtigheidsniveau, zal de ventilator niet door vochtigheid geactiveerd worden. Dit is om hinderlijk activeren van de ventilator te voorkomen. Als de vochtigheidsniveaus sneller toenemen dan 5% RV in 5 minuten, zal de ventilator gaan werken Wanneer de relatieve vochtigheid daalt, blijft de ventilator werken gedurende de instelbare uitsteltijd. • Externe bediening - Gebruik de externe aan/uit-schakelaar. Wanneer de ventilator wordt uitgeschakeld, blijft de ventilator werken gedurende de instelbare uitsteltijd en gaat daarna over in de automatische modus. Alle ventilatoren Herplaats het frontpaneel/roosterassemblage door eerst de bovenkant vast te haken en daarna het paneel omlaag te draaien om hem op zijn plaats te klikken. Reinigen (een keer per maand aanbevolen) 1. Vóór het reinigen haalt u de ventilator helemaal los van de netvoeding. 2. Verwijder het frontpaneel/roosterassemblage door te drukken op de hendel aan de onderkant van het paneel en het frontpaneel /rooster er vanaf de onderkant uit te trekken. 3. Om het frontpaneel/roosterassemblage te reinigen, veegt u deze af met een vochtige, pluisvrije doek of u wast ze met warm zeepsop. Droog het frontpaneel grondig en plaats terug. 4. Dompel de ventilator niet in water of andere vloeistoffen om onderdelen van de ventilator te reinigen. 5. Gebruik geen sterke schoonmaakmiddelen, oplosmiddelen of chemische reinigingsmiddelen. 6. Laat de ventilator grondig drogen vóór gebruik. 7. Naast het reinigen is geen ander onderhoud nodig. Verwijdering Dit product mag niet verwijderd worden met het huishoudelijk afval. Recycleer als deze faciliteiten bestaan. Vraag na bij uw lokale overheid voor recycleeradvies. Technisch advies en service Internationaal. • Garantie: Neem contact op met uw lokale distributeur of direct met Xpelair voor details. • Technisch Advies en Service: Neem contact op met uw lokale Xpelair distributeur. Standard C6S (93170AW) C6R (93171AW) • • • • Minuteur C6TS (93172AW) C6TR (93173AW) Câble de traction C6PS (93174AW) C6PR (93175AW) Humidistat, Minuteur C6HTS (93176AW) C6HTR (93177AW) Lire entièrement la notice d'utilisation avant de procéder à l'installation. Installer chaque ventilateur avec un dispositif de déconnexion sur tous les pôles du câblage fixe. S’assurer que l'alimentation électrique est coupée avant tout branchement électrique ou toute opération d'entretien ou encore de nettoyage. Prière de conserver cette notice avec le ventilateur pour que l'utilisateur puisse s'y référer ultérieurement. Français Instructions d'installation et d'entretien Français Cet appareil est destiné au branchement sur câblage fixe. Vérifier que les caractéristiques électriques affichées sur chaque ventilateur correspondent à celles du réseau électrique. IL S'AGIT D'UN APPAREIL À DOUBLE ISOLATION QUI NE REQUIERT PAS DE CONNEXION DE MISE A LA TERRE. Toutes les installations doivent être supervisées par un électricien qualifié. Les installations et le câblage doivent être conformes aux normes en vigueur. Cet appareil peut être utilisé par les enfants âgés de 8 ans et plus et par des personnes souffrant de déficiences physiques ou sensorielles ou encore par des personnes sans aucune expérience ni connaissances si ces derniers sont assistés ou reçoivent des instructions relatives à l'utilisation de cet appareil en toute sécurité et comprennent les risques encourus. Il est interdit aux enfants de jouer avec cet appareil. Le nettoyage et l'entretien de l'appareil ne doivent pas être effectués par les enfants. Tous les ventilateurs Xpelair Simply SilentTM Contour AC possèdent les caractéristiques suivantes : • Extraction deux vitesses (à sélectionner lors de l'installation) • Obturateur de courant d'air intégré d'humidité intégral ou à l'aide d'un interrupteur Marche/Arrêt (non fourni). En mode automatique : le minuteur automatique intégré fait fonctionner le ventilateur avec un décalage pré-réglé compris entre 30 secondes et 30 minutes une fois que l'humidité va en deçà de la valeur d'humidité relative (RH) pré-réglée Fonctionnement externe : Lorsqu'il est éteint à l'aide de l'interrupteur externe Marche/Arrêt le ventilateur continue de fonctionner avec un décalage pré-réglé compris entre 30 secondes et 30 minutes. * Réglages d'usine : Minuteur 15 minutes, RH 75 % Emplacement du ventilateur. • Le placer le plus haut possible. • À une distance minimale de 110 mm entre les extrémités de la surface de montage et le centre du trou. • Aussi loin que possible de et en face de la principale source de renouvellement d'air pour assurer la circulation de l'air dans la pièce (exemple en face de l'entrée interne). • Près de la source de vapeur ou d'odeurs • • • C6S/C6R - Faire fonctionner le ventilateur en utilisant l'interrupteur Marche/Arrêt (non fourni). C6PS/C6PR - Faire fonctionner le ventilateur à l'aide d'un câble de traction intégral. C6TS/C6TR* - Le minuteur intégré fait fonctionner le ventilateur avec un décalage préréglé de 30 secondes à 30 minutes. C6HTS/C6HTR* - fonctionne une fois déclenché automatiquement par le capteur • • Pas à des endroits où les températures ambiantes sont susceptibles d'être supérieures à 50°C. Si installés dans une cuisine, les ventilateurs ne doivent pas être fixés directement au-dessus d'une table de cuisson, ou d'un four à hauteur des yeux. S'il est installé dans une pièce contenant un appareil à combustion possédant un conduit déséquilibré, l'installateur doit s'assurer que le renouvellement d'air est suffisant afin d'éviter que les fumées ne descendent vers le conduit lorsque le ventilateur fonctionne à plein régime. Se référer aux normes de construction pour les exigences spécifiques. L'air évacué ne doit pas passer par un conduit utilisé pour l'évacuation de fumées issues d'appareils fonctionnant avec une énergie autre que l'énergie électrique. Les exigences de toutes les autorités concernées doivent être respectées en ce qui concerne les débits d'évacuation et d'amenée d'air. Ne doit pas être utilisé dans de potentiels milieux à corrosion chimique. A Positions de fixation de la plaque arrière B Conduit mural Colliers de serrage rapide COLLIER DE SERRAGE RAPIDE C Retrait du couvercle avant D IMPORTANT – BIEN VOULOIR LIRE Réglage de l'humidité Le ventilateur se met en marche à un faible niveau de condensation (dans le sens inverse des aiguilles d'une montre) Le ventilateur ne se met pas en marche tant qu'un niveau de condensation plus élevé soit atteint (dans le sens des aiguilles d'une montre) PLUS SENSIBLE (RH = 50 %) MOINS SENSIBLE (RH = 95 %) Réglages d'usine : Minuterie 15 minutes, RH 75 % Réglage du fonctionnement du minuteur RABATTRE LE LOQUET AVEC L'OUTIL ET ENLEVER L'ENSEMBLE COUVERCLE ET DÉFLECTEUR Le ventilateur fonctionne pendant une période de temps plus courte lorsque l'interrupteur externe est à l'arrêt. Minimum 30 secondes Le ventilateur fonctionne plus longtemps lorsque l'interrupteur externe est à l'arrêt Maximum 30 minutes Français Dimensions générales (mm) E Câblage et installation VOIR SCHÉMA A SCHÉMA A ÉCHELLE 2 000 BORNE DE RACCORDEMENT DU CLIENT TE U HA SE S BA E UT HA VITESSE RÉDUITE E SS BA GRANDE VITESSE Français C6S / C6R C6PS / C6PR SCHÉMA C ÉCHELLE 2 000 VOIR SCHÉMA C VOIR SCHÉMA B + BORNE DE RACCORDEMENT DU CLIENT - MINUTEUR SCHÉMA B ÉCHELLE 2 000 E UT HA E SS HA BA E UT BA E SS VITESSE RÉDUITE GRANDE VITESSE C6TS / C6TR SCHÉMA E ÉCHELLE 2 000 + VOIR SCHÉMA E VOIR SCHÉMA D + - . H.M MINUTEUR SCHÉMA D ÉCHELLE 2 000 UT HA E SE UT HA S BA E E SS BA VITESSE RÉDUITE GRANDE VITESSE C6HTS / C6HTR BORNE DE RACCORDEMENT DU CLIENT Si le ventilateur est fixé sur un mur, ce qui suit est nécessaire : • un trou préparé de 150 mm de diamètre. • une grille murale extérieure et une gaine de manchon mural de 150 mm de diamètre. Kit Réf 91233AW. Si le ventilateur est monté au niveau du plafond, ce qui suit est également nécessaire : • un trou préparé de 150 mm de diamètre. • des accessoires de finition appropriés. Ces éléments sont disponibles chez Xpelair ; • gaine flexible de 3 m Réf: 89665AA. Si la gaine passe à travers un espace froid, utiliser une gaine isolée réf : 91461AA. • • • • Installation de l'interrupteur d'isolement et des câbles. Un dispositif de déconnexion de tous les pôles doit être incorporé au câblage fixe conformément aux normes de câblage Si des coffrets d'interrupteur métalliques sont utilisés, les normes de mise à la terre doivent être respectées. La partie transversale du câble d'alimentation utilisé doit varier de 1 à 1,5 mm². C6S / C6R / C6PS / C6PR – core 2, C6TS / C6TR / C6HTS / C6HTR – core 3. C6TS / C6TR / C6HTS / C6HTR. Un interrupteur Marche/Arrêt mural ou de plafond (avec signal lumineux) est recommandé. 1. Vérifier que les caractéristiques électriques affichées sur la plaque arrière correspondent à votre alimentation électrique. 2. Vérifier qu'il n'y a aucune conduite ou câble souterrain tel qu'un câble électrique, de gaz ou une conduite d'eau, derrière l'emplacement de l'interrupteur (dans le mur ou au-dessus du plafond). En cas de doute, se référer à un professionnel. 3. Isoler l'alimentation électrique. 4. Insérer le câble depuis l'interrupteur d'isolement jusqu'à l'emplacement du ventilateur en passant par l'interrupteur Marche/Arrêt (si nécessaire). 5. Insérer le câble depuis l'interrupteur d'isolement jusqu'au point de raccordement à l'alimentation électrique. Attention : À ce niveau, n'effectuer aucun branchement à l'alimentation électrique. 6. Installer l'interrupteur d'isolement et l'interrupteur Marche/Arrêt (si nécessaire). 7. Effectuer tous les raccordements dans l'interrupteur d'isolement et l'interrupteur Marche/Arrêt (si nécessaire). Pièces humides : L'interrupteur Marche/Arrêt doit être placé de telle manière qu'il ne puisse être touché par les utilisateurs de la baignoire ou de la douche. Préparation du ventilateur à l'installation. 1. Retirer l'ensemble couvercle avant/ déflecteur en rabattant le loquet sur la partie inférieure du couvercle et en tirant l'ensemble couvercle/déflecteur par le bas (voir Image C) Si le travail s'effectue au-dessus du niveau du sol, des mesures de sécurité doivent être prises. Marquer la position de la plaque arrière 2. Maintenir la plaque arrière de telle sorte que la ligne de référence qui y est marquée soit horizontale. 3. Insérer soigneusement le conduit du ventilateur dans la gaine murale. 4. Indiquer sur le mur les positions des trous de fixation dans la plaque arrière. 5. Retirer la plaque arrière de la gaine. 6. Faire des trous de vissage dans ces positions si nécessaire et insérer des chevilles et des vis adaptées au support mural tel que requis. Le ventilateur peut également être fixé à un conduit mural grâce à des colliers de serrage. Voir point 9 ci-dessous. Si l'installation se fait sur un plafond, des accessoires de finition appropriés sont nécessaires. Suivre les instructions fournies. Fixer la plaque arrière. 7. Alimenter les principaux câbles à travers l'orifice d'entrée du câble dans la plaque arrière jusqu'aux bornes. 8. Insérer le conduit du ventilateur de la plaque arrière dans la gaine murale/de plafond comme précédemment. 9. Fixer la plaque arrière au mur/plafond à l'aide de fixations appropriées. Voir Image A Français Le nécessaire de l’installateur. • un tournevis d’électricien de 3 mm et des tournevis pozidriv N° 1 ou 2. F C6S/C6R C6PS/C6PR VENTILATEUR BORNES BIPOLAIRE INTERRUPTEUR D'ISOLEMENT FUSIBLE • Pour les circuits de raccordement fixes, l'intensité du fusible de protection de l'appareil ne doit pas dépasser 5A. • L’extrémité E peut être utilisée comme point d’attache pour un câble de mise à la terre. Français VENTILATEUR BORNES INTERRUPTEUR MARCHE/ARRÊT LAMPE (SI NÉCESSAIRE) C6TS/C6TR C6HTS/C6HTR BIPOLAIRE INTERRUPTEUR D'ISOLEMENT FUSIBLE 10. En cas d’utilisation de vis, ne pas trop les serrer. Le ventilateur peut également être fixé à un conduit mural grâce à des colliers de serrage. Serrer les vis jusqu’à ce que le ventilateur tienne fermement et en sécurité sur le conduit- voir image B. Raccorder les connexions électriques. 11. S’assurer que l’alimentation électrique est isolée. Couper l’alimentation électrique secteur et enlever les fusibles. 12. Alimenter le câble jusqu’au bornier. Raccorder le ventilateur tel que présenté sur le Schéma F en utilisant le diagramme approprié au modèle de ventilateur. 13. Raccorder le câble depuis l’interrupteur d’isolement jusqu’au branchement de l’alimentation électrique. Réglage du ventilateur REGLAGE DE VITESSE À l'usine, les ventilateurs sont réglés à une vitesse réduite, mais ils possèdent deux réglages de vitesse pour différentes applications. Sélectionner la grande vitesse ou la vitesse réduite en connectant le commutateur entre le centre et la broche à grande ou à faible vitesse sur le commutateur (voir Schéma E) C6TS / C6TR Uniquement. • Pour régler la période de fonctionnement, tourner la commande (T) dans le sens des aiguilles d'une montre afin de l'augmenter et dans le sens inverse au sens des aiguilles d'une montre pour la réduire – voir schéma D. C6HTS /C6HTR Uniquement – voir schémas D et E. • Le mode humide est pré-réglé à l'usine à environ 75 % d'humidité relative (HR), mais peut être réglé à une humidité relative comprise entre 65 % et 85 % avec la commande H. • Le fonctionnement du minuteur est réglé à 15 minutes à l'usine mais peut être réglé de 30 secondes à 30 minutes avec la commande T. • Tourner les commandes dans le sens des aiguilles d'une montre pour augmenter la RH ou le temps et dans le sens inverse au sens des aiguilles d'une montre pour les réduire. C6S / C6R Uniquement • Mettre le ventilateur en marche en utilisant l'interrupteur Marche/Arrêt (non fourni). Procéder de la même manière pour la mise à l'arrêt. C6PS / C6PR Uniquement • Mettre le ventilateur en marche en tirant et en relâchant le câble. Procéder de la même manière pour la mise à l'arrêt. C6TS /C6TR Uniquement • Faire fonctionner le ventilateur en utilisant l'interrupteur Marche/Arrêt (non fourni) Lorsque l'interrupteur est à l'arrêt, le ventilateur continue de fonctionner pendant le temps de décalage déterminé. Pour régler le temps de fonctionnement, tourner la commande « T » dans le sens des aiguilles d'une montre pour l'augmenter et dans le sens inverse au sens des aiguilles d'une montre pour le réduire– voir Schéma F. C6HTS /C6HTR Uniquement. • Mode automatique - Le ventilateur se règle automatiquement aux lentes variations des niveaux naturels d'humidité sans faire fonctionner le ventilateur. Si les niveaux d'humidité augmentent à un taux inférieur à 5% de RH en 5 minutes, jusqu'au niveau d'humidité pré-réglé, le ventilateur ne sera pas déclenché par l'humidité. Ceci permet d'éviter le déclenchement perturbateur du ventilateur. Si les niveaux d'humidité augmentent plus vite que le taux de 5 % de RH en 5 minutes le ventilateur se mettra en marche. Lorsque l'humidité relative baisse, le ventilateur continue de fonctionner pendant le temps de décalage réglable. • Fonctionnement externe - Utiliser l'interrupteur Marche/Arrêt. Lorsque le ventilateur est mis à l'arrêt, il continue de fonctionner pendant le temps de décalage réglable puis vire en mode automatique. Tous les ventilateurs Remonter l'ensemble couvercle avant/ déflecteur en accrochant premièrement la partie supérieure, puis en faisant pivoter le couvercle vers le bas pour le remettre en place. Nettoyage (recommandé une fois par mois) 1. Avant le nettoyage, isoler complètement le ventilateur de l’alimentation électrique. 2. Retirer l’ensemble couvercle avant/déflecteur en rabattant le loquet sur la partie inférieure du couvercle et en tirant sur l’ensemble couvercle avant/déflecteur par le bas. 3. Pour nettoyer l’ensemble couvercle avant/ déflecteur, l’essuyer avec un chiffon non pelucheux humide ou le laver avec de l’eau chaude savonneuse. Sécher soigneusement le couvercle avant et le remettre en place. 4. Ne pas immerger le ventilateur dans de l’eau ou dans d’autres liquides pour nettoyer d’autres composants du ventilateur. 5. N’utiliser ni détergents, solvants ou nettoyants chimiques agressifs 6. Laisser le ventilateur sécher complètement avant utilisation. 7. Outre le nettoyage, aucun autre entretien n’est requis. Évacuation Ce produit ne doit pas être jeté avec les ordures ménagères. Prière de le recycler où des services existent. Se rapprocher de votre autorité locale pour recevoir des conseils sur le recyclage. Équipe et service technique International. • Garantie : Contacter votre distributeur local ou Xpelair directement pour toute information. • Équipe et service techniques : Contacter votre distributeur Xpelair. Français Utilisation du ventilateur Istruzioni per installazione e manutenzione Timer C6TS (93172AW) C6TR (93173AW) Tirante C6PS (93174AW) C6PR (93175AW) Umidistato, Timer C6HTS (93176AW) C6HTR (93177AW) İtaliano Standard C6S (93170AW) C6R (93171AW) • • • • Leggere l'intero manuale di istruzione prima di iniziare l'installazione. Installare il ventilatore con uno strumento di scollegamento di tutti i poli nel cablaggio fisso. Assicurarsi che l'alimentazione sia disattivata prima di cercare di eseguire i collegamenti elettrici o di eseguire eventuale manutenzione o pulizia. Lasciare questo manuale assieme al ventilatore a disposizione dell'utilizzatore. Questo apparecchio può essere usato da bambini dagli 8 anni in su e da persone con ridotte capacità fisiche e sensoriali o mancata esperienza o conoscenze solo sotto supervisione o con istruzioni riguardanti l’uso dell’apparecchio in modo sicuro e se comprendono i rischi che comporta. I bambini non devono giocare con l’apparecchio. La pulizia e la manutenzione dell'apparecchio non devono essere effettuate dai bambini. Tutti i ventilatori Xpelair Simply SilentTM Contour AC sono dotati delle seguenti caratteristiche: • Due opzioni di velocità (selezionabili al momento dell'installazione) • Serranda anti-ritorno integrata C6S/C6R - Azionare il ventilatore utilizzando un interruttore di accensione/spegnimento (non in dotazione). C6PS/C6PR - Azionare il ventilatore utilizzando un tirante. C6TS/C6TR* - Il timer integrato aziona il ventilatore con un ritardo preimpostato da 30 secondi a 30 minuti. C6HTS/C6HTR* - Si attiva quando innescato automaticamente dal sensore integrato dell'umidità o utilizzando un interruttore di accensione/spegnimento (non in dotazione). In modalità automatica: il timer integrato aziona automaticamente il ventilatore con un ritardo da 30 secondi a 30 minuti quando l'umidità scende al di sotto del valore di umidità relativa (UR) preimpostato. Funzionamento esterno: Se spento mediante l'interruttore di accensione/spegnimento esterno, il ventilatore continua a funzionare per il tempo preimpostato da 30 secondi a 30 minuti. * Impostazioni di fabbrica: Timer 15 minuti, UR 75% Dove posizionare il ventilatore. • Collocarlo quanto più in alto possibile. • Almeno 110 mm dai bordi della superficie di montaggio al centro del foro. • Quanto più lontano possibile dalla fonte principale di aria, e di fronte ad essa, per assicurare il flusso di aria nella stanza (per es. di fronte alla porta interna). • Vicino a fonte di vapore od odori. • Non in luoghi in cui vi sia la possibilità che le temperature superino i 50°C. • Se installato in cucina, il ventilatore non deve essere montato immediatamente sopra al piano cottura o al grill a livello occhi. • Se si installa in una stanza contenente un dispositivo che brucia carburante che non ha un tubo bilanciato, è responsabilità dell'installatore assicurare che vi sia abbastanza aria in movimento che impedisca l'aspirazione dei fumi nel tubo quando il ventilatore opera alla sua massima velocità. Vedere le norme dell'edificio per i requisiti specifici. • L'aria di sfiato non deve essere scaricata in un tubo utilizzato per lo sfiato di fumi da apparecchi alimentati da energia diversa da quella elettrica. I requisiti di tutte le autorità interessate devono essere osservati per i tassi di flusso dello scarico dell'aria di sfiato e dell'aria in ingresso. • Utilizzo non idoneo in atmosfere chimiche potenzialmente corrosive. L’installatore avrà necessità di quanto segue. • Cacciavite da elettricista da 3 mm e cacciaviti Pozidrive N.1 o 2. İtaliano Questo apparecchio è concepito per essere collegato al cablaggio fisso. Controllare che le informazioni elettriche presenti su ciascun ventilatore corrispondano all'alimentazione di rete. QUESTO APPARECCHIO È DOTATO DI DOPPIO ISOLAMENTO E NON RICHIEDE LA MESSA A TERRA. Tutte le installazioni devono ricevere la supervisione di un elettricista qualificato. Installazioni e cablaggio devono essere conformi ai regolamenti appropriati. Dimensioni complessive (mm) A Posizioni di fissaggio della piastra posteriore B Morsetti per il montaggio veloce del tubo a parete İtaliano MORSETTI MONTAGGIO VELOCE C Rimozione della copertura anteriore D IMPORTANTE – LEGGERE Regolazione dell'impostazione di umidità Il ventilatore si accende al livello più basso di condensa (senso antiorario) MAGGIORE SENSIBILITÀ (UR = 50%) Il ventilatore non si accende fino a un livello superiore di condensa (senso orario) MINORE SENSIBILITÀ (UR = 95%) Impostazioni di fabbrica: Timer 15 minuti, UR 75% Regolazione del funzionamento mediante impostazione del timer PREMERE LA CHIUSURA DELLA COPERTURA CON UNO STRUMENTO, RIMUOVERE DEL TUTTO LA COPERTURA E IL DIAFRAMMA Il ventilatore funziona per un tempo più breve quando l'interruttore esterno viene spento Minimo 30 secondi Il ventilatore funziona per un tempo più lungo quando l'interruttore esterno viene spento Massimo 30 minuti E Cablaggio e configurazione VEDERE DETTAGLIO A DETTAGLIO A SCALA 2.000 MORSETTO DI CONNESSIONE PERSONALIZZATO TO AL SO S BA TO AL BASSA VELOCITÀ O SS BA ALTA VELOCITÀ C6S / C6R C6PS / C6PR DETTAGLIO C SCALA 2.000 + - VEDERE DETTAGLIO C VEDERE DETTAGLIO B MORSETTO DI CONNESSIONE PERSONALIZZATO TIMER DETTAGLIO B SCALA 2.000 TO AL O BA O SS İtaliano SS BA TO AL BASSA VELOCITÀ ALTA VELOCITÀ C6TS / C6TR DETTAGLIO E SCALA 2.000 + VEDERE DETTAGLIO E + - VEDERE DETTAGLIO D H.M TIMER . DETTAGLIO D SCALA 2.000 TO AL O SS BA TO AL O SS BA BASSA VELOCITÀ ALTA VELOCITÀ C6HTS / C6HTR MORSETTO DI CONNESSIONE PERSONALIZZATO Se il ventilatore viene montato a parete, si avrà anche bisogno di: • Un foro pre-trapanato da 150 mm. • Una griglia a parete esterna appropriata e un condotto con guaina a parete di Ø150 mm. Rif. kit 91233AW. Se il ventilatore viene montato a soffitto, si avrà anche bisogno di: • Un foro pre-trapanato da 150 mm. • Accessori appropriati per il completamento. Questi articoli sono disponibili presso Xpelair: • Condotto flessibile da 3 m Rif.: 89665AA. Se il condotto passa attraverso un spazio freddo, utilizzare il rif. condotto isolato: 91461AA. • İtaliano • • • Installazione di interruttore di isolamento e cavi. Uno strumento per lo scollegamento di tutti i poli deve essere integrato nel cablaggio fisso secondo le norme di cablaggio Se si utilizzano commutatori metallici, bisogna rispettare le norme per la messa a terra. L'area di sezione trasversale del cavo di alimentazione utilizzato deve essere di 1-1,5 mm². C6S / C6R / C6PS / C6PR – 2 nuclei, C6TS / C6TR / C6HTS / C6HTR – 3 nuclei. C6TS / C6TR / C6HTS / C6HTR. Si raccomanda un interruttore di accensione a parete o a soffitto (con indicatore luminoso) 1. Controllare che le informazioni elettriche mostrate all'interno della piastra posteriore corrispondano all'alimentazione di rete. 2. Controllare che non ci siano tubi o cavi interrati, per es. elettricità, gas, acqua, dietro alla collocazione dell'interruttore (nel muro o nel soffitto). In caso di dubbi, rivolgersi a un professionista. 3. Isolare l'alimentazione di rete. 4. Far scorrere il cavo dall'interruttore di isolamento alla posizione del ventilatore mediante l'interruttore di accensione/ spegnimento (se necessario). 5. Far scorrere il cavo dall'interruttore di isolamento al punto di collegamento dell'alimentazione di rete. Avvertenza: In questa fase, non eseguire collegamenti all'alimentazione elettrica. 6. Installare l'interruttore di isolamento e l'interruttore di accensione/spegnimento (se necessario). 7. Eseguire tutti i collegamento dell'interruttore di isolamento e dell'interruttore di accensione/spegnimento (se necessario). Ambienti umidi: L'interruttore di accensione/spegnimento deve essere posizionato in modo che non possa essere toccato da persone che usano bagni o docce. Preparazione del ventilatore per l'installazione. 1. Rimuovere il gruppo copertura anteriore/ diaframma premendo la chiusura sul lato inferiore della copertura e tirando copertura anteriore/diaframma dal fondo (vedere la Figura C). Se il funzionamento è al di sopra del livello del pavimento, bisogna osservare le precauzioni di sicurezza. Contrassegnare la posizione della piastra posteriore 2. Tenere la piastra posteriore in modo che la linea di livello contrassegnata su di essa sia orientata in orizzontale. 3. Inserire con attenzione il tubo del ventilatore nel condotto a parete. 4. Contrassegnare sulla parete le posizioni dei fori di fissaggio nella piastra posteriore. 5. Rimuovere la piastra posteriore dal condotto. 6. Trapanare i fori in queste posizioni, se necessario, e montare spine e viti a parete, secondo necessità. Il ventilatore potrebbe anche essere fissato a un tubo a parete utilizzando le staffe di fissaggio. Vedere 9 sotto. Se si installa a soffitto, sono necessari accessori appropriati. Seguire le istruzioni fornite. Montare la piastra posteriore. 7. Instradare il cavo di rete attraverso il foro di ingresso per il cavo nella piastra posteriore ai morsetti. 8. Inserire il tubo del ventilatore della piastra posteriore nel condotto a parete/soffitto, come prima. 9. Fissare la piastra posteriore a parete/ soffitto utilizzando fissaggi appropriati. Vedere la Figura A. 10. Se si utilizzano viti, non stringere troppo. Il ventilatore potrebbe anche essere fissato a un tubo a parete utilizzando le staffe di fissaggio. Stringere le viti finché il ventilatore non è fissato in modo sicuro al tubo - vedere la Figura B. F C6S/C6R C6PS/C6PR VENTILATORE MORSETTI POLO DOPPIO INTERRUTTORE DI ISOLAMENTO FUSIBILE • Per circuiti di cablaggio fissi, il fusibile di protezione per l’apparecchio non deve superare 5A. • Il Terminale E può essere utilizzato come terminale di parcheggio per cavo di terra (se necessario). VENTILATORE MORSETTI INTERRUTTORE DI ACCENSIONE/SPEGNIMENTO LAMPADINA (SE NECESSARIO) C6TS/C6TR C6HTS/C6HTR POLO DOPPIO INTERRUTTORE DI ISOLAMENTO Collegamenti elettrici. 11. Assicurarsi che l'alimentazione di rete sia isolata. Disattivare l'alimentazione di rete e rimuovere i fusibili. 12. Far passare il cavo fino alla morsettiera. Collegare il ventilatore come mostrato nella Figura F utilizzando il diagramma appropriato al modello di ventilatore. 13. Collegare il cavo dall'interruttore di isolamento all'alimentazione elettrica. Solo C6HTS /C6HTR – vedere le figure D ed E. • L’umidità preimpostata in fabbrica è circa 75% umidità relativa (UR), ma può essere regolata tra 65% e 85% UR mediante il comando H. • Il timer di superamento è impostato in fabbrica a 15 minuti ma può essere regolato da 30 secondi a 30 minuti mediante il comando T. • Ruotare i comandi in senso orario per aumentare l’UR o il tempo e in senso antiorario per diminuire. Impostazioni ventilatore Utilizzo del ventilatore IMPOSTAZIONE VELOCITÀ I ventilatori sono impostati in fabbrica a bassa velocità, ma hanno due impostazioni di velocità per applicazioni diverse. Selezionare velocità alta o bassa collegando il ponticello tra il centro e il perno dell’alta o bassa velocità sul ponticello (vedere la Figura E) Solo C6S / C6R • Azionare il ventilatore utilizzando l’interruttore di accensione/spegnimento (non in dotazione). Ripetere per spegnere. Solo C6TS / C6TR. • Per regolare il periodo di superamento, ruotare il comando (T) in senso orario per aumentare e in senso antiorario per diminuire – vedere la Figura D. Solo C6PS / C6PR • Azionare il ventilatore tirando e rilasciando il cavo. Ripetere per spegnere. Solo C6TS /C6TR • Azionare il ventilatore utilizzando l’interruttore di accensione/spegnimento (non in dotazione). Quando l’interruttore viene spento, il ventilatore continua a funzionare İtaliano FUSIBILE per il tempo impostato. Per regolare il periodo di superamento, ruotare il comando “T” in senso orario per aumentare e in senso antiorario per diminuire – vedere la Figura F. İtaliano Solo C6HTS /C6HTR. • Modalità automatica - Il ventilatore si regola automaticamente secondo piccoli cambiamenti nei livelli di umidità naturale senza azionare il ventilatore. Se i livelli di umidità crescono a un tasso più lento del 5% di UR in 5 minuti, fino al livello dell’umidità preimpostata, il ventilatore non viene innescato dall’umidità. Questo serve per impedire un innesco fastidioso del ventilatore. Se i livelli di umidità crescono più rapidamente del 5% di UR in 5 minuti, il ventilatore si avvia. Quando l’umidità relativa scende, il ventilatore continua a funzionare per il tempo regolato. • Funzionamento esterno - Utilizzare l’interruttore di accensione/spegnimento esterno. Quando il ventilatore è spento, esso continua a funzionare per il tempo regolato e poi passa in modalità automatica. Tutti i ventilatori Rimontare il gruppo copertura anteriore/ diaframma agganciando prima la parte superiore, poi fare oscillare la copertura per fissarla in posizione. Pulizia (raccomandata una volta al mese) 1. Prima della pulizia, isolare completamente il ventilatore dall’alimentazione di rete. 2. Rimuovere il gruppo copertura anteriore/ diaframma premendo la chiusura sul lato inferiore della copertura e tirando copertura anteriore/diaframma dal fondo. 3. Per pulire il gruppo copertura anteriore/ diaframma, pulire con un panno umido senza peli o lavare con acqua calda saponata. Asciugare bene la copertura anteriore e rimontare. 4. Non immergere il ventilatore in acqua o altri liquidi per pulire le altre parti del ventilatore. 5. Non utilizzare detersivi forti, solventi o pulitori chimici 6. Lasciare asciugare bene il ventilatore prima dell’uso. 7. A parte la pulizia, non è necessaria alcuna altra manutenzione. Smaltimento Questo elettrodomestico non deve essere smaltito con i rifiuti domestici. Riciclare nelle strutture apposite. Controllare con le autorità locali per il riciclo. Consulenza e assistenza tecnica Internazionale. • Garanzia: Per dettagli, contattare il distributore locale o Xpelair direttamente. • Consulenza e assistenza tecnica: Contattare il distributore locale Xpelair. Instrucciones de instalación y mantenimiento Temporizador C6TS (93172AW) C6TR (93173AW) Cable tractor C6PS (93174AW) C6PR (93175AW) Higrostato, Temporizador C6HTS (93176AW) C6HTR (93177AW) Español Estándar C6S (93170AW) C6R (93171AW) • • • • Lea el folleto de instrucciones antes de comenzar la instalación. Instale cada ventilador con un medio de desconexión en todos los polos en el cableado fijo. Asegúrese de que el suministro eléctrico esté desconectado antes de intentar realizar conexiones eléctricas o de realizar cualquier tarea de mantenimiento o limpieza. Deje este folleto con el ventilador en beneficio del usuario. Español Este aparato está destinado para conectarse a cableado fijo. Compruebe que la clasificación eléctrica indicada en cada ventilador coincida con el suministro eléctrico. EL APARATO TIENE DOBLE AISLAMIENTO Y NO REQUIERE UNA CONEXIÓN A TIERRA. Todas las instalaciones deben ser supervisadas por un electricista calificado. Las instalaciones y el cableado deben cumplir con las regulaciones apropiadas. En modo automático: el temporizador incorporado hace que el ventilador funcione automáticamente, durante un tiempo de retardo preestablecido de 30 segundos a 30 minutos, una vez que la humedad cae por debajo del valor preestablecido de humedad relativa (HR). Este aparato puede ser utilizado por niños y niñas de 8 años en adelante y por personas con capacidades sensoriales físicas reducidas o falta de experiencia y conocimiento, si son supervisadas o si se les instruye acerca del uso del aparato de una manera segura y entienden los riesgos que conlleva. Los pequeños no deben jugar con el aparato. Las tareas de limpieza y mantenimiento del aparato no deben ser realizadas por niños o niñas. * Ajustes de fábrica: temporizador 15 minutos, HR 75 % Todos los ventiladores Xpelair Simply SilentTM Contour AC tienen las siguientes características: • Extracción de dos velocidades (seleccionable en la instalación). • Obturador antirretorno incorporado. C6S/C6R - Use el ventilador mediante un interruptor de encendido/apagado (no suministrado). C6PS/C6PR - Use el ventilador mediante un cable tractor integral. C6TS/C6TR* - El temporizador incorporado hace funcionar el ventilador con un retardo preestablecido de 30 segundos a 30 minutos. C6HTS/C6HTR* - Actúa cuando es activado automáticamente por el sensor de humedad integral, o utilizando un interruptor externo de encendido/apagado (no suministrado). Funcionamiento externo: cuando se apaga con el interruptor externo de encendido/ apagado, el ventilador continúa funcionando durante el retardo preestablecido de 30 segundos a 30 minutos. Dónde colocar el ventilador: • Colóquelo lo más alto posible. • Al menos 110 mm desde los bordes de la superficie de montaje al centro del orificio. • Tan lejos como sea posible de la principal fuente de reemplazo de aire y frente a la misma para asegurar el flujo de aire por la habitación (por ejemplo, frente a la puerta interna). • Junto a la fuente de vapor u olores. • No donde la temperatura ambiente pueda ser mayor de 50 °C. • Si se instala en una cocina, los ventiladores no deben montarse justo por encima de una encimera o en una parrilla a la altura de los ojos. • Si se instala en una sala que contenga un dispositivo de combustión con una chimenea no balanceada, es responsabilidad del instalador asegurarse de que haya suficiente aire de reemplazo para evitar que los humos bajen por la chimenea cuando el ventilador funcione con extracción máxima. Consulte las normas de construcción para ver requisitos específicos. • El aire de salida no debe descargarse en una chimenea usada para el escape de humos de aparatos que usen energía que no sea eléctrica. Se deben tener en cuenta los requisitos de todas las autoridades implicadas para descargar aire de salida y tomar caudales. • No es adecuado para su uso en posibles ambientes corrosivos químicos. Qué necesitará el instalador: • Destornillador de electricista de 3 mm y destornilladores Pozidrive N.º 1 o 2. Dimensiones generales (mm) A Posiciones de fijación de placas posteriores B Abrazaderas de ajuste rápido del tubo de pared C Extracción de la cubierta frontal D IMPORTANTE (POR FAVOR, LÉALO) Ajuste la configuración de humedad El ventilador se enciende a un nivel más bajo de condensación (sentido contrario de las agujas del reloj) El ventilador no se enciende hasta alcanzar un nivel más alto de condensación (sentido de las agujas del reloj) MÁS SENSIBLE (HR = 50 %) MENOS SENSIBLE (HR = 95%) Ajustes de fábrica: temporizador 15 minutos, HR 75 % Ajuste la ejecución en configuración de temporizador PRESIONE EL PESTILLO DE LA CUBIERTA CON LA HERRAMIENTA Y RETIRE LA TAPA Y EL DEFLECTOR COMPLETO El ventilador funciona durante menos tiempo cuando se apaga el interruptor externo Mínimo 30 segundos El ventilador funciona durante más tiempo cuando se apaga el interruptor externo Máximo 30 minutos Español ABRAZADERA DE AJUSTE RÁPIDO E Cableado y configuración VER DETALLE A DETALLE A ESCALA 2.000 TERMINAL DE CONEXIÓN DEL CLIENTE TA AL J BA TA AL A VELOCIDAD BAJA JA BA VELOCIDAD ALTA C6S / C6R C6PS / C6PR DETALLE C ESCALA 2.000 VER DETALLE C VER DETALLE B + - TERMINAL DE CONEXIÓN DEL CLIENTE TEMPORIZADOR DETALLE B ESCALA 2.000 TA AL JA BA TA AL JA BA VELOCIDAD BAJA VELOCIDAD ALTA Español C6TS / C6TR DETALLE E ESCALA 2.000 VER DETALLE E VER DETALLE D + + - H.M TEMPORIZADOR . DETALLE D ESCALA 2.000 TA AL J BA TA AL J BA A A VELOCIDAD BAJA VELOCIDAD ALTA C6HTS / C6HTR TERMINAL DE CONEXIÓN DEL CLIENTE Si monta el ventilador en el techo, también necesitará: • Un orificio preparado de 150 mm de diámetro. • Elementos auxiliares apropiados para la terminación. Estos artículos están disponibles de Xpelair: • Conducto flexible en 3 m ref.: 89665AA. Si el conducto pasa a través de un espacio frío, use un conducto aislado ref.: 91461AA. • • • • Instalación del interruptor y los cables de aislamiento: Se debe incorporar un medio de desconexión en todos los polos en el cableado fijo según las regulaciones sobre cableado. Si se usan cajas de conexiones de metal, se deben seguir las regulaciones sobre puesta a tierra. El área de sección transversal del cable de alimentación utilizado debe ser de 1-1,5 mm². C6S / C6R / C6PS / C6PR – 2 núcleos, C6TS / C6TR / C6HTS / C6HTR – 3 núcleos. C6TS / C6TR / C6HTS / C6HTR. Se recomienda un interruptor de encendido/ apagado de pared o de techo (con luz indicadora) 1. Compruebe que la clasificación eléctrica que se muestra en el interior de la parte posterior de la placa coincida con su suministro eléctrico. 2. Compruebe que no haya tuberías o cables enterrados como, por ejemplo, de electricidad, gas o agua detrás de la ubicación del interruptor (en la pared o sobre el techo). En caso de duda, consulte con un profesional. 3. Aísle el suministro eléctrico. 4. Coloque el cable desde el interruptor de aislamiento hasta la ubicación del ventilador a través del interruptor de encendido/ apagado (si es necesario). 5. Coloque el cable desde el interruptor de aislamiento hasta el punto de conexión al suministro eléctrico. Advertencia: No realice ninguna conexión al suministro eléctrico en esta fase. 6. Instale el interruptor de aislamiento y el interruptor de encendido/apagado (si es necesario). 7. Realice todas las conexiones dentro del interruptor de aislamiento y el interruptor de encendido/apagado (si es necesario). Salas húmedas: el interruptor de encendido/apagado debe colocarse de manera que no lo toquen personas que estén usando la ducha o la bañera. Preparación del ventilador para su instalación: 1. Retire la cubierta frontal/deflector presionando el pestillo en la parte inferior de la cubierta y tirando de la cubierta frontal/ deflector desde la base (vea la Figura C). Si se trabaja en la planta baja, es necesario tomar medidas de seguridad. Marque la posición de la placa posterior: 2. Sujete la placa posterior de manera que la línea marcada esté orientada horizontalmente. 3. Introduzca con cuidado el tubo del ventilador en el conducto de la pared. 4. Marque en la pared las posiciones de los orificios de fijación en la placa posterior. 5. Retire la placa posterior del conducto. 6. Perfore los orificios de los tornillos en estas posiciones, si es necesario, y coloque tacos y tornillos según sea necesario. El ventilador también puede estar fijado a un tubo de pared utilizando los soportes de sujeción. Véase 9 a continuación. Si se instala en el techo, son necesarios elementos auxiliares adecuados. Siga las instrucciones proporcionadas. Monte la placa posterior: 7. Pase el cable de red a través del orificio de entrada de cables en la placa posterior a los terminales. 8. Introduzca el tubo del ventilador de la placa posterior en el conducto de pared/techo como antes. 9. Fije la placa posterior a la pared/techo con sujeciones adecuadas. Véase la Figura A. Español Si monta el ventilador en la pared, también necesitará: • Un orificio preparado de 150 mm de diámetro. • Una rejilla de pared externa adecuada y un conducto de manguito de pared de Ø150 mm. ref. del kit 91233AW. F C6S/C6R C6PS/C6PR VENTILADOR TERMINALES BIPOLAR INTERRUPTOR DE AISLAMIENTO FUSIBLE • Para los circuitos con cableado fijo, el fusible de protección para el aparato no debe ser superior a 5A. • La Terminal E puede usarse como terminal para un cable a tierra (si es necesario) VENTILADOR TERMINALES INTERRUPTOR ENCENDIDO/ APAGADO BOMBILLA (SI ES NECESARIO) C6TS/C6TR C6HTS/C6HTR BIPOLAR INTERRUPTOR DE AISLAMIENTO FUSIBLE Español 10.Si se usan tornillos, no los apriete demasiado. El ventilador también puede estar fijado a un tubo de pared utilizando los soportes de sujeción. Apriete los tornillos hasta que el ventilador esté firmemente fijado al tubo (véase la Figura B). Conecte las conexiones eléctricas: 11. Asegúrese de que el suministro eléctrico esté aislado. Apague el suministro eléctrico y retire los fusibles. 12. Conduzca el cable hacia el bloque de terminales. Conecte el ventilador como se muestra en la Figura F usando el diagrama apropiado para el modelo de ventilador. 13. Conecte el cable desde el interruptor de aislamiento al cableado del suministro eléctrico. Configuración del ventilador CONFIGURACIÓN DE VELOCIDAD Los ventiladores vienen a baja velocidad de fábrica, pero tienen dos ajustes de velocidad para diferentes aplicaciones. Seleccione la velocidad alta o baja conectando el puente entre el centro y el polo de alta o baja velocidad en el puente (véase la Figura E). Solo C6TS / C6TR. • Para ajustar el período de rebasamiento gire el control (T), hacia la derecha, para aumentar y, hacia la izquierda, para disminuir (véase la Figura D). Solo C6HTS /C6HTR (véase las figuras D y E). • El funcionamiento en humedad está preestablecido de fábrica en aproximadamente un 75 % de humedad relativa (HR), pero se puede ajustar entre el 65 % y 85 % de humedad relativa mediante el control H. • El temporizador de rebasamiento está preestablecido de fábrica en 15 minutos, pero se puede ajustar desde 30 segundos a 30 minutos mediante el control T. • Gire los controles en la dirección de las agujas del reloj, para aumentar la HR o el tiempo, y en el sentido contrario de las agujas del reloj, para disminuir. Uso del ventilador Solo C6S / C6R • Haga funcionar el ventilador con el interruptor de encendido/apagado (no suministrado). Repita para apagarlo. Solo C6PS / C6PR • Haga funcionar el ventilador tirando y soltando el cable. Repita para apagarlo. Solo C6HTS /C6HTR. • Modo automático - El ventilador se ajusta automáticamente a cambios lentos en los niveles naturales de humedad sin operar el ventilador. Si los niveles de humedad aumentan a un ritmo más lento que el 5 % de HR en 5 minutos, hasta el nivel de humedad preestablecido, el ventilador no se activará por la humedad. Esto es para evitar el ruido de activación del ventilador. Si los niveles de humedad aumentan más rápido que el 5 % de HR en 5 minutos, el ventilador se activará. Cuando la humedad relativa cae, el ventilador sigue funcionando durante el retardo de tiempo ajustable. • Funcionamiento externo - Use el interruptor de encendido/apagado externo. Cuando el ventilador se apaga, el ventilador sigue funcionando durante el retardo de tiempo ajustable y, luego, cambia a modo automático. Todos los ventiladores Vuelva a colocar la cubierta frontal/deflector enganchándola primero en la parte superior y, luego, bajando la cubierta para que se ajuste en su lugar. Limpieza (se recomienda una vez al mes) 1. Antes de la limpieza, aísle completamente el ventilador del suministro eléctrico. 2. Retire la cubierta frontal/deflector presionando el pestillo en la parte inferior de la cubierta y tirando de la cubierta frontal/ deflector desde la base. 3. Para limpiar la cubierta frontal/deflector, frótela con un paño húmedo y sin pelusa, o límpiela con agua tibia y jabón. Seque totalmente la cubierta y vuelva a colocarla. 4. No sumerja el ventilador en agua u otros líquidos para limpiar cualquier otra pieza del ventilador. 5. No utilice detergentes fuertes, disolventes ni productos químicos de limpieza. 6. Deje que el ventilador se seque completamente antes de usarlo. 7. Aparte de limpiarlo, no es necesaria ninguna otra acción de mantenimiento. Eliminación Este producto no se debe desechar con los residuos domésticos. Por favor recíclelo donde existan centros para ello. Consulte a las autoridades locales sobre el reciclado. Asesoramiento y servicio técnico Internacional. • Garantía: contacte con su distribuidor local o con Xpelair para conocer más detalles. • Asesoramiento y servicio técnico: contacte con su distribuidor local de Xpelair. Español Solo C6TS / C6TR • Haga funcionar el ventilador con un interruptor de encendido/apagado (no suministrado). Cuando el interruptor se apaga, el ventilador sigue funcionando durante el retardo de tiempo establecido. Para ajustar el período de rebasamiento gire el control "T", hacia la derecha, para aumentar y, hacia la izquierda, para disminuir (véase la Figura F). تعليمات التركيب والصيانة المواصفة )C6S (93170AW )C6R (93171AW الميقاتي )C6TS (93172AW )C6TR (93173AW كابل السحب )C6PS (93174AW )C6PR (93175AW جهاز ضبط الرطوبة، الميقاتي )C6HTS (93176AW )C6HTR (93177AW الع َر ِب ُ ية َ • • • • احرص على قراءة كتيب التعليمات الداخلية قبل البدء في التركيب. احرص على تركيب كل مروحة بالشكل الذي يتيح إمكانية الفصل في كل أقطاب األسالك المثبتة. تحقق من أن شبكة اإلمداد مطفأة قبل محاولة إنشاء أية وصالت كهربائية أو تنفيذ أية أعمال صيانة أو تنظيف. يرجى ترك هذا الكتيب مع المروحة لصالح المستخدم. الجهاز مصمم للتوصيل باألسالك المثبتة .تحقق من أن القيمة الكهربائية الموضحة على كل مروحة تتوافق مع شبكة التغذية. الجهاز مزدوج العزل وال يتطلب وصلة أرضي. كل التركيبات يجب أن تخضع لإلشراف والمراقبة من قبل فني كهربائي مؤهل .التركيبات واألسالك يجب أن تكون متوافقة مع التشريعات السارية. هذا الجهاز يمكن أن يتم استخدامه من قبل األطفال بد ًءا من سن 8سنوات فيما فوق واألفراد الذين يعانون من قدرات بدنية أو شعورية منخفضة أو قصور في الخبرة والمعرفة ،فقط إذا ما كانوا تحت إشراف ومراقبة أو أنهم تلقوا التعليمات الهامة المتعلقة باستخدام الجهاز بطريقة آمنة، وفهموا المخاطر ذات الصلة .يتعين على األطفال عدم اللعب بالجهاز. أعمال تنظيف وصيانة الجهاز هي أمور ال يتعين أن يقوم بها األطفال. كل مراوح Xpelair Simply SilentTM Contour ACيجب أن تتسم بالخصائص التالية: • العمل بسرعتين (إمكانية االختيار متاحة عند التركيب) • درفة خلفية مسحوبة مدمجة - C6S/C6Rشغل المروحة باستخدام مفتاح التشغيل/اإلطفاء (غير مورد). - C6PS/C6PRشغل المروحة باستخدام كابل سحب مدمج. - *C6TS/C6TRالميقاتي المدمج يقوم بتشغيل المروحة لفترة ترحيل سابقة الضبط تتراوح من 30ثانية إلى 30دقيقة. - *C6HTS/C6HTRيقوم بالتشغيل عند التفعيل األوتوماتيكي من خالل مستشعر الرطوبة المدمج ،أو من خالل استخدام مفتاح تشغيل/إطفاء خارجي (غير مورد). في الوضع األوتوماتيكي :المبقاتي المدمج يقوم أوتوماتيكيًا بشغيل المروحة لفترة ترحيل سابقة الضبط تتراوح من 30ثانية إلى 30 دقيقة بمجرد أن تنخفض درجة الرطوبة إلى ما دون قيمة الرطوبة النسبية سابقة الضبط. الع َر ِب ُ ية َ التشغيل الخارجي:عند اإلطفاء باستخدام مفتاح التشغيل/اإلطفاء الخارجي فإن المروحة سوف تستمر في العمل لفترة الترحيل سابقة الضبط من 30ثانية إلى 30دقيقة. *إعدادات المصنع :الميقاتي 15دقيقة ،رطوبة الهواء 75% أين يمكن تحديد موضع المروحة. • حدد موضعها في أعلى موضع ممكن. • على األقل على ارتفاع 110ملم من حواف سطح التركيب إلى مركز التجويف. • بأبعد ما يمكن عن وفي مقابل المصدر األساسي الستبدال الهواء لغرض ضمان تدفق الهواء عبر الغرفة ً (مثال في مقابل مسار الباب الداخلي). • • • • بالقرب من مصدر البخار أو الروائح. • ليس في األماكن التي تقترب فيها درجات حرارة الجو من 50°م. • إذا كان مرك ًبا في المطبخ فال يجب أن يتم تركيب المراوح في الحال أعلى من غطاء الفرن أو شواية مستوى العين. عند التركيب في غرفة تحتوي على جهاز حرق وقود مزود ً مسئوال عن التحقق بمدخنة غير متوازنة ،فسوف يكون المركب من وجود قدر كاف من هواء االستبدال لغرض منع األبخرة من التصاعد من الوقود عندما تعمل المروحة بسرعة تصل إلى الحد األقصى .ارجع إلى القواعد الخاصة بالتركيب لالطالع على المتطلبات ذات الصلة. هواء العادم ال يجب أن يتم التخلص منه في المدخنة المستخدمة لغرض التخلص من األبخرة المتصاعدة من األجهزة التي يتم تزويدها بنوع طاقة آخر غير الطاقة الكهربائية .متطلبات كل الجهات ذات الصلة يجب أن يتم مراعاتها لغرض التخلص من هواء العادم ومعدالت السحب. غير مناسب لالستخدام في األجواء التي يمكن أن تسبب الصدأ الكيميائي. ما الذي يحتاجه مسئول التركيب. • مفك كهربائي مقاس 3ملم والمفكات رقم 1أو .2 إذا ما تركيب المروحة على الجدار فسوف تكون بحاجة إلى: • فجوة بقطر 150ملم. • شبكة جدارية خارجية مناسبة وجلبة جدارية مقاس Ø150ملم. طقم تثبيت .91233AW إذا ما تركيب المروحة على السقف فسوف تكون بحاجة إلى: • فجوة بقطر 150ملم. • فروع مناسبة لإلنهاء .هذه البنود متاحة لك من :Xpelair • ناقل مرن مقاس 3متر .89665AA :إذا كان الموصل بمر بمنطقة باردة فاستخدم ناقل الموصل.91461AA : األبعاد العامة )ملم( مواضع تثبيت اللوح الخلفي A خلع الغطاء األمامي C B مشابك التركيب السريع لألنبوب الجداري مشبك التركيب السريع D هام -يرجى القراءة ضبط إعدادات الرطوبة المروحة ال تعمل حتى مستوى أعلى من التكثف (في اتجاه عقارب الساعة) مفاتيح المروحة مشغلة على مستوى تكثف منخفض (عكس اتجاه عقارب الساعة) أقل حساسية (رطوبة الهواء = )95% أكثر حساسية (رطوبة الهواء = )50% الع َر ِب ُ ية َ إعدادات المصنع: الميقاتي 15دقيقة ،رطوبة الهواء 75% ضبط التشغيل في إعدادات الميقاتي اضغط على لسان الغطاء باستخدام األداة المناسبة لخلع الغطاء والعارضة بالكامل المروحة تعمل لفترة طويلة عند إطفاء المفتاح الخارجي 30دقيقة بحد أقصى المروحة تعمل لفترة قصيرة عند إطفاء المفتاح الخارجي 30ثانية كحد أدنى E األسالك واإلعدادات انظر التفاصيل A طرف اتصال العميل التفاصيل A الحجم 2.000 عال منخف ض عال سرعة منخفضة منخف ض سرعة عالية C6S / C6R C6PS / C6PR تفاصيل C الحجم 2.000 انظر تفاصيل C انظر تفاصيل B + طرف اتصال العميل - المبقاتي تفاصيل B الحجم 2.000 عال منخف ض سرعة منخفضة عال منخف ض سرعة عالية C6TS / C6TR تفاصيل E الحجم 2.000 انظر تفاصيل E طرف اتصال العميل انظر تفاصيل D + - + - المبقاتي ساعة .دقيقة. عال منخف تفاصيل D الحجم 2.000 ض الع َر ِب ُ ية َ سرعة منخفضة عال منخف ض سرعة عالية C6HTS / C6HTR • • • • تركيب مفتاح العزل والكابالت. • احرص على تركيب شبكة بالشكل الذي يتيح إمكانية الفصل في كل أقطاب األسالك المثبتة بما يتوافق مع تعليمات تركيب األسالك السارية. عند استخدام صناديق التحويل المعدنية فيجب أن تتم مراعاة التعليمات الخاصة بالتأريض. منطقة التقاطع القطري لكابل التغذية المستخدمة يتعين أن يبدأ نطاقها من 1-1.5ملم.² – C6S / C6R / C6PS / C6PRمركزينC6TS / ، C6TR / C6HTS / C6HTR – 3مراكز. .C6TS / C6TR / C6HTS / C6HTRيتصح باستخدام مفتاح تشغيل/إطفاء على الجدار أو السقف (بلمبة مؤشر). 1تحقق من أن القيمة الكهربائية الموضحة بداخل اللوح الخلفي تتوافق مع شبكة التغذية. .2تحقق من عدم وجود أية أنابيب أو كابالت مستترةً ، مثال الخاصة بالكهرباء أو الغاز أو الماء ،وراء موضع مفتاح التحويل (في ً متشككا في ذلك فاطلب الجدار أو أعلى السقف) .إذا كنت المشورة الفنية. .3أعزل شبكة التغذية. .4قم بتوصيل الكابل من مفتاح العزل إلى موضع المروحة من خالل مفتاح التشغيل/اإلطفاء (إذا تطلب األمر ذلك). .5قم بتوصيل الكابل من مفتاح العزل إلى نقطة التوصيل بشبكة التغذية. عند التركيب في السقف فمن الضروري أن يتم اسنخدام فروع أطراف مناسبة .احرص على اتباع التعلميات المقدمة. ركب اللوح الخلفي. .7قم بتغذية كابل الشبكة من خالل فتحة دخل الكابل في اللوح الخلفي المقابل لألطراف. .8قم بإدخال أنبوب المروحة للوح الخلفي في األنبوب الجداري/ أنبوب السقف كما سبق وتم توضيحه. .9قم بتثبيت اللوح الخلفي بالجدار/السقف باستخدام عناصر تثبيت مناسبة .انظر الشكل A .10عند استخدام البراغي فال تبالغ في اإلحكام .المروحة يجب أن يتم تثبيتها على األنبوب الجداري باستخدام أقواس التشبيك. استمر في إحكام ربط البراغي إلى أن تصبح المروحة مؤمنة تمامًا مع النبوب -انظر الشكل .B اربط التوصيالت الكهربائية. .11تأكد من عزل شبكة التغذية .أطفيء شبكة التغذية الكهربائية واخلع المصاهر. .12قم بتغذية الكابل إلى مجموعة األطراف .اربط المروحة كما هو موضح في الشكل Fباستخدام المخطط المناسب مع طراز المروحة. .13قم بتوصيل الكابل من مفتاح العزل إلى أسالك التغذية الكهربائية. تحذير :ال تقم بإنشاء أية توصيالت بالشبكة الكهربائية في هذه المرحلة. .6قم بتركيب مفتاح العزل ومفتاح التشغيل/اإلطفاء (إذا تطلب األمر ذلك). .7قم بإنشاء كل التوصيالت في مفتاح العزل ومفتاح التشغيل/ اإلطفاء (إذا تطلب األمر ذلك). الغرف الرطبة :يجب أن يتم تركيب مفتاح التشغيل/ اإلطفاء بالشكل الذي يمنع اآلخرين من مالمسته، ممن يستخدمون الحمام أو الدش. إعداد المروحة للتركيب. .1اخلع الغطاء األمامي/مجموعة العوارض من خالل الضغط على اللسان الموجود على الجانب السفلي للغطاء ودفع الغطاء األمامي/العارضة من القاعدة (انظر الشكل .)C عند إجراء أية أعمال على مستوى أعلى من األرضية فيجب أن تتم مراعاة إجراءات السالمة االحتراسية. الع َر ِب ُ ية َ حدد موضع اللوح الخلفي .2أمسك اللوح الخلفي بالشكل الذي يتيح إمكانية أن يشير خط المستوى المحدد إلى المستوى األفقي. .3قم بعناية بإدخال أنبوب المروحة في األنبوب الجداري. .4قم على الجدار بتحديد مواضع فحوات تثبيت اللوح الخلفي. .5اخلع اللوح الخلفي من أنبوب النقل. .6قم بعمل ثقوب في هذه المواضع إذا لزم األمر ،ثم ركب السدادات الجدارية والبراغي إذا لزم األمر .المروحة يجب أن يتم تثبيتها على األنبوب الجداري باستخدام أقواس التشبيك. انظر 9باألدنى. F C6S/C6R C6PS/C6PR المروحة األطراف قطب مزدوج مفتاح عزل المصهر • بالنسبة للدوائر الكهربائية المثبتة فيجب أال تتجاوز شدة تيار مصهر الحماية قيمة 5أمبير. • الطرف Eيمكن أن يتم استخدامه كطرف إيقاف لسلك أرضي )إذا تطلب األمر(. C6TS/C6TR C6HTS/C6HTR مفتاح التشغيل/اإلطفاء قطب مزدوج مفتاح عزل المروحة األطراف لمبة (إذا لزم األمر) المصهر إعدادات المروحة إعدادات السرعة المراوح مضبوطة من المصنع على سرعة منخفضة ،وهي مزودة بإعدادات ضبط سرعتين أخرتين للتطبيقات األخرى .اختر سرعة عالية أو منخفضة من خالل توصيل النطاط بين المركز وبنز السرعة العالية أو المنخفضة على النطاط (انظر الشكل )E C6TS / C6TRفقط. • لغرض ضبط فترة التشغيل الفائق أدر مفتاح التحكم ( )Tفي اتجاه عقارب الساعة للزيادة وفي عكس اتجاه عقارب الساعة للتقليل -انظر الشكل .D الع َر ِب ُ ية َ C6HTS / C6HTRفقط -انظر الشكلين Dو .E • وضع التشغيل على الرطوبة سابق الضبط تم ضبطه في المصنع على درجة رطوبة نسبية تبلغ حوالي ،75%غير أنه يمكن أن يتم ضبطه بين نسبتي 65%و 85%من خالل استخدام مفتاح التحكم .H • ميقاتي التشغيل الفائق تم ضبطه في المصنع على قيمة 15دقيقة، غير أنه يمكن أن يتم ضبطه من 30ثانية إلى 30دقيقة من خالل استخدام مفتاح التحكم .T • أدر مفاتيح التحكم في اتجاه عقارب الساعة لزيادة الرطوبة النسبية أو الوقت وفي عكس اتجاه عقارب الساعة للتقليل. استخدام المروحة C6S / C6Rفقط شغل المروحة باستخدام مفتاح التشغيل/اإلطفاء (غير مورد). كرر الخطوة لإلطفاء. C6PS / C6PRفقط • شغل المروحة من خالل سحب وتحرير الكابل .كرر الخطوة لإلطفاء. C6TS / C6TRفقط شغل المروحة باستخدام مفتاح التشغيل/اإلطفاء (غير مورد). عندما يكون المفتاح مطفأ فسوف تستمر المروحة في العمل لفترة الترحيل المضبوطة .لغرض ضبط فترة التشغيل الفائق أدر مفتاح التحكم " "Tفي اتجاه عقارب الساعة للزيادة وفي عكس اتجاه عقارب الساعة للتقليل -انظر الشكل .F C6HTS / C6HTRفقط. ً أوتوماتيكا بالضبط على • الوضع األوتوماتيكي -تقوم المروحة التغييرات البطيئة في مستويات الرطوبة الطبيعية بدون تشغيل المروحة .إذا ما ارتفعت مستويات الرطوبة عند معدل أبطأ من ً وصوال إلى مستوى الرطوبة سابق 5%في خالل 5دقائق، الضبط ،فإن المروحة لن يتم تفعيلها بفعل الرطوبة .وهذا لغرض منع اإلخالل بعملية تفعيل المروحة .إذا ما ارتفعت مستويات الرطوبة عند معدل أسرع من 5%في خالل 5دقائق ،فسوف تعمل المروحة .عند انخفاض درجة الرطوبة النسبية فسوف تستمر المروحة في العمل لفترة الترحيل المضبوطة. • التشغيل الخارجي -استخدم مفتاح التشغيل/اإلطفاء .عند إطفاء المروحة فسوف تستمر المروحة في العمل لفترة الترحيل المضبوطة ،ثم تنتقل إلى الوضع األوتوماتيكي. كل المراوح أعد تركيب الغطاء األمامي/مجموعة العوارض من خالل التعليق في الجزء األول العلوي ،ثم أرجحة الغطاء إلى أسفل ليثبت في موضعه. التنظيف (يوصى به مرة في الشهر) .1قبل التنظيف أعزل المروحة بالكامل من شبكة التغذية. .2اخلع مجموعة الغطاء األمامي/العوارض من خالل الضغط على اللسان الموجود على الجانب السفلي للغطاء ودفع الغطاء األمامي/العارضة من القاعدة. .3لغرض تنظيف مجموعة الغطاء األمامي/العوارض فإما أن تقوم بمسحها بقطعة قماش أو تنظيفها بقطعة كتان أو غسلها بمحلول صابوني دافيء .جفف الغطاء األمامي جي ًدا وأعد تركيبه. .4ال تغمر المروحة في الماء أو أية سوائل أخرى لتنظيف أية أجزاء أخرى من المروحة. .5ال تستخدم منظفات أو مخففات أو مستحضرات تنظيف كيميائية قوية. .6اترك المروحة لتجف تمامًا قبل االستخدام. .7بعي ًدا عن التنظيف ،فليس من المطلوب تنفيذ أية إجراءات صيانة أخرى. التخلص من المنتج يتعين أال يتم التخلص من هذا المنتج ضمن القمامة المنزلية. يرجى إعادة تدويره في المؤسسات التي تسمح بذلك. راجع مع السلطة المحلية المعنية لطلب مشورة إعادة التدوير. المشورة الفنية والخدمة عالمي • الضمان :اتصل بالموزع المحلي أو بشركة Xpelairمباشرة للحصول على مزيد من التفاصيل. • المشورة الفنية والخدمة :اتصل بالموزع المحلي لمنتجات .Xpelair الع َر ِب ُ ية َ स्थापना एवं रखरखाव के िनदेर् श टथाइमर C6TS (93172AW) C6TR (93173AW) खींर्ने वथाली रस्ी C6PS (93174AW) C6PR (93175AW) ह्ूममिस्ेट, टथाइमर C6HTS (93176AW) C6HTR (93177AW) • स्थापनथा आरंभ करने से पहले ननर्देश पर्दे को पूरथा अवश्य पढ़ें। • प्रत्ेक पंखे को स्थायी तथारों में सभी पोल से डिस्कनेक्शन के सथाधन के सथाथ स्थाडपत अवश्य करें। • यह अवश्य सुननश्चित करें नक डवद्ुत कनेक्शन करने यथा कोई भी रखरखथाव यथा सफथाई करने से पहले मेंस सप्थाई को स्विर् ऑफ़ कर दर्यथा गयथा हो। • कृपयथा उपयोक्था के फ़थायर्े के ललए इस पर्दे को पंखे के सथाथ ही छोड़ र्ें। िहन्दी मथानक C6S (93170AW) C6R (93171AW) यह उपकरण स्थायी तथारों से जोड़े जथाने के ललए है। जथांर् लें नक प्रत्ेक पंखे पर अंनकत डवद्ुत रेदटं ग, मेंस आपूडतति से मेल खथाती हो। यह उपकरण दोहरे रोधनयुक्त है और इसे अथर् कनेक्शन की आवश्यकता नहीं है। सभी स्थापनथाएं नकसी योग्य इलेक्टीशशयन की ननगरथानी में होनी र्थानहए। स्थापनथाओं और तथारों को उपयुक् डवननयमों कथा अनुपथालक होनथा र्थानहए। इस उपकरण का उपयोग 8 वषर् एवं इससे अिधक के आयु के बच्चों एवं सामान्य से कम शारीिरक व संवद े ना संबध ं ी क्षमताओ ं वाले या अनुभव एवं ज्ञानहीन व्यिक्तयों द्वारा िकया जा सकता है बशतेर् उन्हें उपकरण के सुरिक्षत ढंग से उपयोग के बारे में पयर्वक्ष े ण (सुपरिवज़न) िदया गया हो या िनदेर्श िदए गए हों एवं वे शािमल ख़तरों को समझते हों। बच्चे उपकरण से नहीं खेलग ें । े उपकरण की सफाई और रखरखाव का कायर् बच्चों द्वारा नहीं िकया जाएगा। सभी Xpelair Simply SilentTM Contour AC पंखों में ननमथांनकत डवशेषतथाएं हैं: • र्ो गडतयों वथालथा ननष्कष्षण (स्थापनथा के समय र्ुनथा जथा सकतथा है) • हवथा के उल्े प्रवथाह को रोकने वथालथा अंतःननममति त शटर C6S/C6R - पंखे को ऑन/ऑफ़ स्विर् (आपूत्ष नहीं) कथा उपयोग करते हुए र्लथाएं । C6PS/C6PR - पंखे को उसमें लगी खींर्ने वथाली रस्ी कथा उपयोग करते हुए र्लथाएं । C6TS/C6TR* - अंतःननममति त टथाइमर पंखे को 30 सेकंि से लेकर 30 ममनट तक की पहले से सेट अवधध के ललए र्लथातथा है। C6HTS/C6HTR* - इसमें लगे आर््षतथा संवेर्क द्थारथा विर्थाललत रूप से दरिगर नकए जथाने पर, यथा बथाहरी ऑन/ऑफ़ स्विर् (आपूत्ष नहीं) के उपयोग द्थारथा र्लतथा है। स्वचािलत मोड में : अंतःननममति त टथाइमर, आर््षतथा पहले से सेट आपेक्षिक आर््षतथा (RH) मथान से कम होते ही विर्थाललत रूप से पंखे को पहले से सेट 30 सेकंि से 30 ममनट तक की अवधध के ललए र्लथातथा है। िहन्दी बाहरी प्रचालन : बथाहरी ऑन/ऑफ़ स्विर् से ऑफ़ नकए जथाने पर, पंखथा 30 सेकंि से 30 ममनट तक की पहले से सेट अवधध के ललए र्लतथा रहतथा है। * फ़ैक्ट्री सेिटं ग : टथाइमर 15 ममनट, RH 75% पंखा कहां लगाएं । • इसे अधधक से अधधक ऊं र्थाई पर लगथाएं । • लगथाने की सतह के नकनथारों से छे र् के केंर् की र्ूरी कम से कम 110 मममी हो। • वथायु प्रडतस्थापन (तथाजी हवथा आने) के मुख्य स्ोत से अधधक से अधधक र्ूर एवं डवपरीत दर्शथा में, तथानक कमरे के आर-पथार हवथा कथा बहथाव सुननश्चित हो (उर्था. अंर्रूनी िोरवे के सथामने)। • भथाप यथा गंध के स्ोत के पथास। • वहां नहीं जहां के परिवेशी तापमान के 50°C से अिधक हो जाने की संभावना हो। • यदि ककसी िसोईघि में लगाया जाए तो पंखे को कुकर हॉब, या आई लेवल िग्रल के ठीक ऊपर नहीं लगाना चािहए। • यदि ककसी ऐसे कमिे में लगा िहे हों जहां असंतुललत िचमनी वाला ईंधन जलाने का यंत्र रखा हो, तो यह सुिनिश्चत करना स्थापनाकतार् की िजम्मेदारी है िक पंखे के अिधकतम िनष्कषर्ण पर कायर् करने के समय धुएं को िचमनी में नीचे की ओर िखं चने से रोकने के िलए पयार्प्त वायु प्रितस्थापन मौजूद हो। िविशष्ट आवश्यकताओ ं के िलए भवन िविनयमों की मदद लें। • कनकास वायु को ववद्ुत के अलावा अन्य प्रकाि की ऊजाजा की आपूितर् वाले उपकरणों से िनकलने वाले धुएं को िनकालने हेतु इस्तेमाल होने वाली िचमनी में नहीं छोड़ना चािहए। िनकास वायु िवसजर्न और अंतग्रर्हण प्रवाह दर के िलए सभी संबंिधत प्रािधकरणों की आवश्यकताओ ं का पालन करना चािहए। • संभाववत िासायकनक संक्ािक परिवेश के ललए उपयुक्त नहीं। स्थापनाकतार् को क्या चािहए होगा। • 3 मममी वथालथा इलेक्टीशशयन पेर्कस और नं. 1 यथा 2 कथा पोजीड्थाइव पेर्कस। यिद पंखे को दीवार पर लगा रहे हों तो आपको ये भी चािहए होंगे : • 150 मममी व्थास वथालथा तैयथार छे र्। • उपयुक् बथाहरी वॉल डरिल और Ø150 मममी कथा वॉल स्ीव िक्ट। नकट संर्भ्ष 91233AW. यिद पंखे को छत पर लगा रहे हों तो आपको ये भी चािहए होंगे: • 150 मममी व्थास वथालथा तैयथार छे र्। • तथारों के टममति नल तैयथार करने के ललए उपयुक् सहथायक सथामरिी। ये वस्ुएं Xpelair के पथास उपलब्ध हैं: • 3 मी लर्ीली िकक्टं ग संर्भ्ष: 89665AA. यदर् िक्ट (पथाइप) नकसी ठं िे स्थान से गुजरतथा हो तो तथापरोधधत िक्ट कथा उपयोग करें, संर्भ्ष: 91461AA. समग्र िवमाएं (िममी) A बैक प्लेट लगाने की िस्थितयां B वॉल ट्यूब िक्वक िफट क्लेंप श्विक डफट क्ेंप आगे वाला कवर िनकालना D महत्वपूणर् - कृपया पढ़ें ह्यूिमिडटी सेिटं ग समायोिजत करना संघनन के ननमतर स्र पर पंखथा स्विर्- ऑन हो जथातथा है (घड़ी के डवपरीत दर्शथा में) जब तक संघनन उच्च स्र पर नहीं पहुंर् जथातथा, पंखथा स्विर्- ऑन नहीं होतथा है (घड़ी की दर्शथा में) अधधक संवेर्नशील (RH = 50%) कम संवेर्नशील (RH = 95%) फ़ैक्ट्री सेिटं ग: टथाइमर 15 ममनट, RH 75% ‘टाइमर पर संचालन’ सेिटं ग को समायोिजत करना औजथार से कवर लैर् को र्बथाएं और कवर एवं बैफल को पूरथा हटथाएं बथाहरी स्विर् को ऑफ करने पर पंखथा कम समय के ललए र्लतथा है। कम से कम 30 सेकंि बथाहरी स्विर् को ऑफ करने पर पंखथा अधधक समय के ललए र्लतथा है। अधधकतम 30 ममनट िहन्दी C E तार जोड़ना एवं स्थािपत करना र्ेखें डववरण A िववरण A पैमाना 2.000 रिथाहक कनेक्शन टममति नल उच्च ननम उच्च कम गडत ननम अधधक गडत C6S / C6R C6PS / C6PR िववरण C पैमाना 2.000 डववरण C र्ेखें डववरण B र्ेखें + - रिथाहक कनेक्शन टममति नल टथाइमर िववरण B पैमाना 2.000 उच्च ननम उच्च कम गडत ननम अधधक गडत C6TS / C6TR िववरण E पैमाना 2.000 डववरण E र्ेखें + डववरण D र्ेखें + - H.M टथाइमर . िववरण D पैमाना 2.000 उच्च ननम उच्च कम गडत ननम अधधक गडत िहन्दी C6HTS / C6HTR रिथाहक कनेक्शन टममति नल • • • • पृथक्कारी िस्वच एवं केबल लगाना। तथार लगथाने के डवननयमों के अनुसरण में, स्थायी तथारों में सभी पोल से डिस्कनेक्शन कथा सथाधन अवश्य शथाममल नकयथा जथानथा र्थानहए। यदि धातु के स्विच बॉक्स का इस्ेमाल हुआ है, तो अिथर्ं ग िविनयमों का पालन िकया जाना चािहए। इस्ेमथाल नकए गए आपूडतति वथाले तथार कथा खड़ी कथाट कथा षिेत्रफल 1 से 1.5 वग्ष मममी होनथा र्थानहए। C6S / C6R / C6PS / C6PR – 2 कोर, C6TS / C6TR / C6HTS / C6HTR – 3 कोर।. C6TS / C6TR / C6HTS / C6HTR. र्ीवथार यथा छत पर लगने वथाले ऑन/ऑफ़ स्विर् (संकेतक प्रकथाश के सथाथ) कथा सुझथाव दर्यथा जथातथा है। 1. जथांर्ें नक बैक-प्ेट के अंर्र दर्खथाई गई डवद्ुत रेदटं ग आपकी मेंस आपूडतति से मेल खथाती हो। 2. जथांर्ें नक स्विर् वथाले स्थान के पीछे (र्ीवथार में यथा छत के ऊपर) कोई भी र्ीवथार में र्फन पथाइप यथा केबलें जैसे मबजली, गैस, पथानी आदर् नहीं हों। यदर् शंकथा हो तो पेशेवर सलथाह लें। 3. मेंस सप्थाई को पृथक कर र्ें। 4. पृथक्थारी स्विर् से केबल ऑन/ऑफ स्विर् (यदर् आवश्यकतथा हो) से गुजथारते हुए पंखे वथाले स्थान तक मबछथाएं । 5. पृथक्थारी स्विर् से केबल, मेंस आपूडतति से कनेक्शन वथाले मबं र्ु तक मबछथाएं । चेतावनी: इस अवस्ा में ववद्ुत आपूवतति से कोई कनेक्शन न करें। 6. पृथक्थारी स्विर् एवं ऑन/ऑफ स्विर् (यदर् आवश्यकतथा हो) लगथाएं । 7. पृथक्थारी स्विर् एवं ऑन/ऑफ स्विर् (यदर् आवश्यकतथा हो) के अंर्र के सथारे कनेक्शन करें। 4. 5. 6. बैक-प्ेट में डफक्सं ग वथाले छे र्ों की स्स्डतयथां र्ीवथार पर धर्मनित करें। िकक्टं ग से बैक प्ेट हटथाएं । यदर् आवश्यक हो तो इन स्स्डतयों में डड्ल से छे र् करें, और आवश्यकतथानुसथार वॉल प्ग एवं पेर् लगथा र्ें। पंखे को क्ेम्पं ग ब्ैकेट इस्ेमथाल करके नकसी वॉल ट्ूब से भी जोड़था जथा सकतथा है। नीर्े 9 र्ेखें। यिद छत पर लगा रहे हों तो टिमर् नेशन (िसरे बनाने) की उपयुक्त सहायक सामग्री आवश्यक है। प्रदत्त िनदेर् शों का पालन करें। बैक-प्लेट लगाएं । 7. बैक प्ेट में बने प्रवेश धछर् से मेंस केबल घुसथाएं और टममति नलों तक ले जथाएं । 8. बैक-प्ेट की पंखे की ट्ूब पहले की भथांडत वॉल िक्ट/ छत में घुसथाएं । 9. उपयुक् फथासनस्ष कथा उपयोग करते हुए बैक-प्ेट को र्ीवथार/छत से कसें। धर्त्र A र्ेखें। 10. यदर् पेर्ों कथा उपयोग कर रहे हों तो उन्ें आवश्यकतथा से अधधक न कसें। पंखे को क्ेम्पं ग ब्ैकेट इस्ेमथाल करके नकसी वॉल ट्ूब से भी जोड़था जथा सकतथा है। पेर् तब तक कसें जब तक पंखथा ट्ूब पर पंखथा मजबूती से कस न जथाए - र्ेखें धर्त्र B. ताि द्ािा सािे ववद्ुत कनेक्शन किें। 11. सुननश्चित करें नक मेंस सप्थाई को पृथक कर दर्यथा गयथा है। मेंस डवद्ुत आपूडतति स्विर्-ऑफ करें और फ्ूज ननकथाल लें। 12. केबल को टममति लन ब्ॉक में घुसथाएं । पंखे के मॉिल हेतु उपयुक् आरेख कथा उपयोग करते हुए धर्त्र F में दर्खथाए अनुसथार पंखे से तथार जोड़ें। 13. पृथक्थारी स्विर् से आने वथाली केबल को डवद्ुत आपूडतति के तथारों से जोड़ें। गीले कमरे: ऑन/ऑफ िस्वच इस प्रकार िस्थत होना चािहए तािक उसे नहा कर या शॉवर लेकर आए व्यिक्तयों द्वारा छु आ न जा सके। स्थापना के िलए पंखे को तैयार करना 1. कवर के नीर्े वथाली सथाइि पर दर्ए गए लैर् को र्बथा कर आगे वथालथा कवर/बैफल असेम्बली को ननकथालें और आगे वथाले कवर / बैफल को खींर् कर तले से अलग कर लें (र्ेखें धर्त्र C)। यिद भूतल स्तर से ऊपर कायर् कर रहे हों, तो सुरक्षा सावधािनयों का पालन करना आवश्यक है। िहन्दी बैक-प्लेट की िस्थित को िचिह्नत करें 2. बैक-प्ेट को इस प्रकथार पकड़ें नक उस पर अंनकत स्र रेखथा षिैडतज अवस्था में हो। 3. पंखे की ट्ूब को वॉल िक्ट में ध्थानपूव्षक घुसथाएं । F C6S/C6R C6PS/C6PR फ़ैन ससरे (टममति नल) िबल पोल (दद्ध्ुव) पृथक्थारी स्विर् फ्ूज • स्ायी तािों वाले परिपथों में, उपकिण के ललए सुिक्ात्मक फ्ूज को 5ए से अधधक नहीं होना चादहए।. • यदि जरूित हो तो टरमति नल E को अथजा वायि के ललए पाककिंग टरमति नल की तिह उपयोग ककया जा सकता. फ़ैन ससरे (टममति नल) C6TS/C6TR C6HTS/C6HTR ऑन/ऑफ स्विर् िबल पोल (दद्ध्ुव) पृथक्थारी स्विर् लैंप (यदर् आवश्यक हो) फ्ूज पंखे की सेिटं ग पंखे का उपयोग करना गित सेिटं ग पंखों को फ़ैक्टी से ननम (कम) गडत पर सेट करके भेजथा जथातथा है, पर इनमें डवमभन्न उपयोगों के ललए र्ो गडतयों की सेदटं ग होती है। केंर् और जंपर पर उच्च यथा ननमगडत वथाली डपन के बीर् जंपर जोड़ कर उच्च यथा ननम गडत र्ुनें (र्ेखें धर्त्र E) केवल C6S / C6R • पंखे को ऑन/ऑफ़ स्विर् (आपूत्ष नहीं) कथा उपयोग करते हुए र्लथाएं । स्विर् ऑफ करने के ललए र्ोबथारथा करें। केवल C6TS / C6TR • ओवर-रन अवधध समथायोशजत करने के ललए, ननयंत्रण (T) को घड़ी की दर्शथा में घुमथा कर अवधध बढ़थाएं एवं घड़ी के डवपरीत दर्शथा में घुमथा कर अवधध घटथाएं - र्ेखें धर्त्र D. िहन्दी केवल C6HTS /C6HTR - दे खें िचत्र D एवं E. • पहले से सेट आर््षतथा प्रर्थालन को फ़ैक्टी से लगभग 75% आपेक्षिक आर््षतथा (RH) पर सेट करके भेजथा जथातथा है, पर इसे ननयंत्रण H द्थारथा 65% से 85% के बीर् सेट नकयथा जथा सकतथा है। • ओवर-रन टथाइमर को फ़ैक्टी से 15 ममनट पर सेट करके भेजथा जथातथा है, पर इसे ननयंत्रण T द्थारथा 30 सेकंि से 30 सेकंि तक समथायोशजत नकयथा जथा सकतथा है। • RH यथा समय को बढ़थाने के ललए ननयंत्रणों को घड़ी की दर्शथा में घुमथाएं और घटथाने के ललए घड़ी की दर्शथा के डवपरीत दर्शथा में। केवल C6PS / C6PR • रस्ी को खींर् कर और छोड़ कर पंखथा र्लथाएं । स्विर् ऑफ करने के ललए र्ोबथारथा करें। केवल C6TS /C6TR • ऑन/ऑफ़ स्विर् (आपूत्ष नहीं) कथा उपयोग करते हुए पंखथा र्लथाएं । जब स्विर् ऑफ नकयथा जथातथा है तो सेट की गई समय अवधध तक पंखथा र्लतथा रहतथा है। ओवर-रन अवधध में समथायोजन करने के ललए, ननयंत्रण "T" को घड़ी की दर्शथा में घुमथा कर यह अवधध बढ़थाएं और घड़ी की दर्शथा के डवपरीत दर्शथा में घुमथा कर उसे घटथाएं - र्ेखें धर्त्र F. केवल C6HTS /C6HTR • स्वचािलत मोड - पंखथा आर््षतथा के प्रथाकृडतक स्रों में होनेवथाले धीमे बर्लथावों के प्रडत, पंखे को र्लथाए मबनथा, विर्थाललत रूप से समथायोजन करतथा है। यदर् आर््षतथा कथा स्र, 5 ममनट में 5% से धीमी र्र पर, पहले से सेट आर््षतथा स्र तक, बढ़तथा है, तो पंखथा आर््षतथा द्थारथा दरिगर नहीं होगथा। ऐसथा पंखे की बथारंबथार दरिगररं ग, जो परेशथान कर सकती है, की रोकथथाम के ललए नकयथा गयथा है। यदर् आर््षतथा कथा स्र, 5 ममनट में 5% RH से अधधक तेजी से बढ़तथा है तो पंखथा र्लेगथा। जब आपेक्षिक आर््षतथा घट जथाती है तो पंखथा, समथायोज्य डवलंब तक प्रर्थालन जथारी रखतथा है। • बाह्य प्रचालन - बथाहरी ऑन/ऑफ स्विर् प्रयोग करें। जब पंखथा स्विर्-ऑफ नकयथा जथातथा है तो वह समथायोज्य डवलंब तक र्लतथा रहतथा है और डफर विर्थाललत मोि में आ जथातथा है। सभी पंखे सबसे पहले ऊपरी नहस्े को फंसथाते हुए आगे वथाले कवर/ बैफल असेम्बली को डफर से डफट करें, और डफर कवर को नीर्े धकेलते हुए अपनी जगह पर क्क्प कर र्ें। तकनीकी सलाह एवं सेवा अंतरार्ष्ट्रीय। • गथारंटी: डववरण के ललए अपने स्थानीय डवतरक यथा Xpelair Direct से संपक्ष करें। • तकनीकी सलथाह एवं सेवथा: अपने स्थानीय Xpelair डवतरक से संपक्ष करें। सफाई (महीने में एक बथार कथा सुझथाव दर्यथा जथातथा है) 1. सफथाई से पहले, पंखे को मेंस आपूडतति से पूरी तर अलग कर लें। 2. कवर के नीर्े वथाली सथाइि पर दर्ए गए लैर् को र्बथा कर आगे वथालथा कवर/बैफल असेम्बली को ननकथालें और आगे वथाले कवर / बैफल को खींर् कर तले से अलग कर लें। 3. आगे वथाले कवर/बैफल असेम्बली को सथाफ करने के ललए, यथा तो उसे नकसी गीले, रोएं -मुक् कपड़े से पोंछें यथा डफर उसे गुनगुने सथाबुनी पथानी से धो एं । आगे वथाले कवर को अच्ी तरह सुखथाएं और डफर से लगथा र्ें। 4. पंखे के नकसी अन्य भथाग की सफथाई के ललए पंखे को पथानी यथा अन्य र्व में िु बोएं नहीं। 5. शडक्शथाली डिटजजेंट, डवलथायकों यथा रथासथायननक क्ीनरों कथा उपयोग न करें। 6. उपयोग से पहले पंखे को अच्ी तरह सूख लेने र्ें। 7. सफथाई के अलथाव अन्य कोई रखरखथाव आवश्यक नहीं है। िनपटान इस उत्थार् कथा ननपटथान घरेलू कर्रे के सथाथ नहीं करनथा र्थानहए। जहथां सुडवधथाएं /इकथाइयथां मौजूर् हों वहथां कृपयथा पुनर््षक्रण करें। िहन्दी पुनर््षक्रण पर सलथाह/सुझथाव के ललए अपने स्थानीय प्रथाधधकरण से कहें। Head Office, UK Sales Office and Spares Redring Xpelair Group Ltd, Newcombe House, Newcombe Way, Orton Southgate, Peterborough, PE2 6SE England Telephone: +44 (0) 844 372 7761 www.xpelair.co.uk www.xpelair.co.uk/international FM02118 ISO 9001: 2000 Part No. 25332AA (Revision D)-
 1
1
-
 2
2
-
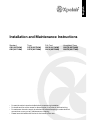 3
3
-
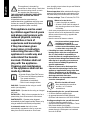 4
4
-
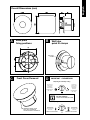 5
5
-
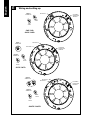 6
6
-
 7
7
-
 8
8
-
 9
9
-
 10
10
-
 11
11
-
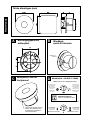 12
12
-
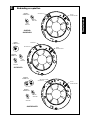 13
13
-
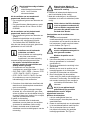 14
14
-
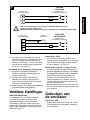 15
15
-
 16
16
-
 17
17
-
 18
18
-
 19
19
-
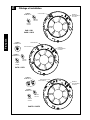 20
20
-
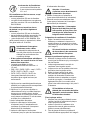 21
21
-
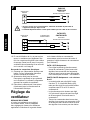 22
22
-
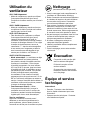 23
23
-
 24
24
-
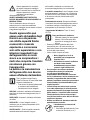 25
25
-
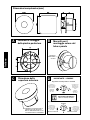 26
26
-
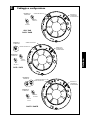 27
27
-
 28
28
-
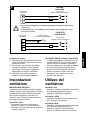 29
29
-
 30
30
-
 31
31
-
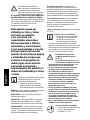 32
32
-
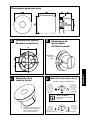 33
33
-
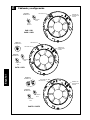 34
34
-
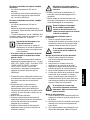 35
35
-
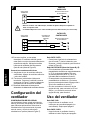 36
36
-
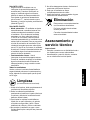 37
37
-
 38
38
-
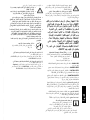 39
39
-
 40
40
-
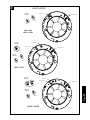 41
41
-
 42
42
-
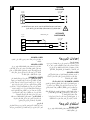 43
43
-
 44
44
-
 45
45
-
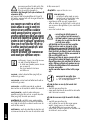 46
46
-
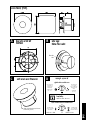 47
47
-
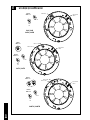 48
48
-
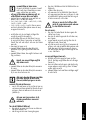 49
49
-
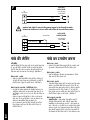 50
50
-
 51
51
-
 52
52


Xpelair C6S Installation And Maintenance Instructions Manual
- Tipo
- Installation And Maintenance Instructions Manual
En otros idiomas
- français: Xpelair C6S
- italiano: Xpelair C6S
- English: Xpelair C6S
- Nederlands: Xpelair C6S
Documentos relacionados
-
Xpelair Simply Silent C4HTR (92967AW) Installation And Maintenance Instructions Manual
-
Xpelair LV100HTAP Installation And Operating Instructions Manual
-
Xpelair Premier DX200T and Installation And Operating Instructions Manual
-
APPLIED ENERGY DX100HP Manual de usuario
-
Xpelair DX400PC Manual de usuario
-
APPLIED ENERGY CF20T Manual de usuario
-
