mothercare Home Safety Starter Kit Guía del usuario
- Tipo
- Guía del usuario

Home Safety
Starter Kit
Contents :
• 8 Clear Corner Cushions
• 1 Door Slam Stopper
• 7 Cupboard and Drawer Catches
• 12 Socket Inserts
• 1 Video Lock
• 1 Fridge Lock
protecting your child
Please read all instructions carefully and keep for future reference
612721 - alts SafetykitINST.qxd 14.06.2000 3:02 pm Page 1

Safety Kit – Instructions
Corner Cushions
Suitable for use on wood, glass, formica, chromed or painted surfaces.
• Wash in warm soapy water. Dry thoroughly
• All surfaces must be clean, dry and free from cleaning and polishing agents.
(Cleaning with isopropyl alcohol or methylated spirit is recommended although you should check an inconspicuous area
before using these substances.)
• Remove backing paper from one side of sticky tabs and fix onto Corner Cushions
• Remove remaining backing paper and press cushion firmly onto corner
To remove: Carefully peel the Corner Cushion up from corner and wipe off adhesive with warm soapy water.
CAUTION: Tape may remove some of the finish from some furniture surface
s.
Door Slam Stopper
• Place Slam Stopper either on the top of the door, not less than 15cm from the outer edge of the door, or on the
outer edge of the door out of reach of the child
CAUTION: Regularly check Slam Stopper for wear and correct positioning.
Discontinue use when child becomes old enough to remove it.
Cupboard and Drawer Latches
• Position catch 2,5cm from inside edge of cupboard frame
• Mark screw positions and drill pilot holes, then screw in position
• Position latch so it engages the catch when door is opened, approx 3.5 - 4cm
• Mark screw positions and drill plotholes, then screw in position
To use: Press down latch with finger when opening cupboard or drawer. Note: Latch can be mounted on the side of the
cupboard with the latch turned sideways on the edge of the cupboard or drawer.
CAUTION: Store dangerous substances out of the reach of children.
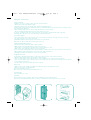
Fridge/Freezer Lock
Check fit before applying. Ensure fridge is on flat surface and do not lean on door when positioning.
• Wipe the fixing surfaces with alcohol and allow to dry thoroughly.
• Peel cover from adhesive pad on Part A and fix to edge of fridge door out of child’s reach. (see figure 1)
• Peel cover from adhesive pad on Part B, position recess of long latch over catch on Part A and stick latch to fridge side
in correct position. (see figure 2)
• To release latch, press lever forward on Part A. (see figure 3)
Video Lock
• With one finger on the left tab, press button in middle and squeeze right tab towards centre.
• Push into slot in video and release button
Note: The left tab does not move
Do not eject videos with lock in place. Damage may occur.
Socket Inserts
Push insert firmly into socket
CAUTION:
These products are only a deterrent. They are not a substitute for proper adult supervision.
Never leave child unattended. Discontinue use when your child becomes old enough to remove or operate.
612721 - alts SafetykitINST.qxd 14.06.2000 3:03 pm Page 2

Kit de Seguridad – Folleto de instrucciones
Almohadillas para esquinas
• Lave las almohadillas con agua tibia y jabón, y séquelas bien
• Limpie las esquinas de los muebles con alcohol
• Saque el papel de un lado de los adheisvos y sujételos en las almohadillas para osquinas
• Saque el papel restante y presione firmemente sobre la almohadilla para sujetarla sobre la esquina
Modo de quitar las almohadillas: Levante la almohadilla par una esquina y quite el adhesivo con agua tibia y jabón
PRECAUCIÓNE: La cinta adhesiva puede quitar una parté dol acabado de algunas superficies de los muebles.
Tope antigolpes
• Ponga el tope antigolpes encima de la puerta a una distancia mínima do 15cm del canto exterior de la puerta, o bien
sobre el canto exterior de la puerta, fuera del alcance del nino.
PRECAUCIÓN: Revise el tope antigolpes periódicamcute para comprobar que no se haya desgastado y que esté eu la
posición correcta.
Deje de usarlo cuando el nino tenga la edad suficiente para poder sacarlo
Cierres para armarios y cajones
• Ponga el cierre a 2,5cm de la orilla interior del marco del armario
• Atornille el cierre en su posición
• Ponga el pestillo en una posición tal que se encaje con el cierre al abrirse la puerta, aprox 3,75 cm
• Atornille el pestillo en su posición
Para usarlo: Presione el pestillo con el dedo al abrir el armario o cajón.
Nota: Se puede instalar el pestillo en un lado del armario, con el pestillo puesto lateralmente en la orilla del armario
o del cajón.
PRECAUCIÓN: No deje productos peligrosos al alcance de los ninos.
Cierre para la nevera /congelador
• Use alcohol para limpiar la superficie en la cual se va a instalar el cierre y séquela
• Instale la almohadilla adhesiva más larga en la Pieza A y la almohadilla corta en la Pieza B
• Ponga la Pieza B sobre el lado de la puerta de la nevera,en lo posible fuera del alcance del nino
• Cierre la puerta y deslice la Pieza A hasta que quede en su posición sobre el lado de la nevera
• Marque la posición e instale el cierre
Para abrir: Presione firmemente sobre la puerta, presionando también la Pieza B
Para sacarlo: Cuidadosamente saque el dispositivo Urando de ello por una esquina y saque el adhesivo
usando agua libia con jabón
Cierre para vídeo
• Con un dedo sobre la pestaña izquierda, presione el botón del medio y apriete la pestaña del lado derecho en sentido
hacia el centro
• Introduzca el cierre en la ranura del vídeo y suelte el botón
Nota: La pestaña del lado izquierdo no se mueve
Tapas para enchufes
Introduzca la tapa firmemente en el enchufe.
Advertencia:
Estos productos sirven únicamente de disuasivo. No sustituyen la supervisión adecuada de un adulto.
Nunca deje a un niño solo. No los utilice más cuando el niño tenga eddad suficiente para retirarlos o hacerlos funcionar.
Part A
Part B
Figure 1
Figure 3
Figure 2
612721 - alts SafetykitINST.qxd 14.06.2000 3:03 pm Page 3

Please keep a note of our company name and address.
Dispose of all packaging safely.
Conserve el nombre y direccion de nuestra empresa.
Elimine todos los embalajes de forma segura.
Made for Mothercare, Watford, England WD24 6SH.
www.mothercare.com
CIF A 8110 8110
612721 - alts SafetykitINST.qxd 14.06.2000 3:03 pm Page 4
-
 1
1
-
 2
2
-
 3
3
-
 4
4


mothercare Home Safety Starter Kit Guía del usuario
- Tipo
- Guía del usuario
En otros idiomas
Otros documentos
-
Electrolux ERC37300X8 Manual de usuario
-
AEG SCT81800S1 Manual de usuario
-
-
-
AEG SKD71800S1 Manual de usuario
-
-
AEG SKD81840S1 Manual de usuario
-
AEG S83800KMX1 Manual de usuario
-
 Safety 1st Complete Magnetic Locking System Manual de usuario
