Signature Hardware SHHBTRCP Guía de instalación
- Tipo
- Guía de instalación

1
1.800.221.3379
HIBISCUS
BATHROOM ACCESSORY INSTALLATION
ACCESORIOS DE BAÑO INSTALACIÓN
SKU: 948226, 948228, 948291, 948222, 948221, 948223
REVISED 12/18/2019
CODES: SHHBRH, SHHB24TB, SHHB30TB, SHHBRK, SHHBTH, SHHBTR
GETTING STARTED
BEFORE YOU BEGIN
We recommend consulting a professional if you are
unfamiliar with installing plumbing fixtures. Signature
Hardware accepts no liability for any damage to the
mounting surface or for personal injury during
installation.
Observe all local plumbing and building codes.
Unpack and inspect the fixture for shipping damage.
If any damage is found, contact our Customer
Relations team at 1-800-221-3379.
Ensure that you have gathered all the required
materials that are needed for the installation.
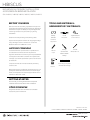
TOOLS AND MATERIALS:
HERRAMIENTAS Y MATERIALES:
Phillips
Screwdriver
Destornillador
Phillips
ANTES DE COMENZAR
Le recomendamos que consulte a un profesional si
no sabe cómo instalar accesorios de plomería.
Signature Hardware no asume ninguna responsabilidad
con respecto a los daños causados a la superficie de
montaje, ni por daños personales que ocurran durante
la instalación.
Cumpla con todas las normas locales de plomería y
construcción.
Retire el empaque y verifique el accesorio para ver si se
produjeron daños durante el envío.Si encuentra algún
daño, comuníquese con nuestro equipo de Servicio al
cliente al 1-800-221-3379.
CÓMO COMENZAR
Asegúrese de haber reunido todos los materiales
necesarios para la instalación.
Safety
Glasses
Gafas de
seguridad
Level
Nivelador
Tape Measure
Cinta métrica
Pencil
Lápiz
1/4” Bit
Broca de 1/4”
Drill
Taladro
Mounting Template
Plantilla de Montaje
24"[610mm]
6.77"[172mm]
C
CALIBRE
PLANTILLA
TEMPLATE
A B
18"[457mm]
D

2
1.800.221.3379
INSTALLATION
INSTALACIÓN
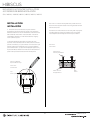
2a. Drill 1/4" hole in the drywall. Push plastic anchors
flush into the drywall. Fasten mounting bracket to wall
with wood screw.
2a. Perfora un orificio de 0,6 cm en el drywall. Empuja los
anclajes plásticos hasta que queden al ras en la pared.
Fila el Soporte de Montaje con tornillos para madera.
1. Unscrew set screw at base of post. Use the
template screw hold marking (A and C) to place the
desired location for the 24" Towel Bar. (A and D for the
30" Towel Bar, A and B for Tissue Holder, A and E for
Towel Rack). Position on wall where desired. Lightly
mark outline of post.
1. Desatornille les tornillos fijos en la base de cada
soporte. Utilice la Plantilla con las Marcas de los Orificios
para los Tornillos (A y C) para colocar, en la ubicación que
desee, la Barra para Toallas de 24". (A y D para la Barra
para Toallas de 30", A y B para la Poitapapel Higiénico, A y
E para el toallero). Determine la ubicación deseada en la
pared. Marque suavemente elcontorno del poste.
HIBISCUS
BATHROOM ACCESSORY INSTALLATION
ACCESORIOS DE BAÑO INSTALACIÓN
SKU: 948226, 948228, 948291, 948222, 948221, 948223
Front View
Vista Frontal
To p
Parte superior
0.94"(24mm)
Side View
Vista lateral
Wood Screw
Tornillo para Madera
Wall
Pared
Plastic Anchor
Anclaje Plástico
Mounting Bracket
Soporte de Montaje

3
1.800.221.3379
2b. If mounting into a wood wall, fasten mounting
bracket flush into the wall with wood screw without
drilling the holes.
2b. Si estás instalando en una pared de madera, fija el
soporte de montaje con tornillos para madera sin
perforar orificios.
HIBISCUS
BATHROOM ACCESSORY INSTALLATION
ACCESORIOS DE BAÑO INSTALACIÓN
SKU: 948226, 948228, 948291, 948222, 948221, 948223
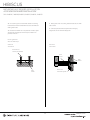
3. Place post over mounting bracket and secure with
set screws.
3. Coloca el poste sobre el soporte de montaje y
asegúralo con los tornillos de fijación.
Wood Screw
Tornillo para Madera
Wall
Pared
Wall
Pared
Side View
Vista lateral
Side View
Vista lateral
Mounting Bracket
Soporte de Montaje
Post
Poste
Set Screw
Tornillo de fijación
-
 1
1
-
 2
2
-
 3
3


Signature Hardware SHHBTRCP Guía de instalación
- Tipo
- Guía de instalación
en otros idiomas
Artículos relacionados
-
Signature Hardware SH447208 Guía de instalación
-
-
-
-
-
-
-
-
-