Nexxt Solutions NHE-S300 Guía del usuario
- Categoría
- Accesorios para motocicletas
- Tipo
- Guía del usuario
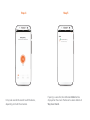
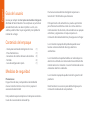
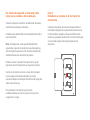
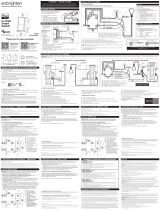
El Nexxt Solutions NHE-S300 es un interruptor inteligente Wi-Fi de 3 vías que facilita controlar y automatizar la iluminación de su hogar. Con este dispositivo, puedes encender y apagar las luces desde cualquier lugar con tu smartphone o tableta, establecer horarios para que las luces se enciendan y apaguen automáticamente, y crear escenas para controlar múltiples luces simultáneamente. También es compatible con el control por voz a través de Amazon Alexa y Google Assistant para que puedas controlar tus luces con solo usar tu voz.
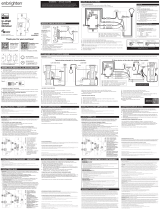
El Nexxt Solutions NHE-S300 es un interruptor inteligente Wi-Fi de 3 vías que facilita controlar y automatizar la iluminación de su hogar. Con este dispositivo, puedes encender y apagar las luces desde cualquier lugar con tu smartphone o tableta, establecer horarios para que las luces se enciendan y apaguen automáticamente, y crear escenas para controlar múltiples luces simultáneamente. También es compatible con el control por voz a través de Amazon Alexa y Google Assistant para que puedas controlar tus luces con solo usar tu voz.


-
 1
1
-
 2
2
-
 3
3
-
 4
4
-
 5
5
-
 6
6
-
 7
7
-
 8
8
-
 9
9
-
 10
10
-
 11
11
-
 12
12
-
 13
13
-
 14
14
-
 15
15
-
 16
16
-
 17
17
-
 18
18
-
 19
19
-
 20
20
-
 21
21
-
 22
22
-
 23
23
-
 24
24
-
 25
25
-
 26
26
-
 27
27
-
 28
28
-
 29
29
-
 30
30
-
 31
31
-
 32
32
-
 33
33
-
 34
34
-
 35
35
-
 36
36


Nexxt Solutions NHE-S300 Guía del usuario
- Categoría
- Accesorios para motocicletas
- Tipo
- Guía del usuario
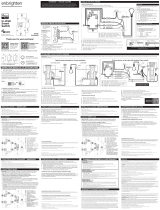
El Nexxt Solutions NHE-S300 es un interruptor inteligente Wi-Fi de 3 vías que facilita controlar y automatizar la iluminación de su hogar. Con este dispositivo, puedes encender y apagar las luces desde cualquier lugar con tu smartphone o tableta, establecer horarios para que las luces se enciendan y apaguen automáticamente, y crear escenas para controlar múltiples luces simultáneamente. También es compatible con el control por voz a través de Amazon Alexa y Google Assistant para que puedas controlar tus luces con solo usar tu voz.
En otros idiomas
- English: Nexxt Solutions NHE-S300 User guide
Documentos relacionados
Otros documentos
-
 nexxt NHC-I710 Manual de usuario
-
 Enbrighten Z-Wave Plus Commercial Grade In-Wall Smart Paddle Switch, 700 Series, White Guía de inicio rápido
-
Enbrighten 60226 Manual de usuario
-
 Enbrighten Z-Wave Plus In-Wall Smart Toggle Switch, 700 Series, White Guía de inicio rápido
-
 Enbrighten Z-Wave Plus In-Wall Smart Toggle Dimmer, 700 Series, White Guía de inicio rápido
-
Legrand WNAL50 Manual de usuario
-
ZKTeco NG-S101 Guía del usuario


