
Handleiding
User Manual
Handbuch
Mode D’emploi
Manual
マニュアル
手册
手冊

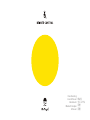
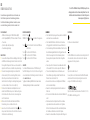
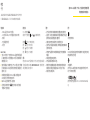
g. 1 | | 図1 | 图1 | 圖一
MR MARIA REMOTE
BATTERY INCLUDED CR2032
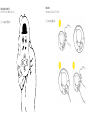
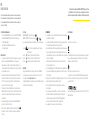
g. 2 | | 図2 | 图2 | 圖二 1
2 3
MRLED8
MR MARIA LED LIGHT SOURCE

BEDIENING (FIG. 1)
AAN/UIT - Gebruik knop
DIMMEN - Gebruik knop (+) en (-)
Knop Het licht gaat in 15 min. geleidelijk aan
Knop Het licht dimt in 5 min. tot uit-stand
Knop Het licht dimt in 15 min. tot uit-stand
Knop Het licht dimt in 30 min. tot uit-stand
GARANTIE
Je hebt 24 maanden garantie op je Mr Maria aankoop*.
Neem contact op met onze klantenservice wanneer je vragen
hebt. Je vindt ons via www.mrmaria.com.
* garantie geldig bij correct gebruik zoals beschreven in
deze handleiding
NL
HANDLEIDING
MAKE IT SHINE
1. De nieuwe LED lichtbron bevat een ontvanger voor het signaal
van de Mr Maria Remote. Vervang de huidige LED lichtbron
dus met de nieuwe en gebruik dezelfde drie schroees om
de LED lamp op zijn plek te houden.
2. Schroef, met een kruiskop-schroevendraaier (niet meegeleverd),
de trekontlasting op de LED lichtbron los en steek de kabel
in de aansluiting. Schroef de trekontlasting vast om de
aansluiting te verstevigen. (fig. 2)
3. Verbind de kabel met het adapter blok en steek de lamp in het
stopcontact. Wanneer een groen lichtje op de LED lichtbron
oplicht, werken alle onderdelen naar behoren.
4. Verwijder het plastic aan de achterzijde van de Mr Maria
Remote om deze gebruiksklaar te maken.
5. Make it shine! Zet de lamp aan met de knop.
Meer over de knoppen lees je hiernaast.
INHOUD VAN DE VERPAKKING
• Mr Maria Remote incl. CR2032 batterij (fig. 1)
• LED lichtbron (MRLED8), 2700 Kelvin en max. 270 Lumen
• Kabel
• Optioneel; adapter blok (laagspanning)
• Deze handleiding
Deze Remote Kit bevat alle onderdelen om je Mr Maria lamp met
afstandsbediening te bedienen. De Mr Maria Remote werkt het best
op een afstand van 1,5 tot 3 meter.
LET OP!
»Het product is geen speelgoed en moet te allen tijde onder
toezicht van een volwassene worden gebruikt.
»Het product bevat kleine onderdelen. Zorg ervoor dat ze
correct zijn bevestigd en houd ze uit de buurt van kinderen.
»De afstandsbediening bevat een kleine batterij. Zorg dat het
batterijklepje goed is afgesloten met het schroee. De afstands-
bediening is geen speelgoed en moet te allen tijde uit de buurt
van kinderen worden gehouden.
»Deze lamp moet binnenshuis worden gebruikt en is niet waterdicht.
Dompel niet onder in water.
»Zorg dat de stekker uit het stopcontact is voordat u begint met
reinigen. Het artikel reinigen met een stoer of een vochtige
doek.
»Gebruik geen andere USB-kabel of adapter dan de meegeleverde.
»Houd de verpakking buiten het bereik van kinderen.
»Demonteer de LED lichtbron niet zelf in geval van storing.
»Bij vervanging van de lichtbron: volg de instructies van de
fabrikant op en gebruik uitsluitend originele onderdelen.
Haal voor vervanging altijd eerst de adapter uit het stopcontact
en de kabel uit de LED module.
»Bewaar deze handleiding voor latere referentie.
Let op! Het Mr Maria lichtobject is GEEN speelgoed.
Voor een goed en veilig gebruik vragen wij u voor montage en
gebruik van het artikel de volgende aanwijzingen te lezen.
Verwijzing naar deze gebruiksaanwijzing.
De Mr Led8 behoort tot de elektronische apparaten en hoort niet
bij het gewone huisvuil maar ingeleverd te worden op een door
uw gemeente aangegeven plek.
Symbool Klasse III apparaat
Dit symbool op de Mr Led8 betekent dat het apparaat werkt op
extra lage spanning, minder dan 50 volt wisselstroom.
Symbool duidend dat dit product CE, FCC, KC, RCM, REACH &
RoHS gekeurd is.
DE SYMBOLEN

CONTROLS
ON/OFF - Use button
DIM - Use button (+) and (-) to make the light dimmer or
brighter respectively.
Button The light will gradually turn on within 15 minutes.
Button The light fades out in 5 minutes.
Button The light fades out in 15 minutes.
Button The light fades out in 30 minutes.
WARRANTY
There’s a 24 month warranty on your Mr Maria design*.
Please contact our customer service if you have any questions.
Find us at www.mrmaria.com.
* valid when the design is used correctly as described in this manual.
EN
USER MANUAL
MAKE IT SHINE
1. The new LED light source contains a receptor for the signal of
the Mr Maria Remote. Therefore first replace the current LED
light source with the new one and use the same three screws
to hold the LED lamp in place.
2. Unscrew the strain relief from the LED light source, using a
Philips screwdriver (not included), and plug the cable into the
DC port. Reattach the strain relief in order to fixate the con-
nected parts. (fig. 2)
3. Connect the power cable to the adapter block and plug the Mr
Maria lamp into a power socket. A green light will illuminate on
the LED light to indicate that all parts are working.Connect the
USB cable to the USB adapter plug.
4. Remove the plastic from the backside of the Mr Maria Remote
to make it ready to use.
5. Make it shine! Use the button to switch the lamp on.
Read more about the controls on the right.
PACKAGE CONTENTS
• Mr Maria Remote incl. CR2032 battery (fig.1)
• LED light source (MRLED8), 2700 Kelvin and max. 270 Lumen
• Power cable
• Optional: adapter block (low voltage)
• This manual
This Remote Kit contains everything you need to operate your
Mr Maria lamp with a remote control. The Mr Maria Remote works
best when used from a distance between 1,5 and 3 meters.
WARNING!
»The product is not a toy and must be used under the supervision
of an adult at all times.
»The product contains particles. Make sure they are correct-
ly attached and keep it away from children.
»The remote control contains a small battery. Make sure the
battery cover is properly closed and secured with the screw. The
remote control is not a toy and should be kept away from children
at all times.
»This lamp should be used indoors and is not waterproof. Do not
immerse in water.
»When cleaning the article always disconnect the adapter from
the power socket. Clean the product with a duster or with a damp
cloth.
»Do not use an USB cable or adapter other than the one supplied.
»Keep the packaging out of reach of children.
»In case of malfunction, do not disassemble the LED module itself.
»When replacing the light source: follow the manufacturer’s
instructions and use only original parts. For replacement, always
first remove the adapter from the socket and the cable from the
LED light source.
»Save this manual for later reference.
A reference to this manual.
The Mr LED8 module is an electronic device and does not belong
in the household rubbish but should be disposed of at the place
indicated by your municipality.
Symbol for Class III appliance.
This s ymbol on the bottom of the unit Mr Led8 means that the
device operates on extra low voltage which is less than 50 volts
alternating current.
Symbol indicating that this product is CE, FCC, KC, RCM, REACH
& RoHS
approved.
THE SYMBOLS
Caution! The Mr Maria light object is NOT a toy. For proper and
safe use we ask you to read the following instructions before
installation and use of the product.

DE
BEDIENUNGSANLEITUNG
BEDIENUNGSELEMENTE
EIN/AUS – Taste
DIMMEN - Taste (+) und (-), um das Licht zu regulieren.
Taste Das Licht schaltet sich innerhalb von 15 Minuten
allmählich ein.
Taste Das Licht erlischt in 5 Minuten.
Taste Das Licht erlischt in 15 Minuten.
Taste Das Licht erlischt in 30 Minuten.
GARANTIE
Sie erhalten 24 MonateGarantie auf Ihr Mr Maria Design*
Nachtlicht. Bitte zögern Sie nicht, sich im Falle von Fragen mit
unseren Kundendienst in Verbindung zu setzen. Sie finden uns
unter www.mrmaria.com.
* gültig, wenn das Design Nachtlicht korrekt, wie in dieser
Bedienungsanleitung beschrieben, verwendet wird.
MAKE IT SHINE
1. Die neue LED-Lichtquelle enthält einen Empfänger für das Signal
der Mr. Maria Fernbedienung. Ersetzen Sie daher zunächst die
bisherige LED-Lichtquelle durch die neue und verwenden Sie
die gleichen drei Schrauben, um die LED-Lampe zu befestigen.
2. Schrauben Sie die Zugentlastung mit einem Kreuzschlitz-
schraubenzieher (nicht im Lieferumfang enthalten) von der
LED-Lichtquelle ab und stecken Sie das Kabel in den
Gleichstromanschluss. Bringen Sie die Zugentlastung wieder
an, um die verbundenen Teile zu fixieren. (Abb. 2)
3. Schließen Sie das Netzkabel an den Adapterblock an und
stecken Sie die Mr Maria Lampe in eine Steckdose. Ein grünes
Licht leuchtet auf der LED-Leuchte auf, um anzuzeigen, dass
alle Teile funktionieren.
4. Entfernen Sie das Plastik auf der Rückseite der Mr Maria
Fernbedienung, um sie einsatzbereit zu machen.
5. Lassen Sie es strahlen! Verwenden Sie die Taste , um die
Lampe einzuschalten. Auf der rechten Seite finden Sie weitere
Informationen über die Bedienung.
PACKUNGSINHALT
• Mr Maria Fernbedienung inkl. CR2032 Batterie (Abb.1)
• LED-Lichtquelle (MRLED8), 2700 Kelvin und max. 270 Lumen
• Power cable
• Optional: adapter block (low voltage)
• Diese Bedienungsanleitung
Dieses Fernsteuerungsset enthält alles, was Sie brauchen, um
Ihre Mr Maria Lampe mit einer Fernbedienung zu bedienen.
Die Mr Maria Fernbedienung funktioniert am besten, wenn sie
aus einer Entfernung zwischen 1,5 und 3m verwendet wird.
Ein Verweis auf dieses Handbuch.
Das Mr LED8-Modul ist ein elektronisches Gerät und gehört nicht
in den Hausmüll, sondern sollte an dem von Ihrer Gemeinde
angegebenen Ort entsorgt werden.
Symbol für Gerät der Klasse III.
Dieses Symbol an der Unterseite der Einheit Mr LED8 bedeutet,
dass das Gerät mit einer Kleinspannung betrieben wird, die
weniger als 50 Volt Wechselstrom beträgt.
Symbol, das darauf hinweist, dass dieses Produkt CE-, FCC-, KC-,
RCM-, REACH- und RoHS-geprüft ist.
DIE SYMBOLE
WARNUNG!
» Das Produkt ist kein Spielzeug und muss jederzeit unter Aufsicht
eines Erwachsenen verwendet werden.
»Das Produkt enthält Kleinteile. Stellen Sie sicher, dass diese
richtig angebracht sind und halten Sie diese von Kindern fern.
» Die Fernbedienung enthält eine kleine Batterie. Stellen Sie sicher,
dass die Abdeckung des Batteriefachs richtig geschlossen und
mit der Schraube gesichert ist. Die Fernbedienung ist kein
Spielzeug und sollte zu jeder Zeit von Kindern ferngehalten
werden.
» Diese Lampe sollte im Innenbereich verwendet werden und ist
nicht wasserdicht. Tauchen Sie die Lampe nicht in Wasser ein.
» Trennen Sie den Adapter immer von der Steckdose, wenn
Sie den Artikel reinigen. Reinigen Sie das Produkt mit einem
Staubtuch oder einem feuchten Tuch.
» Verwenden Sie kein anderes als das mitgelieferte USB-Kabel
oder einen anderen Adapter.
» Bewahren Sie die Verpackung außerhalb der Reichweite von
Kindern auf.
» Im Falle einer Fehlfunktion demontieren Sie das LED-Modul nicht
selbst.
» Beim Auswechseln der Lichtquelle: Beachten Sie die Anwei-
sungen des Herstellers und verwenden Sie nur Originalteile.
Entfernen Sie beim Auswechseln immer zuerst den Adapter aus
der Steckdose und das Kabel von der LED-Lichtquelle.
» Bewahren Sie dieses Handbuch zum späteren Nachschlagen auf.
Vorsicht! Das Mr Maria Lichtobjekt is KEIN Spielzeug. Für eine
ordnungsgemäße und sichere Verwendung bitten wir Sie vor der
Installation und in Gebrauchnahme des Produkts die folgenden
Anweisungen sorgfältig zu lesen.

FR
MODE D’EMPLOI
TOUCHES
MARCHE/ARRÊT – Utilisez la touche
VARIER L’INTENSITÉ – Utilisez les touches (+) et (-)
pour respectivement baisser et augmenter l’intensité lumineuse.
Touche La lampe s’allume progressivement en l’espace
de 15 minutes.
Touche La lampe s’éteint au bout de 5 minutes.
Touche La lampe s’éteint au bout de 15 minutes.
Touche La lampe s’éteint au bout de 30 minutes.
GARANTIE
Une garantie de 24 mois s’applique à votre article Mr Maria*.
Pour toute question, veuillez contacter notre service client.
Consultez notre site www.mrmaria.com.
* garantie applicable en cas d’usage correct de l’article tel qu’il est
décrit dans ce mode d’emploi.
MAKE IT SHINE
1. Le nouveau module LED contient un récepteur pour le signal
émis par la télécommande Mr Maria. Par conséquent,
commencez par remplacer l’ampoule LED existante par ce
nouveau module et utilisez les mêmes trois vis pour maintenir
le module LED en place.
2. Dévissez la bride de fixation de l’ampoule LED à l’aide d’un
tournevis cruciforme (non fourni) et insérez le câble dans le
port DC. Revissez la bride de fixation afin de maintenir les
pièces connectées en place. (fig. 2)
3. Connectez le câble sur l’adaptateur et branchez la lampe
Mr Maria dans une prise de courant. Un témoin lumineux vert
s’allume sur la lampe LED pour indiquer que toutes les pièces
fonctionnent.
4. Enlevez le plastique au dos de la télécommande Mr Maria,
elle est alors prête à fonctionner.
5. Faites-la briller! Allumez la lampe à l’aide de la touche
Découvrez ci-contre à droite les fonctions des diérentes
touches.
CONTENU DE L’EMBALLAGE
• Télécommande Mr Maria avec une pile bouton CR2032 (fig.1)
• Module LED (MRLED8), 2700 kelvin et 270 lumen max.
• Câble d’alimentation
• En option: bloc adaptateur (basse tension)
• Ce mode d’emploi
Ce kit de commande à distance contient tout le nécessaire pour
faire fonctionner votre lampe Mr Maria avec une télécommande.
La télécommande Mr Maria fonctionne le mieux à une distance
entre 1,5 et 3 mètres.
ATTENTION!
»Ce produit n’est pas un jouet et doit être utilisé sous la surveillance
d’un adulte en tout temps.
»Le produit contient des petites pièces. Assurez-vous qu’elles sont
correctement fixées et gardez-les loin des enfants.
»La télécommande contient une petite batterie. Assurez-vous que le
couvercle de la batterie est correctement fermé et fixé avec la vis.
La télécommande n’est pas un jouet et doit être tenue à l’écart des
enfants en tout temps.
»Cette lampe doit être utilisée en intérieur et n’est pas étanche.
Ne pas plonger dans l’eau.
»Lors du nettoyage de l’article, débranchez toujours l’adaptateur de
la prise de courant. Nettoyez le produit avec un chion ou avec un
chion humide.
»N’utilisez pas un câble USB ou un adaptateur autre que celui fourni.
»Gardez l’emballage hors de portée des enfants.
»En cas de dysfonctionnement, ne pas démonter le module
LED lui-même.
»Pour remplacer le module LED: se conformer aux instructions
du fabricant et utiliser uniquement des pièces d’origine. Pour
remplacer l’ampoule, débranchez d’abord l’adaptateur de la
prise de courant et le câble branché sur la lampe LED.
»Sauvegardez ce manuel pour référence ultérieure.
Une référence à ce manuel.
Le module Mr Led8 est un appareil électronique qui n’appartient
pas aux ordures ménagères mais doit être recyclé à l’endroit
indiqué par votre municipalité.
Symbole pour l’appareil de classe III.
Ce symbole sur le bas de l’unité Mr LED8 signifie que l’appareil
fonctionne à très basse tension qui est inférieure à 50 volts de
courant alternatif.
Symbole indiquant que ce produit est certifié CE, FCC, KC, RCM,
REACH et RoHS.
LES SYMBOLES
Attention! L’objet lumineux Mr Maria N’EST PAS un jouet. Pour
une utilisation correcte et sûre, nous vous demandons de lire les
instructions qui suivent avant l’installation et l’utilisation du produit.

ES
MANUAL
CONTROLES
ON/OFF - usa el botón
REGULACIÓN: usa el botón (+) y (-) para atenuar la luz o
hacerla más brillante
Botón La luz se irá encendiendo gradualmente en los
siguientes 15 minutos.
Botón La luz se apaga en 5 minutos.
Botón La luz se apaga en 15 minutos.
Botón La luz se apaga en 30 minutos.
GARANTÍA
Tu Mr Maria tiene una garantía* de 24 meses; después de este
periodo. Si tienes alguna pregunta, ponte en contacto con nuestro
servicio de atención al cliente. Estamos en www.mrmaria.com.
* válida si el producto se utiliza correctamente del modo descrito en
este manual.
MAKE IT SHINE
1. La nueva fuente de luz LED contiene un receptor para la señal
del mando de Mr Maria. En primer lugar, sustituye la fuente de
luz LED actual con la nueva y utiliza los mismos tres tornillos
para colocar la lámpara LED.
2. Desatornilla el tubo pasacables de la fuente de luz LED con un
destornillador Philips (no incluido) y conecta el cable en el
puerto CC. Vuelve a fijar el tubo pasacables para unir las
partes conectadas (fig. 2).
3. Conecta el cable de alimentación al bloque de adaptador y
conecta la lámpara Mr Maria a la toma de corriente. Una luz
verde se encenderá en la luz LED para indicar que todas las
partes están funcionando.
4. Retira el plástico del dorso del Mando de Mr Maria para
comenzar a usarlo.
5. ¡Haz que brille! Usa el botón para encender la lámpara.
Más información sobre los controles a la derecha.
CONTENIDO DEL PAQUETE
• Mando de Mr Maria incl. pila CR2032 (fig.1)
• Fuente de luz LED (MRLED8), Kelvin 2700 y máx. 270 Lumen
• Cable de alimentación
• Opcional: adaptador de corriente (baja tensión) tipo bloque
• Este manual
Este Kit en Remoto incluye todo lo necesario para utilizar tu
lámpara Mr Maria con un mando a distancia. El mando de Mr Maria
funciona mejor a una distancia entre 1,5 y 3 metros.
¡ADVERTENCIA!
»El producto contiene piezas. Asegúrate de que estén correctamente
conectadas y mantenlas fuera del alcance de los niños.
»El mando a distancia contiene una batería pequeña. Asegúrate
de que la tapa de la batería esté correctamente cerrada y
asegurada con el tornillo. El mando a distancia no es un juguete
y debe mantenerse fuera del alcance de los niños en todo
momento.
»Esta lámpara debe usarse en interiores y no es impermeable.
No sumergir en agua.
»Al limpiar el dispositivo, desconecta siempre el adaptador de la
toma de corriente. Limpia el producto con un plumero o con un
paño húmedo.
»No utilices un cable o adaptador USB que no sea el suministrado.
»Mantener el embalaje fuera del alcance de los niños.
»En caso de un mal funcionamiento, no desarmes el módulo LED.
»Al sustituir la fuente de luz, sigue las instrucciones del fabricante
y utiliza únicamente piezas originales. Al sustituirlo, retira siempre
primero el adaptador de la toma de corriente y el cable de la
fuente de luz LED.
»Guarda este manual para futuras referencias.
Una referencia a este manual.
El módulo Mr LED8 es un dispositivo electrónico y no deber ser
desechado en el recipiente de la basura doméstica, Se debe
desechar en el lugar indicado por tu municipio.
Símbolo del aparato de clase III.
Este símbolo ubicado en la parte inferior del aparato eléctrico
Mr Led8 significa que el dispositivo funciona con voltaje extra
bajo, que es menos de 50 voltios de corriente alterna.
Símbolo que indica que este producto está aprobado por CE,
FCC, KC, RCM, REACH y RoHS.
LOS SÍMBOLOS
¡Precaución! El dispositivo Mr Maria no es un juguete. Para un uso
correcto y seguro, te pedimos que leas las siguientes instrucciones
antes de la instalación y el uso del producto.

KO
MAKE IT SHINE
1.
2.
3.
4.
5.
본 리모컨 키트는 리모컨으로 Mr Maria 램프를 제어하는 데 필요한 모든
것을 포함하고 있습니다. Mr Maria 리모컨은 1.5~3m 사이의 거리에서
사용 시 가장 잘 작동합니다.
»
»
»
»
»
»
»
»
»

操作方法
ON/OFF - ボタンを押してください
DIM - (+)や (-)ボタンを押すと、明かりの明暗を調整できます。
ボタン 明かりは徐々に明るくなり、15分以内に灯ります。
ボタン 明かりは徐々に暗くなり、5分後に消えます。
ボタン 明かりは徐々に暗くなり、15分後に消えます。
ボタン 明かりは徐々に暗くなり、30分後に消えます。
保証
MR MARIA製品は24か月保証※です。ご不明な点がございましたら、
カスタマーサービスまでご連絡ください。当社ウェブサイト
WWW.MRMARIA.COMをご覧ください。 ※製品が本マニュアル通りに正
しく使用された場合にのみ有効です。
JP
マニュアル
MAKE IT SHINE
1. 新しいLED光源には、Mr Mariaのリモートコントローラーから送られる
信号用のレセプターが内蔵されています。そのため、まず現在のLED光源
を新しいものと交換し、取り外した3つのねじを使用してLEDランプを所
定の位置に取り付けてください。
2. プラスドライバー(付属しておりません)を使ってLED光源 からストレイン
リリーフを 取り 外し、ケーブルをD C ポートに 差し 込みます。ストレインリリ
ーフを再度取り付けて、接続した部品を固定してください。(図2)
3. 電源ケーブルをアダプターに接続し、Mr Mariaのランプをコンセントに
差し込みます。LEDライトに緑色の光が灯り、全ての部品が機能している
ことを示します。
4. Mr Mariaのリモートコントローラーの裏側のプラスチックを取り除き、使
用できる状態にします。
5. 明かりをつけてみましょう。 ボタンを押してランプの電源をつけま
す。操作の詳細については右側の説明をお読みください。
このリモ ートキットには、リモートコントローラ ーを 使って M r M a r i aのランプ
を操作するために必 要なものが全て含まれています。M r M a r iaのリモートコ
ントローラーは1.5mから3mの距離で使用することで最良のパフォーマンス
を 発 揮しま す。
パッケージに含まれるもの
• Mr Mariaリモートコントローラー、CR2032電池付き(図1)
• LED光源(MRLED8)、2700ケルビン、最大270ルーメン
• 電 源 ケ ーブ ル
• オ プ シ ョ ン:ア ダ プ タ ーブ ロ ッ ク( 低 電 圧 )
• 本マニュアル
注 意 事 項!
»商品には、粒子が含まれます。商品が、正しく接続され、お子様の手の届
かないようご確認ください。
»リモートコントロールには、小 型 バッテリーが含まれます。バッテリーカバ
ーが、正しく閉じられ、ネジで固定されていることをご確認ください。リ
モ ー ト コ ン ト ロ ー ル は 、お も ち ゃ で は な く 、常 に 、お 子 様 の 手 が 届 か な い
ようにしてくだ さい 。
»このランプは、室内で使用されるもので、防水性はありません。水に入れ
ないでください。
»品物をきれいにするときには、必ず、電源ソケットからアダプターを取り
外 してくだ さ い 。商 品 を、布 巾 や 湿った布 で 拭 いてくだ さい 。
»供給されたもの以外 のUSBケーブルやアダプターを使用しないでくだ
さい。
»パッケージを、お子様の手が届かないところにおいてください。
»故障の場合は、LEDモジュールをばらばらにしないでください。
»光源を交換する際は、メーカーの指示事項に従い、純正の部品のみをご
使用ください。交換の際は、まず電源アダプターをコンセントから外し、
その後ケーブルをLED光源から外してください。
»本マニュアルは、後日の参照 用に保管ください。
本マニュアルへの参 照
Mr LED8モジュールは、電子デバイスで、家庭ごみではなく、お客様の自治
体で指定された場所に廃棄ください。
クラスIIIアプライアンスのシンボル
Mr Led8ユニットの底のシンボルは、デバイスが、50ボルトの交流未満の
超 低 電 圧 で 作 動 する ことを意 味します。
シンボルは、本商品が、CE、FCC、KC、RCM、REACH およびRoHS認証済み
であることを示しています。
シンボル
ご注意!Mr Maria(ミスターマリア)ライトオブジェクトは、おもちゃではあ
りません。正しく安全に使 用するため、商品をインストールし使用される前
に、下記のインストラクションをお読みください。

控制方法
开/关 - 使用按钮
亮度调节 - 分使用按钮 (+) 和 (-) 调暗或调亮灯光。
按钮 灯光在 15 分钟内逐渐亮起。
按钮 灯光在 5 分钟内熄灭。
按钮 灯光在 15 分钟内熄灭。
按钮 灯光在 30 分钟内熄灭。
质保
您购买的 MR MARIA 产品保修期为 24 个月*。如有任何问题,请联系我
们的客服。请浏览本公司网站 WWW.MRMARIA.COM。* 按 照 本 手 册 的
说明正确使用,灯具可正常工作。
中文
手册
MAKE IT SHINE
1. 全新 LED 光源包含一个用于接收 Mr Maria 遥控信号的接受器。因
此,首先使用全新 LED 光源替换当前 LED 光源,并使用三颗相同
的螺钉固定 LED 灯。
2. 使用飞利浦螺丝刀(本套装不包含)拧下 LED 光源上的应力释放装
置,并将电缆插入 DC 端口。重新拧紧应力释放装置,以便固定连
接部件。(图 2)
3. 将电源线连接至适配器,将 Mr Maria 灯具插入电源插座。如果
LED 灯亮绿灯,则表示所有部件正常工作。
4. 从 Mr Maria 遥控背面取下塑料,以备使用。
5. 让 您 的 生 活 充 满 光 明 !按 下 按钮打开灯具。阅读手册右页,
了解更多关于控制的信息。
本遥控套装包含了使用遥控器操作 MR MARIA 灯具所需的所有部
件。MR MARIA 遥控在 1.5 至 3 米的距离内使用时效果最佳。
包装清单
• Mr Maria 遥控,含 CR2032 电池(图 1)
• LED 光源 (MRLED8),2700 开氏温度,最大亮度 270 流明
• 电源线
• 可选:适配器(低电压)
• 本手册
警告!
»此产品内含微小部件。请确保正确安装且放置在远离儿童的地方。
»遥控内含一块小电池。请确保正确关闭电池盖并用螺丝刀拧紧。遥控
器不是玩具且应总是放置在远离儿童的地方。
»这款灯应被用于室内且其是不防水的。请勿浸泡在水中。
»在清洁产品时,请总是先从电源插板上断开转接器。请使用抹布或潮
湿的布料清洁产品。
»请勿使用产品所提供的USB数据线或转接器之外的任何数据线或
转接器。
»请将包装放置在远离儿童的地方。
»如产品出现故障,请勿拆卸LED组件。
»更换光源时:请遵循制造商说明书,仅使用原装部件。更换灯具时,
请始终首先拆下插座上的适配器,再从 LED 光源上拆下电缆。
»保存此手册以便日后参阅。
本手册的参考文档。
Mr LED8组件是电子设备且不属于家具类废弃物,请在您所在市政当
局所指明的地点进行处置。
III类器具符号。
此符号在Mr Led8装置上的底部,表示设备在非常低的电压下工作,
即小于50伏特的交流电压。
此符号表示此产品已获得CE、FCC、KC、RCM、REACH & RoHS认
证。
符号
注意!Mr Maria灯具不是一个玩具。为了适当和安全的使用我们要
求您在使用前阅读下面的指示。

控制方法
開/關 - 使用按鈕
亮度調節 - 分別使用按鈕 (+) 和 (-) 調暗或調亮燈光。
按鈕 燈光在 15 分鐘內逐漸亮起。
按鈕 燈光在 5 分鐘內熄滅。
按鈕 燈光在 15 分鐘內熄滅。
按鈕 燈光在 30 分鐘內熄滅。
保固
您的 Mr Maria 燈具保固期為 24 個月*。如果您有任何問題,請聯絡我
們的客戶服務。請瀏覽本公司網站 www.mrmaria.com。* 依 據 本 手
冊的說明正確使用,燈具可正常使用。
中 文( 繁 體 )
手冊
MAKE IT SHINE
1. 新 LED 光源包含用於接收 Mr Maria 遙控器訊號的接受器。因此,
首先使用新 LED 光源取代目前的 LED 光源,並使用相同的三顆螺
絲固定 LED 燈。
2. 使用飛利浦螺絲起子(本套件不包含),從 LED 光源上擰下夾線
套,並將電纜插入 DC 連接埠。重新裝上夾線套,以固定連接零
件。(圖 2)
3. 將電源線連接至轉接器塊上,將 Mr Maria 燈具插入電源插座。如果
LED 燈亮綠燈,則表示所有零件正常運作。
4. 從 Mr Maria 遙控器背面取下塑膠,以備使用。
5. 讓您的生活充滿光明!按下 按鈕開燈。閱讀手冊右頁,了解更
多關於控制的資訊。
本遙控套件隨附使用遙控器操作 Mr Maria 燈所需的所有零件。
Mr Maria 遙控器在 1.5 至 3 公尺的距離內使用時效果最佳。
包裝清單
• Mr Maria 遙控器,含 CR2032 電池(圖 1)
• LED 光源(MRLED8),2700 Kel,最大亮度 270 Lux
• 电源线
• 可线:shi (低电线)
• 本手冊
警 告!
»本產品含有顆粒。請確保他們正確連接并遠離兒童。
»遙控器內含有一塊小電池。請確保電池蓋正確關閉并用螺絲刀固定。
遙控器不是玩具,應時刻遠離兒童。
»燈具屬於室內用品,沒有防水功能。請不要將其浸泡水中。
»清潔產品時,請保持適配器與電源插座斷開。請使用抹布或濕布清
潔產品。
»不要使用原裝之外的其他的USB連接線或適配器。
»將包裝放在兒童觸及不到的地方。
»如果出現故障,請不要拆卸LED模塊本身。
»更換光源時:請遵循製造商說明書,僅使用原廠零件。更換燈具時,務
必先從插座上拆下轉接器,再從 LED 光源上拔除電纜。
»保存這份指南以備之後使用。
這份指南中的參考。
Mr LED8模塊是一個電子設備,不屬於家庭垃圾,應該在市政當局指
示 的 地 方處 理。
第 三 類 電器 符 號。
Mr Led8裝置底部的這個符號表示該裝置應在超低電壓下使用,該電
壓小於50伏的交流電流。
符號表明本產品經CE, FCC, KC, RCM, REACH & RoHS認可。
符號
注 意! 這件瑪利亞先生 (Mr Maria) 燈具不是一個玩具。為了確保您
正確且安全地使用,我們請您在安裝及使用之前閱讀以下操作指南。


MA.SHLV4.0.032022.P1
-
 1
1
-
 2
2
-
 3
3
-
 4
4
-
 5
5
-
 6
6
-
 7
7
-
 8
8
-
 9
9
-
 10
10
-
 11
11
-
 12
12
-
 13
13


en otros idiomas
- français: Mr Maria MRLED8 Manuel utilisateur
- English: Mr Maria MRLED8 User manual
- Deutsch: Mr Maria MRLED8 Benutzerhandbuch
- Nederlands: Mr Maria MRLED8 Handleiding
- 日本語: Mr Maria MRLED8 ユーザーマニュアル
Artículos relacionados


Otros documentos
-
Buki Marko El manual del propietario
-
Caliber MULTI-FI 3 El manual del propietario
-
Haba 4274 El manual del propietario
-
Whirlpool FP 955.1 El manual del propietario
-
-
-
-
Whirlpool FN 34 XA (EU) S Guía del usuario