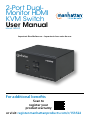
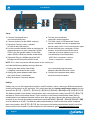
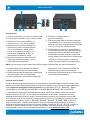
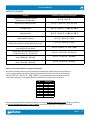
El Manhattan 153522 es un conmutador KVM de 2 puertos con HDMI que te permite controlar hasta 2 computadoras con un solo teclado, ratón y monitor. Soporta resoluciones de hasta 4K a 30Hz y es compatible con cualquier sistema operativo. También cuenta con un concentrador USB integrado de 2 puertos para conectar dispositivos periféricos como impresoras, escáneres o unidades de almacenamiento externas.
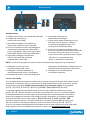
El Manhattan 153522 es un conmutador KVM de 2 puertos con HDMI que te permite controlar hasta 2 computadoras con un solo teclado, ratón y monitor. Soporta resoluciones de hasta 4K a 30Hz y es compatible con cualquier sistema operativo. También cuenta con un concentrador USB integrado de 2 puertos para conectar dispositivos periféricos como impresoras, escáneres o unidades de almacenamiento externas.


-
 1
1
-
 2
2
-
 3
3
-
 4
4
-
 5
5
-
 6
6
-
 7
7
-
 8
8
-
 9
9
-
 10
10
-
 11
11
-
 12
12
-
 13
13
-
 14
14
-
 15
15
-
 16
16


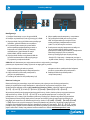
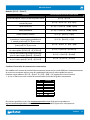
El Manhattan 153522 es un conmutador KVM de 2 puertos con HDMI que te permite controlar hasta 2 computadoras con un solo teclado, ratón y monitor. Soporta resoluciones de hasta 4K a 30Hz y es compatible con cualquier sistema operativo. También cuenta con un concentrador USB integrado de 2 puertos para conectar dispositivos periféricos como impresoras, escáneres o unidades de almacenamiento externas.
en otros idiomas
- français: Manhattan 153522 Manuel utilisateur
- italiano: Manhattan 153522 Manuale utente
- English: Manhattan 153522 User manual
- Deutsch: Manhattan 153522 Benutzerhandbuch
- polski: Manhattan 153522 Instrukcja obsługi
Artículos relacionados
Otros documentos
-
Intellinet 150101 Manual de usuario
-
ATEN CS1964-AT-U Guía de inicio rápido
-
ATEN CS1822 Guía de inicio rápido
-
ATEN CS1844 Guía de inicio rápido
-
Boss ME-80 Manual de usuario
-
ATEN CS1953 Guía de inicio rápido
-
NEC NP-PH2601QL Guía de instalación
-
Yamaha Card Filer Manual de usuario
-
Yamaha S30 Manual de usuario
-
Yamaha CS6R El manual del propietario