Weed Eater EBV 215 El manual del propietario
- Categoría
- Sopladores / secadores de aire
- Tipo
- El manual del propietario
Este manual también es adecuado para

T_ademark
_1_ Please do not return unit to retailer.
Por favor, no devuelva el aparato al lugar de compra.
Veuillez ne pas retourner I'outil au d_taillant.
• 1-800-554-6723
www.weedeater.com
Instruction Manual
Manual de Instrucciones
Manuel d'lnstructions
FOR HOUSEHOLD USE ONLY
PARA USO CASERO SOLAMENTE
POUR UTILISATION A DES FINS
DOMESTIQUES SEULEMENT
EBV 215 B
C(_tlS
&
DANGER:
Read and follow all Safety Rules and Operating Instructions before
using this product. Failure to do so can result in serious injury.
ADVERTENCIA:
Lea el manual de instrucciones y siga todas lea advertencias e
instrucciones de seguridad. El no hacerlo puede resultar en lesiones
graves.
AVERTISSEMENT:
Veuillez lire le rnanuel d'instructions et bien respecter tousles
avertissements et toutes les instructions de s6curit& Tout d6faut
de le faire pourrait entrainer des blessures graves.
Electrolux Home Products, Inc,
250 Bobby Jones Expressway
Augusta, GA 30907
Electrotux Canada Corporation
6150 McLaughlin Road
Mississauga, Ontario L5R 4C2
[] The Ele_,olux Group, Ti'_ wortd's No.1 choice,
KJrCH_,,_CLFANtr_e_NDOUTDO0_Ap,_U4_C_,SCOM_INJ'D
Copyright 2003 Electrolux Home Products, Inc
530086803 6/13/03

IMPORTANT WARNINGS AND
SAFETY INSTRUCTIONS
&WARNING:
When using electric gardening appliances, basic safety precautions should always
be followed to reduce the risk of fire, electric shock, and serious injury. The warnings
and safety instructions in this manual must be followed to reduce the risk of fire, elec-
tric shock, or injury, and to provide reasonable safety and efficiency in using this unit.
The operator is responsible for following the warnings and instructions in this manual
and on the unit. Read the entire instruction manual before assembling and using the
unit! Restrict the use of this unit to persons who read, understand, and follow the
warnings and instructions in this manual and on the unit. Never allow children to use
this unit. Close attention is necessary when used near children.
OPERATOR SAFETY
• Always wear safety glasses or similar
eye protection when operating, servic-
ing, or performing maintenance on your
unit. Wearing eye protection can help to
prevent rocks or debris from being
blown or ricocheting into eyes and face
which can result in blindness or serious
injury.
• Always wear a respirator or face mask
when working with the unit in dusty envi-
ronments.
• Dress safely in long pants. Do not go
barefoot or wear short pants or sandals.
• Do not operate the unit when you are
tired, ill, upset, or if you are under the in-
fluence of alcohol, drugs, or medication.
• Secure hair so it is above shoulder
length. Keep loose hair, loose clothing,
fingers, and all other parts of the body
away from openings and moving parts.
Hair, jewelry, loose clothing, or clothing
with loosely hanging straps, ties, tas-
sels, etc., can be caught in moving
parts.
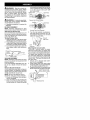
ELECTRICAL SAFETY
•'IL_____°__
_WARNING: Avoid a dangerous
environment. To reduce the risk of elec-
trica! shock, do not use in rain, in damp
or wet locations, or around swimming
pools, hot tubs, etc. Do not expose to
snow, rain, or water to avoid the possibil-
ityofelectrical shock. Do not handle ex-
tension cord plug or unit with wet hands.
• Use only a voltage supply as shown on
the nameplate of the unit.
• Avoid dangerous situations. Do not use
in presence of flammable liquids or
gases to avoid creating a fire or explo-
sion and/or causing damage to unit.
• Avoid dangerous environments. Do not
use in unventilated areas or where dust
or explosive vapors can build up.
• To reduce the risk of electrical shock,
use extension cords specifically marked
as suitable for outdoor appliances. The
electrical rating of the cord must not be
less than the rating of the unit. The cord
must be marked with the suffix '_W-A"(in
Canada, "W*'). Make sure your exten-
sion cord is in good condition. Inspect
extension cord before use and replace if
damaged. An undersized extension
cord will cause a drop in line voltage re-
sulting in loss of power and overheating.
If in doubt, use the next heavier gauge.
The smaller the gauge number, the
heavier the cord.
(NOTE: The correct size to be used de-
pending on the cord length is shown in
this manual. See SELECT AN EXTEN-
SION CORD in the ASSEMBLY section).
• Inspect the insulation and connectors
on the unit and extension cord before
each use. Ifthere is any damage, do not
use until damage is repaired by your au-
thorized service dealer. Do not pull or
carry by cord; do not use cord as a han-
dle, close a door on cord, or pull cord
around sharp edges or comers. Keep
cord away from heated surfaces. Do not
unplug by pulling on cord. To unplug,
• grasp the plug, not the cord.
To reduce the possibility of the exten-
sion cord disconnecting from the unit
during operation, secure cord to cord re-
tainer and connect to recessed plug as
shown in this manual.
• Do not use the unit if the switch does not
turn the unit on and off properly. Have
the unit repaired by your authorized ser-
vice dealer.
2

• Keep the extension cord clear of oper-
ator and obstacles at all times. Do not
expose cords to heat, oil, water, or
sharp edges.
• Avoid any body contact wi_q any
grounded conductor, such as metal
fences, or pipes, to avoid the possibility
of electric shock. Don't handle plug or
unit with wet hands.
• Do not use with damaged cord or plug. If
unit is not working as it should, has been
dropped, damaged, left outdoors, or
dropped into water, return it to your au-
thorized service dealer for repair.
• Ground Fault Circuit Interrupter (GFCI)
protection should be provided on the cir-
cuit or oufiet to be used for this unit. Re-
ceptacles are available having built-in
GFCI protection and may be used for
this measure of safety.
• Keep others including children, animals,
bystanders, and helpers a minimum of
30 feet (10 meters) away. Stop the mo-
tor immediately if you are approached.
Do not allow the unit to be used as a toy.
DOUBLE INSULATION
CONSTRUCTION
This unit is double insulated to help
protect against electric shock. Double
insulation construction consists of two
separate "layers" of electrical insula-
tion instead of grounding.
Tools and appliances built with a
double insulation system are not in-
tended to be grounded. No grounding
means is provided on this unit, nor
should a means of grounding be add-
ed to this unit. As a result, the exten-
sion cord used with your unit can be
plugged into any standard 120 volt
electrical outlet. Safety precautions
must be observed when operating any
electrical tool. The double insulation
system only provides added protection
against injury resulting from an internal
electrical insulation failure.
_!_WARNING: All electhcaI repairs to
this unit, including housing, switch, motor,
etc., must be diagnosed and repaired by
qualified service personnel. Replacement
parts for a double insulated appliance
must be identical to the parts they replace.
A double insulated appliance is marked
with the words "double insulation" or
"double insulated". The symbol []
(square within a square) may also be
marked on the appliance. Failure to have
the unit repaired by Sears service person-
nel can cause the double insulation con-
struction to become ineffective and resuIt
in serious injury.
UNIT/MAINTENANCE SAFETY
•Tum off aII controls and alIow the motor
to stop before disconnecting the unit
from the power source.
• Disconnect the unit from the power
source when not in use. Do not leave
the unit when it is plugged into outlet.
• Do not set the unit on any surface ex-
cept a clean, hard area while the unit is
running. Debris such as gravel, sand,
dust, grass, etc., could be picked up by
the airintake and thrown out through the
discharge opening, damaging the unit,
property, or causing serious injury to by-
standers or operator.
• Do not overreach or use from unstable
surfaces such as ladders, trees, steep
slopes, rooftops, etc. Use extra care
when cleaning on stairways. Keep firm
footing and balance at all times. Keep
hands out of tubes.
• Inspect the entire unit before each use
for worn, loose, missing, or damaged
parts. Do not use until the unit is in
proper working order.
• Disconnect unit from power source be-
fore servicing, cleaning, performing
maintenance, or storing.
• This unit is double insulated. See the
DOUBLE INSULATION CONSTRUCTION
section. Have all internal service per-
formed by qualified service repair per-
sonnel to avoid creating a hazard or
voiding your warranty.
• Have all maintenance other than the
recommended procedures described in
the instruction manual performed by
your authorized service dealer.
• Always see your authorized service
dealer to replace a damaged impeller.
Parts that are chipped, cracked, broken,
or damaged in any other way can fly
apart and cause serious injury. Replace
damaged parts before using the unit.
• Never place any object in the air intake
opening as this could restrict proper air
flow and cause damage to the unit.
• Never douse the unit with water or other
liquids or squirt with a watar hose. Clean
with a damp sponge and mild soap.
See STORAGE.
• Check air intake openings and tubes
frequently, always with lhe unit stopped
and power source disconnected. Keep
vents and tubes free of debris which can
accumulate and restrict proper air flow.
• Do not burn, incinerate, or expose this
unit to extreme heat.
• Store _qeunit unplugged in a high, cool,
dry, indoor area out of the reach of chil-
dren.
3

• Use only recommended attachments
and replacement parts to avoid creating
a hazard and/or voiding warranty.
• Maintain the unit according to recom-
mended procedures.
• Use only for jobs explained in the OP-
ERATIONsection of this manual.
BLOWER SAFETY
• Use only in daylight or in good artificial
light.
• Inspect the area before using the unit.
Remove ail debris and hard objects
such as rocks, glass, wire, etc., that can
ricochet, be thrown, or otherwise cause
injury or damage during operation.
• Avoid accidentsl starting. Be sure _qe
switch is in the OFF position and keep
your hand and fingers away from the
switch while connecting the unit to the
power source or when carrying a unit
connected to the power source.
• Never run the unit without the proper
equipment attached. When used as a
blower, always install a blower tube. Use
only recommended attachments. Do
not use with any opening blocked, Keep
free of dust, lint, hair and anything that
may reduce air flow.
• To avoid spreading fire, do not use blow-
er near leaf or brush fires, fireplaces,
barbecue pits, ashtrays, etc.
• Never place objects inside the blower
tubes; always direct the blowing debris
away from people, animals, glass, and
solid objects such as trees, automo-
biles, walls, etc. The force of air can
cause rocks, dirt, or sticks to be thrown
or to ricochet which can hurt people or
animals, break glass, or cause other
damage.
• Never use for spreading chemicals, fer-
titizers, or any other substances which
may contain toxic materials.
VACUUM SAFETY
• Stop the motor and disconnect the pow-
er source before opening the air inlet
door or attempting to insert or remove
the vacuum tubes. The motor must be
stopped and the impetier blades no
longer turning to avoid serious injury
from the rotating blades.
• Hard objects can be thrown through the
collection bag or the housing and be-
come dangerous missiles which can
cause senous injury to the operator or
others.
• When using the vacuum attachment,
the unit is designed to pick up dry mate-
rial such as leaves, grass, small twigs,
and bits of paper. Do not vacuum
stones, gravel, metal, broken glass, etc.,
to avoid severe damage to the impeller
To avoid the possibility of electrical
shock, do not attempt to vacuum water
or other tiquids.
• Never run the unit without the proper
equipment attached. When used as a
vacuum, always install vacuum tubes
and collection bag assembly. Make sure
the collection bag assembIy is com-
pletely zipped when unit is running to
avoid flying debris. Use only recom-
mended attachments.
• Avoid situations which could set the col-
lection bag on fire. Do not vacuum dis-
carded matches, cigars, cigarettes, or
ash from fireplaces, barbecue pits,
brush piles, etc. To avoid spreading fire,
do not use blower near leaf or brush
fires, fireplaces, barbecue pits, ash-
trays, etc.
• Always use _qecollection bag shoulder
strap when vacuuming to avoid loss of
control.
• Check air intake openings, elbow tube,
and vacuum tubes frequently, always
with the unit stopped and the power
source disconnected. Keep vents and
tubes free of debris which can accumu-
late and restrict proper air fiow. Do not
use with any opening blocked, Keep
free of dust, lint, hair and anything that
may reduce air flow.
STANDARDS
This product is tisted by Underwriters Lab-
oratories, Inc., in accordance with UL
Standard 1017.
If situations occur which are not covered
in this manual, use care and good judg-
ment. If you need assistance, contact
your authorized service dealer or call
1-800-554-6723. Failure to follow all
Safety Rules and Precautions can result
in serous Injury.
SAVE THESE INSTRUCTIONS
4

_kWARNING: Stop the unit and dis-
connect from the power source before
opening the inlet cover or attempting to in-
sert or remove the inlet restrictor, blower
tube, or vacuum tubes. The motor must
be stopped and the impeller blades no
longer turning to avoid sedous injury from
the rotating blades.
_WARNING: Ifreceived assembled,
ensure your unit is properly assembled
and all fasteners are secure.
• A standard screwdriver is required for
assembly.
BLOWER ASSEMBLY
NOTE: Assembly instructions for using
your unit as a vacuum follow this section.
Attaching the blower tube
If you have already assembled your unit
for use as a vacuum, refer to the section
HOW TO CONVERT UNIT FROM VACUUM
USE TO BLOWER USE.
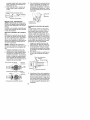
To attach blower tube:
1. Align the grooves on the blower tube
with the grooves on the bloweroutlet.
2. Push the blower tube onto the blower
outlet until it snaps into place (tube is
secured by red tube release button).
3. To remove the blower tube, press the
tube release button while pulling on
tube.
_/_._] Tube Release Button
/ (.--_\ _1/ Blower Tube
VACUUM ASSEMBLY
NOTE: Assembly instructions for using
your unit as ablower are explained in the
previous section.
If you have already assembled your unit
for use as a blower, remove the blower
tube.
Remove the inlet restrictor
An inlet restrictor is used when using your
unit as a blowen This restrictor is not used
during vacuum use and must be removed
during assembly for vacuum use.
NOTE: Be sure to keep the inlet re-
strictor for using your unit as a blowen
1. Ensure unit is stopped and extension
cord is unplugged.
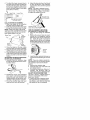
2. Open the inlet cover by inserting the
tip of a screwdriver into the latch area
on the blower unit. Gently tilt handle
of screwdriver toward the front of the
unit to release the latch while pulling
up on the vacuum inlet cover with
your other hand.
Bottom view Latch Area
of unit
Vacuum Inlet Cover (closed)
Impeller_'_ Latch Area
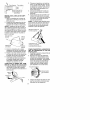
3. Turn the inlet restrictor counterclock-
wise and remove it from the unit. Do
not close the inlet door. You will next
attach the vacuum tubes.
_,_J_ V_ct comver
Inlet _
Restd_ "_/
Attaching the vacuum tubes
There are 2 vacuum tubes, an upper
tube and a lower tube. The upper tube
has a vacuum assist handle attached to
one end and is cut straight on both ends.
The upper tube attaches to the blower
unit. The lower tube has an angled end
that you point toward the ground during
vacuum use. The lower tube attaches to
the upper tube.
1. Ensure unit is stopped and exten-
sion cord is unplugged.
2. While holding inlet cover open, place
the books of the vacuum assist handle
on the retaining posts of the unit.
3. Raise the tube until it is secured to the
blower unit by the red inlet cover latch.
Upper Vacuum Tube
' Vacuum Assist Handle
\
Retaining Post
5

4. To attach the lower vacuum tube to
the upper vacuum tube, first align the
arrowson the twotubes. Then, press
the two tubes together until the lower
tube is securely seated in the upper
tube (about 3 inches).
d_,_ UpperTube Lower Tube
Align arrows on upper
_ Aliganndlower tubes
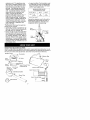
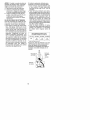
COLLECTION BAG ASSEMBLY
1. Open the zipper on the collection
bag and insert the elbow tube.
2. Push the small end of the elbow tube
through the small opening in the bag.
NOTE: Make sure edge of the small
opening is flush against the flared area
of the elbow tube and the hole for the
tube release button is on top.
Elbow Tube Tube
Release
Sutton
Hole
Zipper
Opening Opening
3. Close the zipper on the bag. Make
sure the zipper is closed completely.
4. Align the grooves on the elbow tube
with the grooves on the bloweroutlet.
5. Push the elbow tube onto the blower
outlet until it snaps into place (elbow
tube is secured by red tube release
button).
ADJUSTINGTHE SHOULDERSTRAP
ON THE COLLECTION BAG
1. Carefully loop the shoulder strap
through the buckle as shown in the il-
lustration below.
Last Int/_
2. Position the unit on your right-hand
side, blower outlet and bag pointing
toward the rear. Hold the unit in an
upright position with the lower vacu-
um tube on the ground to support it.
g. Place the shoulder strap over your
head and onto your left shoulder.
4. Adjust the strap to allow a free flow of
air from the blower. If the collection
bag is kinked, the unit will notoperate
properly.
NOTE: The strap is designed to posi-
tion the collection bag on your shoulder
without kinks. The strap is not intended
to support the weight of the unit.
Shoulder strap
on left shoulder
No kinks in bag /
HOW TO CONVERT UNIT FROM
VACUUM USE TO BLOWER USE
1. Stop unit and unplug the extension
cord.
2. Remove the vacuum tubes by insert-
ing the tip of a screwdriver into the
latch area on the vacuum assist han-
dle. Gently tilt handle of screwdriver
toward the front of the unit to release
the latch while pulling up on the vacu-
um assist handle with your other hand.
Latch Area
g. Install the inlet restrictor that was re-
moved when assembling forvacuum
use.
NOTE: If you are unable to locate the
inlet restrictor, the unit will still operate.
This restrictor improves the blower
function.
4. Remove the collection bag.
5. Close the inlet cover and makesure
it is latched closed.
6. Re-install the blower tube. Refer to AT-
TACHING THE SLOWER TUBE for
instructions on how to attach this item.
SELECT AN EXTENSION CORD
Use only a 120 A.C. voltage supply as
shown on nameplate of the unit to
power your blower.
• To reduce the risk of electricaI shock,
this equipment has a polarized plug
(one blade is wider than the other) and
will require the use of a polarized
6

extensioncord.Theapplianceplug
willfitintoapolarizedextensioncord
onlyoneway.Iftheplugdoesnotfit
fullyintotheextensioncord,reverse
theplug.Iftheplugstilldoesnotfit,
obtainacorrectpolarizedextension
cord.Apolarizedextensioncurdwill
requiretheuseofapolarizedwall
oufiet.Thisplugwillfitintothe
polarizedwalloufietonlyoneway.If
plugdoesnotfitfullyintothewall
oufiet,reversetheplug.Ifitstilldoes
notfit,contactaqualifiedelectricianto
installtheproperwalloutlet.Donot
changetheequipmentplug,extension
cordreceptacle,orextensioncord
pluginanyway.
Theextension cord used to reach the
power source must be:
• Specifically marked as suitable for out-
door use. The cord must be marked with
the suffix "W-A" (in Canada "W").
• Heavy enough to carry full current from
the power source to the unit. Otherwise,
loss of power and overheating can oc-
cur causing damage to unit. Refer to
table for minimum wire gauge recom-
mendations. The cord must be marked
with the proper wire gauge. (Appropriate
extension cords are available.) Do not
use multiple cords.
• In good condition. Cord insulation must
be intact with no cracks or deterioration.
Plug connectors must be undamaged.
DO NOT use multiple cords.
MINIMUM WIRE GAUGE
RECOMMENDATIONS
_ 16_VOLTS 25 F]_ AWG*50FT 1O0 FT.
*AmencanWire Gauge
Secure the extension cord to the unit by
threading the cord through the cord re-
tainer (see illustration). Insert the cord
receptacle into the recessed plug.
Cord
Receptacle
Recessed
Plug
on Unit
Cord
Retainer
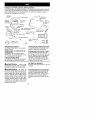
KNOW YOUR ELECTRIC BLOWER
READ THIS INSTRUCTION MANUAL AND SAFETY RULES BEFORE OPERATING YOUR
UNI]: Compare the illustrations to your unit to familiarize yourself with the location of
the various controls and adjustments. Save this manual for future reference.
ON/OFF Switch Top Handle
Cord Air Vents
Retainer __ff ...__
Rear /" _'_
Handle _"__ Upper Vacuum Tube
Inlet Cover Retaining Post
Latch
Tube Release Button
(_X Blower Tube
let Restrictor
Collection Bag
Elbow
Tube
Vacuum Assist Handle
Upper Vacuum Tube
Low_
7

ON/OFF SWITCH
The ON/OFF SWITCH is used to activate
the motor.
INLET COVER LATCH
The INLET COVER LATCH is used toopen
and close the inlet cover and to secure
the upper vacuum tube to the blower
unit.
BLOWER TUBE
The BLOWER TUBE is designed to direct
the flow of air.
INLET RESTRICTOR
The _NLET RESTRICTOR improves the
blower function.
TUBE RELEASE BUTTON
The TUBE RELEASE BUTTON secures the
blower tube or elbow tube to the blower
unit during operation. Also, pressing the
tube release button allows removal of the
blower tube or elbow tube.
_IWARNING: You MUST make sure
the tubes are secure before using the
unit.
_WARNING: Do not use the unit
without the tubes or collection bag proper-
ly attached to avoid flying debris and/or
impeller contact which can cause serious
injury. Always wear eye protection to pre-
vent rocks or debris from being blown or
ricocheting into the eyes and face which
can result in blindness or serious injury.
STOPPING YOUR UNIT
Slide the ON/OFF switch to the OFF
position.
STARTING YOUR UNIT
Your unit has two run positions, LOW
and HIGH. Slide the switch to one of
these positions to turn on the unit.
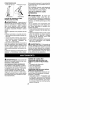
OPERATING POSITION
Eye Protection Eye Protection
Blower Vacuum
USING YOUR UNIT AS A BLOWER
_I_WARNING: Inspect the area be-
fore using the unit. Remove all debris
and hard objects such as rocks, glass,
wire, etc., that can ricochet, be thrown,
or otherwise cause injury or damage
during operation.
Use your unit as a blower for:
• Sweeping debris orgrass ciippings from
driveways, sidewalks, patios, etc.
• Blowing grass clippings, straw, or
leaves into piles, or removing debris
from corners, around joints, or between
bricks.
Direct air flow by directing the blower
tube down or to one side. Always work
away from solid objects such as walks,
large stones, vehicles, and fences.
Ciean comers by starting in comers and
moving outward. This will help prevent
an accumulation of debris which could
fly into your face.
Be careful when working near plants.
The force of the air could damage
tender plants.
USING YOUR UNIT AS A VACUUM
_kWARNING: Do not vacuum
stones, gravel, metal, broken glass,
etc., to avoid severe damage to the im-
peilen To avoid the possibility of electri-
cal shock, do not attemptto vacuum wa-
ter or other liquids.
Use your unit as a vacuum to pick up
dry material such as leaves, grass,
small twigs, and bits of paper.
• For best results during vacuum use,
operate your unit at high speed.
• Move slowly back and forth over the
material as you vacuum. Avoid forc-
ing the unit into a pile of debris as
this can clog the unit.
• Keep the vacuum tube about an inch
above the ground for best results.
_!_WARNING: If the unit becomes
clogged, stop the unit and unplug the ex-
tension cord. Wait until the impeller has
completely stopped turning, then re-
move the vacuum tubes. Carefully
reach into the vacuum opening and
clear out the clogged debris.
8

,_k WARNING: Disconnect power
source before performing maintenance.
GENERAL RECOMMENDATIONS
The warranty on this unit does not cover
items that have been subjected to opera-
tor abuse or negligence. To receive full
value from the warranty, the operator must
maintain unit as instructed in this manual.
Various adjustments will need to be made
periodically to properly maintain your unit.
BEFORE EACH USE
CHECK FOR LOOSE
FASTENERS AND PARTS
• Inlet Cover
• Blower Tube
• Vacuum Tubes
• Collection Bag
CHECK FOR DAMAGED OR
WORN PARTS
Contact your authorized service dealer
for replacement of damaged or worn
parts.
• ON/OFF Switch - Ensure switch func-
tions propedy by moving the switch to
the OFF position. Make sure motor
stops; then restart motor and continue.
• Inlet Cover - Discontinue use of unit if
inlet cover fails to latch properly or if it is
damaged in any way.
AFTER EACH USE
INSPECT AND CLEAN UNIT & LABELS
Stop unit and unplug extension cord.
• After each use, inspect complete unit
for loose or damaged parts. Clean the
unit using a damp cloth with a mild de-
tergent.
• Wipe off unit with a clean dry cloth.
CLEAN COLLECTION BAG
IMPORTANT: THE COLLECTION BAG
MUST BE PROPERLY EMPTIED.
• You must properly empty and maintain
the collection bag to avoid deterioration
and obstruction of air flow.
• Remove the collection bag from the unit
and empty after each use. Do net store
bag without emptying the bag of all con-
tents (grass, leaves, etc.).
• Wash the bag once a year. Remove the
bag from the blower and turn the bag in-
side out. Wash the bag with a water
hose. Allow the bag to hang and dry
completely before you reuse the bag.
HOW TO REMOVE AN OBJECT
FROM THE AIR INTAKE
4_WARNING: Stop the unit and dis-
connect from the power source before
opening the inlet cover. The motor must
be stopped and the impeller blades no
longer turning to avoid serious injury
from the rotating blades.
1. While holding the inlet cover open,
remove the vacuum tubes. The inlet
cover must be held open through all
remaining steps.
2. Carefully reach into the vacuum
opening and clear out the air intake
area. Clear all debris from impeller.
3. Inspect the impeller for cracks. If
cracked or damaged, do not use the
unit. Have parts replaced by your au-
thorized service dealer. Do not at-
tempt to replace them yourself.
9

_kWARNING: Perform the following
steps after each use:
• Stop unit and disconnect from the pow-
er source.
• Allow motor to cool before storing or
transporting.
• Store unit with all guards in place. Posi-
tion unit so that any sharp object cannot
accidentally cause injury.
• Store unit unplugged, well out of the
reach of children.
SEASONAL STORAGE
Prepare unit for storage at the end of
the season or if it will not be used for
30 days or more.
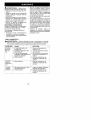
TROUBLESHOOTING TABLE
Ifyour blower is to be stored for a period
of time:
• Stop unit and disconnect from the pow-
er sou roe.
• Clean the entire unit before lengthy stor-
age.
• Open inlet cover and clean any dirt,
grass, or debris that has collected. In-
spect the blower and all tubes. Close
and make sure the cover is latched.
• Clean air vents and air inlet of debris.
• Store your unit and extension cord in a
well ventilated area and covered, if pos-
sible, to prevent dust and dirt accumula-
tion. Do not cover with plastic. Plastic
cannot breathe and may cause con-
densation and eventual rust or corro-
sion.
• Check entire unit for loose screws. Re-
place any damaged, wom, or broken
parts.
_kWARNING: Always stop unit and disconnect from the power source before
performing all of the recommended remedies below except remedies that re-
quire unit to be operating.
SYMPTOM CAUSE REMEDY
Unit fails to 1. Switch in the OFF position. 1. Slide switch to ON position.
operate. 2. Extension cord discon- 2. Reconnect extension cord.
nected.
3. Circuit breaker tripped, or 3. Reset circuit breaker or
fuse blown, fuse.
4. Mechanical failure 4. Contact your authorized
service dealer.
Unit 1. Mechanical failure 1. Contact your authorized
vibrates service dealen
abnormally.
Impeller will 1. Debris in air intake area. 1. Clean unit. Remove any
not turn 2. Mechanical failure, debris.
freely. 2. Contact your authorized
service dealer.
10

ELECTROLUX HOME PRODUCTS,
INC., warrants to the original purchaser
that each new Weed Eater brand elec-
tric or cordless product is free from de-
fects in materia! and workmanship and
agrees to repair or replace under this
warranty any defective Weed Eater
brand electric or cordless product within
two (2) years from the original date of
purchase.
If your Weed Eater brand electric or
cordless product should fail within the
limited warranty period, return it, com-
plete, prepaid, with proof of purchase, to
the dealer from whom it was purchased
for repair or replacement at the option of
ELECTROLUX HOME PRODUCTS,
INC.
This warranty is not transferable and
does not cover damage or liability
caused by improper handling, improper
maintenance or the use of accessories
and/or attachments not specifically rec-
ommended by ELECTROLUX HOME
PRODUCTS, INC., for this tool. Addi-
tionally, this warranty does not cover
parts that will wear and require replace-
ment with reasonable use during the
warranty period. This warranty does not
cover predelivery setup or normal ad-
justments explained in the instruction
manual.
THIS WARRANTY GIVES YOU SPECIFIC
LEGAL RIGHTS, AND YOU MAY HAVE
OTHER R{GHTS WHICH VARY FROM
STATE TO STATE.
NO CLAIMS FOR CONSEQUENTIAL OR
OTHER DAMAGES WILL BE ALLOWED,
AND THERE ARE NO OTHER EXPRESS
WARRANTIES EXCEPT THOSE EX-
PRESSLY STIPULATED HEREIN.
SOME STATES DO NOT ALLOW LIMITA-
TIONS ON HOW LONG AN IMPLIED WAR-
PANTY LASTS OR THE EXCLUSION OR
LIMITATIONS OFINCIDENTAL ORCONSE-
QUENTIAL DAMAGES, SO THE ABOVE
LIMITATIONS OR EXCLUSION MAY NOT
APPLY TO YOU.
The policy of ELECTROLUX HOME
PRODUCTS, INC., to continuously im-
prove its products. Therefore, ELEC-
TROLUX HOME PRODUCTS, INC., re-
serves the right to change, modify, or
discontinue models, designs, specifica-
tions, and accessories of all products at
any time without notice or obligation to
any purchaser.
11

IMPORTANTES ADVERTENCIAS E
INSTRUCCIONES DE SEGURIDAD
'ADVERTENCIA:
AI usar aparatos de jardineria el6ctricos, se deber_n seguir siempre precauciones
b_sicas para reducir el riesgo de incendio, choque eIectrico y accidentes de alta gra-
vedad. Deber_n seguirse las advertencias e instrucciones de seguridad en este
manual para reducir el riesgo de incendios, choque el6ctrico o accidentes y asimis-
mo para proveer seguridad y eficiencia razonables en el uso de este aparato. El
usuario tiene la responsabilidad de obedecer las advertencias e instrucciones con-
tenidas tanto en este manual como en el aparato, iLea el manual de instrucciones en
su totalidad antes de armar y usar el aparato! Limite el uso de este aparato a aquel-
Ias personas que hayan leido y comprendido las advertencias e instrucciones tanto
en este manual como en el aparato y que vayan o obedecerlas. No permita que los
nifios usen este aparato. Toda su atenci6n es necesaria cuando use este aparato
cerca de lugares en donde haya nifios.
SEGURIDAD DEL USUARIO
• Use siempre anteojos de seguridad o
protecci6n similar de ojos al usar y al
hacer mantenimiento del aparato. El
uso de protecci6n de ojos puede ayu-
dar a la prevenci6n de ceguera uotras
heridas graves producidas por pie-
dras o desechos impelidos por el apa-
rato y arrojados en los ojos y en la
cara.
• Use siempre mascarilla filtrante o pro-
tectora al trabajar con el aparato en
ambientes polvorientos.
• Use vestimenta protectora con panta-
Iones largos. No use el aparato des-
calzo ni en pantaIones cortos o en
sandalias.
• No use el aparato cuando se en-
cuentre cansado, enfermo, agitado, ni
bajo la influencia del alcohol, de dro-
gas u otros medicamentos.
• Mantenga el cabello por encima de los
hombros, at_ndolo para tal efecto si es
necesario. Mantenga el cabello, ropa
suelta, ropa con tiras, dedos y otras
partes del cuerpo alejados de las aber-
turas y partes en movimiento. El cabel-
Io, ropa suelta o ropas con tiras, bodas,
corbatas, etc., pueden enredarse en las
piezas m6viles.
SEGURIDAD ELECTRICA
_IkADVERTENCIA: No use su apa-
rato en lugares hQmedos o mojados ni
cerca de piscinas, de los hidromasajes,
etc. No exponga el aparato a la nieve, a
Ia Iluvia ni al agua para evitar la posibili-
dad de choque el_ctrico. No toque el en-
chufe del cable de extensi6n ni el deI
aparato con las manos mojadas.
• Use exclusivamente el voltaje que
consta en la placa del aparato.
• Evite situaciones peligrosas. No use
el aparato en presencia de liquidos ni
_ases inflamabIes,para evitar incen-
los, explosiones y/o daSos al apara-
to.
• Eviteambientes peligrosos. Nousesu
aparato en _reas poco ventiladas
donde haya alta concentraci6n de pol-
vo o vapores explosivos.
• Para reducir el riesgo de choque el6c-
trico, use cables de extensi6n es-
pecificamente marcados como aptos
para usar con aparatos de uso exteri-
ory que tengan una clasificacion el6c-
trica no menor que la clasificaci6n del
aparato. El cable debe venir marcado
con el sufijo "W-A" ("W" en Canada).
AsegQrese que el cable de extensi6n
se encuentre en buenas condioiones.
Si est_ da_ado, c_mbielo. Los cables
de extensi6n demasiado finos cau-
sar&n una baja en el voltaje de linea,
provocando baja de potencia y exce-
so de calentamiento. En caso de
duda, use un cable de clasificaci6n
mAs alta. Cuanto m_s bajo es el
nQmero de clasificaci6n m_s grueso
serA el cable.(AVlSO: La clasificaci6n
correcta dependiendo del largo del
cable se muestran en este manual.
Vea ELIJA UN CABLE DE EXTENSION
en la secci6n MONTAJE).
• Inspeccione el aislante y los conec-
totes en el aparato yen el cable deex-
tension antes de cada uso. Si encuen-
tra algQn dafio, no Io use hasta no ser
reparado por su distribuidor autoriza-
do deI servicio. No arrastre el aparato
12

niIoIleveporelcable;nouseelcable
comomango,nocierrelaspuertas
contraelcable,nitiredelcablesi6ste
est_apoyadocontraunbordefiloso.
Mantengaelcablealejadodesuperfi-
ciescalientes.Notiredelcablepara
desconectarlodel tomacorriente.
Paradesconectar,sujeteelenchufe,
noelcable.
• Parareducirelriesgodequeelcable
deextensi6nsedesconectedelapa-
ratoduranteeluso,asegureelcable
deextensi6nalretentordecabley
conecteconelenchufeembutidoenel
aparatosegQnIomostradoeneste
manual.
• NouseelaparatosielinterruptornoIo
enciendeoapagacomocorresponde.
H&galorepararenundistribuidorau-
torizadodelservicio.
• Mantengaelcabledeextensi6naleja-
dodelusuarioydeobst_culosentodo
momento.Noexpongaalcalor,aI
aceiteniabordesfilosos.
• Evitetodocontactodelcuerpoconlos
conductoresatierra,talescomolos
carlosdemetalo lascercasde
alambre,paraevitarlaposibilidadde
choqueel6ctrico.Nomanejeelen-
chufeoelaparatoconlasmanosmo-
jadas.
• Nouseelaparatoconelcableoelen-
chufeda_ados.Sielaparatonoest_
funcionandocomodebe,si seha
caido,sehadafiado,dejadoalainter-
perieodejadocaeralagua,devuelva-
Ioasudistribuidorautorizadodelser-
vicioparaserreparado.
• DebeproveerseInterruptordeFallas
enelCircuitoaTierra(GroundFault
CircuitInterruptor-GFCI)enelcircui-
tooeneltomacorrienteusadocon
esteaparato.Haytomacorrientesdis-
poniblesconprotecci6nGFCIincor-
poradayestospuedenserusados
paracumplirconestamedidadese-
guridad.
• Mantengaa terceraspersonasin-
cluyendonifios,animales,especta-
doresyayudantesaIejadosdelazona
detrabajoporIomenosunminimode
10metros(30pies).Detengaelmotor
deinmediatosialguienseleacerca.No
permitaqueelaparatoseautilizado
comounjuguete.
CONSTRUCCIONDE DOBLE AISLA-
MIENTO
Este aparato tiene un doble aislamien-
to para ayudar a proteger el mismo en
contra de choques el6ctricos. La
construcci6n de doble aislamiento
consiste en dos "capas" de aislamien-
to el6ctrico en lugar de tenet toma de
tierra.
Herramientas y aparatos construidos
con el sistema de doble aislamiento no
han sido disefiados para que tomen tier-
ra. No se ha provisto para esta m_quina
ningt_n medio para la toma de tierra, y
no se deber_n aSadir medios para la
toma de tierra a la misma. Como resul-
tado, el cable de extensi6n usado con
su aparato puede ser enchufado en cu-
alquier tomacorriente electrico normal
de 120 voltios. Precauciones de segud-
dad deben ser observadas cuando se
use cualquier herramienta el6ctrica. El
sistema de doble aislamiento s61o pro-
vee protecci6n adicional en contra de
accidentes causados per fallo interne de
aislamiento el_ctrico.
,,I_ADVERTENCIA: Toda reparacidn
el_ctrica hecha a este aparato, incluyen-
do la cubierta, el interruptor, el motor, etc.,
debe ser diagnosticada y reparada por un
personal de servicio cualificado. Las pie-
zas de reemplazo en productos de doble
aislamiento deber_n ser id_nticas alas
piezas que se est&n reemplazando. Los
aparatos de doble aislamiento, vienen
marcados con las palabras "doble aisla-
miento" o "aislado doblemente'. El s[mbo-
Io [] (cuadrado dentro de otto cuadrado)
puede tambi6n aparecer en el aparato.
De no permitir que sea el personal de ser-
vicio de Sears quien haga las reparciones
a este aparato, puede causar que la
construcci6n de doble aislamiento se
convierta ineflcaz y resulten accidentes
muy serios.
SEGURIDAD DEL APARATO Y SU
MANTENIMIENTO
• Apague todos los controles y permi-
ta que el motor se detenga antes de
desconectar el aparato del recurso
de energia.
• Desconecte el aparato mientras no Io
est6 usando. No deje el aparato sin
supervisi6n mientras est_ enchufado.
• No coloque el aparato en ninguna su-
perficie que no est6 limpia y que sea
s61ida mientras el aparato est6 en fun-
cionamiento. Escombros como Io son
la gravilla, arena, polvo, hierba, etc.,
podrian ser recogidos por la toma de
aire y arrojados hacia afuera a trav6s
13

de la abertura de descarga, daSando
el aparato, la propiedad o causando
serios accidentes a espectadores o aI
usuario.
• No se incline demasiado o use en su-
perficies inestables como Io son las
escaleras, &rboles, vertientes empi-
nadas, techos, etc. Maneje con sumo
cuidado cuando est_ limpiando escal-
eras. Mantenga un pie firme y balance
todo el tiempo. Mantenga las manos
alejadas de los tubos.
• Inspeccione el aparato entero antes
de ponerlo en marcha, verifique pie-
zas gastadas, sueltas, perdidas o
daSadas. No use us aparato hasta
que _ste se encuentre en forma apro-
piada para el trabajo.
• Desconecte el aparato antes de dar
servicio, limpiarlo, darle mantenimien-
to o almacenarlo.
• Este aparato cuenta con un doble ais-
lamiento. Vea la secci6n de DOBLE
AISLAMIENTO. Haga que todo servicio
intemo sea desempeSado por un per-
sona! de servicio cualificado para evi-
tar el crear peligro o evitar anular la ga-
rantia.
• Permita que todo mantenimiento no
especificado en este manual de
instrucciones, sea desempeSado pot
su distribuidor autorizado del servicio.
• Siempre vea su distribuidor autoriza-
do del servicio para cambiar el impul-
sot si _ste se encuentra daSado. Pie-
zas que est6n astilladas, rajadas,
rotas o daSadas de cualquier otro
modo, podrian set arrojadas al aire en
pedazos y ocasionar graves acci-
dentes. Cambie todas las piezas
daSadas antes de usar su aparato.
• Nunca ponga ningQn objeto en la ab-
ertura de la toma de aire ya que esto
puede obstruir la circulaci6n de aire y
causar daSos al aparato.
• Nunca sumerja el aparato en agua u
otros liquidos o riegue con una man-
guera. Limpie con una esponja hQme-
day con detergente suave. Vea la
secci6n ALMACENAJE.
• Examine las aberturas de la torna de
aire y los tubos frecuentemente,
siempre con el aparato apagado y
desconectado. Mantenga los tubos y
respiraderos Iimpios de escombros
los que pueden acumularse y restrin-
gir la circulaci6n de aire apropiada.
• No queme, incenere o exponga este
aparato a calor extremo.
• AImacene su aparato desconectado
en un lugar alto, fresco, seco, en un
_rea interior y fuera del alcance de los
niSos.
• Use solamente piezas de reemplazo y
accesorios recomendadas, para evi-
tar crear peligro y/o anular la garantia.
• Mantenga el aparato de acuerdo con
los procedimientos recomendados.
• Use t]nicamente para trabajos explici-
tos en este manual en la secci6n USO.
SEGURIDAD DE LA PROPULSOR DE
AIRE
• Use s61o a la Iuz del dia o en buena luz
artificial.
• Inspeccione el &rea antes de usar su
aparato. Retire todos los escombros y
objetos s61idos tales como piedras, vi-
drio, alambre, etc., que el aparato pue-
da arrojar o hacer rebotar, causando
heridas o serios da_os.
• Evite poner en marcha el motor acci-
dentalmente. Asegt[irese que el inter-
ruptor est6 el la posici6n OFF y man-
tenga su mano y sus dedos alejados
del interruptor mientras conecte el
aparato en el recept_culo de energia
o cuando mueva el aparato estando
enchufado.
• Nunca ponga el aparato en marcha
sin antes tenet todo el equipo perti-
nente unido. Cuando se usa como
propulsor de aire, instale simpre el
tubo de propulsi6n. Use s6to los acce-
sorios recomendados. No use con
ninguna de las aberturas bIoqueadas.
Mantenga libre de polvo, pelusa, pelo
o cualquier otra cosa que pueda redu-
cir la circulaci6n del aire.
• Para evitar que el fuego se propague,
no use la propulsor de aire cerca de
donde hay fuego de hojas secas o de
mateza, chimeneas, barbacoas, ce-
niceros, etc.
• Nunca ponga objetos dentro del tubo
de propulsi6n; siempre dirija los es-
combros en direcci6n contraria a
donde personas, animales, cristal, y
objetos s61idos como son los _rboles,
autom6viles, paredes, etc., se en-
cuentran. La fuerza de aire puede
causar que rocas, suciedad o varillas
sean arrojadas al aire o reboten, Io
que puede causar heridas a personas
o animales, romper cristales o causar
otros da_os.
• Nunca utilice para esparcir productos
quimicos, abono, o cualquier otra
clase de substancia que pueda con-
tenet materiales t6xicos.
14

SEGURIDAD DE LA ASPIRADORA
• Detenga el motor y desconecte el en-
chufe antes de abrir la compuerta de
entrada de aire o intentar introducir o
remover los tubos de la aspiradora. El
motor debe detenerse completa-
mente y las aletas de la h61ice no de-
ben girar para evitar serias heridas
causadas por las aletas girantes.
• Objetos s61idos pueden ser arrojados
a trav_s de la bolsa de colecci6n o la
caja y convertirse en misiles peligro-
sos que pueden causar heridas serias
al usuario o a otras personas.
• Cuando est6 usando el accesorio de
la aspiradora, el aprato est_ disefiado
para recoger material seco como son
hojas, hierba, ramas pequefias y pe-
dazos peque5os de papel. No aspire
piedras, gravilla, metal, vidrio roto,
etc., para evitar da_os severos a la as-
piradora. Para evitar Ia posibilidad de
cheque el_ctrico, no intente aspirar
agua u otros liquidos.
• Nunca ponga en marcha el aparato
sin unir el equipo apropiado. Cuando
se usa como aspiradora, siempre
instale los tubos de la aspiradora y el
ensamblaje de la bolsa de colecci6n.
Asegt)rese de que la cremallera de la
bolsa de colecci6n este completa-
mente cerrada cuando el aparato est_
en marcha para evitar que escombros
sean arrojados al aire. Use s61o los ac-
cesorios recomendados.
• Evite situaciones que puedan causar
incendio en la bolsa de colecci6n. No
aspire cerillas, cigarros, cigarrillos
usados o cenizas de chimenea, bar-
bacoas o ceniceros, etc. Para evitar la
propagaci6n de incendios, no use cer-
ca de donde haya fuego de hojas se-
cas o de malezas, chimeneas, barba-
coas, ceniceros, etc.
• Siempre use la banda para el hombro
de la bolsa de colecci6n cuando est_
aspirando para evitar la p6rdida de
control.
• Examine las aberturas de la toma de
aire, el tubo en forma de codo y los tu-
bos de la aspiradora frecuentemente,
siempre con el aparato detenido y el
enchufe desconectado. Mantenga los
respiraderos y tubos limpios de es-
combros los que pueden acurnularse
y restringir la circulaci6n de aire apro-
piada. No utilice con ninguna de las
abertauras bloqueadas. Mantenga
libre de polvo, pelusa, pelo ycualquier
otra cosa que reduzca Ia circulaci6n
de aire.
CRITERIOS
Este producto est_ enlistado por Un-
derwriters Laboratories, Inc., de acuer-
do con UL Standard 1817.
Si ocurrieran situaciones que no hay-
an sido cubiertas en este manual, ten-
ga cuidado y use el buen sentido. Si
necesita ayuda, contacte su distribui-
dor autorizado del servicio o Ilame al
1-888-554-6723. De no cumpIir con
todas las Reglas y Precauciones de
Seguddad, podrian resultar accidentes
muy serios.
GUARDE ESTAS INSTRUCCIONES
_kADVERTENCIA: Detenga el mo-
tor y desconecte el enchufe antes de
abrir la compuerta de entrada de aire o
intentar introducir o remover el limitador
de entrada de aire, tubo de propulsi6n o
tubos de aspiraci6n. El motor debe de-
tenerse completamente y las aletas de
la h_lice no deben girar para evitar ser-
ias heridas causadas por las aletas gi-
rantes.
_J!_ADVERTENCIA: Si recibi6 el
aparato ya armado, asegt]rese de que
el aparato haya sido armado correcta-
mente y que todos los fijadores se en-
cuentren bien ajustados.
• Un destomillador se requiere para el
montaje.
MONTAJE DEL PROPULSOR DE
AIRE
AVISO: Instrucciones de montaje para
el uso del aparato como aspiradora,
Ias hallar& inmediatamente despues
de terminar esta secci6n.
Instalacibn del tubo de propulsibn
Si usted ya ha montado el aparato
para el uso como aspiradora, vea la
secci6n COMO CONVERTIR EL APARA-
TO DE USO DE ASPIRACION A USO DE
PROPULSION.
Para instalar el tubo de propulsi6n:
1. Alinee la ranuras saliente del tubo
de propulsi6n con la ranuras en la
salida de aire de la propulsora.
2. Introduzca el tubo de propulsi6n
sobre el salida de propulsi6n y
15

empQjelo hasta sentir que se haya
fi ado a presi6n correctamente en
a pos c 6n de uso.
3. Para remover el tubo, presione el
bot6n, afloje el tubo mientras se
suelta.
_C_) Bot6n para aflojar el tubo
/,(._\ _ Tubo de Propulsi6n
Salida de de propulsi6n
MONTAJE DEL ASPIRADORA
AVISO: Instrdcciones de montaje para
el uso de su aparato como propulsor de
aire, han sido explicadas en la secci6n
anterior.
Si usted ya ha montado el aparato para
el uso como propulsor de aire, remueva
Ia tubo de propulsi6n.
Remueva el limitador de entrada de
aire
El timitador de entrada de aire es usa-
do cuando el aparato se est& utilizan-
do como propuIsor de aire. Este limita-
dor no se usa cuando el aparato se
utiliza como aspiradora y tiene que ser
removido durante el montaje para el
uso de la aspiradora.
AVISO: AsegQrese de mantener el
Iimitador de entrada de aire para cuan-
do use el aparato como propulsor de
aire.
1. Asegure la aparato se para y se
desconecta la cable de extensi6n.
2. Introduzca un destomillador dentro
del Area del cerradura de la com-
puerta de aspiraci6n. Suavemente,
incline el mango del destornillador
hacia el frente del aparato tirando
hacia arriba de Ia compuerta de as-
plraclon con su otra mano.
Vista inferior de1aparato Area del
Compuerta de AspiracJdn (cerrado)
H6,ice_Arreadelra
Compuerta de AspJraci6n (abJerto)
3. Gire el limitador de entrada de aire
hacia la izquierda (en sentido con-
trario al de las agujas del reloj), y
desp6guelo deI aparato. No cierre
la compuerta de aspiraci6n. Usted
entonces introducir_ los tubos de Ia
aspiradora.
/d_ _ Compuerta
de
aspJraci6n
Limita
entrada de aire
Instalacibn de los tubos de aspira-
ci6n
La aspiradora cuenta con dos tubos,
un tubo superior y un tubo inferior. El
tubo superior est_ cortado de forma
recta en ambas puntas y tiene una
mango auxiliar para aspiraci6n en un
extremo. El tubo superior introduce al
aparato de propulsi6n. El tubo inferior
introduce al tubo superior, y est_ corta-
do en _ngulo en la punta inferior. Esta
punta inferior apuntar& hacia el suelo
durante el uso como aspiradora.
1. Asegure la aparato se para y se
desconecta la cable de extensi6n.
2. Manteni_ndolo abierto el compuer-
ta de aspiraci6n, coloque los gan-
chos que se encuentran en el man-
go auxiliar en el poste de retenci6n
del aparato.
3. Gire el tubo hasta que este fijo por
el cierre de compuerta de aspira-
ci6n.
Tubo de la Aspiradora
Superior
G_a_ _' _ MangoAuxili_
Poste de Retencidn
4. Introduzca eI tubo de la aspiradora
inferior a! tubo de la aspiradora su-
perior por primero alineando las fie-
chas en ambos tubos. Luego, pres-
ione juntos ambos tubos hasta que
el tubo inferior ajustes firmemente
en el tubo superior (aIrededor de 3
pulgadas).
16

_,_ TuboSupedor Tubolnfedor
Alinee las flechas en
"-'_ AIIh tubo inferior
el tubo superior y el
MONTAJE DE LA BOLSA DE ASPI-
RACION
1. Abra la cremallera en Ia bolsa de
aspiraci6n e introduzca el tubo en
forma de codo.
2. Empuje Ia punta pequeSa del tubo
en forma de codo por la abertura
peque_a de la bolsa de aspiraci6n.
AVISO: AsegQrese de que el borde
de la abertura peque_ha de la bolsa se
encuentre pegado a la parte en forma
de embudo del tubo en forma de codo,
y el orificio para que el tubo se suelte,
el bot6n se encuentra en Ia parte su-
perior de la tapa.
Tubo enforma
de codo Orificio
para el
bot6n
2. Coloque el aparato en su lado der-
echo, con la salida de aire y la bol-
sa apuntando hacia detr_s. Sujete
el aparato en posici6n vertical y el
tubo inferior del aspiradora en el
suelo para apoye.
3. Coloque la banda del hombro so-
bresu cabeza y sobre su hombro
izquierdo.
4. Ajuste la banda para permitir la cir-
cuIaci6n libre de aire de la propul-
sor de aire. Si la bolsa de colecci6n
se enrosca, el aparato no funcio-
nar& apropiadamente.
AVISO: La banda est_ diseSada para
que la bolsa de colecci6n tome tal po-
sici6n en su hombro sin enroscarse.
La banda no ha sido diseSada para
sostener el peso del aparato.
Banda de hombro en
hombro izquierdo
Abertura de
cremallera saliente
3. Cierra la cremallera de la bolsa.
AsegQrese de que la cremallera se
encuentre completamente cerrada.
4. AIinee la ranuras saliente del tubo
en formo de codo con Ia ranuras en
la salida del aire de la propulsora.
5. Introduzca el tubo en formo de
codo sobre el salida de propulsi6n
y empQjeIo hasta sentir que se
haya fijado a presi6n correcta-
mente en la posici6n de uso.
AJUSTE DE LA BANDA DEL HOM-
BRO EN LA BOLSA DE COLECCION
1. Cuidadosamente, enlace la banda
del hombro a trav6s de la hebilla
como se muestra en la ilustraci6n a
continuaci6n.
primUel!oame_°nrent_
Si la bolsa
enrosoa, se permitira
la circulaci6n libre de aire
COMO CONVERTIR EL APARATO DE
USO DE ASPIRACION A USO DE
PROPULSION
1. Detenga el aparato y desenchufe el
cable de extensi6n.
2. Remueva los tubos de aspiraci6n.
Introduzca un destomillador dentro
del &rea del cerradura de la mango
auxiliar para aspirador. Suavemente,
incline el mango del destomillador
hacia et frente del aparato tirando
hacia arriba de la mango auxiliar
para aspirador con su otra mano.
Area del cerradura
3. Instale el limitador de salida de aire
que fue removido al armar el apa-
rato para uso de aspiraci6n.
17

AVISO: Si usted no puede Iocalizar el
Iimitador de salida de aire, el aparato
seguir_ funcionando. Este limitador
mejora la funciSn de proputsiSn.
4. Remueva la bolsa de colecci6n.
5. Cierre la compuerta de salida a
propulsiSn y asegt)rese que tenga
el cerrojo completamente cerrado.
6. Vuelva a instalar los tubo de pro-
pulsi6n. Yea INSTALACION DE LOS
TUSOS DE PROPULSION para
instrucciones de como unir estos
accesorios.
ELIJA UN CABLE DE EXTENSION
Use sSIo suministro de voltaje de 120
A.C. como se muestra en la placa en
el aparato, como recurso de energia.
• Para reducir el riesgo de choque el6c-
trico, este equipo cuenta con un en-
chufe polarizado (una aleta es m_s
ancha que la otra). Este enchufe en-
trar_ solamente en una sola posici6n
en un enchufe polarizado del cable de
extensiSn. AsegQrese de tener un
cable de extensiSn polarizado. A su
vez, el enchufe polarizado del cable
de extensi6n entrar_ en el tomacor-
riente de una sola forma. Si el enchufe
no entra completamente en el toma-
corriente, invierta el enchufe. Si to-
davia no entra, contacte un electricis-
ta autorizado para que instale el
tomacorriente apropiado. No cambie
el enchufe de niguna forma.
El cable de extensi6n utilizado para
alcanzar el recurso de energia debe:
• Estar marcado especificamente para
el uso exterior. El cable debe estar
marcado con el sufijo "W-A" ("W" en
Canada).
• Tener la fuerza suficiente para trans-
portarenergia desde el recurso de en-
ergia todo al aparato. De otra manera,
pdrdida de energia y recalentamiento
podrian ocurrir, causando daSo al
aparato. Vea la tabla para las recom-
endaciones minimas de calibre del
cable. El cable debe venir ya marcado
con el calibre apropiado. (Cables de ex-
tensi6n apropiados vienen disponibles).
No utilice cables mQItiples.
• Estar en buena condici6n. El aisla-
miento del cable debe estar intacto sin
grietas o sin deterioro. Los enchufes
no deben tener ninguna se_aI de
daSo.
RECOMENDACIONES PAPA
CALIBRE MINIMO DE CABLE
*Calibre de Cable Amencano
Asegure el cable de extensi6n a su apa-
rato roscando la cable a travds del re-
tentor de cables (vea la ilustraci6n).
Introduzca el recept&cuIo det cable de
extensi6n al enchufe embutido en el
aparato.
Enchufe
Recept_culo embutido
del Cable
en el
\
aparato
Retentor
de cables
18

CONOZCA SU PROPULSOR DE AIRE ELECTRICA
LEA ESTE MANUAL DE INSTRUCCIONES Y LAS REGLAS DE SEGURIDAD ANTES DE
PONER EN FUNC]ONAMIENTO SU APARATO. Compare las ilustraciones a su apa-
rato para familiarizarse con la ubicaci6n de los diversos controles y ajustes.
Guarde este manual para uso futuro.
Interruptor_ _"
ON/OFF _-_ Mango Superior
Retentor __ Respiraderos
de cables --- deAire
de extensi6n\ ( _--\\ de_,re f_
Trasera U_.._;_ _"" Tubo de Aspiraci6n Superior
SoIsa de
collecci6n
Tubo en
forma de
codo
\Cerrojo de la Poste de Retenci6n Mango AuxiIiar
Compuerta de , para Aspirador
Aspiraci6n Tubo de Asplraclon
el tubo Superior _...q
para aflojar
Tubo de Propulsi6n
Tubo de Aspiraci6n
Inferior
Limitador de
INTERRUPTOR ON/OFF
El INTERRUPTOR ON/OFF se usa para
activar el moton
OERROJO DE LA COMPUERTA DE
ASPIRACION
El CERROJO DE LA COMPUERTA DE
ASPIRACION es usado para abrir y cer-
tar la compuerta de aspiraci6n.
TUBO DE PROPULSION
La TUBO DE PROPULSION est_ dise_a-
da para dirigir la circulaci6n de aire.
LIMITADOR DE ENTRADA DE AIRE
La LIMITADOR DE ENTRADA DE A_RE
mejora la funci6n de propulsi6n.
BOTON PAPA AFLOJAR EL TUBO
La BOTON PAPA AFLOJAR EL TUBO
que asegura el tubo de proputsi6n o el
tubo en forma de codo de su aparato
del propulsor durante la operaci6n.
Tambi_n, presionando el bot6n per-
mite el retiro del tubo de propulsi6n o
el tubo en forma de codo.
_lk ADVERTENCIA: Usted DEBE
asegurarse de que los tubos se encuen-
tren seguros antes de usar el aparato.
_kADVERTENCIA: No utilice su
unidad sin antes haberle puesto Ios tu-
bos o la bolsa de colecci6n apropiada-
mente sujeta para evitar que escom-
bros y/o contacto con la h_,lice Io que
puede acarrear serios accidentes. Use
stempre protecci6n para los ojos para
prevenir que escombros o rocas vuelen
o reboten en sus ojos y cara Io que
podria causar la p6rdida de la vista o ac-
cidentes muy serios.
DETENER SU APARATO
Ponga el interruptor ON/OFF en Ia posi-
ci6n OFR
PONER EN MARCHA SU APARATO
Su aparato tiene dos posiciones de
marcha, de baja velocidad (LOW) u
alta velocidad (HIGH). Coloque el in-
terruptor en una de estas dos posi-
ciones para porter en marcha su apa-
rato.
19

POSICION DE USO
Protecci6n de ojos Protecci6n de ojos
Propulsora Aspiradora
USO DE SU APARATO COMO
PROPULSOR DE AIRE
,_ADVERTENCIA: Inspeccione el
_rea antes de usar su aparato. Retire to-
dos los escombros y objetos s61idos
tales como piedras, vidrio, alambre,
etc., que el aparato pueda arrojar o hac-
er rebotar, causando heridas o serios
dafios.
Utilice su aparato como propulsor de mire
para:
• Barrer escombros o recortes de bier-
ba de caminos de entrada, aceras, pa-
tios, etc.
• Soplar recortes de hierba, paja uhojas
en montones, o para remover escom-
bros de esquinas, alrededor de
uniones o entre ladrillos.
Dirija la circulaci6n del mire moviendo Ia
tubo de propulsi6n hacia abajo o hacia
un lado. Siempre aleje Ia circulacion de
mire de objetos s61idos como son pa-
redes, piedras grandes, vehiculos y cer-
cas.
Limpie las esquinas comenzando en la
esquina y movi_ndose hacia afuera.
Esto ayudar_ a prevenir la acumulaci6n
de escombros los que pueden ser arro-
jados a su cara.
Sea cuidadoso cuando est6 trabajando
cerca de plantas. La fuerza del mire
puede dafiar las plantas fr&giles.
USO DE SU APARATO COMO
ASPIRADORA
At=
BADVERTENCIA: No aspire pie-
dras, gravilla, metal, vidrio roto, etc.,
para evitar dafios severos a Ia aspirado-
ra. Para evitar la posibilidad de choque
el_ctrico, no intente aspirar agua u otros
Iiquidos.
Use su aparato como aspiradora para
recoger material seco como hojas, hier-
ba, ramas pequefias y pedazos pe-
quefios de papel.
• Para me ores resultados al usar la as-
p radora, act ve a en a m_s a ta ve o-
cidad.
• Mu6vase lentamente de un lado a otro
sobre el material que desea aspirar.
Evite el forzar el aparato a recoger
montones de desechos pues esto
podria obstruir eI aparato.
• Paramejoresresultados, mantengael
tubo de la aspiradora una pulgada
m&s arriba del sueIo.
,_ADVERTENCIA: Si el aparato se
atasca, detenga la unidad ydesconecte
el cable de extensi6n. Espere a que Ias
h61ices se hayan detenido por completo,
entonces remueva los tubos de la aspira-
dora. Cuidadosamente, actare el atasco
en la abertura de las aspiradora.
_ADVERTENCIA: Desconecte del
recurso de energia antes de dar man-
tenimiento a este aparato.
RECOMENDACIONES GENERALES
La garantia en este aparato no aplica
a los articulos sometidos al abuso o a
Ia negligencia del usuario. Para recibir
el valor completo de la garantia, el
usuario deber_ mantener el aparato
segL3n las instrucciones en este manu-
al. Ser_ necesario hacer varios a ustes
per6d camente para mantener e apa-
rato debidamente.
ANTES DE CADA USO
VERIFIQUE QUE NO HAYA FIJA-
DORES FLO,JOS NI PIEZAS SUEL-
TAS
• Compuerta de Aspiraci6n
• Tubo de Propulsi6n
• Tubos de Aspiraci6n
• Bolsa de Colecci6n
VERIFIQUE QUE NO HAYA PIEZAS
DAI_IADAS O GASTADAS
El contacto distribuidor autorizado del
servicio para el reemplazo de piezas
dafiadas o gastadas.
• Interruptor ON/OFF - AsegL]rese que
el interruptor funcione correctamente
movi6ndolo a la posici6n OFF.Vea que
el motor se haya detenido; acto segui-
do, ponga el motor en marcha nueva-
mente y continue.
2O

• CompuertadeAspiraci6n- Nouseel
aparatosielcompuertadeaspiraci6n
nopuedetrabarcorrectamenteosise
daSadecualquiermanera.
DESPUES DE CADA USO
INSPECCIONE Y LIMPIE EL APARA.
TO Y LAS PLACAS
Pare el aparato y desconecte el cable
de ia extensi6n.
• Despu6s de cada uso, inspeccione el
aparato completa para saber si hay
plezas flojas o dafiadas. Limpie el
aparato y las placas usando un trapo
hL]medo con un detergente suave.
• Seque el aparato con un trapo limpio y
seco.
LIMPIE LA BOLSA DE COLECCION
IMPORTANTE: LA BOLSA DE CO-
LECCION DEBERA VACIARSE
APROPIADAMENTE.
• Se necesitar& limpiar y mantener
apropiadamente la bolsa de colec-
ci6n para evitar el deterioro y la ob-
strucci6n de la circulaci6n de aire.
• Remueva la bolsa de colecci6n del
aparato y vaciela despu6s de cada
uso. No almacene la bolsa de colec-
ci6n Ilena (hojas, hierba, etc.).
• Lave la bolsa una vez al aSo. Re-
mueva la bolsa de la propulsor de
aire y volvi6ndola al reves. Lave la
bolsa con una manguera de agua.
Asegt_rese que la bolsa est6 comple-
tamente seca antes de volverla a
usar.
REMOVER OBJETOS DE LA TOMA
DE AIRE
_kADVERTENCIA: Detenga el mo-
tor y desconecte el enchufe antes de
abrir la compuerta de entrada de aire. El
motordebe detenerse completamente y
Ias aletas de la h_lice no deben girar
para evitar serias heridas causadas por
Ias aletas girantes.
• Mientras sostiene la compuerta de as-
piraci6n abierta, remueva los tubos de
aspiraci6n. La compuerta de aspira-
ci6n debe ser abierta durante los pa-
sos siguientes.
• Cuidadosamente, alcance la abertura
de Ia aspiradora y aclare eI _rea de la
toma de aire. Limpie todos los escom-
bros deI h_lice.
• Examine que las h_lice no se hayan
roto ni quebrado. Si se hubieran daSa-
do o quebrado, no use el aparato,
haga que su distribuidor autorizado
del servicio las reemplace. No intente
reemplazarlas usted mismo.
21

_IADVERTENCIA: Realice los si-
guientes pasos despu_s de cada uso:
• Detenga el motor y desconecte el en-
chufe.
• Guarde el aparato en una Iocalizaci6n
estable. Asegure el aparato antes de
transportarlo.
• Guarde el aparato con todos sus pro-
tectores en su debido luga£ Ponga el
aparato en una posici6n tal que no
pueda causar ningL]n accidente.
• Guarde su aparato compietamente
fuera del alcance de los nifios.
ESTACIONAL ALMACENAJE
Prepare el aparato para el almacenaje
al final de la temporada o siva estar
sin usar por m&s de 30 dias.
Siva guardar el aparato durante un
periodo Iargo:
• Detenga el motor y desconecte el
aparato de la recurso de energia.
• Limpie el aparato por completo antes
del almacenaje.
• Abra la compuerta de aspiraci6n y
limpie Ia suciedad, hierba o escom-
bros que se hayan coleccionado. In-
speccione la propulsor de aire y to-
dos sus tubos. Cierre y asegQrese
que el cerrojo de la compuerta est6
completamente cerrado.
• Limpie de escombros los respirader-
os y la toma de aire.
• Si es posible, almacene su aparato y
el cable de extensi6n en un _rea cu-
bierta y bien ventiiada, para evitar la
acumulaciSn de polvo y de suciedad.
No cubra con un pl&stico. El pl_stico
no respira y puede causar condensa-
ci6n y eventualmente corrosiSn o en-
mohecimiento.
• Examine el aparato entero en
bt]squeda de tomillos. Reemplace
todas las piezas que est6n dafiadas,
gastadas o rotas.
TABLA DIAGNOSTICA
_1_ ADVERTENCIA: Siempre detenga el motor y desconecte el enchufe
antes de hacer cualquiera de las reparaciones recomendadas a continua-
ci6n excepto reparaciones que requieran que la aparato en operaci6n.
PROBLEMA SOLUCION
El aparato
falla al in-
tento de
USO.
CAUSA
1. El interruptor est& en la
osiciSn OFF.
P
2. El cable de extensiSn est#,
desconectado.
3. El circuito del interruptor
autom_tico est_ apagado o el
fusible estA fundido.
4. Falla mec&nica.
1. Mueva el interruptor a la
posici6n ON.
2. Vuelva a conectar el cable
de extensi6n.
3. Fije de nuevo el circuito deI
interruptor autom&tico o el
fusible.
4. Entre en contacto con su
distribuidor autorizado del
servicio.
1. Entre en contacto con su
distribuidor autorizado del
servicio.
El aparato 1. Falla mec_nica.
vibra de
forma anor-
real.
La h_lice 1. Hay escombros en el _rea 1. Limpie su aparato. Remueva
no gira li- de entrada de aire. todo tipo de escombros.
bremente. 2. Falla mec&nica. 2. Entre en contacto con su
distribuidor autorizado del
servicio.
22

ELECTROLUX HOME PRODUCTS,
INC.,, Ie garantizan al comprador original
que cada producto el_ctrico o inal_mbri-
co, nuevos, de las marcas Weed Eater,
estar& libre de defectos en material y
mano de obra y accede a reparar o cam-
biar, bajo esta garantia, cualquier produc-
to el6ctrico o inal_mbrico de las marcas
Weed Eater que se encuentre defectuo-
so dentro de los dos (2) afos despues de
Ia fecha original de compra.
Si su producto el_ctrico o inal_mbrico de
Ias marcas Weed Eater fallara dentro del
pedodo de garantia, devu_lvalo, comple-
to, saldado y con recibo de compra al
agente al que lefue comprado para repa-
raci6n o reemplazo a opci6n de ELEC-
TROLUX HOME PRODUCTS, INC.
Esta garantia no es transferible y no cubre
daSos y responsabilidad causados por el
manejo inapropiado, mantenimiento in-
apropiado, o el uso de accesorios y/o pie-
zas no especificamente recomendadas
por ELECTROLUX HOME PRODUCTS,
INC., para el uso de esta herramienta. En
adici6n, esta garantia no cubre las piezas
que se deterioren y requieran ser reem-
plazadas por el uso razonable durante el
pedodo de garantia. Esta garantia no
cubre planes de acuerdo de entrega o
_Jeustesnormales explicitos en el manual
instrucciones.
ESTA GARANT_A CONFIERE DERECHOS
LEGALES ESPECIFICOS AL PROPIETAR{O,
QUE TAL VEZ TENGA ASIMISMO OTROS
DERECHOS QUE VARtAN ENTRE ESTA-
DOS.
NO SE PERMmRAN RECLAMACtONES
POR CONSECUENClA O POR OTROS
DAi_OS, Y NO HAY OTRAS GARANTIAS EX-
PRESADAS EXCEPTUANDO LAS QUE AQUI
SE ESTIPULAN.
ALGUNOS ESTADOS NO PERMITEN LIMI-
TACtONES EN CUANTO AL PERtODO DE
TIEMPO QUE UNA GARANTIA PUEDE DU-
PAR O LA RESTRICClON O UMITACION DE
DAi/OS INCIDENTES O CONSECUENTES,
LO QUE IMPLICA QUE LO DICHO ANTE-
RIORMENTE PUEDE QUE NO TENGA NIN-
GUNA VALIDEZ EN EL ESTADO EN DONDE
USTED RESIDE.
La norma de ELECTROLUX HOME
PRODUCTS, INC., es la de mejorar sus
productos de una forma continua. Por Io
tanto, ELECTROLUX HOME PROD-
UCTS, INC., se reserva el derecho a
cambiar, moditicar o descontinuar mode-
los, diseSos, especificaciones y acceso-
rios de todos sus productos, en cualquier
momento y sin previo aviso u obligaci6n
para con ning0n comprador.
23
-
 1
1
-
 2
2
-
 3
3
-
 4
4
-
 5
5
-
 6
6
-
 7
7
-
 8
8
-
 9
9
-
 10
10
-
 11
11
-
 12
12
-
 13
13
-
 14
14
-
 15
15
-
 16
16
-
 17
17
-
 18
18
-
 19
19
-
 20
20
-
 21
21
-
 22
22
-
 23
23


Weed Eater EBV 215 El manual del propietario
- Categoría
- Sopladores / secadores de aire
- Tipo
- El manual del propietario
- Este manual también es adecuado para
en otros idiomas
- English: Weed Eater EBV 215 Owner's manual