HP Photosmart C5100 All-in-One Printer series Guía de instalación
- Categoría
- Impresión
- Tipo
- Guía de instalación

1
2
3
Cable Ethernet*
*No incluido
Ethernet cable*
*Purchased separately
Cable USB*
*No incluido
USB cable*
*Purchased separately
ab
Basics Guide
HP Photosmart C5100 All-in-One series
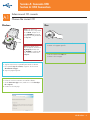
Lea este documento primero antes de instalar el producto, para información referente a las especificaciones eléctricas y advertencias de seguridad
refiérase a las instrucciones de uso.
Remove all tape and lift display
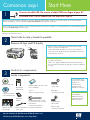
Start Here
Use this guide to set up the hardware and connect the HP All-in-One to either your computer or a working network. If you have problems during
setup, see Troubleshooting later in the guide.
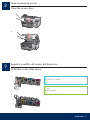
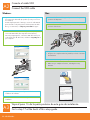
Locate components
USB cable users: Do not connect the USB cable until step A2.
a Remove all tape and protective film from the lid and from the front
and back of the device.
b Lift the color graphics display and remove the protective film.
You can adjust the height of the display to a position suitable for
viewing.
**The contents of your
box may differ.
Additional network
equipment specified
later in the guide.
HP Photosmart C5100 All-in-One series Setup Guide
Basics Guide
Adapter
Power Cord
Ink Cartridge
4 x 6 in
(10 x 15 cm) photo paper
Control panel faceplate
(may be pre-attached)
**Documentation CD
Comience aquí
Quite toda la cinta y levante la pantalla
Localice los componentes
Usuarios de cable USB: No conecte el cable USB hasta llegar al paso A2.
a Retire la cinta y la película protectora de la tapa y la parte
anterior y posterior del dispositivo.
b Levante la pantalla de gráficos en color y retire la película
protectora. Puede ajustar la altura de la pantalla a la posición
adecuada para ver mejor.
**El contenido de la
caja puede ser distinto.
El equipo de
red adicional se
especificará más
adelante en esta guía.
Guía de instalación de HP Photosmart C5100 All-in-One series
Guía básica
Adaptador
Cable de alimentación
Cartucho de tinta
Papel fotográfico de 10 x 15 cm
(4 x 6 pulgadas)
Plantilla del panel de control
(es posible que esté colocada
previamente)
Utilice esta guía para instalar el hardware y conectar el dispositivo HP All-in-One al equipo o a la red de trabajo. Si encuentra problemas
durante la instalación, consulte el apartado Solución de problemas más adelante en esta guía.
Windows/Mac CD
**
CD de documentación

2 • HP All-in-One
5
4
a
b
ab
c
d
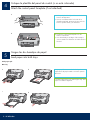
Attach the control panel faceplate (if not attached)
Load paper into both trays
a Position the control panel faceplate over the
buttons on the device.
b Press down firmly on all edges of the overlay to
secure it. Make sure all buttons are visible and not
blocked.
Main tray:
Load plain white paper in the bottom paper tray. Plain
paper is needed for alignment.
Coloque la plantilla del panel de control (si no está colocada)
Cargue las dos bandejas de papel
a Coloque la plantilla del panel de control sobre los
botones del dispositivo.
b Presione con firmeza todos los bordes de la
plantilla para fijarla. Asegúrese de que todos los
botones queden visibles y sin obstáculos.
Bandeja principal:
Cargue papel blanco normal en la bandeja de
papel inferior. El papel normal es necesario para la
alineación.

HP All-in-One • 3
5
e f g
h i
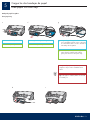
Load paper into both trays
Photo paper tray:
Tip: If the paper is tabbed, make sure the tab
is towards you.
e Lift the output tray. f Pull out the photo tray.
g Load the 4 x 6 inch (10 x 15 cm) photo
paper from the sample pack with the
glossy side down in to the photo tray.
Cargue las dos bandejas de papel
Bandeja de papel fotográfico:
Consejo: Si el papel tiene pestañas,
asegúrese de que estén orientadas hacia
usted.
e
Levante la bandeja de salida.
f Extraiga la bandeja de fotografías. g
Cargue el papel fotográfico de 10 x 15 cm
(4 x 6 pulgadas) incluido como se muestra.
La cara brillante debe colocarse mirando a
la bandeja de fotografías.

4 • HP All-in-One
6
7
After you press the On button, wait for the prompt on
the color graphics display before continuing.
Tras presionar el botón Encender , espere a que
aparezca el mensaje correspondiente en la pantalla
de gráficos en color antes de continuar.
USB cable users: Do not connect the USB cable until
instructed later in this guide.
Connect the power cord and adapter
Press the On button
Usuarios de cable USB: No conecte el cable USB hasta
que se le indique más adelante en esta guía.
Conecte el cable de alimentación y el adaptador
Presione el botón de encendido

HP All-in-One • 5
8
9
a
b
a
b
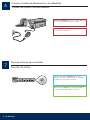
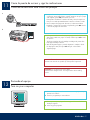
Open the access door
Lift latches inside of the devise
a Squeeze the bottom of each latch to release it, and then lift the
latch.
b Lift all six latches.
Abra la puerta de acceso
Levante los pestillos del interior del dispositivo
a Comprima la parte inferior del pestillo para soltarlo y levántelo.
b Levante los seis pestillos.

6 • HP All-in-One
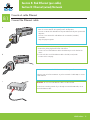
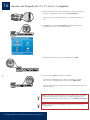
10
a
b
c
Insert all six ink cartridges
Match the color and pattern of the ink cartridge to the color and pattern
on the print carriage.
a Push the black ink cartridge in to the first slot on the left. Close the
latch.
b Repeat with each of the color ink cartridges.
c Make sure each latch is secure.
Note: Use only the ink cartridges that came with the printer. The ink in
these cartridges is specially formulated to mix with the ink in the print
head assembly at first-time setup.
Inserte los seis cartuchos de tinta
Haga coincidir el color y el modelo del cartucho de tinta con los del
carro de impresión.
a Inserte el cartucho de tinta negra en la primera ranura de la
izquierda. Cierre el pestillo.
b Repita la operación con cada uno de los cartuchos de tinta de
color.
c Asegúrese de que los pestillos están bien colocados.
Nota: Utilice únicamente los cartuchos de tinta incluidos con la
impresora. La tinta de los mismos está especialmente formulada para
mezclarse con la del conjunto de cabezales de impresión durante la
primera instalación.

HP All-in-One • 7
11
12
a
b
Close the access door and follow the prompts
CAUTION: Do not disconnect or turn off the
HP All-in-One during this time. You may hear the device making
noises.
a After you close the access door, a prompt appears to load plain
white paper. Make sure paper is loaded, and then press OK to start
the process.
The device initializes the ink cartridges and aligns the printer. This
takes approximately 5 minutes.
b After the alignment page is printed, alignment is complete. Check
the display for status, then press OK . Recycle or discard the
alignment page
a Turn on your computer, login if necessary, and then wait for the
desktop to appear.
b Close any open programs.
Turn on your computer
Cierre la puerta de acceso y siga las indicaciones
PRECAUCIÓN: No desconecte ni apague el dispositivo HP All-in-One
durante este intervalo. Es posible que el dispositivo haga ruido.
a Después de cerrar la puerta de acceso, aparece un mensaje que le
solicita que cargue papel blanco normal. Asegúrese de que el papel
está cargado y pulse OK para iniciar el proceso.
El dispositivo inicializa los cartuchos de tinta y alinea la impresora.
Este proceso tarda aproximadamente 5 minutos en llevarse a cabo.
b Una vez impresa la página de alineación, la alineación habrá
finalizado. Compruebe el estado en la pantalla y pulse OK . Recicle
o deseche la página de alineación
a Encienda el equipo, inicie la sesión si es necesario y espere a que
aparezca el escritorio.
b Cierre los programas que estén abiertos.
Encienda el equipo

8 • HP All-in-One
13
Use this connection type if you want to connect the device directly to one
computer. (Do not connect the USB cable until step A2.)
Equipment needed: USB cable.
For a USB connection, go to Section A (page 9) for instructions.
Use this connection type if you want an Ethernet cable connection between the
device and your network.
Equipment needed: hub/router/switch and Ethernet cable.
For an Ethernet cable connection, go to Section B (page 11) for instructions.
A: USB Connection - Do not connect yet
B: Ethernet (Wired) Network
Choose ONE connection type (A or B)
Seleccione UN solo tipo de conexión (A o B)
Utilice este tipo de conexión si desea conectar el dispositivo directamente a un
equipo. (No conecte el cable USB hasta llegar al paso A2.)
Equipo necesario: cable USB.
Si desea realizar una conexión USB, vaya a la Sección A (página 9) para
obtener instrucciones.
A: Conexión USB (no la realice aún)
Utilice este tipo de conexión si desea tener una conexión de cable Ethernet entre
el dispositivo y la red.
Equipo necesario: concentrador/enrutador/conmutador y cable Ethernet.
Si desea obtener instrucciones sobre la conexión con cable Ethernet, consulte la
sección B (en la página 11).
B: Red Ethernet (por cable)

HP All-in-One • 9
A1
Choose the correct CD
Section A: USB Connection
Note: If the startup screen
does not appear, double-click
My Computer , double-click
the CD-ROM icon with the HP
logo, and then double-click
setup.exe .
a Locate the HP All-in-One Mac CD.
b Continue to the next page.
a Insert the HP All-in-One Windows CD.
b Follow the onscreen instructions to install the software.
c On the Connection Type screen, make sure to select directly to
this computer .
d Continue to the next page.
Seleccione el CD correcto
Sección A: Conexión USB
Windows: Mac:
Nota: Si no aparece la
pantalla de inicio, haga doble
clic en Mi PC , después en el
icono CD-ROM que presenta
el logotipo de HP y finalmente
en setup.exe .
a Inserte el CD de Windows del dispositivo HP All-in-One.
b Siga las instrucciones en pantalla para instalar el software.
c En la pantalla Tipo de conexión , asegúrese de seleccionar
directamente al equipo .
d Vaya a la página siguiente.
a Localice el CD de Mac del dispositivo HP All-in-One.
b Continúe en la página siguiente.

10 • HP All-in-One
A2
A3
Connect the USB cable
b Follow the onscreen instructions to complete the software
installation.
a Follow the onscreen instructions until you see the prompt to
connect the USB cable. (This may take several minutes.)
Once the prompt appears, connect the USB cable to the port
on the back of the HP All-in-One, and then to any USB port on
your computer.
a Connect the USB cable from your computer to the USB port on
the back of the device.
b Double-click the HP All-in-One Installer icon.
c Make sure you complete all screens, including the Setup
Assistant.
Go to step 17 at the back of this setup guide.
Conecte el cable USB
Windows:
a Siga las instrucciones en pantalla hasta que un mensaje solicite
la conexión del cable USB. (Es posible que este proceso lleve
unos minutos).
Cuando haya aparecido el mensaje, conecte el cable USB al
puerto ubicado en la parte posterior del dispositivo HP All-in-
One y, a continuación, a cualquier puerto USB del equipo.
b Siga las instrucciones en pantalla para finalizar la
instalación del software.
a Conecte el cable USB del equipo al puerto USB en la parte
posterior del dispositivo.
b Haga doble clic en el icono HP All-in-One Installer .
c Asegúrese de completar todas las pantallas, incluido el asistente
de instalación.
Vaya al paso 16 de la parte posterior de esta guía de instalación.
Mac:

HP All-in-One • 11
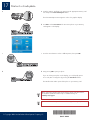
B1
a
b
c
Section B: Ethernet (wired) Network
Connect the Ethernet cable
IMPORTANT: Do not connect the Ethernet cable to a cable modem.
You must have a working network. If you already connected the USB cable, do not
connect the Ethernet cable.
a Locate the Ethernet cable that you purchased separately.
b Remove the yellow plug from the back of the device.
c Connect one end of the Ethernet cable to the Ethernet port on the back of the
device.
d Connect the other end of the Ethernet cable to the hub/router/switch.
e Continue to the next page.
Sección B: Red Ethernet (por cable)
Conecte el cable Ethernet
a Tome el cable Ethernet, que habrá adquirido por separado.
b Retire el conector amarillo de la parte posterior del dispositivo.
c Conecte un extremo del cable Ethernet al puerto Ethernet de la parte posterior del
dispositivo.
d Conecte el otro extremo del cable Ethernet al concentrador/enrutador/
conmutador.
e Vaya a la página siguiente.
IMPORTANTE: No conecte el cable Ethernet a un módem por cable.
Debe tener una red en funcionamiento. Si ya ha conectado el cable USB, no conecte
el cable Ethernet.

12 • HP All-in-One
B2
B3
Go to step 17 at the back of this setup guide.
Choose the correct CD
Note: If the startup screen does not appear,
double-click My Computer , double-click the
CD-ROM icon with the HP logo, and then
double-click setup.exe .
a Insert the HP All-in-One Windows CD.
b Follow the onscreen instructions.
c On the Connection Type screen, make sure to select through the
network . Follow the onscreen instructions.
a Insert the HP All-in-One Mac CD.
b Double-click the HP All-in-One installer icon.
c Make sure you complete all screens, including the Setup
Assistant. To install software on additional computers, go to
step 14.
Questions: Anti-virus, Anti-Spyware, or firewall programs can block software installation.
For details, go to www.hp.com/support , enter Photosmart C5100 , and then search for Firewalls .
d You must choose unlock or accept all firewall messages by clicking
Next on any screen that refers to a firewall. Follow all onscreen
instructions. To install software on additional computers, go to
step 14.
Vaya al paso 16 de la parte posterior de esta guía de instalación.
a Inserte el CD de Mac del dispositivo HP All-in-One.
b Haga doble clic en el icono HP All-in-One Installer .
Windows:
Mac:
d Debe elegir desbloquear o aceptar todos los mensajes del servidor
de seguridad. Para ello, haga clic en Siguiente en todas las
pantallas relacionadas con dicho servidor. Siga las instrucciones
que aparecen en pantalla. Para instalar software en otros equipos,
vaya al paso 14.
c Asegúrese de completar todas las pantallas, incluido el
asistente de instalación. Para instalar software en otros
equipos, vaya al paso 14.
Nota: Si no aparece la pantalla de inicio,
haga doble clic en Mi PC , después en el icono
CD-ROM que presenta el logotipo de HP y
finalmente en setup.exe .
a Inserte el CD de Windows del dispositivo HP All-in-One.
b Siga las instrucciones en pantalla.
c En la pantalla Tipo de conexión , asegúrese de que selecciona
a través de la red . Siga las instrucciones que aparecen en pantalla.
Preguntas: Los programas que protegen contra los virus y el software espía pueden bloquear la instalación del software. Para obtener
información más detallada, consulte www.hp.com/support , introduzca Photosmart C5100 y busque la sección Servidores de seguridad .
Seleccione el CD correcto

HP All-in-One • 13
14
15
Install software on additional computers
If you have additional computers on your network, install the HP All-in-One software on
each computer. Choose the correct HP All-in-One CD for each installation.
Follow the onscreen instructions. Make sure that you choose the connection types
between the network and your HP All-in-One (not between your computer and the
network).
Problem: The Microsoft Add Hardware screen appears.
Action: Click Cancel . Unplug the USB cable, and then insert the HP All-in-One
Windows CD. Refer to Section A.
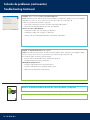
Troubleshooting
Go to step 17 at the back of this setup guide.
Instale el software en otros equipos
Si tiene otros equipos en la red, instale el software del dispositivo HP All-in-One en
uno de ellos. Elija el CD correcto del dispositivo HP All-in-One para cada instalación.
Siga las instrucciones que aparecen en pantalla. Asegúrese de que selecciona los
tipos de conexión entre la red y el dispositivo HP All-in-One (no entre el equipo y la
red).
Solución de problemas
Problema: Aparece la pantalla Agregar hardware de Microsoft.
Acción: Haga clic en Cancelar . Desconecte el cable USB e inserte el CD de Windows
del dispositivo HP All-in-One. Consulte la Sección A.
Vaya al paso 16 de la parte posterior de esta guía de instalación.

14 • HP All-in-One
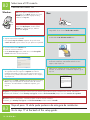
Basics Guide
HP Photosmart C5100 All-in-One series
Troubleshooting Continued
Problem: The Printer Not Found message appears.
Action: First make sure that you have an active connection with the device. Check your color graphics display
for an icon. If you do not see an icon, go back to your connection type Section (A or B).
If you have an active connection, try the following:
• Turn your device off, wait 30 seconds, and then turn it back on.
• Try temporarily disconnecting your firewall.
Wired (Ethernet) network users:
• Check the cable between the router and the device.
• Check the cable between your computer and the device.
• Make sure your LAN card is set up properly.
See the Basics Guide for more troubleshooting and additional set up information.
Problema: Aparece el mensaje No se encuentra la impresora .
Acción: Asegúrese de que dispone de una conexión activa con el dispositivo. Busque un icono en la pantalla
de gráficos en color. Si no lo ve, regrese a la sección sobre el tipo de conexión (A o B).
Si tiene una conexión activa, pruebe lo siguiente:
• Desconecte el dispositivo y vuelva a conectarlo transcurridos 30 segundos.
• Intente desconectar temporalmente el servidor de seguridad.
Usuarios de red por cable (Ethernet):
• Compruebe el cable entre el enrutador y el dispositivo.
• Compruebe el cable entre el equipo y el dispositivo.
• Asegúrese de que la tarjeta para LAN está correctamente configurada.
Consulte en la guía básica información adicional sobre solución de problemas y configuración.
Solución de problemas (continuación)

16
© Copyright 2006 Hewlett-Packard Development Company, L.P.
a
c
d
Consejo: Para obtener más información acerca de la impresión de fotografías
de las tarjetas de memoria y otras funciones, consulte la guía básica y la
ayuda en línea. Para obtener ayuda adicional, consulte www.hp.com/support .
Consejo: Puede utilizar el botón Reimprimir para hacer una copia de una
fotografía original.
a Inserte la tarjeta de memoria de la cámara en la ranura para tarjeta de
memoria correspondiente y pulse el botón Photosmart Express .
Aparecerá el menú de Photosmart Express en la pantalla de gráficos en
color.
b Pulse OK para seleccionar Ver e imprimir . En pantalla aparecerá la
fotografía más reciente de la tarjeta de memoria.
c Utilice las flechas para seleccionar otra fotografía y pulse OK .
d Siga presionando OK para imprimir la fotografía.
Puede imprimir rápidamente la que aparece en pantalla en formato
10 x 15 cm (4 x 6 pulgadas) presionando el botón Imprimir fotos .
La HP All-in-One realizará una impresión de la fotografía almacenada en la
tarjeta de memoria.
Imprima una fotografía de 10 x 15 cm (4 x 6 pulgadas)

*Q8211-90249*
Q8211-90249
*Q8211-90249*
17
© Copyright 2006 Hewlett-Packard Development Company, L.P.
a
c
d
a Insert the memory card from your camera into the appropriate memory card
slot and press the Photosmart Express button.
The Photosmart Express menu appears on the color graphics display.
b Press OK to select View & Print . The most recent photo on your memory
card appears on the display.
c Press the arrow buttons to select a different picture, then press OK .
d Keep pressing OK to print your photo.
If you are looking at a photo on the display, you could quickly print a
4 x 6 inch (10 x 15 cm) photo by pressing the Print Photos button.
The HP All-in-One makes a print of the photo on your memory card.
Tip: To learn about printing photos from memory cards, and other features,
see the Basics Guide and online help. For additional help, see
www.hp.com/support .
Tip: You could use the Reprint button to make a copy of an original photo.
Print a 4 x 6 inch photo
-
 1
1
-
 2
2
-
 3
3
-
 4
4
-
 5
5
-
 6
6
-
 7
7
-
 8
8
-
 9
9
-
 10
10
-
 11
11
-
 12
12
-
 13
13
-
 14
14
-
 15
15
-
 16
16


HP Photosmart C5100 All-in-One Printer series Guía de instalación
- Categoría
- Impresión
- Tipo
- Guía de instalación
en otros idiomas
Artículos relacionados
-
HP Photosmart D7400 Printer series El manual del propietario
-
-
HP (Hewlett-Packard) Photosmart D7200 Manual de usuario
-
HP Photosmart C8100 All-in-One Printer series Guía de instalación
-
-
-
Compaq Photosmart Pro B9180 Printer series El manual del propietario
-
-