Yamaha RS40 Manual de usuario
- Categoría
- Tambores musicales
- Tipo
- Manual de usuario

RS40
Assembly Manual / Montageanleitung
Manuel d’assemblage / Manual de montaje
U.R.G., Pro Audio & Digital Musical Instrument Division, Yamaha Corporation
© 2006 Yamaha Corporation
WJ28960 607PO***.*-01A0
Printed in Indonesia
ES
FR
DEEN
A1
z DTX Series: Drum Trigger Module
x Foot Pedal: FP6110 etc.
c Satellite Speaker
v Sub Woofer Amp unit
z DTX-Serie: Drum-Trigger-Modul
x Pedal: FP6110 usw.
c Satellitenlautsprecher
v Subwoofer-/Verstärker-Einheit
z Série DTX : Drum Trigger Module
x Pédale : FP6110 etc.
c Haut-parleur satellite
v Unité d’ampli de caisson de basses
z Serie DTX: Módulo de activación de batería
x Pedal: FP6110 etc.
c Altavoz satélite
v Unidad amplificadora de subwoofer
Set up example
Aufbaubeispiel
Exemple de configuration
Ejemplo de instalación
z
c
c
v
x
English
Before using, please read this assembly manual,
and use this product in a safe and proper manner.
Particularly in the case of children and young users,
parents or an instructor should teach the children the
proper manner in which to use the device.
* Specifications are subject to change without notice.
Deutsch
Bitte lesen Sie vor Gebrauch diese Mon-
tageanleitung, und verwenden Sie das
Produkt sicher und auf geeignete Weise.
Besonders für Kinder und jüngere
Anwender sollten die Eltern oder ein
Lehrer den Kindern die richtige Art und
Weise zeigen, in der das Produkt ange-
wendet werden sollte.
* Die technischen Daten können ohne vorherige Ankündigung geändert werden.
Français
Veuillez lire ce mode d’emploi en tout pre-
mier, afin d’utiliser ce produit de manière cor-
recte et sans danger. Les parents ou les
instructeurs sont invités à enseigner aux
enfants et aux jeunes utilisateurs la manière
correcte d’utiliser cet instrument.
* Ces spécifications peuvent faire l’objet de modifications sans préavis.
Español
Antes de utilizar el instrumento, lea el
manual de instrucciones y utilícelo de
forma segura y correcta. Especialmente
en el caso de niños y jóvenes, los padres o
un instructor deberían enseñarles a
utilizarlo correctamente.
* Especificaciones sujetas a cambio sin previo aviso.
PRECAUTIONS
WARNING
If this symbol is ignored and the equipment is used improperly, fatal injury to
persons or serious damage could occur.
Always set the product on a flat and solid surface. Placement on a sloping, unstable surface or on steps
may result in the product being unstable and subject to overturning.
Make sure all bolts are tightened firmly. Loose bolts may result in the rack overturning or in parts dropping,
causing injury.
When adjusting the height or angle, do not suddenly loosen the bolts. The pad may drop, the rack or pipes
may slip, pinching or causing injury to hands or fingers.
Do not sit or step on the rack. The rack may overturn or be damaged, resulting in injury.
Please be careful when children are close to or touching the product. Since the product has many pipes
and arms, careless movement around the product may result in injury.
When setting the pads and modules, please pay close attention in regards to the handling and setting of
cables. Carelessly placed cables may cause the user and others to trip and fall.
Do not alter the product. Doing so may result in injury or damage/deterioration to the product.
CAUTION
If this symbol is ignored and the equipment is used improperly, there is a danger
or injury to persons handling the equipment, and material damage could occur.
Do not put your hands or feet under the foot pedal or foot switch. They may be pinched, resulting in injury.
Watch your fingers when adjusting clamps. They may become pinched, resulting in injury.
Be careful around pipe ends, inside the pipe and screw ends. Metal shavings, etc. may injure your fingers.
Do not attach acoustic drums to the electronic drum rack. Clamps may be damaged and drums may drop,
causing injury.
Do not step on or place heavy objects on the product. Doing so may result in damage.
Do not use or keep the product in places with extremely high temperature (places in direct sunlight, close
to a heater, in a closed car, etc.) or high humidity (bathroom, outside on a rainy day, etc.). Doing so may
result in deformation, discoloration, stickiness, damage or deterioration.
When cleaning the product, do not use benzine, thinner or alcohol as it may result in discoloration or defor-
mation. Please wipe with a soft cloth or a damp cloth that has been wrung out thoroughly. If the product is
soiled or sticky, use a neutral detergent on a cloth then wipe with a damp cloth that has been wrung out
thoroughly to remove any remaining detergent. Also pay close attention so as not to let the water and
detergent come into contact with the cushions used in the product; doing so may result in deterioration.
To prevent against accidents and injury
Please follow the cautions listed below.
Caution (including danger, or warning). This
mark indicates cautions to which you should
pay close attention.
Actions indicated with this icon are prohibited
and should not be attempted.
VORSICHTSMASSNAHMEN
WARNUNG
Wenn dieses Symbol ignoriert und das Produkt falsch angewendet wird, können
schwere Personenschäden oder Sachschäden eintreten.
Stellen Sie das Produkt immer auf einer ebenen und stabilen Oberfläche auf. Die Platzierung auf einer
schiefen, instabilen Oberfläche oder auf Stufen kann zur Folge haben, dass das Produkt instabil ist und
leichter umfallen kann.
Achten Sie darauf, dass alle Bolzen festgezogen sind. Lose Bolzen können bewirken, dass das Rack oder
Teile davon herunterfallen und beschädigt werden sowie Verletzungen verursachen.
Wenn Sie Höhe oder Neigungswinkel einstellen, achten Sie darauf, nicht versehentlich die Bolzen zu
lösen. Das Pad könnte herunterfallen, das Rack oder Rohre könnten abrutschen und Hände oder Finger
einklemmen.
Setzen Sie sich nicht auf das Rack und steigen Sie nicht darauf. Das Rack kann umkippen oder
beschädigt werden und dabei Verletzungen verursachen.
Bitte seien Sie vorsichtig, wenn Kinder in der Nähe sind oder das Produkt berühren. Da das Produkt viele
Rohre und Ausleger besitzt, können achtlose Bewegungen in Nähe des Produkts Verletzungen verursa-
chen.
Achten Sie beim Einstellen der Pads und Module bitte sorgfältig auf die Handhabung der Kabel und die
Kabelführung. Achtlos platzierte Kabel können dazu führen, dass der Anwender oder Andere stolpern und
hinfallen.
Modifizieren Sie das Produkt nicht. Dadurch können Verletzungen auftreten oder das Produkt beschädigt
oder beinträchtigt werden.
VORSICHT
Wenn dieses Symbol ignoriert und das Produkt falsch angewendet wird, besteht
Verletzungsgefahr für Personen, die mit dem Produkt umgehen, oder es können
Sachschäden entstehen.
Geraten Sie nicht mit der Hand oder den Füßen unter das Pedal oder den Fußschalter. Sie könnten sich
einklemmen und Verletzungen erleiden.
Achten Sie auf Ihre Finger, wenn Sie die Klemmen einstellen. Sie könnten sich einklemmen und Verlet-
zungen erleiden.
Seien Sie vorsichtig mit Rohrenden, mit den Rohrinnenwänden und Schraubenspitzen. An den metallenen
Graten usw. könnten Sie sich die Finger verletzen.
Montieren Sie keine akustischen Trommeln an dem E-Schlagzeug-Rack. Die Klemmen könnten beschä-
digt werden und Tromeln könnten herunterfallen und Verletzungen verursachen.
Treten Sie nicht auf das Produkt und stellen Sie keine schweren Gegenstände darauf ab. Dadurch kann es
zu Beschädigungen kommen.
Lagern oder verwenden Sie das Produkt nicht an Orten mit extrem hoher Temperatur (in direktem Son-
nenlicht, in Nähe einer Heizung, in einem geschlossenen Fahrzeug usw.) oder hoher Luftfeuchtigkeit
(Badezimmer, draußen im Regen usw.). Dadurch könnte das Produkt verformt, verfärbt, verklebt, beschä-
digt oder sonstwie beeinträchtigt werden.
Verwenden Sie kein Benzin, Lösemittel oder Alkohol, um das Produkt zu reinigen, da dies zu Verfärbung
oder Verformung führen kann. Bitte wischen Sie das Produkt mit einem weichen oder leicht angefeuchte-
tem und gut ausgewrungenem Tuch sauber. Wenn das Produkt stark verschmutzt ist, verwenden Sie ein
Tuch mit einem neutralen Reinigungsmittel, und wischen Sie das Produkt mit einem leicht angefeuchtetem
und gut ausgewrungenem Tuch sauber, so dass kein Reinigungsmittel auf dem Produkt verbleibt. Achten
Sie auch besonders darauf, dass kein Wasser und Reinigungsmittel in Kontakt mit den Kissen des Pro-
dukts gerät; dadurch wird das Produkt beeinträchtigt.
Zur Vorbeugung gegen Unfälle und Verletzungen
Befolgen Sie bitte die unten aufgeführten Vorsichtsmaßnahmen.
Vorsicht (einschließlich Gefahr, oder Warnung). Dieses
Symbol markiert Vorsichtsmaßnahmen, die Sie genau
beachten sollten.
Aktionen, die mit diesem Symbol versehen sind, sind unzu
-
lässig und sollten nicht ausgeführt werden.
PRECAUTIONS D’USAGE
AVERTISSEMENT
Si ce symbole est ignoré et l’équipement utilisé de manière incorrecte, cela
pourra exposer les personnes à des blessures mortelles ou entraîner de graves
dommages.
Posez toujours le produit sur une surface plate et ferme. Si vous le disposez sur une surface inclinée ou
instable ou sur des marches, cela pourra le déstabiliser et provoquer sa chute à terre.
Assurez-vous que tous les boulons sont fermement resserrés. Des boulons desserrés peuvent provoquer
le renversement du rack ou la chute des pièces, causant des blessures.
Lorsque vous réglez la hauteur ou l’angle, ne desserrez pas brusquement les boulons. Le pad risque de
tomber, le rack ou les tuyaux glisser, causant des pincements aux doigts ou des blessures aux mains.
Ne vous asseyez pas sur le rack et ne marchez pas dessus. Le rack risque de se renverser ou de
s’endommager, en provoquant des blessures.
Soyez très vigilant avec les enfants lorsqu’ils s’approchent du produit ou cherchent à le toucher. Etant
donné que le produit dispose d’un grand nombre de tuyaux et de bras, tout mouvement inconsidéré autour
de son emplacement peut provoquer des blessures.
Lors du réglage des pads et des modules, soyez attentif à la manipulation et à la configuration des câbles.
Des câbles disposés n’importe comment peuvent provoquer le trébuchement et la chute de l’utilisateur
ainsi que d’autres personnes.
Ne modifiez pas le produit. Cela pourrait l'endommager, le détériorer ou provoquer des blessures.
ATTENTION
Si ce symbole est ignoré et l’équipement utilisé de manière incorrecte, cela
pourra exposer les personnes manipulant l’équipement à des blessures ou
entraîner des dommages matériels.
Ne placez pas vos mains ou vos pieds sous la pédale ou le sélecteur au pied. Vous risquez de vous faire
pincer les doigts ou de vous blesser.
Faites attention à vos doigts lorsque vous réglez les pinces. Vous risquez de vous les faire pincer ou de
vous blesser.
Faites attention en manipulant les tuyaux notamment leurs extrémités ainsi que les bouts des vis et bou-
lons. Les copeaux notamment métalliques peuvent vous blesser les doigts.
Ne fixez pas de batterie acoustique au rack de batterie électronique. Les pinces risquent de s’endomma-
ger et les batteries chuter à terre, provoquant des blessures.
Ne marchez pas sur le produit et ne placez pas dessus des objets lourds, au risque de provoquer des
dommages.
N’utilisez pas et ne conservez pas le produit dans des lieux à température très élevée (à la lumière directe
du soleil, à proximité d’un radiateur ou dans une voiture fermée à clé, etc.) ou à forte humidité (salle de
bain, à l’extérieur par une journée pluvieuse, etc.). Cela pourrait entraîner sa déformation et sa décolora-
tion, le rendre poisseux, l’endommager ou le détériorer.
Pour nettoyer le produit, n'utilisez pas de benzène, de diluant ou d'alcool au risque de provoquer sa déco-
loration ou sa déformation. Essuyez-le avec un chiffon sec et doux ou un tissus humide ayant été très bien
essoré. Si le produit est sale ou collant, nettoyez-le avec un tissus imbibé de détergent neutre puis
essuyez-le avec un chiffon humide ayant été préalablement bien essoré afin d'en retirer toute trace de
détergent. Veillez à ne pas laisser l'eau ou le détergent entrer en contact avec les coussins utilisés dans le
produit, car cela pourrait le détériorer.
Pour prévenir les accidents et les blessures
Veuillez respecter les précautions listées ci-dessous.
Attention (y compris danger ou avertissement). Ce
symbole indique les précautions à prendre sérieuse-
ment en considération.
Les actions signalées par cette icône sont interdites et
ne devraient être à aucun moment envisagées.
PRECAUCIONES
ADVERTENCIA
Si se ignora este símbolo y se utiliza el equipo indebidamente, podrían
producirse lesiones personales o daños graves.
Coloque siempre el producto en una superficie llana y firme. Si lo coloca en una superficie pendiente o
instable o en peldaños, el producto podría estar instable y darse la vuelta.
Asegúrese de que los tornillos están firmemente apretados. Si los tornillos están flojos, el bastidor puede
darse la vuelta o se pueden caer componentes, y dar lugar a lesiones.
Para ajustar la altura o la inclinación, no afloje los tornillos de repente. El disco se podría caer, el bastidor
o los tubos podrían deslizarse y pellizcarle o lesionarle los dedos o las manos.
No se siente en el bastidor ni lo pise porque se podrían dar la vuelta o dañarse, dando lugar a lesiones.
Tenga especial cuidado cuando los niños estén cerca del instrumento o tocándolo. Puesto que el
producto tiene muchos tubos y brazos, si no se tiene cuidado cuando se esté cerca de él se podrían
producir lesiones.
Para ajustar los discos y los módulos, preste especial atención al manejo y ajuste de los cables. Unos
cables mal colocados pueden ser causa de tropiezos y caídas.
No modifique el producto. Si lo hace, podría dañarse o deteriorarse el producto.
ATENCIÓN
Si se ignora este símbolo y se utiliza el equipo indebidamente, existiría el riesgo
de lesiones para los usuarios del equipo o de daños en los materiales.
No ponga las manos ni los pies debajo del pedal ni del interruptor del pedal. Podría pellizcarse y
lesionarse.
Tenga cuidado con las manos cuando ajuste las abrazaderas. Podría pellizcarse y lesionarse.
Tenga cuidado con los extremos de los tubos, dentro de ellos y con los tornillos. Las virutas metálicas, etc.
podrían causarle lesiones en los dedos.
No acople baterías acústicas en el bastidor de la batería electrónica. Las abrazaderas se podrían dañar y
la batería caerse y producir lesiones.
No pise el producto ni ponga objetos pesados encima ya que se podría dañar.
No utilice ni guarde el producto en sitios con temperaturas muy elevadas (bajo la luz solar directa, cerca
de un radiador, en un coche cerrado, etc.) o con mucha humedad (cuarto de baño, en el exterior en días
lluviosos, etc.). Si se hiciera, el resultado podría ser su deformación, pérdida de color, pegajosidad, daños
o deterioro.
Cuando limpie el producto, no utilice bencina, disolventes ni alcohol, porque podría ocasionar pérdida de
color o deformación. Limpie con un paño suave o húmedo que se haya escurrido bien Si el producto está
sucio o pegajoso, utilice un detergente neutro y después retire con un paño húmedo bien escurrido los
restos del detergente. Asimismo, preste mucha atención para que ni el agua ni el detergente entren en
contacto con los discos del producto, porque se podrían deteriorar.
Para evitar accidentes y lesiones
Siga las notas de atención indicadas a continuación.
Atención (incluido peligro o advertencia). Con esta
marca se indican aquellos aspectos a los que se debe
prestar especial atención.
Las acciones indicadas con este icono están prohibidas
y no se debería intentar llevarlas a cabo.
* Before setup, please make sure that you have all of the items listed below. If anything is missing, please
contact the dealer from whom you purchased the unit.
q
RS40 overall assembly X 1 (when the box is opened),
w
module stand fastening screw X 2,
e
cable band X 10,
r
Assembly Manual (this sheet) X 1
* Vergewissern Sie sich vor dem Aufbau, dass alle unten aufgelisteten Teile vorhanden sind. Bei fehlenden
Teilen wenden Sie sich bitte an den Händler, bei dem Sie das Produkt erworben haben.
q
RS40-Gesamtbaugruppe X 1 (sobald der Karton geöffnet ist),
w
Befestigungsschrauben für
Modulständer X 2,
e
Kabel-Clip X 10,
r
Montageanleitung (dieses Blatt) X 1
* Avant de procéder à l’installation, vérifiez que vous disposez de tous les éléments contenus dans la liste
ci-dessous. Si vous constatez l’absence d’un élément donné, contactez le revendeur auprès duquel vous
avez acheté l’unité.
q
assemblage général RS40 X 1 (lorsque l’emballage est ouvert),
w
vis de fixation du support du
module X 2,
e
bande pour câble X 10,
r
manuel d’assemblage (ce document) X 1
* Antes del montaje, asegúrese de que dispone de todos los artículos mencionados a continuación.
Si faltara alguno, póngase en contacto con el punto de venta.
q
unidad completa RS40 X 1 (cuando la caja está abierta),
w
tornillo para sujetar el soporte del módulo X 2,
e
banda para cables X 10,
r
manual de montaje (esta hoja) X 1
Package Contents
Lieferumfang
Contenu de l’emballage
Contenido del paquete
q
w
e
*Parts for the RS40’s main structure have already been assembled before packing. After removing the unit from the
box, follow the instructions described below to complete the assembly.
A Phillips (+) screwdriver is required when attaching the Drum Trigger Module. Please prepare one before starting
assembly.
1.
After removing the unit from the box, remove all cushion material.
2.
Loosen the bolts marked with before setting up.
3.
Loosen the bolts on the movable arms and legs, as shown in the diagrams below, then secure the bolts firmly
once setting is complete.
Follow the setup order
q
–
!3
in the diagrams shown below.
Be careful around the pipe edges. The cut pipe ends are sharp and can injure your fingers.
4.
Attaching the Drum Trigger Module
Remove the module stand (
A
) from the holder clamp (
B
), and use the supplied screws (
D
) to attach the Drum
Tr igger Module (
C
). Reattach the module stand (
A
) to the holder clamp (
B
).
* Make sure only the supplied screws are used. Using any other screws may result in the unit falling off the
module stand or damage to the unit.
5.
Attach the cymbal pad (
E
) to the cymbal holder (
F
) and adjust its position, then secure it in place. (Please refer to
the Owner’s Manual that came with the cymbal pads on attaching the cymbal pads.)
6.
Attach the drum pad (
G
) to the hexagonal rod cylinder (
H
) and adjust its position, then secure it in place.
* Make sure all bolts on clamps, pads, etc., are firmly tightened.
Loose or over-tightened bolts may result in the part falling off and/or damage. Please use caution.
After assembly is complete, setup the kick pad, hi-hat control pedal, etc., and connect the cables. (Please refer
to the Owner’s Manual that came with the drum trigger module for information on connecting the pads to the
module.) Use the supplied cable bands to secure the cables to the frame pipes to keep cables out of the way
during performance.
If the rack is moved even after setup is complete, make sure the bolts are loosened before moving the rack.
*Die Grundeinheit des RS40 wurde vor dem Versand bereits vorbereitend zusammengebaut. Folgen Sie nach dem
Auspacken den untenstehenden Anweisungen, um den Zusammenbau zu vervollständigen.
Zu Befestigung des Drum-Trigger-Moduls benötigen Sie einen Kreuzschlitzschraubendreher (+). Legen Sie einen
solchen Schraubenzieher bereit, bevor Sie den Zusammenbau in Angriff nehmen.
1.
Entfernen Sie nach dem Herausnehmen der Einheit aus der Verpackung sämtliches Polstermaterial.
2.
Lösen Sie vor dem Aufbau die Bolzen, die mit markiert sind.
3.
Lösen Sie die Bolzen an den beweglichen Armen und Beinen, wie in den folgenden Abbildungen gezeigt, und
schrauben Sie die Bolzen dann gut fest, sobald der Aufbau abgeschlossen ist.
Befolgen Sie die Montagereihenfolge
q
–
!3
in den folgenden Abbildungen.
Seien Sie an den Rohrenden bitte vorsichtig. Die Schnittkanten der Rohrenden sind scharf und Sie könn-
ten sich an den Fingern verletzen.
4.
Befestigen des Drum-Trigger-Moduls
Entfernen Sie den Modulständer (
A
) von der Halteklemme (
B
), und verwenden Sie die beiliegenden Schrauben
(
D
) zur Befestigung des Drum-Trigger-Moduls (
C
). Befestigen Sie den Modulständer (
A
) wieder an der Halte-
klemme (
B
).
*Achten Sie darauf, nur die beiliegenden Schrauben zu verwenden. Die Verwendung anderer Schrauben kann
Schäden am Gerät verursachen oder dazu führen, dass das Gerät vom Modulständer fällt.
5.
Befestigen Sie das Becken-Pad (
E
) an dem Beckenhalter (
F
) und stellen Sie die gewünschte Position ein, und
ziehen Sie die Schrauben fest. (Bitte lesen Sie zur Montage der Becken-Pads die mit dem jeweiligen Pad gelie-
ferte Anleitung.)
6.
Befestigen Sie das Drum-Pad (
G
) an der Hexagonalstange (
H
) und stellen Sie die gewünschte Position ein, und
ziehen Sie dann die Schrauben fest.
*Vergewissern Sie sich, dass alle Schrauben von Klammern, Pads usw. fest angezogen sind.
Lockere oder zu fest angezogene Schrauben können einen Fall und/oder eine Beschädigung von Teilen zur
Folge haben. Seien Sie diesbezüglich bitte vorsichtig.
Nach dem Zusammenbau richten Sie das Kick-Pad, Hi-Hat-Control-Pedal usw. ein und stellen die Kabelverbin-
dungen her. (Richten Sie sich beim Anschluss der Pads am Modul nach der mit dem Drum-Trigger-Modul
gelieferten Bedienungsanleitung.) Sichern Sie die Kabel mit den mitgelieferten Kabelbindern so an den Rack-
Rohren, dass sie beim Spielen nicht stören.
Wenn das fertig eingerichtete Rack umgestellt werden soll, lösen Sie die Schrauben, bevor Sie das Rack
bewegen.
* Les éléments de la structure principale du RS40 ont déjà été montés avant emballage. Après avoir sorti l’unité de
sa boîte, suivez les instructions ci-après pour terminer le montage.
Un tournevis cruciforme (+) est requis pour fixer le module de batterie électronique Drum Trigger à la structure.
Munissez-vous d’un tel tournevis avant de commencer le montage.
1.
Une fois que vous enlevé l’unité de son emballage, retirez tous les matériaux de protection.
2.
Desserrez les vis signalées par le symbole graphique avant de procéder au montage.
3.
Desserrez les boulons situés sur les pieds et les bras amovibles, tel qu’indiqué dans les schémas ci-dessous,
puis fixez-les fermement une fois que l’installation est terminée.
Respectez la séquence d’installation
q
–
!3
telle qu’indiquée dans les diagrammes ci-dessous.
Soyez vigilant en maniant les extrémités des tuyaux. Ils sont en effet tranchants et peuvent vous blesser
les doigts.
4.
Fixation de l’unité Drum Trigger Module
Retirez le pied du module (
A
) de la pince de support (
B
), puis utilisez les vis fournies (
D
) pour fixer l’unité Drum
Tr igger Module (
C
). Refixez le pied du module (
A
) à la pince de support (
B
).
* Assurez-vous d’utiliser exclusivement les vis fournies. L’utilisation d’autres vis peut entraîner la chute du
support du module et endommager l’unité elle-même.
5.
Fixez le pad de cymbale (
E
) au support de cymbale (
F
) et réglez sa position, puis fixez-le en place. (Pour les
détails sur la fixation des pads de cymbale, reportez-vous au mode d’emploi fourni avec les pads de cymbale).
6.
Fixez le pad de batterie (
G
) au cylindre de la tige hexagonale (
H
) et réglez sa position, puis fixez-le en place.
* Assurez-vous que les boulons des brides, des pads, etc. sont bien serrés.
Des boulons desserrés ou trop serrés pourraient entraîner la chute voire le bris d’une pièce. Faites preuve de
prudence.
Une fois le montage terminé, installez le pad de grosse caisse, la pédale de charleston, etc. et raccordez les
câbles. Pour obtenir des précisions sur le raccordement des pads au module, consultez le Mode d’emploi du
module de batterie Drum Trigger. Utilisez les attache-câbles fournis pour fixer les câbles aux tubes de la struc-
ture, afin que les câbles ne vous gênent pas pendant votre performance.
Si vous devez déplacer le rack après en avoir terminé la configuration, desserrez les boulons avant le déplace-
ment.
*Algunas partes de la estructura principal del RS40 ya se han montado antes de su embalaje. Tras extraer la
unidad de la caja, siga las instrucciones descritas a continuación para finalizar el montaje.
Es necesario un destornillador de estrella o Phillips (+) para montar el módulo de activación de la batería. Tenga
uno a su disposición antes de empezar el montaje.
1.
Después de sacar la unidad de la caja, retire todo el material de protección.
2.
Antes de empezar, afloje los tornillos con la marca .
3.
Afloje los tornillos de los brazos y las patas móviles, tal como se muestra en los esquemas siguientes, y después
fije bien los tornillos una vez que la instalación esté completa.
Siga el orden de instalación
q
–
!3
de los esquemas siguientes.
Tenga cuidado con los bordes de los tubos. Estos bordes son afilados y podrían causarle lesiones en los
dedos.
4.
Colocación del módulo de activación de la batería
Retire el soporte del módulo (
A
) de la abrazadera de la base (
B
) y utilice los tornillos que se suministran (
D
)
para acoplar el módulo de activación de la batería (
C
). Vuelva a acoplar el soporte del módulo (
A
) a la
abrazadera de la base (
B
).
* Asegúrese de que utiliza los tornillos que se suministran. Si se utilizaran otros tornillos se podría caer la
unidad del soporte o dañarse.
5.
Acople el pad de los platillos (
E
) a la base (
F
) y ajuste su posición; después fíjelo en su sitio. (Consulte en el
manual de instrucciones que se suministra con los pads de los platillos la información sobre su colocación.)
6.
Acople el pad de los platillos (
G
) al cilindro de varilla hexagonal (
H
) y ajuste su posición; después fíjelo en su
sitio.
* Asegúrese de que todos los tornillos de las abrazaderas, pads, etc., están bien sujetos. Unos tornillos flojos o
excesivamente apretados pueden hacer que el componente se caiga o se dañe. Tenga precaución.
Después de terminar el montaje, instale el bombo, el pedal de control del charles, etc., y conecte los cables.
(Consulte el Manual de instrucciones que se suministra con el módulo de activación de la batería para obte-
ner información sobre cómo conectar los pads al módulo.) Utilice las bandas para cables que se suministran
para asegurar los cables a los tubos de forma que no molesten durante la interpretación.
Si se mueve el bastidor incluso después de terminar la instalación, asegúrese de que se aflojan los tornillos
antes de hacerlo.
RS40 Assembly
Montage RS40
Assemblage du RS40
Unidad RS40
D
Å
ı
r
yu
e
qw
!0 !1
!3
!2
o
i
t
F
H
G
C
A
B
E
Å
ı
Switching the position of Pipe Å and Pipe ı can be used to
change the height of the hi-hat pad and tom pads.
Durch Vertauschen von Rohr
Å und Rohr ı kann die Höhe
des Hi-Hat-Pads und der Tom-Pads geändert werden.
Changer la position du tube
Å et du tube ı peut permettre de
régler la hauteur du pad de charleston et des pads de tom.
Se puede cambiar la posición del tubo
Å y del tubo ı para
regular la altura del pad de charles y los pads de timbal.
For details of products, please contact your nearest Yamaha
representative or the authorized distributor listed below.
Die Einzelheiten zu Produkten sind bei Ihrer unten aufgeführten
Niederlassung und bei Yamaha Vertragshändlern in den jeweiligen Bestim-
mungsländern erhältlich.
Pour plus de détails sur les produits, veuillez vous adresser à Yamaha ou au
distributeur le plus proche de vous figurant dans la liste suivante.
Para detalles sobre productos, contacte su tienda Yamaha más cercana o el
distribuidor autorizado que se lista debajo.
Per ulteriori dettagli sui prodotti, rivolgersi al più vicino rappresentante Yamaha
oppure a uno dei distributori autorizzati elencati di seguito.
Neem voor details over producten alstublieft contact op met uw dichtstbijzijnde
Yamaha-vertegenwoordiging of de geautoriseerde distributeur uit het ondersta-
ande overzicht.
CANADA
Yamaha Canada Music Ltd.
135 Milner Avenue, Scarborough, Ontario,
M1S 3R1, Canada
Tel: 416-298-1311
U.S.A.
Yamaha Corporation of America
6600 Orangethorpe Ave., Buena Park, Calif.
90620, U.S.A.
Tel: 714-522-9011
MEXICO
Yamaha de México S.A. de C.V.
Calz. Javier Rojo Gómez #1149,
Col. Guadalupe del Moral
C.P. 09300, México, D.F., México
Tel: 55-5804-0600
BRAZIL
Yamaha Musical do Brasil Ltda.
Rua Joaquim Floriano, 913 - 4' andar, Itaim Bibi,
CEP 04534-013 Sao Paulo, SP. BRAZIL
Tel: 011-3704-1377
ARGENTINA
Yamaha Music Latin America, S.A.
Sucursal de Argentina
Viamonte 1145 Piso2-B 1053,
Buenos Aires, Argentina
Tel: 1-4371-7021
PANAMA AND OTHER LATIN
AMERICAN COUNTRIES/
CARIBBEAN COUNTRIES
Yamaha Music Latin America, S.A.
Torre Banco General, Piso 7, Urbanización Marbella,
Calle 47 y Aquilino de la Guardia,
Ciudad de Panamá, Panamá
Tel: +507-269-5311
THE UNITED KINGDOM
Yamaha-Kemble Music (U.K.) Ltd.
Sherbourne Drive, Tilbrook, Milton Keynes,
MK7 8BL, England
Tel: 01908-366700
IRELAND
Danfay Ltd.
61D, Sallynoggin Road, Dun Laoghaire, Co. Dublin
Tel: 01-2859177
GERMANY
Yamaha Music Central Europe GmbH
Siemensstraße 22-34, 25462 Rellingen, Germany
Tel: 04101-3030
SWITZERLAND/LIECHTENSTEIN
Yamaha Music Central Europe GmbH,
Branch Switzerland
Seefeldstrasse 94, 8008 Zürich, Switzerland
Tel: 01-383 3990
AUSTRIA
Yamaha Music Central Europe GmbH,
Branch Austria
Schleiergasse 20, A-1100 Wien, Austria
Tel: 01-60203900
CZECH REPUBLIC/SLOVAKIA/
HUNGARY/SLOVENIA
Yamaha Music Central Europe GmbH,
Branch Austria, CEE Department
Schleiergasse 20, A-1100 Wien, Austria
Tel: 01-602039025
POLAND
Yamaha Music Central Europe GmbH
Sp.z. o.o. Oddzial w Polsce
ul. 17 Stycznia 56, PL-02-146 Warszawa, Poland
Tel: 022-868-07-57
THE NETHERLANDS/
BELGIUM/LUXEMBOURG
Yamaha Music Central Europe GmbH,
Branch Belgium
Clarissenhof 5-b, 4133 AB Vianen, The Netherlands
Tel: 0347-358 040
FRANCE
Yamaha Musique France
BP 70-77312 Marne-la-Vallée Cedex 2, France
Tel: 01-64-61-4000
ITALY
Yamaha Musica Italia S.P.A.
Combo Division
Viale Italia 88, 20020 Lainate (Milano), Italy
Tel: 02-935-771
SPAIN/PORTUGAL
Yamaha-Hazen Música, S.A.
Ctra. de la Coruna km. 17, 200, 28230
Las Rozas (Madrid), Spain
Tel: 91-639-8888
GREECE
Philippos Nakas S.A. The Music House
147 Skiathou Street, 112-55 Athens, Greece
Tel: 01-228 2160
SWEDEN
Yamaha Scandinavia AB
J. A. Wettergrens Gata 1, Box 30053
S-400 43 Göteborg, Sweden
Tel: 031 89 34 00
DENMARK
YS Copenhagen Liaison Office
Generatorvej 6A
DK-2730 Herlev, Denmark
Tel: 44 92 49 00
FINLAND
F-Musiikki Oy
Kluuvikatu 6, P.O. Box 260,
SF-00101 Helsinki, Finland
Tel: 09 618511
NORWAY
Norsk filial av Yamaha Scandinavia AB
Grini Næringspark 1, N-1345 Østerås, Norway
Tel: 67 16 77 70
ICELAND
Skifan HF
Skeifan 17 P.O. Box 8120
IS-128 Reykjavik, Iceland
Tel: 525 5000
OTHER EUROPEAN COUNTRIES
Yamaha Music Central Europe GmbH
Siemensstraße 22-34, 25462 Rellingen, Germany
Tel: +49-4101-3030
Yamaha Corporation,
Asia-Pacific Music Marketing Group
Nakazawa-cho 10-1, Hamamatsu, Japan 430-8650
Tel: +81-53-460-2312
TURKEY/CYPRUS
Yamaha Music Central Europe GmbH
Siemensstraße 22-34, 25462 Rellingen, Germany
Tel: 04101-3030
OTHER COUNTRIES
Yamaha Music Gulf FZE
LB21-128 Jebel Ali Freezone
P. O.Box 17328, Dubai, U.A.E.
Tel: +971-4-881-5868
THE PEOPLE’S REPUBLIC OF CHINA
Yamaha Music & Electronics (China) Co.,Ltd.
25/F., United Plaza, 1468 Nanjing Road (West),
Jingan, Shanghai, China
Tel: 021-6247-2211
HONG KONG
Tom Lee Music Co., Ltd.
11/F., Silvercord Tower 1, 30 Canton Road,
Tsimshatsui, Kowloon, Hong Kong
Tel: 2737-7688
INDONESIA
PT. Yamaha Music Indonesia (Distributor)
PT. Nusantik
Gedung Yamaha Music Center, Jalan Jend. Gatot
Subroto Kav. 4, Jakarta 12930, Indonesia
Tel: 21-520-2577
KOREA
Yamaha Music Korea Ltd.
Tong-Yang Securities Bldg. 16F 23-8 Yoido-dong,
Youngdungpo-ku, Seoul, Korea
Tel: 02-3770-0660
MALAYSIA
Yamaha Music Malaysia, Sdn., Bhd.
Lot 8, Jalan Perbandaran, 47301 Kelana Jaya,
Petaling Jaya, Selangor, Malaysia
Tel: 3-78030900
PHILIPPINES
Yupangco Music Corporation
339 Gil J. Puyat Avenue, P.O. Box 885 MCPO,
Makati, Metro Manila, Philippines
Tel: 819-7551
SINGAPORE
Yamaha Music Asia Pte., Ltd.
#03-11 A-Z Building
140 Paya Lebor Road, Singapore 409015
Tel: 747-4374
TAIWAN
Yamaha KHS Music Co., Ltd.
3F, #6, Sec.2, Nan Jing E. Rd. Taipei.
Taiwan 104, R.O.C.
Tel: 02-2511-8688
THAILAND
Siam Music Yamaha Co., Ltd.
891/1 Siam Motors Building, 15-16 floor
Rama 1 road, Wangmai, Pathumwan
Bangkok 10330, Thailand
Tel: 02-215-2626
OTHER ASIAN COUNTRIES
Yamaha Corporation,
Asia-Pacific Music Marketing Group
Nakazawa-cho 10-1, Hamamatsu, Japan 430-8650
Tel: +81-53-460-2317
AUSTRALIA
Yamaha Music Australia Pty. Ltd.
Level 1, 99 Queensbridge Street, Southbank,
Victoria 3006, Australia
Tel: 3-9693-5111
NEW ZEALAND
Music Houses of N.Z. Ltd.
146/148 Captain Springs Road, Te Papapa,
Auckland, New Zealand
Tel: 9-634-0099
COUNTRIES AND TRUST
TERRITORIES IN PACIFIC OCEAN
Yamaha Corporation,
Asia-Pacific Music Marketing Group
Nakazawa-cho 10-1, Hamamatsu, Japan 430-8650
Tel: +81-53-460-2312
NORTH AMERICA
CENTRAL & SOUTH AMERICA
EUROPE
AFRICA
MIDDLE EAST
ASIA
OCEANIA
HEAD OFFICE
Yamaha Corporation, Pro Audio & Digital Musical Instrument Division
Nakazawa-cho 10-1, Hamamatsu, Japan 430-8650
Tel: +81-53-460-2445
SY38
PLEASE KEEP THIS MANUAL
NOTICE:
Service charges incurred due to a lack of knowledge relating to how a function or effect works
(when the unit is operating as designed) are not covered by the manufacturer’s warranty, and are
therefore the owners responsibility. Please study this manual carefully and consult your dealer
before requesting service.
ENVIRONMENTAL ISSUES:
Yamaha strives to produce products that are both user safe and environmentally friendly. We sin-
cerely believe that our products and the production methods used to produce them, meet these
goals. In keeping with both the letter and the spirit of the law, we want you to be aware of the fol-
lowing:
Warning:
Do not attempt to disassemble.
Disposal Notice:
Should this product become damaged beyond repair, or for some reason its useful life is consid-
ered to be at an end, please observe all local, state, and federal regulations that relate to the dis-
posal of products that contain plastics, etc. If your dealer is unable to assist you, please contact
Yamaha directly.
NAME PLATE LOCATION:
The name plate is located on the red pipe of the product. The model number, serial number, etc.,
are located on this plate. You should record the model number, serial number, and the date of
purchase in the spaces provided below and retain this manual as a permanent record of your
purchase.
Model :
RS40
Serial No. Purchase Date :
SPECIAL MESSAGE SECTION
YA M A HA

RS40
Assembly Manual / Montageanleitung
Manuel d’assemblage / Manual de montaje
U.R.G., Pro Audio & Digital Musical Instrument Division, Yamaha Corporation
© 2006 Yamaha Corporation
WJ28960 607PO***.*-01A0
Printed in Indonesia
ES
FR
DEEN
A1
z DTX Series: Drum Trigger Module
x Foot Pedal: FP6110 etc.
c Satellite Speaker
v Sub Woofer Amp unit
z DTX-Serie: Drum-Trigger-Modul
x Pedal: FP6110 usw.
c Satellitenlautsprecher
v Subwoofer-/Verstärker-Einheit
z Série DTX : Drum Trigger Module
x Pédale : FP6110 etc.
c Haut-parleur satellite
v Unité d’ampli de caisson de basses
z Serie DTX: Módulo de activación de batería
x Pedal: FP6110 etc.
c Altavoz satélite
v Unidad amplificadora de subwoofer
Set up example
Aufbaubeispiel
Exemple de configuration
Ejemplo de instalación
z
c
c
v
x
English
Before using, please read this assembly manual,
and use this product in a safe and proper manner.
Particularly in the case of children and young users,
parents or an instructor should teach the children the
proper manner in which to use the device.
* Specifications are subject to change without notice.
Deutsch
Bitte lesen Sie vor Gebrauch diese Mon-
tageanleitung, und verwenden Sie das
Produkt sicher und auf geeignete Weise.
Besonders für Kinder und jüngere
Anwender sollten die Eltern oder ein
Lehrer den Kindern die richtige Art und
Weise zeigen, in der das Produkt ange-
wendet werden sollte.
* Die technischen Daten können ohne vorherige Ankündigung geändert werden.
Français
Veuillez lire ce mode d’emploi en tout pre-
mier, afin d’utiliser ce produit de manière cor-
recte et sans danger. Les parents ou les
instructeurs sont invités à enseigner aux
enfants et aux jeunes utilisateurs la manière
correcte d’utiliser cet instrument.
* Ces spécifications peuvent faire l’objet de modifications sans préavis.
Español
Antes de utilizar el instrumento, lea el
manual de instrucciones y utilícelo de
forma segura y correcta. Especialmente
en el caso de niños y jóvenes, los padres o
un instructor deberían enseñarles a
utilizarlo correctamente.
* Especificaciones sujetas a cambio sin previo aviso.
PRECAUTIONS
WARNING
If this symbol is ignored and the equipment is used improperly, fatal injury to
persons or serious damage could occur.
Always set the product on a flat and solid surface. Placement on a sloping, unstable surface or on steps
may result in the product being unstable and subject to overturning.
Make sure all bolts are tightened firmly. Loose bolts may result in the rack overturning or in parts dropping,
causing injury.
When adjusting the height or angle, do not suddenly loosen the bolts. The pad may drop, the rack or pipes
may slip, pinching or causing injury to hands or fingers.
Do not sit or step on the rack. The rack may overturn or be damaged, resulting in injury.
Please be careful when children are close to or touching the product. Since the product has many pipes
and arms, careless movement around the product may result in injury.
When setting the pads and modules, please pay close attention in regards to the handling and setting of
cables. Carelessly placed cables may cause the user and others to trip and fall.
Do not alter the product. Doing so may result in injury or damage/deterioration to the product.
CAUTION
If this symbol is ignored and the equipment is used improperly, there is a danger
or injury to persons handling the equipment, and material damage could occur.
Do not put your hands or feet under the foot pedal or foot switch. They may be pinched, resulting in injury.
Watch your fingers when adjusting clamps. They may become pinched, resulting in injury.
Be careful around pipe ends, inside the pipe and screw ends. Metal shavings, etc. may injure your fingers.
Do not attach acoustic drums to the electronic drum rack. Clamps may be damaged and drums may drop,
causing injury.
Do not step on or place heavy objects on the product. Doing so may result in damage.
Do not use or keep the product in places with extremely high temperature (places in direct sunlight, close
to a heater, in a closed car, etc.) or high humidity (bathroom, outside on a rainy day, etc.). Doing so may
result in deformation, discoloration, stickiness, damage or deterioration.
When cleaning the product, do not use benzine, thinner or alcohol as it may result in discoloration or defor-
mation. Please wipe with a soft cloth or a damp cloth that has been wrung out thoroughly. If the product is
soiled or sticky, use a neutral detergent on a cloth then wipe with a damp cloth that has been wrung out
thoroughly to remove any remaining detergent. Also pay close attention so as not to let the water and
detergent come into contact with the cushions used in the product; doing so may result in deterioration.
To prevent against accidents and injury
Please follow the cautions listed below.
Caution (including danger, or warning). This
mark indicates cautions to which you should
pay close attention.
Actions indicated with this icon are prohibited
and should not be attempted.
VORSICHTSMASSNAHMEN
WARNUNG
Wenn dieses Symbol ignoriert und das Produkt falsch angewendet wird, können
schwere Personenschäden oder Sachschäden eintreten.
Stellen Sie das Produkt immer auf einer ebenen und stabilen Oberfläche auf. Die Platzierung auf einer
schiefen, instabilen Oberfläche oder auf Stufen kann zur Folge haben, dass das Produkt instabil ist und
leichter umfallen kann.
Achten Sie darauf, dass alle Bolzen festgezogen sind. Lose Bolzen können bewirken, dass das Rack oder
Teile davon herunterfallen und beschädigt werden sowie Verletzungen verursachen.
Wenn Sie Höhe oder Neigungswinkel einstellen, achten Sie darauf, nicht versehentlich die Bolzen zu
lösen. Das Pad könnte herunterfallen, das Rack oder Rohre könnten abrutschen und Hände oder Finger
einklemmen.
Setzen Sie sich nicht auf das Rack und steigen Sie nicht darauf. Das Rack kann umkippen oder
beschädigt werden und dabei Verletzungen verursachen.
Bitte seien Sie vorsichtig, wenn Kinder in der Nähe sind oder das Produkt berühren. Da das Produkt viele
Rohre und Ausleger besitzt, können achtlose Bewegungen in Nähe des Produkts Verletzungen verursa-
chen.
Achten Sie beim Einstellen der Pads und Module bitte sorgfältig auf die Handhabung der Kabel und die
Kabelführung. Achtlos platzierte Kabel können dazu führen, dass der Anwender oder Andere stolpern und
hinfallen.
Modifizieren Sie das Produkt nicht. Dadurch können Verletzungen auftreten oder das Produkt beschädigt
oder beinträchtigt werden.
VORSICHT
Wenn dieses Symbol ignoriert und das Produkt falsch angewendet wird, besteht
Verletzungsgefahr für Personen, die mit dem Produkt umgehen, oder es können
Sachschäden entstehen.
Geraten Sie nicht mit der Hand oder den Füßen unter das Pedal oder den Fußschalter. Sie könnten sich
einklemmen und Verletzungen erleiden.
Achten Sie auf Ihre Finger, wenn Sie die Klemmen einstellen. Sie könnten sich einklemmen und Verlet-
zungen erleiden.
Seien Sie vorsichtig mit Rohrenden, mit den Rohrinnenwänden und Schraubenspitzen. An den metallenen
Graten usw. könnten Sie sich die Finger verletzen.
Montieren Sie keine akustischen Trommeln an dem E-Schlagzeug-Rack. Die Klemmen könnten beschä-
digt werden und Tromeln könnten herunterfallen und Verletzungen verursachen.
Treten Sie nicht auf das Produkt und stellen Sie keine schweren Gegenstände darauf ab. Dadurch kann es
zu Beschädigungen kommen.
Lagern oder verwenden Sie das Produkt nicht an Orten mit extrem hoher Temperatur (in direktem Son-
nenlicht, in Nähe einer Heizung, in einem geschlossenen Fahrzeug usw.) oder hoher Luftfeuchtigkeit
(Badezimmer, draußen im Regen usw.). Dadurch könnte das Produkt verformt, verfärbt, verklebt, beschä-
digt oder sonstwie beeinträchtigt werden.
Verwenden Sie kein Benzin, Lösemittel oder Alkohol, um das Produkt zu reinigen, da dies zu Verfärbung
oder Verformung führen kann. Bitte wischen Sie das Produkt mit einem weichen oder leicht angefeuchte-
tem und gut ausgewrungenem Tuch sauber. Wenn das Produkt stark verschmutzt ist, verwenden Sie ein
Tuch mit einem neutralen Reinigungsmittel, und wischen Sie das Produkt mit einem leicht angefeuchtetem
und gut ausgewrungenem Tuch sauber, so dass kein Reinigungsmittel auf dem Produkt verbleibt. Achten
Sie auch besonders darauf, dass kein Wasser und Reinigungsmittel in Kontakt mit den Kissen des Pro-
dukts gerät; dadurch wird das Produkt beeinträchtigt.
Zur Vorbeugung gegen Unfälle und Verletzungen
Befolgen Sie bitte die unten aufgeführten Vorsichtsmaßnahmen.
Vorsicht (einschließlich Gefahr, oder Warnung). Dieses
Symbol markiert Vorsichtsmaßnahmen, die Sie genau
beachten sollten.
Aktionen, die mit diesem Symbol versehen sind, sind unzu
-
lässig und sollten nicht ausgeführt werden.
PRECAUTIONS D’USAGE
AVERTISSEMENT
Si ce symbole est ignoré et l’équipement utilisé de manière incorrecte, cela
pourra exposer les personnes à des blessures mortelles ou entraîner de graves
dommages.
Posez toujours le produit sur une surface plate et ferme. Si vous le disposez sur une surface inclinée ou
instable ou sur des marches, cela pourra le déstabiliser et provoquer sa chute à terre.
Assurez-vous que tous les boulons sont fermement resserrés. Des boulons desserrés peuvent provoquer
le renversement du rack ou la chute des pièces, causant des blessures.
Lorsque vous réglez la hauteur ou l’angle, ne desserrez pas brusquement les boulons. Le pad risque de
tomber, le rack ou les tuyaux glisser, causant des pincements aux doigts ou des blessures aux mains.
Ne vous asseyez pas sur le rack et ne marchez pas dessus. Le rack risque de se renverser ou de
s’endommager, en provoquant des blessures.
Soyez très vigilant avec les enfants lorsqu’ils s’approchent du produit ou cherchent à le toucher. Etant
donné que le produit dispose d’un grand nombre de tuyaux et de bras, tout mouvement inconsidéré autour
de son emplacement peut provoquer des blessures.
Lors du réglage des pads et des modules, soyez attentif à la manipulation et à la configuration des câbles.
Des câbles disposés n’importe comment peuvent provoquer le trébuchement et la chute de l’utilisateur
ainsi que d’autres personnes.
Ne modifiez pas le produit. Cela pourrait l'endommager, le détériorer ou provoquer des blessures.
ATTENTION
Si ce symbole est ignoré et l’équipement utilisé de manière incorrecte, cela
pourra exposer les personnes manipulant l’équipement à des blessures ou
entraîner des dommages matériels.
Ne placez pas vos mains ou vos pieds sous la pédale ou le sélecteur au pied. Vous risquez de vous faire
pincer les doigts ou de vous blesser.
Faites attention à vos doigts lorsque vous réglez les pinces. Vous risquez de vous les faire pincer ou de
vous blesser.
Faites attention en manipulant les tuyaux notamment leurs extrémités ainsi que les bouts des vis et bou-
lons. Les copeaux notamment métalliques peuvent vous blesser les doigts.
Ne fixez pas de batterie acoustique au rack de batterie électronique. Les pinces risquent de s’endomma-
ger et les batteries chuter à terre, provoquant des blessures.
Ne marchez pas sur le produit et ne placez pas dessus des objets lourds, au risque de provoquer des
dommages.
N’utilisez pas et ne conservez pas le produit dans des lieux à température très élevée (à la lumière directe
du soleil, à proximité d’un radiateur ou dans une voiture fermée à clé, etc.) ou à forte humidité (salle de
bain, à l’extérieur par une journée pluvieuse, etc.). Cela pourrait entraîner sa déformation et sa décolora-
tion, le rendre poisseux, l’endommager ou le détériorer.
Pour nettoyer le produit, n'utilisez pas de benzène, de diluant ou d'alcool au risque de provoquer sa déco-
loration ou sa déformation. Essuyez-le avec un chiffon sec et doux ou un tissus humide ayant été très bien
essoré. Si le produit est sale ou collant, nettoyez-le avec un tissus imbibé de détergent neutre puis
essuyez-le avec un chiffon humide ayant été préalablement bien essoré afin d'en retirer toute trace de
détergent. Veillez à ne pas laisser l'eau ou le détergent entrer en contact avec les coussins utilisés dans le
produit, car cela pourrait le détériorer.
Pour prévenir les accidents et les blessures
Veuillez respecter les précautions listées ci-dessous.
Attention (y compris danger ou avertissement). Ce
symbole indique les précautions à prendre sérieuse-
ment en considération.
Les actions signalées par cette icône sont interdites et
ne devraient être à aucun moment envisagées.
PRECAUCIONES
ADVERTENCIA
Si se ignora este símbolo y se utiliza el equipo indebidamente, podrían
producirse lesiones personales o daños graves.
Coloque siempre el producto en una superficie llana y firme. Si lo coloca en una superficie pendiente o
instable o en peldaños, el producto podría estar instable y darse la vuelta.
Asegúrese de que los tornillos están firmemente apretados. Si los tornillos están flojos, el bastidor puede
darse la vuelta o se pueden caer componentes, y dar lugar a lesiones.
Para ajustar la altura o la inclinación, no afloje los tornillos de repente. El disco se podría caer, el bastidor
o los tubos podrían deslizarse y pellizcarle o lesionarle los dedos o las manos.
No se siente en el bastidor ni lo pise porque se podrían dar la vuelta o dañarse, dando lugar a lesiones.
Tenga especial cuidado cuando los niños estén cerca del instrumento o tocándolo. Puesto que el
producto tiene muchos tubos y brazos, si no se tiene cuidado cuando se esté cerca de él se podrían
producir lesiones.
Para ajustar los discos y los módulos, preste especial atención al manejo y ajuste de los cables. Unos
cables mal colocados pueden ser causa de tropiezos y caídas.
No modifique el producto. Si lo hace, podría dañarse o deteriorarse el producto.
ATENCIÓN
Si se ignora este símbolo y se utiliza el equipo indebidamente, existiría el riesgo
de lesiones para los usuarios del equipo o de daños en los materiales.
No ponga las manos ni los pies debajo del pedal ni del interruptor del pedal. Podría pellizcarse y
lesionarse.
Tenga cuidado con las manos cuando ajuste las abrazaderas. Podría pellizcarse y lesionarse.
Tenga cuidado con los extremos de los tubos, dentro de ellos y con los tornillos. Las virutas metálicas, etc.
podrían causarle lesiones en los dedos.
No acople baterías acústicas en el bastidor de la batería electrónica. Las abrazaderas se podrían dañar y
la batería caerse y producir lesiones.
No pise el producto ni ponga objetos pesados encima ya que se podría dañar.
No utilice ni guarde el producto en sitios con temperaturas muy elevadas (bajo la luz solar directa, cerca
de un radiador, en un coche cerrado, etc.) o con mucha humedad (cuarto de baño, en el exterior en días
lluviosos, etc.). Si se hiciera, el resultado podría ser su deformación, pérdida de color, pegajosidad, daños
o deterioro.
Cuando limpie el producto, no utilice bencina, disolventes ni alcohol, porque podría ocasionar pérdida de
color o deformación. Limpie con un paño suave o húmedo que se haya escurrido bien Si el producto está
sucio o pegajoso, utilice un detergente neutro y después retire con un paño húmedo bien escurrido los
restos del detergente. Asimismo, preste mucha atención para que ni el agua ni el detergente entren en
contacto con los discos del producto, porque se podrían deteriorar.
Para evitar accidentes y lesiones
Siga las notas de atención indicadas a continuación.
Atención (incluido peligro o advertencia). Con esta
marca se indican aquellos aspectos a los que se debe
prestar especial atención.
Las acciones indicadas con este icono están prohibidas
y no se debería intentar llevarlas a cabo.
* Before setup, please make sure that you have all of the items listed below. If anything is missing, please
contact the dealer from whom you purchased the unit.
q
RS40 overall assembly X 1 (when the box is opened),
w
module stand fastening screw X 2,
e
cable band X 10,
r
Assembly Manual (this sheet) X 1
* Vergewissern Sie sich vor dem Aufbau, dass alle unten aufgelisteten Teile vorhanden sind. Bei fehlenden
Teilen wenden Sie sich bitte an den Händler, bei dem Sie das Produkt erworben haben.
q
RS40-Gesamtbaugruppe X 1 (sobald der Karton geöffnet ist),
w
Befestigungsschrauben für
Modulständer X 2,
e
Kabel-Clip X 10,
r
Montageanleitung (dieses Blatt) X 1
* Avant de procéder à l’installation, vérifiez que vous disposez de tous les éléments contenus dans la liste
ci-dessous. Si vous constatez l’absence d’un élément donné, contactez le revendeur auprès duquel vous
avez acheté l’unité.
q
assemblage général RS40 X 1 (lorsque l’emballage est ouvert),
w
vis de fixation du support du
module X 2,
e
bande pour câble X 10,
r
manuel d’assemblage (ce document) X 1
* Antes del montaje, asegúrese de que dispone de todos los artículos mencionados a continuación.
Si faltara alguno, póngase en contacto con el punto de venta.
q
unidad completa RS40 X 1 (cuando la caja está abierta),
w
tornillo para sujetar el soporte del módulo X 2,
e
banda para cables X 10,
r
manual de montaje (esta hoja) X 1
Package Contents
Lieferumfang
Contenu de l’emballage
Contenido del paquete
q
w
e
*Parts for the RS40’s main structure have already been assembled before packing. After removing the unit from the
box, follow the instructions described below to complete the assembly.
A Phillips (+) screwdriver is required when attaching the Drum Trigger Module. Please prepare one before starting
assembly.
1.
After removing the unit from the box, remove all cushion material.
2.
Loosen the bolts marked with before setting up.
3.
Loosen the bolts on the movable arms and legs, as shown in the diagrams below, then secure the bolts firmly
once setting is complete.
Follow the setup order
q
–
!3
in the diagrams shown below.
Be careful around the pipe edges. The cut pipe ends are sharp and can injure your fingers.
4.
Attaching the Drum Trigger Module
Remove the module stand (
A
) from the holder clamp (
B
), and use the supplied screws (
D
) to attach the Drum
Tr igger Module (
C
). Reattach the module stand (
A
) to the holder clamp (
B
).
* Make sure only the supplied screws are used. Using any other screws may result in the unit falling off the
module stand or damage to the unit.
5.
Attach the cymbal pad (
E
) to the cymbal holder (
F
) and adjust its position, then secure it in place. (Please refer to
the Owner’s Manual that came with the cymbal pads on attaching the cymbal pads.)
6.
Attach the drum pad (
G
) to the hexagonal rod cylinder (
H
) and adjust its position, then secure it in place.
* Make sure all bolts on clamps, pads, etc., are firmly tightened.
Loose or over-tightened bolts may result in the part falling off and/or damage. Please use caution.
After assembly is complete, setup the kick pad, hi-hat control pedal, etc., and connect the cables. (Please refer
to the Owner’s Manual that came with the drum trigger module for information on connecting the pads to the
module.) Use the supplied cable bands to secure the cables to the frame pipes to keep cables out of the way
during performance.
If the rack is moved even after setup is complete, make sure the bolts are loosened before moving the rack.
*Die Grundeinheit des RS40 wurde vor dem Versand bereits vorbereitend zusammengebaut. Folgen Sie nach dem
Auspacken den untenstehenden Anweisungen, um den Zusammenbau zu vervollständigen.
Zu Befestigung des Drum-Trigger-Moduls benötigen Sie einen Kreuzschlitzschraubendreher (+). Legen Sie einen
solchen Schraubenzieher bereit, bevor Sie den Zusammenbau in Angriff nehmen.
1.
Entfernen Sie nach dem Herausnehmen der Einheit aus der Verpackung sämtliches Polstermaterial.
2.
Lösen Sie vor dem Aufbau die Bolzen, die mit markiert sind.
3.
Lösen Sie die Bolzen an den beweglichen Armen und Beinen, wie in den folgenden Abbildungen gezeigt, und
schrauben Sie die Bolzen dann gut fest, sobald der Aufbau abgeschlossen ist.
Befolgen Sie die Montagereihenfolge
q
–
!3
in den folgenden Abbildungen.
Seien Sie an den Rohrenden bitte vorsichtig. Die Schnittkanten der Rohrenden sind scharf und Sie könn-
ten sich an den Fingern verletzen.
4.
Befestigen des Drum-Trigger-Moduls
Entfernen Sie den Modulständer (
A
) von der Halteklemme (
B
), und verwenden Sie die beiliegenden Schrauben
(
D
) zur Befestigung des Drum-Trigger-Moduls (
C
). Befestigen Sie den Modulständer (
A
) wieder an der Halte-
klemme (
B
).
*Achten Sie darauf, nur die beiliegenden Schrauben zu verwenden. Die Verwendung anderer Schrauben kann
Schäden am Gerät verursachen oder dazu führen, dass das Gerät vom Modulständer fällt.
5.
Befestigen Sie das Becken-Pad (
E
) an dem Beckenhalter (
F
) und stellen Sie die gewünschte Position ein, und
ziehen Sie die Schrauben fest. (Bitte lesen Sie zur Montage der Becken-Pads die mit dem jeweiligen Pad gelie-
ferte Anleitung.)
6.
Befestigen Sie das Drum-Pad (
G
) an der Hexagonalstange (
H
) und stellen Sie die gewünschte Position ein, und
ziehen Sie dann die Schrauben fest.
*Vergewissern Sie sich, dass alle Schrauben von Klammern, Pads usw. fest angezogen sind.
Lockere oder zu fest angezogene Schrauben können einen Fall und/oder eine Beschädigung von Teilen zur
Folge haben. Seien Sie diesbezüglich bitte vorsichtig.
Nach dem Zusammenbau richten Sie das Kick-Pad, Hi-Hat-Control-Pedal usw. ein und stellen die Kabelverbin-
dungen her. (Richten Sie sich beim Anschluss der Pads am Modul nach der mit dem Drum-Trigger-Modul
gelieferten Bedienungsanleitung.) Sichern Sie die Kabel mit den mitgelieferten Kabelbindern so an den Rack-
Rohren, dass sie beim Spielen nicht stören.
Wenn das fertig eingerichtete Rack umgestellt werden soll, lösen Sie die Schrauben, bevor Sie das Rack
bewegen.
* Les éléments de la structure principale du RS40 ont déjà été montés avant emballage. Après avoir sorti l’unité de
sa boîte, suivez les instructions ci-après pour terminer le montage.
Un tournevis cruciforme (+) est requis pour fixer le module de batterie électronique Drum Trigger à la structure.
Munissez-vous d’un tel tournevis avant de commencer le montage.
1.
Une fois que vous enlevé l’unité de son emballage, retirez tous les matériaux de protection.
2.
Desserrez les vis signalées par le symbole graphique avant de procéder au montage.
3.
Desserrez les boulons situés sur les pieds et les bras amovibles, tel qu’indiqué dans les schémas ci-dessous,
puis fixez-les fermement une fois que l’installation est terminée.
Respectez la séquence d’installation
q
–
!3
telle qu’indiquée dans les diagrammes ci-dessous.
Soyez vigilant en maniant les extrémités des tuyaux. Ils sont en effet tranchants et peuvent vous blesser
les doigts.
4.
Fixation de l’unité Drum Trigger Module
Retirez le pied du module (
A
) de la pince de support (
B
), puis utilisez les vis fournies (
D
) pour fixer l’unité Drum
Tr igger Module (
C
). Refixez le pied du module (
A
) à la pince de support (
B
).
* Assurez-vous d’utiliser exclusivement les vis fournies. L’utilisation d’autres vis peut entraîner la chute du
support du module et endommager l’unité elle-même.
5.
Fixez le pad de cymbale (
E
) au support de cymbale (
F
) et réglez sa position, puis fixez-le en place. (Pour les
détails sur la fixation des pads de cymbale, reportez-vous au mode d’emploi fourni avec les pads de cymbale).
6.
Fixez le pad de batterie (
G
) au cylindre de la tige hexagonale (
H
) et réglez sa position, puis fixez-le en place.
* Assurez-vous que les boulons des brides, des pads, etc. sont bien serrés.
Des boulons desserrés ou trop serrés pourraient entraîner la chute voire le bris d’une pièce. Faites preuve de
prudence.
Une fois le montage terminé, installez le pad de grosse caisse, la pédale de charleston, etc. et raccordez les
câbles. Pour obtenir des précisions sur le raccordement des pads au module, consultez le Mode d’emploi du
module de batterie Drum Trigger. Utilisez les attache-câbles fournis pour fixer les câbles aux tubes de la struc-
ture, afin que les câbles ne vous gênent pas pendant votre performance.
Si vous devez déplacer le rack après en avoir terminé la configuration, desserrez les boulons avant le déplace-
ment.
*Algunas partes de la estructura principal del RS40 ya se han montado antes de su embalaje. Tras extraer la
unidad de la caja, siga las instrucciones descritas a continuación para finalizar el montaje.
Es necesario un destornillador de estrella o Phillips (+) para montar el módulo de activación de la batería. Tenga
uno a su disposición antes de empezar el montaje.
1.
Después de sacar la unidad de la caja, retire todo el material de protección.
2.
Antes de empezar, afloje los tornillos con la marca .
3.
Afloje los tornillos de los brazos y las patas móviles, tal como se muestra en los esquemas siguientes, y después
fije bien los tornillos una vez que la instalación esté completa.
Siga el orden de instalación
q
–
!3
de los esquemas siguientes.
Tenga cuidado con los bordes de los tubos. Estos bordes son afilados y podrían causarle lesiones en los
dedos.
4.
Colocación del módulo de activación de la batería
Retire el soporte del módulo (
A
) de la abrazadera de la base (
B
) y utilice los tornillos que se suministran (
D
)
para acoplar el módulo de activación de la batería (
C
). Vuelva a acoplar el soporte del módulo (
A
) a la
abrazadera de la base (
B
).
* Asegúrese de que utiliza los tornillos que se suministran. Si se utilizaran otros tornillos se podría caer la
unidad del soporte o dañarse.
5.
Acople el pad de los platillos (
E
) a la base (
F
) y ajuste su posición; después fíjelo en su sitio. (Consulte en el
manual de instrucciones que se suministra con los pads de los platillos la información sobre su colocación.)
6.
Acople el pad de los platillos (
G
) al cilindro de varilla hexagonal (
H
) y ajuste su posición; después fíjelo en su
sitio.
* Asegúrese de que todos los tornillos de las abrazaderas, pads, etc., están bien sujetos. Unos tornillos flojos o
excesivamente apretados pueden hacer que el componente se caiga o se dañe. Tenga precaución.
Después de terminar el montaje, instale el bombo, el pedal de control del charles, etc., y conecte los cables.
(Consulte el Manual de instrucciones que se suministra con el módulo de activación de la batería para obte-
ner información sobre cómo conectar los pads al módulo.) Utilice las bandas para cables que se suministran
para asegurar los cables a los tubos de forma que no molesten durante la interpretación.
Si se mueve el bastidor incluso después de terminar la instalación, asegúrese de que se aflojan los tornillos
antes de hacerlo.
RS40 Assembly
Montage RS40
Assemblage du RS40
Unidad RS40
D
Å
ı
r
yu
e
qw
!0 !1
!3
!2
o
i
t
F
H
G
C
A
B
E
Å
ı
Switching the position of Pipe Å and Pipe ı can be used to
change the height of the hi-hat pad and tom pads.
Durch Vertauschen von Rohr
Å und Rohr ı kann die Höhe
des Hi-Hat-Pads und der Tom-Pads geändert werden.
Changer la position du tube
Å et du tube ı peut permettre de
régler la hauteur du pad de charleston et des pads de tom.
Se puede cambiar la posición del tubo
Å y del tubo ı para
regular la altura del pad de charles y los pads de timbal.
For details of products, please contact your nearest Yamaha
representative or the authorized distributor listed below.
Die Einzelheiten zu Produkten sind bei Ihrer unten aufgeführten
Niederlassung und bei Yamaha Vertragshändlern in den jeweiligen Bestim-
mungsländern erhältlich.
Pour plus de détails sur les produits, veuillez vous adresser à Yamaha ou au
distributeur le plus proche de vous figurant dans la liste suivante.
Para detalles sobre productos, contacte su tienda Yamaha más cercana o el
distribuidor autorizado que se lista debajo.
Per ulteriori dettagli sui prodotti, rivolgersi al più vicino rappresentante Yamaha
oppure a uno dei distributori autorizzati elencati di seguito.
Neem voor details over producten alstublieft contact op met uw dichtstbijzijnde
Yamaha-vertegenwoordiging of de geautoriseerde distributeur uit het ondersta-
ande overzicht.
CANADA
Yamaha Canada Music Ltd.
135 Milner Avenue, Scarborough, Ontario,
M1S 3R1, Canada
Tel: 416-298-1311
U.S.A.
Yamaha Corporation of America
6600 Orangethorpe Ave., Buena Park, Calif.
90620, U.S.A.
Tel: 714-522-9011
MEXICO
Yamaha de México S.A. de C.V.
Calz. Javier Rojo Gómez #1149,
Col. Guadalupe del Moral
C.P. 09300, México, D.F., México
Tel: 55-5804-0600
BRAZIL
Yamaha Musical do Brasil Ltda.
Rua Joaquim Floriano, 913 - 4' andar, Itaim Bibi,
CEP 04534-013 Sao Paulo, SP. BRAZIL
Tel: 011-3704-1377
ARGENTINA
Yamaha Music Latin America, S.A.
Sucursal de Argentina
Viamonte 1145 Piso2-B 1053,
Buenos Aires, Argentina
Tel: 1-4371-7021
PANAMA AND OTHER LATIN
AMERICAN COUNTRIES/
CARIBBEAN COUNTRIES
Yamaha Music Latin America, S.A.
Torre Banco General, Piso 7, Urbanización Marbella,
Calle 47 y Aquilino de la Guardia,
Ciudad de Panamá, Panamá
Tel: +507-269-5311
THE UNITED KINGDOM
Yamaha-Kemble Music (U.K.) Ltd.
Sherbourne Drive, Tilbrook, Milton Keynes,
MK7 8BL, England
Tel: 01908-366700
IRELAND
Danfay Ltd.
61D, Sallynoggin Road, Dun Laoghaire, Co. Dublin
Tel: 01-2859177
GERMANY
Yamaha Music Central Europe GmbH
Siemensstraße 22-34, 25462 Rellingen, Germany
Tel: 04101-3030
SWITZERLAND/LIECHTENSTEIN
Yamaha Music Central Europe GmbH,
Branch Switzerland
Seefeldstrasse 94, 8008 Zürich, Switzerland
Tel: 01-383 3990
AUSTRIA
Yamaha Music Central Europe GmbH,
Branch Austria
Schleiergasse 20, A-1100 Wien, Austria
Tel: 01-60203900
CZECH REPUBLIC/SLOVAKIA/
HUNGARY/SLOVENIA
Yamaha Music Central Europe GmbH,
Branch Austria, CEE Department
Schleiergasse 20, A-1100 Wien, Austria
Tel: 01-602039025
POLAND
Yamaha Music Central Europe GmbH
Sp.z. o.o. Oddzial w Polsce
ul. 17 Stycznia 56, PL-02-146 Warszawa, Poland
Tel: 022-868-07-57
THE NETHERLANDS/
BELGIUM/LUXEMBOURG
Yamaha Music Central Europe GmbH,
Branch Belgium
Clarissenhof 5-b, 4133 AB Vianen, The Netherlands
Tel: 0347-358 040
FRANCE
Yamaha Musique France
BP 70-77312 Marne-la-Vallée Cedex 2, France
Tel: 01-64-61-4000
ITALY
Yamaha Musica Italia S.P.A.
Combo Division
Viale Italia 88, 20020 Lainate (Milano), Italy
Tel: 02-935-771
SPAIN/PORTUGAL
Yamaha-Hazen Música, S.A.
Ctra. de la Coruna km. 17, 200, 28230
Las Rozas (Madrid), Spain
Tel: 91-639-8888
GREECE
Philippos Nakas S.A. The Music House
147 Skiathou Street, 112-55 Athens, Greece
Tel: 01-228 2160
SWEDEN
Yamaha Scandinavia AB
J. A. Wettergrens Gata 1, Box 30053
S-400 43 Göteborg, Sweden
Tel: 031 89 34 00
DENMARK
YS Copenhagen Liaison Office
Generatorvej 6A
DK-2730 Herlev, Denmark
Tel: 44 92 49 00
FINLAND
F-Musiikki Oy
Kluuvikatu 6, P.O. Box 260,
SF-00101 Helsinki, Finland
Tel: 09 618511
NORWAY
Norsk filial av Yamaha Scandinavia AB
Grini Næringspark 1, N-1345 Østerås, Norway
Tel: 67 16 77 70
ICELAND
Skifan HF
Skeifan 17 P.O. Box 8120
IS-128 Reykjavik, Iceland
Tel: 525 5000
OTHER EUROPEAN COUNTRIES
Yamaha Music Central Europe GmbH
Siemensstraße 22-34, 25462 Rellingen, Germany
Tel: +49-4101-3030
Yamaha Corporation,
Asia-Pacific Music Marketing Group
Nakazawa-cho 10-1, Hamamatsu, Japan 430-8650
Tel: +81-53-460-2312
TURKEY/CYPRUS
Yamaha Music Central Europe GmbH
Siemensstraße 22-34, 25462 Rellingen, Germany
Tel: 04101-3030
OTHER COUNTRIES
Yamaha Music Gulf FZE
LB21-128 Jebel Ali Freezone
P. O.Box 17328, Dubai, U.A.E.
Tel: +971-4-881-5868
THE PEOPLE’S REPUBLIC OF CHINA
Yamaha Music & Electronics (China) Co.,Ltd.
25/F., United Plaza, 1468 Nanjing Road (West),
Jingan, Shanghai, China
Tel: 021-6247-2211
HONG KONG
Tom Lee Music Co., Ltd.
11/F., Silvercord Tower 1, 30 Canton Road,
Tsimshatsui, Kowloon, Hong Kong
Tel: 2737-7688
INDONESIA
PT. Yamaha Music Indonesia (Distributor)
PT. Nusantik
Gedung Yamaha Music Center, Jalan Jend. Gatot
Subroto Kav. 4, Jakarta 12930, Indonesia
Tel: 21-520-2577
KOREA
Yamaha Music Korea Ltd.
Tong-Yang Securities Bldg. 16F 23-8 Yoido-dong,
Youngdungpo-ku, Seoul, Korea
Tel: 02-3770-0660
MALAYSIA
Yamaha Music Malaysia, Sdn., Bhd.
Lot 8, Jalan Perbandaran, 47301 Kelana Jaya,
Petaling Jaya, Selangor, Malaysia
Tel: 3-78030900
PHILIPPINES
Yupangco Music Corporation
339 Gil J. Puyat Avenue, P.O. Box 885 MCPO,
Makati, Metro Manila, Philippines
Tel: 819-7551
SINGAPORE
Yamaha Music Asia Pte., Ltd.
#03-11 A-Z Building
140 Paya Lebor Road, Singapore 409015
Tel: 747-4374
TAIWAN
Yamaha KHS Music Co., Ltd.
3F, #6, Sec.2, Nan Jing E. Rd. Taipei.
Taiwan 104, R.O.C.
Tel: 02-2511-8688
THAILAND
Siam Music Yamaha Co., Ltd.
891/1 Siam Motors Building, 15-16 floor
Rama 1 road, Wangmai, Pathumwan
Bangkok 10330, Thailand
Tel: 02-215-2626
OTHER ASIAN COUNTRIES
Yamaha Corporation,
Asia-Pacific Music Marketing Group
Nakazawa-cho 10-1, Hamamatsu, Japan 430-8650
Tel: +81-53-460-2317
AUSTRALIA
Yamaha Music Australia Pty. Ltd.
Level 1, 99 Queensbridge Street, Southbank,
Victoria 3006, Australia
Tel: 3-9693-5111
NEW ZEALAND
Music Houses of N.Z. Ltd.
146/148 Captain Springs Road, Te Papapa,
Auckland, New Zealand
Tel: 9-634-0099
COUNTRIES AND TRUST
TERRITORIES IN PACIFIC OCEAN
Yamaha Corporation,
Asia-Pacific Music Marketing Group
Nakazawa-cho 10-1, Hamamatsu, Japan 430-8650
Tel: +81-53-460-2312
NORTH AMERICA
CENTRAL & SOUTH AMERICA
EUROPE
AFRICA
MIDDLE EAST
ASIA
OCEANIA
HEAD OFFICE
Yamaha Corporation, Pro Audio & Digital Musical Instrument Division
Nakazawa-cho 10-1, Hamamatsu, Japan 430-8650
Tel: +81-53-460-2445
SY38
PLEASE KEEP THIS MANUAL
NOTICE:
Service charges incurred due to a lack of knowledge relating to how a function or effect works
(when the unit is operating as designed) are not covered by the manufacturer’s warranty, and are
therefore the owners responsibility. Please study this manual carefully and consult your dealer
before requesting service.
ENVIRONMENTAL ISSUES:
Yamaha strives to produce products that are both user safe and environmentally friendly. We sin-
cerely believe that our products and the production methods used to produce them, meet these
goals. In keeping with both the letter and the spirit of the law, we want you to be aware of the fol-
lowing:
Warning:
Do not attempt to disassemble.
Disposal Notice:
Should this product become damaged beyond repair, or for some reason its useful life is consid-
ered to be at an end, please observe all local, state, and federal regulations that relate to the dis-
posal of products that contain plastics, etc. If your dealer is unable to assist you, please contact
Yamaha directly.
NAME PLATE LOCATION:
The name plate is located on the red pipe of the product. The model number, serial number, etc.,
are located on this plate. You should record the model number, serial number, and the date of
purchase in the spaces provided below and retain this manual as a permanent record of your
purchase.
Model :
RS40
Serial No. Purchase Date :
SPECIAL MESSAGE SECTION
YA M A HA
Transcripción de documentos
Assembly Manual / Montageanleitung Manuel d’assemblage / Manual de montaje RS40 English Deutsch Français Español PRECAUTIONS VORSICHTSMASSNAHMEN PRECAUTIONS D’USAGE PRECAUCIONES Before using, please read this assembly manual, and use this product in a safe and proper manner. Particularly in the case of children and young users, parents or an instructor should teach the children the proper manner in which to use the device. Bitte lesen Sie vor Gebrauch diese Montageanleitung, und verwenden Sie das Produkt sicher und auf geeignete Weise. Besonders für Kinder und jüngere Anwender sollten die Eltern oder ein Lehrer den Kindern die richtige Art und Weise zeigen, in der das Produkt angewendet werden sollte. To prevent against accidents and injury Please follow the cautions listed below. Caution (including danger, or warning). This mark indicates cautions to which you should pay close attention. Actions indicated with this icon are prohibited and should not be attempted. WARNING Zur Vorbeugung gegen Unfälle und Verletzungen Befolgen Sie bitte die unten aufgeführten Vorsichtsmaßnahmen. Vorsicht (einschließlich Gefahr, oder Warnung). Dieses Symbol markiert Vorsichtsmaßnahmen, die Sie genau beachten sollten. Veuillez lire ce mode d’emploi en tout premier, afin d’utiliser ce produit de manière correcte et sans danger. Les parents ou les instructeurs sont invités à enseigner aux enfants et aux jeunes utilisateurs la manière correcte d’utiliser cet instrument. AVERTISSEMENT Achten Sie darauf, dass alle Bolzen festgezogen sind. Lose Bolzen können bewirken, dass das Rack oder Teile davon herunterfallen und beschädigt werden sowie Verletzungen verursachen. Wenn Sie Höhe oder Neigungswinkel einstellen, achten Sie darauf, nicht versehentlich die Bolzen zu lösen. Das Pad könnte herunterfallen, das Rack oder Rohre könnten abrutschen und Hände oder Finger einklemmen. When adjusting the height or angle, do not suddenly loosen the bolts. The pad may drop, the rack or pipes may slip, pinching or causing injury to hands or fingers. Setzen Sie sich nicht auf das Rack und steigen Sie nicht darauf. Das Rack kann umkippen oder beschädigt werden und dabei Verletzungen verursachen. Do not sit or step on the rack. The rack may overturn or be damaged, resulting in injury. Bitte seien Sie vorsichtig, wenn Kinder in der Nähe sind oder das Produkt berühren. Da das Produkt viele Rohre und Ausleger besitzt, können achtlose Bewegungen in Nähe des Produkts Verletzungen verursachen. Please be careful when children are close to or touching the product. Since the product has many pipes and arms, careless movement around the product may result in injury. Achten Sie beim Einstellen der Pads und Module bitte sorgfältig auf die Handhabung der Kabel und die Kabelführung. Achtlos platzierte Kabel können dazu führen, dass der Anwender oder Andere stolpern und hinfallen. When setting the pads and modules, please pay close attention in regards to the handling and setting of cables. Carelessly placed cables may cause the user and others to trip and fall. Modifizieren Sie das Produkt nicht. Dadurch können Verletzungen auftreten oder das Produkt beschädigt oder beinträchtigt werden. Do not alter the product. Doing so may result in injury or damage/deterioration to the product. Wenn dieses Symbol ignoriert und das Produkt falsch angewendet wird, besteht Verletzungsgefahr für Personen, die mit dem Produkt umgehen, oder es können Sachschäden entstehen. VORSICHT If this symbol is ignored and the equipment is used improperly, there is a danger or injury to persons handling the equipment, and material damage could occur. When cleaning the product, do not use benzine, thinner or alcohol as it may result in discoloration or deformation. Please wipe with a soft cloth or a damp cloth that has been wrung out thoroughly. If the product is soiled or sticky, use a neutral detergent on a cloth then wipe with a damp cloth that has been wrung out thoroughly to remove any remaining detergent. Also pay close attention so as not to let the water and detergent come into contact with the cushions used in the product; doing so may result in deterioration. * Specifications are subject to change without notice. Asegúrese de que los tornillos están firmemente apretados. Si los tornillos están flojos, el bastidor puede darse la vuelta o se pueden caer componentes, y dar lugar a lesiones. Lorsque vous réglez la hauteur ou l’angle, ne desserrez pas brusquement les boulons. Le pad risque de tomber, le rack ou les tuyaux glisser, causant des pincements aux doigts ou des blessures aux mains. Para ajustar la altura o la inclinación, no afloje los tornillos de repente. El disco se podría caer, el bastidor o los tubos podrían deslizarse y pellizcarle o lesionarle los dedos o las manos. Ne vous asseyez pas sur le rack et ne marchez pas dessus. Le rack risque de se renverser ou de s’endommager, en provoquant des blessures. No se siente en el bastidor ni lo pise porque se podrían dar la vuelta o dañarse, dando lugar a lesiones. Soyez très vigilant avec les enfants lorsqu’ils s’approchent du produit ou cherchent à le toucher. Etant donné que le produit dispose d’un grand nombre de tuyaux et de bras, tout mouvement inconsidéré autour de son emplacement peut provoquer des blessures. Tenga especial cuidado cuando los niños estén cerca del instrumento o tocándolo. Puesto que el producto tiene muchos tubos y brazos, si no se tiene cuidado cuando se esté cerca de él se podrían producir lesiones. Lors du réglage des pads et des modules, soyez attentif à la manipulation et à la configuration des câbles. Des câbles disposés n’importe comment peuvent provoquer le trébuchement et la chute de l’utilisateur ainsi que d’autres personnes. Para ajustar los discos y los módulos, preste especial atención al manejo y ajuste de los cables. Unos cables mal colocados pueden ser causa de tropiezos y caídas. Ne modifiez pas le produit. Cela pourrait l'endommager, le détériorer ou provoquer des blessures. No modifique el producto. Si lo hace, podría dañarse o deteriorarse el producto. Si ce symbole est ignoré et l’équipement utilisé de manière incorrecte, cela pourra exposer les personnes manipulant l’équipement à des blessures ou entraîner des dommages matériels. ATENCIÓN No ponga las manos ni los pies debajo del pedal ni del interruptor del pedal. Podría pellizcarse y lesionarse. Tenga cuidado con las manos cuando ajuste las abrazaderas. Podría pellizcarse y lesionarse. Tenga cuidado con los extremos de los tubos, dentro de ellos y con los tornillos. Las virutas metálicas, etc. podrían causarle lesiones en los dedos. No acople baterías acústicas en el bastidor de la batería electrónica. Las abrazaderas se podrían dañar y la batería caerse y producir lesiones. No pise el producto ni ponga objetos pesados encima ya que se podría dañar. No utilice ni guarde el producto en sitios con temperaturas muy elevadas (bajo la luz solar directa, cerca de un radiador, en un coche cerrado, etc.) o con mucha humedad (cuarto de baño, en el exterior en días lluviosos, etc.). Si se hiciera, el resultado podría ser su deformación, pérdida de color, pegajosidad, daños o deterioro. Cuando limpie el producto, no utilice bencina, disolventes ni alcohol, porque podría ocasionar pérdida de color o deformación. Limpie con un paño suave o húmedo que se haya escurrido bien Si el producto está sucio o pegajoso, utilice un detergente neutro y después retire con un paño húmedo bien escurrido los restos del detergente. Asimismo, preste mucha atención para que ni el agua ni el detergente entren en contacto con los discos del producto, porque se podrían deteriorar. N’utilisez pas et ne conservez pas le produit dans des lieux à température très élevée (à la lumière directe du soleil, à proximité d’un radiateur ou dans une voiture fermée à clé, etc.) ou à forte humidité (salle de bain, à l’extérieur par une journée pluvieuse, etc.). Cela pourrait entraîner sa déformation et sa décoloration, le rendre poisseux, l’endommager ou le détériorer. Pour nettoyer le produit, n'utilisez pas de benzène, de diluant ou d'alcool au risque de provoquer sa décoloration ou sa déformation. Essuyez-le avec un chiffon sec et doux ou un tissus humide ayant été très bien essoré. Si le produit est sale ou collant, nettoyez-le avec un tissus imbibé de détergent neutre puis essuyez-le avec un chiffon humide ayant été préalablement bien essoré afin d'en retirer toute trace de détergent. Veillez à ne pas laisser l'eau ou le détergent entrer en contact avec les coussins utilisés dans le produit, car cela pourrait le détériorer. * Especificaciones sujetas a cambio sin previo aviso. Set up example Package Contents w q q RS40 overall assembly X 1 (when the box is opened), w module stand fastening screw X 2, e cable band X 10, r Assembly Manual (this sheet) X 1 Lieferumfang Si se ignora este símbolo y se utiliza el equipo indebidamente, existiría el riesgo de lesiones para los usuarios del equipo o de daños en los materiales. * Ces spécifications peuvent faire l’objet de modifications sans préavis. * Die technischen Daten können ohne vorherige Ankündigung geändert werden. * Before setup, please make sure that you have all of the items listed below. If anything is missing, please contact the dealer from whom you purchased the unit. Si se ignora este símbolo y se utiliza el equipo indebidamente, podrían producirse lesiones personales o daños graves. Assurez-vous que tous les boulons sont fermement resserrés. Des boulons desserrés peuvent provoquer le renversement du rack ou la chute des pièces, causant des blessures. Ne marchez pas sur le produit et ne placez pas dessus des objets lourds, au risque de provoquer des dommages. Lagern oder verwenden Sie das Produkt nicht an Orten mit extrem hoher Temperatur (in direktem Sonnenlicht, in Nähe einer Heizung, in einem geschlossenen Fahrzeug usw.) oder hoher Luftfeuchtigkeit (Badezimmer, draußen im Regen usw.). Dadurch könnte das Produkt verformt, verfärbt, verklebt, beschädigt oder sonstwie beeinträchtigt werden. Verwenden Sie kein Benzin, Lösemittel oder Alkohol, um das Produkt zu reinigen, da dies zu Verfärbung oder Verformung führen kann. Bitte wischen Sie das Produkt mit einem weichen oder leicht angefeuchtetem und gut ausgewrungenem Tuch sauber. Wenn das Produkt stark verschmutzt ist, verwenden Sie ein Tuch mit einem neutralen Reinigungsmittel, und wischen Sie das Produkt mit einem leicht angefeuchtetem und gut ausgewrungenem Tuch sauber, so dass kein Reinigungsmittel auf dem Produkt verbleibt. Achten Sie auch besonders darauf, dass kein Wasser und Reinigungsmittel in Kontakt mit den Kissen des Produkts gerät; dadurch wird das Produkt beeinträchtigt. Do not use or keep the product in places with extremely high temperature (places in direct sunlight, close to a heater, in a closed car, etc.) or high humidity (bathroom, outside on a rainy day, etc.). Doing so may result in deformation, discoloration, stickiness, damage or deterioration. Atención (incluido peligro o advertencia). Con esta marca se indican aquellos aspectos a los que se debe prestar especial atención. Coloque siempre el producto en una superficie llana y firme. Si lo coloca en una superficie pendiente o instable o en peldaños, el producto podría estar instable y darse la vuelta. Ne fixez pas de batterie acoustique au rack de batterie électronique. Les pinces risquent de s’endommager et les batteries chuter à terre, provoquant des blessures. Treten Sie nicht auf das Produkt und stellen Sie keine schweren Gegenstände darauf ab. Dadurch kann es zu Beschädigungen kommen. Do not step on or place heavy objects on the product. Doing so may result in damage. ADVERTENCIA Faites attention en manipulant les tuyaux notamment leurs extrémités ainsi que les bouts des vis et boulons. Les copeaux notamment métalliques peuvent vous blesser les doigts. Montieren Sie keine akustischen Trommeln an dem E-Schlagzeug-Rack. Die Klemmen könnten beschädigt werden und Tromeln könnten herunterfallen und Verletzungen verursachen. Do not attach acoustic drums to the electronic drum rack. Clamps may be damaged and drums may drop, causing injury. Si ce symbole est ignoré et l’équipement utilisé de manière incorrecte, cela pourra exposer les personnes à des blessures mortelles ou entraîner de graves dommages. Faites attention à vos doigts lorsque vous réglez les pinces. Vous risquez de vous les faire pincer ou de vous blesser. Seien Sie vorsichtig mit Rohrenden, mit den Rohrinnenwänden und Schraubenspitzen. An den metallenen Graten usw. könnten Sie sich die Finger verletzen. Be careful around pipe ends, inside the pipe and screw ends. Metal shavings, etc. may injure your fingers. Siga las notas de atención indicadas a continuación. Las acciones indicadas con este icono están prohibidas y no se debería intentar llevarlas a cabo. Ne placez pas vos mains ou vos pieds sous la pédale ou le sélecteur au pied. Vous risquez de vous faire pincer les doigts ou de vous blesser. Achten Sie auf Ihre Finger, wenn Sie die Klemmen einstellen. Sie könnten sich einklemmen und Verletzungen erleiden. Watch your fingers when adjusting clamps. They may become pinched, resulting in injury. Attention (y compris danger ou avertissement). Ce symbole indique les précautions à prendre sérieusement en considération. Para evitar accidentes y lesiones Posez toujours le produit sur une surface plate et ferme. Si vous le disposez sur une surface inclinée ou instable ou sur des marches, cela pourra le déstabiliser et provoquer sa chute à terre. ATTENTION Geraten Sie nicht mit der Hand oder den Füßen unter das Pedal oder den Fußschalter. Sie könnten sich einklemmen und Verletzungen erleiden. Do not put your hands or feet under the foot pedal or foot switch. They may be pinched, resulting in injury. Veuillez respecter les précautions listées ci-dessous. Les actions signalées par cette icône sont interdites et ne devraient être à aucun moment envisagées. Stellen Sie das Produkt immer auf einer ebenen und stabilen Oberfläche auf. Die Platzierung auf einer schiefen, instabilen Oberfläche oder auf Stufen kann zur Folge haben, dass das Produkt instabil ist und leichter umfallen kann. Make sure all bolts are tightened firmly. Loose bolts may result in the rack overturning or in parts dropping, causing injury. Antes de utilizar el instrumento, lea el manual de instrucciones y utilícelo de forma segura y correcta. Especialmente en el caso de niños y jóvenes, los padres o un instructor deberían enseñarles a utilizarlo correctamente. Pour prévenir les accidents et les blessures Aktionen, die mit diesem Symbol versehen sind, sind unzulässig und sollten nicht ausgeführt werden. Wenn dieses Symbol ignoriert und das Produkt falsch angewendet wird, können schwere Personenschäden oder Sachschäden eintreten. WARNUNG If this symbol is ignored and the equipment is used improperly, fatal injury to persons or serious damage could occur. Always set the product on a flat and solid surface. Placement on a sloping, unstable surface or on steps may result in the product being unstable and subject to overturning. CAUTION U.R.G., Pro Audio & Digital Musical Instrument Division, Yamaha Corporation © 2006 Yamaha Corporation WJ28960 607PO***.*-01A0 Printed in Indonesia A1 EN DE FR ES e c z DTX Series: Drum Trigger Module x Foot Pedal: FP6110 etc. c Satellite Speaker v Sub Woofer Amp unit c z Aufbaubeispiel z DTX-Serie: Drum-Trigger-Modul x Pedal: FP6110 usw. c Satellitenlautsprecher v Subwoofer-/Verstärker-Einheit * Vergewissern Sie sich vor dem Aufbau, dass alle unten aufgelisteten Teile vorhanden sind. Bei fehlenden Teilen wenden Sie sich bitte an den Händler, bei dem Sie das Produkt erworben haben. q RS40-Gesamtbaugruppe X 1 (sobald der Karton geöffnet ist), w Befestigungsschrauben für Modulständer X 2, e Kabel-Clip X 10, r Montageanleitung (dieses Blatt) X 1 Exemple de configuration Contenu de l’emballage z Série DTX : Drum Trigger Module x Pédale : FP6110 etc. c Haut-parleur satellite v Unité d’ampli de caisson de basses * Avant de procéder à l’installation, vérifiez que vous disposez de tous les éléments contenus dans la liste ci-dessous. Si vous constatez l’absence d’un élément donné, contactez le revendeur auprès duquel vous avez acheté l’unité. q assemblage général RS40 X 1 (lorsque l’emballage est ouvert), w vis de fixation du support du module X 2, e bande pour câble X 10, r manuel d’assemblage (ce document) X 1 Ejemplo de instalación z Serie DTX: Módulo de activación de batería x Pedal: FP6110 etc. c Altavoz satélite v Unidad amplificadora de subwoofer Contenido del paquete * Antes del montaje, asegúrese de que dispone de todos los artículos mencionados a continuación. Si faltara alguno, póngase en contacto con el punto de venta. q unidad completa RS40 X 1 (cuando la caja está abierta), w tornillo para sujetar el soporte del módulo X 2, e banda para cables X 10, r manual de montaje (esta hoja) X 1 v x RS40 Assembly Montage RS40 Assemblage du RS40 Unidad RS40 * Parts for the RS40’s main structure have already been assembled before packing. After removing the unit from the box, follow the instructions described below to complete the assembly. A Phillips (+) screwdriver is required when attaching the Drum Trigger Module. Please prepare one before starting assembly. * Die Grundeinheit des RS40 wurde vor dem Versand bereits vorbereitend zusammengebaut. Folgen Sie nach dem Auspacken den untenstehenden Anweisungen, um den Zusammenbau zu vervollständigen. Zu Befestigung des Drum-Trigger-Moduls benötigen Sie einen Kreuzschlitzschraubendreher (+). Legen Sie einen solchen Schraubenzieher bereit, bevor Sie den Zusammenbau in Angriff nehmen. * Les éléments de la structure principale du RS40 ont déjà été montés avant emballage. Après avoir sorti l’unité de sa boîte, suivez les instructions ci-après pour terminer le montage. Un tournevis cruciforme (+) est requis pour fixer le module de batterie électronique Drum Trigger à la structure. Munissez-vous d’un tel tournevis avant de commencer le montage. * Algunas partes de la estructura principal del RS40 ya se han montado antes de su embalaje. Tras extraer la unidad de la caja, siga las instrucciones descritas a continuación para finalizar el montaje. Es necesario un destornillador de estrella o Phillips (+) para montar el módulo de activación de la batería. Tenga uno a su disposición antes de empezar el montaje. 1. After removing the unit from the box, remove all cushion material. 1. Entfernen Sie nach dem Herausnehmen der Einheit aus der Verpackung sämtliches Polstermaterial. 1. Une fois que vous enlevé l’unité de son emballage, retirez tous les matériaux de protection. 1. Después de sacar la unidad de la caja, retire todo el material de protección. 2. Loosen the bolts marked with 2. Lösen Sie vor dem Aufbau die Bolzen, die mit 2. Desserrez les vis signalées par le symbole graphique 2. Antes de empezar, afloje los tornillos con la marca 3. Loosen the bolts on the movable arms and legs, as shown in the diagrams below, then secure the bolts firmly once setting is complete. Follow the setup order q–!3 in the diagrams shown below. 3. Lösen Sie die Bolzen an den beweglichen Armen und Beinen, wie in den folgenden Abbildungen gezeigt, und schrauben Sie die Bolzen dann gut fest, sobald der Aufbau abgeschlossen ist. Befolgen Sie die Montagereihenfolge q–!3 in den folgenden Abbildungen. 3. Desserrez les boulons situés sur les pieds et les bras amovibles, tel qu’indiqué dans les schémas ci-dessous, puis fixez-les fermement une fois que l’installation est terminée. Respectez la séquence d’installation q–!3 telle qu’indiquée dans les diagrammes ci-dessous. 3. Afloje los tornillos de los brazos y las patas móviles, tal como se muestra en los esquemas siguientes, y después fije bien los tornillos una vez que la instalación esté completa. Siga el orden de instalación q–!3 de los esquemas siguientes. before setting up. Seien Sie an den Rohrenden bitte vorsichtig. Die Schnittkanten der Rohrenden sind scharf und Sie könnten sich an den Fingern verletzen. Be careful around the pipe edges. The cut pipe ends are sharp and can injure your fingers. 4. markiert sind. 4. Attaching the Drum Trigger Module Remove the module stand (A) from the holder clamp (B), and use the supplied screws (D) to attach the Drum Trigger Module (C). Reattach the module stand (A) to the holder clamp (B). * Make sure only the supplied screws are used. Using any other screws may result in the unit falling off the module stand or damage to the unit. 5. Attach the cymbal pad (E) to the cymbal holder (F) and adjust its position, then secure it in place. (Please refer to the Owner’s Manual that came with the cymbal pads on attaching the cymbal pads.) 6. Attach the drum pad (G) to the hexagonal rod cylinder (H) and adjust its position, then secure it in place. Befestigen des Drum-Trigger-Moduls Entfernen Sie den Modulständer (A) von der Halteklemme (B), und verwenden Sie die beiliegenden Schrauben (D) zur Befestigung des Drum-Trigger-Moduls (C). Befestigen Sie den Modulständer (A) wieder an der Halteklemme (B). Soyez vigilant en maniant les extrémités des tuyaux. Ils sont en effet tranchants et peuvent vous blesser les doigts. 4. * Achten Sie darauf, nur die beiliegenden Schrauben zu verwenden. Die Verwendung anderer Schrauben kann Schäden am Gerät verursachen oder dazu führen, dass das Gerät vom Modulständer fällt. 5. 6. * Make sure all bolts on clamps, pads, etc., are firmly tightened. Loose or over-tightened bolts may result in the part falling off and/or damage. Please use caution. After assembly is complete, setup the kick pad, hi-hat control pedal, etc., and connect the cables. (Please refer to the Owner’s Manual that came with the drum trigger module for information on connecting the pads to the module.) Use the supplied cable bands to secure the cables to the frame pipes to keep cables out of the way during performance. If the rack is moved even after setup is complete, make sure the bolts are loosened before moving the rack. Befestigen Sie das Becken-Pad (E) an dem Beckenhalter (F) und stellen Sie die gewünschte Position ein, und ziehen Sie die Schrauben fest. (Bitte lesen Sie zur Montage der Becken-Pads die mit dem jeweiligen Pad gelieferte Anleitung.) Befestigen Sie das Drum-Pad (G) an der Hexagonalstange (H) und stellen Sie die gewünschte Position ein, und ziehen Sie dann die Schrauben fest. Fixation de l’unité Drum Trigger Module Retirez le pied du module (A) de la pince de support (B), puis utilisez les vis fournies (D) pour fixer l’unité Drum Trigger Module (C). Refixez le pied du module (A) à la pince de support (B). 5. 6. Fixez le pad de cymbale (E) au support de cymbale (F) et réglez sa position, puis fixez-le en place. (Pour les détails sur la fixation des pads de cymbale, reportez-vous au mode d’emploi fourni avec les pads de cymbale). . Tenga cuidado con los bordes de los tubos. Estos bordes son afilados y podrían causarle lesiones en los dedos. 4. * Assurez-vous d’utiliser exclusivement les vis fournies. L’utilisation d’autres vis peut entraîner la chute du support du module et endommager l’unité elle-même. Colocación del módulo de activación de la batería Retire el soporte del módulo (A) de la abrazadera de la base (B) y utilice los tornillos que se suministran (D) para acoplar el módulo de activación de la batería (C). Vuelva a acoplar el soporte del módulo (A) a la abrazadera de la base (B). * Asegúrese de que utiliza los tornillos que se suministran. Si se utilizaran otros tornillos se podría caer la unidad del soporte o dañarse. 5. Acople el pad de los platillos (E) a la base (F) y ajuste su posición; después fíjelo en su sitio. (Consulte en el manual de instrucciones que se suministra con los pads de los platillos la información sobre su colocación.) 6. Acople el pad de los platillos (G) al cilindro de varilla hexagonal (H) y ajuste su posición; después fíjelo en su sitio. Fixez le pad de batterie (G) au cylindre de la tige hexagonale (H) et réglez sa position, puis fixez-le en place. * Assurez-vous que les boulons des brides, des pads, etc. sont bien serrés. Des boulons desserrés ou trop serrés pourraient entraîner la chute voire le bris d’une pièce. Faites preuve de prudence. Une fois le montage terminé, installez le pad de grosse caisse, la pédale de charleston, etc. et raccordez les câbles. Pour obtenir des précisions sur le raccordement des pads au module, consultez le Mode d’emploi du module de batterie Drum Trigger. Utilisez les attache-câbles fournis pour fixer les câbles aux tubes de la structure, afin que les câbles ne vous gênent pas pendant votre performance. Si vous devez déplacer le rack après en avoir terminé la configuration, desserrez les boulons avant le déplacement. * Vergewissern Sie sich, dass alle Schrauben von Klammern, Pads usw. fest angezogen sind. Lockere oder zu fest angezogene Schrauben können einen Fall und/oder eine Beschädigung von Teilen zur Folge haben. Seien Sie diesbezüglich bitte vorsichtig. Nach dem Zusammenbau richten Sie das Kick-Pad, Hi-Hat-Control-Pedal usw. ein und stellen die Kabelverbindungen her. (Richten Sie sich beim Anschluss der Pads am Modul nach der mit dem Drum-Trigger-Modul gelieferten Bedienungsanleitung.) Sichern Sie die Kabel mit den mitgelieferten Kabelbindern so an den RackRohren, dass sie beim Spielen nicht stören. Wenn das fertig eingerichtete Rack umgestellt werden soll, lösen Sie die Schrauben, bevor Sie das Rack bewegen. G avant de procéder au montage. For details of products, please contact your nearest Yamaha representative or the authorized distributor listed below. Per ulteriori dettagli sui prodotti, rivolgersi al più vicino rappresentante Yamaha oppure a uno dei distributori autorizzati elencati di seguito. Die Einzelheiten zu Produkten sind bei Ihrer unten aufgeführten Niederlassung und bei Yamaha Vertragshändlern in den jeweiligen Bestimmungsländern erhältlich. Neem voor details over producten alstublieft contact op met uw dichtstbijzijnde Yamaha-vertegenwoordiging of de geautoriseerde distributeur uit het onderstaande overzicht. Pour plus de détails sur les produits, veuillez vous adresser à Yamaha ou au distributeur le plus proche de vous figurant dans la liste suivante. 关于各产品的详细信息,请向就近的YAMAHA 代理商或下列经销商询问。 * Asegúrese de que todos los tornillos de las abrazaderas, pads, etc., están bien sujetos. Unos tornillos flojos o excesivamente apretados pueden hacer que el componente se caiga o se dañe. Tenga precaución. Después de terminar el montaje, instale el bombo, el pedal de control del charles, etc., y conecte los cables. (Consulte el Manual de instrucciones que se suministra con el módulo de activación de la batería para obtener información sobre cómo conectar los pads al módulo.) Utilice las bandas para cables que se suministran para asegurar los cables a los tubos de forma que no molesten durante la interpretación. Si se mueve el bastidor incluso después de terminar la instalación, asegúrese de que se aflojan los tornillos antes de hacerlo. Para detalles sobre productos, contacte su tienda Yamaha más cercana o el distribuidor autorizado que se lista debajo. NORTH AMERICA CANADA E Yamaha Canada Music Ltd. 135 Milner Avenue, Scarborough, Ontario, M1S 3R1, Canada Tel: 416-298-1311 H Yamaha Corporation of America 6600 Orangethorpe Ave., Buena Park, Calif. 90620, U.S.A. Tel: 714-522-9011 CENTRAL & SOUTH AMERICA MEXICO F !3 D y A Viamonte 1145 Piso2-B 1053, Buenos Aires, Argentina Tel: 1-4371-7021 PANAMA AND OTHER LATIN AMERICAN COUNTRIES/ CARIBBEAN COUNTRIES !2 !0 Yamaha Music Latin America, S.A. !1 o i r e Torre Banco General, Piso 7, Urbanización Marbella, Calle 47 y Aquilino de la Guardia, Ciudad de Panamá, Panamá Tel: +507-269-5311 EUROPE THE UNITED KINGDOM Yamaha-Kemble Music (U.K.) Ltd. Sherbourne Drive, Tilbrook, Milton Keynes, MK7 8BL, England Tel: 01908-366700 Switching the position of Pipe Å and Pipe ı can be used to change the height of the hi-hat pad and tom pads. Durch Vertauschen von Rohr Å und Rohr ı kann die Höhe des Hi-Hat-Pads und der Tom-Pads geändert werden. IRELAND Changer la position du tube Å et du tube ı peut permettre de régler la hauteur du pad de charleston et des pads de tom. GERMANY Danfay Ltd. 61D, Sallynoggin Road, Dun Laoghaire, Co. Dublin Tel: 01-2859177 Yamaha Music Central Europe GmbH Siemensstraße 22-34, 25462 Rellingen, Germany Tel: 04101-3030 Se puede cambiar la posición del tubo Å y del tubo ı para regular la altura del pad de charles y los pads de timbal. SWITZERLAND/LIECHTENSTEIN Yamaha Music Central Europe GmbH, Branch Switzerland Seefeldstrasse 94, 8008 Zürich, Switzerland Tel: 01-383 3990 AUSTRIA Yamaha Music Central Europe GmbH, Branch Austria Å ı q w Yamaha Musica Italia S.P.A. Combo Division Viale Italia 88, 20020 Lainate (Milano), Italy Tel: 02-935-771 Schleiergasse 20, A-1100 Wien, Austria Tel: 01-60203900 CZECH REPUBLIC/SLOVAKIA/ HUNGARY/SLOVENIA Yamaha Music Central Europe GmbH, Branch Austria, CEE Department Schleiergasse 20, A-1100 Wien, Austria Tel: 01-602039025 Yamaha Music & Electronics (China) Co.,Ltd. 25/F., United Plaza, 1468 Nanjing Road (West), Jingan, Shanghai, China Tel: 021-6247-2211 HONG KONG Tom Lee Music Co., Ltd. 11/F., Silvercord Tower 1, 30 Canton Road, Tsimshatsui, Kowloon, Hong Kong Tel: 2737-7688 INDONESIA PT. Yamaha Music Indonesia (Distributor) PT. Nusantik Gedung Yamaha Music Center, Jalan Jend. Gatot Subroto Kav. 4, Jakarta 12930, Indonesia Tel: 21-520-2577 KOREA Yamaha Music Korea Ltd. GREECE Philippos Nakas S.A. The Music House Yamaha Music Latin America, S.A. Sucursal de Argentina t ITALY Ctra. de la Coruna km. 17, 200, 28230 Las Rozas (Madrid), Spain Tel: 91-639-8888 ARGENTINA B BP 70-77312 Marne-la-Vallée Cedex 2, France Tel: 01-64-61-4000 Yamaha-Hazen Música, S.A. Rua Joaquim Floriano, 913 - 4' andar, Itaim Bibi, CEP 04534-013 Sao Paulo, SP. BRAZIL Tel: 011-3704-1377 ı FRANCE Calz. Javier Rojo Gómez #1149, Col. Guadalupe del Moral C.P. 09300, México, D.F., México Tel: 55-5804-0600 Yamaha Musical do Brasil Ltda. u Clarissenhof 5-b, 4133 AB Vianen, The Netherlands Tel: 0347-358 040 Yamaha de México S.A. de C.V. 147 Skiathou Street, 112-55 Athens, Greece Tel: 01-228 2160 SWEDEN Tong-Yang Securities Bldg. 16F 23-8 Yoido-dong, Youngdungpo-ku, Seoul, Korea Tel: 02-3770-0660 MALAYSIA Yamaha Music Malaysia, Sdn., Bhd. Lot 8, Jalan Perbandaran, 47301 Kelana Jaya, Petaling Jaya, Selangor, Malaysia Tel: 3-78030900 Yamaha Scandinavia AB J. A. Wettergrens Gata 1, Box 30053 S-400 43 Göteborg, Sweden Tel: 031 89 34 00 PHILIPPINES DENMARK Yupangco Music Corporation 339 Gil J. Puyat Avenue, P.O. Box 885 MCPO, Makati, Metro Manila, Philippines Tel: 819-7551 YS Copenhagen Liaison Office Generatorvej 6A DK-2730 Herlev, Denmark Tel: 44 92 49 00 SINGAPORE FINLAND Yamaha Music Asia Pte., Ltd. #03-11 A-Z Building 140 Paya Lebor Road, Singapore 409015 Tel: 747-4374 F-Musiikki Oy Kluuvikatu 6, P.O. Box 260, SF-00101 Helsinki, Finland Tel: 09 618511 TAIWAN NORWAY Yamaha KHS Music Co., Ltd. Norsk filial av Yamaha Scandinavia AB Grini Næringspark 1, N-1345 Østerås, Norway Tel: 67 16 77 70 3F, #6, Sec.2, Nan Jing E. Rd. Taipei. Taiwan 104, R.O.C. Tel: 02-2511-8688 THAILAND ICELAND NOTICE: Service charges incurred due to a lack of knowledge relating to how a function or effect works (when the unit is operating as designed) are not covered by the manufacturer’s warranty, and are therefore the owners responsibility. Please study this manual carefully and consult your dealer before requesting service. ENVIRONMENTAL ISSUES: Yamaha strives to produce products that are both user safe and environmentally friendly. We sincerely believe that our products and the production methods used to produce them, meet these goals. In keeping with both the letter and the spirit of the law, we want you to be aware of the following: Warning: Do not attempt to disassemble. Disposal Notice: Should this product become damaged beyond repair, or for some reason its useful life is considered to be at an end, please observe all local, state, and federal regulations that relate to the disposal of products that contain plastics, etc. If your dealer is unable to assist you, please contact Yamaha directly. NAME PLATE LOCATION: The name plate is located on the red pipe of the product. The model number, serial number, etc., are located on this plate. You should record the model number, serial number, and the date of purchase in the spaces provided below and retain this manual as a permanent record of your purchase. Siam Music Yamaha Co., Ltd. Skifan HF 891/1 Siam Motors Building, 15-16 floor Rama 1 road, Wangmai, Pathumwan Bangkok 10330, Thailand Tel: 02-215-2626 Skeifan 17 P.O. Box 8120 IS-128 Reykjavik, Iceland Tel: 525 5000 OTHER EUROPEAN COUNTRIES OTHER ASIAN COUNTRIES Yamaha Music Central Europe GmbH Siemensstraße 22-34, 25462 Rellingen, Germany Tel: +49-4101-3030 AFRICA Yamaha Corporation, Asia-Pacific Music Marketing Group Nakazawa-cho 10-1, Hamamatsu, Japan 430-8650 Tel: +81-53-460-2317 Yamaha Corporation, Asia-Pacific Music Marketing Group TURKEY/CYPRUS Siemensstraße 22-34, 25462 Rellingen, Germany Tel: 04101-3030 LB21-128 Jebel Ali Freezone P.O.Box 17328, Dubai, U.A.E. Tel: +971-4-881-5868 AUSTRALIA Yamaha Music Australia Pty. Ltd. Music Houses of N.Z. Ltd. 146/148 Captain Springs Road, Te Papapa, Auckland, New Zealand Tel: 9-634-0099 COUNTRIES AND TRUST TERRITORIES IN PACIFIC OCEAN Yamaha Corporation, Asia-Pacific Music Marketing Group Nakazawa-cho 10-1, Hamamatsu, Japan 430-8650 Tel: +81-53-460-2312 Yamaha Music Central Europe GmbH Sp.z. o.o. Oddzial w Polsce ul. 17 Stycznia 56, PL-02-146 Warszawa, Poland Tel: 022-868-07-57 HEAD OFFICE Purchase Date : NEW ZEALAND Yamaha Music Central Europe GmbH Yamaha Music Gulf FZE Serial No. Level 1, 99 Queensbridge Street, Southbank, Victoria 3006, Australia Tel: 3-9693-5111 MIDDLE EAST OTHER COUNTRIES Model : RS40 OCEANIA Nakazawa-cho 10-1, Hamamatsu, Japan 430-8650 Tel: +81-53-460-2312 POLAND SY38 SPECIAL MESSAGE SECTION THE PEOPLE’S REPUBLIC OF CHINA SPAIN/PORTUGAL BRAZIL Å ASIA Yamaha Music Central Europe GmbH, Branch Belgium Yamaha Musique France U.S.A. C THE NETHERLANDS/ BELGIUM/LUXEMBOURG Yamaha Corporation, Pro Audio & Digital Musical Instrument Division Nakazawa-cho 10-1, Hamamatsu, Japan 430-8650 Tel: +81-53-460-2445 PLEASE KEEP THIS MANUAL Assembly Manual / Montageanleitung Manuel d’assemblage / Manual de montaje RS40 English Deutsch Français Español PRECAUTIONS VORSICHTSMASSNAHMEN PRECAUTIONS D’USAGE PRECAUCIONES Before using, please read this assembly manual, and use this product in a safe and proper manner. Particularly in the case of children and young users, parents or an instructor should teach the children the proper manner in which to use the device. Bitte lesen Sie vor Gebrauch diese Montageanleitung, und verwenden Sie das Produkt sicher und auf geeignete Weise. Besonders für Kinder und jüngere Anwender sollten die Eltern oder ein Lehrer den Kindern die richtige Art und Weise zeigen, in der das Produkt angewendet werden sollte. To prevent against accidents and injury Please follow the cautions listed below. Caution (including danger, or warning). This mark indicates cautions to which you should pay close attention. Actions indicated with this icon are prohibited and should not be attempted. WARNING Zur Vorbeugung gegen Unfälle und Verletzungen Befolgen Sie bitte die unten aufgeführten Vorsichtsmaßnahmen. Vorsicht (einschließlich Gefahr, oder Warnung). Dieses Symbol markiert Vorsichtsmaßnahmen, die Sie genau beachten sollten. Veuillez lire ce mode d’emploi en tout premier, afin d’utiliser ce produit de manière correcte et sans danger. Les parents ou les instructeurs sont invités à enseigner aux enfants et aux jeunes utilisateurs la manière correcte d’utiliser cet instrument. AVERTISSEMENT Achten Sie darauf, dass alle Bolzen festgezogen sind. Lose Bolzen können bewirken, dass das Rack oder Teile davon herunterfallen und beschädigt werden sowie Verletzungen verursachen. Wenn Sie Höhe oder Neigungswinkel einstellen, achten Sie darauf, nicht versehentlich die Bolzen zu lösen. Das Pad könnte herunterfallen, das Rack oder Rohre könnten abrutschen und Hände oder Finger einklemmen. When adjusting the height or angle, do not suddenly loosen the bolts. The pad may drop, the rack or pipes may slip, pinching or causing injury to hands or fingers. Setzen Sie sich nicht auf das Rack und steigen Sie nicht darauf. Das Rack kann umkippen oder beschädigt werden und dabei Verletzungen verursachen. Do not sit or step on the rack. The rack may overturn or be damaged, resulting in injury. Bitte seien Sie vorsichtig, wenn Kinder in der Nähe sind oder das Produkt berühren. Da das Produkt viele Rohre und Ausleger besitzt, können achtlose Bewegungen in Nähe des Produkts Verletzungen verursachen. Please be careful when children are close to or touching the product. Since the product has many pipes and arms, careless movement around the product may result in injury. Achten Sie beim Einstellen der Pads und Module bitte sorgfältig auf die Handhabung der Kabel und die Kabelführung. Achtlos platzierte Kabel können dazu führen, dass der Anwender oder Andere stolpern und hinfallen. When setting the pads and modules, please pay close attention in regards to the handling and setting of cables. Carelessly placed cables may cause the user and others to trip and fall. Modifizieren Sie das Produkt nicht. Dadurch können Verletzungen auftreten oder das Produkt beschädigt oder beinträchtigt werden. Do not alter the product. Doing so may result in injury or damage/deterioration to the product. Wenn dieses Symbol ignoriert und das Produkt falsch angewendet wird, besteht Verletzungsgefahr für Personen, die mit dem Produkt umgehen, oder es können Sachschäden entstehen. VORSICHT If this symbol is ignored and the equipment is used improperly, there is a danger or injury to persons handling the equipment, and material damage could occur. When cleaning the product, do not use benzine, thinner or alcohol as it may result in discoloration or deformation. Please wipe with a soft cloth or a damp cloth that has been wrung out thoroughly. If the product is soiled or sticky, use a neutral detergent on a cloth then wipe with a damp cloth that has been wrung out thoroughly to remove any remaining detergent. Also pay close attention so as not to let the water and detergent come into contact with the cushions used in the product; doing so may result in deterioration. * Specifications are subject to change without notice. Asegúrese de que los tornillos están firmemente apretados. Si los tornillos están flojos, el bastidor puede darse la vuelta o se pueden caer componentes, y dar lugar a lesiones. Lorsque vous réglez la hauteur ou l’angle, ne desserrez pas brusquement les boulons. Le pad risque de tomber, le rack ou les tuyaux glisser, causant des pincements aux doigts ou des blessures aux mains. Para ajustar la altura o la inclinación, no afloje los tornillos de repente. El disco se podría caer, el bastidor o los tubos podrían deslizarse y pellizcarle o lesionarle los dedos o las manos. Ne vous asseyez pas sur le rack et ne marchez pas dessus. Le rack risque de se renverser ou de s’endommager, en provoquant des blessures. No se siente en el bastidor ni lo pise porque se podrían dar la vuelta o dañarse, dando lugar a lesiones. Soyez très vigilant avec les enfants lorsqu’ils s’approchent du produit ou cherchent à le toucher. Etant donné que le produit dispose d’un grand nombre de tuyaux et de bras, tout mouvement inconsidéré autour de son emplacement peut provoquer des blessures. Tenga especial cuidado cuando los niños estén cerca del instrumento o tocándolo. Puesto que el producto tiene muchos tubos y brazos, si no se tiene cuidado cuando se esté cerca de él se podrían producir lesiones. Lors du réglage des pads et des modules, soyez attentif à la manipulation et à la configuration des câbles. Des câbles disposés n’importe comment peuvent provoquer le trébuchement et la chute de l’utilisateur ainsi que d’autres personnes. Para ajustar los discos y los módulos, preste especial atención al manejo y ajuste de los cables. Unos cables mal colocados pueden ser causa de tropiezos y caídas. Ne modifiez pas le produit. Cela pourrait l'endommager, le détériorer ou provoquer des blessures. No modifique el producto. Si lo hace, podría dañarse o deteriorarse el producto. Si ce symbole est ignoré et l’équipement utilisé de manière incorrecte, cela pourra exposer les personnes manipulant l’équipement à des blessures ou entraîner des dommages matériels. ATENCIÓN No ponga las manos ni los pies debajo del pedal ni del interruptor del pedal. Podría pellizcarse y lesionarse. Tenga cuidado con las manos cuando ajuste las abrazaderas. Podría pellizcarse y lesionarse. Tenga cuidado con los extremos de los tubos, dentro de ellos y con los tornillos. Las virutas metálicas, etc. podrían causarle lesiones en los dedos. No acople baterías acústicas en el bastidor de la batería electrónica. Las abrazaderas se podrían dañar y la batería caerse y producir lesiones. No pise el producto ni ponga objetos pesados encima ya que se podría dañar. No utilice ni guarde el producto en sitios con temperaturas muy elevadas (bajo la luz solar directa, cerca de un radiador, en un coche cerrado, etc.) o con mucha humedad (cuarto de baño, en el exterior en días lluviosos, etc.). Si se hiciera, el resultado podría ser su deformación, pérdida de color, pegajosidad, daños o deterioro. Cuando limpie el producto, no utilice bencina, disolventes ni alcohol, porque podría ocasionar pérdida de color o deformación. Limpie con un paño suave o húmedo que se haya escurrido bien Si el producto está sucio o pegajoso, utilice un detergente neutro y después retire con un paño húmedo bien escurrido los restos del detergente. Asimismo, preste mucha atención para que ni el agua ni el detergente entren en contacto con los discos del producto, porque se podrían deteriorar. N’utilisez pas et ne conservez pas le produit dans des lieux à température très élevée (à la lumière directe du soleil, à proximité d’un radiateur ou dans une voiture fermée à clé, etc.) ou à forte humidité (salle de bain, à l’extérieur par une journée pluvieuse, etc.). Cela pourrait entraîner sa déformation et sa décoloration, le rendre poisseux, l’endommager ou le détériorer. Pour nettoyer le produit, n'utilisez pas de benzène, de diluant ou d'alcool au risque de provoquer sa décoloration ou sa déformation. Essuyez-le avec un chiffon sec et doux ou un tissus humide ayant été très bien essoré. Si le produit est sale ou collant, nettoyez-le avec un tissus imbibé de détergent neutre puis essuyez-le avec un chiffon humide ayant été préalablement bien essoré afin d'en retirer toute trace de détergent. Veillez à ne pas laisser l'eau ou le détergent entrer en contact avec les coussins utilisés dans le produit, car cela pourrait le détériorer. * Especificaciones sujetas a cambio sin previo aviso. Set up example Package Contents w q q RS40 overall assembly X 1 (when the box is opened), w module stand fastening screw X 2, e cable band X 10, r Assembly Manual (this sheet) X 1 Lieferumfang Si se ignora este símbolo y se utiliza el equipo indebidamente, existiría el riesgo de lesiones para los usuarios del equipo o de daños en los materiales. * Ces spécifications peuvent faire l’objet de modifications sans préavis. * Die technischen Daten können ohne vorherige Ankündigung geändert werden. * Before setup, please make sure that you have all of the items listed below. If anything is missing, please contact the dealer from whom you purchased the unit. Si se ignora este símbolo y se utiliza el equipo indebidamente, podrían producirse lesiones personales o daños graves. Assurez-vous que tous les boulons sont fermement resserrés. Des boulons desserrés peuvent provoquer le renversement du rack ou la chute des pièces, causant des blessures. Ne marchez pas sur le produit et ne placez pas dessus des objets lourds, au risque de provoquer des dommages. Lagern oder verwenden Sie das Produkt nicht an Orten mit extrem hoher Temperatur (in direktem Sonnenlicht, in Nähe einer Heizung, in einem geschlossenen Fahrzeug usw.) oder hoher Luftfeuchtigkeit (Badezimmer, draußen im Regen usw.). Dadurch könnte das Produkt verformt, verfärbt, verklebt, beschädigt oder sonstwie beeinträchtigt werden. Verwenden Sie kein Benzin, Lösemittel oder Alkohol, um das Produkt zu reinigen, da dies zu Verfärbung oder Verformung führen kann. Bitte wischen Sie das Produkt mit einem weichen oder leicht angefeuchtetem und gut ausgewrungenem Tuch sauber. Wenn das Produkt stark verschmutzt ist, verwenden Sie ein Tuch mit einem neutralen Reinigungsmittel, und wischen Sie das Produkt mit einem leicht angefeuchtetem und gut ausgewrungenem Tuch sauber, so dass kein Reinigungsmittel auf dem Produkt verbleibt. Achten Sie auch besonders darauf, dass kein Wasser und Reinigungsmittel in Kontakt mit den Kissen des Produkts gerät; dadurch wird das Produkt beeinträchtigt. Do not use or keep the product in places with extremely high temperature (places in direct sunlight, close to a heater, in a closed car, etc.) or high humidity (bathroom, outside on a rainy day, etc.). Doing so may result in deformation, discoloration, stickiness, damage or deterioration. Atención (incluido peligro o advertencia). Con esta marca se indican aquellos aspectos a los que se debe prestar especial atención. Coloque siempre el producto en una superficie llana y firme. Si lo coloca en una superficie pendiente o instable o en peldaños, el producto podría estar instable y darse la vuelta. Ne fixez pas de batterie acoustique au rack de batterie électronique. Les pinces risquent de s’endommager et les batteries chuter à terre, provoquant des blessures. Treten Sie nicht auf das Produkt und stellen Sie keine schweren Gegenstände darauf ab. Dadurch kann es zu Beschädigungen kommen. Do not step on or place heavy objects on the product. Doing so may result in damage. ADVERTENCIA Faites attention en manipulant les tuyaux notamment leurs extrémités ainsi que les bouts des vis et boulons. Les copeaux notamment métalliques peuvent vous blesser les doigts. Montieren Sie keine akustischen Trommeln an dem E-Schlagzeug-Rack. Die Klemmen könnten beschädigt werden und Tromeln könnten herunterfallen und Verletzungen verursachen. Do not attach acoustic drums to the electronic drum rack. Clamps may be damaged and drums may drop, causing injury. Si ce symbole est ignoré et l’équipement utilisé de manière incorrecte, cela pourra exposer les personnes à des blessures mortelles ou entraîner de graves dommages. Faites attention à vos doigts lorsque vous réglez les pinces. Vous risquez de vous les faire pincer ou de vous blesser. Seien Sie vorsichtig mit Rohrenden, mit den Rohrinnenwänden und Schraubenspitzen. An den metallenen Graten usw. könnten Sie sich die Finger verletzen. Be careful around pipe ends, inside the pipe and screw ends. Metal shavings, etc. may injure your fingers. Siga las notas de atención indicadas a continuación. Las acciones indicadas con este icono están prohibidas y no se debería intentar llevarlas a cabo. Ne placez pas vos mains ou vos pieds sous la pédale ou le sélecteur au pied. Vous risquez de vous faire pincer les doigts ou de vous blesser. Achten Sie auf Ihre Finger, wenn Sie die Klemmen einstellen. Sie könnten sich einklemmen und Verletzungen erleiden. Watch your fingers when adjusting clamps. They may become pinched, resulting in injury. Attention (y compris danger ou avertissement). Ce symbole indique les précautions à prendre sérieusement en considération. Para evitar accidentes y lesiones Posez toujours le produit sur une surface plate et ferme. Si vous le disposez sur une surface inclinée ou instable ou sur des marches, cela pourra le déstabiliser et provoquer sa chute à terre. ATTENTION Geraten Sie nicht mit der Hand oder den Füßen unter das Pedal oder den Fußschalter. Sie könnten sich einklemmen und Verletzungen erleiden. Do not put your hands or feet under the foot pedal or foot switch. They may be pinched, resulting in injury. Veuillez respecter les précautions listées ci-dessous. Les actions signalées par cette icône sont interdites et ne devraient être à aucun moment envisagées. Stellen Sie das Produkt immer auf einer ebenen und stabilen Oberfläche auf. Die Platzierung auf einer schiefen, instabilen Oberfläche oder auf Stufen kann zur Folge haben, dass das Produkt instabil ist und leichter umfallen kann. Make sure all bolts are tightened firmly. Loose bolts may result in the rack overturning or in parts dropping, causing injury. Antes de utilizar el instrumento, lea el manual de instrucciones y utilícelo de forma segura y correcta. Especialmente en el caso de niños y jóvenes, los padres o un instructor deberían enseñarles a utilizarlo correctamente. Pour prévenir les accidents et les blessures Aktionen, die mit diesem Symbol versehen sind, sind unzulässig und sollten nicht ausgeführt werden. Wenn dieses Symbol ignoriert und das Produkt falsch angewendet wird, können schwere Personenschäden oder Sachschäden eintreten. WARNUNG If this symbol is ignored and the equipment is used improperly, fatal injury to persons or serious damage could occur. Always set the product on a flat and solid surface. Placement on a sloping, unstable surface or on steps may result in the product being unstable and subject to overturning. CAUTION U.R.G., Pro Audio & Digital Musical Instrument Division, Yamaha Corporation © 2006 Yamaha Corporation WJ28960 607PO***.*-01A0 Printed in Indonesia A1 EN DE FR ES e c z DTX Series: Drum Trigger Module x Foot Pedal: FP6110 etc. c Satellite Speaker v Sub Woofer Amp unit c z Aufbaubeispiel z DTX-Serie: Drum-Trigger-Modul x Pedal: FP6110 usw. c Satellitenlautsprecher v Subwoofer-/Verstärker-Einheit * Vergewissern Sie sich vor dem Aufbau, dass alle unten aufgelisteten Teile vorhanden sind. Bei fehlenden Teilen wenden Sie sich bitte an den Händler, bei dem Sie das Produkt erworben haben. q RS40-Gesamtbaugruppe X 1 (sobald der Karton geöffnet ist), w Befestigungsschrauben für Modulständer X 2, e Kabel-Clip X 10, r Montageanleitung (dieses Blatt) X 1 Exemple de configuration Contenu de l’emballage z Série DTX : Drum Trigger Module x Pédale : FP6110 etc. c Haut-parleur satellite v Unité d’ampli de caisson de basses * Avant de procéder à l’installation, vérifiez que vous disposez de tous les éléments contenus dans la liste ci-dessous. Si vous constatez l’absence d’un élément donné, contactez le revendeur auprès duquel vous avez acheté l’unité. q assemblage général RS40 X 1 (lorsque l’emballage est ouvert), w vis de fixation du support du module X 2, e bande pour câble X 10, r manuel d’assemblage (ce document) X 1 Ejemplo de instalación z Serie DTX: Módulo de activación de batería x Pedal: FP6110 etc. c Altavoz satélite v Unidad amplificadora de subwoofer Contenido del paquete * Antes del montaje, asegúrese de que dispone de todos los artículos mencionados a continuación. Si faltara alguno, póngase en contacto con el punto de venta. q unidad completa RS40 X 1 (cuando la caja está abierta), w tornillo para sujetar el soporte del módulo X 2, e banda para cables X 10, r manual de montaje (esta hoja) X 1 v x RS40 Assembly Montage RS40 Assemblage du RS40 Unidad RS40 * Parts for the RS40’s main structure have already been assembled before packing. After removing the unit from the box, follow the instructions described below to complete the assembly. A Phillips (+) screwdriver is required when attaching the Drum Trigger Module. Please prepare one before starting assembly. * Die Grundeinheit des RS40 wurde vor dem Versand bereits vorbereitend zusammengebaut. Folgen Sie nach dem Auspacken den untenstehenden Anweisungen, um den Zusammenbau zu vervollständigen. Zu Befestigung des Drum-Trigger-Moduls benötigen Sie einen Kreuzschlitzschraubendreher (+). Legen Sie einen solchen Schraubenzieher bereit, bevor Sie den Zusammenbau in Angriff nehmen. * Les éléments de la structure principale du RS40 ont déjà été montés avant emballage. Après avoir sorti l’unité de sa boîte, suivez les instructions ci-après pour terminer le montage. Un tournevis cruciforme (+) est requis pour fixer le module de batterie électronique Drum Trigger à la structure. Munissez-vous d’un tel tournevis avant de commencer le montage. * Algunas partes de la estructura principal del RS40 ya se han montado antes de su embalaje. Tras extraer la unidad de la caja, siga las instrucciones descritas a continuación para finalizar el montaje. Es necesario un destornillador de estrella o Phillips (+) para montar el módulo de activación de la batería. Tenga uno a su disposición antes de empezar el montaje. 1. After removing the unit from the box, remove all cushion material. 1. Entfernen Sie nach dem Herausnehmen der Einheit aus der Verpackung sämtliches Polstermaterial. 1. Une fois que vous enlevé l’unité de son emballage, retirez tous les matériaux de protection. 1. Después de sacar la unidad de la caja, retire todo el material de protección. 2. Loosen the bolts marked with 2. Lösen Sie vor dem Aufbau die Bolzen, die mit 2. Desserrez les vis signalées par le symbole graphique 2. Antes de empezar, afloje los tornillos con la marca 3. Loosen the bolts on the movable arms and legs, as shown in the diagrams below, then secure the bolts firmly once setting is complete. Follow the setup order q–!3 in the diagrams shown below. 3. Lösen Sie die Bolzen an den beweglichen Armen und Beinen, wie in den folgenden Abbildungen gezeigt, und schrauben Sie die Bolzen dann gut fest, sobald der Aufbau abgeschlossen ist. Befolgen Sie die Montagereihenfolge q–!3 in den folgenden Abbildungen. 3. Desserrez les boulons situés sur les pieds et les bras amovibles, tel qu’indiqué dans les schémas ci-dessous, puis fixez-les fermement une fois que l’installation est terminée. Respectez la séquence d’installation q–!3 telle qu’indiquée dans les diagrammes ci-dessous. 3. Afloje los tornillos de los brazos y las patas móviles, tal como se muestra en los esquemas siguientes, y después fije bien los tornillos una vez que la instalación esté completa. Siga el orden de instalación q–!3 de los esquemas siguientes. before setting up. Seien Sie an den Rohrenden bitte vorsichtig. Die Schnittkanten der Rohrenden sind scharf und Sie könnten sich an den Fingern verletzen. Be careful around the pipe edges. The cut pipe ends are sharp and can injure your fingers. 4. markiert sind. 4. Attaching the Drum Trigger Module Remove the module stand (A) from the holder clamp (B), and use the supplied screws (D) to attach the Drum Trigger Module (C). Reattach the module stand (A) to the holder clamp (B). * Make sure only the supplied screws are used. Using any other screws may result in the unit falling off the module stand or damage to the unit. 5. Attach the cymbal pad (E) to the cymbal holder (F) and adjust its position, then secure it in place. (Please refer to the Owner’s Manual that came with the cymbal pads on attaching the cymbal pads.) 6. Attach the drum pad (G) to the hexagonal rod cylinder (H) and adjust its position, then secure it in place. Befestigen des Drum-Trigger-Moduls Entfernen Sie den Modulständer (A) von der Halteklemme (B), und verwenden Sie die beiliegenden Schrauben (D) zur Befestigung des Drum-Trigger-Moduls (C). Befestigen Sie den Modulständer (A) wieder an der Halteklemme (B). Soyez vigilant en maniant les extrémités des tuyaux. Ils sont en effet tranchants et peuvent vous blesser les doigts. 4. * Achten Sie darauf, nur die beiliegenden Schrauben zu verwenden. Die Verwendung anderer Schrauben kann Schäden am Gerät verursachen oder dazu führen, dass das Gerät vom Modulständer fällt. 5. 6. * Make sure all bolts on clamps, pads, etc., are firmly tightened. Loose or over-tightened bolts may result in the part falling off and/or damage. Please use caution. After assembly is complete, setup the kick pad, hi-hat control pedal, etc., and connect the cables. (Please refer to the Owner’s Manual that came with the drum trigger module for information on connecting the pads to the module.) Use the supplied cable bands to secure the cables to the frame pipes to keep cables out of the way during performance. If the rack is moved even after setup is complete, make sure the bolts are loosened before moving the rack. Befestigen Sie das Becken-Pad (E) an dem Beckenhalter (F) und stellen Sie die gewünschte Position ein, und ziehen Sie die Schrauben fest. (Bitte lesen Sie zur Montage der Becken-Pads die mit dem jeweiligen Pad gelieferte Anleitung.) Befestigen Sie das Drum-Pad (G) an der Hexagonalstange (H) und stellen Sie die gewünschte Position ein, und ziehen Sie dann die Schrauben fest. Fixation de l’unité Drum Trigger Module Retirez le pied du module (A) de la pince de support (B), puis utilisez les vis fournies (D) pour fixer l’unité Drum Trigger Module (C). Refixez le pied du module (A) à la pince de support (B). 5. 6. Fixez le pad de cymbale (E) au support de cymbale (F) et réglez sa position, puis fixez-le en place. (Pour les détails sur la fixation des pads de cymbale, reportez-vous au mode d’emploi fourni avec les pads de cymbale). . Tenga cuidado con los bordes de los tubos. Estos bordes son afilados y podrían causarle lesiones en los dedos. 4. * Assurez-vous d’utiliser exclusivement les vis fournies. L’utilisation d’autres vis peut entraîner la chute du support du module et endommager l’unité elle-même. Colocación del módulo de activación de la batería Retire el soporte del módulo (A) de la abrazadera de la base (B) y utilice los tornillos que se suministran (D) para acoplar el módulo de activación de la batería (C). Vuelva a acoplar el soporte del módulo (A) a la abrazadera de la base (B). * Asegúrese de que utiliza los tornillos que se suministran. Si se utilizaran otros tornillos se podría caer la unidad del soporte o dañarse. 5. Acople el pad de los platillos (E) a la base (F) y ajuste su posición; después fíjelo en su sitio. (Consulte en el manual de instrucciones que se suministra con los pads de los platillos la información sobre su colocación.) 6. Acople el pad de los platillos (G) al cilindro de varilla hexagonal (H) y ajuste su posición; después fíjelo en su sitio. Fixez le pad de batterie (G) au cylindre de la tige hexagonale (H) et réglez sa position, puis fixez-le en place. * Assurez-vous que les boulons des brides, des pads, etc. sont bien serrés. Des boulons desserrés ou trop serrés pourraient entraîner la chute voire le bris d’une pièce. Faites preuve de prudence. Une fois le montage terminé, installez le pad de grosse caisse, la pédale de charleston, etc. et raccordez les câbles. Pour obtenir des précisions sur le raccordement des pads au module, consultez le Mode d’emploi du module de batterie Drum Trigger. Utilisez les attache-câbles fournis pour fixer les câbles aux tubes de la structure, afin que les câbles ne vous gênent pas pendant votre performance. Si vous devez déplacer le rack après en avoir terminé la configuration, desserrez les boulons avant le déplacement. * Vergewissern Sie sich, dass alle Schrauben von Klammern, Pads usw. fest angezogen sind. Lockere oder zu fest angezogene Schrauben können einen Fall und/oder eine Beschädigung von Teilen zur Folge haben. Seien Sie diesbezüglich bitte vorsichtig. Nach dem Zusammenbau richten Sie das Kick-Pad, Hi-Hat-Control-Pedal usw. ein und stellen die Kabelverbindungen her. (Richten Sie sich beim Anschluss der Pads am Modul nach der mit dem Drum-Trigger-Modul gelieferten Bedienungsanleitung.) Sichern Sie die Kabel mit den mitgelieferten Kabelbindern so an den RackRohren, dass sie beim Spielen nicht stören. Wenn das fertig eingerichtete Rack umgestellt werden soll, lösen Sie die Schrauben, bevor Sie das Rack bewegen. G avant de procéder au montage. For details of products, please contact your nearest Yamaha representative or the authorized distributor listed below. Per ulteriori dettagli sui prodotti, rivolgersi al più vicino rappresentante Yamaha oppure a uno dei distributori autorizzati elencati di seguito. Die Einzelheiten zu Produkten sind bei Ihrer unten aufgeführten Niederlassung und bei Yamaha Vertragshändlern in den jeweiligen Bestimmungsländern erhältlich. Neem voor details over producten alstublieft contact op met uw dichtstbijzijnde Yamaha-vertegenwoordiging of de geautoriseerde distributeur uit het onderstaande overzicht. Pour plus de détails sur les produits, veuillez vous adresser à Yamaha ou au distributeur le plus proche de vous figurant dans la liste suivante. 关于各产品的详细信息,请向就近的YAMAHA 代理商或下列经销商询问。 * Asegúrese de que todos los tornillos de las abrazaderas, pads, etc., están bien sujetos. Unos tornillos flojos o excesivamente apretados pueden hacer que el componente se caiga o se dañe. Tenga precaución. Después de terminar el montaje, instale el bombo, el pedal de control del charles, etc., y conecte los cables. (Consulte el Manual de instrucciones que se suministra con el módulo de activación de la batería para obtener información sobre cómo conectar los pads al módulo.) Utilice las bandas para cables que se suministran para asegurar los cables a los tubos de forma que no molesten durante la interpretación. Si se mueve el bastidor incluso después de terminar la instalación, asegúrese de que se aflojan los tornillos antes de hacerlo. Para detalles sobre productos, contacte su tienda Yamaha más cercana o el distribuidor autorizado que se lista debajo. NORTH AMERICA CANADA E Yamaha Canada Music Ltd. 135 Milner Avenue, Scarborough, Ontario, M1S 3R1, Canada Tel: 416-298-1311 H Yamaha Corporation of America 6600 Orangethorpe Ave., Buena Park, Calif. 90620, U.S.A. Tel: 714-522-9011 CENTRAL & SOUTH AMERICA MEXICO F !3 D y A Viamonte 1145 Piso2-B 1053, Buenos Aires, Argentina Tel: 1-4371-7021 PANAMA AND OTHER LATIN AMERICAN COUNTRIES/ CARIBBEAN COUNTRIES !2 !0 Yamaha Music Latin America, S.A. !1 o i r e Torre Banco General, Piso 7, Urbanización Marbella, Calle 47 y Aquilino de la Guardia, Ciudad de Panamá, Panamá Tel: +507-269-5311 EUROPE THE UNITED KINGDOM Yamaha-Kemble Music (U.K.) Ltd. Sherbourne Drive, Tilbrook, Milton Keynes, MK7 8BL, England Tel: 01908-366700 Switching the position of Pipe Å and Pipe ı can be used to change the height of the hi-hat pad and tom pads. Durch Vertauschen von Rohr Å und Rohr ı kann die Höhe des Hi-Hat-Pads und der Tom-Pads geändert werden. IRELAND Changer la position du tube Å et du tube ı peut permettre de régler la hauteur du pad de charleston et des pads de tom. GERMANY Danfay Ltd. 61D, Sallynoggin Road, Dun Laoghaire, Co. Dublin Tel: 01-2859177 Yamaha Music Central Europe GmbH Siemensstraße 22-34, 25462 Rellingen, Germany Tel: 04101-3030 Se puede cambiar la posición del tubo Å y del tubo ı para regular la altura del pad de charles y los pads de timbal. SWITZERLAND/LIECHTENSTEIN Yamaha Music Central Europe GmbH, Branch Switzerland Seefeldstrasse 94, 8008 Zürich, Switzerland Tel: 01-383 3990 AUSTRIA Yamaha Music Central Europe GmbH, Branch Austria Å ı q w Yamaha Musica Italia S.P.A. Combo Division Viale Italia 88, 20020 Lainate (Milano), Italy Tel: 02-935-771 Schleiergasse 20, A-1100 Wien, Austria Tel: 01-60203900 CZECH REPUBLIC/SLOVAKIA/ HUNGARY/SLOVENIA Yamaha Music Central Europe GmbH, Branch Austria, CEE Department Schleiergasse 20, A-1100 Wien, Austria Tel: 01-602039025 Yamaha Music & Electronics (China) Co.,Ltd. 25/F., United Plaza, 1468 Nanjing Road (West), Jingan, Shanghai, China Tel: 021-6247-2211 HONG KONG Tom Lee Music Co., Ltd. 11/F., Silvercord Tower 1, 30 Canton Road, Tsimshatsui, Kowloon, Hong Kong Tel: 2737-7688 INDONESIA PT. Yamaha Music Indonesia (Distributor) PT. Nusantik Gedung Yamaha Music Center, Jalan Jend. Gatot Subroto Kav. 4, Jakarta 12930, Indonesia Tel: 21-520-2577 KOREA Yamaha Music Korea Ltd. GREECE Philippos Nakas S.A. The Music House Yamaha Music Latin America, S.A. Sucursal de Argentina t ITALY Ctra. de la Coruna km. 17, 200, 28230 Las Rozas (Madrid), Spain Tel: 91-639-8888 ARGENTINA B BP 70-77312 Marne-la-Vallée Cedex 2, France Tel: 01-64-61-4000 Yamaha-Hazen Música, S.A. Rua Joaquim Floriano, 913 - 4' andar, Itaim Bibi, CEP 04534-013 Sao Paulo, SP. BRAZIL Tel: 011-3704-1377 ı FRANCE Calz. Javier Rojo Gómez #1149, Col. Guadalupe del Moral C.P. 09300, México, D.F., México Tel: 55-5804-0600 Yamaha Musical do Brasil Ltda. u Clarissenhof 5-b, 4133 AB Vianen, The Netherlands Tel: 0347-358 040 Yamaha de México S.A. de C.V. 147 Skiathou Street, 112-55 Athens, Greece Tel: 01-228 2160 SWEDEN Tong-Yang Securities Bldg. 16F 23-8 Yoido-dong, Youngdungpo-ku, Seoul, Korea Tel: 02-3770-0660 MALAYSIA Yamaha Music Malaysia, Sdn., Bhd. Lot 8, Jalan Perbandaran, 47301 Kelana Jaya, Petaling Jaya, Selangor, Malaysia Tel: 3-78030900 Yamaha Scandinavia AB J. A. Wettergrens Gata 1, Box 30053 S-400 43 Göteborg, Sweden Tel: 031 89 34 00 PHILIPPINES DENMARK Yupangco Music Corporation 339 Gil J. Puyat Avenue, P.O. Box 885 MCPO, Makati, Metro Manila, Philippines Tel: 819-7551 YS Copenhagen Liaison Office Generatorvej 6A DK-2730 Herlev, Denmark Tel: 44 92 49 00 SINGAPORE FINLAND Yamaha Music Asia Pte., Ltd. #03-11 A-Z Building 140 Paya Lebor Road, Singapore 409015 Tel: 747-4374 F-Musiikki Oy Kluuvikatu 6, P.O. Box 260, SF-00101 Helsinki, Finland Tel: 09 618511 TAIWAN NORWAY Yamaha KHS Music Co., Ltd. Norsk filial av Yamaha Scandinavia AB Grini Næringspark 1, N-1345 Østerås, Norway Tel: 67 16 77 70 3F, #6, Sec.2, Nan Jing E. Rd. Taipei. Taiwan 104, R.O.C. Tel: 02-2511-8688 THAILAND ICELAND NOTICE: Service charges incurred due to a lack of knowledge relating to how a function or effect works (when the unit is operating as designed) are not covered by the manufacturer’s warranty, and are therefore the owners responsibility. Please study this manual carefully and consult your dealer before requesting service. ENVIRONMENTAL ISSUES: Yamaha strives to produce products that are both user safe and environmentally friendly. We sincerely believe that our products and the production methods used to produce them, meet these goals. In keeping with both the letter and the spirit of the law, we want you to be aware of the following: Warning: Do not attempt to disassemble. Disposal Notice: Should this product become damaged beyond repair, or for some reason its useful life is considered to be at an end, please observe all local, state, and federal regulations that relate to the disposal of products that contain plastics, etc. If your dealer is unable to assist you, please contact Yamaha directly. NAME PLATE LOCATION: The name plate is located on the red pipe of the product. The model number, serial number, etc., are located on this plate. You should record the model number, serial number, and the date of purchase in the spaces provided below and retain this manual as a permanent record of your purchase. Siam Music Yamaha Co., Ltd. Skifan HF 891/1 Siam Motors Building, 15-16 floor Rama 1 road, Wangmai, Pathumwan Bangkok 10330, Thailand Tel: 02-215-2626 Skeifan 17 P.O. Box 8120 IS-128 Reykjavik, Iceland Tel: 525 5000 OTHER EUROPEAN COUNTRIES OTHER ASIAN COUNTRIES Yamaha Music Central Europe GmbH Siemensstraße 22-34, 25462 Rellingen, Germany Tel: +49-4101-3030 AFRICA Yamaha Corporation, Asia-Pacific Music Marketing Group Nakazawa-cho 10-1, Hamamatsu, Japan 430-8650 Tel: +81-53-460-2317 Yamaha Corporation, Asia-Pacific Music Marketing Group TURKEY/CYPRUS Siemensstraße 22-34, 25462 Rellingen, Germany Tel: 04101-3030 LB21-128 Jebel Ali Freezone P.O.Box 17328, Dubai, U.A.E. Tel: +971-4-881-5868 AUSTRALIA Yamaha Music Australia Pty. Ltd. Music Houses of N.Z. Ltd. 146/148 Captain Springs Road, Te Papapa, Auckland, New Zealand Tel: 9-634-0099 COUNTRIES AND TRUST TERRITORIES IN PACIFIC OCEAN Yamaha Corporation, Asia-Pacific Music Marketing Group Nakazawa-cho 10-1, Hamamatsu, Japan 430-8650 Tel: +81-53-460-2312 Yamaha Music Central Europe GmbH Sp.z. o.o. Oddzial w Polsce ul. 17 Stycznia 56, PL-02-146 Warszawa, Poland Tel: 022-868-07-57 HEAD OFFICE Purchase Date : NEW ZEALAND Yamaha Music Central Europe GmbH Yamaha Music Gulf FZE Serial No. Level 1, 99 Queensbridge Street, Southbank, Victoria 3006, Australia Tel: 3-9693-5111 MIDDLE EAST OTHER COUNTRIES Model : RS40 OCEANIA Nakazawa-cho 10-1, Hamamatsu, Japan 430-8650 Tel: +81-53-460-2312 POLAND SY38 SPECIAL MESSAGE SECTION THE PEOPLE’S REPUBLIC OF CHINA SPAIN/PORTUGAL BRAZIL Å ASIA Yamaha Music Central Europe GmbH, Branch Belgium Yamaha Musique France U.S.A. C THE NETHERLANDS/ BELGIUM/LUXEMBOURG Yamaha Corporation, Pro Audio & Digital Musical Instrument Division Nakazawa-cho 10-1, Hamamatsu, Japan 430-8650 Tel: +81-53-460-2445 PLEASE KEEP THIS MANUAL Assembly Manual / Montageanleitung Manuel d’assemblage / Manual de montaje RS40 English Deutsch Français Español PRECAUTIONS VORSICHTSMASSNAHMEN PRECAUTIONS D’USAGE PRECAUCIONES Before using, please read this assembly manual, and use this product in a safe and proper manner. Particularly in the case of children and young users, parents or an instructor should teach the children the proper manner in which to use the device. Bitte lesen Sie vor Gebrauch diese Montageanleitung, und verwenden Sie das Produkt sicher und auf geeignete Weise. Besonders für Kinder und jüngere Anwender sollten die Eltern oder ein Lehrer den Kindern die richtige Art und Weise zeigen, in der das Produkt angewendet werden sollte. To prevent against accidents and injury Please follow the cautions listed below. Caution (including danger, or warning). This mark indicates cautions to which you should pay close attention. Actions indicated with this icon are prohibited and should not be attempted. WARNING Zur Vorbeugung gegen Unfälle und Verletzungen Befolgen Sie bitte die unten aufgeführten Vorsichtsmaßnahmen. Vorsicht (einschließlich Gefahr, oder Warnung). Dieses Symbol markiert Vorsichtsmaßnahmen, die Sie genau beachten sollten. Veuillez lire ce mode d’emploi en tout premier, afin d’utiliser ce produit de manière correcte et sans danger. Les parents ou les instructeurs sont invités à enseigner aux enfants et aux jeunes utilisateurs la manière correcte d’utiliser cet instrument. AVERTISSEMENT Achten Sie darauf, dass alle Bolzen festgezogen sind. Lose Bolzen können bewirken, dass das Rack oder Teile davon herunterfallen und beschädigt werden sowie Verletzungen verursachen. Wenn Sie Höhe oder Neigungswinkel einstellen, achten Sie darauf, nicht versehentlich die Bolzen zu lösen. Das Pad könnte herunterfallen, das Rack oder Rohre könnten abrutschen und Hände oder Finger einklemmen. When adjusting the height or angle, do not suddenly loosen the bolts. The pad may drop, the rack or pipes may slip, pinching or causing injury to hands or fingers. Setzen Sie sich nicht auf das Rack und steigen Sie nicht darauf. Das Rack kann umkippen oder beschädigt werden und dabei Verletzungen verursachen. Do not sit or step on the rack. The rack may overturn or be damaged, resulting in injury. Bitte seien Sie vorsichtig, wenn Kinder in der Nähe sind oder das Produkt berühren. Da das Produkt viele Rohre und Ausleger besitzt, können achtlose Bewegungen in Nähe des Produkts Verletzungen verursachen. Please be careful when children are close to or touching the product. Since the product has many pipes and arms, careless movement around the product may result in injury. Achten Sie beim Einstellen der Pads und Module bitte sorgfältig auf die Handhabung der Kabel und die Kabelführung. Achtlos platzierte Kabel können dazu führen, dass der Anwender oder Andere stolpern und hinfallen. When setting the pads and modules, please pay close attention in regards to the handling and setting of cables. Carelessly placed cables may cause the user and others to trip and fall. Modifizieren Sie das Produkt nicht. Dadurch können Verletzungen auftreten oder das Produkt beschädigt oder beinträchtigt werden. Do not alter the product. Doing so may result in injury or damage/deterioration to the product. Wenn dieses Symbol ignoriert und das Produkt falsch angewendet wird, besteht Verletzungsgefahr für Personen, die mit dem Produkt umgehen, oder es können Sachschäden entstehen. VORSICHT If this symbol is ignored and the equipment is used improperly, there is a danger or injury to persons handling the equipment, and material damage could occur. When cleaning the product, do not use benzine, thinner or alcohol as it may result in discoloration or deformation. Please wipe with a soft cloth or a damp cloth that has been wrung out thoroughly. If the product is soiled or sticky, use a neutral detergent on a cloth then wipe with a damp cloth that has been wrung out thoroughly to remove any remaining detergent. Also pay close attention so as not to let the water and detergent come into contact with the cushions used in the product; doing so may result in deterioration. * Specifications are subject to change without notice. Asegúrese de que los tornillos están firmemente apretados. Si los tornillos están flojos, el bastidor puede darse la vuelta o se pueden caer componentes, y dar lugar a lesiones. Lorsque vous réglez la hauteur ou l’angle, ne desserrez pas brusquement les boulons. Le pad risque de tomber, le rack ou les tuyaux glisser, causant des pincements aux doigts ou des blessures aux mains. Para ajustar la altura o la inclinación, no afloje los tornillos de repente. El disco se podría caer, el bastidor o los tubos podrían deslizarse y pellizcarle o lesionarle los dedos o las manos. Ne vous asseyez pas sur le rack et ne marchez pas dessus. Le rack risque de se renverser ou de s’endommager, en provoquant des blessures. No se siente en el bastidor ni lo pise porque se podrían dar la vuelta o dañarse, dando lugar a lesiones. Soyez très vigilant avec les enfants lorsqu’ils s’approchent du produit ou cherchent à le toucher. Etant donné que le produit dispose d’un grand nombre de tuyaux et de bras, tout mouvement inconsidéré autour de son emplacement peut provoquer des blessures. Tenga especial cuidado cuando los niños estén cerca del instrumento o tocándolo. Puesto que el producto tiene muchos tubos y brazos, si no se tiene cuidado cuando se esté cerca de él se podrían producir lesiones. Lors du réglage des pads et des modules, soyez attentif à la manipulation et à la configuration des câbles. Des câbles disposés n’importe comment peuvent provoquer le trébuchement et la chute de l’utilisateur ainsi que d’autres personnes. Para ajustar los discos y los módulos, preste especial atención al manejo y ajuste de los cables. Unos cables mal colocados pueden ser causa de tropiezos y caídas. Ne modifiez pas le produit. Cela pourrait l'endommager, le détériorer ou provoquer des blessures. No modifique el producto. Si lo hace, podría dañarse o deteriorarse el producto. Si ce symbole est ignoré et l’équipement utilisé de manière incorrecte, cela pourra exposer les personnes manipulant l’équipement à des blessures ou entraîner des dommages matériels. ATENCIÓN No ponga las manos ni los pies debajo del pedal ni del interruptor del pedal. Podría pellizcarse y lesionarse. Tenga cuidado con las manos cuando ajuste las abrazaderas. Podría pellizcarse y lesionarse. Tenga cuidado con los extremos de los tubos, dentro de ellos y con los tornillos. Las virutas metálicas, etc. podrían causarle lesiones en los dedos. No acople baterías acústicas en el bastidor de la batería electrónica. Las abrazaderas se podrían dañar y la batería caerse y producir lesiones. No pise el producto ni ponga objetos pesados encima ya que se podría dañar. No utilice ni guarde el producto en sitios con temperaturas muy elevadas (bajo la luz solar directa, cerca de un radiador, en un coche cerrado, etc.) o con mucha humedad (cuarto de baño, en el exterior en días lluviosos, etc.). Si se hiciera, el resultado podría ser su deformación, pérdida de color, pegajosidad, daños o deterioro. Cuando limpie el producto, no utilice bencina, disolventes ni alcohol, porque podría ocasionar pérdida de color o deformación. Limpie con un paño suave o húmedo que se haya escurrido bien Si el producto está sucio o pegajoso, utilice un detergente neutro y después retire con un paño húmedo bien escurrido los restos del detergente. Asimismo, preste mucha atención para que ni el agua ni el detergente entren en contacto con los discos del producto, porque se podrían deteriorar. N’utilisez pas et ne conservez pas le produit dans des lieux à température très élevée (à la lumière directe du soleil, à proximité d’un radiateur ou dans une voiture fermée à clé, etc.) ou à forte humidité (salle de bain, à l’extérieur par une journée pluvieuse, etc.). Cela pourrait entraîner sa déformation et sa décoloration, le rendre poisseux, l’endommager ou le détériorer. Pour nettoyer le produit, n'utilisez pas de benzène, de diluant ou d'alcool au risque de provoquer sa décoloration ou sa déformation. Essuyez-le avec un chiffon sec et doux ou un tissus humide ayant été très bien essoré. Si le produit est sale ou collant, nettoyez-le avec un tissus imbibé de détergent neutre puis essuyez-le avec un chiffon humide ayant été préalablement bien essoré afin d'en retirer toute trace de détergent. Veillez à ne pas laisser l'eau ou le détergent entrer en contact avec les coussins utilisés dans le produit, car cela pourrait le détériorer. * Especificaciones sujetas a cambio sin previo aviso. Set up example Package Contents w q q RS40 overall assembly X 1 (when the box is opened), w module stand fastening screw X 2, e cable band X 10, r Assembly Manual (this sheet) X 1 Lieferumfang Si se ignora este símbolo y se utiliza el equipo indebidamente, existiría el riesgo de lesiones para los usuarios del equipo o de daños en los materiales. * Ces spécifications peuvent faire l’objet de modifications sans préavis. * Die technischen Daten können ohne vorherige Ankündigung geändert werden. * Before setup, please make sure that you have all of the items listed below. If anything is missing, please contact the dealer from whom you purchased the unit. Si se ignora este símbolo y se utiliza el equipo indebidamente, podrían producirse lesiones personales o daños graves. Assurez-vous que tous les boulons sont fermement resserrés. Des boulons desserrés peuvent provoquer le renversement du rack ou la chute des pièces, causant des blessures. Ne marchez pas sur le produit et ne placez pas dessus des objets lourds, au risque de provoquer des dommages. Lagern oder verwenden Sie das Produkt nicht an Orten mit extrem hoher Temperatur (in direktem Sonnenlicht, in Nähe einer Heizung, in einem geschlossenen Fahrzeug usw.) oder hoher Luftfeuchtigkeit (Badezimmer, draußen im Regen usw.). Dadurch könnte das Produkt verformt, verfärbt, verklebt, beschädigt oder sonstwie beeinträchtigt werden. Verwenden Sie kein Benzin, Lösemittel oder Alkohol, um das Produkt zu reinigen, da dies zu Verfärbung oder Verformung führen kann. Bitte wischen Sie das Produkt mit einem weichen oder leicht angefeuchtetem und gut ausgewrungenem Tuch sauber. Wenn das Produkt stark verschmutzt ist, verwenden Sie ein Tuch mit einem neutralen Reinigungsmittel, und wischen Sie das Produkt mit einem leicht angefeuchtetem und gut ausgewrungenem Tuch sauber, so dass kein Reinigungsmittel auf dem Produkt verbleibt. Achten Sie auch besonders darauf, dass kein Wasser und Reinigungsmittel in Kontakt mit den Kissen des Produkts gerät; dadurch wird das Produkt beeinträchtigt. Do not use or keep the product in places with extremely high temperature (places in direct sunlight, close to a heater, in a closed car, etc.) or high humidity (bathroom, outside on a rainy day, etc.). Doing so may result in deformation, discoloration, stickiness, damage or deterioration. Atención (incluido peligro o advertencia). Con esta marca se indican aquellos aspectos a los que se debe prestar especial atención. Coloque siempre el producto en una superficie llana y firme. Si lo coloca en una superficie pendiente o instable o en peldaños, el producto podría estar instable y darse la vuelta. Ne fixez pas de batterie acoustique au rack de batterie électronique. Les pinces risquent de s’endommager et les batteries chuter à terre, provoquant des blessures. Treten Sie nicht auf das Produkt und stellen Sie keine schweren Gegenstände darauf ab. Dadurch kann es zu Beschädigungen kommen. Do not step on or place heavy objects on the product. Doing so may result in damage. ADVERTENCIA Faites attention en manipulant les tuyaux notamment leurs extrémités ainsi que les bouts des vis et boulons. Les copeaux notamment métalliques peuvent vous blesser les doigts. Montieren Sie keine akustischen Trommeln an dem E-Schlagzeug-Rack. Die Klemmen könnten beschädigt werden und Tromeln könnten herunterfallen und Verletzungen verursachen. Do not attach acoustic drums to the electronic drum rack. Clamps may be damaged and drums may drop, causing injury. Si ce symbole est ignoré et l’équipement utilisé de manière incorrecte, cela pourra exposer les personnes à des blessures mortelles ou entraîner de graves dommages. Faites attention à vos doigts lorsque vous réglez les pinces. Vous risquez de vous les faire pincer ou de vous blesser. Seien Sie vorsichtig mit Rohrenden, mit den Rohrinnenwänden und Schraubenspitzen. An den metallenen Graten usw. könnten Sie sich die Finger verletzen. Be careful around pipe ends, inside the pipe and screw ends. Metal shavings, etc. may injure your fingers. Siga las notas de atención indicadas a continuación. Las acciones indicadas con este icono están prohibidas y no se debería intentar llevarlas a cabo. Ne placez pas vos mains ou vos pieds sous la pédale ou le sélecteur au pied. Vous risquez de vous faire pincer les doigts ou de vous blesser. Achten Sie auf Ihre Finger, wenn Sie die Klemmen einstellen. Sie könnten sich einklemmen und Verletzungen erleiden. Watch your fingers when adjusting clamps. They may become pinched, resulting in injury. Attention (y compris danger ou avertissement). Ce symbole indique les précautions à prendre sérieusement en considération. Para evitar accidentes y lesiones Posez toujours le produit sur une surface plate et ferme. Si vous le disposez sur une surface inclinée ou instable ou sur des marches, cela pourra le déstabiliser et provoquer sa chute à terre. ATTENTION Geraten Sie nicht mit der Hand oder den Füßen unter das Pedal oder den Fußschalter. Sie könnten sich einklemmen und Verletzungen erleiden. Do not put your hands or feet under the foot pedal or foot switch. They may be pinched, resulting in injury. Veuillez respecter les précautions listées ci-dessous. Les actions signalées par cette icône sont interdites et ne devraient être à aucun moment envisagées. Stellen Sie das Produkt immer auf einer ebenen und stabilen Oberfläche auf. Die Platzierung auf einer schiefen, instabilen Oberfläche oder auf Stufen kann zur Folge haben, dass das Produkt instabil ist und leichter umfallen kann. Make sure all bolts are tightened firmly. Loose bolts may result in the rack overturning or in parts dropping, causing injury. Antes de utilizar el instrumento, lea el manual de instrucciones y utilícelo de forma segura y correcta. Especialmente en el caso de niños y jóvenes, los padres o un instructor deberían enseñarles a utilizarlo correctamente. Pour prévenir les accidents et les blessures Aktionen, die mit diesem Symbol versehen sind, sind unzulässig und sollten nicht ausgeführt werden. Wenn dieses Symbol ignoriert und das Produkt falsch angewendet wird, können schwere Personenschäden oder Sachschäden eintreten. WARNUNG If this symbol is ignored and the equipment is used improperly, fatal injury to persons or serious damage could occur. Always set the product on a flat and solid surface. Placement on a sloping, unstable surface or on steps may result in the product being unstable and subject to overturning. CAUTION U.R.G., Pro Audio & Digital Musical Instrument Division, Yamaha Corporation © 2006 Yamaha Corporation WJ28960 607PO***.*-01A0 Printed in Indonesia A1 EN DE FR ES e c z DTX Series: Drum Trigger Module x Foot Pedal: FP6110 etc. c Satellite Speaker v Sub Woofer Amp unit c z Aufbaubeispiel z DTX-Serie: Drum-Trigger-Modul x Pedal: FP6110 usw. c Satellitenlautsprecher v Subwoofer-/Verstärker-Einheit * Vergewissern Sie sich vor dem Aufbau, dass alle unten aufgelisteten Teile vorhanden sind. Bei fehlenden Teilen wenden Sie sich bitte an den Händler, bei dem Sie das Produkt erworben haben. q RS40-Gesamtbaugruppe X 1 (sobald der Karton geöffnet ist), w Befestigungsschrauben für Modulständer X 2, e Kabel-Clip X 10, r Montageanleitung (dieses Blatt) X 1 Exemple de configuration Contenu de l’emballage z Série DTX : Drum Trigger Module x Pédale : FP6110 etc. c Haut-parleur satellite v Unité d’ampli de caisson de basses * Avant de procéder à l’installation, vérifiez que vous disposez de tous les éléments contenus dans la liste ci-dessous. Si vous constatez l’absence d’un élément donné, contactez le revendeur auprès duquel vous avez acheté l’unité. q assemblage général RS40 X 1 (lorsque l’emballage est ouvert), w vis de fixation du support du module X 2, e bande pour câble X 10, r manuel d’assemblage (ce document) X 1 Ejemplo de instalación z Serie DTX: Módulo de activación de batería x Pedal: FP6110 etc. c Altavoz satélite v Unidad amplificadora de subwoofer Contenido del paquete * Antes del montaje, asegúrese de que dispone de todos los artículos mencionados a continuación. Si faltara alguno, póngase en contacto con el punto de venta. q unidad completa RS40 X 1 (cuando la caja está abierta), w tornillo para sujetar el soporte del módulo X 2, e banda para cables X 10, r manual de montaje (esta hoja) X 1 v x RS40 Assembly Montage RS40 Assemblage du RS40 Unidad RS40 * Parts for the RS40’s main structure have already been assembled before packing. After removing the unit from the box, follow the instructions described below to complete the assembly. A Phillips (+) screwdriver is required when attaching the Drum Trigger Module. Please prepare one before starting assembly. * Die Grundeinheit des RS40 wurde vor dem Versand bereits vorbereitend zusammengebaut. Folgen Sie nach dem Auspacken den untenstehenden Anweisungen, um den Zusammenbau zu vervollständigen. Zu Befestigung des Drum-Trigger-Moduls benötigen Sie einen Kreuzschlitzschraubendreher (+). Legen Sie einen solchen Schraubenzieher bereit, bevor Sie den Zusammenbau in Angriff nehmen. * Les éléments de la structure principale du RS40 ont déjà été montés avant emballage. Après avoir sorti l’unité de sa boîte, suivez les instructions ci-après pour terminer le montage. Un tournevis cruciforme (+) est requis pour fixer le module de batterie électronique Drum Trigger à la structure. Munissez-vous d’un tel tournevis avant de commencer le montage. * Algunas partes de la estructura principal del RS40 ya se han montado antes de su embalaje. Tras extraer la unidad de la caja, siga las instrucciones descritas a continuación para finalizar el montaje. Es necesario un destornillador de estrella o Phillips (+) para montar el módulo de activación de la batería. Tenga uno a su disposición antes de empezar el montaje. 1. After removing the unit from the box, remove all cushion material. 1. Entfernen Sie nach dem Herausnehmen der Einheit aus der Verpackung sämtliches Polstermaterial. 1. Une fois que vous enlevé l’unité de son emballage, retirez tous les matériaux de protection. 1. Después de sacar la unidad de la caja, retire todo el material de protección. 2. Loosen the bolts marked with 2. Lösen Sie vor dem Aufbau die Bolzen, die mit 2. Desserrez les vis signalées par le symbole graphique 2. Antes de empezar, afloje los tornillos con la marca 3. Loosen the bolts on the movable arms and legs, as shown in the diagrams below, then secure the bolts firmly once setting is complete. Follow the setup order q–!3 in the diagrams shown below. 3. Lösen Sie die Bolzen an den beweglichen Armen und Beinen, wie in den folgenden Abbildungen gezeigt, und schrauben Sie die Bolzen dann gut fest, sobald der Aufbau abgeschlossen ist. Befolgen Sie die Montagereihenfolge q–!3 in den folgenden Abbildungen. 3. Desserrez les boulons situés sur les pieds et les bras amovibles, tel qu’indiqué dans les schémas ci-dessous, puis fixez-les fermement une fois que l’installation est terminée. Respectez la séquence d’installation q–!3 telle qu’indiquée dans les diagrammes ci-dessous. 3. Afloje los tornillos de los brazos y las patas móviles, tal como se muestra en los esquemas siguientes, y después fije bien los tornillos una vez que la instalación esté completa. Siga el orden de instalación q–!3 de los esquemas siguientes. before setting up. Seien Sie an den Rohrenden bitte vorsichtig. Die Schnittkanten der Rohrenden sind scharf und Sie könnten sich an den Fingern verletzen. Be careful around the pipe edges. The cut pipe ends are sharp and can injure your fingers. 4. markiert sind. 4. Attaching the Drum Trigger Module Remove the module stand (A) from the holder clamp (B), and use the supplied screws (D) to attach the Drum Trigger Module (C). Reattach the module stand (A) to the holder clamp (B). * Make sure only the supplied screws are used. Using any other screws may result in the unit falling off the module stand or damage to the unit. 5. Attach the cymbal pad (E) to the cymbal holder (F) and adjust its position, then secure it in place. (Please refer to the Owner’s Manual that came with the cymbal pads on attaching the cymbal pads.) 6. Attach the drum pad (G) to the hexagonal rod cylinder (H) and adjust its position, then secure it in place. Befestigen des Drum-Trigger-Moduls Entfernen Sie den Modulständer (A) von der Halteklemme (B), und verwenden Sie die beiliegenden Schrauben (D) zur Befestigung des Drum-Trigger-Moduls (C). Befestigen Sie den Modulständer (A) wieder an der Halteklemme (B). Soyez vigilant en maniant les extrémités des tuyaux. Ils sont en effet tranchants et peuvent vous blesser les doigts. 4. * Achten Sie darauf, nur die beiliegenden Schrauben zu verwenden. Die Verwendung anderer Schrauben kann Schäden am Gerät verursachen oder dazu führen, dass das Gerät vom Modulständer fällt. 5. 6. * Make sure all bolts on clamps, pads, etc., are firmly tightened. Loose or over-tightened bolts may result in the part falling off and/or damage. Please use caution. After assembly is complete, setup the kick pad, hi-hat control pedal, etc., and connect the cables. (Please refer to the Owner’s Manual that came with the drum trigger module for information on connecting the pads to the module.) Use the supplied cable bands to secure the cables to the frame pipes to keep cables out of the way during performance. If the rack is moved even after setup is complete, make sure the bolts are loosened before moving the rack. Befestigen Sie das Becken-Pad (E) an dem Beckenhalter (F) und stellen Sie die gewünschte Position ein, und ziehen Sie die Schrauben fest. (Bitte lesen Sie zur Montage der Becken-Pads die mit dem jeweiligen Pad gelieferte Anleitung.) Befestigen Sie das Drum-Pad (G) an der Hexagonalstange (H) und stellen Sie die gewünschte Position ein, und ziehen Sie dann die Schrauben fest. Fixation de l’unité Drum Trigger Module Retirez le pied du module (A) de la pince de support (B), puis utilisez les vis fournies (D) pour fixer l’unité Drum Trigger Module (C). Refixez le pied du module (A) à la pince de support (B). 5. 6. Fixez le pad de cymbale (E) au support de cymbale (F) et réglez sa position, puis fixez-le en place. (Pour les détails sur la fixation des pads de cymbale, reportez-vous au mode d’emploi fourni avec les pads de cymbale). . Tenga cuidado con los bordes de los tubos. Estos bordes son afilados y podrían causarle lesiones en los dedos. 4. * Assurez-vous d’utiliser exclusivement les vis fournies. L’utilisation d’autres vis peut entraîner la chute du support du module et endommager l’unité elle-même. Colocación del módulo de activación de la batería Retire el soporte del módulo (A) de la abrazadera de la base (B) y utilice los tornillos que se suministran (D) para acoplar el módulo de activación de la batería (C). Vuelva a acoplar el soporte del módulo (A) a la abrazadera de la base (B). * Asegúrese de que utiliza los tornillos que se suministran. Si se utilizaran otros tornillos se podría caer la unidad del soporte o dañarse. 5. Acople el pad de los platillos (E) a la base (F) y ajuste su posición; después fíjelo en su sitio. (Consulte en el manual de instrucciones que se suministra con los pads de los platillos la información sobre su colocación.) 6. Acople el pad de los platillos (G) al cilindro de varilla hexagonal (H) y ajuste su posición; después fíjelo en su sitio. Fixez le pad de batterie (G) au cylindre de la tige hexagonale (H) et réglez sa position, puis fixez-le en place. * Assurez-vous que les boulons des brides, des pads, etc. sont bien serrés. Des boulons desserrés ou trop serrés pourraient entraîner la chute voire le bris d’une pièce. Faites preuve de prudence. Une fois le montage terminé, installez le pad de grosse caisse, la pédale de charleston, etc. et raccordez les câbles. Pour obtenir des précisions sur le raccordement des pads au module, consultez le Mode d’emploi du module de batterie Drum Trigger. Utilisez les attache-câbles fournis pour fixer les câbles aux tubes de la structure, afin que les câbles ne vous gênent pas pendant votre performance. Si vous devez déplacer le rack après en avoir terminé la configuration, desserrez les boulons avant le déplacement. * Vergewissern Sie sich, dass alle Schrauben von Klammern, Pads usw. fest angezogen sind. Lockere oder zu fest angezogene Schrauben können einen Fall und/oder eine Beschädigung von Teilen zur Folge haben. Seien Sie diesbezüglich bitte vorsichtig. Nach dem Zusammenbau richten Sie das Kick-Pad, Hi-Hat-Control-Pedal usw. ein und stellen die Kabelverbindungen her. (Richten Sie sich beim Anschluss der Pads am Modul nach der mit dem Drum-Trigger-Modul gelieferten Bedienungsanleitung.) Sichern Sie die Kabel mit den mitgelieferten Kabelbindern so an den RackRohren, dass sie beim Spielen nicht stören. Wenn das fertig eingerichtete Rack umgestellt werden soll, lösen Sie die Schrauben, bevor Sie das Rack bewegen. G avant de procéder au montage. For details of products, please contact your nearest Yamaha representative or the authorized distributor listed below. Per ulteriori dettagli sui prodotti, rivolgersi al più vicino rappresentante Yamaha oppure a uno dei distributori autorizzati elencati di seguito. Die Einzelheiten zu Produkten sind bei Ihrer unten aufgeführten Niederlassung und bei Yamaha Vertragshändlern in den jeweiligen Bestimmungsländern erhältlich. Neem voor details over producten alstublieft contact op met uw dichtstbijzijnde Yamaha-vertegenwoordiging of de geautoriseerde distributeur uit het onderstaande overzicht. Pour plus de détails sur les produits, veuillez vous adresser à Yamaha ou au distributeur le plus proche de vous figurant dans la liste suivante. 关于各产品的详细信息,请向就近的YAMAHA 代理商或下列经销商询问。 * Asegúrese de que todos los tornillos de las abrazaderas, pads, etc., están bien sujetos. Unos tornillos flojos o excesivamente apretados pueden hacer que el componente se caiga o se dañe. Tenga precaución. Después de terminar el montaje, instale el bombo, el pedal de control del charles, etc., y conecte los cables. (Consulte el Manual de instrucciones que se suministra con el módulo de activación de la batería para obtener información sobre cómo conectar los pads al módulo.) Utilice las bandas para cables que se suministran para asegurar los cables a los tubos de forma que no molesten durante la interpretación. Si se mueve el bastidor incluso después de terminar la instalación, asegúrese de que se aflojan los tornillos antes de hacerlo. Para detalles sobre productos, contacte su tienda Yamaha más cercana o el distribuidor autorizado que se lista debajo. NORTH AMERICA CANADA E Yamaha Canada Music Ltd. 135 Milner Avenue, Scarborough, Ontario, M1S 3R1, Canada Tel: 416-298-1311 H Yamaha Corporation of America 6600 Orangethorpe Ave., Buena Park, Calif. 90620, U.S.A. Tel: 714-522-9011 CENTRAL & SOUTH AMERICA MEXICO F !3 D y A Viamonte 1145 Piso2-B 1053, Buenos Aires, Argentina Tel: 1-4371-7021 PANAMA AND OTHER LATIN AMERICAN COUNTRIES/ CARIBBEAN COUNTRIES !2 !0 Yamaha Music Latin America, S.A. !1 o i r e Torre Banco General, Piso 7, Urbanización Marbella, Calle 47 y Aquilino de la Guardia, Ciudad de Panamá, Panamá Tel: +507-269-5311 EUROPE THE UNITED KINGDOM Yamaha-Kemble Music (U.K.) Ltd. Sherbourne Drive, Tilbrook, Milton Keynes, MK7 8BL, England Tel: 01908-366700 Switching the position of Pipe Å and Pipe ı can be used to change the height of the hi-hat pad and tom pads. Durch Vertauschen von Rohr Å und Rohr ı kann die Höhe des Hi-Hat-Pads und der Tom-Pads geändert werden. IRELAND Changer la position du tube Å et du tube ı peut permettre de régler la hauteur du pad de charleston et des pads de tom. GERMANY Danfay Ltd. 61D, Sallynoggin Road, Dun Laoghaire, Co. Dublin Tel: 01-2859177 Yamaha Music Central Europe GmbH Siemensstraße 22-34, 25462 Rellingen, Germany Tel: 04101-3030 Se puede cambiar la posición del tubo Å y del tubo ı para regular la altura del pad de charles y los pads de timbal. SWITZERLAND/LIECHTENSTEIN Yamaha Music Central Europe GmbH, Branch Switzerland Seefeldstrasse 94, 8008 Zürich, Switzerland Tel: 01-383 3990 AUSTRIA Yamaha Music Central Europe GmbH, Branch Austria Å ı q w Yamaha Musica Italia S.P.A. Combo Division Viale Italia 88, 20020 Lainate (Milano), Italy Tel: 02-935-771 Schleiergasse 20, A-1100 Wien, Austria Tel: 01-60203900 CZECH REPUBLIC/SLOVAKIA/ HUNGARY/SLOVENIA Yamaha Music Central Europe GmbH, Branch Austria, CEE Department Schleiergasse 20, A-1100 Wien, Austria Tel: 01-602039025 Yamaha Music & Electronics (China) Co.,Ltd. 25/F., United Plaza, 1468 Nanjing Road (West), Jingan, Shanghai, China Tel: 021-6247-2211 HONG KONG Tom Lee Music Co., Ltd. 11/F., Silvercord Tower 1, 30 Canton Road, Tsimshatsui, Kowloon, Hong Kong Tel: 2737-7688 INDONESIA PT. Yamaha Music Indonesia (Distributor) PT. Nusantik Gedung Yamaha Music Center, Jalan Jend. Gatot Subroto Kav. 4, Jakarta 12930, Indonesia Tel: 21-520-2577 KOREA Yamaha Music Korea Ltd. GREECE Philippos Nakas S.A. The Music House Yamaha Music Latin America, S.A. Sucursal de Argentina t ITALY Ctra. de la Coruna km. 17, 200, 28230 Las Rozas (Madrid), Spain Tel: 91-639-8888 ARGENTINA B BP 70-77312 Marne-la-Vallée Cedex 2, France Tel: 01-64-61-4000 Yamaha-Hazen Música, S.A. Rua Joaquim Floriano, 913 - 4' andar, Itaim Bibi, CEP 04534-013 Sao Paulo, SP. BRAZIL Tel: 011-3704-1377 ı FRANCE Calz. Javier Rojo Gómez #1149, Col. Guadalupe del Moral C.P. 09300, México, D.F., México Tel: 55-5804-0600 Yamaha Musical do Brasil Ltda. u Clarissenhof 5-b, 4133 AB Vianen, The Netherlands Tel: 0347-358 040 Yamaha de México S.A. de C.V. 147 Skiathou Street, 112-55 Athens, Greece Tel: 01-228 2160 SWEDEN Tong-Yang Securities Bldg. 16F 23-8 Yoido-dong, Youngdungpo-ku, Seoul, Korea Tel: 02-3770-0660 MALAYSIA Yamaha Music Malaysia, Sdn., Bhd. Lot 8, Jalan Perbandaran, 47301 Kelana Jaya, Petaling Jaya, Selangor, Malaysia Tel: 3-78030900 Yamaha Scandinavia AB J. A. Wettergrens Gata 1, Box 30053 S-400 43 Göteborg, Sweden Tel: 031 89 34 00 PHILIPPINES DENMARK Yupangco Music Corporation 339 Gil J. Puyat Avenue, P.O. Box 885 MCPO, Makati, Metro Manila, Philippines Tel: 819-7551 YS Copenhagen Liaison Office Generatorvej 6A DK-2730 Herlev, Denmark Tel: 44 92 49 00 SINGAPORE FINLAND Yamaha Music Asia Pte., Ltd. #03-11 A-Z Building 140 Paya Lebor Road, Singapore 409015 Tel: 747-4374 F-Musiikki Oy Kluuvikatu 6, P.O. Box 260, SF-00101 Helsinki, Finland Tel: 09 618511 TAIWAN NORWAY Yamaha KHS Music Co., Ltd. Norsk filial av Yamaha Scandinavia AB Grini Næringspark 1, N-1345 Østerås, Norway Tel: 67 16 77 70 3F, #6, Sec.2, Nan Jing E. Rd. Taipei. Taiwan 104, R.O.C. Tel: 02-2511-8688 THAILAND ICELAND NOTICE: Service charges incurred due to a lack of knowledge relating to how a function or effect works (when the unit is operating as designed) are not covered by the manufacturer’s warranty, and are therefore the owners responsibility. Please study this manual carefully and consult your dealer before requesting service. ENVIRONMENTAL ISSUES: Yamaha strives to produce products that are both user safe and environmentally friendly. We sincerely believe that our products and the production methods used to produce them, meet these goals. In keeping with both the letter and the spirit of the law, we want you to be aware of the following: Warning: Do not attempt to disassemble. Disposal Notice: Should this product become damaged beyond repair, or for some reason its useful life is considered to be at an end, please observe all local, state, and federal regulations that relate to the disposal of products that contain plastics, etc. If your dealer is unable to assist you, please contact Yamaha directly. NAME PLATE LOCATION: The name plate is located on the red pipe of the product. The model number, serial number, etc., are located on this plate. You should record the model number, serial number, and the date of purchase in the spaces provided below and retain this manual as a permanent record of your purchase. Siam Music Yamaha Co., Ltd. Skifan HF 891/1 Siam Motors Building, 15-16 floor Rama 1 road, Wangmai, Pathumwan Bangkok 10330, Thailand Tel: 02-215-2626 Skeifan 17 P.O. Box 8120 IS-128 Reykjavik, Iceland Tel: 525 5000 OTHER EUROPEAN COUNTRIES OTHER ASIAN COUNTRIES Yamaha Music Central Europe GmbH Siemensstraße 22-34, 25462 Rellingen, Germany Tel: +49-4101-3030 AFRICA Yamaha Corporation, Asia-Pacific Music Marketing Group Nakazawa-cho 10-1, Hamamatsu, Japan 430-8650 Tel: +81-53-460-2317 Yamaha Corporation, Asia-Pacific Music Marketing Group TURKEY/CYPRUS Siemensstraße 22-34, 25462 Rellingen, Germany Tel: 04101-3030 LB21-128 Jebel Ali Freezone P.O.Box 17328, Dubai, U.A.E. Tel: +971-4-881-5868 AUSTRALIA Yamaha Music Australia Pty. Ltd. Music Houses of N.Z. Ltd. 146/148 Captain Springs Road, Te Papapa, Auckland, New Zealand Tel: 9-634-0099 COUNTRIES AND TRUST TERRITORIES IN PACIFIC OCEAN Yamaha Corporation, Asia-Pacific Music Marketing Group Nakazawa-cho 10-1, Hamamatsu, Japan 430-8650 Tel: +81-53-460-2312 Yamaha Music Central Europe GmbH Sp.z. o.o. Oddzial w Polsce ul. 17 Stycznia 56, PL-02-146 Warszawa, Poland Tel: 022-868-07-57 HEAD OFFICE Purchase Date : NEW ZEALAND Yamaha Music Central Europe GmbH Yamaha Music Gulf FZE Serial No. Level 1, 99 Queensbridge Street, Southbank, Victoria 3006, Australia Tel: 3-9693-5111 MIDDLE EAST OTHER COUNTRIES Model : RS40 OCEANIA Nakazawa-cho 10-1, Hamamatsu, Japan 430-8650 Tel: +81-53-460-2312 POLAND SY38 SPECIAL MESSAGE SECTION THE PEOPLE’S REPUBLIC OF CHINA SPAIN/PORTUGAL BRAZIL Å ASIA Yamaha Music Central Europe GmbH, Branch Belgium Yamaha Musique France U.S.A. C THE NETHERLANDS/ BELGIUM/LUXEMBOURG Yamaha Corporation, Pro Audio & Digital Musical Instrument Division Nakazawa-cho 10-1, Hamamatsu, Japan 430-8650 Tel: +81-53-460-2445 PLEASE KEEP THIS MANUAL Assembly Manual / Montageanleitung Manuel d’assemblage / Manual de montaje RS40 English Deutsch Français Español PRECAUTIONS VORSICHTSMASSNAHMEN PRECAUTIONS D’USAGE PRECAUCIONES Before using, please read this assembly manual, and use this product in a safe and proper manner. Particularly in the case of children and young users, parents or an instructor should teach the children the proper manner in which to use the device. Bitte lesen Sie vor Gebrauch diese Montageanleitung, und verwenden Sie das Produkt sicher und auf geeignete Weise. Besonders für Kinder und jüngere Anwender sollten die Eltern oder ein Lehrer den Kindern die richtige Art und Weise zeigen, in der das Produkt angewendet werden sollte. To prevent against accidents and injury Please follow the cautions listed below. Caution (including danger, or warning). This mark indicates cautions to which you should pay close attention. Actions indicated with this icon are prohibited and should not be attempted. WARNING Zur Vorbeugung gegen Unfälle und Verletzungen Befolgen Sie bitte die unten aufgeführten Vorsichtsmaßnahmen. Vorsicht (einschließlich Gefahr, oder Warnung). Dieses Symbol markiert Vorsichtsmaßnahmen, die Sie genau beachten sollten. Veuillez lire ce mode d’emploi en tout premier, afin d’utiliser ce produit de manière correcte et sans danger. Les parents ou les instructeurs sont invités à enseigner aux enfants et aux jeunes utilisateurs la manière correcte d’utiliser cet instrument. AVERTISSEMENT Achten Sie darauf, dass alle Bolzen festgezogen sind. Lose Bolzen können bewirken, dass das Rack oder Teile davon herunterfallen und beschädigt werden sowie Verletzungen verursachen. Wenn Sie Höhe oder Neigungswinkel einstellen, achten Sie darauf, nicht versehentlich die Bolzen zu lösen. Das Pad könnte herunterfallen, das Rack oder Rohre könnten abrutschen und Hände oder Finger einklemmen. When adjusting the height or angle, do not suddenly loosen the bolts. The pad may drop, the rack or pipes may slip, pinching or causing injury to hands or fingers. Setzen Sie sich nicht auf das Rack und steigen Sie nicht darauf. Das Rack kann umkippen oder beschädigt werden und dabei Verletzungen verursachen. Do not sit or step on the rack. The rack may overturn or be damaged, resulting in injury. Bitte seien Sie vorsichtig, wenn Kinder in der Nähe sind oder das Produkt berühren. Da das Produkt viele Rohre und Ausleger besitzt, können achtlose Bewegungen in Nähe des Produkts Verletzungen verursachen. Please be careful when children are close to or touching the product. Since the product has many pipes and arms, careless movement around the product may result in injury. Achten Sie beim Einstellen der Pads und Module bitte sorgfältig auf die Handhabung der Kabel und die Kabelführung. Achtlos platzierte Kabel können dazu führen, dass der Anwender oder Andere stolpern und hinfallen. When setting the pads and modules, please pay close attention in regards to the handling and setting of cables. Carelessly placed cables may cause the user and others to trip and fall. Modifizieren Sie das Produkt nicht. Dadurch können Verletzungen auftreten oder das Produkt beschädigt oder beinträchtigt werden. Do not alter the product. Doing so may result in injury or damage/deterioration to the product. Wenn dieses Symbol ignoriert und das Produkt falsch angewendet wird, besteht Verletzungsgefahr für Personen, die mit dem Produkt umgehen, oder es können Sachschäden entstehen. VORSICHT If this symbol is ignored and the equipment is used improperly, there is a danger or injury to persons handling the equipment, and material damage could occur. When cleaning the product, do not use benzine, thinner or alcohol as it may result in discoloration or deformation. Please wipe with a soft cloth or a damp cloth that has been wrung out thoroughly. If the product is soiled or sticky, use a neutral detergent on a cloth then wipe with a damp cloth that has been wrung out thoroughly to remove any remaining detergent. Also pay close attention so as not to let the water and detergent come into contact with the cushions used in the product; doing so may result in deterioration. * Specifications are subject to change without notice. Asegúrese de que los tornillos están firmemente apretados. Si los tornillos están flojos, el bastidor puede darse la vuelta o se pueden caer componentes, y dar lugar a lesiones. Lorsque vous réglez la hauteur ou l’angle, ne desserrez pas brusquement les boulons. Le pad risque de tomber, le rack ou les tuyaux glisser, causant des pincements aux doigts ou des blessures aux mains. Para ajustar la altura o la inclinación, no afloje los tornillos de repente. El disco se podría caer, el bastidor o los tubos podrían deslizarse y pellizcarle o lesionarle los dedos o las manos. Ne vous asseyez pas sur le rack et ne marchez pas dessus. Le rack risque de se renverser ou de s’endommager, en provoquant des blessures. No se siente en el bastidor ni lo pise porque se podrían dar la vuelta o dañarse, dando lugar a lesiones. Soyez très vigilant avec les enfants lorsqu’ils s’approchent du produit ou cherchent à le toucher. Etant donné que le produit dispose d’un grand nombre de tuyaux et de bras, tout mouvement inconsidéré autour de son emplacement peut provoquer des blessures. Tenga especial cuidado cuando los niños estén cerca del instrumento o tocándolo. Puesto que el producto tiene muchos tubos y brazos, si no se tiene cuidado cuando se esté cerca de él se podrían producir lesiones. Lors du réglage des pads et des modules, soyez attentif à la manipulation et à la configuration des câbles. Des câbles disposés n’importe comment peuvent provoquer le trébuchement et la chute de l’utilisateur ainsi que d’autres personnes. Para ajustar los discos y los módulos, preste especial atención al manejo y ajuste de los cables. Unos cables mal colocados pueden ser causa de tropiezos y caídas. Ne modifiez pas le produit. Cela pourrait l'endommager, le détériorer ou provoquer des blessures. No modifique el producto. Si lo hace, podría dañarse o deteriorarse el producto. Si ce symbole est ignoré et l’équipement utilisé de manière incorrecte, cela pourra exposer les personnes manipulant l’équipement à des blessures ou entraîner des dommages matériels. ATENCIÓN No ponga las manos ni los pies debajo del pedal ni del interruptor del pedal. Podría pellizcarse y lesionarse. Tenga cuidado con las manos cuando ajuste las abrazaderas. Podría pellizcarse y lesionarse. Tenga cuidado con los extremos de los tubos, dentro de ellos y con los tornillos. Las virutas metálicas, etc. podrían causarle lesiones en los dedos. No acople baterías acústicas en el bastidor de la batería electrónica. Las abrazaderas se podrían dañar y la batería caerse y producir lesiones. No pise el producto ni ponga objetos pesados encima ya que se podría dañar. No utilice ni guarde el producto en sitios con temperaturas muy elevadas (bajo la luz solar directa, cerca de un radiador, en un coche cerrado, etc.) o con mucha humedad (cuarto de baño, en el exterior en días lluviosos, etc.). Si se hiciera, el resultado podría ser su deformación, pérdida de color, pegajosidad, daños o deterioro. Cuando limpie el producto, no utilice bencina, disolventes ni alcohol, porque podría ocasionar pérdida de color o deformación. Limpie con un paño suave o húmedo que se haya escurrido bien Si el producto está sucio o pegajoso, utilice un detergente neutro y después retire con un paño húmedo bien escurrido los restos del detergente. Asimismo, preste mucha atención para que ni el agua ni el detergente entren en contacto con los discos del producto, porque se podrían deteriorar. N’utilisez pas et ne conservez pas le produit dans des lieux à température très élevée (à la lumière directe du soleil, à proximité d’un radiateur ou dans une voiture fermée à clé, etc.) ou à forte humidité (salle de bain, à l’extérieur par une journée pluvieuse, etc.). Cela pourrait entraîner sa déformation et sa décoloration, le rendre poisseux, l’endommager ou le détériorer. Pour nettoyer le produit, n'utilisez pas de benzène, de diluant ou d'alcool au risque de provoquer sa décoloration ou sa déformation. Essuyez-le avec un chiffon sec et doux ou un tissus humide ayant été très bien essoré. Si le produit est sale ou collant, nettoyez-le avec un tissus imbibé de détergent neutre puis essuyez-le avec un chiffon humide ayant été préalablement bien essoré afin d'en retirer toute trace de détergent. Veillez à ne pas laisser l'eau ou le détergent entrer en contact avec les coussins utilisés dans le produit, car cela pourrait le détériorer. * Especificaciones sujetas a cambio sin previo aviso. Set up example Package Contents w q q RS40 overall assembly X 1 (when the box is opened), w module stand fastening screw X 2, e cable band X 10, r Assembly Manual (this sheet) X 1 Lieferumfang Si se ignora este símbolo y se utiliza el equipo indebidamente, existiría el riesgo de lesiones para los usuarios del equipo o de daños en los materiales. * Ces spécifications peuvent faire l’objet de modifications sans préavis. * Die technischen Daten können ohne vorherige Ankündigung geändert werden. * Before setup, please make sure that you have all of the items listed below. If anything is missing, please contact the dealer from whom you purchased the unit. Si se ignora este símbolo y se utiliza el equipo indebidamente, podrían producirse lesiones personales o daños graves. Assurez-vous que tous les boulons sont fermement resserrés. Des boulons desserrés peuvent provoquer le renversement du rack ou la chute des pièces, causant des blessures. Ne marchez pas sur le produit et ne placez pas dessus des objets lourds, au risque de provoquer des dommages. Lagern oder verwenden Sie das Produkt nicht an Orten mit extrem hoher Temperatur (in direktem Sonnenlicht, in Nähe einer Heizung, in einem geschlossenen Fahrzeug usw.) oder hoher Luftfeuchtigkeit (Badezimmer, draußen im Regen usw.). Dadurch könnte das Produkt verformt, verfärbt, verklebt, beschädigt oder sonstwie beeinträchtigt werden. Verwenden Sie kein Benzin, Lösemittel oder Alkohol, um das Produkt zu reinigen, da dies zu Verfärbung oder Verformung führen kann. Bitte wischen Sie das Produkt mit einem weichen oder leicht angefeuchtetem und gut ausgewrungenem Tuch sauber. Wenn das Produkt stark verschmutzt ist, verwenden Sie ein Tuch mit einem neutralen Reinigungsmittel, und wischen Sie das Produkt mit einem leicht angefeuchtetem und gut ausgewrungenem Tuch sauber, so dass kein Reinigungsmittel auf dem Produkt verbleibt. Achten Sie auch besonders darauf, dass kein Wasser und Reinigungsmittel in Kontakt mit den Kissen des Produkts gerät; dadurch wird das Produkt beeinträchtigt. Do not use or keep the product in places with extremely high temperature (places in direct sunlight, close to a heater, in a closed car, etc.) or high humidity (bathroom, outside on a rainy day, etc.). Doing so may result in deformation, discoloration, stickiness, damage or deterioration. Atención (incluido peligro o advertencia). Con esta marca se indican aquellos aspectos a los que se debe prestar especial atención. Coloque siempre el producto en una superficie llana y firme. Si lo coloca en una superficie pendiente o instable o en peldaños, el producto podría estar instable y darse la vuelta. Ne fixez pas de batterie acoustique au rack de batterie électronique. Les pinces risquent de s’endommager et les batteries chuter à terre, provoquant des blessures. Treten Sie nicht auf das Produkt und stellen Sie keine schweren Gegenstände darauf ab. Dadurch kann es zu Beschädigungen kommen. Do not step on or place heavy objects on the product. Doing so may result in damage. ADVERTENCIA Faites attention en manipulant les tuyaux notamment leurs extrémités ainsi que les bouts des vis et boulons. Les copeaux notamment métalliques peuvent vous blesser les doigts. Montieren Sie keine akustischen Trommeln an dem E-Schlagzeug-Rack. Die Klemmen könnten beschädigt werden und Tromeln könnten herunterfallen und Verletzungen verursachen. Do not attach acoustic drums to the electronic drum rack. Clamps may be damaged and drums may drop, causing injury. Si ce symbole est ignoré et l’équipement utilisé de manière incorrecte, cela pourra exposer les personnes à des blessures mortelles ou entraîner de graves dommages. Faites attention à vos doigts lorsque vous réglez les pinces. Vous risquez de vous les faire pincer ou de vous blesser. Seien Sie vorsichtig mit Rohrenden, mit den Rohrinnenwänden und Schraubenspitzen. An den metallenen Graten usw. könnten Sie sich die Finger verletzen. Be careful around pipe ends, inside the pipe and screw ends. Metal shavings, etc. may injure your fingers. Siga las notas de atención indicadas a continuación. Las acciones indicadas con este icono están prohibidas y no se debería intentar llevarlas a cabo. Ne placez pas vos mains ou vos pieds sous la pédale ou le sélecteur au pied. Vous risquez de vous faire pincer les doigts ou de vous blesser. Achten Sie auf Ihre Finger, wenn Sie die Klemmen einstellen. Sie könnten sich einklemmen und Verletzungen erleiden. Watch your fingers when adjusting clamps. They may become pinched, resulting in injury. Attention (y compris danger ou avertissement). Ce symbole indique les précautions à prendre sérieusement en considération. Para evitar accidentes y lesiones Posez toujours le produit sur une surface plate et ferme. Si vous le disposez sur une surface inclinée ou instable ou sur des marches, cela pourra le déstabiliser et provoquer sa chute à terre. ATTENTION Geraten Sie nicht mit der Hand oder den Füßen unter das Pedal oder den Fußschalter. Sie könnten sich einklemmen und Verletzungen erleiden. Do not put your hands or feet under the foot pedal or foot switch. They may be pinched, resulting in injury. Veuillez respecter les précautions listées ci-dessous. Les actions signalées par cette icône sont interdites et ne devraient être à aucun moment envisagées. Stellen Sie das Produkt immer auf einer ebenen und stabilen Oberfläche auf. Die Platzierung auf einer schiefen, instabilen Oberfläche oder auf Stufen kann zur Folge haben, dass das Produkt instabil ist und leichter umfallen kann. Make sure all bolts are tightened firmly. Loose bolts may result in the rack overturning or in parts dropping, causing injury. Antes de utilizar el instrumento, lea el manual de instrucciones y utilícelo de forma segura y correcta. Especialmente en el caso de niños y jóvenes, los padres o un instructor deberían enseñarles a utilizarlo correctamente. Pour prévenir les accidents et les blessures Aktionen, die mit diesem Symbol versehen sind, sind unzulässig und sollten nicht ausgeführt werden. Wenn dieses Symbol ignoriert und das Produkt falsch angewendet wird, können schwere Personenschäden oder Sachschäden eintreten. WARNUNG If this symbol is ignored and the equipment is used improperly, fatal injury to persons or serious damage could occur. Always set the product on a flat and solid surface. Placement on a sloping, unstable surface or on steps may result in the product being unstable and subject to overturning. CAUTION U.R.G., Pro Audio & Digital Musical Instrument Division, Yamaha Corporation © 2006 Yamaha Corporation WJ28960 607PO***.*-01A0 Printed in Indonesia A1 EN DE FR ES e c z DTX Series: Drum Trigger Module x Foot Pedal: FP6110 etc. c Satellite Speaker v Sub Woofer Amp unit c z Aufbaubeispiel z DTX-Serie: Drum-Trigger-Modul x Pedal: FP6110 usw. c Satellitenlautsprecher v Subwoofer-/Verstärker-Einheit * Vergewissern Sie sich vor dem Aufbau, dass alle unten aufgelisteten Teile vorhanden sind. Bei fehlenden Teilen wenden Sie sich bitte an den Händler, bei dem Sie das Produkt erworben haben. q RS40-Gesamtbaugruppe X 1 (sobald der Karton geöffnet ist), w Befestigungsschrauben für Modulständer X 2, e Kabel-Clip X 10, r Montageanleitung (dieses Blatt) X 1 Exemple de configuration Contenu de l’emballage z Série DTX : Drum Trigger Module x Pédale : FP6110 etc. c Haut-parleur satellite v Unité d’ampli de caisson de basses * Avant de procéder à l’installation, vérifiez que vous disposez de tous les éléments contenus dans la liste ci-dessous. Si vous constatez l’absence d’un élément donné, contactez le revendeur auprès duquel vous avez acheté l’unité. q assemblage général RS40 X 1 (lorsque l’emballage est ouvert), w vis de fixation du support du module X 2, e bande pour câble X 10, r manuel d’assemblage (ce document) X 1 Ejemplo de instalación z Serie DTX: Módulo de activación de batería x Pedal: FP6110 etc. c Altavoz satélite v Unidad amplificadora de subwoofer Contenido del paquete * Antes del montaje, asegúrese de que dispone de todos los artículos mencionados a continuación. Si faltara alguno, póngase en contacto con el punto de venta. q unidad completa RS40 X 1 (cuando la caja está abierta), w tornillo para sujetar el soporte del módulo X 2, e banda para cables X 10, r manual de montaje (esta hoja) X 1 v x RS40 Assembly Montage RS40 Assemblage du RS40 Unidad RS40 * Parts for the RS40’s main structure have already been assembled before packing. After removing the unit from the box, follow the instructions described below to complete the assembly. A Phillips (+) screwdriver is required when attaching the Drum Trigger Module. Please prepare one before starting assembly. * Die Grundeinheit des RS40 wurde vor dem Versand bereits vorbereitend zusammengebaut. Folgen Sie nach dem Auspacken den untenstehenden Anweisungen, um den Zusammenbau zu vervollständigen. Zu Befestigung des Drum-Trigger-Moduls benötigen Sie einen Kreuzschlitzschraubendreher (+). Legen Sie einen solchen Schraubenzieher bereit, bevor Sie den Zusammenbau in Angriff nehmen. * Les éléments de la structure principale du RS40 ont déjà été montés avant emballage. Après avoir sorti l’unité de sa boîte, suivez les instructions ci-après pour terminer le montage. Un tournevis cruciforme (+) est requis pour fixer le module de batterie électronique Drum Trigger à la structure. Munissez-vous d’un tel tournevis avant de commencer le montage. * Algunas partes de la estructura principal del RS40 ya se han montado antes de su embalaje. Tras extraer la unidad de la caja, siga las instrucciones descritas a continuación para finalizar el montaje. Es necesario un destornillador de estrella o Phillips (+) para montar el módulo de activación de la batería. Tenga uno a su disposición antes de empezar el montaje. 1. After removing the unit from the box, remove all cushion material. 1. Entfernen Sie nach dem Herausnehmen der Einheit aus der Verpackung sämtliches Polstermaterial. 1. Une fois que vous enlevé l’unité de son emballage, retirez tous les matériaux de protection. 1. Después de sacar la unidad de la caja, retire todo el material de protección. 2. Loosen the bolts marked with 2. Lösen Sie vor dem Aufbau die Bolzen, die mit 2. Desserrez les vis signalées par le symbole graphique 2. Antes de empezar, afloje los tornillos con la marca 3. Loosen the bolts on the movable arms and legs, as shown in the diagrams below, then secure the bolts firmly once setting is complete. Follow the setup order q–!3 in the diagrams shown below. 3. Lösen Sie die Bolzen an den beweglichen Armen und Beinen, wie in den folgenden Abbildungen gezeigt, und schrauben Sie die Bolzen dann gut fest, sobald der Aufbau abgeschlossen ist. Befolgen Sie die Montagereihenfolge q–!3 in den folgenden Abbildungen. 3. Desserrez les boulons situés sur les pieds et les bras amovibles, tel qu’indiqué dans les schémas ci-dessous, puis fixez-les fermement une fois que l’installation est terminée. Respectez la séquence d’installation q–!3 telle qu’indiquée dans les diagrammes ci-dessous. 3. Afloje los tornillos de los brazos y las patas móviles, tal como se muestra en los esquemas siguientes, y después fije bien los tornillos una vez que la instalación esté completa. Siga el orden de instalación q–!3 de los esquemas siguientes. before setting up. Seien Sie an den Rohrenden bitte vorsichtig. Die Schnittkanten der Rohrenden sind scharf und Sie könnten sich an den Fingern verletzen. Be careful around the pipe edges. The cut pipe ends are sharp and can injure your fingers. 4. markiert sind. 4. Attaching the Drum Trigger Module Remove the module stand (A) from the holder clamp (B), and use the supplied screws (D) to attach the Drum Trigger Module (C). Reattach the module stand (A) to the holder clamp (B). * Make sure only the supplied screws are used. Using any other screws may result in the unit falling off the module stand or damage to the unit. 5. Attach the cymbal pad (E) to the cymbal holder (F) and adjust its position, then secure it in place. (Please refer to the Owner’s Manual that came with the cymbal pads on attaching the cymbal pads.) 6. Attach the drum pad (G) to the hexagonal rod cylinder (H) and adjust its position, then secure it in place. Befestigen des Drum-Trigger-Moduls Entfernen Sie den Modulständer (A) von der Halteklemme (B), und verwenden Sie die beiliegenden Schrauben (D) zur Befestigung des Drum-Trigger-Moduls (C). Befestigen Sie den Modulständer (A) wieder an der Halteklemme (B). Soyez vigilant en maniant les extrémités des tuyaux. Ils sont en effet tranchants et peuvent vous blesser les doigts. 4. * Achten Sie darauf, nur die beiliegenden Schrauben zu verwenden. Die Verwendung anderer Schrauben kann Schäden am Gerät verursachen oder dazu führen, dass das Gerät vom Modulständer fällt. 5. 6. * Make sure all bolts on clamps, pads, etc., are firmly tightened. Loose or over-tightened bolts may result in the part falling off and/or damage. Please use caution. After assembly is complete, setup the kick pad, hi-hat control pedal, etc., and connect the cables. (Please refer to the Owner’s Manual that came with the drum trigger module for information on connecting the pads to the module.) Use the supplied cable bands to secure the cables to the frame pipes to keep cables out of the way during performance. If the rack is moved even after setup is complete, make sure the bolts are loosened before moving the rack. Befestigen Sie das Becken-Pad (E) an dem Beckenhalter (F) und stellen Sie die gewünschte Position ein, und ziehen Sie die Schrauben fest. (Bitte lesen Sie zur Montage der Becken-Pads die mit dem jeweiligen Pad gelieferte Anleitung.) Befestigen Sie das Drum-Pad (G) an der Hexagonalstange (H) und stellen Sie die gewünschte Position ein, und ziehen Sie dann die Schrauben fest. Fixation de l’unité Drum Trigger Module Retirez le pied du module (A) de la pince de support (B), puis utilisez les vis fournies (D) pour fixer l’unité Drum Trigger Module (C). Refixez le pied du module (A) à la pince de support (B). 5. 6. Fixez le pad de cymbale (E) au support de cymbale (F) et réglez sa position, puis fixez-le en place. (Pour les détails sur la fixation des pads de cymbale, reportez-vous au mode d’emploi fourni avec les pads de cymbale). . Tenga cuidado con los bordes de los tubos. Estos bordes son afilados y podrían causarle lesiones en los dedos. 4. * Assurez-vous d’utiliser exclusivement les vis fournies. L’utilisation d’autres vis peut entraîner la chute du support du module et endommager l’unité elle-même. Colocación del módulo de activación de la batería Retire el soporte del módulo (A) de la abrazadera de la base (B) y utilice los tornillos que se suministran (D) para acoplar el módulo de activación de la batería (C). Vuelva a acoplar el soporte del módulo (A) a la abrazadera de la base (B). * Asegúrese de que utiliza los tornillos que se suministran. Si se utilizaran otros tornillos se podría caer la unidad del soporte o dañarse. 5. Acople el pad de los platillos (E) a la base (F) y ajuste su posición; después fíjelo en su sitio. (Consulte en el manual de instrucciones que se suministra con los pads de los platillos la información sobre su colocación.) 6. Acople el pad de los platillos (G) al cilindro de varilla hexagonal (H) y ajuste su posición; después fíjelo en su sitio. Fixez le pad de batterie (G) au cylindre de la tige hexagonale (H) et réglez sa position, puis fixez-le en place. * Assurez-vous que les boulons des brides, des pads, etc. sont bien serrés. Des boulons desserrés ou trop serrés pourraient entraîner la chute voire le bris d’une pièce. Faites preuve de prudence. Une fois le montage terminé, installez le pad de grosse caisse, la pédale de charleston, etc. et raccordez les câbles. Pour obtenir des précisions sur le raccordement des pads au module, consultez le Mode d’emploi du module de batterie Drum Trigger. Utilisez les attache-câbles fournis pour fixer les câbles aux tubes de la structure, afin que les câbles ne vous gênent pas pendant votre performance. Si vous devez déplacer le rack après en avoir terminé la configuration, desserrez les boulons avant le déplacement. * Vergewissern Sie sich, dass alle Schrauben von Klammern, Pads usw. fest angezogen sind. Lockere oder zu fest angezogene Schrauben können einen Fall und/oder eine Beschädigung von Teilen zur Folge haben. Seien Sie diesbezüglich bitte vorsichtig. Nach dem Zusammenbau richten Sie das Kick-Pad, Hi-Hat-Control-Pedal usw. ein und stellen die Kabelverbindungen her. (Richten Sie sich beim Anschluss der Pads am Modul nach der mit dem Drum-Trigger-Modul gelieferten Bedienungsanleitung.) Sichern Sie die Kabel mit den mitgelieferten Kabelbindern so an den RackRohren, dass sie beim Spielen nicht stören. Wenn das fertig eingerichtete Rack umgestellt werden soll, lösen Sie die Schrauben, bevor Sie das Rack bewegen. G avant de procéder au montage. For details of products, please contact your nearest Yamaha representative or the authorized distributor listed below. Per ulteriori dettagli sui prodotti, rivolgersi al più vicino rappresentante Yamaha oppure a uno dei distributori autorizzati elencati di seguito. Die Einzelheiten zu Produkten sind bei Ihrer unten aufgeführten Niederlassung und bei Yamaha Vertragshändlern in den jeweiligen Bestimmungsländern erhältlich. Neem voor details over producten alstublieft contact op met uw dichtstbijzijnde Yamaha-vertegenwoordiging of de geautoriseerde distributeur uit het onderstaande overzicht. Pour plus de détails sur les produits, veuillez vous adresser à Yamaha ou au distributeur le plus proche de vous figurant dans la liste suivante. 关于各产品的详细信息,请向就近的YAMAHA 代理商或下列经销商询问。 * Asegúrese de que todos los tornillos de las abrazaderas, pads, etc., están bien sujetos. Unos tornillos flojos o excesivamente apretados pueden hacer que el componente se caiga o se dañe. Tenga precaución. Después de terminar el montaje, instale el bombo, el pedal de control del charles, etc., y conecte los cables. (Consulte el Manual de instrucciones que se suministra con el módulo de activación de la batería para obtener información sobre cómo conectar los pads al módulo.) Utilice las bandas para cables que se suministran para asegurar los cables a los tubos de forma que no molesten durante la interpretación. Si se mueve el bastidor incluso después de terminar la instalación, asegúrese de que se aflojan los tornillos antes de hacerlo. Para detalles sobre productos, contacte su tienda Yamaha más cercana o el distribuidor autorizado que se lista debajo. NORTH AMERICA CANADA E Yamaha Canada Music Ltd. 135 Milner Avenue, Scarborough, Ontario, M1S 3R1, Canada Tel: 416-298-1311 H Yamaha Corporation of America 6600 Orangethorpe Ave., Buena Park, Calif. 90620, U.S.A. Tel: 714-522-9011 CENTRAL & SOUTH AMERICA MEXICO F !3 D y A Viamonte 1145 Piso2-B 1053, Buenos Aires, Argentina Tel: 1-4371-7021 PANAMA AND OTHER LATIN AMERICAN COUNTRIES/ CARIBBEAN COUNTRIES !2 !0 Yamaha Music Latin America, S.A. !1 o i r e Torre Banco General, Piso 7, Urbanización Marbella, Calle 47 y Aquilino de la Guardia, Ciudad de Panamá, Panamá Tel: +507-269-5311 EUROPE THE UNITED KINGDOM Yamaha-Kemble Music (U.K.) Ltd. Sherbourne Drive, Tilbrook, Milton Keynes, MK7 8BL, England Tel: 01908-366700 Switching the position of Pipe Å and Pipe ı can be used to change the height of the hi-hat pad and tom pads. Durch Vertauschen von Rohr Å und Rohr ı kann die Höhe des Hi-Hat-Pads und der Tom-Pads geändert werden. IRELAND Changer la position du tube Å et du tube ı peut permettre de régler la hauteur du pad de charleston et des pads de tom. GERMANY Danfay Ltd. 61D, Sallynoggin Road, Dun Laoghaire, Co. Dublin Tel: 01-2859177 Yamaha Music Central Europe GmbH Siemensstraße 22-34, 25462 Rellingen, Germany Tel: 04101-3030 Se puede cambiar la posición del tubo Å y del tubo ı para regular la altura del pad de charles y los pads de timbal. SWITZERLAND/LIECHTENSTEIN Yamaha Music Central Europe GmbH, Branch Switzerland Seefeldstrasse 94, 8008 Zürich, Switzerland Tel: 01-383 3990 AUSTRIA Yamaha Music Central Europe GmbH, Branch Austria Å ı q w Yamaha Musica Italia S.P.A. Combo Division Viale Italia 88, 20020 Lainate (Milano), Italy Tel: 02-935-771 Schleiergasse 20, A-1100 Wien, Austria Tel: 01-60203900 CZECH REPUBLIC/SLOVAKIA/ HUNGARY/SLOVENIA Yamaha Music Central Europe GmbH, Branch Austria, CEE Department Schleiergasse 20, A-1100 Wien, Austria Tel: 01-602039025 Yamaha Music & Electronics (China) Co.,Ltd. 25/F., United Plaza, 1468 Nanjing Road (West), Jingan, Shanghai, China Tel: 021-6247-2211 HONG KONG Tom Lee Music Co., Ltd. 11/F., Silvercord Tower 1, 30 Canton Road, Tsimshatsui, Kowloon, Hong Kong Tel: 2737-7688 INDONESIA PT. Yamaha Music Indonesia (Distributor) PT. Nusantik Gedung Yamaha Music Center, Jalan Jend. Gatot Subroto Kav. 4, Jakarta 12930, Indonesia Tel: 21-520-2577 KOREA Yamaha Music Korea Ltd. GREECE Philippos Nakas S.A. The Music House Yamaha Music Latin America, S.A. Sucursal de Argentina t ITALY Ctra. de la Coruna km. 17, 200, 28230 Las Rozas (Madrid), Spain Tel: 91-639-8888 ARGENTINA B BP 70-77312 Marne-la-Vallée Cedex 2, France Tel: 01-64-61-4000 Yamaha-Hazen Música, S.A. Rua Joaquim Floriano, 913 - 4' andar, Itaim Bibi, CEP 04534-013 Sao Paulo, SP. BRAZIL Tel: 011-3704-1377 ı FRANCE Calz. Javier Rojo Gómez #1149, Col. Guadalupe del Moral C.P. 09300, México, D.F., México Tel: 55-5804-0600 Yamaha Musical do Brasil Ltda. u Clarissenhof 5-b, 4133 AB Vianen, The Netherlands Tel: 0347-358 040 Yamaha de México S.A. de C.V. 147 Skiathou Street, 112-55 Athens, Greece Tel: 01-228 2160 SWEDEN Tong-Yang Securities Bldg. 16F 23-8 Yoido-dong, Youngdungpo-ku, Seoul, Korea Tel: 02-3770-0660 MALAYSIA Yamaha Music Malaysia, Sdn., Bhd. Lot 8, Jalan Perbandaran, 47301 Kelana Jaya, Petaling Jaya, Selangor, Malaysia Tel: 3-78030900 Yamaha Scandinavia AB J. A. Wettergrens Gata 1, Box 30053 S-400 43 Göteborg, Sweden Tel: 031 89 34 00 PHILIPPINES DENMARK Yupangco Music Corporation 339 Gil J. Puyat Avenue, P.O. Box 885 MCPO, Makati, Metro Manila, Philippines Tel: 819-7551 YS Copenhagen Liaison Office Generatorvej 6A DK-2730 Herlev, Denmark Tel: 44 92 49 00 SINGAPORE FINLAND Yamaha Music Asia Pte., Ltd. #03-11 A-Z Building 140 Paya Lebor Road, Singapore 409015 Tel: 747-4374 F-Musiikki Oy Kluuvikatu 6, P.O. Box 260, SF-00101 Helsinki, Finland Tel: 09 618511 TAIWAN NORWAY Yamaha KHS Music Co., Ltd. Norsk filial av Yamaha Scandinavia AB Grini Næringspark 1, N-1345 Østerås, Norway Tel: 67 16 77 70 3F, #6, Sec.2, Nan Jing E. Rd. Taipei. Taiwan 104, R.O.C. Tel: 02-2511-8688 THAILAND ICELAND NOTICE: Service charges incurred due to a lack of knowledge relating to how a function or effect works (when the unit is operating as designed) are not covered by the manufacturer’s warranty, and are therefore the owners responsibility. Please study this manual carefully and consult your dealer before requesting service. ENVIRONMENTAL ISSUES: Yamaha strives to produce products that are both user safe and environmentally friendly. We sincerely believe that our products and the production methods used to produce them, meet these goals. In keeping with both the letter and the spirit of the law, we want you to be aware of the following: Warning: Do not attempt to disassemble. Disposal Notice: Should this product become damaged beyond repair, or for some reason its useful life is considered to be at an end, please observe all local, state, and federal regulations that relate to the disposal of products that contain plastics, etc. If your dealer is unable to assist you, please contact Yamaha directly. NAME PLATE LOCATION: The name plate is located on the red pipe of the product. The model number, serial number, etc., are located on this plate. You should record the model number, serial number, and the date of purchase in the spaces provided below and retain this manual as a permanent record of your purchase. Siam Music Yamaha Co., Ltd. Skifan HF 891/1 Siam Motors Building, 15-16 floor Rama 1 road, Wangmai, Pathumwan Bangkok 10330, Thailand Tel: 02-215-2626 Skeifan 17 P.O. Box 8120 IS-128 Reykjavik, Iceland Tel: 525 5000 OTHER EUROPEAN COUNTRIES OTHER ASIAN COUNTRIES Yamaha Music Central Europe GmbH Siemensstraße 22-34, 25462 Rellingen, Germany Tel: +49-4101-3030 AFRICA Yamaha Corporation, Asia-Pacific Music Marketing Group Nakazawa-cho 10-1, Hamamatsu, Japan 430-8650 Tel: +81-53-460-2317 Yamaha Corporation, Asia-Pacific Music Marketing Group TURKEY/CYPRUS Siemensstraße 22-34, 25462 Rellingen, Germany Tel: 04101-3030 LB21-128 Jebel Ali Freezone P.O.Box 17328, Dubai, U.A.E. Tel: +971-4-881-5868 AUSTRALIA Yamaha Music Australia Pty. Ltd. Music Houses of N.Z. Ltd. 146/148 Captain Springs Road, Te Papapa, Auckland, New Zealand Tel: 9-634-0099 COUNTRIES AND TRUST TERRITORIES IN PACIFIC OCEAN Yamaha Corporation, Asia-Pacific Music Marketing Group Nakazawa-cho 10-1, Hamamatsu, Japan 430-8650 Tel: +81-53-460-2312 Yamaha Music Central Europe GmbH Sp.z. o.o. Oddzial w Polsce ul. 17 Stycznia 56, PL-02-146 Warszawa, Poland Tel: 022-868-07-57 HEAD OFFICE Purchase Date : NEW ZEALAND Yamaha Music Central Europe GmbH Yamaha Music Gulf FZE Serial No. Level 1, 99 Queensbridge Street, Southbank, Victoria 3006, Australia Tel: 3-9693-5111 MIDDLE EAST OTHER COUNTRIES Model : RS40 OCEANIA Nakazawa-cho 10-1, Hamamatsu, Japan 430-8650 Tel: +81-53-460-2312 POLAND SY38 SPECIAL MESSAGE SECTION THE PEOPLE’S REPUBLIC OF CHINA SPAIN/PORTUGAL BRAZIL Å ASIA Yamaha Music Central Europe GmbH, Branch Belgium Yamaha Musique France U.S.A. C THE NETHERLANDS/ BELGIUM/LUXEMBOURG Yamaha Corporation, Pro Audio & Digital Musical Instrument Division Nakazawa-cho 10-1, Hamamatsu, Japan 430-8650 Tel: +81-53-460-2445 PLEASE KEEP THIS MANUAL-
 1
1
-
 2
2
-
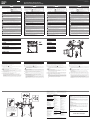 3
3
-
 4
4


Yamaha RS40 Manual de usuario
- Categoría
- Tambores musicales
- Tipo
- Manual de usuario
en otros idiomas
- français: Yamaha RS40 Manuel utilisateur
- italiano: Yamaha RS40 Manuale utente
- English: Yamaha RS40 User manual
- Deutsch: Yamaha RS40 Benutzerhandbuch
- русский: Yamaha RS40 Руководство пользователя
- Nederlands: Yamaha RS40 Handleiding
- português: Yamaha RS40 Manual do usuário
- dansk: Yamaha RS40 Brugermanual
- polski: Yamaha RS40 Instrukcja obsługi
- čeština: Yamaha RS40 Uživatelský manuál
- svenska: Yamaha RS40 Användarmanual
- Türkçe: Yamaha RS40 Kullanım kılavuzu
- română: Yamaha RS40 Manual de utilizare
Artículos relacionados
-
Yamaha RS70 Manual de usuario
-
-
-
Yamaha HH65 El manual del propietario
-
-
Yamaha PCY65 Manual de usuario
-
Yamaha RHH135 El manual del propietario
-
-
-