ADVERTENCIA
Para evitar incendios o el riesgo de
electrocución, no exponga la unidad a la
lluvia ni a la humedad.
Acerca de este manual
Las instrucciones de este manual hacen referencia a 5 modelos.
Se ha utilizado el modelo M-650V para las ilustraciones.
Las diferencias entre los modelos se muestran en la tabla siguiente:
M-657V/655V/650V M-565V/560V
Contador de cinta aa
Toma MIC a —
Indicador REC a —
Indicador BATT/E a —
Indicador REC/BATT — a
VOR aa
FAST PB a —
Asa de mano a —
a: proporcionado o suministrado
—: no proporcionado o no suministrado
Entre los modelos M-657V, M-655V y M-650V, y entre M-565V y
M-560V no hay diferencia excepto en los accesorios suministrados.
Para obtener información acerca de los accesorios suministrados,
consulte el apartado “Especificaciones” de este manual.
Fuentes de alimentación
Elija una de las siguientes fuentes de alimentación.
Pilas secas
Compruebe que no se ha realizado ninguna conexión a la toma
DC IN 3V.
1 Abra la tapa del compartimiento de las pilas.
2 Inserte dos pilas tamaño AA (R6) con la polaridad correcta y
cierre la tapa.
Para extraer las pilas
Si la tapa del compartimiento de las pilas se
desprende accidentalmente
Colóquela como se indica.
Cuándo reemplazar las pilas
Para la M-565V/560V
Reemplace las pilas por otras nuevas cuando el indicador REC/
BATT se atenúe.
Para los modelos M-657V/655V/650V
Reemplace las pilas por otras nuevas cuando la lámpara BATT
se apague y la lámpara E parpadee.
Notas
• La unidad reproducirá normalmente durante un momento aunque
parpadee el indicador E. Sin embargo, reemplace las pilas lo antes
posible. Si no lo hiciese, la reproducción no podría realizarse con el
sonido normal, podría grabarse ruido, y el sonido grabado no sería
suficientemente alto (M-657V/655V/650V solamente).
• En los casos siguientes, no necesitará reemplazar las pilas:
– Si la lámpara BATT parpadea con el sonido de reproducción cuando
aumenta el volumen.
– Si la lámpara E se enciende momentáneamente cuando la cinta
empieza a funcionar o cuando finaliza (M-657V/655V/650V
solamente).
– Si la lámpara E parpadea durante FF (CUE, búsqueda) o REW
(REVIEW, revisión) (M-657V/655V/650V solamente).
Duración de la pila (número aproximado de horas) (JEITA*)
* Valor determinado por la norma de la JEITA (Japan Electronics and
Information Technology Industries Association) (Utilizando un
microcasete Sony).
**Cuando se utilizan pilas secas alcalinas “STAMINA” LR6 (SG) de Sony
(fabricadas en Japón).
Nota
La duración de las pilas puede verse reducida. Ello dependerá del uso de
la unidad.
Alimentación doméstica
Conecte el adaptador de alimentación ca a DC IN 3 V y a la toma
de red. Utilice el adaptador de ca (suministrado con el
M-655V solamente) o el adaptador AC-E30HG (no
suministrado). No utilice ningún otro tipo de adaptador ca.
Nota
Las especificaciones de la unidad AC-E30HG varían en función de la
zona. Compruede la tensión local y la forma del enchufe antes de la
adquisición.
Para clientes en EE UU
RECICLADO DE BATERIAS DE NIQUEL-CADMIO
Las baterias de niquel-cadmio son reciclables.
Usted podra ayudar a conservar el medio ambiente
devolviendo las baterias usadas al punto de
recogida y reciclaje mas proximo.
Nota: En cierzas zonas, puede estar prohibido
tirar las baterias de niquel-cadmio a la
basura del hogar o de la empresa.
Para mas informacion sobre el reciclado de baterias, llame al
numero gratuito 1-800-822-8837, o visite http://www.rbrc.org/.
Precaucion: No utilice baterias de niquel-cadmio danadas o con
fugas.
Si tiene alguna duda o problema referentes a la unidad, póngase
en contacto con el proveedor Sony más cercano.
Solución de problemas
Si sigue teniendo problemas después de revisar esta lista,
consulte al proveedor Sony más cercano.
No es posible insertar una casete.
t La casete se está insertando en la posición incorrecta.
t Ya se ha pulsado n.
La unidad no funciona.
t Las pilas se han insertado con la polaridad incorrecta.
t Las pilas disponen de poca energía. Sustituya las pilas por
unas nuevas.
t>PAUSE está deslizado en la dirección de la flecha.
t El adaptador de alimentación de ca sólo se ha conectado a
la unidad y va a utilizar la unidad con pilas.
No es posible grabar.
t No hay ninguna casete en el compartimiento.
t Se ha retirado la lengüeta de la cinta. Si desea volver a
utilizar la cinta para grabar, cubra el orificio de la
lengüeta con cinta adhesiva.
La grabación se interrumpe.
t El interruptor VOR está situado en H o L. Cuando no
utilice VOR, colóquelo en OFF.
Durante la CUE/REVIEW (búsqueda/revisión) la cinta se
detiene o no funciona.
No es posible avanzar rápido ni rebobinar.
t Las pilas disponen de poca energía. Sustituya las pilas por
unas nuevas.
La grabación no puede borrarse por completo.
t El cabezal está sucio. Consulte el apartado
“Mantenimiento”.
No es posible reproducir.
t La cinta ha llegado al final. Rebobínela la cinta.
El altavoz no emite sonido alguno.
t El auricular está conectado.
t El volumen está bajado del todo.
El sonido se pierde o se oye ruido excesivo.
t El volumen está bajado del todo.
t Las pilas disponen de poca energía. Sustituya las pilas por
unas nuevas.
t El cabezal está sucio. Consulte el apartado
“Mantenimiento”.
t La cinta de casete se colocó directamente sobre el altavoz,
lo que causó la magnetización y el deterioro de la calidad
tonal.
t No utilice la unidad cerca de dispositivos que emitan
ondas radioeléctricas, como teléfonos celulares (móviles).
La velocidad de la cinta es demasiado rápida o
demasiado lenta en el modo de reproducción.
t Configuración inadecuada del interruptor TAPE SPEED
(velocidad de la cinta). Asígnele la misma velocidad que
utilizó para la grabación.
t Las pilas disponen de poca energía. Sustituya las pilas por
unas nuevas.
La velocidad de la cinta es más rápida que la velocidad
normal de reproducción.
t El interruptor FAST PB (M-657V/655V/650V solamente)
está deslizado en la dirección de la flecha.
Mantenimiento
Para limpiar el cabezal y la pista de la cinta
Pulse n y limpie el cabezal, el cabezal móvil y el cilindro de
paso con un bastoncillo de algodón humedecido en alcohol cada
10 horas de uso.
Para limpiar el exterior
Utilice un paño suave ligeramente humedecido en agua. No
emplee alcohol, bencina ni diluyentes.
Especificaciones
Cinta
(tipo de posición normal)
Sistema de grabación
2 pistas, 1 canal monofónico
Altavoz
Aprox. 3,6 cm de diámetro
Velocidad de cinta
2,4 cm/s , 1,2 cm/s
Gama de frecuencias
300 - 4 000 Hz (con el interruptor TAPE SPEED ajustado en 2,4 cm/s)
Entrada (M-657V/655V/650V solamente)
Toma de entrada para micrófono (minitoma/PLUG IN POWER)
Sensibilidad de 0,24 mV para micrófono con impedancia de
3 kΩ o menos
Salida
Toma de auriculares (minitoma) para auriculares de 8 a 300 Ω
Salida de alimentación (al 10% de distorsión armónica)
250 mW
Requisitos de alimentación
Pilas tamaño AA (R6) de 3 V cc × 2/Fuentes externas de
alimentación de cc de 3 V
Dimensiones (an/al/fn)
Aprox. 62,2 × 119,1 × 25,4 mm., incluidos componentes y controles.
Masa
M-657V/655V/650V: 115 g aprox. (sólo la unidad principal)
M-565V/560V: 113 g aprox. (sólo la unidad principal)
Accesorios suministrados
Adaptador de alimentación de ca (1) (M-655V solamente)
Adaptador de carga de la pila (1) (M-655V solamente)
Pilas recargables NC-AA, de 1,2 V, 700 mAh, Ni-Cd (2) (M-655V
solamente)
Cinta de microcasete MC-30 (1) (modelos M-657V, M-650V para
Europa y M-560V para los Estados Unidos y Europa solamente)
Cinta de microcasete MC-30 (3) (M-565V solamente)
Pilas alcalinas LR6 (2) (M-657V/565V/560V sólo para Estados
Unidos)
Micrófono (1) (M-657V solamente)
Bolsa de transporte (1) (M-657V solamente)
El diseño y las especificaciones están sujetos a cambio sin previo aviso.
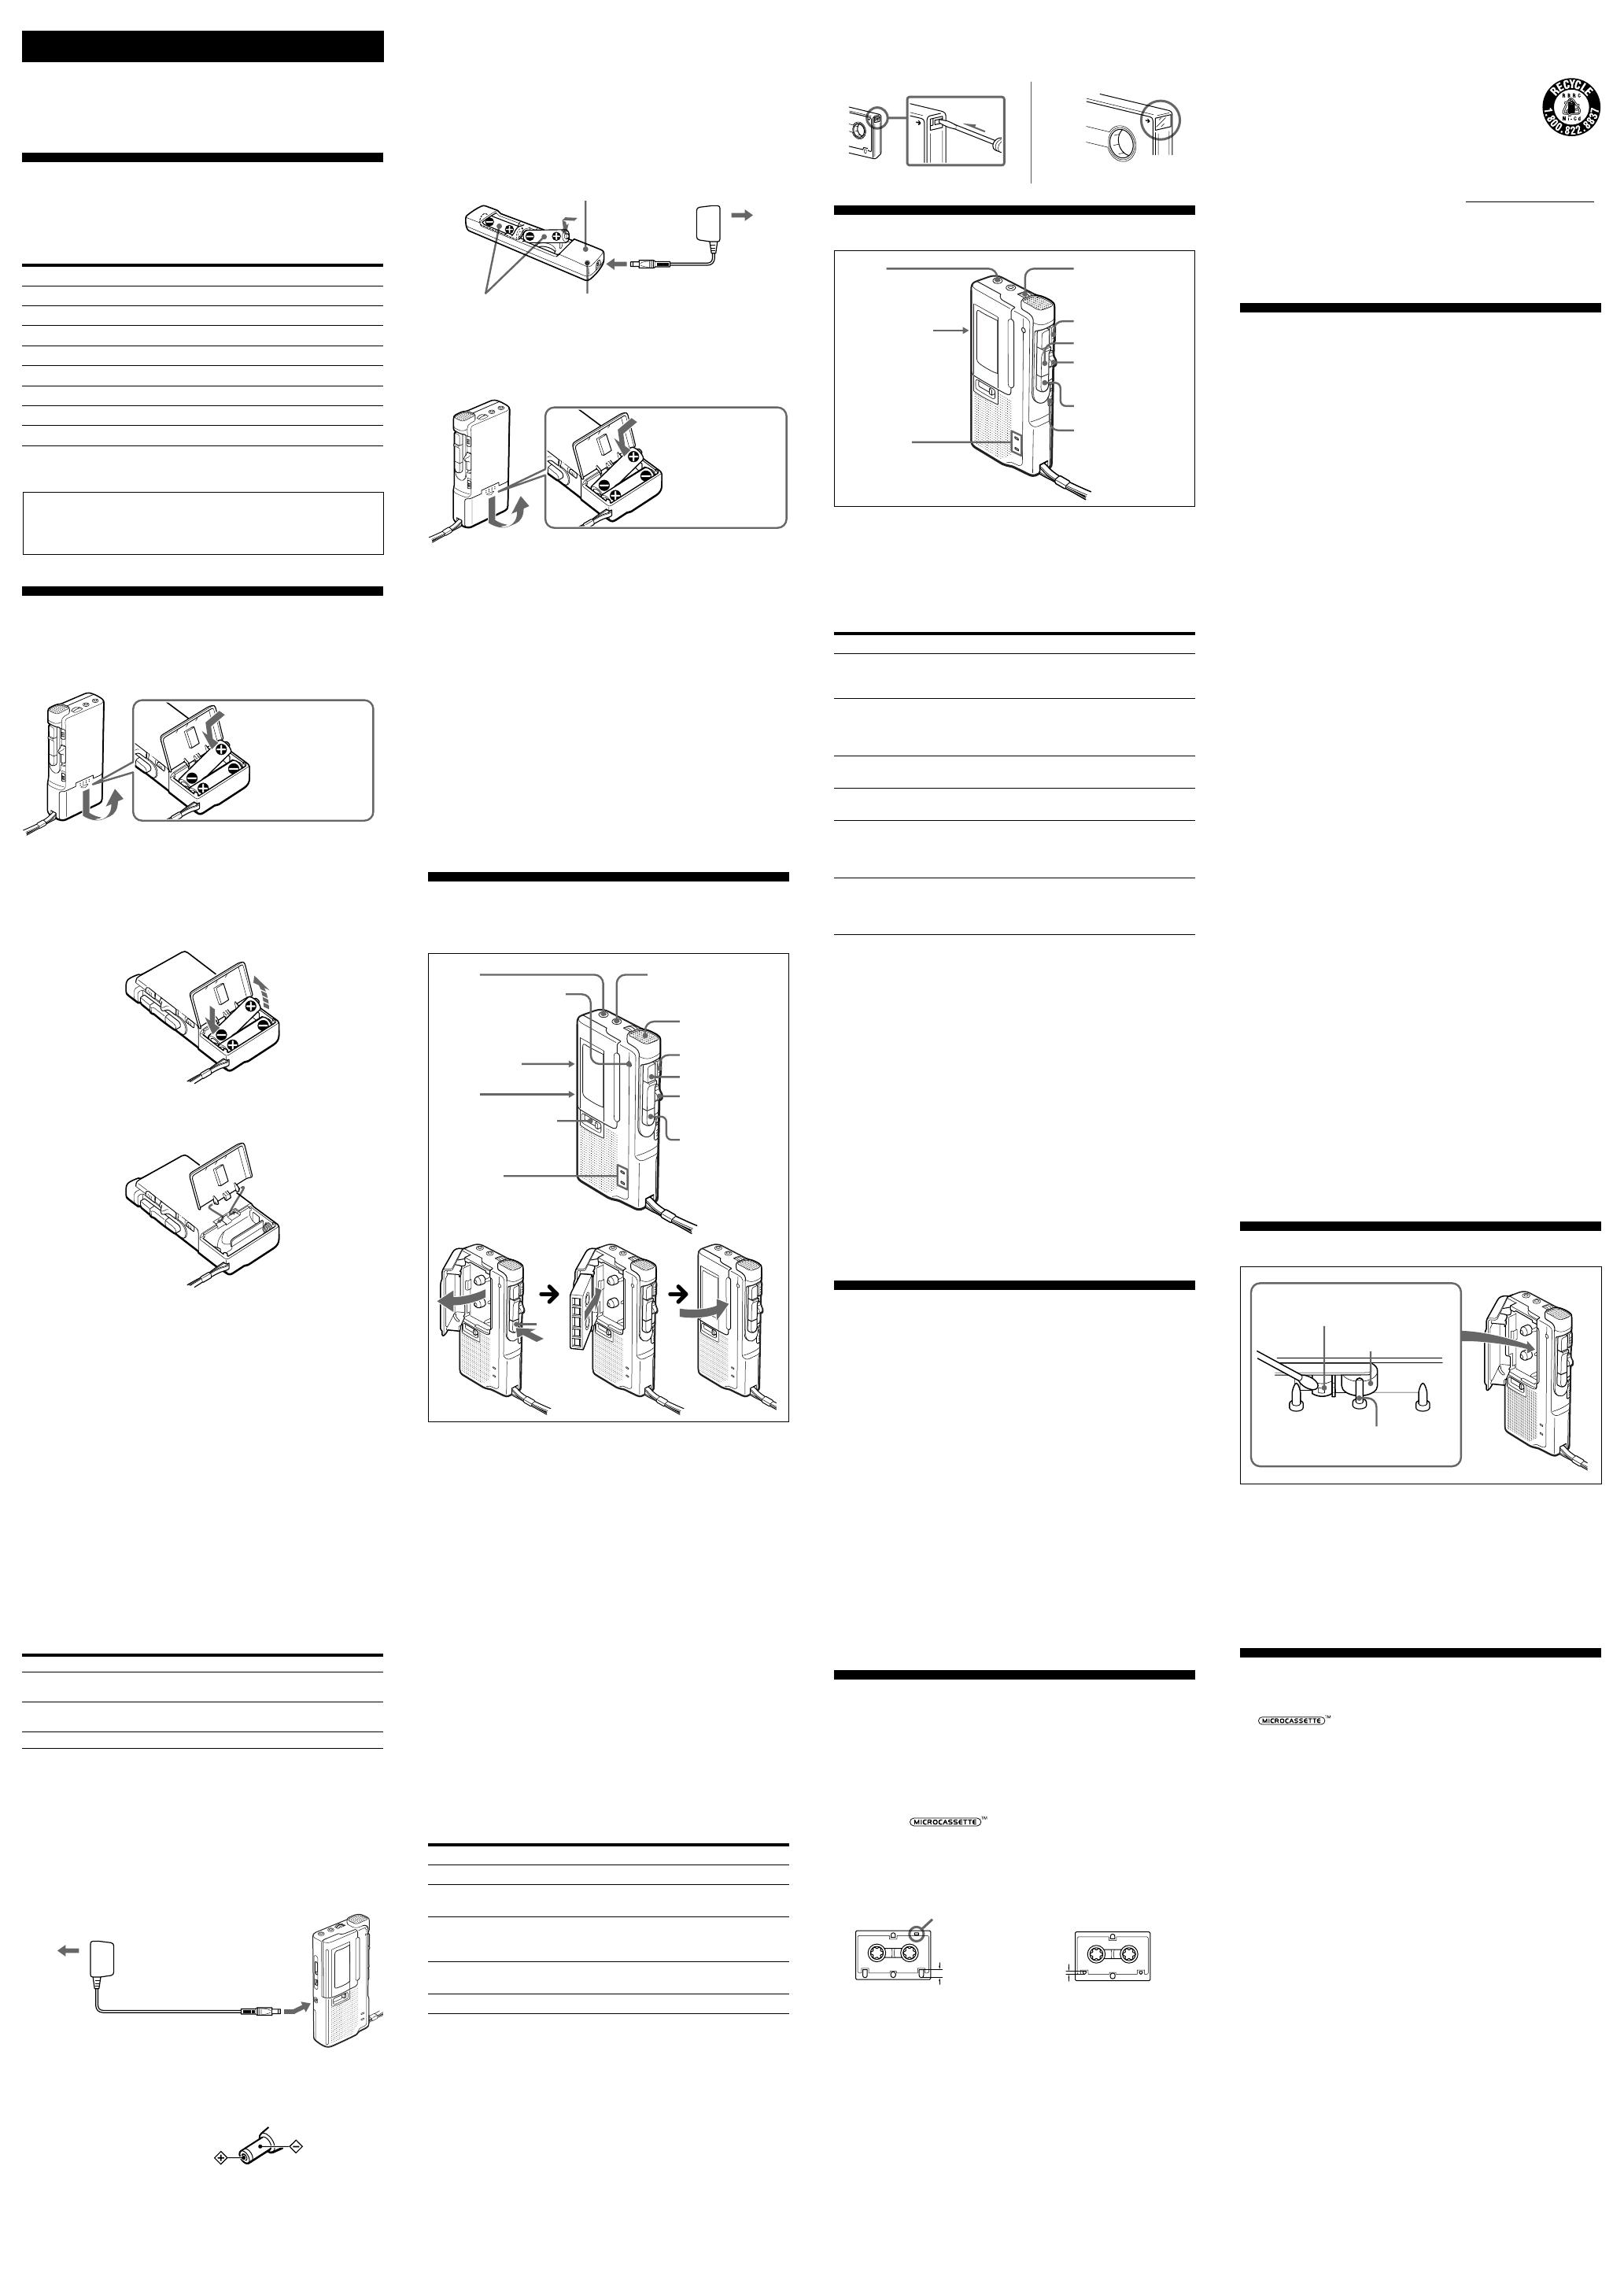
Para impedir que una casete se grabe accidentalmente
Rompa y retire las lengüetas de la
casete
. Para volver a utilizar la
casete
para grabar, cubra el orificio de la lengüeta con cinta
adhesiva.
Reproducción de cintas
1 Inserte una
casete
con la cara que va a reproducir mirando a
la tapa.
2 Seleccione la velocidad de cinta que se utilizó al grabarla.
3 Pulse n.
4 Gire VOL para ajustar el volumen.
Si conecta auriculares (no suministrados) a la toma EAR, los
canales izquierdo y derecho emitirán sonido monofónico.
Baterías recargables (suministradas con el
M-655V solamente)
Cargue las baterías solamente con el adaptador para carga y el
adaptador de alimentación de ca suministrados. Las baterías
podrán cargarse unas 500 veces.
Cerciórese de cargar las baterías durante unas 8 horas antes de
utilizarlas. La unidad podrá utilizarse para grabación durante
unas 10 horas con las baterías completamente cargadas.
Para cargar
El indicador de alimentación del adaptador para carga permanecerá
encendido mientras esté suministrándose alimentación del tomacorriente
de la red.
Para utilice
Notas
• Utilice las dos baterías solamente con el adaptador para carga
suministrado.
• Si se produce distorsión del sonido o hay ruido excesivo o si la unidad
no funciona adecuadamente, desconecte la alimentación de la unidad y
recargue juntas las dos baterías.
• Las baterías se descargarán incluso aunque no las utilice. Cerciórese de
cargarlas antes de utilizarlas.
• Recargue las dos baterías juntas. De lo contrario, la carga no podría
realizarse.
• Cerciórese de extraer las baterías del adaptador para carga cuando haya
finalizado la carga a fin de evitar que se sobrecarguen (más de 20 horas).
• La carga y la operación deberán realizarse a temperaturas
comprendidas entre 5 y 40°C.
• El adaptador para carga se calentará durante la carga, pero esto no
significa problema alguno.
• No utilice ni deje el adaptador para carga en un lugar cercano a fuentes
térmicas ni sometido a la luz solar directa ni a humedad excesiva.
• Cuando no vaya a utilizar el adaptador de alimentación de ca durante
mucho tiempo, desenchúfelo del tomacorriente de la red.
• No intente cargar pilas.
Grabación
Cerciórese de que no haya nada conectado a MIC (M-657V/
655V/650V solamente).
1 Pulse el botón de reinicio del contador de cinta.
2 Pulse Tx e inserte una microcasete estándar con la cara
que desea grabar mirando hacia la tapa.
3 Seleccione la velocidad de cinta que desee.
2.4 cm para obtener un sonido óptimo (recomendado para
uso normal): es posible realizar una grabación de 30 minutos
utilizando las dos caras de una cinta microcasete MC-30.
1.2 cm para mayor tiempo de grabación: es posible realizar
una grabación de 60 minutos utilizando las dos caras de una
cinta microcasete MC-30.
4 Sitúe VOR en la posición H, L u OFF.
Si sitúa VOR en la posición H o L, la unidad inicia
automáticamente la grabación del sonido y activa el modo
de pausa si no hay sonido (de este modo, se ahorra cinta y
pilas).
H : Para grabar en reuniones o en lugares silenciosos y/o
amplios.
L : Para grabar un dictado o en un lugar ruidoso.
Cuando el sonido no es suficientemente alto, seleccione la
posición OFF o es posible que la unidad no empiece a
grabar.
5 Pulse z.
Se pulsa n de forma simultánea y comienza la grabación.
Durante la reproducción de la cinta, la lámpara REC o la
lámpara REC/BATT se enciende y parpadea en función de
la intensidad del sonido.
El nivel de grabación es fijo.
Polaridad del enchufe
EAR
VOL
n
> PAUSE
m CUE/
REVIEW M
Tx
BATT/E
(M-657V/655V/
650V solamente)
FAST PB
(M-657V/655V/
650V solamente)
z
REC (M-657V/655V/
650V solamente)
REC/BATT (M-565V/
560V solamente)
Tx
EAR
VOR
TAPE SPEED
Contador de cinta
Micrófono
> PAUSE
m CUE/
REVIEW M
Pilas
Pilas de manganeso
de Sony R6P (SR)
Pila LR6 alcalina
de Sony (SG)**
NC-AA
Grabación
8 (M-657V/655V/650V
solamente)
26 (M-657V/655V/650V
solamente)
10 (M-655V solamente)
10 (M-565V/560V
solamente)
30 (M-565V/560V
solamente)
Inserte primero el
lado # de cada
pila.
TAPE SPEED
Tx
Adaptador de ca (no suministrado)
a toma de alimentación
Inserte primero
el lado # de
cada pila.
Cabezal
Cabezal móvil
Cilindro de paso
MIC (PLUG IN POWER)
(M-657V/655V/650V
solamente)
BATT/E
(M-657V/655V/
650V solamente)
Para
Detener la grabación
Iniciar la grabación
durante la reproducción
Revisar una parte de
cinta recién grabada
Hacer una pausa en la
grabación
Extraer una microcasete
Nota
Seleccione la velocidad de grabación de cinta de 2,4 cm si reproduce la
cinta grabada en otra unidad. De otro modo, la calidad del sonido puede
modificarse.
Observaciones sobre VOR (Grabación activada por voz)
• El sistema VOR depende de las condiciones ambientales. Si no obtiene
los resultados deseados, sitúe VOR en la posición OFF.
• Si utiliza la unidad en un lugar ruidoso, ésta permanecerá en el modo
de grabación. Si, por el contrario, el sonido es demasiado débil, la
unidad no iniciará la grabación. Sitúe VOR en H (alto) o L (bajo) en
función de las condiciones.
Para controlar el sonido
Conecte el auricular (no suministrado) a la toma EAR. No es
posible ajustar el volumen de control con VOL.
Pulse o deslice
Tx
z durante la reproducción (la unidad activa el
modo de grabación)
Empuje mCUE/MREVIEW hacia
MREVIEW durante la grabación. Suelte el
botón para iniciar la reproducción.
Deslice >PAUSE en la dirección de la flecha.
Tx
Para
Detener la reproducción/
detener el avance o rebobinado
rápido de cinta*
Introducir una pausa en la
reproducción
Avanzar rápido
Rebobinar
Buscar hacia delante durante la
reproducción (CUE)
Buscar hacia atrás durante
reproducción (REVIEW)
* Si deja la unidad encendida después de rebobinar la cinta, las pilas se
consumirán con rapidez. Asegúrese de desactivar el botón Tx.
Nota
Si la cinta se ha bobinado por completo mientras se realiza la búsqueda
hacia adelante/atrás durante la reproducción (CUE/REVIEW), el
interruptor mCUE/MREVIEW puede no volver a la posición central
al soltarlo. En este caso, desplace el interruptor a la posición central para
iniciar la reproducción.
Para aumentar la velocidad de reproducción (M-657V/
655V/650V solamente)
Deslice el interruptor FAST PB en la dirección de la flecha. La
velocidad de reproducción aumentará.
Para volver a la velocidad original, deslice el interruptor FAST
PB hasta la posición original.
Al final de la cinta
En el modo de grabación o reproducción, la cinta se detiene
cuando llega al final y los botones bloqueados se liberan
automáticamente (mecanismo de desconexión automática).
Asegúrese de ajustar mCUE/MREVIEW en la posición
central después del avance rápido o el rebobinado.
Grabación/reproducción con el
equipo conectado
(M-657V/655V/650V solamente)
Grabación con un micrófono externo
Conecte un micrófono a la toma MIC.
M-657V : utilice el micrófono suministrado.
Otro modelo: utilice un micrófono de baja impedancia (menos
de 3 kiloohmios) como el ECM-T6 (no suministrado). Cuando
utilice un micrófono con alimentación a través de la clavija, la
alimentación del mismo la suministrará la unidad.
Nota
Cuando grabe con un micrófono externo, el sistema VOR puede no
trabajar adecuadamente debido a la diferencia de sensibilidad.
Grabación desde otra grabadora de cintas
Conecte la otra grabadora a la toma MIC utilizando un cable
conector RK-G64HG (no suministrado).
Ponga esta unidad en el modo de grabación y la otra grabadora
de cintas en el modo de reproducción. En este caso, ponga VOR
en OFF.
Precauciones
Acerca de la alimentación
•Utilice la unidad sólo con 3 V cc.
Para utilizar ca, utilice el adaptador de ca recomendado para la
unidad. No emplee otro tipo de adaptador. Si va a utilizar
pilas, emplee dos pilas tamaño AA (R6).
Acerca de la unidad
•Utilice sólo (microcasete estándar) con esta
unidad. Las casetes no estándar no pueden utilizarse porque
su dimensión “L” (consulte la ilustración) es diferente.
•No coloque la unidad cerca de fuentes de calor ni en un lugar
expuesto a la luz del sol, a cantidades de polvo excesivas o a
golpes mecánicos.
•Si se introduce algún objeto sólido o se derrama líquido dentro
de la unidad, extraiga las pilas o desconecte el adaptador de
alimentación de ca y haga que personal cualificado revise la
unidad antes de volver a utilizarla.
•Aleje las tarjetas de crédito personales con codificación
magnética o los relojes de cuerda, etc., de la unidad para evitar
que se produzcan posibles daños por el imán del altavoz.
•Si no va a utilizar la unidad durante un periodo de tiempo
prolongado, extraiga las pilas para evitar que se produzcan
daños derivados de fugas del electrolito o corrosión.
•Si la unidad no se ha utilizado durante varios días, active el
modo de reproducción y deje que se caliente durante unos
minutos antes de insertar una cinta.
Pulse o deslice
Tx
Deslice >PAUSE en la dirección de la
flecha. La lámpara REC (M-657V/655V/
650V) o REC/BATT (M-565V/560V) se
apaga.
Deslice mCUE/MREVIEW hacia
mCUE durante la detención.
Deslice mCUE/MREVIEW hacia
MREVIEW durante la detención.
Mantenga pulsado hacia abajo
mCUE/MREVIEW durante la
reproducción y suéltelo en la posición
que desee.
Mantenga pulsado hacia arriba
mCUE/MREVIEW durante la
reproducción y suéltelo en la posición
que desee.
Aprox. 5 mm Aprox. 2,5 mm
No estándarEstándar
Sólo las cintas microcasete
estándar tienen una pequeña
hendidura en la cara A.
Adaptador para carga
a un tomacorriente
de la red
Indicador de
alimentación
Baterías NC-AA
Adaptador de
alimentación
de ca

