
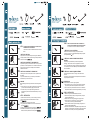
STEP 1. PLEASE READ BEFORE BEGINNING YOUR INSTALLATION -
DETERMINE INSTALLATION METHOD.
The three most common installation methods are indicated
below:
1. METHOD # 1-DRYWALL
Using the E-Z Ancor
®
provided and pictured in Figure 1A-Determine
mounting locations and drive into the wall using a Phillips screwdriver
until flush with the wall.
2. METHOD #2 - MOUNTING TO A WOODEN STUD
Upon determining that you will install into a stud - Use only the screw
provided, do not use the plastic E-Z Ancor
®
. Determine locations and
pre-drill a 1/16" pilot hole prior to installing screw. See detailed
installation instructions.
3. METHOD #3 - MOUNTING TO CERAMIC TILE
If installing into ceramic tile, the plastic E-Z Ancor
®
provided cannot
be untilized.
*Inquire at the retailer where you purchased your accessories for
standard masonry anchors and screws.
WARNING
Before attempting to drill through ceramic tile, the following must be
done:
a. Using a center punch, very lightly and carefully tap the spot where
you wish to drill to break the shiny glass portion of the tile.
b. Once this is done you can safely drill through the tile with a
standard masonry drill bit and install standard masonry ancor (not
provided).
STEP 2 . INSTALLATION
1. Determine the location where you wish to install your accessory.
2. Place mounting bracket at the desired location and mark
hole.
3. Install E-Z Ancor
®
at each pencil mark made.
4. Align brackets with installed E-Z Ancor
®
and secure with screws
provided.
5. Install post over bracket and secure with set screw.
6. Assemble the bar between the 2 posts and position over wall
brackets, screw the posts with the screws provided.
PASO 1. LEER LAS INSTRUCCIONES ANTES DE COMENZAR LA
INSTALACIÓN - DETERMINE EL MÉTODO DE INSTALACIÓN.
A continuación se indican los métodos de instalación:
1. MÉTODO #1- Pared tipo DRYWALL
Determine la ubicacion de montaje y enrosque los E-Z Ancor
®
incluidos en la pared con un destornillador Phillips hasta que queden
al ras.(ILUSTRACIÓN 1B)
2. MÉTODO #2 - MONTAJE SOBRE TRAVESAÑO DE
MADERA
Después que haya determinado que hará el montaje sobre el
travesaño -- Use el tornillo incluido en el paquete. No use el E-Z
Ancor
®
tarugo. Determine la posición y taladreun agujero preliminar de
1/16" antes de poner el tornillo. Más abajo se dan detalles adicionales
sobre al instalación.
3. MÉTODO #3 - MONTAJE SOBRE CERÁMICA
No utilíce los plásticos E-Z Ancor
®
tarugos cuando instale sobre
céramica.
*Pida tarugos y tornillos estándar de mampostería en la tienda donde
haya comprado los accesorios.
ADVERTENCIA
Antes de taladrar la cerámica, haga lo siguiente:
a. Dé un golpe suave con un punzón en el lugar donde va a taladrar,
para punzar la parte brillante de la parte de arriba de cerámica.
b. Una vez hecho ésto, puede taladrar la cerámica con un taladro de
mampostería estándar e instalar los tarugos estándar (no incluidos).
PASO 2 - INSTALACIÓN
1. Determine el lugar donde desea instalar el accesorio.
2. Posicione el soporte de montaje en el lugar deseado y marque el
agujero.(ILUSTRACIÓN 2A)
3. Instale un E-Z Ancor
®
tarugo en cada marca que haya hecho.
4. Aliñe los soportes con los E-Z Ancor
®
tarugos y asegúrelos
con los tornillo que se incluyen.(ILUSTRACIÓN 2B)
5. Instale la terminal sobre el soporte de montaje y asegúrela con un
tornillo de ajuste.(ILUSTRACIÓN 3)
6. Ensamble la barra del toallero o del sujetador de papel entre las dos
terminales y posiciónela sobre los soportes de montaje. Atornille las
terminales con los tornillos que se incluyen.(ILUSTRACIÓN 4)
Pantone 3025
-
 1
1
