Genius Alarma G5504 OEM TRF Series El manual del propietario
- Categoría
- Alarma de carro
- Tipo
- El manual del propietario
Este manual también es adecuado para

ESPAÑOL
Genius Car Alarm
www.alarmasgenius.com
1
Alarma “OEM”
G-5504 CF
TRF Series

ESPAÑOL
Genius Car Alarm
www.alarmasgenius.com
2
Genius Car Alarm
www.alarmasgenius.com
2
Alarma Genius OEM G-5504
• Sistema de alarma para vehículos de 12 Voltios
• Modulo controlado por Micro-Procesador
• Modulo de alarma diseñado para vehículo con controles remotos OEM
• Aprendizaje de 4 controles remotos Genius de Código Fijo, Frecuencia de Transmisión 370
Mhz
• Identificador de controles programados (I.C.P.) (Programable)
• Armado y Desarmado mediante la señal apertura y cierre y las luces
• LED indicador de Tablero
• Salida Positiva para el Destello de Luces con relee interno en el modulo
• Salida Negativa Canal 2 (Abre Baúl eléctrico) mediante el control remoto Genius
• Cierre Centralizado A Negativo
• Armado Automático (Programable)
• Cierre de los Seguros Eléctricos con el Armado Automático (Programable)
• Rearmado Automático (Desarmado Accidental)
• Cierre de los Seguros con el Rearmado Automático
• Apertura y Cierre de los Seguros eléctricos con la Ignición (Programable)
• Cierre de los seguros eléctricos al pisar el pedal del freno (Programable)
• Sensor de Impacto con Pre-aviso
• Pánico mediante el control remoto Genius
• Car Finder o Localizador mediante el control remoto Genius
• Línea de Pulsadores Originales Positivos (Ford, etc.)
• Línea de Pulsadores Originales Negativos (GM, Toyota, etc.) Baúl y Capota
• Línea de Pulsadores de Baúl y Capo (Negativo)
• Retardo de la línea de pulsadores (Programable)
• Anti-asalto por Apertura de Puerta (Programable)
• Anti-asalto Especial mediante el swiche de Ignición (Programable)
• Anti-asalto de Presencia (Programable) Transmisor Opcional
• Antia-asalto por control mediante el control remoto Genius (Programable)
• Aviso Luminoso al Activarse el Anti-asalto
• Modo Valet.
• Salida Negativa con el armado, para el corta corriente
• Salida Negativa temporizada para Módulos Alza vidrios (Programable)
• Reconocedor de conductor (Programable)
• Dome Light (Programable)
• Exclusión de Zonas Defectuosas
• Claxon Intermitente (Programable)
• Programación de funciones por medio de software y por Jumper
• Desarmado manual mediante código PIN de seguridad
• Memoria del último estado del sistema
• Sirena Electrónica de 130 dba 20 W 6 Tonos
• Cableado Identificado con colores
• Fusibles de Protección incorporado al Cableado

ESPAÑOL
Genius Car Alarm
www.alarmasgenius.com
3
Genius Car Alarm
www.alarmasgenius.com
3
Alarma Genius de Código Fijo
OEM G-5504
Introducción.
Agradecemos el haber adquirido para su vehículo nuestro sistema de seguridad. Lea bien el
manual de uso del sistema principalmente las funciones del transmisor, el swiche valet y el LED
indicador del tablero.
El sistema de alarma Genius OEM-5504, fue diseñada y elaborada para aquellos vehículos que
posean un control remoto original de fábrica para el cierre y apertura de los seguros eléctricos de
las puertas.
Armado del sistema de alarma.
El Armado del sistema de alarma podrá ser obtenida mediante 2 métodos.
El primero mediante el botón candado cerrado del control remoto, donde es necesario que el
swiche de ignición se encuentre en la posición de OFF y el sistema no se encuentre en el modo
Valet.
El segundo en mediante el Armado automático
, la cual se obtiene al pasar el swiche de ignición a
la posición de ON a OFF y luego abrir y cerrar una puerta. El sistema se Armará Automático 30
segundos después de haber cerrado la ultima puerta, esta función es programable ver tabla de
programación de funciones
Armado de sistema de alarma utilizando el Control Remoto.
El sistema de alarma siempre podrá ser armado mediante el control remoto con la condición de
que el swiche de ignición se encuentre en la posición de OFF y el sistema no se encuentre en el
modo Valet.
Para armar el sistema de alarma después de salir del vehículo y haber cerrado bien todas las
puertas, simplemente presione y suelte el botón candado cerrado del control remoto 1 vez , las
luces darán 1 destello, la sirena dará 1 sonido y el LED indicador del tablero comenzara a titilar
lentamente confirmando que el sistema se encuentra armado, los seguros eléctricos se cierran, el
Corta corriente será activado evitando que el vehículo pueda ser utilizado, pasado los tres
segundos el sistema de alarma pasa a la modalidad de espera de un intento de hurto
Sistema de Alarma Armado y Activado.
Cuando el sistema de alarma se encuentra armado el LED indicador del tablero titila lentamente,
si una puerta es abierta, la sirena comenzara a sonar y las luces a destellar durante 60 segundos ,
si la puerta permanece abierta pasados los 60 segundos la sirena seguirá sonando y las luces
detallando durante 3 minutos, pasado los 3 minutos el sistema de alarma excluye los sensores de
las puertas protegiendo el vehículo con el resto de los sensores, si la puerta es cerrada antes de
los primeros 60 segundos después de comenzar a sonar la sirena, la sirena se silenciara a los 60
segundos y las luces dejan de destellar.
Si al desarmar el sistema de alarma, la sirena emitiera 4 sonidos y las luces 4 destellos, esto le
indicara que el vehículo sufrió un intento de hurto, el LED indicador del tablero seguirá titilando
hasta que pase el swiche de ignición a la posición de ON, por favor revise bien el vehículo.
Desarmado del sistema de Alarma.
Cuando el sistema de alarma se encuentra armado, presione y suelte el botón candado abierto del
control remoto, la sirena emitirá 2 sonidos y las luces 2 destellos indicándole el desarmado del
sistema de alarma, el corta corriente se desactivara, el LED indicador del tablero se apagara, los
seguros eléctricos de las puertas se abrirán.
Exclusión de zonas defectuosas.
Al armar el sistema de alarma y alguna zona se encuentre defectuosa, la sirena emitirá 3 sonidos
y las luces darán 3 destellos simultáneos, indicándole que una zona se encuentra defectuosa,

ESPAÑOL
Genius Car Alarm
www.alarmasgenius.com
4
Genius Car Alarm
www.alarmasgenius.com
4
cuando esto ocurra la zona defectuosa será excluida automáticamente y el vehículo quedara
protegido con el resto de las zonas, por ejemplo si el baúl se encuentra mal cerrada en el
momento de haber armado el sistema de alarma por el transmisor, la sirena emitirá 3 sonidos y las
luces 3 destellos indicándole que hay una puerta mal cerrada y excluirá los sensores de esa zona.
La zona defectuosa será nuevamente incorporada a la protección 3 segundos después de haber
corregido la falla ósea después de haber cerrado bien el baúl.
Sensor de impacto –Doble Zona
El sensor de impacto está diseñado para detectar movimientos bruscos en el vehículo (Choque),
impactos, movimientos por grúa, ruptura de vidrios. Puede también ser accionado por las ondas
expansivas producidas por extractores ruidosos, por un trueno o por tráfico pesado. El sensor de
impacto NO será accionado por el viento o por movimientos oscilantes. Si el sensor de impacto
detecta un golpe leve, la sirena emitirá 5 sonidos y las luces darán 2 destellos. Si el sensor de
impacto detecta un golpe fuerte, la sirena sonara y las luces destellaran por 60 segundos.
El nivel de la sensibilidad será fijada por el instalador y deberá de estar en una sensibilidad
óptima, La sensibilidad excesiva puede causar falsas alarmas.
Anti-asalto Por Ignición
Esta función esta en el software del la memoria para activar el anti-asalto automáticamente cada
vez que se coloque el swiche de ignición de la posición de OFF a la posición de ON sin necesidad
de abrir una puerta o presionar el control remoto. Al pasar el swiche de ignición a la posición de
ON el LED indicador del tablero comenzara a titilar, las luces del vehículo darán 2 destellos, si el
aviso acústico está programado, la sirena emitirá 2 sonidos, Esta función es programable (ver
tabla de programación)
Anti-asalto por Puertas.
Con el swiche de ignición en la posición de ON, usted abre y cierra la puerta una puerta, el LED
indicador del tablero comenzará a titilar, las luces darán 2 destellos indicándole la activación del
Anti-asalto, si el aviso acústico está programado la sirena confirmara con 2 sonidos. Esta función
es programable (ver tabla de programación)
Anti-asalto Activado
Tan pronto el sistema de alarma entre en modo de anti-asalto las luces del vehículo darán 2
destellos, si la función 13 esta activada, la sirena emitirá 2 sonidos, LED indicador comenzara a
titilar lentamente, pasados los 30 segundos las luces comenzaran a destellar y la sirena a sonar
intermitente, pasados los 15 segundos después de haber comenzado a sonar la sirena
intermitente si la función 14 está programada se activa el corta corriente en forma intermitente
produciendo una falla en el motor, luego de 15 segundos se activara el corte de corriente
constante apagando el motor del vehículo y cerrando los seguros eléctricos, la sirena comenzara
a sonar corrida.
Deshabilitacion / Desactivación de los Anti-asaltos
Para Deshabilitar el anti-asalto antes de que comience a sonar la sirena corrida los 6 tonos o antes
de los 60 segundos después de haberse activado el anti-asalto, presione y suelte el botón reset 1
vez.
Para Desactivar el anti-asalto después de haber comenzado a sonar la sirena corrida los 6 tonos o
pasados los 60 segundos después de haberse activado, mantenga o pase el swiche de ignición a
la posición de ON, presione el botón reset la cantidad de veces como lo indique el código de
seguridad (de fabrica es 1) y espere 3 segundos, tiempo de espera de confirmación que el código
introducido es el correcto
Sirena Electrónica
Instale la sirena debajo del capo, deberá de colocarla en un lugar protegida del calor y daños por

ESPAÑOL
Genius Car Alarm
www.alarmasgenius.com
5
Genius Car Alarm
www.alarmasgenius.com
5
agua, al conducir a través de chacos o aguas profundas podría salpicarle el agua causando daños
a la sirena, fíjela en una posición que el agua no la dañe. Si va a lavar el motor del vehículo,
proteja la sirena con una bolsa plástica para evitar daños. Los daños causados por agua o por
calor no son cubiertos por la garantía.
Blinker de Luces
Cuando la sirena este sonando, las luces del vehículo parpadearan simultáneamente. Las luces
también parpadearan al armar y al desarmar el sistema de alarma.
Códigos de Confirmación con el blinker de Luces
Este es un indicador visual del estado del sistema de alarma.
A) 1 Flash - Armado
B) 2 Flash - Desarmado
C) 3 Flash - Puerta, Maleta & Capo abierta al armar.
D) 4 Flash - Al Desarmar indica que la alarma se disparo.
Códigos de confirmación con la Sirena
Este es un indicador sonoro del estado del sistema de alarma.
A) 1
Sonido Armado
B) 2 Sonidos Desarmado
C) 3 Sonidos Puerta, Maleta & Capto abierta al armar
D) 4 Sonidos Al Desarmar indica que la alarma se disparo
Instalación del LED indicador del tablero
Ubíquelo en un lugar visible en el tablero, el LED ilumina indicando que el vehículo tiene sistema
de alarma. Indicaciones del estado de la alarma mediante el LED del tablero:
A) Flash lento Sistema Armado
B) Flash rápidos Auto Rearmando conteo regresivo de 90 segundos
C) LED apagado Sistema Desarmado e ignición en ON
D) 1 Flash 1 Pausa Disparo por Puerta, Maleta o Capto
E) 2 Flash 1 Pausa Disparo por impacto.
F) 3 Flash 1 Pausa Disparo por ignición
E) Encendido Fijo Alarma en Modo Valet
Si al desarmar la sirena emitiera 4 sonidos indicaría que la alarma se disparo. El LED del tablero
le indicara mediante los destellos la causa del disparo. Coloque una etiqueta debajo del LED del
tablero indicándole los códigos.
Modo Valet y Botón Reset
El Modo Valet fue diseñado para deshabilitar el sistema de alarma cuando sea requerido, ejemplo
cuando usted necesite deja el vehículo en un estacionamiento, hacerle mantenimiento, etc.
Para obtener el modo vale se hace necesario que el sistema de alarma se encuentre desarmado,
pase el swiche de ignición en la posición de ON, presione por 3 segundos el botón reset, al activar
el modo vale el LED indicador del tablero pasara a encendido constante y las luces daran un
destello.
Cuando el sistema de alarma se encuentre en el modo valet serán excluidos los cortes de
corriente (anti-asaltos) y el sistema de alarma sonora

ESPAÑOL
Genius Car Alarm
www.alarmasgenius.com
6
Genius Car Alarm
www.alarmasgenius.com
6
Para salir del modo valet, simplemente con el swiche de ignición en ON presione el botón reset
por 3 segundos, el LED indicador se apagara y las luces darán 2 destellos indicándole la salida del
modo valet.
Desarmado del sistema mediante el botón reset
En el caso de que el control remoto se extravíe, se dañe o se le agote la batería, usted podrá
desarmar el sistema mediante el botón reset.
Primero. Con el sistema armado, abra la puerta del chofer, la sirena comenzara a sonar.
Segundo, pase el swiche de ignición a la posición de ON, antes de los 10 segundos presione el
botón reset la cantidad de veces asignadas en el código de seguridad (de fabrica es 1) la sirena
continuara sonando por 3 segundos y si el código de seguridad es correcto el sistema se
desarma.
Funciones con el Control Remoto de 4 Botones GENIUS
Botón Funciones Condiciones
Armado de alarma Alarma Desarmada
Car Finder Alarma armada
Presione el Botón 1
Cerrar seguros Ignición ON / Modo Valet
Desarmado de alarma Alarma armada Presione el Botón 2
Abrir seguros Ignición ON / Modo Valet
Presione el Botón 3 y luego
el Botón 1
Armado silencioso de alarma Alarma desarmada
Presione el Boton 3 y luego el
Botón 2.
Desarmado silencioso de
alarma
Alarma armada
Mantener presionado
los Botones 1 y 2 por 3 seg
Función Panico Alarma armada o desarmada
Mantener presionado
el Boton 4 por 3 seg
2do. Canal de salida Alarma armada o desarmada
Mantener presionado Los
Botones 3 y 4 por 3seg.
3er. Canal de salida Alarma armada o desarmada
Presione el Boton 1 y luego
el Botón 2 rápidamente
Activar sensor Bypass Alarma desarmada
Mantener presionado
el Botón 3 por 3 seg
Antiasalto por control remoto Ignición ON
NOTA: Por favor observe la tabla superior y siga las instrucciones para las diversas
funciones.
Programación y Memorización de Controles Remotos y Transmisor de Presencia. (Genius)
El sistema de alarma está diseñado para memorizar hasta 4 controles remotos diferentes,
precaución cada vez que usted programe un control remoto, el sistema de alarma borra de la
memoria los controles remotos Genius anteriores, programe todos los controles remotos en el
mismo momento, ya que mediante esta función de borrado usted podrá borrar de la memoria
cualquier control remoto que se le haya extraviado simplemente programado nuevamente el
control remoto o los controles remotos que usted posea. El Transmisor de presencia deberá ser el

ESPAÑOL
Genius Car Alarm
www.alarmasgenius.com
7
Genius Car Alarm
www.alarmasgenius.com
7
último en memorizarse.
Para ingresar a la memoria y programar los controles remotos, siga los siguientes pasos:
1. Con el sistema de alarma desarmado, pase el swiche de ignición a la posición de ON
2. Dentro de los primeros 5 segundos después de haber pasado el swiche de ignición a la
posición de ON, presione y suelte 5 veces el botón reset, la sirena confirmara con un
sonido largo, usted tiene 10 segundos para comenzar a ingresar los controles remotos, si
no ingresa ningún control remoto antes de los 10 segundos o pasa el swiche de ignición a
la posición de OFF, el sistema saldrá automáticamente del modo de aprendizaje de
controles remoto y la sirena le confirmara con 2 sonidos y la memoria de los controles
remotos no será borrada.
3. Presione y suelte el Botón 1 del control remoto a programar, la sirena confirmara con 1
sonido la memorización del control remoto, desde ese momento los controles remotos
viejos son borrados.
4. Si desea programar un segundo control remoto repita el paso 3 donde la sirena le
confirmara con 2 sonidos la memorización del segundo control remoto y con 3 sonidos el
tercero con el cuarto cierra la programación.
5. Pase el swiche de ignición a la posición de OFF o espere 10 segundos y el sistema de
alarma cierra y sale del modo de aprendizaje de controles remotos, la sirena confirmara
con 2 sonidos.
6. Si el anti-asalto por ignición se encuentra activado, coloque el sistema en modo valet y
siga los pasos del 1 al 5.
7. Para programar el transmisor adicional del anti-asalto por alejamiento programe en la
memoria primero los controles remotos de la alarma y de ultimo programe el transmisor
adicional, con el transmisor apagado, presione y suelte el botón del transmisor, el sistema
confirmara con varios sonidos la memorización del transmisor
El Control Remoto opcional Genius de Código Fijo.
Cada control remoto viene asignado con un código diferente, usted puede programar un máximo
de 4 códigos (4 controles remotos). El control remoto posee 4 botones, Botón 1, Botón 2, Botón 3
y Botón 4.
El sistema esta pre-programado con una rutina de trabajo con cada botón del control remoto.
Trabaja con la siguiente Configuración:
Botón 1 Arma / Cierra seguros
Con el swiche de ignición en OFF
Presione y suelte el botón 1 para Armar el sistema de alarma.
Si presiona el botón 2 dentro de los primeros 3 segundos después de haber Armado el sistema
Botón 2
Botón 3
Botón 4
Botón 1

ESPAÑOL
Genius Car Alarm
www.alarmasgenius.com
8
Genius Car Alarm
www.alarmasgenius.com
8
de alarma, se excluye el Sensor de Impacto.
Con el swiche de ignición en ON
Presione y suelte el botón 1 y Cierran los seguros eléctricos Presione por 3 segundos y activara el
Pánico
Botón 2 Desarma / Abre Seguros / Modo Valet
Con el swiche de ignición en OFF
Presione y suelte el botón 2 para Desarmar el sistema de alarma y abrirá los seguros eléctricos,
presione nuevamente y enviara el segundo pulso para abrir los seguros eléctricos
Con el swiche de ignición en ON
Presione y suelte y abre los seguros eléctricos
Presione y mantenga presionado por 3 segundos, ingresa o sale del modo valet
Botón 4 Canal 2
Presione por 3 segundos el botón 4, activara el canal 2, el cual es utilizado para abrir el baúl
Eléctrico del vehículo.
Botones 3 y 4 Simultáneos Canal 3
Presione los botones 3 y 4 simultáneos, activara el canal 3, (Ver programación canal 3)
Botón 3 Anti-asalto
Presione el botón 3 con la ignición en ON para activar el Anti-asalto por Control Remoto.
Botón 1. Car Finder
Con el sistema Armado, Presione y suelte el botón 1, activara el Car Finder
Botón 3 y luego el Botón 1 Armado Silencioso
Con el swiche de ignición en OFF
Presione y suelte el botón 3 y luego presione y suelte el botón 1, el sistema se armará en modo
silencioso, solo se obtendrá el aviso luminoso de Armado
Botón 3 y luego el Botón 2 Desarmado Silencioso
Con el sistema de alarma Armado
Presione y suelte el botón 3 y luego presione y suelte el botón 2, el sistema se Desarmará en
modo silencioso, solo se obtendrá el aviso luminoso de Desarmado
Códigos de Seguridad en el Control Remoto Genius.
Usted puede asignar hasta 4 controles remotos Genius. Cada control remoto posee un código
único (código invisible) no habrá otro control remoto con el código igual al suyo, de hecho en la
fabrica se programan los microprocesadores de los controles remotos de uno en uno evitando que
los códigos se dupliquen.
Armado Silencioso con el control remoto Genius.
Primero presione y suelte el botón 3, luego presione y suelte el botón 1 del control remoto para
armar el sistema de alarma en modo silencioso, el sistema de alarma se armara sin que la sirena
suene. Al armar en silencioso y el vehículo posee una puerta abierta o mal cerrada, la sirena
emitirá los correspondientes avisos de alerta informándole con 3 sonidos de la sirena.

ESPAÑOL
Genius Car Alarm
www.alarmasgenius.com
9
Genius Car Alarm
www.alarmasgenius.com
9
Desarmado Silencioso con el control remoto Genius.
Primero presione y suelte el botón 3, luego presione y suelte el botón 2 del control remoto para
desarmar el sistema de alarma en modo silencioso, el sistema se desarmara sin que la sirena
suene. Al desarmar en silencioso y el vehículo sufrió un intento de hurto, la sirena emitirá los
correspondientes avisos de alerta informándole con 3 sonidos de la sirena.
Exclusión del Sensor de impacto mediante el control remoto Genius.
Al armar el sistema de alarma, el Sensor de impacto podar ser excluido, presione el botón 1 del
control remoto para armar y dentro de los 3 primeros segundos presione el botón 2 del control
remoto, la sirena confirmara con 1 sonido la exclusión del Sensor de impacto. Esta función se
hace necesaria cuando se deja el vehículo en una zona transitada por vehículos pesados o
cuando se encuentre una persona dentro del vehículo.
Al desarmar el sistema de alarma el Sensor de impacto vuelve a ser incorporado en el sistema de
protección e incorporándolo en la siguiente armado.
Control de bloqueo de puertas (mientras se está manejando)
A. Presione el botón 1 para bloquear puertas.
B. Presione el boton 2 para desbloquear puertas
Car Finder o Localizador con el control remoto Genius
El Car Finder fue diseñado como una función de localización del vehículo para poder ubicarlo en
aquellos casos cuando no recordamos el lugar donde lo parqueamos en un estacionamiento, con
el sistema de alarma armado, presione y suelte el botón 1 del control remoto, inmediatamente la
sirena emitirá 1 sonido y las luces darán 5 destellos indicándole la ubicación del vehículo.
Función de Pánico con el control remoto Genius
Con el sistema de alarma armado o desarmado, presione los botones 1 y 2 del control remoto por
3 segundos, activara el modo pánico, la sirena comenzara a sonar y las luces del vehículo a
encender y apagar, para desactivar presione y suelte el botón 2 del control remoto.
Abre Baúl Eléctrico. (Canal 2) con el control remoto Genius
En la programación del Sistema de alarma se diseño un canal de transmisión el cual podrá ser
utilizada para abrir la baúl eléctrica del vehículo mediante el control remoto, presione el botón 4
del control remoto por 3 segundos y suelte, inmediatamente la baúl se abrirá, si el sistema de
alarma se encuentra armado, no será necesario desarmar el sistema de alarma y luego abrir el
baúl, simplemente presione el botón 4, el sistema de alarma abrirá el baúl y hace un bypass al
sensor de impacto y a la línea de pulsador del baúl, así a usted se le evitara la molestia de que la
sirena comience a sonar al abrir el baúl por medio del control remoto.
Anti-asalto por Control Remoto con el control remoto Genius
Esta función es utilizada para inmovilizar el vehículo en caso de emergencia presionando el botón
3 del control remoto por 3 segundos mientras el motor del vehículo este en marcha, las luces del
vehículo darán 2 destellos, el LED indicador comenzara a titilar indicando la activación del Anti-
asalto, si el aviso acústico está programado la sirena dará 1 sonido. Esta función es programable
(ver tabla de programación de funciones)
Anti-asalto de Presencia (Transmisor opcional Genius de código Fijo)
Esta función es utilizada para inmovilizar el vehículo en caso de emergencia, simplemente
abriendo una de las puertas y alejando el transmisor de presencia aproximadamente 15 mts del
vehículo, estando el motor en marcha. Si tiene el transmisor de presencia dentro del vehículo, la
alarma reconocerá la señal y el anti-asalto entrara en modo pasivo.

ESPAÑOL
Genius Car Alarm
www.alarmasgenius.com
10
Genius Car Alarm
www.alarmasgenius.com
10
MODO DE PASIVO:
Función de anti-asalto quedara en modo pasivo, en el momento que la
alarma reciba por primera vez la señal del trasmisor de presencia, estando
el vehículo encendido.
El anti-asalto pasa a modo Activo cuando se abre cualquiera de las
puertas del vehículo, estando el motor en marcha.
Al alejar el transmisor de presencia, comenzara el conteo del ciclo de los 60
segundos de activación del anti-asalto.
Después de los 60 segundos, los siguientes 15 segundos las luces darán 2
destellos, el LED indicador comenzara a titilar rápidamente, indicando la
activación del anti-asalto
(Si el aviso acústico está programado, la sirena dará 2 sonidos/ función
No. 13) Para que el anti-asalto de presencia funcione, se deberá adquirir el
Transmisor de presencia (opcional) y programarlo en la memoria del
sistema de la alarma y habilitar la función numero 16 de la tabla de
funciones
NOTA:
Si el usuario olvida o se le extravía el transmisor de presencia a la hora de desactivar la alarma y
entra al vehículo, deberá hacer un solo toque al valet swiche, en menos de 60 segundos,
después de encendido el vehículo. Este toque deberá hacerlo cada vez que encienda el auto
Encendido del Transmisor de Presencia.
Presione el botón del transmisor y manténgalo presionado, el LED rojo del transmisor emitirá un
destello y se apagara, al cabo de 3 segundos el LED del transmisor permanecerá encendido por 2
segundos. Suelte el botón del transmisor. El transmisor enviara una señal al modulo receptor
(Unidad Central) cada 6 segundos. Cuando la batería interna del transmisor se encuentre
agotada, el LED del transmisor comenzara a darle avisos de advertencia mediante titileos
continuos. Usted deberá remplazar la batería del transmisor.
Apagado del Transmisor.
Presione el botón del transmisor y manténgalo presionado, el LED rojo del transmisor emitirá un
destello y se apagara, al cabo de 3 segundos el LED del transmisor emitirá 5 destellos. Suelte el
botón del transmisor.
Anti-asalto Activado
Tan pronto el sistema de alarma entre en modo de anti-asalto las luces del vehículo darán 2
destellos, si la función 13 esta activada, la sirena emitirá 2 sonidos, LED indicador comenzara a
titilar lentamente, pasados los 30 segundos las luces comenzaran a destellar y la sirena a sonar
intermitente, pasados los 15 segundos después de haber comenzado a sonar la sirena
intermitente si la función 14 está programada se activa el corta corriente en forma intermitente
produciendo una falla en el motor, luego de 15 segundos se activara el corte de corriente
constante apagando el motor del vehículo y cerrando los seguros eléctricos, comenzara a sonar la
sirena corrida.
Deshabilitacion / Desactivación de los Anti-asaltos
Para Deshabilitar el anti-asalto antes de que comience a sonar la sirena corrida los 6 tonos o antes
de los 60 segundos después de haberse activado el anti-asalto, presione y suelte el botón reset 1
vez.
Para Desactivar el anti-asalto después de haber comenzado a sonar la sirena corrida los 6 tonos o
pasados los 60 segundos después de haberse activado, mantenga o pase el swiche de ignición a
la posición de ON, presione el botón reset la cantidad de veces como lo indique el código de
Transmisor Opcional
de Presencia 370Mhz

ESPAÑOL
Genius Car Alarm
www.alarmasgenius.com
11
Genius Car Alarm
www.alarmasgenius.com
11
seguridad (de fabrica es 1) y espere 3 segundos, tiempo de espera de confirmación que el código
introducido es el correcto
Programacion de funciones
a. La selección de la función es programable. Por favor siga los pasos.
b. En estado desarmado, coloque la ignición en ON/OFF
c. Dentro de 10 segundos, después de colocar la ignición en OFF, presione el botón de valet
5 veces, entonces la sirena hará un largo sonido y la luz estará encendida. El sistema
entrará en la función de programacion de funciones.
d. Después de entrar en el modo de selección de la función, dentro de los primeros 10
segundos presione y suelte el boton Reset la cantidad de veces correspondiente al numero
de la función que usted desea programar, la sirena le confirmara con la misma cantidad de
tonos como la cantidad de veces que usted presiono el botón reset. Ejemplo: Usted
desea programar el cierre de los seguros electricos con el armado automatico,
presione el boton reset 2 veces, la sirena respondera con dos sonidos
e. Cuando alcance la función deseada, presione el botón 1 o botón 2 del control remoto para
seleccionar tambien podra hacer la sellcion cerrando o abriendo los seguros electricos con
el swiche de la puerta (Manual). La sirena sonará una vez cuando es el botón 1 o cierre, la
sirena sonará dos veces con el boton 2 o abra.
f. Para programar otra función del menú seleccionado, vuelva a presionar nuevamente el
botón valet el número de veces de la siguiente función que se desee programar.
Ejemplo. Deseamos programar la función Armado Automático con cierre de puertas
(Función 2), presionamos el botón valet 2 veces, presionamos y soltamos el botón 1 del
control remoto o cerramos los seguros eléctricos con el swiche de la puerta, ahora
deseamos programar la función Anti-asalto por ignición (Función 10), presionamos el
botón valet 8 veces, presionamos y soltamos el botón 1 del control remoto o cerramos
los seguros eléctricos con el swiche de la puerta.
g. Si en 10 segundos no realiza ninguna acción o gira la ignición a la posición OFF, el
sistema dará un largo beep y saldrá del modo de selección de funciones.
Tabla de Funciones
Función Boton
ACTIVA
Boton
DESACTIVA
1 Armado Automatico SI NO
2.
Cierrar los seguros con el Armado
Automatico
SI NO
3. Cerrar los seguros con la ignicion SI PISAR
FRENO
4.
Abrir y Crerrar los seguros con la
ignicion
SI NO
5 Rearmado Automatico SI NO
6. Aviso Acustico al Armar y Desarmar SI NO
7 Exclucion de falsa alarma SI NO
8 Antiasalto por Control Remoto SI NO
9
Retardo de la linea de pulsadores
(Dome Ligth)
SI NO
10 Antiasalto por ignicion SI NO
11 3er. Canal PULSO Pulso de 30
seg al armar
para modulos
alazavidrios
12 Salida para Claxon intermitente Claxon
intermitente
Dome ligth
13 Aviso Acustico al activarse el Anti-
asalto
SI NO

ESPAÑOL
Genius Car Alarm
www.alarmasgenius.com
12
Genius Car Alarm
www.alarmasgenius.com
12
14
Falla en el motor durante la fase del
antiasalto
SI
NO
15
Cierre de seguros con el Rearmado
Automatico
SI NO
16 Antiasalto por presencia SI NO
17 Identificador de controles programados
( I.C.P.)
SI NO
18 Reconocimiento de conductor SI NO
19 Detención de luces OEM SI NO
20 Antiasalto por puerta SI NO
21 Reset de Fabrica SI
Función 1 / Armado Automático.
El sistema de alarma se armara automático después de haber cerrado la última puerta con el
swiche de ignición en la posición de OFF. Una vez que se cierre la ultima puerta, las luces darán 1
destello, la sirena emitirá 1 sonido y el LED indicador del tablero comenzara a titilar rápidamente
indicándole el inicio del armado del modo Automático, pasados los 30 segundos, después de
haber cerrado la ultima puerta, la sirena emitirá 1 sonido y el LED indicador del tablero comenzara
a titilar lentamente, confirmando el armado completo del sistema de alarma.
Si durante los primeros 30 segundos antes de armarse el sistema de alarma una puerta es
abierta, el armado automático pasara en modo de espera, al cerrar la puerta se reinicia y
comienza nuevamente el tiempo de espera de los 30 segundos. El armado automático quedara
excluido con el sistema en modo Vale.
Nota: Para evitar molestias al momento de abandonar el vehículo, cerciorase de retirar la llave del
swiche de encendido, ya que el sistema de alarma al armarse en automático podría cerrar los
seguros eléctricos impidiendo que usted pueda ingresar nuevamente al vehículo.
Función 2 / Cierre de Seguros con el Armado Automática
Con la función No. 1 en ON, al armarse el sistema de alarma en modo automático, cierra los
seguros eléctricos de las puertas.
Función 3 / Cierre seguros con ignición
Con el sistema de alarma desarmado y la llave de ignición es pasada a la posición de encendido,
los seguros eléctricos de las puertas se cierran en forma automática. Se podrá seleccionar 3
modos de cierre de los seguros eléctricos.
Selección 1: (Normal)
Al pasar la llave de ignición a On, después de 5 segundos se cierran automáticamente los seguros
eléctricos de las puertas. Si una puerta permanece abierta en el momento pasar la llave de ignición
a encendido, los seguros de las puertas NO se cierran.
Selección 2: (Pisar el pedal del freno).
Al pasar la llave de ignición a On, y todas las puertas estén cerradas, al pisar y soltar el pedal del
freno, los seguros eléctricos de las puertas se cierran automáticamente. Mientras se conduce y una
puerta es abierta, los seguros se cierran automáticos después haber cerrado la puerta y pisar y
soltar el pedal del freno.
Función 4 / Apertura y Cierre de seguros con ignición
La función 4 Habilita y Deshabilita la función 3
Al pasar la llave de ignición a la posición de OFF, los seguros de las puertas se abren
inmediatamente.

ESPAÑOL
Genius Car Alarm
www.alarmasgenius.com
13
Genius Car Alarm
www.alarmasgenius.com
13
Función 5 / Rearmado Automático
Esta función está programada en la memoria del sistema de alarma como una función preventiva,
caso que se hace necesario cuando usted desarma el sistema de alarma mediante el control
remoto y no ha ingresado al vehículo y pasado el swiche de ignición a la posición de ON, el LED
indicador del tablero comenzara a titilar rápidamente, pasados los 90 segundos el sistema de
alarma se arma nuevamente confirmando con 1 sonido de la sirena y 1 destello de las luces, si la
función 15 está programada en ON, los seguros eléctrico se cierran, protegiendo nuevamente el
vehículo hasta que usted lo desarme nuevamente
Función 6 / Armado y Desarmado Acústico
Selección 1: (ON)
Al armar el sistema de alarma, la sirena emitirá 1 sonido de aviso de armado, Al desarmar el
sistema de alarma, la sirena emitirá 2 sonidos.
Selección 2: (OFF)
Al armar el sistema de alarma, la sirena NO sonara, pero si una puerta permanece abierta al
momento de armar la alarma, la sirena emitirá 3 sonidos de advertencia. Al desarmar la alarma, la
sirena NO sonara, pero si la alarma se disparo, la sirena emitirá 4 sonidos de aviso de disparo.
Nota al armar y desarmar el sistema de alarma solo obtendremos el aviso luminoso, 1 destello de
luz armada, 2 destellos de luz desarmada.
Función 7 / Exclusión de falsas Alarmas
El sistema de seguridad está diseñado y programado para sonar la sirena un periodo de 30
segundo, en el caso de haber algún intento de hurto el cual haga que la sirena suene un periodo
mayor a los 30 segundos, al llegar a los 3 minutos de sonar la sirena automáticamente el sistema
de seguridad silencia la sirena y excluye el Sensor de la zona activada, protegiendo el vehículo
con el resto de los sensores, función que también se aplica para el Sensor de impacto con 10
disparos continuos de Pre-aviso.
Función 8 / Anti-asalto Por Control Remoto (Control Genius)
Esta función es utilizada para inmovilizar el vehículo en caso de emergencia presionando el botón
3 del control remoto Genius por 3 segundos mientras el motor del vehículo este en marcha, las
luces del vehículo darán 2 destellos, el LED indicador comenzara a titilar indicando la activación
del Anti-asalto, si el aviso acústico está programado la sirena dará 1 sonido.
Función 9 / Retardo línea de pulsadores por Luz de Cortesía
Esta función se hace necesaria para aquellos casos en donde el vehículo deja la luz interna del
techo por tiempo después de haber cerrado todas las puertas con el motor apagado.
Selección 1 (ON)
El sistema de alarma dará un retardo en la línea de pulsadores de 60 segundos.
Selección 2 (OFF)
El sistema de alarma no tendrá retardo en la línea de pulsadores.
Nota: Si la selección 1 es escogida, pasados los 60 segundos después de haber armado la alarma
y una puerta permanece abierta, la sirena emitirá los 3 aviso de puerta abierta.
Función 10 / Anti-asalto Por ignición
El anti-asalto se activara inmediatamente cada vez que la llave de ignición es pasada de la
posición de OFF a la posición de ON.

ESPAÑOL
Genius Car Alarm
www.alarmasgenius.com
14
Genius Car Alarm
www.alarmasgenius.com
14
Función 11 / Tipo del Pulso del Canal 3
El canal 3 del sistema de alarma es completamente independiente del canal 2 abre baúl eléctrico,
este fue diseñado para ser utilizado presionando simultáneos los botones 3 y 4 del control remoto,
se podrá utilizar para activar módulos opcionales tales como Modulo de encendido del vehículo,
Modulo Alza vidrio eléctrico, Etc.
El canal 3 posee dos (2) tipo de señal (Pulso, pulso de 30 segundos al armar)
A. Pulso: Presione por 3 segundos y suelte los botones 3 y 4 simultáneos del control remoto
Genius, y obtendrá un pulso
B. Alza vidrio Eléctrico. Al armar el sistema de alarma envía un pulso de 30 segundos el cual
puede ser utilizado para activar un modulo opcional de alza vidrio eléctrico
Función 12 / Claxon Intermitente (Corneta)
La función del Claxon intermitente puede ser programada con 2 diferentes funciones pero solo una
de ellas puede ser elegida:
A. Claxon Intermitente. Sonara en intermitencia el claxon del vehículo cuando el sistema de
alarma se dispare por intento de hurto y dará 1 sonido al armar el sistema de alarma y 2
sonidos al desarmar el sistema de alarma, funcionara en conjunto con las funciones de la
salida de la sirena (independiente)
B. Dome Light, Enciende las luces internas del vehículo al desarmar el sistema de alarma y
encienden intermitente al sonar la sirena ya sea por pánico o por intento de hurto. Corta
Corriente, Al armar el sistema de alarma mantiene un pulso constante el cual puede
ser utilizado para un segundo corta corriente o para activar sensores adicionales.
Función 13 / Aviso Acústico de la Activación del Anti-asalto
Al activarse el anti-asalto por cualquiera de sus 4 métodos, la sirena emitirá 1 sonido de aviso.
Función 14 / Falla del motor durante la segunda fase del Anti-asalto
Cuando el procedimiento de la función del anti-asalto llegue a los 45 segundos, el corte de
corriente se activar en forma intermitente, generando una falla del motor e impidiendo que el motor
del vehículo se apague bruscamente, luego de 15 segundos de falla del motor, el corte de corriente
se activa constante, apagando el motor por completo e impidiendo que pueda volver a ser
encendido
Función 15 / Cierre de seguros con el Rearmado Automático
Con la función 5 en ON, al desactivar el sistema de alarma y ninguna puerta es abierta o la llave
de ignición no es pasada a ON, a los 90 segundos el sistema de alarma se arma en forma
automático y se cierran los seguros eléctricos.
Función 16 / Anti-asalto de Presencia (Transmisor Adicional)
Esta función es utilizada para inmovilizar el vehículo en caso de emergencia, simplemente
abriendo una de las puertas y alejando el transmisor de presencia aproximadamente 15 mts del
vehículo, estando el motor en marcha. Si tiene el transmisor de presencia dentro del vehículo, la
alarma reconocerá la señal y el anti-asalto entrara en modo pasivo.
Función 17 / Identificador de controles programados (I.C.P.)
Cada vez que coloque la llave en la posición de (ON) el LED se encenderá en forma intermitente
dentro de 10 segundos, para indicar el número de controles remotos que fueron programados.
1. Intermitencia /pausa = 1 control programado
2. Intermitencia /pausa = 2 control programado
3. Intermitencia /pausa = 3 control programado
4. Intermitencia /pausa = 4 control programado
Función 18 / Reconocedor de conductor
Al desarmar la alarma con el control remoto el motor del vehículo permanecerá bloqueado y para
desbloquearlo realice los siguientes pasos:

ESPAÑOL
Genius Car Alarm
www.alarmasgenius.com
15
Genius Car Alarm
www.alarmasgenius.com
15
a. Presione el botón del candado abierto del control remoto para desarmar la alarma.
b. Girar la llave en la posición de (ON).
c. Ingrese el CODIGO PIN presionando el botón de valet y el corte de corriente será
desbloqueado.
Si el CODIGO PIN es 1, el sistema podrá ser desbloqueado tan pronto como presione el botón
de valet.
SI el anti-atraco por (ignición) esta activado al pasar la llave del vehículo a posición de ON presione
una sola vez (1) el botón de valet y el anti-atraco y la función de reconocimiento del conductor
serán cancelada al mismo tiempo.
Función 19 / Detectar luces OEM.
Al Programar la función 19 en ON, el sistema de alarma solo podrá ser armada y desarmada
mediante el pulso de los cierres de puertas en conjunto con el aviso luminoso que emite el
vehículo cuando se cierra y se abren los seguros eléctricos con el control remoto original OEM. El
cable Blanco fino, sensor de entrada deberá de ser conectado a las luces pero NO podrá ser
unido con el cable blanco grueso del blinker de luces de la alarma.
Función 20 / Anti-asalto por puerta cables Verde y Purpura.
Cada vez que una puerta es abierta y cerrada, el anti-asalto se activa.
Función 21. Reseteo de fábrica.
Esta función fue creada para colocar todas las funciones de la memoria de la alarma al estado
como venía de fábrica.
Código de Seguridad (Código Pin)
(De Fábrica el Código de seguridad asignado es 1)
Usted podrá desarmar el sistema de alarma y desactivar el Anti-asalto mediante el swiche de
Ignición e introduciendo el Código de seguridad por medio el botón reset.
Usted podrá cambiar el código de seguridad mediante el siguiente Procedimiento:
1. Pase el swiche de ignición de la posición de OFF a ON 3 veces y a la tercera déjela en
OFF en un tiempo no mayor a 7 segundos.
2. La sirena emitirá un sonido y las luces quedaran encendidas, el sistema ingreso en
programación del código PIN.
3. Presione y suelte el botón reset la cantidad de veces del nuevo código que usted desee
ingresar entre 1 y 9.
4. La sirena confirmara con la misma cantidad de sonido al número del nuevo código PIN y
cierra la programación.
Por favor anote y guarde el número del nuevo código de seguridad ya que será requerida para
desarmar el sistema de alarma en caso de emergencia o para desactivar el anti-asalto.

ESPAÑOL
Genius Car Alarm
www.alarmasgenius.com
16
1
A B
C D E F G H
2 3 4 5 6 7 8 9 10
“A” Negro/Blanco
LUZ DE EMERGENCIA
“1” Purpura
PUERTA TG (+)
+12V
“2” Verde
PUERTA TG (-)
“3” Blanco/Negro
PULSADOR DE CAPOTA Y
BAÚL TG (-)
“4” Amarillo
ENTRADA - IGNICION
“5” Negro/Blanco
PEDAL DEL FRENO
“6” Amarillo / Negro
ENTRADA
“7” Naranja
CORTA CORRIENTE (-200mA)
“8” Marrón/Negro
CANAL 3 SALIDA (-300mA)
“9” Marrón/Blanco
CLAXON INTERMITENTE
(-300mA)
“10” Gris
APERTURA DE BAÚL ELÉCTRICO
“C” Azul
ABRE SEGUROS (-200mA)
“D” Marrón
CIERRA SEGUROS (-200mA)
“E” Negro
GND. MASA
“F” Blanco
LUCES
“G” Rojo
FUSIBLES
“H” Gris Grueso
SIRENA
10A - Fusible
12V
Bateria
GND - MASA
15A - Fusible
Fusibles
Bombillos
ON
“B” Blanco
ENTRADA LUZ “OEM”
LUCES
G5504
-12V
-12V
+12V
GND - MASA
MALETA
by Pass
85 30
86 87A
Relevo para el
apagado del
motor
Cable que se corta para
apagar el vehículo, puede
ser fusible de ignición ó
bomba de gasolina
SALIDA NEGATIVA ALZA VIDRIO
PROGRAMACIÓN
DOME LIGHT
SALIDA (-)
PROG. 12
CAPOT
BAUL
G5504 CF - TRF Series
Diagrama de Instalación
1
Julio - 2016

ESPAÑOL
Genius Car Alarm
www.alarmasgenius.com
17
1 “Verde / Blanco OEM”
ENTRADA (-/+) POR DEFECTO (+)
BAJAR DEL MOTOR
2 “Rojo / Blanco OEM”
ENTRADA (-/+) POR DEFECTO (+)
DE SUBIR DEL MOTOR
3 “Amarillo / Negro OEM”
ENTRADA (-/+) POR DEFECTO (-)
DE BAJAR DEL MICROSWITCH
DEL MOTOR
4 “Azul / Negro OEM”
ENTRADA (-/+) POR DEFECTO (-)
DE SUBIR DEL MICROSWITCH
DEL MOTOR
LED
SW VALET
CONECTOR DE BLOQUEO
CONFIGURACIÓN DE
LOS JUMPERS
J4
SWITCH
BAJAR - / +
J3
SWITCH
SUBIR - / +
J2
SEÑAL AL
SUBIR - / +
J1
-
+
SEÑAL AL
BAJAR - / +
4 3 2 1
SENSOR DE IMPACTO
GENIUS
SENSOR AUXILIAR
(OPCIONAL)
G5504
ROJO AZUL
2
G5504 CF - TRF Series
Diagrama de Instalación
Julio - 2016

ESPAÑOL
Genius Car Alarm
www.alarmasgenius.com
18
Genius Car Alarm
www.alarmasgenius.com
18
Selección de señal de Apertura/ Cierre - OEM

ESPAÑOL
Genius Car Alarm
www.alarmasgenius.com
19
Genius Car Alarm
www.alarmasgenius.com
19
Selección de señal del swiche Apertura/ Cierre - OEM
Configuración cables OEM (Arma / Desarma)
Modo B: Este modo utiliza hasta 4 cables para detectar el bloqueo de las puertas del vehículo,
para determinar el estado del sistema. Dos cables (VERDE/ BLANCO para bloqueo y
BLANCO/ROJO para desbloqueo son conectados a la puerta del conductor). Cuando las puertas
son bloqueadas con un transmisor original de fábrica, el sistema se armará. Cuando las puertas
son desbloqueadas con un transmisor original de fábrica, el sistema se desarma. El cable
AMARILLO/NEGRO (para el botón de bloqueo) y el cable AZUL/ NEGRO (para el botón de
desbloqueo) debe ser conectado a uno de los cables desde el botón de bloqueo/ desbloqueo en la
puerta del conductor. Estos cables son importantes pues ellos paran el sistema desde armado/
desarmado cuando la puerta es bloqueada o desbloqueada manualmente.

ESPAÑOL
Genius Car Alarm
www.alarmasgenius.com
20
Genius Car Alarm
www.alarmasgenius.com
20
VERDE/ BLANCO OEM de entrada de bloqueo (-/+) por defecto (+)
Este es el cable de entrada de bloqueo, que es el cable de Armado. Este cable busca una señal
cuando las puertas son bloqueadas con los controles remotos de fábrica. La señal puede ser tanto
(+ / -). Esto puede ser conectado al cable del motor de bloqueo de la puerta del chofer o a un
cable de señal de bloqueo que viene de fábrica. Para (-) entrada NEGATIVO, mueva el Jumper J1
a NEGATIVO.
ROJO/ BLANCO OEM entrada de desbloqueo (-/+) por defecto (+)
Este es el cable de entrada de desbloqueo, que es el cable de Desarme, busca una señal cuando
las puertas (o puerta del conductor) son desbloqueadas con el control remoto de fábrica. La señal
puede ser tanto (+ / -). Hay muchos sistemas de fábrica que desbloquea solo la puerta del
conductor primero (llamado desbloqueo inteligente). En estos sistemas es importante encontrar
una señal de desbloqueo de la puerta del conductor, cuando botón de desbloqueo sobre el control
cuando es presionado por primera vez. Esto significa que primero debes encontrar el cable de
señal de desbloqueo que viene sólo en la puerta del conductor. También puede ser conectado en
la puerta del chofer al cable de desbloqueo que viene de fábrica en la entrada de las llaves.
AMARILLO/ NEGRO OEM entrada de validación (-/+) por defecto (-)
Este es el cable de Validación. Este cable monitorea la señal de armado proporcionando así un
alto nivel de protección del armado. Si la señal de bloqueo es activada por el botón de bloqueo de
la puerta quiere decir que no está armando el sistema. Esto se debería atar al cable del interruptor
de bloqueo de la puerta.
AZUL/ NEGRO OEM entrada de validación (-/+) por defecto (-)
Este es el cable de Validación. Este cable monitorea la señal de desarmado proporcionando así
un alto nivel de protección del desarmado. Si la señal de desbloqueo es activada por el botón de
desbloqueo de la puerta quiere decir que no está desarmando el sistema. Esto se debería atar al
cable del interruptor de desbloqueo de la puerta.
Modo A:
Este modo utiliza hasta 4 cables para detectar el bloqueo del vehículo, para determinar el estado
del sistema. El cables (VERDE/ BLANCO para bloqueo y BLANCO/ROJO para desbloqueo son
conectados a la puerta del conductor). Cuando las puertas son bloqueadas con un transmisor
original de fábrica, el sistema se armará. Cuando las puertas son desbloqueadas con un
transmisor original de fábrica, el sistema se desarma. Hay un PIN, BLANCO con dos cables (1
BLANCO que es para la luces) y (2 NEGRO/ BLANCO para la luces de intermitente) deben ser
conectados uno de los dos cables en algunos modelos de carros (1. cable de luces de parqueo,
2.a la luces direccionales botón del carro).Y en algunos modelos de carros, el sistema necesitará
estos dos cables (1. cable de luces de parqueo, 2. cable de luces direccionales) para cooperar con
el cable VERDE/ BLANCO (para bloqueo) y ROJO/ BLANCO (para desbloqueo), para que el
sistema sea armado o desarmado.
Por ejemplo:
En algunos modelos de carro, cuando se presiona el transmisor original de fábrica, la luz de
parqueo parpadea para indicar que el carro ha sido bloqueado. Pero cuando se presiona el botón
de luces intermitente las luces parpadean, entones eso causa que el sistema se arme. Para evitar
esta situación, el cable de luces intermitente (Negro/ Blanco) tiene que ser conectado a las luces
intermitente. El sistema reconoce la luz de parqueo cuando es activada por las luces
intermitentes, no es un transmisor de fábrica. El sistema no será armado cuando se presiona el
botón de la luces intermitente del carro.

ESPAÑOL
Genius Car Alarm
www.alarmasgenius.com
21
Genius Car Alarm
www.alarmasgenius.com
21
Fecha de Venta:___________________________ Factura _____________________
BENEFICIARIO
Nombre:_________________________________ C.I.:_____________________
Marca del Vehículo:________________________ Color:___________________
Modelo: ____________________________ Placa:__________________________
SELLO Y FIRMA DEL DISTRIBUIDOR QUE INSTALO EL SISTEMA
REVISION TECNICA
1ra. Fecha __________________________________________________________
Observaciones:___________________________________________________
Sello: __________________________________________________________
2da Fecha __________________________________________________________
Observaciones:___________________________________________________
Sello: __________________________________________________________
3ra Fecha __________________________________________________________
Observaciones:___________________________________________________
Sello: __________________________________________________________

ESPAÑOL
Genius Car Alarm
www.alarmasgenius.com
22
Genius Car Alarm
www.alarmasgenius.com
22
LIMITE DE GARANTÍA
Todo sistema de alarma marca GENIUS está garantizado por ( ) año(s) a partir de la fecha
de instalación tomando en cuenta las siguientes condiciones:
1. Esta garantía no cubre desperfectos o mal funcionamientos ocasionados por:
a. Mala instalación
b. Inmersión en agua o líquidos
c. Choques o incendios
d. Intento de modificación o reparación por manos no calificadas
e. Perdida o deterioro de los controles
2. Los gastos de desmontaje, montaje o cualquier otro que se ocasiones, será por cuenta
del reclamante.
3. La ejecución de esta garantía, tendrá mayor agilidad en sus trámites,
Si el usuario posee la calcomanía colocada en el vidrio trasero del vehículo.
4. El departamento técnico de la empresa se reserva el derecho de determinar
la validez de la garantía según experticia
ADVERTENCIA:
El antirrobo tiene exclusivamente una función disuasiva contra eventuales robos. En ningún caso
puede ser considerado como un seguro contra el robo. El constructor declina todas las
responsabilidades por averías o anomalías de funcionamiento de la alarma, de los accesorios o
del grupo del automóvil, debido a la mala instalación o la supervisión de las características
especificadas
Recomendaciones para guardar, manténgala siempre con usted.
1) Desactivación del Anti asalto
Con la llave de ignición en ON, presione el botón reset la cantidad de veces como indique el
código pin (De fabrica es 1), a los 3 segundos el anti atraco se desactivara.
2) Desactivación Manual
Con la llave de ignición en ON, presione el botón reset la cantidad de veces como indique el
código pin (De fabrica es 1), a los 3 segundos el sistema de alarma se desactivara.
3) Ingreso y Salida del Modo Valet
Con la llave de ignición en la posición de ON, presione y mantenga presionando el botón
reset por 5 segundos, el LED del tablero permanecerá encendido fijo, para salir del modo
valet, con la llave de ignición en la posición de ON, presione y suelte el botón reset, el LED
del tablero se apagara
Importante, Plastifique y guarde estas instrucciones y llévelo siempre consigo

ENGLISH
Genius Car Alarm
www.geniuscaralarm.com
23
“OEM” Car Alarm
G-5504 CF
TRF Series

ENGLISH
Genius Car Alarm
www.geniuscaralarm.com
24
Genius Car Alarms
www.alarmasgenius.com
2
Genius Car Alarm Hopping code
OEM G-5504
• Car alarm system 12 volt
• Module controlled by Micro-Processor
• Car Alarm designed for vehicle manufactures remotes to lock and unlock the doors
• 4 remote controls Learning Genius Variable Code Transmit Frequency 370 Mhz
• Notice learned remote (N.L.R.) (Programmable)
• Arm and Disarm, by locking and unlocking signal and lights
• LED Board
• Positive Output for Flash of Light with internal relay in the module
• Negative Output Channel 2 (Opens electrical Trunk) by remote Genius
• Central locking (Negative)
• Automatic Arming with Door Lock (Programmable)
• Automatic Re-arming (Accidental Disarm) with Door Lock
• Lock and unlock the doors with the ignition (programmable)
• Lock doors with the brake pedal (Programmable)
• Shock Sensor with Pre-warning
• Function Panic, by remote Genius
• Car Finder, by remote control Genius
• Positive Originals Line Switches (Ford, etc..)
• Negative Originals Line Switches (GM, Toyota, etc.)
• Negative Line Switches Trunk, Hood
• Delay doors pin switch (Programmable)
• Door Anti-hijacking (Programmable)
• Ignition Anti-hijacking (Programmable)
• Far away Anti-hijacking (Programmable) Optional Transmitter
• Remote Anti-hijacking by remote Genius (Programmable)
• Warning light to activate the Anti-hijacking
• Valet Mode.
• Negative Output to arming (cut ignition)
• Negative Output timed for Modules, up windows (programmable)
• Recognizer Driver (Programmable)
• Function Dome Light (Programmable)
• Defective Areas excluded
• Flashing Horn (Programmable)
• Programming software functions
• Emergency Disarm using PIN security code
• Last State Memory System
• Electronic Siren, dba 130, 20 W, 6 Tones
• Wires Identified with colors
• Protection fuses built into the wiring
Genius Car Alarm Hopping code
OEM G-5504

ENGLISH
Genius Car Alarm
www.geniuscaralarm.com
25
Genius Car Alarms
www.alarmasgenius.com
3
Introduction.
Thank you for purchasing your vehicle for our security. Read through the operating system use
mainly transmitter functions, the valet button and LED indicator board.
The alarm system OEM Genius-5504, was designed and developed for those vehicles that have a
factory original remote control for opening and closing the door locks.
Arming the alarm system.
Arming the alarm system is using 2 methods.
The first
through the closed lock button on the remote control, which is necessary for the ignition is
off and the system is not in Valet mode.
The second
is the automatic Arm, which is obtained by passing the ignition ON to OFF and then
opening and closing a door. Automatic The system will arm 30 seconds after the last door has
been closed, this function is programmable see table programming functions
Arming the alarm system using the Remote Control.
The alarm system can always be armed by remote control provided the ignition is off and the
system is not in Valet mode.
To arm the alarm system after leaving the vehicle and have closed all doors, simply press and
release the closed lock remote button 1 time, the lights will 1 flash, the siren will give 1 beep and
the LED board begin to flash slowly confirming the system is armed, the locks are closed, the
current cuts will be activated preventing the vehicle can be used past three seconds the alarm
system goes to standby an attempted theft
Armed and Alarm System Activated.
When the alarm system is armed the LED blinks slowly board, if a door is open, the siren starts to
sound and lights flashing for 60 seconds, if the door remains open after 60 seconds, the siren will
continue to sound and lights detailing for 3 minutes, spent the three minutes the alarm system
excludes sensors doors protecting the vehicle with the other sensors, if the door is closed before
the first 60 seconds after starting the siren, the siren is silenced after 60 seconds and the lights
stop flashing.
If to disarm the alarm system, the siren sounds 4 beeps and lights blink 4 times, this will indicate
that the vehicle suffered an attempted theft, the LED board will continue flashing until you pass the
swiche ignition to the ON position Please check the vehicle well.
Disarming the alarm system.
When the alarm system is armed, press and release the open lock button on the remote control,
siren sounds 2 beeps and flashes indicating lights 2 disarming the alarm system, cutting ignition
was turned off, the LED board was turned off, the locks of the doors will open.
Exclusion defective areas.
When arming the alarm system and the defective area, the siren will sound 3 beeps and lights give
3 simultaneous flashes, indicating that an area is found defective, when this happens the faulty
zone will be automatically bypassed and the vehicle remain protected with the rest areas, for
example, if the trunk is not closed at the time of arming the alarm system by transmitter, the siren
will sound 3 beeps and lights flash 3 times indicating that there is a closed area and exclude bad
sensors that area. The defective area will be incorporated into the protection again 3 seconds after
the fault has been corrected.

ENGLISH
Genius Car Alarm
www.geniuscaralarm.com
26
Genius Car Alarms
www.alarmasgenius.com
4
Shock sensor – Dual zone
The shock sensor is designed to detect strong shock on the vehicle (collision), impacts,
movements trailer, breaking windows. It can also be triggered by the shock waves produced
by noisy exhausts, by thunder or heavy traffic. The shock sensor will NOT be powered by
wind or oscillating movements. When the sensor detects slight shock impact, the siren will 5
sounds and lights give 2 flashes. If the sensor detects an impact heavy blow, the siren will
sound and lights will flash for 60 seconds.
The level of sensitivity will be set by the installer and should be in optimal sensitivity Excessive
sensitivity can cause false alarms.
Ignition Anti-hijacking
This function is in software memory to activate the anti-hijacking automatically whenever the
ignition swiche the OFF position to the ON position without opening a door or pressing the remote
control button. Passing the swiche ignition to the ON position the LED on the board start flashing,
the vehicle lights give 2 flashes, if the acoustic signal is programmed, the siren sounds 2 beeps,
This feature is programmable (see program table )
Door Anti-hijacking.
With the ignition ON, you open and close a door, the LED on the board start flashing, the vehicle
lights give 2 flashes, if the acoustic signal is programmed, the siren sounds 2 beeps, This feature is
programmable (see program table )
Activated Anti-hijacking
As soon as the alarm system from going to anti-hijacking cars lights give 2 flashes, if function 13 is
activated, the siren sounds 2 beeps, LED will start flashing slowly, after 30 seconds the lights begin
to flash and siren to sound intermittently after 15 seconds and the function 14 is programmed, the
cut ignition is activated intermittently producing an engine failure, after 15 seconds will activate the
ignition cut constant turning off the vehicle engine and closing the locks, the siren starts to sound
constantly.Deshabilitacion /
Disarm Anti-hijacking
To Disable the anti-hijacking before it starts to run the siren tones or 6 before 60 seconds after
activated anti-hijacking, press and release the reset button 1 time.
To disable anti-hijacking after starting the siren tones or 6 after 60 seconds after activated, hold or
pass the ignition ON, press the reset button the number of times the security code (factory is 1) and
wait 3 seconds timeout confirmation that the code entered is correct
Electronic siren
Install the siren under the hood, should you place it in a protected place away from heat and water
damage, while driving through deep water or clearings may be splashed with water causing
damage to the siren, set at a position that water does not damage . If you wash your vehicle engine,
protect the siren with a plastic bag to prevent damage. Damage caused by water or heat are not
covered by warranty.
Flashes Lights
When the siren is sounding, vehicle lights will flash simultaneously. The lights also blink when
arming and disarming the alarm system.
Warnings flashing lights
This is a visual indicator of the status of the alarm system.
A) 1 Flash – Armed
B) 2 flashes - Disarms
C) 3 Flashes – 3 flashes - Trunk or Hood open when arming.
D) 4 Flashes - To disarm the alarm indicates trigger.

ENGLISH
Genius Car Alarm
www.geniuscaralarm.com
27
Genius Car Alarms
www.alarmasgenius.com
5
Siren Warnings
This is a sound indicator of the state of the alarm system.
A) 1
Sound Armed
B) 2 Sounds Desarms
C) 3 Sounds Trunk or Hood open when arming
D) 4 Sounds To disarm the alarm indicates trigger
Installing the LED Board
Insert visible on the board, the LED lights indicating that the vehicle has an alarm system.
Indications of alarm status by LED board:
A) Slow flashes Armed
B) Quick flashes Auto Re-arm, 60-second countdown
C) LED Off Disarmed and ignition ON
D) 1 Flash 1 Pause Trigger Door, Hood or trunk
E) 2 Flashes 1 Pause Trigger impact.
F) 3 Flashes 1 Pause Trigger on ignition
E) On Fixed Valet Mode
When disarm the siren sounds 4 beeps indicate that the alarm will trigger. The LED board by the
flashes will indicate the trigger cause. Place a sticker under the LED board indicating codes.
Valet Mode and Reset Button
The Valet Mode is designed to disable the alarm system when required. Example, when you need
to leave the vehicle in a parking lot, performing maintenance, etc..
For the way it is necessary that the system alarm is disarmed, pass the ignition in the ON position,
press for 3 seconds the reset button. In valet mode, the indicator LED on the board lights up
continuously.
When the alarm system is in valet mode will be excluded cutting ignition (anti-hijacking) and
audible alarm system
To exit valet mode simply with ignition ON press the reset button for 3 seconds, the LED will turn
off indicating the valet mode output.
Emergency Disarm by the reset button
In the event that the remote control is lost, damaged or the battery is depleted, you can disarm the
system using the reset button.
First. With the system armed, open the driver's door, the siren begins to sound.
Second, Pass the ignition ON, before the 10 seconds press the reset button the number of times
assigned in the security code (factory is 1) the siren will continue to sound for 3 seconds and if the
code is correct, the siren muted and the system is disarmed.

ENGLISH
Genius Car Alarm
www.geniuscaralarm.com
28
Genius Car Alarms
www.alarmasgenius.com
6
Functions Remote Control 4 Button GENIUS
Button Function Terms
Arm Disarmed
Car Finder Armed
Button 1
Lock Ignition ON / Valet Mode
Disarm Alarm armed Button 2
Unlock Ignition ON / Valet Mode
Button 3, then button 1 Silent arms Disarmed
Button 3, then button 2 Silent Disarm Armed
Buttons 1 and 2 for 3 seconds Function Panic Armed or Desarmed
Button 4 for 3 seconds Channel 2 Forever
Buttons 3 and 4 for 3 seconds Channel 3 Forever
Button 1, then button 2 Shock Sensor Bypass Disarmed
Button 4 for 3 seconds Anti-hijacking Ignition ON
NOTE: Please review the table above and follow the instructions for the functions.
Learning Remotes (Genius) and Transmitter Presence. (Genius)
The alarm system is designed to learn up to 4 different remote controls, caution when
programming the first remote control alarm system erases memory previous remotes Genius.
program all remotes at the same time, because by this you erase function can erase any memory
of the remote control is lost is simply programmed the remote or remotes you own again. The
transmitter presence should be the last program.
Learning remotes (Genius), follow these steps:
1. With the system disarmed alarm, switch ignition to the ON position
2. Within the first 5 seconds after the last swiche ignition to the ON position, press and release
the reset button 5 times, the siren will confirm with a long sound, you have 10 seconds to
begin entering the remotes, if not enter any remote before the 10 seconds or passes
swiche ignition to the OFF position, the system will exit the learning mode and remote
controls will confirm with 2 siren sounds and the memory of the remote control will not be
removed.
3. Press and release the remote control button 1 to program the siren sound will confirm the
learner's with 1 remote control, at this time the old remotes are erased.
4. To program a second remote control repeat step 3 where the siren will confirm with 2
sounds the learner's second remote control with 3 sounds and the third to the fourth remote
control programming closes.
5. Pass the ignition to OFF or wait 10 seconds, the alarm system closes and exits the learning
mode of remote controls, siren with 2 sounds confirmed.
6. If the anti-hijacking ignition is on, place the system in valet mode and follow steps 1 to 5.
7. To program additional transmitter anti-hijacking presence, in the first program memory
remotes alarm and finally program the additional presence transmitter. With the presence
transmitter off, press and release the transmitter button, the system will confirm with various
sounds memorization transmitter

ENGLISH
Genius Car Alarm
www.geniuscaralarm.com
29
Genius Car Alarms
www.alarmasgenius.com
7
Genius Remote Control. Rolling Code.
Every remote control is assigned a different code, you can program up to 4 codes (4 remotes). The
remote has 4 buttons, Button 1, Button 2, Button 3 and 4 button.
The alarm system is pre-programmed with a routine function for each button on the remote control.
Works with the following configuration:
Buttnn 1 Arm / Lock
Ignition OFF
Press and release button 1 to arm the alarm system.
Pressing button 2 within the first 3 seconds after arming the alarm system, the shock sensor is
excluded.
Ignition ON
Press and release the 1 button locks the doors Press for 3 seconds to activate the panic function
Button 2 Disarm / Unlock / Valet Mode
Ignition OFF
Press and release the 2 button to disarm the alarm system and unlock the doors, press again and
send the second pulse to unlock the doors
Ignition ON
Press and release, unlock doors
Press and hold for 3 seconds, enter or exit valet mode
Button 4 - Channel 2
Press the 4 button for 3 seconds, activate channel 2, which is used to open trunk.
Buttons 3 and 4 both - Chnnel 3
Press buttons 3 and 4 at the same time for 3 seconds activates channel 3 (see table programming
- channel 3)
Button 2
Button 3
Button 4
Button 1

ENGLISH
Genius Car Alarm
www.geniuscaralarm.com
30
Genius Car Alarms
www.alarmasgenius.com
8
Button 3 Anti-hijacking
With the ignition ON, press the 3 button for 3 seconds to activate the Anti-hijacking.
Button 1. Car Finder
System Armed, Press and relase button 1, activate the Car Finder
Button 3 after Button 1 Silent Arm
Ignition OFF, press and release the 3 button, then press and release the button 1, the alarm
system is armed in silent mode, only the light flashes 1 time
3 Button, then Button 2 - Silent Disarm
Arming the system, press and release button 3, then press and release Button 2 Disarms the alarm
system in silent mode, only flash lights Disarm
Genius Remote Control.
You can assign up to 4 remotes Genius. Each remote has a unique code (invisible code) there will
be a remote control with the code like yours, in the manufacture microprocessors remotes are
programmed one at a time, preventing duplication codes.
Silent Arming with remote control (Genius).
First press and release the 3 button, then press and release button 1 on the remote to arm the
alarm system in silent mode, the alarm system arming without the siren sounding. When arming
and silent vehicle's open or not closed, the siren will alert the relevant notices informing with 3
siren sounds.
Silent Disarm with Remote Control (Genius).
First press and release the 3 button, then press and release the 2 button on the remote to disarm
the alarm system in silent mode, the system will disarm without the siren sounding. Disarming
silent and suffered an attempted vehicle theft, the siren will alert the relevant notices informing with
3 siren sounds.
Arming Without Shock Sensor
When arming the alarm system, the shock sensor can be excluded, press the 1 button on the
remote control to arm and within the first 3 seconds press the 2 button on the remote control, siren
sound with 1 confirmed the exclusion of the Sensor shock. This function is necessary when the
vehicle is left in a busy area for heavy vehicles, when a person is in the vehicle.
To disarm the alarm system shock sensor returns to be incorporated in the system of protection
and incorporating it into the next armed.
Lock / Unlock (while driving)
A. Press 1 to lock doors.
B. Press button 2 to unlock doors
Car Finder (Remote Control Genius)
The Car Finder was designed as a function to locate in those cases when we do not remember the
place where we parked in a parking lot, with the system armed alarm, press and release button 1
on the remote, immediately the siren will emit 1 beep and give 5 flashes lights indicating the
location of the vehicle.

ENGLISH
Genius Car Alarm
www.geniuscaralarm.com
31
Genius Car Alarms
www.alarmasgenius.com
9
Panic function (Remote Control Genius)
With the alarm system armed or disarmed, press buttons 1 and 2 on the remote control for 3
seconds, activate the panic mode, the siren sounds, the vehicle lights flashing. To deactivate press
and release the button 2 on the remote control.
Channel 2 - Open trunk electric (remote Genius)
In programming the alarm system a transmission channel which can be used to open the trunk of
the vehicle power using the remote control, press the 4 button on the remote control for 3 seconds
and release immediately opens the trunk is design, if the alarm system is armed, you will not need
to disarm the alarm system and then open the trunk, simply press the 4 button, the alarm system
will open the trunk and does a bypass shock sensor and push the trunk line ..
Remote Anti-Hijacking (Remote Control Genius)
This function is used to hold the vehicle in an emergency by pressing the 3 button on the remote
control for 3 seconds while the driver of the moving vehicle, vehicle lights give 2 flashes, the LED
will start flashing indicating the activation of the Anti hijacking, if audible warning siren is scheduled
give 1 beep. This feature is programmable (see table programming functions)
Anti-Hijacking Far Away (Optional transmitter Genius - rolling code)
This function is used to secure the vehicle in case of emergency, simply opening a door and
moving the transmitter about 15 mts presence of the vehicle, the engine is running. If the
transmitter is present within the vehicle, the alarm signal and recognize the anti-hijcking went into
passive mode.
PASSIVE MODE:
The anti-hijacking remain in passive mode when the alarm first receives the
transmitter signal presence, the engine switched on.
The anti-hijacking mode becomes active when any vehicle door is
opened with the engine running.
When moving the transmitter presence begins a countdown of 60 seconds to
activate the anti-hijacking.
After 60 seconds, the next 15 seconds will give 2 flashes lights, the LED will
start flashing rapidly, indicating the activation of the anti-hijacking (if the
warning sound is programmed, the siren will give 2 beeps / Function Number
13 ) for the anti-hijacking presence work, you will need to purchase the
presence Transmitter (optional) and program it into the system memory and
enable the alarm function number 16 function table
NOTE:
If you forget or misplace her presence transmitter when the alarm goes off the vehicle, you must
make a single touch to swiche valet, in less than 60 seconds after the vehicle ignition. This touch
must do so every time you start the engine
Presence transmitter power ON.
Press and hold the transmitter button, the red LED on the transmitter will emit a flash after 3
seconds the LED on the transmitter will stay on for 2 seconds. Release the transmitter button. The
transmitter will send a signal to the receiver module (Central Unit) every 6 seconds. When the
internal battery of the transmitter is low, the LED transmitter began to give warnings by continuous
flashes. You must replace the transmitter battery.
Presence transmitter power OFF.
Press and hold the transmitter button, the red LED on the transmitter will turn off a flash and, after
3 seconds the LED on the transmitter will emit 5 flashes. Release the transmitter button. The
transmitter is turned off
Presence Optional
Transmitter 370MHz
Rolling Code

ENGLISH
Genius Car Alarm
www.geniuscaralarm.com
32
Genius Car Alarms
www.alarmasgenius.com
10
Activated Anti-hijacking
As soon as the system enters the anti-hijacking vehicle lights give 2 flashes, if function 13 is
activated, the siren will emit 2 beeps, LED will start flashing slowly, after 30 seconds the lights
begin to flash and the intermittent siren sounded, after 15 seconds after they started flashing siren
sound if function 14 is ON, ignition cut intermittently producing an engine failure, after 15 seconds
will activate the power failure constant turning off the vehicle engine and lock the doors, the siren
sounds constant.
Cancels / Disables Anti-hijacking
To cancel the anti-hijacking before it starts to sound the siren tones or 6 before 60 seconds, press
and release the reset button 1 time.
To disable anti-hijacking after starting the siren 6 tones or after 60 seconds, hold or pass the ignition
ON, press the reset button the number of times the security code (factory is 1) and wait 3 seconds
timeout confirmation that the code entered is correct
Programming functions
For selection of programming functions, please follow the steps
a. In disarm mode, pass the ignition ON to OFF
b. Within 10 seconds after passing the ignition OFF, press the valet button 5 times, the siren
emits a long sound and light vehicle light fixed. The system enters the programming
function.
c. Within the first 10 seconds, press the valet times equal to the number of the function you
want to program, the siren will chirp each time you press the valet button.
d. When you reach the desired function, press button 1 or 2 button Remote Control to select.
Also you could make the selection locking or unlocking the door button (Manual). The siren
will sound once with button 1 or closure, the siren will beep twice with the 2 button or open.
e. To program another funtcion on the menu press the valet button again the number of times
of the next function to be programmed. For example: We want to program the automatic
arming with door lock function (Function 2), press the valet button 2 times, press and
release the button 1 on the remote control or close the locks with swiche door, Deseamos
programar la función Armado Automático con cierre de puertas (Función 2), presionamos
el botón valet 2 veces, presionamos y soltamos el botón 1 del control remoto o cerramos
los seguros eléctricos con el swiche de la puerta, now we want to set the Anti - assault
ignition function (Function 10), press the valet button 8 times, press and release the button
1 on the remote control or close the locks with swiche door.
f. If no action is taken within 10 seconds or turn the ignition to the OFF position, the system
will give a long beep and exit the selection mode functions.
FUNCTION TABLE
NO. FUNCTION CLOSE
BUTTON
OPEN BUTTON
1 Automatic Arming YES NO
2. Close insurance with Automatic Arming YES NO
3. Close insurance by ignition YES TREAD BRAKE
4. Open and close insurance by ignition YES NO
5 Automatic Re-Arming YES NO
6. Acoustic warning to Arm and Disarm YES NO
7 Exclusion of false alarm YES NO
8 Anti hijack by remote control YES NO
9 Delay line pushbuttons (Dome Ligth) YES NO
10 Anti hijack by ignition YES NO
11 3rd channel PULSE
30 sec pulse
rise to

ENGLISH
Genius Car Alarm
www.geniuscaralarm.com
33
Genius Car Alarms
www.alarmasgenius.com
11
assemble
modules for
glasses
12 Output for intermittent horn Intermittent
horn
Dome ligth
13 Acoustic Notice to activate the Anti
hijack
YES NO
14
Engine failure during the phase of anti
hijack
YES NO
15 Close insurance with Automatic Re-
arming
YES NO
16 Anti hijack by presence YES NO
17 ID programmed controls ( I.C.P.) YES NO
18 Recognition driver YES NO
19 Stopping OEM lights YES NO
20 Anti hijack by door YES NO
21 Factory Reset YES
Function 1 –Automatic Arm
The alarm system automatically arms itself after closing the last door and the ignition in OFF.
Once the last door is closed, the lights will 1 flash, the siren will sound and the LED on board starts
flashing quickly indicating the onset of armed Auto mode, after 30 seconds after closing the last
door, the siren will sound and one board LED will start flashing slowly to confirm full arming of the
alarm system.
If during the first 30 seconds before arming the alarm system is a door open, the automatic arming
Standby pass, closing the door and starts again restarts the timeout 30 seconds. The automatic
arming does not work in valet mode.
Note: To avoid problems when leaving the vehicle, be sure to remove the key from the ignition
switch because the alarm system to arm automatically locks could close avoiding you to re-enter
the vehicle.
Function 2 / Close insurance with Automatic Arming
Function No. 1 is ON, to arming the alarm system automatically closes electric door locks.
Function 3 / Close insurance by ignition
With the alarm system disarmed and the ignition key is passed to the on position , power door locks
are closed automatically. He can choose 3 modes of closure of locks.
Selection 1: (Normal).
Passing the ignition key to On, after 5 seconds automatically close the door locks. If a door remains
open when passing the ignition key to on, the door locks are not closed.
Selection 2: (Depress the brake pedal).
Passing the ignition key to On, and all doors are closed, pressing and releasing the brake pedal,
electric door locks are automatically closed. While driving, and a door is opened, insurance close
automatic after closing door and press and release the brake pedal.
Function 4 / Open and close insurance by ignition
The four function enables and disables the function 3
Passing the ignition key to the OFF position , the door locks are opened immediately.

ENGLISH
Genius Car Alarm
www.geniuscaralarm.com
34
Genius Car Alarms
www.alarmasgenius.com
12
Function 5 / Automatic Re-Arming
This function is programmed in the memory of the alarm system as a preventive function, if that
becomes necessary when you disarm the alarm system by remote control and has not entered the
vehicle and passed Swiche ignition to the ON position, the LED panel began blinking rapidly, after
90 seconds the alarm system is armed again confirming 1 siren sound and 1 flash of lights, if
function 15 is set to ON, the electric insurance are closed, protecting the vehicle again until you
take it apart again.
Function 6 / Acoustic warning to Arm and Disarm
Selection 1: (ON)
When arming the alarm system, the siren will sound warning one armed, to disarm the alarm system,
the siren will sound 2 sounds.
Selection 2: (OFF)
When arming the alarm system, the siren will not sound, but if a door is open when arming the alarm,
the siren emits 3 warning sounds. To disarm the alarm, the siren will not sound, but if the alarm
trigger, the siren sounds emit 4 warning shot.
Note: to arm and disarm the alarm system only get the warning light, 1 flash of light armed ,
disarmed 2 flashes of light.
Function 7 / Exclusion of false alarm
The security system is designed and programmed to sound the siren a period of 30 seconds, in the
case of any attempted theft which makes the siren sounds more than 30 seconds period , arriving
at 3 minutes of sound the siren automatically mutes the security system siren and excludes sensor
activated zone, protecting the vehicle with the other sensors, a function that also applies to the
impact sensor 10 continuous shots Pre - warning.
Function 8 / Anti hijack by remote control (Genius Control).
This function is used to immobilize the vehicle in case of emergency by pressing the 3 button
remote control Genius for 3 seconds while the vehicle engine is running, the vehicle lights will 2
flashes, the indicator LED will start flashing indicating activation anti - hijack, if the audible warning
is programmed the siren will sound one.
Function 9 / Delay line pushbuttons (Dome Ligth).
This function is necessary for those cases where the vehicle leaves the internal ceiling light time
after closing all the doors with the engine off.
Selection 1 (ON)
The alarm system will give a delay line buttons 60 seconds.
Selection 2 (OFF)
The alarm system will not delay line switches.
Note : If the setting 1 is chosen, after 60 seconds after the alarm armed and a door remains open,
the siren will open warning 3 door.
Function 10 / Anti hijack by ignition.
The anti-hijack is immediately activated whenever the ignition key is passed from the OFF position
to the ON position.
Function 11 / 3rd channel.
Channel 3 alarm system is completely independent of channel 2 opens electric trunk, this was
designed to be used by pressing simultaneously buttons 3 and 4 on the remote control can be
used to activate optional modules such as module ignition, module for electric glass, Etc.

ENGLISH
Genius Car Alarm
www.geniuscaralarm.com
35
Genius Car Alarms
www.alarmasgenius.com
13
Channel 3 has two ( 2) type of signal ( pulse , pulse 30 seconds when arming)
A. Pulse: Press for 3 seconds and release the buttons 3 and 4 simultaneous remote control Genius
, and get a pulse .
B. Alza Electric glass. When arming the alarm system sends a pulse of 30 seconds which it can be
used to activate an optional module electric glass hike.
Function 12 / Output for intermittent horn.
Horn intermittent function can be programmed with two different functions but only one
of them can be chosen:
A. Horn Flashing. Flashing sounded the horn of the vehicle when the system alarm is triggered by
attempted theft and give 1 beep when arming the alarm system and 2 sounds to disarm the alarm
system, work in conjunction with the functions of the siren output (independent).
B. Dome Light , internal lights of the vehicle to disarm the alarm system and light flashing at the
siren either panic or attempted theft. Short Current, When arming the alarm system maintains a
constant pulse which can it is used for a second short current or activate additional sensors.
Function 13 / Acoustic Notice to activate the Anti hijack.
Upon activation of the anti - hijack by any of its 4 methods, the siren will sound 1 beep sound.
Function 14 / Engine failure during the phase of anti hijack.
When the process of the function of the anti - assault reaches 45 seconds, the power failure is
activated intermittently, generating an engine failure and preventing the vehicle engine is turned off
abruptly after 15 seconds of engine failure the constant power failure triggered, shutting off the
engine completely and preventing it can be restarted.
Function 15 / Close insurance with Automatic Re-arming.
With function 5 ON, to disable the alarm system and no door is opened or the ignition key is not
passed to ON, within 90 seconds the alarm system is armed in automatic form and locks are
closed.
Function 16 / Anti hijack by presence (Aditional Transmisor)
This function is used to immobilize the vehicle in case of emergency, simply opening one of the
doors and moving the transmitter presence of about 15 meters from the vehicle, the engine is
running. If you have the transmitter present within the vehicle, the alarm will recognize the signal
and anti - hijack came into passive mode.
Function 17 / ID programmed controls (I.C.P.)
Every time you put the key in the position (ON) the LED will light up intermittently within 10
seconds to indicate the number of remote controls that were scheduled.
1. Flasher / pause = 1 programmed control
2. Flasher / paus = 2 programmed control
3. Flasher / pause = 3 programmed control
4. Flasher / pause = 4 programmed control
Función 18 / Reconocedor de conductor
To disarm the alarm with the remote control the vehicle engine remains locked and to unlock
perform the following steps :
a. Press the open padlock on the remote control to disarm the alarm.
b. Turn the key in the position (ON).
c. Enter the PIN code by pressing the valet and the power outage will be unlocked.
If the PIN code is 1, the system can be unlocked as soon as you press the valet.
If anti - hijack (ignition) is activated to move the vehicle key to position ON press once (1) button
valet and anti - mugging and function driver recognition will be canceled at the same time.

ENGLISH
Genius Car Alarm
www.geniuscaralarm.com
36
Genius Car Alarms
www.alarmasgenius.com
14
Function 19 / Detecting OEM lights.
When programming function 19 ON, the alarm system can only be armed and disarmed by the
pulse of door locks together with the warning light emitted by the vehicle when it closes and locks
open with the original remote control OEM. Thin White cable input sensor must be connected to
the lights but NOT be attached with thick white cable blinker light alarm.
Function 20 / Anti hijack by door.
Each time a door is opened and closed, the anti- assault is activated.
Function 21. Factory Reset.
This function was created to place all the functions of the memory of the alarm to the state as it
was coming from factory.
Security Code (Pin Code)
(Security Code Factory is assigned 1)
You can disarm the alarm system and disable Anti - assault by Swiche of
Ignition and entering the security code via the reset button.
You can change the security code using the following procedure:
1. Pass the ignition Swiche position OFF to ON 3 times and the third set it off in a time of
no more than 7 seconds.
2. The siren will sound and lights remain on, the system PIN entry into programming code.
Press and release the reset button the number of times the new code you want to enter
between 1 and 9.
3. The siren confirmed with the same amount of sound the number of new PIN code and
close the program.
Please record and save the number of new security code as it will be required to disarm the alarm
system in case of emergency or to disable the anti - hijack.

ENGLISH
Genius Car Alarm
www.geniuscaralarm.com
37
1
A B
C D E F G H
2 3 4 5 6 7 8 9 10
“A” White/Black
EMERGENCY LIGHT
“1” Purple
DOOR TG (+)
+12V
“2” Green
DOOR TG (-)
“3” Black / White
CAR HOOD PULSE Y
TRUNK TG (-)
“4” Yellow
INPUT - IGNITION
“5” Black / White
BRAKE PEDAL
“6” Yellow / Black
IINPUT
“7” ORANGE
RUNNING SHORT (-200mA)
“8” BROWN /BLACK
CHANNEL 3 OUTPUT (-300mA)
“9” BROWN / WHITE
SIREN
(-300mA)
“10” Gray
ELECTRIC TRUNK OPEN
“C” Azul
INSURANCE OPEN (-200mA)
“D” Brown
INSURANCE CLOSES (-200mA)
“E” Black
GND. GROUND
“F” White
LIGHT
“G” RED
FUSE
“H” GRAY
HORN
10A - Fuse
12V
BATTERY
GND - GROUND
15A - FUSE
FUSE
Bulb
ON
“B” White
LIGHT INPUT “OEM”
LIGHTS
G5504
-12V
-12V
+12V
GND - GROUND
MALETA
by Pass
85 30
86 87A
Relay for
off
motor
Cable is cut to
turn off the vehicle, you can
be fuse or ignition
gasoline pump
NEGATIVE OUTPUT UP WINDOW
PROGRAMMING
DOME LIGHT
OUTPUT (-)
PROG. 12
CAPOT
TRUNK
G5504 CF - TRF Series
Installation Diagram
1
July - 2016

ENGLISH
Genius Car Alarm
www.geniuscaralarm.com
38
1 “Green / White OEM”
INPUT (-/+) DEFAULT (+)
LOWER ENGINE
2 “Red / White OEM”
INPUT (-/+) DEFAULT (+)
CLIMBING THE ENGINE
3 “Yellow / Black OEM”
INPUT (-/+) DEFAULT (-)
LOWERING OF MICROSWITCH
THE MOTOR
4 “Blue / Black OEM”
INPUT (-/+) DEFAULT (-)
CLIMBING THE MICROSWITCH
THE MOTOR
LED
SW VALET
BLOCK CONNECTOR
JUMPERS
PROGRAMMING
J4
SWITCH
DOWN - / +
J3
SWITCH UP
- / +
J2
SIGNAL TO
GO UP - / +
J1
-
+
SIGNAL TO
GO DOWN - / +
4 3 2 1
SHOCK SENSOR
GENIUS
AUXILIARY SENSOR
(OPCIONAL)
G5504
ROJO AZUL
2
G5504 CF - TRF Series
Installation Diagram
Julio - 2016

ENGLISH
Genius Car Alarm
www.geniuscaralarm.com
39
Genius Car Alarms
www.alarmasgenius.com
17
Signal selection Swiche Open/ Close - OEM
Configuration cables OEM (Arming / Disarming)
Mode B: This mode uses up to 4 cables for locking the vehicle doors, to determine the status of
the system. Two cables (GREEN/ WHITE for lock and WHITE/ RED for unlocking are connected to
the driver's door). When the doors are locked with factory original transmitter, the system will arm.
When the doors are unlocked with factory original transmitter, the system is disarmed. The wire
YELLOW / BLACK (for the lock button) and BLUE / BLACK (for the unlock button) should be
connected to one of the wires from the button lock / unlock the driver's door. These cables are
important because they stop the system from arming / disarming when the door is locked or
unlocked manually
Genius Car Alarms
www.alarmasgenius.com
18
GREEN/ WHITE OEM input lock (-/+) default (+)
This is the lock-in wire, which is the Armed wire. This wire looks for a signal when the doors are
locked with the factory remotes. The signal can be (+ / -). This can be connected to the door
actuator cable lock the driver's door. For (-) input NEGATIVE, move the Jumper J1 to NEGATIVE.
RED/ WHITE OEM input unlock (-/+) default (+)
This is the release input wire, the cable is Disarm, searching for a signal when the doors (or
driver's door) are unlocked with the factory remote. The signal can be (+ / -). There are many
factory systems that unlocks only the driver's door first (called smart unlock). In these systems it is
important to find a signal unlock the driver's door when unlock button on the control when it is
pressed for the first time. This means that you must first find the signal cable that comes only
unlock the driver's door. It can also be connected in the driver's door unlocking cable from the
factory at the entrance of the keys.
YELLOW/ BLACK OEM input validate (-/+) default (-)
This is the wire validation. This wire unarmed monitors the signal thus providing a high level of
protection of disarming. If the enable signal is activated by the release button means that the door
is not dismantling the system. This should tie the switch cable unlocking the door.
BLUE/ BLACK OEM input validate (-/+) default (-)
This is the wire validation. This wire unarmed monitors the signal thus providing a high level of
protection of disarming. If the enable signal is activated by the release button means that the door
is not dismantling the system. This should tie the switch cable unlocking the door.
Mode A:
This mode uses up to 4 cables for locking the vehicle, to determine the state of the system. The
wires (GREEN/ WHITE for lock and WHITE/ RED to unlocking are connected to the driver's door).
When the doors are locked with factory original transmitter, the system will arm. When the doors
are unlocked with factory original transmitter, the system is disarmed. There is a PIN, white with 2
wires (1 WHITE for the lights) and (2 BLACK / WHITE for flashing lights) must be connected to
each of the two wires in some car models (1. wire parking lights, 2. wire directional lights button
car). And in some car models, the system will need these two wires (1. wire parking lights, 2. wire
directional lights) to cooperate with the GREEN/ WHITE wire (for blocking) and RED/ WHITE (to
unlock), so that the system is armed or disarmed.
For example:
In some car models, when you press the factory original transmitter, parking light flashes to
indicate that the car has been locked. But when you press the emergency light, the light start
flashes, that causes the system is armed. To avoid this situation, the power indicator lights (Black /
White) must be connected to the flashing lights. The system recognizes the emergency light when
activated by the flashing lights, not a factory transmitter. The system will not be armed when you
press the button the car flashing lights.

ENGLISH
Genius Car Alarm
www.geniuscaralarm.com
40
Genius Car Alarms
www.alarmasgenius.com
19
Date of Sale:___________________________ Invoice _____________________
BENEFICIARY
Name:_________________________________ C.I.:_____________________
Marks of the Vehicle:________________________ Color:___________________
Model: ____________________________ Plate:__________________________
SEAL AND SIGNATURE OF DEALER INSTALL THE SYSTEM
TECHNICAL REVIEW
1st. It dates __________________________________________________________
Remarks:___________________________________________________
Stamp: __________________________________________________________
2nd Date __________________________________________________________
Remarks:___________________________________________________
Stamp: __________________________________________________________
3rd Date __________________________________________________________
Remarks:___________________________________________________
Stamp: __________________________________________________________

ENGLISH
Genius Car Alarm
www.geniuscaralarm.com
41
Genius Car Alarms
www.alarmasgenius.com
20
LIMITATION OF WARRANTY
Any alarm system, GENIUS brand is guaranteed by ( ) year (s) from the date of installation
taking into account the following conditions:
1. This warranty does not cover damage or malfunctions caused by:
a. Incorrect installation
b. Immersion in water or liquid
c. Shock or fire
d. Attempted modification or repair by unqualified hands
e. Leakage or deterioration of the controls
2. The costs of removal, installation or other occasions that will be borne by the claimant.
3. The performance of this warranty will have greater flexibility in their procedures, if the user
has the sticker affixed to the rear window of the vehicle.
4. The technical department of the company reserves the right to determine the validity of the
guarantee as expertise
WARNING:
The alarm is only a deterrent against possible theft. In no case can be considered as an insurance
against theft. The manufacturer declines all liability for faults or alarm operation, accessories or
car group, due to poor installation or supervision of specified characteristics.
Recommendations to save, keep it with you.
1) Disabling the Anti-hijackinging
With the ignition key ON, press the reset button as many times as indicated by the pin code
(The factory is 1), at 3 seconds will deactivate Anti-hijackinging.
2) Disable Manual
Pass the ignition key On press the reset button as many times as indicated by the pin code
(The factory is 1), at 3 seconds will deactivate alarm.
3) Entry and Exit Valet Mode
With the ignition key in the ON position, press and keep pressing the reset button for 3
seconds, the LED will stay on board fixed to exit valet mode with the ignition key in the ON
position, press the reset for 3 seconds, the LED will turn off board.
Important, Laminate and save these instructions and take it with you always
-
 1
1
-
 2
2
-
 3
3
-
 4
4
-
 5
5
-
 6
6
-
 7
7
-
 8
8
-
 9
9
-
 10
10
-
 11
11
-
 12
12
-
 13
13
-
 14
14
-
 15
15
-
 16
16
-
 17
17
-
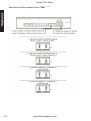 18
18
-
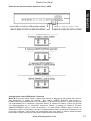 19
19
-
 20
20
-
 21
21
-
 22
22
-
 23
23
-
 24
24
-
 25
25
-
 26
26
-
 27
27
-
 28
28
-
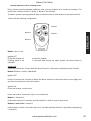 29
29
-
 30
30
-
 31
31
-
 32
32
-
 33
33
-
 34
34
-
 35
35
-
 36
36
-
 37
37
-
 38
38
-
 39
39
-
 40
40
-
 41
41


Genius Alarma G5504 OEM TRF Series El manual del propietario
- Categoría
- Alarma de carro
- Tipo
- El manual del propietario
- Este manual también es adecuado para
en otros idiomas
Artículos relacionados
Otros documentos
-
 Genius Car Alarm Alarma Genius G34-Si El manual del propietario
-
 Genius Car Alarm Alarma OEM G5504 Version 2 El manual del propietario
-
 Genius Car Alarm Alarma G3000 Link TRF Series El manual del propietario
-
 Genius Car Alarm Alarma G350 2Way Digital El manual del propietario
-
Genius Car Alarm Alarma Genius Digital G300a El manual del propietario
-
 Genius Car Alarm Alarma Genius OEM G3000Link El manual del propietario
-
 Genius Car Alarm Alarma Genius OEM G2000 El manual del propietario
-
 Genius Car Alarm Alarma Serie 2B 4 Bot Si V3 El manual del propietario
-
 Genius Car Alarm Alarma Serie 2B 3 Bot Se V3 El manual del propietario
-
 Genius Car Alarm Alarma Genius 2B Se 2 Bot El manual del propietario


