Ameriwood Home 9634196PCOM Assembly Instructions Manual
- Tipo
- Assembly Instructions Manual


paso en el orden correcto. Si los pasos no estan ejecutados en secuencia, ocurrirá
dificultades en el montalje.
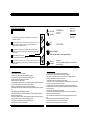
Make sure all parts are included. Most board parts are labeled or stamped on the raw edge.
Asegurar que todas las piezas son incluidas. La mayoría de las tablas tienen las
etiquetas o los sellos en el lado sin acabado.
Work in spacious area, preferably on a carpet, near the place the unit will be used.
Trabajar en una área espaciosa, preferible sobre alfombra, cercas del lugar donde se va
a usar el mueble.
Have the following tools close at hand.
Tener las herramientes siguientes cerca de la mano.
Do not use power tools to assemble your furniture. Power tools may strip or damage the parts.
No use herramienta electrica para montar su unidad. Las herramientas electricas pueden
dañar las piezas.
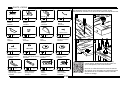
Before starting - Antes de empezar .
- Visit our website for assembly video clips.
- Identify, sort and count the parts before attempting assembly.
- Call our toll free number if you need assistance identifying parts.
- Compression dowels are tapped in with a hammer.
- Slides have lips only on the right side.
- Cam locks that are properly fastened on a horizontal board will face toward the center of the
unit, on a vertical board the point on the lock will face the bottom.
- Back panels provide stability and support. Use all the nails provided.
- When tapping nails into a board, be sure there are equal margins on all sides to square the
unit.
- Units without the back panel installed may collapse.
- Clean the product with your favorite furniture polish and a soft cloth. DO NOT USE harsh
chemicals or abrasive cleaners.
- Move your new furniture carefully, with two people lift and carry the unit to it's new location.
- Never push, drag or scoot your furniture (especially on carpet).
- Your furniture can be disassembled and reassembled to move.
- Additional parts are available for a nominal fee.
-Visitar nuestro website para mirar los videos cortos del montaje.
-Identificar, clasificar y contar las piezas antes de intentar el montaje.
-Llamar gratis a nuestro número de servicio si necesite ayuda con identificar las piezas.
-Las clavijas de compresión se taladran con un martillo.
-Las correderas sólo tienen las protruciones en el lado derecho.
-Las cerraduras de leva que se atan propiamente en una tabla horizontal se puntan al centro de
la unidad, y las en una tabla vertical se puntan al fondo.
-Los paneles traseros se mantienen la estabilidad. Usar todos los tornillos proporcionados.
-A taladrar los tornillos en una tabla, asegurarse que hay márgenes iguales en todos los lados
para cuadrar la unidad.
-Las unidades sin panel trasero pueden derrumbarse.
-Limpiar la unidad con su pulimento favorito de mueble y una tela suave. NO UTILIZAR
productos con quimicos duros o abrasives.
-Mover su mueble nuevo cuidadosamente, con dos personas levanter la unidad a su nuevo
lugar.
-Nunca empujar o arrastrar su mueble (especialmente en alfombra).
-Poderse desmontar y volver a montar su mueble de para mover.
-Piezas adicionales están disponibles para una cuota nominal.
Call us at:
Llamar a:
Fax:
Fax:
Write to:
Escribir a:
1-800-489-3351
(in U.S.A. only)
(Solo en U.S.A)
1-636-745-1005
Visit our Website:
Visitar nuestro website:
www.ameriwood.com
Ameriwood
410 East 1st Street South Wright City, MO 63390 USA
Attn: Service Dept.
2
Monday - Friday
9:00 am - 5:00 pm
Central Time
Lunes - Viernes
9:00h - 17:00h
Tiempo Central

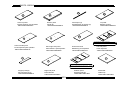
PARTS -PIEZAS
3/23
Hutch top shelf
Estante superior para aparador
T9634196PCOM010HC
Bottom panel
Panel del
T9634196PCOM020HC
Top shelf
Estante superior
T9634196PCOM040HC
Shelf apron (2)
Embellecedor de estante (2)
T9634196PCOM030HC
Hutch left side panel
Panel Izquierdo para aparador
T9634196PCOM050HC
Hutch right side panel
Panel derecho para aparador
T9634196PCOM060HC
Left side panel
Panel izqueirdo
T9634196PCOM080HC
Hutch fixed shelf
Estante fijo para aparador
T9634196PCOM070HC
Right side panel
Panel derecho
T9634196PCOM100HC
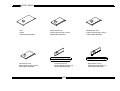
Partition panel
Panel de partición
T9634196PCOM110HC
Fixed shelf
Tablero fija
T9634196PCOM120HC
A
B
D
C
E
F
G
H
J
K
L
Support panel(2)
Panel de Soporte (2)
T9634196PCOM090HC
I
Pre-assembled part / Partes premontados
Left cabinet member/Corredera de mueble izquierda (3) TWQ0072
Screw / Tornillo (9) TWQ0073
Pre-assembled part / Partes premontados
Right cabinet member/Corredera de mueble derecha (9) TWQ0074
Screw / Tornillo (9) TWQ0073

Door
Puerta
T9634196PCOM130HC
Upper drawer front
Panel frontal del cajón superior
T9634196PCOM140HC
M
N
O
P
Q
Middle drawer front
Panel frontal del cajón central
T9634196PCOM150HC
Lower drawer front
Panel frontal del cajón inferior
T9634196PCOM160HC
Left drawer side (3)
Panel Izquierdo de Cajón (3)
T9634196PCOM170HC
Pre-assembled parts / Parte premontados
Left drawer runner/Deslizador izquierdo de cajon TWQ0075
Screw / Tornillo (3) TWQ0073
R
Pre-assembled part / Partes premontados
Right drawer runner/Deslizador derecha de cajon TWQ0076
Screw / Tornillo (3) TWQ0073
Right drawer side (3)
Panel Derecho de Cajón (3)
T9634196PCOM180HC
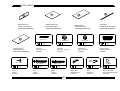
PARTS -PIEZAS
4/23

PARTS -PIEZAS
5/23
T
U
x 30
5
Ø3 x 15 mm
x 34
1
x 22
2
x 24
7
Ø4 x 32 mm
x 10
6
Ø4 x 44mm
Drawer bottom (3)
Fondo del cajón (3)
T9634196PCOM200HC
Back panel (2)
Panel trasero (2)
T9634196PCOM210HC
S
Drawer back (3)
Trasero del cajón (3)
T9634196PCOM190HC
x 12
3
x 41
4
Ø8 x 30 mm
x 1
8
x 1
9
x 1
10
25 x 22 x1
Shelf apron
Embellecedor de estante
T9634196PCOM220HC
V
W
Back panel (2)
Panel trasero (2)
T9634196PCOM230HC
Screw
Tornillo
THC0125
Cam bolt
Perno de la leva
THC0222
Ø6 x 35 mm
Cam lock
Cerradura de la leva
THC0070
Screw
Tornillo
THC0022
Screw
Tornillo
THC0071
CAM LOCK
Serrure de came
THC0003
Wooden dowel
Clavija de madera
THC0024
Ø15 x 9 mm
Magic catch
Pestillo mágico
THC0015
Magic catch plate
Placa de pestillo mágico
THC0288
Glue
Pegamento
THC0012
Ø15X12mm

6/23
PARTS -PIEZAS
To view a video on how the cam fastening
system works, download a free QR-reader on
your smartphone, then scan the code.
Para ver un video de como funciona el sistema
de sujeción cam, descargue una aplicación gratis
que podra ver en su teléfono movil, entonces
escnee el código.
This illustration shows how the cam fastening system works.
Esta ilustración muestra como funciona el sistema de fijación de leva.
x 7
11
Ø3 x 15 mm
x 1
15
x 5
18
Ø5/32"x19mm
x 1
16
x 1
17
x 2
19
Ø5/32"x12mm
Ø8x12D9
20
x 2
21
x 22
22
x12
x 1
12
40*16.5*15
40*16.5*15
x 1
13
x 1
14
x 1
23 24
x 1
25
x 1
26
x 1
Ø4x32mm
Ø4x12mm
Screw
Tornillo
THC0061
Pull
Jalón
THC0269
Screw bolt
Tornillo con tuerca
THC0021
Knob
Puno
THC0268
Pull
Jalón
THC0270
Screw bolt
Tornillo con tuerca
THC0271
Door shaft support
Soporte para eje de puerta
THC0273
Cam cover
Leva de cubierta
THC0076
Cam cover
Leva de cubierta
THC0008
HINGE
Bisagra
THC0277
HINGE
Bisagra
THC0278
Handle
Manija
THC0276
Wall bracket
Soporte para la pared
THC0091
WALL ANCHOR
Ancrage mural
THC0011
Screw
Tornillo
THC0129
PAN HEAD
Dia 4 x 12mm
THC0026

7/23
1
x 8
7
x 6
4
x 10
1
G
lue
Pegamento
Wooden Dowel
Clavija de Madera
Hole for wooden dowel
Agujero para clavija de madera
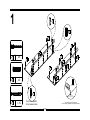
1
Do not over tighten
No lo presione tanto
A
C
D
V
7
Use one drop of glue in dowel hole.
Use una gota de pegamento en el agujero de clavija.
4
1
1
1
1
1
7
7
4
4
4

8/23
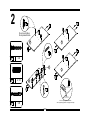
2
x 19
x 6
1
G
lue
Pegamento
Wooden Dowel
Clavija de Madera
Hole for wooden dowel
Agujero para clavija de madera
Use one drop of glue in dowel hole.
Use una gota de pegamento en el agujero de clavija.
x 4
7
E
F
7
J
1
Do not over tighten
No lo presione tanto
7
C
1
1
1
7
G
4
4
4
4
4
4
4
4
4

9/23
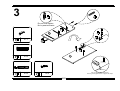
3
x 4
1
x 4
x 2
11
x 1
8
G
lue
Pegamento
Wooden Dowel
Clavija de Madera
Hole for wooden dowel
Agujero para clavija de madera
Use one drop of glue in dowel hole.
Use una gota de pegamento en el agujero de clavija.
1
Do not over tighten
No lo presione tanto
K
1
8
11
1
K
4
4
4

10/23
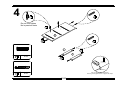
4
x 2
1
x 8
G
lue
Pegamento
Wooden Dowel
Clavija de Madera
Hole for wooden dowel
Agujero para clavija de madera
Use one drop of glue in dowel hole.
Use una gota de pegamento en el agujero de clavija.
1
Do not over tighten
No lo presione tanto
H
1
I
I
4
4
4
4
4
4

11/23
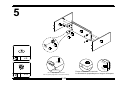
5
x 4
2
E
F
G
Proper orientation of cam lock
La orientacion apropiada para el seguro de bloqueo
Unlock
Desbloquear
Lock
Bloquear
x 4
21
2
21
2
21
G
lue
Pegamento
Wooden Dowel
Clavija de Madera
Hole for wooden dowel
Agujero para clavija de madera
Use one drop of glue in dowel hole.
Use una gota de pegamento en el agujero de clavija.

12/23
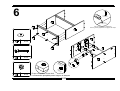
6
x 4
2
x 4
E
F
6
6
6
D
K
H
3
3
3
3
2
21
x 4
21
1
1
Proper orientation of cam lock
La orientacion apropiada para el seguro de bloqueo
Unlock
Desbloquear
Lock
Bloquear
I
I
G
lue
Pegamento
Wooden Dowel
Clavija de Madera
Hole for wooden dowel
Agujero para clavija de madera
Use one drop of glue in dowel hole.
Use una gota de pegamento en el agujero de clavija.
21
6

13/23
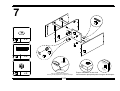
7
x 4
4
x 4
2
J
K
L
x 4
21
2
21
4
Proper orientation of cam lock
La orientacion apropiada para el seguro de bloqueo
Unlock
Desbloquear
Lock
Bloquear
G
lue
Pegamento
Wooden Dowel
Clavija de Madera
Hole for wooden dowel
Agujero para clavija de madera
Use one drop of glue in dowel hole.
Use una gota de pegamento en el agujero de clavija.
21

14/23
8
x 6
2
F
D
J
K
2
21
x 6
21
21
2

15/23
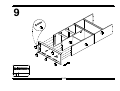
9
x 6
6
F
6
6
6
6
6
B
K
J
6

16/23
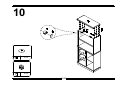
10
x 4
2
A
x 4
21
2
21
2
21
2
21

17/23
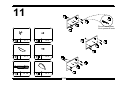
11
x 1
16
x 1
15
x 12
1
x 2
19
x 3
18
x 1
17
1
Do not over tighten
No lo presione tanto
18
18
1
1
1
1
1
1
19
17
16
15
N
O
P

18/23
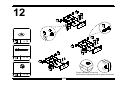
12
x 12
7
x 12
3
N
O
P
7
7
7
7
7
7
7
S
S
S
R
R
R
Q
Q
Q
T
T
T
Proper orientation of cam lock
La orientacion apropiada para el seguro de bloqueo
Unlock
Desbloquear
Lock
Bloquear
x 12
22
22
3
22
3
22
3
22
3
22
3
22
3

19/23
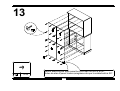
13
x 30
5
5
90°
Before attaching the back panel,be sure that the unit is at 90°.
Antes de atar el panel trasero,asegúrese de que la unidad está a 90°.
5
W
U
W
U

20/23
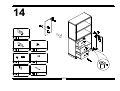
14
x 3
11
x 1
10
x 1
12
x 1
13
x 2
18
x 1
14
x 2
20
11
12
M
18
14
20
11
10
13
P
O
N
20
20

21/23
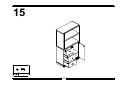
15
x 2
11

22/23
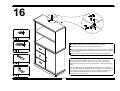
16
x 1
24
x 1
23
x 1
25
x 1
26
23
24
25
26
Using SCREW (26), attach the SAFETY BRACKET (23). Using SCREW (25),
attach the SAFETY BRACKET (23) to the wall. If you do not screw into
anything solid, drill a ¼” (6mm) hole in the screw location, tap the WALL
ANCHOR (24) into the hole and mount to the wall by screwing into the wall
anchor.
Con el tornillo (26), fije el SOPORTE DE SEGURIDAD (23). Con el tornillo
(25), fije el SOPORTE DE SEGURIDAD (23) a la pared. Si no atornilla en algo
sólido, taladre un ajujero del diámetro de ¼” (6mm) en el lugar del tornillo,
tape el ANCLA DE PARED (24) en el agujero y montela a la pared
atornillando en el ancla de pared.
With the help from another person,carefully stand the unit upright and attach
the SAFETY BRACKET to the back edge of the top as shown.
Please note that this unit must be placed against a wall.
Con la ayuda de otra persona, cuidadosamente ponga la unidad en posición
vertical y ate el SOPORTE DE SEGURIDAD al borde trasero de la superficie
como se muestra.
Tenga en cuenta que esta unidad debe ser colocada contra una pared.

23/23
Enjoy Your Furniture
DISFRUTE DE SU MUEBLE
WEIGHT LIMITS:
LÍMITES DE PESO:
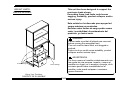
WARNING
Please make sure that all objects are removed
before moving the assembled unit.
The unit must be team lifted, not dragged or
pushed.
Failure to do so could cause instability, product
collapse, and/or serious injury.
ADVERTENCIA
Por favor mueva el mueble cuidadosamente con
las ayuda de otra persona. levante y mueva el
mueble a su lugar. no lo arrastre o empuje, de lo
contrario puede haber inestabilidad en el
mueble y este puede colapsar u ocasionar
graves lesiones.
This unit has been designed to support the
maximum loads shown.
Exceeding these load limits could cause
sagging, instability, product collapse, and/or
serious injury.
Esta unidad se ha dise para apoyar lad
cargas mxima se mostradas.
Exceder estos limites de carga podia causar
ceder, inestabilidad, drrumbamiento del
producto, yo lesion seria.
15 Ibs.
/6.8 kgs
15 Ibs./6.8 kgs
30 Ibs./13.6 kgs
30 Ibs./13.6 kgs
10 Ibs./4.5 kgs
-
 1
1
-
 2
2
-
 3
3
-
 4
4
-
 5
5
-
 6
6
-
 7
7
-
 8
8
-
 9
9
-
 10
10
-
 11
11
-
 12
12
-
 13
13
-
 14
14
-
 15
15
-
 16
16
-
 17
17
-
 18
18
-
 19
19
-
 20
20
-
 21
21
-
 22
22
-
 23
23


Ameriwood Home 9634196PCOM Assembly Instructions Manual
- Tipo
- Assembly Instructions Manual
en otros idiomas
- English: Ameriwood Home 9634196PCOM
Artículos relacionados
Otros documentos
-
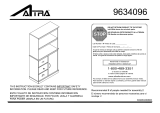 Dorel Home Furnishings 9634096 El manual del propietario
-
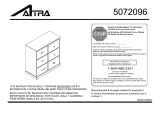 Dorel Home Furnishings 5072096GB El manual del propietario
-
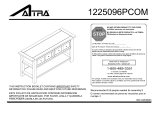 Dorel Home Furnishings 1225096PCOM El manual del propietario
-
 Dorel Home Furnishings 1610096 El manual del propietario
-
Altra Furniture 1773196PCOM Instrucciones de operación
-
 Altra 9363096 Manual de usuario
-
 Dorel Home Furnishings 1622096PCOM El manual del propietario
-
 Dorel Home Furnishings 7658096 El manual del propietario
-
 Dorel Home Furnishings 1769096PCOMUK El manual del propietario
-
Ameriwood HD09354 Instrucciones de operación


