La página se está cargando...

Assembling the panel
• 2 - rails
• 7 - pickets
©2019 Universal Forest Products, Inc. All rights reserved.
68956 U.S. Hwy 131, White Pigeon, MI 49099 616.365.4201 10549_3/19
www.ufpi.com
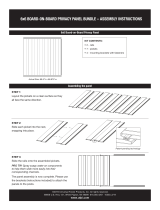
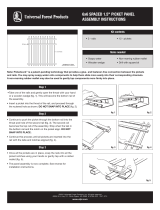
6x6 BOARD-ON-BOARD PRIVACY PANEL – ASSEMBLY INSTRUCTIONS
(2) Rails
(7) Pickets
Actual Size: 68.5"h x 66.875"w
STEP 1:
Layout the pickets on a clean surface so they
all face the same direction.
STEP 2:
Slide each picket into the next,
snapping into place.
STEP 3:
Slide the rails onto the assembled pickets.
PRO TIP: Spray soapy water on components
to help them slide more easily into their
corresponding channels.
The panel assembly is now complete. Please use
the brackets (instructions included) to attach the
panels to the posts.
6x6 Board-on-Board Privacy Panel
KIT CONTENTS:
Patent-pending technology

* One per panel and
one to complete
fence run.
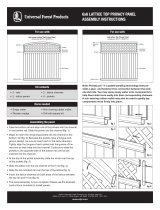
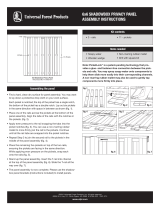
Digging postholes
Installing fences on sloped landscapes
Design and layout
Preparation
Check local ordinances and regulations before building your
fence. Before construction, contact your local utility companies
to mark any underground cables and pipelines. In addition, it is
a good idea to discuss plans with any neighbors along your
proposed fence line.
Most yards are relatively level and will allow for a fairly simple
installation. If your yard is steeply pitched or very uneven, be
sure to allow for the required mounting height of the adjacent
panel when setting your posts. You may need to "stair step"
the panels in extreme cases (fig. 1).
A general rule of thumb is to place 1/3 of the post into the ground.
Check local regulations for any special requirements. The fence
will be stronger if the end, corner and gate posts are set at least
6" deeper than the line posts. Using a posthole digger or power
auger, dig the holes 10-12" wide and 6" deeper than needed.
Backfill the holes with 6" of gravel to drain water away from the
bottom of the posts (fig. 2). Keep the height of your fence panels
in mind when digging your postholes.
Check measurements of fence. Inside-to-inside post distance is
67" (fig. 3). Use a string line to ensure all post holes are in line and
verify spacing between holes. Double-check all measurements.
• Determine the number of posts, panels and gates needed to
complete the job based on the total linear footage. Take into
consideration post, panel and gate widths when determining
the total number of each.
• Adjust layout to accommodate as many full panels as possible.
If you must use a partial panel, place it in the farthest rear
corner of the property.
• Locate property boundaries and drive stakes into the ground
at corners and ends of fence line, based on local municipality
regulations.
• Stretch twine or heavy string between stakes and pull tight
to mark layout of fence line.
• Be sure to measure your fence panels and gates prior to
determining the location of the postholes. Place posts in the
following order along string line:
• End/corner posts • Gate posts • Line posts
©2019 Universal Forest Products, Inc. All rights reserved.
68956 U.S. Hwy 131, White Pigeon, MI 49099 616.365.4201 10549_3/19
www.ufpi.com
6x6 BOARD-ON-BOARD PANEL INSTALLATION INSTRUCTIONS
• Fence posts*
• Posthole digger
• Measuring tape
• Clear PVC cement
• Drill
• Screwdriver
• Level
• Chop saw
• String line
• Concrete
• Gravel
• Shims
• Pencil
• Safety glasses
• Gloves
Items you may need
fig. 1
Step method
36" to 42"
10" to 12"
Diameter
Level
Fig.4.pdf
fig. 2
67" from
Post to Post
Corner or End Post
Level
Fig.5.pdf
fig. 3

THE DIAGRAMS AND INSTRUCTIONS IN THIS BROCHURE ARE FOR ILLUSTRATION PURPOSES ONLY AND ARE NOT MEANT TO REPLACE A LICENSED PROFESSIONAL. ANY CONSTRUCTION OR
USE OF THE PRODUCT MUST BE IN ACCORDANCE WITH ALL LOCAL ZONING AND/OR BUILDING CODES. THE CONSUMER ASSUMES ALL RISKS AND LIABILITY ASSOCIATED WITH THE
CONSTRUCTION OR USE OF THIS PRODUCT. THE CONSUMER OR CONTRACTOR SHOULD TAKE ALL NECESSARY STEPS TO ENSURE THE SAFETY OF EVERYONE INVOLVED IN THE PROJECT,
INCLUDING, BUT NOT LIMITED TO, WEARING THE APPROPRIATE SAFETY EQUIPMENT. EXCEPT AS CONTAINED IN THE WRITTEN LIMITED WARRANTY, THE WARRANTOR DOES NOT
PROVIDE ANY OTHER WARRANTY, EITHER EXPRESS OR IMPLIED, AND SHALL NOT BE LIABLE FOR ANY DAMAGES, INCLUDING CONSEQUENTIAL DAMAGES.
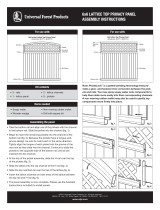
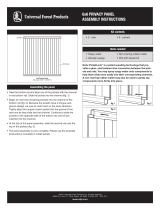
Setting and installing posts and panels
Installing brackets to posts
fig. 4
• Prepare the pre-assembled fence panels by sliding the
mounting brackets onto the rails with the open space at the
top. Slide the bracket fully onto the rail.
• While holding the bracket in place, attach one screw into one
of the slotted holes. Place the screw at the end of the slot
closest to the mounting face of the bracket (fig. 4).
• This will temporarily hold the bracket to the panel while you
place the complete panel between the posts. Do this for all
brackets on each fence panel prior to installation. You will be
able to slide the bracket outward to get a perfect fit if your
post opening is slightly wider than the suggested dimension.
• Starting at a corner, mix concrete in the first hole per the
instructions on the bag. Mix thoroughly and install the post into
the hole and tap the post to the proper depth. Measure to be
sure you can install the finished panel to the post with approxi-
mately a 2" gap from the ground to the bottom of the panel.
You may also need to leave a space from the highest point of
the panel to the top of the post (fig. 5). The spacing allows the
cap to be installed on top of the post without interference with
the top rail.
• Install the next post as described above, paying careful
attention to the spacing between posts. It is important to
determine the height requirement for mounting the next
panels, as you may need to leave more post above the
ground to accommodate its mounting height (especially
if you are installing the fence on an uneven landscape).
• Slide the panel between posts and position to the desired
height. Use wooden blocks or shims to obtain the proper
spacing from the ground. Using the supplied screws
(four per bracket), attach the panel to the posts. Be sure
to center the fence brackets on the post.
• Use a level to ensure the fence is plumb and the posts are
square with the ground. Brace the panel and post to hold the
position as the concrete sets (per the time frame established
in the manufacturer's instructions). Continue setting posts and
installing panels to complete the project. Once posts are set,
finish panel installation by using the provided screws to secure
the fence bracket to the panel.
• Install a post cap on each post using a clear PVC cement
or an exterior adhesive.
6x6 BOARD-ON-BOARD PANEL INSTALLATION INSTRUCTIONS
©2019 Universal Forest Products, Inc. All rights reserved.
68956 U.S. Hwy 131, White Pigeon, MI 49099 616.365.4201 10549_3/19
www.ufpi.com
fig. 5

Ensamble del panel
• 2 - rieles
• 7 - tablas
©2019 Universal Forest Products, Inc. Todos los derechos reservados.
68956 U.S. Hwy 131, White Pigeon, MI 49099 616.365.4201 10549_3/19
www.ufpi.com
PANEL DE PRIVACIDAD DE TABLAS ENGANCHADAS DE 6X6 –
INSTRUCCIONES DE ARMADO
Tamaño real: 68.5"A x 66.875"An
PASO 1:
Acomode las tablas en una superficie limpia
de modo que todos estén orientadas en la
misma dirección.
PASO 2:
Deslice cada tabla dentro
de la siguiente, fijándolas
en su sitio.
PASO 3:
Deslice los rieles en las tablas armadas.
CONSEJO PARA PROFESIONALES: Rocíe agua
jabonosa sobre los componentes para ayudar a
que se deslicen con más facilidad en sus canales
correspondientes.
El montaje del panel ya está completo. Use los
soportes (instrucciones incluidas) para fijar los
paneles a los postes.
Panel de privacidad de tablas enganchadas de 6x6
UN KIT INCLUYE:
Tecnología con patente pendiente

* One per panel and
one to complete
fence run.
67 pulgadas de
poste a poste
Poste de la esquina
o del extremo
Nivel
Fig.5.pdf
36 a 42
pulgadas
10 a 12
pulgadas de
diámetro.
Nivel
Fig.4.pdf
Cómo cavar huecos para los postes
Instalación de cercas en jardines inclinados
Diseño y distribución
Preparación
Compruebe ordenanzas y normas locales antes de construir su
cerca. Antes de la construcción, póngase en contacto con las
empresas locales de servicios públicos para marcar los cables
subterráneos y tuberías. Además, es una buena idea hablar
sobre estos planes con los vecinos a lo largo de su línea de
cerca propuesta.
La mayoría de los jardines son relativamente planos y permiten
una instalación sencilla. Si su jardín es muy empinado o desigual,
asegúrese de dejar la altura de montaje deseado para el panel
adyacente cuando coloque los postes. En casos extremos es
posible que necesite "escalonar" los paneles (fig. 1).
Como regla general, se inserta 1/3 del poste en el suelo. Verifica
las regulaciones locales para cualquier requerimiento especial.
La cerca será más fuerte si la profundidad de los postes de
los extremos, las esquinas y la puerta es 15.2 cm mayor que la
de los otros postes. Con un cavador de hoyos de poste o una
barrena eléctrica, cava hoyos de 25.4 cm a 30.5 cm de diámetro,
con 15.2 cm más de la profundidad necesaria. Rellena el fondo
de los hoyos con 15.2 cm de grava para drenar el agua de la
parte inferior de los postes (fig. 2). Ten en cuenta la altura de los
paneles de la cerca cuando caves los hoyos de los postes.
Tecnología con patente pendiente
Compruebe las medidas de la cerca. La distancia entre los centros
de los postes es de 67 pulg. (fig. 3). Utilice una línea de cordel
para asegurarse que todos los huecos para los postes estén en
línea y verifique el espaciado entre los huecos. Verifique dos
veces todas las mediciones.
• Determine el número de postes, paneles y puertas necesarias
para completar el trabajo en base al total de los metros lineales.
Tome en consideración los anchos de los postes, paneles y
puertas cundo determine el número total de cada uno de ellos.
• Modifique el diseño para dar cabida a tantos paneles completos
como sea posible. Si debe usar parte de un panel, colóquelo en
la esquina posterior más alejada de la propiedad
• Ubique los límites de la propiedad y meta las estacas en el
suelo en las esquinas y extremos de línea de la cerca, siguiendo
los reglamentos de la municipalidad local.
• Estire el hilo o el cordel pesado entre las estacas y tire con
fuerza para marcar el diseño de la línea de la cerca.
• Asegúrese de medir los paneles de la cerca y las puertas antes de
determinar la ubicación de los huecos para los postes. Coloque
los postes en el siguiente orden a lo largo de la línea del cordel:
• Postes del extremo/esquina • Postes de la puerta • Postes de línea
©2019 Universal Forest Products, Inc. Todos los derechos reservados.
68956 U.S. Hwy 131, White Pigeon, MI 49099 616.365.4201 10549_3/19
www.ufpi.com
PANEL DE PRIVACIDAD DE TABLAS ENGANCHADAS DE 6X6 –
INSTRUCCIONES DE ARMADO
fig. 1
Método de escalonamiento
fig. 2
fig. 3
*Uno por panel y
uno para completar
el cerco.
• Postes de cerca*
• Cavador de hoyos
de poste
• Cinta de medir
• Cemento PVC
transparente
• Taladro
• Destornillador
• Nivel
• Sierra caladora
• Cuerda
alineadora
• Concreto
• Grava
• Cuñas
• Lápiz
• Gafas de
seguridad
• Guantes
Artículos que se necesitan

LOS DIAGRAMAS E INSTRUCCIONES EN ESTE FOLLETO SÓLO TIENEN FINES ILUSTRATIVOS Y NO PRETENDEN SUSTITUIR A UN PROFESIONAL CON LICENCIA. CUALQUIER CONSTRUCCIÓN O USO DEL
PRODUCTO DEBE ESTAR EN CONFORMIDAD CON TODOS LOS CÓDIGOS DE CONSTRUCCIÓN Y/O URBANISMO LOCALES. EL CONSUMIDOR ASUME TODA LA RESPONSABILIDAD, ASÍ COMO LOS RIESGOS
RELACIONADOS CON LA CONSTRUCCIÓN O EL USO DE ESTE PRODUCTO. EL CONSUMIDOR O EL CONTRATISTA DEBEN TOMAR TODAS LAS MEDIDAS NECESARIAS PARA GARANTIZAR LA SEGURIDAD DE
TODAS LAS PERSONAS QUE PARTICIPAN EN EL PROYECTO, INCLUYENDO, ENTRE OTROS, EL USO DE LOS EQUIPOS DE SEGURIDAD ADECUADOS. SALVO EN LOS CASOS QUE FIGURAN EN EL ESCRITO DE
GARANTÍA LIMITADA, EL GARANTE NO OFRECE NINGUNA OTRA GARANTÍA, EXPRESA O IMPLÍCITA, NI SE CONSIDERARÁ RESPONSABLE DE CUALQUIER DAÑO, INCLUYENDO LOS DAÑOS CONSIGUIENTES.
Cómo configurar e instalar los postes y paneles
Cómo instalar los soportes a los postes
fig. 4
• Prepara los paneles de cerca preensamblados deslizando los
soportes de montaje en las barandas con el espacio abierto hacia
arriba. Desliza completamente el soporte sobre la baranda.
• Mientras sostienes el soporte en su lugar, instala un tornillo en
uno de los orificios ranurados. Coloca el tornillo en el extremo de
la ranura más cercano a la cara de montaje del soporte (fig. 4).
• Esto sostendrá temporalmente el soporte en el panel mientras
colocas el panel completo entre los postes. Haz esto mismo
con los cuatro soportes en cada panel de la cerca antes de
la instalación. Podrás deslizar el soporte hacia afuera para
conseguir el ajuste perfecto si tu abertura de poste es ligeramente
más ancha que la medida recomendada.
• Comenzando desde la esquina, mezcla el concreto en el primer
orificio de acuerdo con las instrucciones de la bolsa. Mezcla
completamente, instala el poste en el orificio y golpea el poste
hasta la profundidad adecuada. Mide bien para asegurar que
puedas instalar el panel terminado al poste con un espacio de
aproximadamente 5.1 cm entre el suelo y la parte inferior del
panel. También pudiera ser necesario dejar un espacio desde el
punto más alto del panel hasta la parte superior del poste (Fig. 5).
El espaciado permite que el tope se instale en la parte superior
del poste sin interferir con la baranda superior.
• Instala el poste siguiente como se describió más arriba y presta
especial atención al espaciado entre los postes. Es importante
determinar la altura requerida para montar los paneles siguientes,
ya que pudiera ser necesario dejar más poste por encima del nivel
de la tierra para ajustarse a su altura de montaje (especialmente si
estás instalando la cerca sobre un terreno irregular).
• Desliza el panel entre los postes y colócalo a la altura deseada.
Usa bloques de madera o cuñas para lograr el espaciado
preciso desde el suelo. Fija el panel a los postes con los tornillos
suministrados (cuatro por soporte). Asegúrate de centrar los
soportes de la cerca en el poste.
• Usa un nivel para garantizar que la cerca esté a plomo y los postes
a escuadra con respecto al suelo. Asegura el panel y los postes
para mantener la posición a medida que fragua el concreto (en el
tiempo establecido por las instrucciones del fabricante). Continua
colocando los postes e instalando los paneles hasta completar
el proyecto. Una vez que los postes estén colocados, termina la
instalación de los paneles con los tornillos proporcionados para
asegurar el soporte de la cerca al panel.
• Coloque una tapa de poste en cada poste utilizando cemento
PVC transparente o un adhesivo para uso exterior.
PANEL DE PRIVACIDAD DE TABLAS ENGANCHADAS DE 6X6 –
INSTRUCCIONES DE ARMADO
©2019 Universal Forest Products, Inc. Todos los derechos reservados.
68956 U.S. Hwy 131, White Pigeon, MI 49099 616.365.4201 10549_3/19
www.ufpi.com
fig. 5
5,08 cm (2 po)
/