
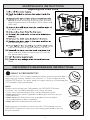
Warranty Registration and Inquiry
For product warranty registration, TOTO U.S.A. Inc. recommends online warranty registration. Please visit
our web site http://www.totousa.com. If you have questions regarding warranty policy or coverage, please con-
tact TOTO U.S.A. Inc., Customer Service Department, 1155 Southern Road, Morrow, GA 30260
(888) 295-8134 or (678) 466-1300 when calling from outside of U.S.A.
Installation Manual
Manual de Instrucciones
Manuel D’Installation
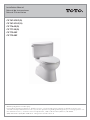
CST474CEF(G)
CST474CUF(G)
CST794SF
CST794EF
CST764S(G)
CST774S(G)

2
ENGLISH
TABLE OF CONTENTS
THANKS FOR CHOOSING TOTO!
The mission of TOTO is to provide the world with healthy, hygienic and more
comfortable lifestyles. We design every product with the balance of form and function
as a guiding principle. Congratulations on your choice.
Thanks for Choosing TOTO®! ...........................................................................................2
Common Tools Needed ....................................................................................................2
Included Parts ..................................................................................................................... 2
Before Installation ...............................................................................................................3
Installation Procedure ........................................................................................................4
Maintenance Instructions ...................................................................................................7
CEFIONTECT® Cleaning Instructions.................................................................................9
Care and Cleaning ..............................................................................................................2
Warranty ............................................................................................................................10
Rough-In Dimensions ......................................................................................................29
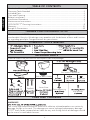
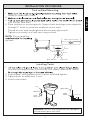
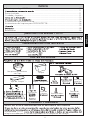
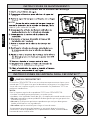
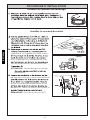
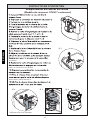
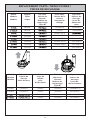
Check to make sure you have all these parts from the package:
COMMON TOOLS NEEDED
INCLUDED PARTS
- 11/64
- 5/16
Tank
Cover Plate
Top Bolt
PVC outlet Connection
Toilet Mounting
T-Bolt Washer T-Bolt Nut
with Washer
a b
cd
Tank to Bowl Gasket
WARNING!
The use of high concentration of chlorine or chlorine-related products can seriously
damage fittings in the tank. This damage can cause leakage and property damage.
TOTO® shall not be responsible or liable for any tank fitting failure or damage caused
by the use of in-tank bowl cleaners.
CARE AND CLEANING

3
ENGLISH
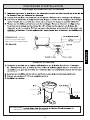
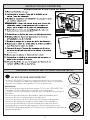
BEFORE INSTALLATION
Read these instructions thoroughly before beginning work.
Please leave instructions for customers. These instruction contain maintenance
and warranty information.
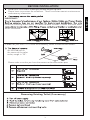
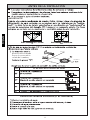
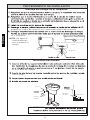
In order for your new TOTO toilet to fit correctly, check the dimensions below:
the finished wall to
the center of the toilet
outlet, rough-in "RI": Valve
"RI"
Closet
“RI” Outlet Connection Part No.
9"
7
"
11"
Please make sure that you have the correct outlet connection part:
IMPORTANT!
means of installing these toilets in a back-to-back situation is when the toilet drain
to this installation.
YES NO
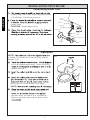
Removing Existing Toilet (if necessary)

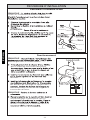
4
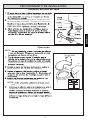
ENGLISH
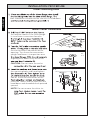
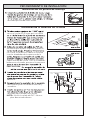
the location shown in the Unifit Rough-
In installation instructions found in
the circular recess around the outlet
opening. Turn the outlet connection
upright and lower it into position over
aligned, press down firmly to set the
CA UTION: Do not move the outlet
the mounting bolts and hand-tighten
side of the outlet connection to the
Insert the T-bolts into the slots with the
head down and threaded shank pointed
upward.
NO TE: Do not remove the white tie-
force.
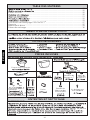
Ill. 3
T-Bolts
Nut
Bolt
Ill. 4
C
2"
B
A
Ill. 2
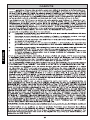
INSTALLATION PROCEDURE
Ill. 1
Install Mounting Bolts
Install Outlet Connection
bolt should be inserted into the slot with its head down

5
ENGLISH
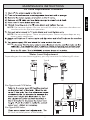
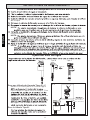
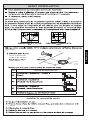
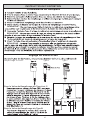
INSTALLATION PROCEDURE
Tank to Bowl Mounting
outlet on underside of tank.
inlet in bowl tank shelf.
Place washers on mounting bolts. Support tank and align mounting bolts
through ½" holes in tank base and bowl mount shelf.
Thread on nuts end, hand tighten before releasing the tank.
Tighten nuts evenly until tank sets snug on bowl.
NOTE: Do not grab the
Installing Toilet
sure that the spigot outlet of toilet slips into rubber sleeve and T-bolts
Insert washer and thread nuts on to bolts and hand tighten.
Tighten bolts an additional ½ turn.
Install cover plates.
Tank-to-Bowl Gasket
Rubber Washer
Tank
Bowl
Brass Washer Brass Nut
spigot outlet
rubber
sleeve
nut
washer
Cover
Plate
WARNING: DO NOT over tighten the nuts, damage to
china or plastic parts may result.
the tank.
1.
2.
3.
4.
1.
2.
3.
4.

6
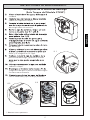
ENGLISH
supply stop instruction at the location shown
in the Before Installation section.
supply stop.
CAUTION: Hand-tighten only.
NOTE:
needed. The water will automatically stop at
proper level.
valve for proper operation. Make sure that
proper position.
top.
bushing nuts into the bowl seat holes.
NO TE:
hinge unit into place while holding seat
the bolt from the top with a screwdriver.
Replace the bolt cap and the lower lid (if
Rubber
Brushing
Nut
Ill. 7
Ill. 6
Water
Inlet
Washer
Coupling
Nut
Trim Plate Hose (not
Valve
Nut
Compression
Valve
Nipple
INSTALLATION PROCEDURE
Connecting Water Line
Operation

7
ENGLISH
Water Level Adjustment
Depending on the manufacturing plant, you may have one the following fill valves:
Type B
For Type A and C Fill Valve:
-
For Type B Fill Valve:
fill valve has been preset at the factory.
Top of
Tube
Water
Ill. 1
Type C
NO TE: Do not overtighten. These are plastic parts. Never use pipe dope on any
water supply connection.
pipe.
NO TE:
Once the water stops filling the tank, some residual drops of water may drip
MAINTENANCE INSTRUCTIONS
Fill Valve Replacement Procedure
NO TE: Do not over-tighten. Be sure to install fill valve in a position that does not
interfere with the trip lever operation.

ENGLISH
Ill. 1
Ill. 2 Ill. 3 Ill. 4
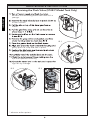
Servicing the Flush Valve (ST453* Model Tank Only)
Remove the remaining water from tank with a
sponge.
a clean surface.
shown.
gently press to snap and lock in place.
on lever to lock in place.
trip lever operates normally.
signs of any leakage.
* denotes other options
MAINTENANCE INSTRUCTIONS

9
ENGLISH
Flush Tower
Drain Valve
Refill Tube
ill. 1
ill. 2
tank.
NOTE: Before removing anything from the tank,
note the placement of the drain valve, chain and
refill tube.
the drain valve.
the former drain valve.
and use a wrench to tighten another 3/4 turn.
chain and refill tube the same way as it was for
the former drain valve.
filled.
MAINTENANCE INSTRUCTIONS
Replacing the Drain Valve
No CEFIONTECT®
With CEFIONTECT®
WHAT IS CEFIONTECT®?
CEFIONTECT® MAINTENANCE INSTRUCTIONS
CEFIONTECT® is TOTO’s super-smooth permanent glaze that prevents debris
from sticking to surfaces. Products with the letter “G” in the number have the
CEFIONTECT® glaze. This glaze, along with regular cleaning, will help keep your
TOTO product in pristine condition.
NOTE:
For best results to keep your Toto product with CEFIONTECT® clean:
• Lavatory: Use a mild dish detergent with a clean, soft cloth.
• Toilet: Use a gel based cleaner with a soft bristled-plastic brush.
• Don't use cleaners, polishing powders or detergents that have gritty or
coarse particles.
• Don't use bleach, chemical thinners or products that have acid or
alkaline detergents listed as ingredients.
• Don't use metal scrub brushes or steel wool.
Following these instructions will ensure that your TOTO product with the
CEFIONTECT® glaze will always stay intact, keeping your product like new
for years to come!

10
ENGLISH
WARRANTY
and workmanship during normal use when properly installed and serviced, for a period of one
-
any subsequent purchaser or owner of the Product. This warranty applies only to TOTO Product
-
use, provided that such Product was properly installed, used and serviced in accordance with
instructions. TOTO reserves the right to make such inspections as may be necessary in order to
determine the cause of the defect. TOTO will not charge for labor or parts in connection with
warranty repairs or replacements. TOTO is not responsible for the cost of removal, return and/
or reinstallation of the Product.
3. This warranty does not apply to the following items:
electrical storm, etc.
b. Damage or loss resulting from any accident, unreasonable use, misuse, abuse, negli-
gence, or improper care, cleaning, or maintenance of the Product.
c. Damage or loss resulting from sediments or foreign matter contained in a water system.
d. Damage or loss resulting from improper installation or from installation of the Product in
a harsh and/or hazardous environment, or improper removal, repair or modification of the
e. Damage or loss resulting from electrical surges or lightning strikes or other acts which are
not the fault of TOTO or which the Product is not specified to tolerate.
f. Damage or loss resulting from normal and customary wear and tear, such as gloss reduc-
tion, scratching or fading over time due to use, cleaning practices or water or atmospheric
conditions.
h. Toilet seats of plastic, wood or metal.
4. In order for this limited warranty to be valid, proof of purchase is required. TOTO encourages
warranty registration upon purchase to create a record of Product ownership at http://www.
totousa.com. Product registration is completely voluntary and failure to register will not dimin-
ish your limited warranty rights.
-
TRY.
6. To obtain warranty repair service under this warranty, you must take the Product or deliver it
letter stating the problem, or contact a TOTO distributor or products service contractor, or write
Product cannot be returned to TOTO, receipt by TOTO of written notice of the defect together
service facility.
-
uct caused by either chloramines in the treatment of public water supply or cleaners containing
products can seriously damage the fittings. This damage can cause leakage and serious property
damage. For more information, please call TOTO at (888) 295-8134.
-
-
-

11
ESPAÑOL
ÍNDICE
¡GRACIAS POR ELEGIR TOTO!
HERRAMIENTAS QUE NECESITA
PARTES INCLUÍDAS
Recipiente de Porcelana
con Tapa
Placa de
Cubierta
Tornillos de
(para el
Perno de Mon-
Perno en T
Tuerca para
Perno en T
Tornillo de
a b
cd
Tapa del Tanque
Tanque
Tanque - Recipiente
Broca de 5/16
Broca de 11/64
Recipiente
¡Gracias por elegir TOTO®! .........................................................................................11
.................................................................................. 11
Partes Incluidas 11................................................................................................................
....................................................................................................12
........................................................................................13
Instrucciones de mantenimiento ....................................................................................16
Instrucciones de limpieza para CEFIONTECT® ............................................................18
11Cuidado y limpieza ........................................................................................................
............................................................................................................................19
..........................................................................................................................29
Refacciones ......................................................................................................................30
AVISO: NO UTILICE LIMPIADORES EN EL RECIPIENTE DEL TANQUE
la propiedad. TOTO®
tanque causados por el uso de limpiadores en el recipiente del tanque.
CUIDADO Y LIMPIEZA

12
ESPAÑOL
ANTES DE LA INSTALACIÓN
-
pared suelo acabada
hasta el centro de la
salida del inodoro,
Pared
"RI"
Brida del
“RI” N° de Pieza de la Conexión de Salida
9"
7
"
11"
¡IMPORTANTE!
SÍ NO
Extracción inodoro existente (si es necesario)

13
ESPAÑOL
-
ros en el suelo en el lugar que se indica
-
-
tal forma que la parte superior quede mi-
un nuevo sello de cera sobre el encastre
vircular alrededor de la apertura de la
sobre la brida del suelo. Con la unidad de-
bidamente alineada, presione firmemente
PRE CAUCIÓN:
-
adicional.
de salida al piso utilizando 4 tornillos y
arandelas.
roscados apuntando hacia arriba.
NO TA: Nivele la salida de PVC. No em-
plee demasiada duerza.
il. 3
Pernos
en T
Tuerca
Ranura
i l. 4
C
2"
B
A
Pared
il. 2
PROCEDIMIENTO DE INSTALACIÓN
roscado apuntando hacia arriba.
il. 1
Instalación de los pernos de montaje
Instalación de la conexión de la salida

14
ESPAÑOL
PROCEDIMIENTO DE INSTALACIÓN
-
ras en la base del inodoro.
con la mano.
ADV ENTENCIA:
soporte del tanque del recipiente.
pulgada en la base del tanque y en el soporte del tanque del recipiente.
en el recipiente.
NOTA: No agarre el
tubo de desagur
para maniobrar el
tanque.
Rondana de Goma
Montaje del tanque en el recipiente
Instalación del inodoro
Tuerca
Placa de
Cubierta
Manguito
de Goma
Recipiente
Tanque

15
ESPAÑOL
con las instructiones para el tope de suministro
Tire la cadena brevemente para asegurarse de
que no quede suciedad. Conecte el suministro
PRE CAUCIÓN:
NO TA:
y que el brazo de la cisterna se encuentre en la
parte superior del tanque del inodoro.
-
orificios del asiento del recipiente.
NO TA: -
sario.
unidad de charnelas hasta alcanzar la ubi-
la parte superior con el destornillador. Vuelva a
Tuera
Revestida
con Goma
il. 7
il. 6
Tuerca de
-
Tuerca de
Niple
PROCEDIMIENTO DE INSTALACIÓN
Conexión de linéa de aqua
Operación
Tanque

16
ESPAÑOL
manualmente.
NO TA: -
NO TA:
suministro de agua se interrumpe, es probable que caigan algunas gotas de agua
Ajuste del nivel del agua
Tipo B
éa de
Para una Válvula de Llenado Tipo A y C:
Refere a la marca para el nivel de agua
Permita que el agua llene el tanque. Gire
aumentar la altura del nivel del agua. (ver
-
del agua. Tire la cadena para verificar el
Para la Válvula Tipo B:
-
-
rior del Tubo de
Rebosadero/
Tubo de Relleno
il. 1
Tipo C
del tanque.
NO TA:
INSTRUCCIONES DE MANTENIMIENTO
Procedimento de reemplazo de la válvula de llenado

17
ESPAÑOL
il. 1
il. 2 il. 3 il. 4
Reemplazo de la válvula de descarga
(Solo Tanque del Modelo ST453*)
INSTRUCCIONES DE MANTENIMIENTO
inodoro.
sobre una superficie limpia.
-
descarga como se muestra.
de descarga.
entre y se asegure en su lugar.
palanca de descarga y presione la traba
lugar.
sobre el tanque.
asegurarse de que la palanca de descargue
funcione normalmente.
sea el adecuado y que no haya perdidas.
* denota otras opciones

ESPAÑOL
il. 1
il. 2
tanque.
seguro.
NOTA:
cadena y del tubo de llenado.
tanque.
anterior.
de vuelta.
nuevo en sus ubicaciones originales.
INSTRUCCIONES DE MANTENIMIENTO
Tubo de llenado
Torre de descarga
Sustitución de la válvula de drenaje
Sin CEFIONTECT®
Con CEFIONTECT®
¿QUÉ ES CEFIONTECT®?
El esmalte CEFIONTECT® es un acristalamiento permanente súper suave
creado por TOTO que evita que los desechos se peguen a las supercies.
Junto con una limpieza regular, este mantendrá sus productos TOTO en
perfectas condiciones.
NOTA:
Para la limpieza regular de su producto TOTO con CEFIONTECT®:
• Lavabo: Use detergente para platos y un paño suave.
• Inodoros: Use limpiador a base de gel y un cepillo plástico de cerdas suaves.
• No use limpiadores, polvos pulidores o detergentes que tengan partículas
arenosas o gruesas.
• No use lejía, diluyentes químicos o productos que incluyan detergentes
ácidos o alcalinos en sus ingredientes.
• No utilice cepillos metálicos para fregar ni lana de acero.
Si sigue estas instrucciones de limpieza, se asegurará de que el esmalte
CEFIONTECT® de su producto TOTO permanezca intacto, manteniendolo
hermoso durante muchos años.
BLANQUEAD
DILUYENTE
DE PINTURA
INSTRUCCIONES DE LIMPIEZA PARA CEFIONTECT®

19
ESPAÑOL
GARANTÍA
1. TOTO® garantiza que su vitreos china producto no presenta defectos en sus materiales ni de fab-
siempre que dicho Producto haya sido instalado, utilizado y mantenido de acuerdo con las in-
strucciones. TOTO se reserve el derecho de hacer tantas inspecciones como sean necesarias para
-
-
gencia o cuidado, limpieza o mantenimiento inadecuado del Producto.
agua.
Producto.
-
-
-
-
-
-
-
-
-
-

20
FRANÇAIS
TABLE DES MATIÈRES
MERCI D’AVOIR CHOISI TOTO!
OUTILS NÉCESSAIRES
®!........................................................................................... 20
.......................................................................................... 20
Pièces incluses ................................................................................................................. 20
...................................................................................................... 21
.................................................................................................. 22
................................................................................................... 25
.................................................................................................... 20
Garantie ............................................................................................................................ 27
Instructions de Nettoyage CEFIONTECT®....................................................................27
Robinetterie brute ........................................................................................................... 29
Pièces de rechange ......................................................................................................... 30
plus confortable. comme principe de base, nous concevons chaque produit avec un
PIÈCES INCLUSES
a b
cd
Cuvette avec Couvercle
Cache
Montage
(Pour la
Boulon de
Montage des
Toilettes (Bou-
Rondelle du
Boulon en T boulon en T
Vis de Montage
avec Rondelle
Rèservoir
Couvercle
b. Rondelles
Matèrial pour Rèservoir
ENTRETIEN ET NETTOYAGE
AVERTISSEMENT:
® ne pourra

21
FRANÇAIS
ci-dessous:
fini et le centre de
la sortie du toilette, Robinet
Mur
"RI"
Bride de
sol de
toilette
“RI” Raccord de sortie pièce N°.
9"
7
"
11"
AVANT L’INSTALLATION
IMPORTANT!
OUI NON
Installer le raccord de sortie
cuvette.

22
FRANÇAIS
caoutchouc sur la gorge circulaire autour
-
bien en position sur la bride de sol. Pres-
afin de le positionner correctemnet (voir
ATT ENTION : Ne pas bouger le raccord
caoutchouc.
boulons de montage; serrez manuellement
partie arrière du raccord de sortie au sol
boulons en T dans les fentes tête en bas et
REMARQUE : Nivelez la sortie en PVC.
Caoutchouc
Ill. 3
Boulons
en T
Rondelle
Ill. 4
C
2"
B
A
Mur
Plancher
de Toilette
Ill. 2
PROCÉDURE D’INSTALLATION
Ill. 1
Installer le raccord de sortie
Installer les boulons de montage

23
FRANÇAIS
la cuvette.
du toillette.
ATT ENTION!
porcelaine ou les pièces en plastique.
Installer le toilette
Montage du réservoir sur la cuvette
REMARQUE : Ne pas
saisir le tuyau de trop-
plein pur la manipulation
PROCÉDURE D’INSTALLATION
Rondelle en Caoutchouc
Cuvette
Rondelle
Cache
Manchon en
Caoutchouc

24
FRANÇAIS
REMARQUE :
suivant les instructions relatives au robinet
ATT ENTION :
comprise entre 1,40 et 5,50 bars.
REMARQUE :
automatiquement au niveau correct.
que le clapet de non-retour fonctionne
toillettes.
des boulons de montage est compris dans la
caoutchouc dans les orifices du siège de la
cuvette des toillettes.
REMARQUE :
la charnière pour la positionner tout en
tournevis. Remplacer le cache boulon et le
Bague en
Caoutchouc
Ill. 7
Ill. 6
Rondelle
Robinet
Compression
Robinet
Canalisation
PROCÉDURE D’INSTALLATION
Fonctionnement
Raccorder la conduite d’eau

25
FRANÇAIS
REMARQUE :
REMARQUE :
Réglage de niveau d’eau
remplissage suivants: Type B
Pour le Valve de Remplissage de Type A et C:
Pour le Valve de Remplissage de Type B:
du tube
de trop-
plein
Ill. 1
Type C
INSTRUCTIONS D’ENTRETIEN
Procedimento de reemplazo
REMARQUE :

26
FRANÇAIS
INSTRUCTIONS D’ENTRETIEN
Ill. 1
Ill. 2 Ill. 3 Ill. 4
Remplacement de robinet de chasse
(Modèle de réservoir ST453* seulement)
en place.
pour la verrouiller en place.
fonctionne normalement.
* dénote d'autres options

27
FRANÇAIS
ill. 1
ill. 2
trop-plein de la valve du drain.
3/4 de tour.
INSTRUCTIONS D’ENTRETIEN
Valve du drain
Tour de
soupape de
chasse
Tube de remplissage
Remplacement d’une valve du drain
INSTRUCTIONS DE NETTOYAGE CEFIONTECT®
Pas de CEFIONTECT®
Avec CEFIONTECT®
QU'EST-CE QUE CEFIONTECT®?
Le vernis CEFIONTECT® est un vitrage permanent ultra-lisse créé par
TOTO qui empêche les débris de coller au surfaces. Avec un nettoyage
régulier, cela gardera votre produits TOTO en parfait état.
REMARQUE:
Pour un nettoyage régulier de votre produit TOTO avec CEFIONTECT®:
• Lavabos: utilisez un détergent à vaisselle et un chiffon doux.
• Toilettes: utilisez un nettoyant à base de gel et une brosse en plastique à
poils doux.
• N'utilisez pas de nettoyants, de poudres à polir ou de détergents
contenant des particules granuleuses ou grossières.
• N'utilisez pas d'eau de Javel, de diluants chimiques ou de produits
contenant des détergents acides ou alcalins dans leurs ingrédients.
• N'utilisez pas de brosses à récurer métalliques ou de laine d'acier.
Le respect de ces instructions de nettoyage, vous assurerez que le vernis
CEFIONTECT® de votre produit TOTO reste intact, le gardant beau pendant de
nombreuses années.
EAU DE
JAVEL
DILUANT À
PEINTURE

FRANÇAIS
GARANTIE
1. TOTO®-
-
-
inondation, tonnerre, orage etc. -
gence ou un mauvais traitement, nettoyage ou entretien de l`appareil.
m.
-
-
-
-
-
ce produit de plomberie ou composant du produit par la chloramine contenue dans le traitement
-

29
ROUGH-IN DIMENSIONS / BOSQUEJO /
ROBINETTERIE BRUTE
* Check for correct dimension
baseboard blocks.
* Confirme las dimensiones correctas
* Vérifiez que les dimensions sont correctes
le plinthe du mur.
Consult your builder or contractor.
standard. Consultez votre constructeur ou chef de chantier.
Model A B C D
17-1/4"
16"
19-3/8"
19-3/8"

30
REPLACEMENT PARTS / REFACCIONES /
PIÈCES DE RECHANGE
Model
Modelo
Modèle
-
Flush Valve
Válvula de la
cisterna
Soupape de
vidange
THU456R-A
THU491
THU445.10F-A
THU445.10F-A
THU444.10D-A
THU444.10D-A
THU443.10B-A
THU443.10B-A
Flapper
Tapón
Clapet
9BU094
9BU094
THU500S
THU500S
THU500S
THU500S
THU500S
THU500S
Fill Valve
Válvula de
llenado
Robinet de
remplissage
(Type B)
Trip Lever
Palanca de
descarga
Levier de
dèclenche
ment
THU485#CP
THU492#CP
THU279#CP
THU194#CP
THU194#CP
THU194#CP
THU194#CP
Model
Modelo
Modèle
Drain Valve
Válvula de
drenaje
Valve du drain
Seal Gasket
Junta de
sellado
joint
d’étanchéité
THU407 TSU99A.X
TSU99A.X
TSU99A.X
TSU99A.X
THU824-A
THU824-A
ST454E*
ST454ER THU407
THU407
THU407
Fill Valve
Válvula de
Llenado
Robinet de
remplissage
(Type B)
Trip Lever
Palanca de
descarga
Levier de
dèclenchement
THU164#CP
THU279#CP
THU808#CP-A
THU164#CP


TOTO® U.S.A., Inc. 1155 Southern Road,
Morrow, Georgia 30260
Tel: 888-295-8134 Fax: 800-699-4889
www.totousa.com
0GU011Z-8
Rev Date: 6/21
Warranty Registration and Inquiry
For product warranty registration, TOTO U.S.A. Inc. recommends online warranty registration. Please visit
our web site http://www.totousa.com. If you have questions regarding warranty policy or coverage, please con-
tact TOTO U.S.A. Inc., Customer Service Department, 1155 Southern Road, Morrow, GA 30260
(888) 295-8134 or (678) 466-1300 when calling from outside of U.S.A.
-
 1
1
-
 2
2
-
 3
3
-
 4
4
-
 5
5
-
 6
6
-
 7
7
-
 8
8
-
 9
9
-
 10
10
-
 11
11
-
 12
12
-
 13
13
-
 14
14
-
 15
15
-
 16
16
-
 17
17
-
 18
18
-
 19
19
-
 20
20
-
 21
21
-
 22
22
-
 23
23
-
 24
24
-
 25
25
-
 26
26
-
 27
27
-
 28
28
-
 29
29
-
 30
30
-
 31
31
-
 32
32


en otros idiomas
- français: Toto CST Series Guide d'installation
- English: Toto CST Series Installation guide
Artículos relacionados
-
Toto CST474CEFG#01 Manual de usuario
-
Toto MS604114 Manual de usuario
-
Toto CST436 El manual del propietario
-
Toto CST744EL#01 Guía de instalación
-
Toto 03 Guía de instalación
-
Toto 0GU219 Guía de instalación
-
Toto CST646F El manual del propietario
-
-
Toto LT161 Manual de usuario
-
Toto 0GU220 Guía de instalación