Euro-Pro EP662 Manual de usuario
- Categoría
- Aspiradoras
- Tipo
- Manual de usuario
Este manual también es adecuado para

2 in 1 Pick-Up Stick Vacuum
Aspiradora Con Mango 2 EN 1
USA: EURO-PRO OPERATING LLC Canada: EURO-PRO OPERATING LLC
94 Main Mill Street, Door 16 4400 Bois Franc
Plattsburg, NY 12901 St. Laurent, QC H4S 1A7
Tel.: 1 (800) 798-7398
www.sharkvac.com
Owner’s Manual
Manual del Usuario
Model-Modelo: EP662
120 V., 60 Hz., 2 A.
COPYRIGHT © EURO-PRO OPERATING LLC 2007
La página se está cargando ...

GARANTÍA LIMITADA DE UN (1) AÑO
EURO-PRO Operating LLC garantiza este producto contra defectos de materiales y mano de
obra por un término de un (1) año a partir de la fecha de compra original, siempre que sea
utilizado para uso doméstico normal, sujeto a las siguientes condiciones, exclusiones y
excepciones.
Si su artefacto no funciona correctamente al utilizarlo bajo condiciones domésticas normales
dentro del período de garantía, devuelva el artefacto completo y los accesorios, pagando el
envío, a:
EE.UU.: EURO-PRO Operating LLC, 94 Main Mill Street, Door 16, Plattsburgh, N.Y. 12901
Canadá: EURO-PRO Operating LLC, 4400 Bois Franc, St. Laurent, QC, H4S 1A7
Si EURO-PRO determina que el artefacto presenta un defecto de materiales o mano de obra, lo
reparará o remplazará sin cargo. El envío debe incluir un comprobante de la fecha de compra y
$ 5.95 para cubrir los gastos de envío. *
Los insumos tales como, sin limitación, filtros, cepillos y partes eléctricas que normalmente
necesitan ser reemplazados son explícitamente excluidos de la garantía.
La responsabilidad de EURO-PRO Operating LLC se limita únicamente al costo de reparación
o reemplazo de la unidad, a nuestro criterio. Esta garantía no cubre el desgaste normal de las
partes y no cubre ninguna unidad que haya sido alterada o utilizada con fines comerciales. Esta
garantía limitada no cubre daños ocasionados por uso inadecuado, abuso, negligencia o daños
causados por embalaje inapropiado o maltrato durante el transporte. Esta garantía no cubre
daños o defectos causados o resultantes durante el transporte para su reparación o alteraciones
del producto o cualquiera de sus partes, realizadas por una persona no autorizada por EURO-
PRO.
Esta garantía es válida para el comprador original del producto y excluye cualquier otra garantía
legal y/o convencional. La responsabilidad de EURO-PRO Operating LLC, de existir, se limita a
las obligaciones específicas asumidas expresamente bajo los términos de esta garantía limitada.
Bajo ninguna circunstancia EURO-PRO Operating LLC será responsable por daños
incidentales o indirectos de ninguna clase. Algunos estados no permiten la exclusión o limitación
de daños consiguientes o incidentales, por lo tanto lo anterior puede no ser válido para usted.
Esta garantía le otorga derechos legales específicos, y usted puede también tener otros
derechos los que varían de estado a estado.
*Importante: Embale el producto cuidadosamente para evitar daños durante el transporte.
Asegúrese de incluir un comprobante de la fecha de compra y de colocarle una etiqueta al
producto con su nombre, dirección completa y número de teléfono, una nota
proporcionando información de la compra, número de modelo y una descripción del
problema. Le recomendamos asegurar el paquete (puesto que la garantía no cubre daños
de envío). Escriba en el exterior del paquete “ATTENTION CUSTOMER SERVICE”.
Nosotros nos esforzamos constantemente en mejorar nuestros productos, por lo tanto las
especificaciones aquí indicadas pueden cambiar sin previo aviso.
TARJETA DE REGISTRO DEL CLIENTE
SÓLO PARA CONSUMIDORES CANADIENSES
Complete y envíe la tarjeta de registro del producto dentro de los diez (10) días posteriores a la
compra. El registro nos permitirá contactarnos con usted en caso de existir alguna notificación
de seguridad con respecto al producto. Retornando esta tarjeta usted reconoce haber leído y
entendido las instrucciones de uso y advertencias incluidas en estas instrucciones.
ENVIAR A:
EURO-PRO Operating LLC, 4400 Bois Franc, St. Laurent, QC, H4S 1A7
____________________________________________________________________________
Modelo del Artefacto
____________________________________________________________________________
Fecha de compra Nombre del Negocio
____________________________________________________________________________
Nombre del Dueño
____________________________________________________________________________
Dirección Ciudad Provincia Código Postal
IMPORTANT SAFETY INSTRUCTIONS
When using your 2 IN 1 PICK-UP STICK VACUUM basic safety precautions should always be
observed, including the following:
To reduce the risk of fire, electric
shock, or injury:
• Do not leave the 2 IN 1 PICK-UP
STICK VACUUM plugged in when
unattended. Unplug the electrical cord
when not in use and before servicing.
• Do not allow to be used as a toy.
Close attention is necessary when
used by or near children, pets or
plants.
• Use only as described in this manual.
Use only manufacturer’s recommended
accessories.
• Do not pull cord, use cord as a handle,
close a door on cord, or pull cord
around sharp edges or corners. Do
not run vacuum cleaner over cord.
Keep cord away from heated surfaces.
• Use only extension cords UL-rated or
cUL at 15 amperes. extension cords
rated for less amperage may
overheat. Care should be taken to
arrange the cord so that the cord
cannot be pulled or tripped over.
• Turn off all controls as applicable
before unplugging from electrical outlet.
• Do not unplug by pulling on cord. To
unplug, grasp the plug, not the cord.
• Do not handle plug or vacuum with
wet hands or operate without shoes.
• Do not put any objects into openings.
Do not use with any opening blocked.
Keep free of dust, lint, hair and
anything else that may reduce air flow.
• Store your appliance indoors in a cool,
dry area.
• Keep your work area well lit.
• Do not immerse the vacuum into water
or other liquids.
• Keep end of hose, wands and other
openings away from your face and
body.
• Use only on dry surfaces.
• Using improper voltage may result in
damage to the motor and possible
injury to the user. Correct voltage is
listed on rating label.
1. Read all instructions before using your
2 IN 1 PICK-UP STICK VACUUM.
2. Use the system only for its intended
use.
3. To protect against a risk of electric
shock, do not immerse any part of the
system in water or other liquids.
4. Never yank cord to disconnect from
outlet; instead, grasp plug and pull to
disconnect.
5. Do not allow cord to touch hot
surfaces.
6. Do not run appliance over cord.
7. Do not operate the system with a
damaged cord or plug, or if the
appliance or any other part of the
system has been dropped or damaged.
To avoid the risk of electric shock, do
not disassemble or attempt to repair the
2 IN 1 PICK-UP STICK VACUUM.
Return the unit to EURO-PRO
Operating LLC (see warranty) for
examination and repair. Incorrect re-
assembly or repair can cause a risk of
electrical shock or injury to persons
when the 2 IN 1 PICK-UP STICK
VACUUM is used.
8. Close supervision is necessary for any
appliance being used by or near
children. Do not leave the system
unattended while connected.
9. Keep hair, loose clothing, fingers and
all parts of body away from opening
and moving parts.
10. Do not use to pick up flammable or
combustible liquids such as gasoline or
use in areas where they may be
present.
11. Do not pick up anything that is burning
or smoking such as cigarettes, matches
or hot ashes.
12. Use extra care when cleaning on stairs.
13. Do not use the vacuum without the
dust cup filter in place.
14. This appliance is intended only for
household use. Follow all user
instructions in this manual.
SAVE THESE INSTRUCTIONS
For Household Use Only
1 Rev. 07/07
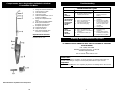
WARNING: To reduce the risk of electric shock, this appliance has a polarized plug (one blade
is wider than the other).
This plug will fit in a polarized outlet only one way. If the plug does not
fit fully in the outlet, reverse the plug. If it still does not fit, contact a qualified electrician to install
the proper outlet. Do not modify the plug in any way.
Impreso en China
Modelo EP662
Modelo EP662
16

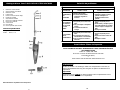
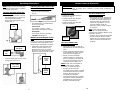
Getting to Know Your 2 IN 1 PICK-UP STICK VACUUM
1. Extension Tube Handle
2. Quick Release Cord Hook
3. Extension Tube
4. Locking Clip
5. Power Cord (not shown fully)
6. Hand Vac Handle
7. On/Off Power Switch
8. Dust Cup Container Release
9. Dust Cup Container
10. Crevice Tool
11. Floor Brush
12. Dust Cup Filter (not shown)
Technical Specifications
Voltage: 120 V.
Power: 60 Hz., 2 A.
2
Note: Illustrations may differ from actual product.
15
Para Ordenar Filtros de Repuesto
PARA COMPRAR FILTROS DE REPUESTO O POR SOPORTE TÉCNICO
para Modelo EP662
Llame al: 1 (800) 798-7398
de Lunes a Viernes de 8:30 AM hasta 5:00 PM
Hora del Este (EST)
o
visite nuestro sitio de Internet: www.sharkvac.com
Observaciones:
El filtro es lavable. Sin embargo, deben ser reemplazados cada tres (3)
meses (dependiendo del uso) para asegurar el óptimo rendimiento de su
aspiradora.
Importante
:
Asegúrese de que TODOS
los filtros lavables estén completamente secos
antes de volverlos a instalar en la aspiradora.
Solución de problemas
GUÍA PARA EL DIAGNÓSTICO DE PROBLEMAS
PROBLEMA POSIBLE CAUSA POSIBLE SOLUCIÓN
ASPIRADORA
NO
FUNCIONA
1. Batería descargada.
2. El tomacorriente donde
enchufa el cargador no
funciona.
1. Recargue la unidad.
2. Verifique el fusible o la llave
general. Reemplace el
fusible/encienda la llave
general.
NO LEVANTA
LA TIERRA O
LA SUCCIÓN
ES MUY
DÉBIL.
1. Recipiente para la tierra está
lleno.
2. Hay que limpiar o reemplazar
el filtro.
3. La unidad necesita una
recarga.
1. Vacíe el recipiente para la
tierra.
2. Quite el filtro y verifique que no
haya nada tapando el conducto
del aire. Limpie o reemplace el
filtro.
3. Recargue la unidad.
SALE TIERRA
DE LA
ASPIRADORA
1. Recipiente para la tierra está
lleno.
2. El recipiente de la tierra no
está instalado correctamente.
3. Hay un agujero en el filtro o
está roto.
1. Vacíe el recipiente para la
tierra.
2. Repase las instrucciones del
filtro.
3. Reemplace el filtro.

Precautionary Measures
Important: If the suction opening in the unit or the hose is blocked, switch off the
vacuum cleaner and remove the blocking substance before you start the unit again.
1. Do not operate the vacuum cleaner
too close to heaters, radiators or
cigarette butts.
2. Before inserting the power plug into
the wall outlet, make sure that your
hands are dry.
4. When pulling out the power plug
from the wall outlet, pull the plug not
the power cord.
3. Before you start vacuuming, make
sure to remove large or sharp
objects that might damage the dust
cup filter.
5. Do not pick up anything that is
burning or smoking such as
cigarettes, matches or hot ashes.
6. Do not use without dust cup filter in
place.
3
14
Limpieza y Reemplazo del Filtro
Limpieza y Reemplazo del Filtro
Para obtener el mejor rendimiento,
vacíe el recipiente para la tierra y
limpie el filtro luego de cada uso.
1. Para quitar el recipiente de la
tierra, presione el botón para
destrabarlo (Fig. 8) y quite el
recipiente. (Fig. 9)
Presione el
botón para
destrabar el
recipiente de
la tierra
Fig. 8
2. Quite el filtro. (Fig. 10)
Quite el recipiente
de la unidad
principal.
Fig. 9
Recipiente
para la
Tierra
Filtro
Fig. 10
3. Vacíe la tierra del recipiente.
4. Enjuague el filtro con agua fría, y
déjelo secar completamente
durante 24 horas antes de volverlo
a colocar dentro del recipiente de la
tierra.
Nota Importante: No lo coloque en
una lavadora. No lo seque con un
secador de cabello. DEJE QUE SE
SEQUE AL AIRE.
5. Vuelva a colocar el filtro con
cuidado dentro del recipiente de la
tierra. Nunca use la aspiradora
sin el filtro colocado en su lugar.
6. Coloque el recipiente para la tierra
en el cuerpo principal de la unidad.
Nota: Le recomendamos reemplazar
el filtro cada tres (3) meses
(dependiendo del uso) para asegurar el
máximo rendimiento de la unidad.

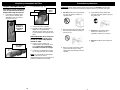
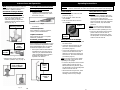
Operating Instructions
Note: Always remove the power plug
from the wall outlet before assembling
or removing accessories.
Inserting the Metal Handle Into
the Main Body
• On the hand vac handle, pull open
the handle port (Fig. 1) and insert
the extension tube until the
locking clip is sitting firmly on the
handle. (Fig. 2)
Attaching the Crevice Tool or the
Floor Brush to the Main Body
• Push the crevice tool or floor brush
into the suction hole opening.
(Fig. 5)
• Push the handle port closed so that
it snaps shut. (Fig. 3 & 4)
• The following are recommendations
for accessory usage:
Crevice Tool
For radiators, crevices, corners,
base-boards and between cushions.
Floor Brush
For all kinds of flooring, including
carpeted and tiled floors.
Winding & Unwinding the Power
4
Cord
This vacuum cleaner is equipped with a
convenient cord storage feature. This
unit also has a quick release cord hook
• Wind power cord around the quick
release cord hook and the cord
winding hook. (Fig. 6) To unwind
the power cord, simply twist the quick
release cord hook to the left or right.
Instrucciones de Operación
13
Llave de Encendido
• El botón de encendido tiene dos
posiciones. (Fig. 7)
• Presione el lado de la “I” para
encender la aspiradora.
• Presione el lado de la “O” para
apagar la aspiradora.
Fig. 7
Posición
Encendido
Posición
Apagado
Uso de la unidad como
aspiradora de mano
• Desconecte el tubo de extensión de
la aspiradora de mano destrabando
el orificio de conexión del gancho y
quitando el tubo de extensión del
mango de la aspiradora. Una vez
que haya quitado el tubo de
extensión, vuelva a cerrar el orificio
de conexión.
Nota
: Puede dejar el cabezal
esquinero o el cepillo para pisos
colocado en la unidad al utilizarla como
aspiradora de mano.
• Presione “I” en la llave de encendido
para encender la unidad. Cuando
termine de usar la unidad, presione
“O” en la llave de encendido para
apagarla.
Advertencia: El orificio de succión debe permanecer abierto, sin obstrucciones
todo el tiempo. De lo contrario el motor puede recalentarse y
dañarse.
Uso de la Unidad como
Aspiradora Vertical
• Desenrolle y enchufe el cable de
alimentación en el tomacorriente de
120V.
• Inserte el tubo de extensión dentro
de la aspiradora de mano (vea las
instrucciones de la página 4).
• Elija el accesorio apropiado
(cabezal esquinero o cepillo para
pisos) y colóquelo en el orificio de
succión de la aspiradora (vea las
instrucciones de la página 12).
Nota: Puede usar la aspiradora en
posición vertical sin el cabezal
esquinero o el cepillo para pisos.
• Presione “I” en la llave de
encendido para encender la unidad.
Cuando termine de usar la unidad,
presione “O” en la llave de
encendido para apagarla.
• Cuando termine de usar la unidad,
enrosque el cable de alimentación
alrededor de los ganchos para
facilitar su almacenamiento.
Handle
Port
Push handle
Port so that it
snaps shut
Fig. 2
Push firmly
into handle
Locking
Clip
Fig. 3
Fig. 1
Fig. 5
Quick
Release
Cord
Hook
Cord
Winding
Hook
Fig. 4
Fig. 6

Fig. 2
Orificio de Conexión
Presione
firmemente
dentro
del mango.
Gancho
de Traba
Fig.1
Operating Instructions
Power Switch
5
• The On/Off power switch has two
positions. (Fig. 7)
• Push on the "I" side to turn the
vacuum ON.
• Push on the "O" side to turn the
vacuum OFF.
Using the Unit as a Hand
Vacuum
• Disconnect the extension tube from
the hand vac by releasing the handle
port from the locking clip and
removing the extension tube from the
hand vac handle. Once the extension
tube is removed, snap the handle
port shut.
Note: You may choose to leave the
crevice tool or floor brush attached to
the hand vac when operating as such.
• Press the “I” position on the On/Off
power switch to turn the unit on.
When finished using the unit, press
the “O” position on the On/Off power
switch to turn the unit off.
Caution: The suction hole opening must be open and free of any obstructions at
all times. Otherwise, the motor will overheat and could become damaged.
Using the Unit as an Upright
• Unwind the power cord and plug into
the 120V outlet.
• Insert the extension tube into the
hand vac. (See the instructions
provided on page 4.)
• Choose the appropriate accessory
(crevice tool or floor brush) and
attach it to suction hole opening on
the hand vac. (See the instructions
provided on page 4.)
Note: You may choose not to attach
the crevice tool or floor brush when
operating as an upright.
• Press the “I” position on the On/Off
power switch to turn the unit on.
When finished using the unit, press
the “O” position on the On/Off power
switch to turn the unit off.
• When finished using the unit, wind
the power cord around the cord
winding hooks for easy storage.
Instrucciones de Operación
Nota: Siempre desenchufe el cable de
alimentación del tomacorriente antes
de instalar o quitar accesorios.
Insertando el Mango Metálico
dentro del Cuerpo Principal
• Abra el orificio de conexión en el
mango de la aspiradora de mano
(Fig. 1) e inserte el tubo de
extensión hasta que el gancho
quede firmemente trabado dentro
del mango. (Fig. 2).
Colocando el Cabezal Esquinero
y el Cepillo para Piso en el
Cuerpo Principal
• Coloque el cabezal esquinero o el
cepillo para piso dentro del orificio
de succión. (Fig. 5).
• Presione para cerrar el orificio de
conexión y trabarlo. (Fig. 3 y Fig. 4).
• Recomendaciones para el uso de
accesorios:
Cabezal Esquinero
Para radiadores, ranuras, esquinas,
zócalos y entre almohadones.
Cepillo Para Pisos
Para todo tipo de pisos, incluyendo
alfombras y baldosas.
Enrollado y Desenrollado del
12
Cable de Alimentación
Esta aspiradora está equipada con una
forma conveniente de guardar el cable.
Esta unidad también tiene un gancho
de liberación rápida para el cable.
• Enrosque el cable de alimentación
alrededor de los ganchos para el
cable. (Fig. 6). Para desenrollar el
cable, simplemente gire el gancho
de liberación rápida hacia la
izquierda o la derecha.
Presione para
cerrar el orificio de
conexión y trabarlo.
Fig. 3
Fig. 4
Fig. 5
Gancho
para el
Cable
Gancho para
Enrollar el
Cable
Fig. 7
ON
Position
OFF
Position
Fig. 6

6
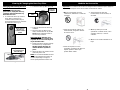
Cleaning & Changing the Dust Cup Filter
Changing and Cleaning the Dust
Cup Filter
In order to achieve the best
performance, empty the dust cup
container and clean the dust cup
filter after each use.
1. To remove the dust cup container,
press down on the dust cup
container release button (Fig. 8)
and separate the dust cup container
from the main unit. (Fig. 9)
Press down on
the dust cup
container release
button
Fig. 8
2. Pull out the dust cup filter. (Fig. 10)
Fig. 9
Dust Cup
Container
Dust Cup
Filter
Fig. 10
3. Empty the dust from the dust cup
container.
4. Rinse the dust cup filter in cold
water, and then let it air dry for 24
hours before replacing it back in
the dust cup container.
Important Note: DO NOT use a
washing machine to clean the dust
cup filter. Do not use a hair dryer to
dry it. AIR DRY ONLY.
5. Replace the dust cup filter carefully
into the dust cup compartment.
NEVER operate the stick vac
without the dust cup filter in
place.
6. Attach the dust cup container to the
main body of the unit.
Note: It is recommended that the dust
cup filter be replaced every three (3)
months (depending on usage) to
ensure peak performance of the unit.
Medidas de Precaución
Importante: Si la abertura de succión o la manguera de la unidad se tapan, apague la
aspiradora y destápelos antes de encender nuevamente la unidad.
1.No use la aspiradora cerca de
calefactores, radiadores o colillas de
cigarrillos.
2.Antes de enchufar el cable en un
tomacorriente, asegúrese de tener
las manos secas.
4. Al desenchufar el cable del
tomacorriente, tire del enchufe, no
del cable.
3.Antes de empezar a usar la
aspiradora, asegúrese de quitar los
objetos grandes o filosos que
podrían dañar el filtro.
5. No recoja nada que se esté
quemando o echando humo, como
cigarrillos, fósforos, o cenizas
calientes.
6. No lo use sin el filtro instalado en su
lugar.
11
Separate the dust
cup container from
the main body.

7
Ordering Replacement Dust Cup Filters
TO ORDER REPLACEMENT FILTERS OR FOR TECHNICAL SUPPORT
for Model EP662
Call: 1 (800) 798-7398
Monday to Friday 8:30 A.M. - 5:00 P.M.
Eastern Standard Time
or
visit our website: www.sharkvac.com
Please Note:
The Dust Cup Filter is washable. It should, however, be replaced every three (3)
months (depending on usage) to ensure peak performance of your vacuum.
Important:
Make sure that ALL filters are completely dry before re-installing back in the vacuum.
TROUBLESHOOTING GUIDE
PROBLEM POSSIBLE REASON POSSIBLE SOLUTION
VACUUM WILL
NOT
OPERATE
1. No power in electrical outlet
supplying transformer.
1. Check fuse or breaker.
Replace fuse/reset
breaker.
VACUUM WILL
NOT PICK-UP
OR SUCTION
POWER IS
WEAK
1. Dust cup container is full.
2. Dust cup filter needs
cleaning or replacement.
3. Unit needs recharging.
1. Empty dust cup
container
2. Remove dust cup filter
and check for object(s)
in air duct and remove.
Clean or replace dust
cup filter.
3. Charge unit.
DUST
ESCAPING
FROM
VACUUM
1. Dust cup container is full.
2. Dust cup filter is not installed
correctly.
3. Puncture/hole in dust cup
filter.
1. Empty dust cup
container.
2. Review dust cup filter
installation instructions.
3. Replace dust cup filter.
Troubleshooting
Componentes de su Aspiradora Inalámbrica Vertical
Convertible Sin Bolsa
1. Mango del Tubo de Extensión
2. Gancho para el Cable
3. Tubo de Extensión
4. Gancho de Traba
5. Cable de Alimentación (no se
muestra completo)
6. Mango de la Aspiradora de
Mano
7. Llave de Encendido ON/OFF
8. Botón para Destrabar el
Recipiente para la Tierra
9. Recipiente para Tierra
10. Cabezal Esquinero
11. Cepillo Para Pisos
12. Filtro del Recipiente de la
Tierra (no se muestra)
Especificaciones Técnicas
Voltaje: 120 V.
Potencia: 60 Hz., 2 A.
10
Note: Illustrations may differ from actual product.

ONE (1) YEAR LIMITED WARRANTY
EURO-PRO Operating LLC warrants this product to be free from defects in material and
workmanship for a period of one (1) year from the date of the original purchase, when utilized for
normal household use, subject to the following conditions, exclusions and exceptions.
If your appliance fails to operate properly while in use under normal household conditions within
the warranty period, return the complete appliance and accessories, freight prepaid to:
U.S.: EURO-PRO Operating LLC, 94 Main Mill Street, Door 16, Plattsburgh, NY 12901
Canada: EURO-PRO Operating LLC, 4400 Bois Franc, St. Laurent, QC, H4S 1A7
If the appliance is found by EURO-PRO Operating LLC to be defective in material or
workmanship, EURO-PRO Operating LLC will repair or replace it free of charge. Proof of
purchase date and $ 5.95 to cover the cost of return shipping and handling must be included. *
Non-durable parts including, without limitation, filters, brushes and electrical parts which normally
require replacement are specifically excluded from warranty.
The liability of EURO-PRO Operating LLC is limited solely to the cost of the repair or
replacement of the unit at our option. This warranty does not cover normal wear of parts and
does not apply to any unit that has been tampered with or used for commercial purposes. This
limited warranty does not cover damage caused by misuse, abuse, negligent handling or
damage due to faulty packaging or mishandling in transit. This warranty does not cover damage
or defects caused by or resulting from damages from shipping or repairs, service or alterations to
the product or any of its parts, which have been performed by a repair person not authorized by
EURO-PRO Operating LLC.
This warranty is extended to the original purchaser of the unit and excludes all other legal and/or
conventional warranties. The responsibility of EURO-PRO Operating LLC if any, is limited to the
specific obligations expressly assumed by it under the terms of the limited warranty. In no event
is EURO-PRO Operating LLC liable for incidental or consequential damages of any nature
whatsoever. Some states/provinces do not permit the exclusion or limitation of incidental or
consequential damages, so the above may not apply to you
.
This warranty gives you specific legal rights, and you may also have other rights which vary from
state to state or province to province.
*Important: Carefully pack item to avoid damage in shipping. Be sure to include proof
of purchase date and to attach tag to item before packing with your name, complete
address and phone number with a note giving purchase information, model number and
what you believe is the problem with item. We recommend you insure the package (as
damage in shipping is not covered by your warranty). Mark the outside of your package
“ATTENTION CUSTOMER SERVICE”. We are constantly striving to improve our products,
therefore the specifications contained herein are subject to change without notice.
OWNERSHIP REGISTRATION CARD
FOR CANADIAN CONSUMERS ONLY
Please fill out and mail the product registration card within ten (10) days of purchase. The
registration will enable us to contact you in the unlikely event of a product safety notification. By
returning this card you acknowledge to have read and understood the instructions for use, and
warnings set forth in the accompanying instructions.
RETURN TO: EURO-PRO Operating LLC, 4400 Bois Franc, St. Laurent, QC, H4S 1A7
_____________________________________________________________________
Appliance model
____________________________________________________________________________
Date purchased Name of store
____________________________________________________________________________
Owner’s name
____________________________________________________________________________
Address City Province Postal Code
Model EP662
Printed in China
Model EP662
8
INSTRUCCIONES IMPORTANTES DE SEGURIDAD
Al usar su Aspiradora con mango 2 en 1, siempre debe seguir precauciones básicas de
seguridad, incluyendo las siguientes:
CONSERVE ESTAS INSTRUCCIONES
Para Uso Doméstico Solamente
Para reducir el riesgo de incendio,
descarga eléctrica o daños personales:
• No deje la aspiradora enchufada cuando
esté desatendida. Desenchúfela cuando
no la utilice o antes de realizarle algún
servicio.
• No permita que se utilice como un juguete.
Debe tener mucho cuidado al ser utilizada
por o cerca de niños, mascotas o plantas.
• Utilícela solamente como se indica en este
manual. Use únicamente los accesorios
recomendados por el fabricante.
• No tire del cable, no lo utilice como manija,
no lo apriete con una puerta, o tire del
cable a través de esquinas o bordes
filosos. No pase la aspiradora por encima
del cable de alimentación. Mantenga el
cable alejado de superficies calientes.
•Use únicamente cables de extensión
aprobados por UL o cUL para 15 amperes.
Los cables de menor capacidad pueden
recalentarse. Tenga cuidado al colocar el
cable para que nadie lo tironee o se
tropiece con él.
• Apague todos los controles que
correspondan antes de desenchufarla del
tomacorriente.
• No la desenchufe tirando del cable. Para
desenchufarla, tire del enchufe, no del
cable.
• No toque el enchufe o la aspiradora con
las manos húmedas o la utilice descalzo.
• No introduzca ningún objeto en las ranuras.
No la use con alguna abertura obstruida.
Manténgala sin tierra, pelusa, cabellos o
cualquier otra cosa que pueda reducir la
circulación de aire.
• Siempre guarde su artefacto en el interior
en un lugar frío y seco.
• Mantenga el área de trabajo bien
iluminada.
• No sumerja la aspiradora en agua o
ningún otro líquido.
• Mantenga el extremo de la manguera,
tubos y otras aberturas alejados de su cara
y de su cuerpo.
• Utilícela solamente en superficies secas.
• El uso de un voltaje incorrecto puede dañar
el motor y posiblemente lesionar al usuario.
El voltaje correcto está impreso en la
etiqueta del producto.
1. Lea completamente las instrucciones
antes de utilizarla.
2. Use el aparato únicamente en las
aplicaciones para las que fue
diseñado.
3. Para evitar el riesgo de descarga
eléctrica, no sumerja ninguna parte del
sistema en agua o ningún otro líquido.
4. Nunca tire del cable para
desenchufarlo, agárrelo y tire del
enchufe.
5. No deje que el cable entre en contacto
con superficies calientes.
6. No pase el artefacto por encima del
cable de alimentación.
7. No use el sistema con un cable o
enchufe dañado, o si el artefacto o
cualquiera de sus partes se ha caído o
dañado. Para evitar el riesgo de
descarga eléctrica, no desarme o
intente reparar la aspiradora. Retorne
la aspiradora a EURO-PRO Operating
LLC (ver garantía) para que sea
examinada y reparada. El armado o
reparación incorrecta puede crear
riesgo de descarga eléctrica o heridas
a personas al utilizar la aspiradora.
8. Tenga mucho cuidado al utilizar
cualquier aparato eléctrico cerca de
niños. No deje el sistema desatendido
mientras esté enchufado.
9. Mantenga el cabello, la ropa suelta, los
dedos y toda parte del cuerpo alejados
de las aberturas y de las partes
móviles.
10. No la use para recoger líquidos
inflamables o combustibles como
gasolina ni la use en áreas donde
puedan estar presentes.
11. No recoja nada que se esté quemando
o echando humo, como cigarrillos,
fósforos, o cenizas calientes.
12. Tenga especial cuidado al limpiar
escaleras.
13. No use la aspiradora sin tener el filtro
colocado en su lugar.
14. Este artefacto eléctrico es para uso
domiciliario solamente. Siga todas las
instrucciones de este manual.
9
Rev. 07/07
ADVERTENCIA: Para reducir el riesgo de una descarga eléctrica, este artefacto posee un
enchufe polarizado (una pata es más ancha que la otra). Este enchufe entra completamente en
un tomacor
riente polarizado en una sola posición. De no ser así, inviértalo, y si aún así no
entra completamente, llame a un el
ectricista calificado para que instale un tomacorriente
apropiado. No intente modif
icar el enchufe de ninguna manera.
Transcripción de documentos
2 in 1 Pick-Up Stick Vacuum Aspiradora Con Mango 2 EN 1 Owner’s Manual Manual del Usuario Model-Modelo: EP662 120 V., 60 Hz., 2 A. USA: EURO-PRO OPERATING LLC Canada: EURO-PRO OPERATING LLC 94 Main Mill Street, Door 16 4400 Bois Franc Plattsburg, NY 12901 St. Laurent, QC H4S 1A7 Tel.: 1 (800) 798-7398 www.sharkvac.com COPYRIGHT © EURO-PRO OPERATING LLC 2007 IMPORTANT SAFETY INSTRUCTIONS Modelo EP662 GARANTÍA LIMITADA DE UN (1) AÑO EURO-PRO Operating LLC garantiza este producto contra defectos de materiales y mano de obra por un término de un (1) año a partir de la fecha de compra original, siempre que sea utilizado para uso doméstico normal, sujeto a las siguientes condiciones, exclusiones y excepciones. Si su artefacto no funciona correctamente al utilizarlo bajo condiciones domésticas normales dentro del período de garantía, devuelva el artefacto completo y los accesorios, pagando el envío, a: EE.UU.: EURO-PRO Operating LLC, 94 Main Mill Street, Door 16, Plattsburgh, N.Y. 12901 Canadá: EURO-PRO Operating LLC, 4400 Bois Franc, St. Laurent, QC, H4S 1A7 Si EURO-PRO determina que el artefacto presenta un defecto de materiales o mano de obra, lo reparará o remplazará sin cargo. El envío debe incluir un comprobante de la fecha de compra y $ 5.95 para cubrir los gastos de envío. * Los insumos tales como, sin limitación, filtros, cepillos y partes eléctricas que normalmente necesitan ser reemplazados son explícitamente excluidos de la garantía. La responsabilidad de EURO-PRO Operating LLC se limita únicamente al costo de reparación o reemplazo de la unidad, a nuestro criterio. Esta garantía no cubre el desgaste normal de las partes y no cubre ninguna unidad que haya sido alterada o utilizada con fines comerciales. Esta garantía limitada no cubre daños ocasionados por uso inadecuado, abuso, negligencia o daños causados por embalaje inapropiado o maltrato durante el transporte. Esta garantía no cubre daños o defectos causados o resultantes durante el transporte para su reparación o alteraciones del producto o cualquiera de sus partes, realizadas por una persona no autorizada por EUROPRO. Esta garantía es válida para el comprador original del producto y excluye cualquier otra garantía legal y/o convencional. La responsabilidad de EURO-PRO Operating LLC, de existir, se limita a las obligaciones específicas asumidas expresamente bajo los términos de esta garantía limitada. Bajo ninguna circunstancia EURO-PRO Operating LLC será responsable por daños incidentales o indirectos de ninguna clase. Algunos estados no permiten la exclusión o limitación de daños consiguientes o incidentales, por lo tanto lo anterior puede no ser válido para usted. Esta garantía le otorga derechos legales específicos, y usted puede también tener otros derechos los que varían de estado a estado. *Importante: Embale el producto cuidadosamente para evitar daños durante el transporte. Asegúrese de incluir un comprobante de la fecha de compra y de colocarle una etiqueta al producto con su nombre, dirección completa y número de teléfono, una nota proporcionando información de la compra, número de modelo y una descripción del problema. Le recomendamos asegurar el paquete (puesto que la garantía no cubre daños de envío). Escriba en el exterior del paquete “ATTENTION CUSTOMER SERVICE”. Nosotros nos esforzamos constantemente en mejorar nuestros productos, por lo tanto las especificaciones aquí indicadas pueden cambiar sin previo aviso. TARJETA DE REGISTRO DEL CLIENTE SÓLO PARA CONSUMIDORES CANADIENSES Complete y envíe la tarjeta de registro del producto dentro de los diez (10) días posteriores a la compra. El registro nos permitirá contactarnos con usted en caso de existir alguna notificación de seguridad con respecto al producto. Retornando esta tarjeta usted reconoce haber leído y entendido las instrucciones de uso y advertencias incluidas en estas instrucciones. ENVIAR A: EURO-PRO Operating LLC, 4400 Bois Franc, St. Laurent, QC, H4S 1A7 Modelo EP662 ____________________________________________________________________________ Modelo del Artefacto ____________________________________________________________________________ Fecha de compra Nombre del Negocio ____________________________________________________________________________ Nombre del Dueño ____________________________________________________________________________ Dirección Ciudad Provincia Código Postal Impreso en China 16 When using your 2 IN 1 PICK-UP STICK VACUUM basic safety precautions should always be observed, including the following: 1. 2. 3. 4. 5. 6. 7. 8. 9. 10. 11. 12. 13. 14. Read all instructions before using your 2 IN 1 PICK-UP STICK VACUUM. Use the system only for its intended use. To protect against a risk of electric shock, do not immerse any part of the system in water or other liquids. Never yank cord to disconnect from outlet; instead, grasp plug and pull to disconnect. Do not allow cord to touch hot surfaces. Do not run appliance over cord. Do not operate the system with a damaged cord or plug, or if the appliance or any other part of the system has been dropped or damaged. To avoid the risk of electric shock, do not disassemble or attempt to repair the 2 IN 1 PICK-UP STICK VACUUM. Return the unit to EURO-PRO Operating LLC (see warranty) for examination and repair. Incorrect reassembly or repair can cause a risk of electrical shock or injury to persons when the 2 IN 1 PICK-UP STICK VACUUM is used. Close supervision is necessary for any appliance being used by or near children. Do not leave the system unattended while connected. Keep hair, loose clothing, fingers and all parts of body away from opening and moving parts. Do not use to pick up flammable or combustible liquids such as gasoline or use in areas where they may be present. Do not pick up anything that is burning or smoking such as cigarettes, matches or hot ashes. Use extra care when cleaning on stairs. Do not use the vacuum without the dust cup filter in place. This appliance is intended only for household use. Follow all user instructions in this manual. To reduce the risk of fire, electric shock, or injury: • Do not leave the 2 IN 1 PICK-UP STICK VACUUM plugged in when unattended. Unplug the electrical cord when not in use and before servicing. • Do not allow to be used as a toy. Close attention is necessary when used by or near children, pets or plants. • Use only as described in this manual. Use only manufacturer’s recommended accessories. • Do not pull cord, use cord as a handle, close a door on cord, or pull cord around sharp edges or corners. Do not run vacuum cleaner over cord. Keep cord away from heated surfaces. • Use only extension cords UL-rated or cUL at 15 amperes. extension cords rated for less amperage may overheat. Care should be taken to arrange the cord so that the cord cannot be pulled or tripped over. • Turn off all controls as applicable before unplugging from electrical outlet. • Do not unplug by pulling on cord. To unplug, grasp the plug, not the cord. • Do not handle plug or vacuum with wet hands or operate without shoes. • Do not put any objects into openings. Do not use with any opening blocked. Keep free of dust, lint, hair and anything else that may reduce air flow. • Store your appliance indoors in a cool, dry area. • Keep your work area well lit. • Do not immerse the vacuum into water or other liquids. • Keep end of hose, wands and other openings away from your face and body. • Use only on dry surfaces. • Using improper voltage may result in damage to the motor and possible injury to the user. Correct voltage is listed on rating label. SAVE THESE INSTRUCTIONS For Household Use Only WARNING: To reduce the risk of electric shock, this appliance has a polarized plug (one blade is wider than the other). This plug will fit in a polarized outlet only one way. If the plug does not fit fully in the outlet, reverse the plug. If it still does not fit, contact a qualified electrician to install the proper outlet. Do not modify the plug in any way. 1 Rev. 07/07 Getting to Know Your 2 IN 1 PICK-UP STICK VACUUM Solución de problemas GUÍA PARA EL DIAGNÓSTICO DE PROBLEMAS 1. 2. 3. 4. 5. 6. 7. 8. 9. 10. 11. 12. Extension Tube Handle Quick Release Cord Hook Extension Tube Locking Clip Power Cord (not shown fully) Hand Vac Handle On/Off Power Switch Dust Cup Container Release Dust Cup Container Crevice Tool Floor Brush Dust Cup Filter (not shown) PROBLEMA Technical Specifications POSIBLE CAUSA POSIBLE SOLUCIÓN ASPIRADORA NO FUNCIONA 1. Batería descargada. 2. El tomacorriente donde enchufa el cargador no funciona. 1. Recargue la unidad. 2. Verifique el fusible o la llave general. Reemplace el fusible/encienda la llave general. NO LEVANTA LA TIERRA O LA SUCCIÓN ES MUY DÉBIL. 1. Recipiente para la tierra está lleno. 2. Hay que limpiar o reemplazar el filtro. 3. La unidad necesita una recarga. 1. Vacíe el recipiente para la tierra. 2. Quite el filtro y verifique que no haya nada tapando el conducto del aire. Limpie o reemplace el filtro. 3. Recargue la unidad. SALE TIERRA DE LA ASPIRADORA 1. Recipiente para la tierra está lleno. 2. El recipiente de la tierra no está instalado correctamente. 3. Hay un agujero en el filtro o está roto. 1. Vacíe el recipiente para la tierra. 2. Repase las instrucciones del filtro. 3. Reemplace el filtro. Voltage: 120 V. Power: 60 Hz., 2 A. Para Ordenar Filtros de Repuesto PARA COMPRAR FILTROS DE REPUESTO O POR SOPORTE TÉCNICO para Modelo EP662 Llame al: 1 (800) 798-7398 de Lunes a Viernes de 8:30 AM hasta 5:00 PM Hora del Este (EST) o visite nuestro sitio de Internet: www.sharkvac.com Observaciones: El filtro es lavable. Sin embargo, deben ser reemplazados cada tres (3) meses (dependiendo del uso) para asegurar el óptimo rendimiento de su aspiradora. Importante: Asegúrese de que TODOS los filtros lavables estén completamente secos antes de volverlos a instalar en la aspiradora. Note: Illustrations may differ from actual product. 2 15 Precautionary Measures Limpieza y Reemplazo del Filtro 2. Quite el filtro. (Fig. 10) Limpieza y Reemplazo del Filtro Recipiente para la Tierra Para obtener el mejor rendimiento, vacíe el recipiente para la tierra y limpie el filtro luego de cada uso. 1. Important: If the suction opening in the unit or the hose is blocked, switch off the vacuum cleaner and remove the blocking substance before you start the unit again. 1. Do not operate the vacuum cleaner too close to heaters, radiators or cigarette butts. Filtro Para quitar el recipiente de la tierra, presione el botón para destrabarlo (Fig. 8) y quite el recipiente. (Fig. 9) 4. When pulling out the power plug from the wall outlet, pull the plug not the power cord. Fig. 10 Presione el botón para destrabar el recipiente de la tierra 3. Vacíe la tierra del recipiente. 4. Enjuague el filtro con agua fría, y déjelo secar completamente durante 24 horas antes de volverlo a colocar dentro del recipiente de la tierra. 2. Before inserting the power plug into the wall outlet, make sure that your hands are dry. 5. Do not pick up anything that is burning or smoking such as cigarettes, matches or hot ashes. Nota Importante: No lo coloque en una lavadora. No lo seque con un secador de cabello. DEJE QUE SE SEQUE AL AIRE. Fig. 8 5. Vuelva a colocar el filtro con cuidado dentro del recipiente de la tierra. Nunca use la aspiradora sin el filtro colocado en su lugar. Quite el recipiente de la unidad principal. 6. Coloque el recipiente para la tierra en el cuerpo principal de la unidad. 6. Do not use without dust cup filter in place. 3. Before you start vacuuming, make sure to remove large or sharp objects that might damage the dust cup filter. Nota: Le recomendamos reemplazar el filtro cada tres (3) meses (dependiendo del uso) para asegurar el máximo rendimiento de la unidad. Fig. 9 14 3 Operating Instructions Note: Always remove the power plug from the wall outlet before assembling or removing accessories. Attaching the Crevice Tool or the Floor Brush to the Main Body • Push the crevice tool or floor brush into the suction hole opening. (Fig. 5) Inserting the Metal Handle Into the Main Body • Instrucciones de Operación On the hand vac handle, pull open the handle port (Fig. 1) and insert the extension tube until the locking clip is sitting firmly on the handle. (Fig. 2) Fig. 5 • The following are recommendations for accessory usage: Crevice Tool For radiators, crevices, corners, base-boards and between cushions. Floor Brush For all kinds of flooring, including carpeted and tiled floors. Handle Port Advertencia: El orificio de succión debe permanecer abierto, sin obstrucciones todo el tiempo. De lo contrario el motor puede recalentarse y dañarse. This vacuum cleaner is equipped with a convenient cord storage feature. This unit also has a quick release cord hook • Wind power cord around the quick release cord hook and the cord winding hook. (Fig. 6) To unwind the power cord, simply twist the quick release cord hook to the left or right. Push firmly into handle Locking Clip Fig. 2 • Quick Release Cord Hook Push the handle port closed so that it snaps shut. (Fig. 3 & 4) Push handle Port so that it snaps shut • Desconecte el tubo de extensión de la aspiradora de mano destrabando el orificio de conexión del gancho y quitando el tubo de extensión del mango de la aspiradora. Una vez que haya quitado el tubo de extensión, vuelva a cerrar el orificio de conexión. Nota: Puede dejar el cabezal esquinero o el cepillo para pisos colocado en la unidad al utilizarla como aspiradora de mano. • Presione “I” en la llave de encendido para encender la unidad. Cuando termine de usar la unidad, presione “O” en la llave de encendido para apagarla. Posición Encendido Posición Apagado Winding & Unwinding the Power Cord Fig. 1 Uso de la unidad como aspiradora de mano Llave de Encendido • El botón de encendido tiene dos posiciones. (Fig. 7) • Presione el lado de la “I” para encender la aspiradora. • Presione el lado de la “O” para apagar la aspiradora. Fig. 7 Uso de la Unidad como Aspiradora Vertical • • • Desenrolle y enchufe el cable de alimentación en el tomacorriente de 120V. Inserte el tubo de extensión dentro de la aspiradora de mano (vea las instrucciones de la página 4). Elija el accesorio apropiado (cabezal esquinero o cepillo para pisos) y colóquelo en el orificio de succión de la aspiradora (vea las instrucciones de la página 12). Nota: Puede usar la aspiradora en Cord Winding Hook Fig. 6 Fig. 3 posición vertical sin el cabezal esquinero o el cepillo para pisos. • Presione “I” en la llave de encendido para encender la unidad. Cuando termine de usar la unidad, presione “O” en la llave de encendido para apagarla. • Cuando termine de usar la unidad, enrosque el cable de alimentación alrededor de los ganchos para facilitar su almacenamiento. Fig. 4 4 13 Operating Instructions Instrucciones de Operación Nota: Siempre desenchufe el cable de alimentación del tomacorriente antes de instalar o quitar accesorios. Colocando el Cabezal Esquinero y el Cepillo para Piso en el Cuerpo Principal Insertando el Mango Metálico dentro del Cuerpo Principal • • Abra el orificio de conexión en el mango de la aspiradora de mano (Fig. 1) e inserte el tubo de extensión hasta que el gancho quede firmemente trabado dentro del mango. (Fig. 2). Coloque el cabezal esquinero o el cepillo para piso dentro del orificio de succión. (Fig. 5). Caution: The suction hole opening must be open and free of any obstructions at all times. Otherwise, the motor will overheat and could become damaged. • The On/Off power switch has two positions. (Fig. 7) • Push on the "I" side to turn the vacuum ON. • Push on the "O" side to turn the vacuum OFF. Fig. 5 • Orificio de Conexión Using the Unit as a Hand Vacuum Power Switch • Disconnect the extension tube from the hand vac by releasing the handle port from the locking clip and removing the extension tube from the hand vac handle. Once the extension tube is removed, snap the handle port shut. ON Position Recomendaciones para el uso de accesorios: Note: You may choose to leave the crevice tool or floor brush attached to the hand vac when operating as such. • Press the “I” position on the On/Off power switch to turn the unit on. When finished using the unit, press the “O” position on the On/Off power switch to turn the unit off. Cabezal Esquinero Para radiadores, ranuras, esquinas, zócalos y entre almohadones. Cepillo Para Pisos Para todo tipo de pisos, incluyendo alfombras y baldosas. Enrollado y Desenrollado del Cable de Alimentación Fig.1 Esta aspiradora está equipada con una forma conveniente de guardar el cable. Esta unidad también tiene un gancho de liberación rápida para el cable. • Enrosque el cable de alimentación alrededor de los ganchos para el cable. (Fig. 6). Para desenrollar el cable, simplemente gire el gancho de liberación rápida hacia la izquierda o la derecha. Presione firmemente dentro del mango. Gancho de Traba Fig. 2 • Presione para cerrar el orificio de conexión y trabarlo. (Fig. 3 y Fig. 4). Presione para cerrar el orificio de conexión y trabarlo. Gancho para el Cable OFF Position Fig. 7 Using the Unit as an Upright • Unwind the power cord and plug into the 120V outlet. • Insert the extension tube into the hand vac. (See the instructions provided on page 4.) • Choose the appropriate accessory (crevice tool or floor brush) and attach it to suction hole opening on the hand vac. (See the instructions provided on page 4.) Note: You may choose not to attach the crevice tool or floor brush when operating as an upright. • Press the “I” position on the On/Off power switch to turn the unit on. When finished using the unit, press the “O” position on the On/Off power switch to turn the unit off. • When finished using the unit, wind the power cord around the cord winding hooks for easy storage. Gancho para Enrollar el Cable Fig. 3 Fig. 6 Fig. 4 12 5 Medidas de Precaución Cleaning & Changing the Dust Cup Filter 2. Pull out the dust cup filter. (Fig. 10) Changing and Cleaning the Dust Cup Filter Dust Cup Container In order to achieve the best performance, empty the dust cup container and clean the dust cup filter after each use. 1. To remove the dust cup container, press down on the dust cup container release button (Fig. 8) and separate the dust cup container from the main unit. (Fig. 9) Importante: Si la abertura de succión o la manguera de la unidad se tapan, apague la aspiradora y destápelos antes de encender nuevamente la unidad. 1. No use la aspiradora cerca de calefactores, radiadores o colillas de cigarrillos. Dust Cup Filter 4. Al desenchufar el cable del tomacorriente, tire del enchufe, no del cable. Fig. 10 3. Empty the dust from the dust cup container. 4. Rinse the dust cup filter in cold water, and then let it air dry for 24 hours before replacing it back in the dust cup container. Press down on the dust cup container release button Important Note: DO NOT use a washing machine to clean the dust cup filter. Do not use a hair dryer to dry it. AIR DRY ONLY. 5. Replace the dust cup filter carefully into the dust cup compartment. NEVER operate the stick vac without the dust cup filter in place. 6. Attach the dust cup container to the main body of the unit. Fig. 8 Separate the dust cup container from the main body. 2. Antes de enchufar el cable en un tomacorriente, asegúrese de tener las manos secas. 5. No recoja nada que se esté quemando o echando humo, como cigarrillos, fósforos, o cenizas calientes. 6. No lo use sin el filtro instalado en su lugar. 3. Antes de empezar a usar la aspiradora, asegúrese de quitar los objetos grandes o filosos que podrían dañar el filtro. Note: It is recommended that the dust cup filter be replaced every three (3) months (depending on usage) to ensure peak performance of the unit. Fig. 9 6 11 Componentes de su Aspiradora Inalámbrica Vertical Convertible Sin Bolsa Troubleshooting TROUBLESHOOTING GUIDE 1. 2. 3. 4. 5. Mango del Tubo de Extensión Gancho para el Cable Tubo de Extensión Gancho de Traba Cable de Alimentación (no se muestra completo) 6. Mango de la Aspiradora de Mano 7. Llave de Encendido ON/OFF 8. Botón para Destrabar el Recipiente para la Tierra 9. Recipiente para Tierra 10. Cabezal Esquinero 11. Cepillo Para Pisos 12. Filtro del Recipiente de la Tierra (no se muestra) Especificaciones Técnicas Voltaje: 120 V. Potencia: 60 Hz., 2 A. PROBLEM POSSIBLE REASON POSSIBLE SOLUTION VACUUM WILL NOT OPERATE 1. No power in electrical outlet supplying transformer. 1. Check fuse or breaker. Replace fuse/reset breaker. VACUUM WILL NOT PICK-UP OR SUCTION POWER IS WEAK 1. Dust cup container is full. 2. Dust cup filter needs cleaning or replacement. 3. Unit needs recharging. 1. Empty dust cup container 2. Remove dust cup filter and check for object(s) in air duct and remove. Clean or replace dust cup filter. 3. Charge unit. DUST ESCAPING FROM VACUUM 1. Dust cup container is full. 2. Dust cup filter is not installed correctly. 3. Puncture/hole in dust cup filter. 1. Empty dust cup container. 2. Review dust cup filter installation instructions. 3. Replace dust cup filter. Ordering Replacement Dust Cup Filters TO ORDER REPLACEMENT FILTERS OR FOR TECHNICAL SUPPORT for Model EP662 Call: 1 (800) 798-7398 Monday to Friday 8:30 A.M. - 5:00 P.M. Eastern Standard Time or visit our website: www.sharkvac.com Please Note: The Dust Cup Filter is washable. It should, however, be replaced every three (3) months (depending on usage) to ensure peak performance of your vacuum. Important: Make sure that ALL filters are completely dry before re-installing back in the vacuum. Note: Illustrations may differ from actual product. 10 7 INSTRUCCIONES IMPORTANTES DE SEGURIDAD Model EP662 ONE (1) YEAR LIMITED WARRANTY EURO-PRO Operating LLC warrants this product to be free from defects in material and workmanship for a period of one (1) year from the date of the original purchase, when utilized for normal household use, subject to the following conditions, exclusions and exceptions. If your appliance fails to operate properly while in use under normal household conditions within the warranty period, return the complete appliance and accessories, freight prepaid to: U.S.: EURO-PRO Operating LLC, 94 Main Mill Street, Door 16, Plattsburgh, NY 12901 Canada: EURO-PRO Operating LLC, 4400 Bois Franc, St. Laurent, QC, H4S 1A7 If the appliance is found by EURO-PRO Operating LLC to be defective in material or workmanship, EURO-PRO Operating LLC will repair or replace it free of charge. Proof of purchase date and $ 5.95 to cover the cost of return shipping and handling must be included. * Non-durable parts including, without limitation, filters, brushes and electrical parts which normally require replacement are specifically excluded from warranty. The liability of EURO-PRO Operating LLC is limited solely to the cost of the repair or replacement of the unit at our option. This warranty does not cover normal wear of parts and does not apply to any unit that has been tampered with or used for commercial purposes. This limited warranty does not cover damage caused by misuse, abuse, negligent handling or damage due to faulty packaging or mishandling in transit. This warranty does not cover damage or defects caused by or resulting from damages from shipping or repairs, service or alterations to the product or any of its parts, which have been performed by a repair person not authorized by EURO-PRO Operating LLC. This warranty is extended to the original purchaser of the unit and excludes all other legal and/or conventional warranties. The responsibility of EURO-PRO Operating LLC if any, is limited to the specific obligations expressly assumed by it under the terms of the limited warranty. In no event is EURO-PRO Operating LLC liable for incidental or consequential damages of any nature whatsoever. Some states/provinces do not permit the exclusion or limitation of incidental or consequential damages, so the above may not apply to you. This warranty gives you specific legal rights, and you may also have other rights which vary from state to state or province to province. *Important: Carefully pack item to avoid damage in shipping. Be sure to include proof of purchase date and to attach tag to item before packing with your name, complete address and phone number with a note giving purchase information, model number and what you believe is the problem with item. We recommend you insure the package (as damage in shipping is not covered by your warranty). Mark the outside of your package “ATTENTION CUSTOMER SERVICE”. We are constantly striving to improve our products, therefore the specifications contained herein are subject to change without notice. Al usar su Aspiradora con mango 2 en 1, siempre debe seguir precauciones básicas de seguridad, incluyendo las siguientes: 1. 2. 3. 4. 5. 6. 7. 8. 9. 10. 11. OWNERSHIP REGISTRATION CARD FOR CANADIAN CONSUMERS ONLY Please fill out and mail the product registration card within ten (10) days of purchase. The registration will enable us to contact you in the unlikely event of a product safety notification. By returning this card you acknowledge to have read and understood the instructions for use, and warnings set forth in the accompanying instructions. RETURN TO: EURO-PRO Operating LLC, 4400 Bois Franc, St. Laurent, QC, H4S 1A7 12. 13. 14. Para reducir el riesgo de incendio, descarga eléctrica o daños personales: • No deje la aspiradora enchufada cuando esté desatendida. Desenchúfela cuando no la utilice o antes de realizarle algún servicio. • No permita que se utilice como un juguete. Debe tener mucho cuidado al ser utilizada por o cerca de niños, mascotas o plantas. • Utilícela solamente como se indica en este manual. Use únicamente los accesorios recomendados por el fabricante. • No tire del cable, no lo utilice como manija, no lo apriete con una puerta, o tire del cable a través de esquinas o bordes filosos. No pase la aspiradora por encima del cable de alimentación. Mantenga el cable alejado de superficies calientes. • Use únicamente cables de extensión aprobados por UL o cUL para 15 amperes. Los cables de menor capacidad pueden recalentarse. Tenga cuidado al colocar el cable para que nadie lo tironee o se tropiece con él. • Apague todos los controles que correspondan antes de desenchufarla del tomacorriente. • No la desenchufe tirando del cable. Para desenchufarla, tire del enchufe, no del cable. • No toque el enchufe o la aspiradora con las manos húmedas o la utilice descalzo. • No introduzca ningún objeto en las ranuras. No la use con alguna abertura obstruida. Manténgala sin tierra, pelusa, cabellos o cualquier otra cosa que pueda reducir la circulación de aire. • Siempre guarde su artefacto en el interior en un lugar frío y seco. • Mantenga el área de trabajo bien iluminada. • No sumerja la aspiradora en agua o ningún otro líquido. • Mantenga el extremo de la manguera, tubos y otras aberturas alejados de su cara y de su cuerpo. • Utilícela solamente en superficies secas. • El uso de un voltaje incorrecto puede dañar el motor y posiblemente lesionar al usuario. El voltaje correcto está impreso en la etiqueta del producto. Lea completamente las instrucciones antes de utilizarla. Use el aparato únicamente en las aplicaciones para las que fue diseñado. Para evitar el riesgo de descarga eléctrica, no sumerja ninguna parte del sistema en agua o ningún otro líquido. Nunca tire del cable para desenchufarlo, agárrelo y tire del enchufe. No deje que el cable entre en contacto con superficies calientes. No pase el artefacto por encima del cable de alimentación. No use el sistema con un cable o enchufe dañado, o si el artefacto o cualquiera de sus partes se ha caído o dañado. Para evitar el riesgo de descarga eléctrica, no desarme o intente reparar la aspiradora. Retorne la aspiradora a EURO-PRO Operating LLC (ver garantía) para que sea examinada y reparada. El armado o reparación incorrecta puede crear riesgo de descarga eléctrica o heridas a personas al utilizar la aspiradora. Tenga mucho cuidado al utilizar cualquier aparato eléctrico cerca de niños. No deje el sistema desatendido mientras esté enchufado. Mantenga el cabello, la ropa suelta, los dedos y toda parte del cuerpo alejados de las aberturas y de las partes móviles. No la use para recoger líquidos inflamables o combustibles como gasolina ni la use en áreas donde puedan estar presentes. No recoja nada que se esté quemando o echando humo, como cigarrillos, fósforos, o cenizas calientes. Tenga especial cuidado al limpiar escaleras. No use la aspiradora sin tener el filtro colocado en su lugar. Este artefacto eléctrico es para uso domiciliario solamente. Siga todas las instrucciones de este manual. Model EP662 _____________________________________________________________________ Appliance model ____________________________________________________________________________ Date purchased Name of store ____________________________________________________________________________ ADVERTENCIA: Para reducir el riesgo de una descarga eléctrica, este artefacto posee un Owner’s name ____________________________________________________________________________ Address City Province Postal Code Printed in China CONSERVE ESTAS INSTRUCCIONES Para Uso Doméstico Solamente 8 enchufe polarizado (una pata es más ancha que la otra). Este enchufe entra completamente en un tomacorriente polarizado en una sola posición. De no ser así, inviértalo, y si aún así no entra completamente, llame a un electricista calificado para que instale un tomacorriente apropiado. No intente modificar el enchufe de ninguna manera. 9 Rev. 07/07-
 1
1
-
 2
2
-
 3
3
-
 4
4
-
 5
5
-
 6
6
-
 7
7
-
 8
8
-
 9
9
-
 10
10


Euro-Pro EP662 Manual de usuario
- Categoría
- Aspiradoras
- Tipo
- Manual de usuario
- Este manual también es adecuado para
En otros idiomas
- English: Euro-Pro EP662 User manual


