
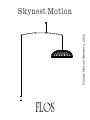
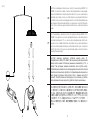
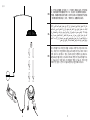
Skynest Motion
Design Marcel Wanders, 2022

2 3
EN
INSTRUCTION FOR CORRECT INSTALLATION AND USE
WARNING!
The safety of this fitting can only be guaranteed
if these instructions are observed, during both
installation and use. Please retain these instructions
safety.
REMARKS:
• When installing and whenever acting on the
appliance, ensure that the power supply has been
switched off.
• The appliance may in no way be modified or
tampered with. Any modification may compromise
safety and making the appliance itself dangerous.
FLOS declines all responsibility for products that
are modified.
• The device carries no risk of photobiological
emissions.
• The light source cannot be replaced by the
customer. Contact FLOS for information.
• Should the external trailing cable get damaged,
it must be replaced by FLOS or by qualified
personnel in order to avoid any danger.
• The symbol shown on the device indicates that
the product must be disposed of in a different
manner than with the urban waste.
TECHNICAL DATA
57W LED
CLEANING INSTRUCTIONS
• Use only a soft cloth to clean the appliance,
dampened with water and soap or mild cleanser
if needed for resistant dirt.
• Warning: do not use alcohol or other solvents.
FR
INSTRUCTIONS D’INSTALLATION ET D’EMPLOI
ATTENTION!
La sûreté de cet appareil est garantie uniquement si l’on
respecte ces instructions soit en phase d’installation
soit pendant l’utilisation; il faut donc les conserver.
NOTICES:
• Au moment de l’installation et chaque fois que l’on
intervient sur l’appareil, s’assurer que la tension
d’alimentation a été coupée.
• L’appareil ne peut être modifié ou altéré de quelque
manière que ce soit, toute modification peut
compromettre sa sécurité en le rendant dangereux.
FLOS décline toute responsabilité sur les produits
modifiés.
• L’ appareil ne présente aucun risque photobiologique.
• La source lumineuse ne peut pas être remplacée par
le client. Pour obtenir des informations, contacter la
société FLOS.
• Si le cordon flexible externe est endommagé, il doit
être remplacé par FLOS ou par le personnel qualifié
afin d’éviter des dangers.
• Le symbole montré sur l’appareil indique que le
produit doit être éliminé selon les règles de tri sélectif
des déchets.
DONNEES TECHNIQUES
57W LED
INSTRUCTIONS POUR LE NETTOYAGE
• Pour le nettoyage de l’appareil utiliser exclusivement
un chiffon doux, humecté si nécessaire, avec de l’eau
et du savon ou avec un détergent neutre pour les
salissures les plus tenaces.
• Attention: ne pas utiliser d’alcool ou solvents.
IT
ISTRUZIONI DI INSTALLAZIONE ED IMPIEGO
ATTENZIONE!
La sicurezza dell’apparecchio é garantita solo
rispettando queste istruzioni sia in fase di
installazione che di impiego; é pertanto necessario
conservarle.
AVVERTENZE:
• All’atto dell’installazione ed ogni volta che si
interviene sull’apparecchio, assicurarsi che sia
stata tolta la tensione di alimentazione.
• L’apparecchio non può essere in alcun modo
modificato o manomesso, ogni modifica ne può
compromettere la sicurezza rendendo lo stesso
pericoloso. FLOS declina ogni responsabilità per
i prodotti modificati.
• L’apparecchio è esente dal rischio di emissione
fotobiologica.
• La sorgente luminosa non può essere sostituita
dal cliente. Per informazioni contattare FLOS.
• Se il cavo flessibile si danneggia, deve essere
sostituito da FLOS o da personale qualificato al
fine di evitare pericoli.
• Il simbolo riportato sull’apparecchio indica che
il prodotto deve essere smaltito in modo
differenziato dai rifiuti urbani.
DATI TECNICI
57W LED
ISTRUZIONI PER LA PULIZIA DELL’APPARECCHIO
• Per la pulizia dell’apparecchio utilizzare
esclusivamente un panno morbido eventualmente
inumidito con acqua e sapone.
• Attenzione: non utilizzare alcool o solventi.
DE
INSTALLATION - UND GEBRAUCHSANWEISUNGEN
ACHTUNG!
Wir garantieren nur dann für die Sicherheit der Leuchte,
wenn diese Anweisungen sowohl bei der Installation
als auch beim Gebrauch genau beachtet werden.
Es ist daher ratsam, sie aufzubewahren.
BEMERKUNGEN:
• Bei der Installation und bei Eingriffen an der Leuchte ist
sicherzustellen, daß die Anlage vom Netz abgeschaltet
ist.
• Der Apparat darf auf keinen Fall veraendert oder
unerlaubt geoeffnet werden, jede Veraenderung
desselben kann die Sicherheit in Frage stellen
und somit gefaehrlich werden. FLOS lehnt jede
Verantwortung fuer unsachgemaess behandelte
Produkte ab.
• Das Gerät ist frei von photobiologischen
Emissionsgefahren.
• Die Leuchtquelle kann nicht vom Kunden ausgewechselt
werden. Für Informationen bitte FLOS kontaktieren.
• Falls das flexible äußere Kabel beschädigt wird, muß
es von FLOS oder von qualifiziertem Personal ersetzt
werden, um Gefahren zu vermeiden.
• Das auf dem Gerät wiedergegebene Symbol zeigt
an, dass das Produkt getrennt vom Stadtmüll entsorgt
werden muss.
TECHNISCHE DATEN
57W LED
REINIGUNGSVORSCHRIFTEN
• Bei der Reinigung der Leuchte darf man ausschließlich
weiche Tücher verwenden. Eventuell kann man diese
mit Wasser und Seife oder mit einem neutralen
Reinigungsmittel anfeuchten.
• Achtung: Weder Alkohol noch Lösungsmittel verwenden.

4 5
ES
INSTRUCCIONES DE INSTALACIÓN Y DE USO
¡ATENCIÓN!
La seguridad del aparato sólo puede garantizarse
con la condición de que se respeten las siguientes
instrucciones, tanto en la fase de instalación como
de uso, por lo cual se recomienda conservarlas.
ADVERTENCIA:
• Para efectuar la instalación, y cada vez que se
efectúe alguna operación en el aparato, asegurarse
de haber cortado la corriente eléctrica.
• El aparato no puede ser en ningùn caso modificado
o forzado, cualquier modificaciòn puede
comprometer la seguridad haciéndolo peligroso.
FLOS declina cualquier responsabilidad por los
productos modificados.
• El aparato no presenta ningún riesgo fotobiológico.
• La fuente luminosa no puede ser sustituida por el
cliente. Para más información, ponerse en contacto
con FLOS.
• Si el cable externo se estropea, debe ser sustituido
por FLOS o por personal cualificado con el fin de
evitar situaciones peligrosas.
• El símbolo que aparece en el aparato indica
que el producto debe ser eliminado en modo
diferenciado del resto de los desechos urbanos.
DATOS TECNICOS
57W LED
INSTRUCCIONES PARA LIMPIAR EL APARATO
• Para la limpieza del aparato, utilizar exclusivamente
un paño suave. En caso de suciedad más
resistente, humedecer el paño con agua y jabón o
un detergente neutro.
• Advertencia: no emplear alcohol ni disolventes.
J
•
•
•
•
•
•
PT
INSTRUÇÕES INSTALAÇÃO E USO
ATENÇÃO!
A segurança do aparelho é garantida somente
se respeitarmos as instruções tanto na fase de
instalação como na de uso; portanto é necessário
conservar tais instruções.
ADVERTÊNCIA:
• Para efectuar a instalação, e todas as vezes que
se efectue uma intervenção no aparelho, é preciso
controlar com toda a certeza que o mesmo não
está ligado à corrente eléctrica.
• De forma alguma o aparelho deve ser modificado
ou alterado, toda e qualquer modificação
pode comprometer a segurança tornando o
aparelho perigoso. FLOS declina toda e qualquer
responsabilidade pelos produtos modificados.
• El aparato no presenta ningún riesgo fotobiológico.
• A fonte luminosa não pode ser substituída pelo
cliente. Para maiores informações contactar FLOS.
• Se o cabo flexível está danificado, deve ser
substituído pela FLOS ou por pessoal qualificado
para evitar qualquer perigo.
• O símbolo indicado no aparelho indica que o
produto deve ser eliminado de forma diferenciada
em relação ao lixo urbano.
DADOS TÉCNICOS
57W LED
INSTRUÇÕES PARA A LIMPEZA DO APARELHO
• Para limpeza do aparelho utilizar exclusivamente
um tecido macio eventualmente úmido com água
e sabão ou detergente neutro para a sujeira mais
difícil.
• Atenção: não utilizar álcool ou solventes.
RUS
•
•
•
•
•
•

6 7
CN
•
•
•
•
•
•
SA
•
•
•
•
•
•
•
•
KR
•
•
•
•
•
•
•
•
•

8 9
IT Fig.2 NOTA BENE: Scegliere i tasselli ad espansione idonei per la superficie destinata al montaggio.
EN Pic.2 NOTE: Select and employ screw anchors which are suited to the surface where the appliance is
to be installed.
DE Abb.2 BEACHTEN SIE! Die dehnbaren Einsatzstücke sind angemessen für die vorgesehene Oberfläche
zur Montage auszuwählen.
FR Fig.2 NOTE: Choisir les chevilles à expansion correctes pour la superficie destinée au montage.
ES Fig.2 Nota importante: Elegir los tacos de expansión idoneos para la superficie destinada al montaje.
PT Fig.2 Observar bem: escolher as buchas de expansão idóneas para a superfície destinada a montagem.
RUS
Рис.2 ПРИМЕЧАНИЕ: Выбирать расширительные вставки, соответствующие
поверхности, предназначенной для монтажа.
J
CN
SA
KR
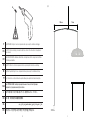
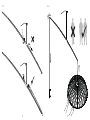
70 cm100 cm
Fig. 1

10 11
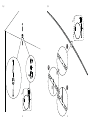
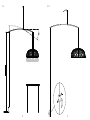
1
2
3
Fig. 3
Fig. 2

12 13
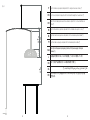
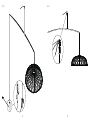
50 cm
80 cm85 cm
9 cm21 cm
*
*
Fig. 4 IT Fig.4 Per mantenere le proporzioni del prodotto, FLOS consiglia di osservare le misure (*).
EN Pic.4 To keep the product in proportion, FLOS recommends following these measurements (*).
DE Abb.4 Um die Produktproportionen nicht zu verändern, empfiehlt FLOS, sich nach den Maßen zu
richten (*).
FR Fig.4 Pour maintenir les proportions du produit, FLOS recommande de respecter les cotes (*).
ES Fig.4 Para mantener las proporciones del producto, FLOS recomienda respetar las medidas (*).
PT Fig.4 Para manter as proporções do produto, FLOS recomenda cumprir as medidas (*).
RUS
Рис.4 Для соблюдения пропорций устройства, FLOS рекомендует соблюдать
размеры (*).
J
*
CN *
SA *
KR *

14 15
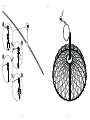
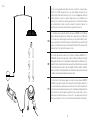
1
3
2
4
Fig. 5 Fig. 6

16 17
Fig. 8
Fig. 7

18 19
Fig. 10
α
Fig. 9

20 21
Fig. 12Fig. 11

22 23
IT
Fig.13 Per l’accensione/spegnimento dell’apparecchio premere il pulsante (P); sequenza luminosa:
MASSIMO / 50% / SPENTO. Ad apparecchio acceso, un contatto prolungato del pulsante provoca il
decremento progressivo dell’intensità luminosa fino al 10% e viceversa. Al raggiungimento dell’intensità
desiderata, interrompere il contatto con il pulsante. L’apparecchio può essere comandato anche con
interruttore remoto che permette di accendere/spegnere l’apparecchio con l’ultima intensità luminosa
scelta; la funzione dimmer è attivabile solo tramite il pulsante (P). A seguito di un “blackout”, con
apparecchio spento, al riallacciamento della tensione di rete l’apparecchio resterà spento.
EN
Pic.13 To switch the device on/off push the button (P); light sequence: MAXIMUM / 50% / OFF. When the
appliance is switched on, prolonged contact of the button causes a progressive decrease of light intensity
up to 10% and viceversa. Upon reaching the desired intensity, stop contact with the button. The device
can also be operated with a remote switch that allows you to turn on/turn off the device with the last light
intensity choice; the dimmer function can only be activated with the button (P). After a blackout with the
appliance switched off, it will stay off when the power is restored.
DE
Abb.13 Zum Ein-/Ausschalten der Leuchte die Taste (P) drücken; Lichtsequenz: MAXIMUM / 50% /
AUSGESCHALTET. Wenn die Leuchte eingeschaltet ist, bewirkt ein längerer Tastendruck die fortlaufende
Verringerung der Lichtstärke bis zu 10% und umgekehrt. Sobald die gewünschte Lichtstärke erreicht ist,
den Kontakt mit der Taste unterbrechen. Die Leuchte kann auch mit einem Fernschalter gesteuert werden,
der das Ein-/Ausschalten der Leuchte mit der zuletzt gewählten Lichtstärke ermöglicht; die Dimmer-
Funktion ist nur mit der Taste (P) aktivierbar. Nach einem Stromausfall bei abgeschalteter Leuchte bleibt
sie, sobald die Stromversorgung wiederhergestellt wird, ausgeschaltet.
FR
Fig.13 Pour allumer et éteindre l’appareil, appuyer sur le bouton (P); séquence lumineuse: MAXIMUM /
50% /ETEINT. Lorsque l’appareil est allumé, la baisse progressive de l’intensité lumineuse jusqu’à 10% et
vice versa peut être obtenue en maintenant la pression sur le bouton. Une fois atteint le niveau d’intensité
désiré, relâcher la pression du bouton. L’appareil peut aussi être commandé par un interrupteur à distance
qui permet d’allumer et d’éteindre l’appareil en gardant en mémoire la dernière intensité choisie; la
fonction variation est uniquement obtenue avec le bouton (P). Si une coupure générale d’électricité
survient alors que l’appareil est éteint, celui-ci restera éteint au moment du rétablissement du courant.
100%
50%
OFF
10%
100%
Fig. 13
P

24 25
ES
Imag.13 Para encender/apagar el dispositivo, pulse el botón (P); secuencia luminosa: MÁXIMO / 50%
/APAGADO. Con el dispositivo encendido, si mantiene el botón pulsado durante un tiempo prolongado,
hará que la intensidad luminosa se reduzca progresivamente hasta el 10% y viceversa. Cuando alcance la
intensidad que desee, detenga el contacto con el botón. El dispositivo se puede regular también a través
del interruptor remoto, que permite encender/apagar el dispositivo con la última intensidad luminosa que
haya configurado; la función del atenuador (dimmer) sólo se puede activar con el botón (P). Después de
un corte de luz con el dispositivo apagado, cuando la tensión de red vuelve, el dispositivo permanecerá
apagado.
PT
Fig.13 Para ligar/desligar o aparelho premir o botão (P). Sequência da iluminação: MÁXIMO / 50% /
DESLIGADO. Com o aparelho aceso, um contacto prolongado do botão provoca o decremento progressivo
da intensidade de iluminação até 10% e vice-versa. Ao atingir a intensidade desejada, libertar o botão.
O aparelho pode ser comandado também através do interruptor remoto que permite ligar/desligar o
aparelho com a última intensidade de iluminação escolhida. A função dimmer só pode ser activada com
o botão (P). Após um corte eléctrico geral com o aparelho desligado, quando a tensão de rede regressar,
o aparelho permanecerá desligado.
RUS
Рис.13 Для включения /выключения устройства нажмите кнопку (P);
последовательность: МАКС./ 50% / ВЫКЛ. При включенном устройстве длительное
нажатие кнопки вызывает постепенное уменьшение интенсивности до 10%, и
наоборот. При достижении желаемой интенсивности света отпустить кнопку.
Устройством можно управлять также с помощью удаленного выключателя, который
позволяет включать/выключать устройство с последней заданной интенсивностью
света; функция регулировки света доступна только с помощью кнопки (P).В
результате “blackout”(отключения электроэнергии) при отключении устройства,
когда напряжение сети снова включится, устройство останется выключенным.
J
100%
50%
OFF
10%
100%
Fig. 13
P

26 27
CN
SA
KR
100%
50%
OFF
10%
100%
Fig. 13
P

28 29
Fig. 15Fig. 14

30 31
35042 AC - 06/04/2023
Fig. 17Fig. 16

flos.com
-
 1
1
-
 2
2
-
 3
3
-
 4
4
-
 5
5
-
 6
6
-
 7
7
-
 8
8
-
 9
9
-
 10
10
-
 11
11
-
 12
12
-
 13
13
-
 14
14
-
 15
15
-
 16
16
-
 17
17


en otros idiomas
- français: FLOS Skynest Motion Guide d'installation
- italiano: FLOS Skynest Motion Guida d'installazione
- português: FLOS Skynest Motion Guia de instalação
- 日本語: FLOS Skynest Motion インストールガイド
Artículos relacionados
-
 FLOS Coordinates Floor Guía de instalación
-
 FLOS Taccia (PMMA) Guía de instalación
-
FLOS Skynest Manual de usuario
-
 FLOS Coordinates Wall 1 Guía de instalación
-
 FLOS Bellhop Wall Up Guía de instalación
-
 FLOS Almendra Arch Suspension Long 2 Guía de instalación
-
 FLOS To-Tie T1 Guía de instalación
-
 FLOS My Disc Manual de usuario
-
 FLOS Goldman Guía de instalación


