AA 2-19/32 in. (66 mm) Screws / Tornillos 66 mm (2-19/32pulg)
BB 3/4 in. (19 mm) Wood Screws / Tornillos para madera 19 mm (3/4pulg)
CC 1-23/64 in. (34 mm) Screws / Tornillos 34 mm (1-23/64pulg)
DD 2 in. (51 mm) Screws / Tornillos 51 mm (2 pulg)
EE 1-1/4 in. (32 mm) Screws / Tornillos 32 mm (1-1/4 pulg)
Part
Parte
Description
Descripción
Qty
Cantidad
H32-0C000XD19-XT
Rev. 18/04_00
BB
DD
CC
EE
HARDWARE CONTENTS (Actual Size) / ADITAMENTOS (Tamaño real)
2
6
2
2
1
BB
DD
Hardware Used
Aditamentos utilizados
Hardware Used
Aditamentos utilizados
BB
AA
2-1/8 in. (ø 54 mm)
ø 54 mm (2-1/8 pulg)
OR
O
BB
B
H
USE AND CARE GUIDE
GUÍA DE USO Y CUIDADOS
FOR
PARA
Optional
Opcional
Required
Necesario
A
C
B
E
F
D
H
G
I
J
L
M
K
Questions, problems, missing parts? Before returning to the store, call Deant Customer
Service
08:30 a.m.-05:30 p.m., EST, Monday - Friday
Preguntas, problemas, piezas faltantes? Antes de volver a la tienda, llame al servicio de
atención al cliente Desaante
08:30 a.m.-05:30 p.m., EST, Lunes - Viernes
1-877-ONE-LOCK
HOMEDEPOT.COM
PACKAGE CONTENTS LIST / LISTA DE CONTENIDOS DEL PAQUETE
WARNING / ADVERTENCIA :
IF DRILLING IS REQUIRED, you should read thoroughly and understand all steps prior to drilling. Please drill
holes from both sides to avoid splintering of the door face.
Si debe perforar la puerta, sepa cómo usar su taladro con seguridad, y entienda todos los pasos de
preparación de la puerta antes de proceder.
Read the precautions and instructions in this manual before installing and using this lock. Save this manual for future
reference.
Lea las advertencias e instrucciones en este manual antes de instalar y usar esta cerradura. Guarde este manual para
consultas futuras.
Safety Information / Información de seguridad
Before beginning installation of product, make sure all parts are present. Compare parts with Hardware Included and
Package Contents lists. If any part is missing or damaged, do not attempt to assemble, install or operate the product.
Call the Customer Service Team at 1-877-ONE-LOCK or visit www.HomeDepot.com.
Antes de comenzar la instalación del producto, salvo que todas las partes están presentes. Comparar y compartir con
el hardware incluido El paquete listas de contenido. Si alguna parte falta o está dañada, no intente ensamblar, instalar
o utilizar el producto.
Llame al Equipo de Servicio al Cliente al 1-877-ONE-LOCK o visitar www.HomeDepot.com.
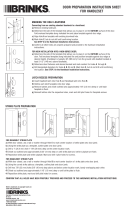
TOOLS REQUIRED / HERRAMIENTAS NECESARIAS
PREPARATION / PREPARACIÓN
BEFORE PROCEEDING / ANTES DE PROCEDER
Check Dimensions
Revise las medidas
1-3/8” - 1-3/4”
(35mm - 45mm)
2-3/8” (60mm)
OR / O
2-3/4” (70mm)
2-1/8” (54mm)
1” (25mm)
Backset
Distancia al centro
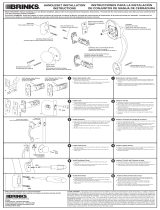
A. Using the template, mark the door and drill the holes, and chisel out a mortise.
A. Con la plantilla, marque la puerta y perfore los orificios, y cincele las muescas.
Door Drilling For New Installation
Perforación De La Puerta Para Una Instalación Nueva
B
H
NOTE: If your door already has holes, skip to step
NOTA: Si su puerta ya tiene agujeros, pase a al paso
2
Outline
Lineamientos
1" (25 mm) hole , 1-1/8" (28 mm)
deep Oricio de 1" (25 mm) y
1-1/8" (28 mm) de profundidad
Chisel 1/8” (3mm) deep
Cincel de 1/8” (3 mm)
de profundidad
L
F
B. PREPARE DOOR JAMB
B. PREPARE LA JAMBA DE LA PUERTA
1
1" (25 mm) hole , 1/2" (13 mm)
deep Oricio de 1" (25 mm) y
1/2" (13 mm) de profundidad
a.
b.
c.
1”
25 mm
2-1/8"
(54 mm)
2-1/8"
(54 mm)
1”
1/8”
25 mm
3 mm
Choose Faceplate / Selección De La Placa Delantera
2
Set the Latch Backset / Fije la entrada del pestillo
3
3
4
180º
2
8
3
2
4
3
2
-
3
/
4
”
(
7
0
m
m
)
2
8
3
2
4
3
2-3/8’’
(60 mm)
2-3/4’’
(70 mm)
OR
O
OR
O
2
8
3
2
8
3
2
-
3
/
8
”
(
6
0
m
m
)
Installation / Instalación
4
B. INSTALL STRIKE PLATE IN DOOR JAMB
B. INSTALE LA PLACA DEL CERROJO EN EL MARCO INTERIOR PARA
PUERTA
BB
DD
A. INSTALL LATCH
A. INSTALE EL PESTILLO
NOTE: If required, bend the adjustable tang on the strike
to eliminate a loose fit between the door and the door
stop.
NOTA: Si es necesario, doblar la rabera ajustable sobre el
cerradero para lograr un buen calce entre la puerta y el
marco.
Tap Latch Flush
Introduzca el Seguro al Ras
Wood Block (not included)
Bloque de Madera (no incluido)
Actual Size
Tamaño real
Actual Size
Tamaño real
Actual Size
Tamaño real
Thumbturn /
Mariposa
Deadbolt Latch /
Pestillo de la cerradura
Outside Cylinder /
Cilindro exterior
Inside Knob Assembly /
Ensamble de perilla interior
Deadbolt Strike /
Placa hembra de cerrojo de pasador
Latch Strike /
Placa hembra del pestillo
Latch /
Pestillo
Screw Cover /
Cubierta del tornillo
Washer /
Arandela
Handleset /
Conjunto de la manija
Drive-in Collar (Optional) /
Collarín rotativo (opcional)
Drive-in Collar (Optional) /
Collarín rotativo (opcional)
Keys /
Llave
Description /
Descripción
Part /
Parte
Qty /
Cantidad
G
H
I
J
L
M
A
B
C
E
D
K
F
1
1
1
1
1
1
1
1
1
1
4
1
1

The retailer of this product, hereby warrants, subject to the conditions set forth below,
that it will either repair or replace, at its option, this product if it proves to be
defective by reason of improper workmanship or materials within the original
purchaser's lifetime. In order to obtain repairs or replacement under this limited
warranty you must bring this product to the retailer's store in which you bought it.
Original purchaser: This limited warranty is limited to the original purchaser at retail
of this product from retailer.
Except to the extent prohibited by applicable law, no other warranties, whether
express or implied, including the warranties of merchantability and tness for a
particular purpose, shall apply to this product. Under no circumstances shall retailer
be liable for consequential or incidental damages in connection with this product. To
the extent retailer is prohibited by applicable law from excluding implied warranties,
the duration of such implied warranties which are not excludable shall be the original
purchaser's lifetime. Some states do not allow the limitation on how long an implied
warranty lasts, so the above limitation on the duration of implied warranties which
are not excludable, if any, may not apply to you. Some states do not allow the
exclusion or limitation of incidental or consequential damages, so the above limitation
or exclusion of incidental or consequential damages may not apply to you.
Retailer neither assumes not authorizes any representative or other person to assume
for it any obligation or liability other than such as is expressly set forth herein. This
limited warranty gives you specic legal rights, and you may also have other rights
which vary from state to state.
De no ser prohibido por las leyes aplicables, ninguna otra garantí a, bien sea
expresada o implicada, incluso las garantí as de comerciabilidad y ecacia para un
determinado uso, aplicará a este producto. No quedará responsable el pormenorista,
bajo ningunas circunstancias, por daños consecuenciales o incidentales relacionados
con este producto. En casos en que las aplicables leyes prohiben que el vendedor
excluya las garantí as implicadas, la duración de tales garantí as implicadas que no
sean excluibles será la vida del comprador original. Ciertos estados no permiten la
limitación de la duración de una garantí a implicada. Como tal, tal vez no aplique en
su caso la susodicha limitación de la duración de cualesquier garantí as implicadas
que no sean excluibles. Ciertos estados no permiten la exclusión o limitación de
daños incidentales o consecuenciales. Como tal, tal vez no aplique en su caso la
susodicha limitación o exclusión de daños incidentales o consecuenciales.
El pormenorista no se asume ni autoriza que ningún representante u otra persona
asuma de su parte ninguna obligación o responsabilidad aparte de aquellas que se
han expresado en la presente. Esta garantí limitada le da espécicos derechos
legales, y quizá tenga otros derechos que varí an de estado en estado.
LIFETIME LIMITED WARRANTY / GARANTIA LIMITADA DE TODALA VIDA
MARK HEIGHT 36 in. (914 mm) FROM FLOOR TO CENTER
Drill 1 in. hole at
center of door edge.
CENTER TO CENTER 5-1/2 in. (140 mm)
ø 3/8 in. (10 mm)
ø 10 mm (3/8 pulg)
Fold here. Place on
door edge.
Coloque en el borde
de la puerta.
1-3/4 in.
(45 mm)
1-9/16 in.
(40 mm)
1-3/8 in.
(35 mm)
1-3/4 in.
(45 mm)
1-9/16 in.
(40 mm)
1-3/8 in.
(35 mm)
Perfore un oricio de
1” (25 mm) en el
centro del borde de
la puerta.
Drill 1 in. hole at
center of door edge.
Perfore un oricio de
1” (25 mm) en el
centro del borde de
la puerta.
CENTRO A CENTRO 140 mm (5-1/2 pulg)
Backset 2-3/4 in. (70 mm)
Distancia al centro 70 mm (2-3/4 pulg)
Backset 2-3/8 in. (60 mm)
Distancia al centro 60 mm (2-3/8 pulg)
CENTER TO CENTER 8-5/8 in. (219 mm)
CENTRO A CENTRO 219 mm (8-5/8 pulg)
MARCAR UNA ALTURA DE 914 mm (36 pulg) DESDE EL PISO HASTA EL CENTRO
Install Handleset
Instale el conjunto de la manija
Install Inside Knob
Instale la perilla interior
CC
ø 2-1/8 in. (54 mm)
ø 54 mm (2-1/8 pulg)
ø 2-1/8 in. (54 mm)
ø 54 mm (2-1/8 pulg)
Install Handleset Screw
Instale el tornillo del conjunto de la manija
Installing the deadbolt trim
Instale el armazón del cerrojo muerto
EE
L
M
2-3/4” (70 mm)
OR
O
2-3/8” (60 mm)
Adjust center-to-center distance
Ajuste de centro a centro de distancia
OR O
8-5/8 “ (219 mm)
8-31/32 “ (228 mm)
8-7/16 “ (214 mm)
AA
Correct
Correcto
Correct Incorrect
Correcto Incorrecto
CARE AND MAINTENANCE
The following care instructions should be followed to ensure a long lasting finish:
1. Remove locks, or do not install locks, prior to painting your door.
2. Periodically clean with mild soap and a soft cloth only.
Do not use abrasives or harsh chemicals, and avoid sharp or scratching objects.
CUIDADO Y MANTENIMIENTO
Se deben seguir las siguientes instrucciones de cuidado para garantizar un acabado duradero:
1. Retire las cerraduras, o no las instale, antes de pintar su puerta.
2. Limpie periódicamente sólo con jabón y un paño suave.
No utilice abrasivos o productos químicos y evite los cortes o arañazos.
Hardware Used
Aditamentos utilizad
EE
Actual Size
Tamaño real
Hardware Used
Aditamentos utilizad
CC
Actual Size
Tamaño real
AA
Hardware Used
Aditamentos utilizad
Actual Size
Tamaño real
Do not leave the key in the cylinder during installation.
NO deje la llave en el cilindro durante la instalación.
-
 1
1
-
 2
2


Defiant 32HCX2G1 Guía de instalación
- Tipo
- Guía de instalación
- Este manual también es adecuado para
En otros idiomas
- English: Defiant 32HCX2G1 Installation guide
Documentos relacionados
-
Defiant DC1X71 Guía de instalación
-
-
-
Defiant LP2XK01C Manual de usuario
-
-
-
-
-