Dell 1201MP Projector Guía de inicio rápido
- Tipo
- Guía de inicio rápido
El Dell 1201MP Projector es un dispositivo versátil que te ofrece una experiencia visual de alta calidad para diversas aplicaciones. Con su potente lámpara y resolución nativa de 800 x 600 píxeles, este proyector garantiza imágenes nítidas y brillantes. Además, cuenta con una relación de contraste de 2000:1 que proporciona negros profundos y blancos brillantes. También tiene una variedad de características convenientes, como corrección trapezoidal, zoom digital y modos de video preestablecidos.
El Dell 1201MP Projector es un dispositivo versátil que te ofrece una experiencia visual de alta calidad para diversas aplicaciones. Con su potente lámpara y resolución nativa de 800 x 600 píxeles, este proyector garantiza imágenes nítidas y brillantes. Además, cuenta con una relación de contraste de 2000:1 que proporciona negros profundos y blancos brillantes. También tiene una variedad de características convenientes, como corrección trapezoidal, zoom digital y modos de video preestablecidos.


Transcripción de documentos
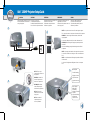
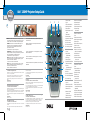
Dell™ 1201MP Projector Setup Guide CAUTION: 1 ACHTUNG: Follow all safety instructions in your Lesen Sie sich erst alle Product Information Guide before Sicherheitsanweisungen im using the projector. Produktinformationshandbuch durch, bevor Sie den Projektor verwenden. ATTENTION: PRECAUCIÓN: AVVISO: Respectez toutes les consignes de sécurité de votre Guide d'information du produit avant d’utiliser le projecteur. Siga todas las instrucciones de seguridad en su Guía de información del producto antes de usar el proyector. Attenersi a tutte le istruzioni di sicurezza fornite nella guida informativa del prodotto prima di utilizzare il proiettore. 4 NOTE: It may take several seconds for the image to appear. The connection shown in the picture is based on Dell computers. HINWEIS: Es kann einige Sekunden dauern, bis das Bild angezeigt wird. La connexion illustrée est basée sur des ordinateurs Dell. REMARQUE: L'affichage de l'image peut prendre plusieurs secondes. Die in der Abbildung gezeigte Verbindung basiert auf DellComputern. NOTA: La imagen puede tardar varios segundos en aparecer. La conexión mostrada en la imagen se basa en ordenadores Dell. 2 NOTA: La visualizzazione dell'immagine potrebbe richiedere alcuni secondi. Lo schema di collegamento raffigurato si basa su computer Dell. NOTE: Turn on your computer after you turn on the projector. 3 HINWEIS: Schalten Sie erst den Projektor und dann den Computer ein. REMARQUE: Allumez votre ordinateur après avoir allumé le projecteur. NOTA: Encienda el ordenador tras encender el proyector. NOTA: accendere il computer dopo aver acceso il proiettore. 5 Zoom Adjust Zoom-Einstellung Réglage du zoom Ajuste del zoom Regolazione zoom Focus Adjust BildschärfeEinstellung Réglage de la mise au point Ajuste del enfoque Regolazione messa a fuoco Dell™ 1201MP Projector Setup Guide 1 2 3 6 NOTE: The USB cable (as shown in step 1) must be connected to use Next Page and Previous Page on the remote control. The USB cable is not provided by Dell. For more information about your projector, see your Owner’s Manual. HINWEIS: Wenn Sie die Funktionen Next Page und Previous Page auf der Fernbedienung verwenden möchten, muss das USB-Kabel (siehe Schritt 1) angeschlossen werden. Le câble USB n’est pas fourni par Dell. Weitere Informationen zum Projektor finden Sie im Benutzerhandbuch. REMARQUE: Le câble USB (comme indiqué dans l'étape 1) doit être connecté pour utiliser Page Suivante et Page Précédente sur la télécommande. Le câble USB n’est pas fourni par Dell. Pour plus d'informations sur votre projecteur, voir votre Manuel d'utilisateur. NOTA: El cable USB (como aparece en el paso 1) debe estar conectado para usar Siguiente página y Página anterior en el mando a distancia. il cavo USB non viene fornito da Dell. NOTA: il cavo USB (come mostrato nel passo 1) deve essere collegato per utilizzare i tasti di Next Page e Previous Page sul telecomando. Dell no suministra el cable USB. Para más información sobre el proyector, consulte su Manual del propietario. Information in this document is subject to change without notice.© © 2007 Dell Inc. All rights reserved. Microsoft et Windows sont des marques commerciales déposées de Microsoft Corporation. Reproduction in any manner whatsoever without the written permission of Dell Inc. is strictly forbidden. Dell rejette tout intérêt de propriété dans les marques et noms autres que les siens propres. Dell and the DELL logo are trademarks of Dell Inc.; Microsoft and Windows are registered trademarks of Microsoft Corporation. Février 2007 Imprimé en Chine Dell disclaims any proprietary interest in the marks and names of others. La información en este documento está sujeta a cambios sin previo aviso. © 2007 Dell Inc. Todos los derechos reservados. February 2007 Printed in China Per ulteriori informazioni sul proiettore, vedere il manuale dell'utente. Queda estrictamente prohibida la reproducción de cualquier forma sin el permiso por escrito de Dell Inc. Dell y el logotipo DELL son marcas de Dell Inc.; Microsoft and Windows son marcas registradas de Microsoft Corporation. Reproduktionen jeglicher Art sind ohne die schriftliche Zustimmung der Dell Inc. strengstens untersagt. Dell niega cualquier interés de propiedad sobre las marcas y nombres de otros. Dell und das DELL-Logo sind Warenzeichen der Dell Inc.; Microsoft und Windows sind eingetragene Warenzeichen der Microsoft Corporation. Febrero de 2007 Impreso en China Februar 2007 Gedruckt in China Les informations contenues dans le présent document peuvent être modifiées sans préavis. © 2007 Dell Inc. Tous droits réservés. 4 5 12 Änderungen der Informationen in diesem Dokument bleiben vorbehalten und bedürfen keiner Ankündigung. © 2007 Dell Inc. Alle Rechte vorbehalten. Dell hat kein Interesse am Eigentum an den Warenzeichen und Namen anderer. 13 Le informazioni contenute nel presente documento sono soggette a modifica senza preavviso. © 2007 Dell Inc. Tutti i diritti riservati. È assolutamente vietata la riproduzione con qualsiasi mezzo e maniera di qualunque contenuto senza previa autorizzazione scritta di Dell Inc. Dell e il logo DELL sono marchi di fabbrica di Dell Inc.; Microsoft e Windows sono marchi registrati di Microsoft Corporation. Toute reproduction sans la permission écrite de Dell Inc. est strictement interdite. Dell nega qualsiasi interesse proprietario su marchi e nomi di altri. Dell et le logo DELL sont des marques commerciales de Dell Inc.; Febbraio 2007 Stampato in Cina 11 6 10 7 9 8 1. Power button 2. Light 3. Video Mode button 4. Next Page button 5. Menu button 6. 4:3/16:9 (aspect ratio) 4. button 7. Hide button 8. Volume button 9. Keystone Correction button 10. Resync button 11. Source button 12. Four Directions buttons 13. Previous Page button 1. Power (Netztaste) 2. Lampe 3. Video Mode 3. (Grafikmodus) 4. Next Page 5. Menu (Menü) 6. 4:3/16:9 (Bildformat) Taste 7. Hide (Ausblenden) 8. Volume 9. (Lautstärkeregler) 9. Trapezkorrektur 10. Resync 11. Source (Signalquelle) 12. Vier Richtungstasten 13. Previous Page 1. Bouton Marche 2. Voyant 3. Bouton Mode Vidéo 4. Bouton Page Suivante 5. Bouton Menu 6. Bouton 4:3/16:9 4.(proportions) 7. Bouton Masquer 8. Bouton Volume 9. Bouton Correction Trapézoïdale 10. Bouton Resync 11. Bouton Source 12. Boutons Quatre Directions 13. Bouton Page 13. Précédente 1. Botón Alimentación 2. Luz 3. Botón Modo de vídeo 4. Botón Siguiente página 5. Botón Menú 6. Botón 4:3/16:9 (rel. aspecto) 7. Botón Ocultar 8. Botón de Volumen 9. Botón Corrección de 9. distorsión trapezoidal 10. Botón Resync 11. Botón Fuente 12. Botones de Cuatro 10. direcciones 13. Botón Página anterior 1. Tasto di Accensione 2. Luce 3. Tasto Video Mode 3. (Modalità Video) 4. Tasto Next Page 3. 3. 5. Tasto Menu 6. Tasto 4:3/16:9 3. (proporzioni) 7. Tasto Hide (Nascondi) 8. Tasto Volume 9. Tasto Keystone Correction 9. (Correzione della distorsione 9. trapezoidale) 10. Tasto Resync (Risincronizzazione) 11. Tasto Source (Sorgente) 12. Tasti Quattro direzioni 13. Tasto Previous Page-
 1
1
-
 2
2


Dell 1201MP Projector Guía de inicio rápido
- Tipo
- Guía de inicio rápido
El Dell 1201MP Projector es un dispositivo versátil que te ofrece una experiencia visual de alta calidad para diversas aplicaciones. Con su potente lámpara y resolución nativa de 800 x 600 píxeles, este proyector garantiza imágenes nítidas y brillantes. Además, cuenta con una relación de contraste de 2000:1 que proporciona negros profundos y blancos brillantes. También tiene una variedad de características convenientes, como corrección trapezoidal, zoom digital y modos de video preestablecidos.
en otros idiomas
- français: Dell 1201MP Projector Guide de démarrage rapide
- italiano: Dell 1201MP Projector Guida Rapida
- English: Dell 1201MP Projector Quick start guide
- Deutsch: Dell 1201MP Projector Schnellstartanleitung
Artículos relacionados
-
Dell Projector 0H8213A00 Manual de usuario
-
Dell 1201MP Projector Guía de inicio rápido
-
-
Dell Projector 1200MP Guía de inicio rápido
-
-
-
-