Rockford Fosgate Polaris PMX-P2 Instrucciones de operación
- Categoría
- Receptor
- Tipo
- Instrucciones de operación

PMX-P2
Installation assistance available at:
600 South Rockford Drive • Tempe, Arizona 85281 United States
Direct: (480) 967-3565 • Toll Free: (800) 669-9899
rockfordfosgate.com
071619 1230-72994-01-B Printed In China
OPERATION MANUAL

2
Dear Customer,
Congratulations on your purchase of the world’s finest brand
of audio products. At Rockford Fosgate we are fanatics about
musical reproduction at its best, and we are pleased you chose
our product. Through years of engineering expertise, hand
crasmanship and critical testing procedures, we have created a
wide range of products that reproduce music with all the clarity
and richness you deserve.
For maximum performance we recommend you have your new
Rockford Fosgate product installed by an Authorized Rockford
Fosgate Dealer. Please read your warranty and retain your
receipt and original carton for possible future use.
Great product and competent installations are only a piece of
the puzzle when it comes to your system. Make sure that your
installer is using 100% authentic installation accessories from
Rockford Fosgate in your installation. Rockford Fosgate has
everything from RCA cables and speaker wire to power wire
and battery connectors. Insist on it! Aer all, your new system
deserves nothing but the best.
To add the finishing touch to your new Rockford Fosgate image,
order your Rockford accessories, which include everything from
T-shirts to hats.
Visit our web site for the latest information on all Rockford
products;
www.rockfordfosgate.com
or, in the U.S. call 1-800-669-9899 or FAX 1-800-398-3985. For all
other countries, call +001-480-967-3565 or FAX +001-480-966-3983.
Table of Contents
If, aer reading your manual, you still have questions regarding
this product, we recommend that you see your Rockford Fosgate
dealer. If you need further assistance, you can call us direct at
1-800-669-9899. Be sure to have your serial number, model num-
ber and date of purchase available when you call.
Safety
This symbol with “WARNING” is
intended to alert the user to the pres-
ence of important instructions. Failure
to heed the instructions could result in
severe injury or death.
This symbol with “CAUTION” is
intended to alert the user to the pres-
ence of important instructions. Failure
to heed the instructions could result in
injury or unit damage.
To prevent injury and damage to the unit, please read and follow
the instructions in this manual.
If you feel unsure about installing this system yourself, have it
installed by a qualified Rockford Fosgate dealer.
Before installation, disconnect the battery negative (-) terminal to
prevent damage to the unit, fire and/or possible injury.
FCC Compliance Statement
FCC ID: 2AA7S-PMX-P2
This equipment has been tested and found to comply with the
limits for a Class B digital device, pursuant to part 15 of the FCC
Rules. These limits are designed to provide more reasonable pro-
tection against harmful interference in a residential installation.
Operation is subjected to the following two conditions: (1) This
device may not cause harmful interference, and (2) the device
must accept any interference received, including interference that
may cause undesired operation.
This equipment generates, uses, and can radiate radio frequency
energy and, if not installed and used in accordance with the
instructions, may cause harmful interference to radio communica-
tions. However, there is no guarantee that interference will not
occur in a particular installation. If this equipment does cause
harmful interference to radio or television reception, which can be
determined by turning the equipment o and on, you are encour-
aged to try to correct the interference by one of the following
measures:
• Reorient or relocate the receiving antenna.
• Increase the separation between the equipment and receiver.
• Connect the equipment into an outlet on a circuit dierent from
that to which the receiver is connected.
• Consult the dealer or an experienced radio/TV technician for
help.
Introduction
PRACTICE SAFE SOUND
Continuous exposure to sound pressure levels over 100dB
may cause permanent hearing loss. High powered auto
sound systems may produce sound pressure levels well
over 130dB. Use common sense and practice safe sound.
2 Introduction
3 Specifications
4 Design Features
5-8 Operation
Settings
Tuner (AM/FM/WB)
USB-iPod
Bluetooth
®
Pandora
®
9 Troubleshooting
10-25 French, Spanish, German & Italian
26-27 Notes
28 Limited Warranty Information
©2019 Rockford Corporation. All Rights Reserved. PUNCH® and associated logos where applicable, are registered trademarks of Rockford Corporation in the
United States and/or other countries. iPhone and iPod are trademarks of Apple Inc., registered in the U.S. and other countries. The Bluetooth
®
word mark and
logos are registered trademarks owned by Bluetooth SIG, Inc. and any use of such marks by Rockford Corporation is under license. All other trademarks are
the property of their respective owners. Specifications subject to change without notice.
“Made for iPod” and “Made for iPhone” mean that an electronic accessory has been designed to connect specifically to iPod, or iPhone, respectively, and has
been certified by the developer to meet Apple performance standards. Apple is not responsible for the operation of this device or its compliance with safety
and regulatory standards. Please note that the use of this accessory with iPod or iPhone may aect wireless performance.
Pandora, the Pandora logo, and the Pandora trade dress are trademarks or registered trademarks of Pandora Media, Inc. Used with permission. Pandora is
only available in certain countries. Please visit http://www.pandora.com/legal for more information.

3
Specifications
CEA 2006
Power ratings on Rockford Fosgate source units conform to CEA-2006 industry standards. These guide-
lines mean your source unit’s output power ratings are REAL POWER numbers, not inflated marketing
ratings.
Model PMX-P2
Operating Voltage 10.5V - 16V
Fuse Rating 20A
Power Output
25 W X 4 @ 4 Ohms RMS
50 W x 4 @ 2 Ohms Peak
Output Impedance 500Ω
Frequency Response 20 - 20kHz
FM Frequency Range 87.5MHz - 107.9MHz
AM Frequency Range 530kHz - 1710kHz
WB Frequency Range
162.40 - 162.55
(US & Canada)
Tuner Presets 18 FM / 12 AM / 6 WB
Display 2.7” Color TFT
Bluetooth 3.0+EDR, A2DP 1.3
USB Compatibility 2.0
USB Capacity
32 GB max, 255 Folders max,
999 Songs max
USB Output 1A
Made for iPhone Model Names-
iPhone 6 Plus
iPhone 6
iPhone 5S
iPhone 5C
iPhone 5
iPhone 4S
iPhone 4
iPhone 3GS
Made for iPod Model Names
iPod Touch (5th generation)
iPod Touch (4th generation)
iPod Nano (7th generation)
iPod Nano (6th generation)
Android Compatibility Bluetooth
®
Only
Audio File Compatibility MP3, WMA

4
Design Features
Rotary Encoder
This knob is for adjusting main volume, zone
volumes, menu navigation and setting adjustments.
REV / FWD button
Use this button to skip back and forward through
channels or tracks with a press. Holding the button
down will activate manual seek mode.
MENU button
Press & hold for 5 seconds to access the main
menu settings. Pressing will give you access to the
settings for the active source.
DIMMER button
Pressing this button will allow you to select
between the two brightness values for the display.
PLAY / PAUSE button
Press this button to play or pause your music.
This button also acts as a MUTE when the
source is in TUNER mode.
SRC (Power) Button
This button allows you to switch
between sources (press) and power the
unit ON and OFF (press and hold).
SUB Buttons
These buttons allow you to adjust the subwoofer
output or rear line out UP or DOWN (0-20).
Fig. 1

5
Settings
Source Unit Settings
To access the source unit’s settings, press and hold
the MENU button until the options appear. Rotate the
encoder to scroll through the list of settings. Then press
the encoder button to select the setting you wish to
change. (BALANCE>FADER>AUDIO>VOLTAGE GAUGE>BT
PAIRING>BEEP>TUNER REGION>SOFTWARE>FACTORY
DEFAULT)
This source unit has a zero current draw when turned o. All of
your settings and presets will be saved along with your vehicles
battery during storage.
SOURCE
Press the SRC button to show the dierent source options (FM
TUNER>AM TUNER>USB>BLUETOOTH>PANDORA). Use the ro-
tary encoder or press the SRC button to scroll through sources.
If a source is GREYED out, that means it is not available. An ex-
ample would be Bluetooth is greyed out because the Bluetooth
mobile device is not connected yet.
Once the Bluetooth mobile device is connected, Bluetooth
source selection will be available. See BT Device Pairing for
connecting your mobile device.
BALANCE
Press the encoder button to access BALANCE adjustment
settings. Rotate the encoder button to set output BALANCE.
FADER
Press the encoder button to access FADER adjustment settings.
Rotate the encoder button to set output FADER.
AUDIO
To access the AUDIO settings, press the AUDIO option from the
MENU screen. Rotate the encoder to scroll through the list of
settings. Then press the encoder button to select the setting
you wish to change. (7 BAND EQ>CROSSOVER>PEQ>SOURCE
GAIN>INTERNAL AMPLIFIER)
7 BAND EQ
Press the encoder button to access the 7 BAND EQ settings.
Use the rotary encoder to scroll through the EQ settings. (FLAT
> ROCK > CLASSIC > ACOUSTIC > DANCE > ELECTRONIC > HIP-
HOP > CUSTOM) When setting up the CUSTOM EQ, press the
encoder button to set the first frequency. Once active, rotate
the encoder to adjust the frequency settings. Press encoder
button again to access the next frequency. Repeat until all EQ
settings are complete. Press the MENU button to exit and go
back up one level.
CROSSOVER
Press to access the CROSSOVER settings. Use the
rotary encoder to select the crossover zone options
(FRONT>REAR>SUB). Press the encoder to adjust the frequency
of the crossover (60Hz>80Hz>120Hz>APF). Press MENU to exit
and go back up one level.
PUNCH EQ
Press to access the PUNCH EQ settings. Use the rotary encoder
to adjust the gain output (0-12). Press MENU to exit and go back
up one level.
Punch EQ is an onboard equalizer with up to +18dB @ 45Hz
and/or up to +12dB boost at 12.5kHz
SOURCE GAIN
To adjust the level of device input gain, scroll
through the inputs (FM TUNER>AM TUNER>WB
TUNER>USB>BLUETOOTH>PANDORA) to the device you want
to adjust, press the encoder button to access the gain settings.
Rotate the encoder button to set the level of gain. (-3dB > -2dB
> -1dB > 0dB > +1dB > +2dB > +3dB)
INTERNAL AMPLIFIER
Press to access the INTERNAL AMPLIFIER options. Use the
rotary encoder to select options (ON>OFF). When using
an amplifier to power your speakers, select OFF. If you are
powering your speakers directly from the source unit, select the
INTERNAL AMPLIFIER to ON.
VOLTAGE GAUGE
To display the vehicle voltage, press the encoder button on the
VOLTAGE GAUGE option.
BT DEVICE PAIRING
Press the encoder button to access options (DISCOVERABLE >
DEVICE).
DISCOVERABLE
This is used to determine if the units Bluetooth is discoverable
or not. You can either select ENABLE (allows Bluetooth devices
to discover PMX-P2) or DISABLE (PMX-P2 is not able to be
discovered by Bluetooth devices). When ENABLE is selected,
the PMX-P2 is now ready for pairing to your Bluetooth mobile
device. Open the Bluetooth settings on your mobile device to
find your source unit labeled “ROCKFORD PMX” and select.
DEVICE
Selecting DEVICE by pressing the encoder button will allow you
to rename the source unit with up to 16 characters. This gives
you the ability to have a unique name for easy identification
during device pairing. Press the encoder button to select the
letter to be changed and rotate the knob to change the value.
Repeat process until desired name is reached.
BEEP
Press the encoder button to access the BEEP options. Rotate
the encoder button to turn system beep ON/ OFF.
TUNER REGION
To adjust, press the encoder button to access. Rotate
the encoder button to select the TUNER REGION of your
preference. (EUROPE > USA > RUSSIA > LATIN > ASIA > JAPAN >
MIDEAST > AUSTRALIA)
SOFTWARE
VERSION - Press the encoder button to display the current
firmware version of the unit.

6
Settings
UPDATE - Press the encoder button to update the firmware.
Follow the instructions on the screen when updating.
THEME
To adjust the THEME, press the encoder to access the feature.
Rotate the encoder button to select the desired THEME (DAY,
NIGHT).
DAY – Screen will have a White background with Black
Lettering.
NIGHT – Screen will have Black background with White
lettering.
FACTORY DEFAULT
AUDIO – Press the encoder button to access. Rotate the
encoder button to select YES/NO. Selecting YES will reset your
unit back to factory default settings.
SYSTEM - Press the encoder button to access. Rotate the
encoder button to select YES/NO. Selecting YES will reset your
unit back to factory default settings.
Basic Operation
TURNING THE UNIT ON / OFF
Press and hold the SRC (Power) button to turn the unit ON or
OFF
ADJUSTING THE VOLUME
Rotate encoder knob le or right to desired volume level (0-40).
The current volume level will be displayed during adjustment.
ADJUSTING THE SUBWOOFER OUTPUT
Press the SUB + or SUB- buttons to adjust the output level
(0-20).
ADJUSTING THE SCREEN BRIGHTNESS
Press the SCREEN BRIGHTNESS button to adjust the brightness
level. There are two brightness levels.
SELECTING A SOURCE TO PLAY
Press the SRC button to show the dierent source options (FM
TUNER>AM TUNER>WB TUNER>USB>BLUETOOTH>PANDORA).
Use the rotary encoder or press the SRC button to scroll
through sources.
Tuner Operation (FM/AM/WB)
To operate, use the rotary encoder to select the tuner source
you want to listen to (FM>AM>WB).
To switch between AUTO and MANUAL SEEK modes, press and
hold either the FWD or REV buttons.
To AUTO SEEK stations, press the FWD and REV buttons. To
MANUAL SEEK stations, press and hold the FWD and REV
buttons to tune to the desired frequency.
To MUTE the TUNER, press the PLAY/PAUSE button.
FM BAND SETTINGS
To access the FM BAND SETTINGS, press the MENU when
using the FM TUNER source. This will give you access to
the settings specific to the FM TUNER (FM>PRESETS>ADD
PRESETS>REMOVE PRESETS>AUTO STORE>LOCAL).
PRESETS
Press the encoder button to access the PRESETS list. Using this
feature allows you to see what PRESETS are saved on the unit.
ADD PRESETS
Press the encoder button on the ADD PRESETS option. You will
need to be on both the station and PRESET group you want to
add first (FM1>FM2>FM3). Using this feature allows you to save
stations to the unit. Once selected, use the rotary encoder to
select the PRESET number (1-6) you want the station saved to.
REMOVE PRESETS
Press the encoder button on the REMOVE PRESETS option. You
will need to be under the PRESET group you want to adjust first
(FM1>FM2>FM3). Using this feature allows you to remove saved
stations on the unit. Once selected, use the rotary encoder
to select the PRESET number (1-6) of the station you want
removed.
FM
Press the encoder button to access the FM PRESET options
(FM>FM>FM). Using this feature allows you to have separate
tuner preset groups to choose from. Use the rotary encoder
button to scroll through the TUNER groups and press to select
the group.
AUTO STORE
Press the encoder button to access the AUTO STORE function.
You will need to be under the PRESET group you want to adjust
first (FM1>FM2>FM3). This feature automatically stores presets
on the unit. It will stop when presets 1-6 are set. Select the next
PRESET group and repeat to fill next set.
LOCAL
Press the encoder button to access the LOCAL options. Once
selected, use the rotary encoder to select ON or OFF. The local
option tunes to nearby radio stations with suiciently strong
signals for good reception. In areas where reception is poor,
switching to distance tuning enables the unit to tune in to more
distant stations. Distance tuning is the default.
AM BAND SETTINGS
To access the AM BAND SETTINGS, press the MENU when
using the AM TUNER source. This will give you access to
the settings specific to the AM TUNER (AM>PRESETS>ADD
PRESETS>REMOVE PRESETS>AUTO STORE>LOCAL).
PRESETS
Press the encoder button to access the PRESETS list. Using this
feature allows you to see what PRESETS are saved on the unit.
ADD PRESETS
Press the encoder button on the ADD PRESETS option. You will
need to be on both the station and PRESET group you want
to add first (AM1>AM2). Using this feature allows you to save

7
stations to the unit. Once selected, use the rotary encoder to
select the PRESET number (1-6) you want the station saved to.
REMOVE PRESETS
Press the encoder button on the REMOVE PRESETS option.
You will need to be under the PRESET group you want to adjust
first (AM1>AM2). Using this feature allows you to remove saved
stations on the unit. Once selected, use the rotary encoder
to select the PRESET number (1-6) of the station you want
removed.
AM
Press the encoder button to access the FM PRESET options
(AM1>AM2). Using this feature allows you to have separate
tuner preset groups to choose from. Use the rotary encoder
button to scroll through the TUNER groups and press to select
the group.
AUTO STORE
Press the encoder button to access the AUTO STORE function.
You will need to be under the PRESET group you want to adjust
first (AM1>AM2). This feature automatically stores presets on
the unit. It will stop when presets 1-6 are set. Select the next
PRESET group and repeat to fill next set.
LOCAL
Press the encoder button to access the LOCAL options. Once
selected, use the rotary encoder to select ON or OFF. The local
option tunes to nearby radio stations with suiciently strong
signals for good reception. In areas where reception is poor,
switching to distance tuning enables the unit to tune in to more
distant stations. Distance tuning is the default.
WB BAND SETTINGS
To access the WB BAND SETTINGS, press the MENU when using
the WB TUNER source. This will give you access to the settings
specific to the WB TUNER (PRESETS>ADD PRESETS>REMOVE
PRESETS).
PRESETS
Press the encoder button to access the PRESETS list. Using this
feature allows you to see what PRESETS are saved on the unit.
ADD PRESETS
Press the encoder button on the ADD PRESETS option. You will
need to be on both the station you want to add first. Using this
feature allows you to save stations to the unit. Once selected,
use the rotary encoder to select the PRESET number (1-6) you
want the station saved to.
REMOVE PRESETS
Press the encoder button on the REMOVE PRESETS option.
You will need to be under the PRESET group you want to adjust
first (AM1>AM2). Using this feature allows you to remove saved
stations on the unit. Once selected, use the rotary encoder
to select the PRESET number (1-6) of the station you want
removed.
USB (iPod) Operation
Aer your device is connected to the source unit, this feature
allows you to control playback from your device directly from
the source unit. Select the USB source option on the source
unit.
To play or pause a song, press the PLAY/PAUSE button.
To skip a track forward, press the FWD button. To skip a track
backwards, press the REV button.
To access USB specific settings, press the MENU button for the
list of settings (BROWSER>REPEAT>SHUFFLE). Use the encoder
to select the option to change.
BROWSER
Press the encoder button to access the BROWSER options (PLA
YLISTS>ARTISTS>ALBUMS>GENRES>SONGS>COMPOSERS>AU
DIOBOOKS>PODCASTS). Using this feature allows you to search
for tracks or songs by dierent types of categories.
REPEAT
Press the encoder button to access the REPEAT feature options
(OFF>ONE>ALL).
SHUFFLE
Press the encoder button to access the SHUFFLE feature
options (OFF>ALL). This feature allows you to set your
preference on shuling tracks or songs.
NOTE: When using a USB extension cable, it must be a Rockford
Fosgate powered extension cable (part # PMX-USBEXT). The
cable is 33 feet (10 meters).
Operation

8
Operation
Bluetooth
®
Operation
Aer your device is paired to the source unit, this feature
allows you to control playback from your device directly from
the source unit. Select the BLUETOOTH source option on the
source unit.
To play or pause a song, press the PLAY/PAUSE button.
To skip a track forward, press the FWD button. To skip a track
backwards, press the REV button.
To access BLUETOOTH specific settings, press the MENU button
for the list of settings (BROWSER>REPEAT>SHUFFLE). Use the
encoder to select the option to change.
BROWSER
Press the encoder button to access the BROWSER options (PLA
YLISTS>ARTISTS>ALBUMS>GENRES>SONGS>COMPOSERS>AU
DIOBOOKS>PODCASTS). Using this feature allows you to search
for tracks or songs by dierent types of categories.
REPEAT
Press the encoder button to access the REPEAT feature options
(OFF>ONE>ALL). This feature allows you to set your preference
on the amount of times a track or song will repeat.
SHUFFLE
Press the encoder button to access the SHUFFLE feature
options (OFF>ALL). This feature allows you to set your
preference on shuling tracks or songs.
NOTE: When the device is initially paired, the volume on the
device will be roughly at half volume. You will need to turn
the volume all the way up on the connected device prior to
level setting. The device will remain at maximum volume aer
initially setting and when it re-pairs to the source unit.
This feature allows you to control the Pandora
®
app from the
source unit directly (Android users will have to use Bluetooth
only, iOS users can use both USB and Bluetooth). You will need
to start the Pandora
®
app on your device first, then select the
Pandora
®
source option on the source unit. To use the “Thumbs
Up” feature, press and hold the SUB+ button. To use the
“Thumbs down” feature, press and hold the SUB - button.
To play or pause a song, press the PLAY/PAUSE button.
To skip a track forward, press the FWD button.
To access Pandora
®
specific settings, press the MENU button
for the list of settings (STATIONS>BOOKMARKS>STATIONS
MANAGE). Use the encoder to select the option to change.
STATIONS
To adjust, press the encoder button to access. Rotate the
encoder button to select your options (SHUFFLE>SORT DATE/A-
Z>STATIONS). Selecting the SHUFFLE option will shule your
stations and selecting the SORT feature will sort your stations
by date added or alphabetically. You can also select your saved
stations directly from this list.
BOOKMARKS
To BOOKMARK an artist or track that is playing, press
the encoder button to display your BOOKMARK options
(ARTIST>TRACK). Select the option you wish to use for
bookmarking.
Pandora, the Pandora logo, and the Pandora trade dress are
trademarks or registered trademarks of Pandora Media, LLC.
Used with permission. Pandora is only available in certain
countries. Please visit http://www.pandora.com/legal for more
information.

9
Symptom Diagnosis Remedy
Basic
Source unit does not turn on.
Blown fuse Check fuse of the unit, replace with correct rating.
Vehicle’s ignition is o
If connected following the instructions, the unit will
not operate with ignition o.
Unit is not properly grounded Check wiring and repair as necessary.
Radio Tuner
Tuner fails to tune any stations
No antenna or disconnected or
open connection in cable
Check all connections and repair as necessary.
Unable to tune stations in seek
mode
You are in a weak signal area Make sure the tuner LOC mode is o.
USB Devices
USB device cannot be inserted
The USB device has been inserted
in the wrong direction
Reversing the connection direction of the USB
device, try reinserting.
The USB device connector is
broken
Replace with a new USB device.
USB device is not recognized
The USB device is damaged
Disconnect USB device and reconnect. If the device
is still not recognized, try replacing with a dier-
ent USB device.USB does not work with Android
devices.
Connectors are loose
No sound heard with the
display “No File” shown
No MP3/WMA files are stored on
the USB device
Store these files properly on the USB device. USB
does not work with Android devices.
Sound skips or is noisy
MP3/WMA files are not created
properly
Use MP3/WMA files that are encoded correctly.
Bluetooth
Bluetooth source volume is
lower than other sources
Bluetooth from device is not at
maximum volume
Turn the volume on the device to maximum level
Troubleshooting

10
Français
Caractéristiques de conception (Fig. 1)
Encodeur rotatif
Ce bouton sert à ajuster le volume principal, les volumes de
zones, la navigation du menu et les réglages des paramètres.
Bouton MENU
Ce bouton donne accès aux paramètres principaux de l’appareil
par une longue pression. Appuyer dessus brièvement pour avoir
accès aux paramètres pour la source active.
Bouton SRC (Alimentation)
Ce bouton permet de commuter entre les sources (pression
courte) et d’activer et de désactiver l’appareil (pression longue).
Boutons SUB
Ces boutons permettent d’ajuster la sortie du subwoofer ou la
ligne arrière vers le haut ou vers le bas (0-20).
Bouton LECTURE/PAUSE
Appuyer sur ce bouton pour jouer ou pauser la musique. Ce
bouton sert aussi de VEILLEUSE quand la source est en mode
TUNER.
Bouton DIMMER (GRADATEUR)
Appuyer sur ce bouton pour sélectionner entre les valeurs de
luminosité de l’aichage.
Bouton REV/FWD
Utiliser ce bouton pour sauter en arrière et en avant parmi les
chaînes ou les pistes avec une pression courte. Une pression
longue activera le mode de recherche manuelle.
Paramètres de l’unité source
Pour accéder aux paramètres de l’unité source, appuyer
longuement sur le bouton MENU jusqu’à aichage des op-
tions. Faire pivoter l’encodeur pour faire défiler la liste des
paramètres et eectuer une pression courte sur le bouton
d’encodeur pour sélectionner le paramètre que l’on souhaite
modifier. (BALANCE>FADER>AUDIO>VOLTAGE GAUGE>BT
PAIRING>BEEP>TUNER REGION>SOFTWARE>FACTORY DEFAULT)
Cette unité source a un courant nul quand elle est désactivée.
Tous les paramètres et préréglages seront sauvegardés avec la
batterie du bateau pendant l’entreposage.
BALANCE
Appuyer brièvement sur le bouton d’encodeur pour accéder
aux paramètres de réglage de BALANCE. Faire pivoter le bouton
d’encodeur pour régler la BALANCE de sortie.
FADER
Appuyer brièvement sur le bouton d’encodeur pour accéder
aux paramètres de réglage du FADER. Faire pivoter le bouton
d’encodeur pour régler le FADER de sortie.
AUDIO
Pour accéder aux paramètres AUDIO, eectuer une pres-
sion courte sur l’option AUDIO à partir de l’écran MENU. Faire
pivoter l’encodeur pour faire défiler la liste des paramètres et
eectuer une pression courte sur le bouton d’encodeur pour
sélectionner le paramètre que l’on souhaite modifier. (7 BAND
EQ>CROSSOVER>PEQ>SOURCE GAIN>INTERNAL AMPLIFIER)
7 BAND EQ
Appuyer brièvement sur le bouton d’encodeur pour accéder
aux paramètres 7 BAND EQ. Utiliser l’encodeur rotatif pour faire
défiler les paramètres EQ. (FLAT > ROCK > CLASSIC > ACOUSTIC
> DANCE > ELECTRONIC > HIP-HOP > CUSTOM) Lors de la
configuration du CUSTOM EQ, eectuer une pression courte sur
le bouton d’encodeur pour régler la première fréquence. Une
fois activé, faire pivoter l’encodeur pour ajuster les paramètres
de fréquence. Eectuer une autre pression courte sur le bouton
d’encodeur pour accéder à la fréquence prochaine. Répéter
jusqu’à ce que tous les paramètres EQ soient terminés. Appuyer
brièvement sur le bouton MENU pour quitter et revenir d’un
niveau en arrière.
CROISEMENT
Appuyer brièvement pour accéder aux paramètres de CROISE-
MENT. Utiliser l’encodeur rotatif pour sélectionner les options de
zones de croisement (FRONT>REAR>SUB). Eectuer une courte
pression sur l’encodeur pour ajuster la fréquence du croisement
(60 Hz>80 Hz>120 Hz>APF). Appuyer brièvement sur le bouton
MENU pour quitter et revenir d’un niveau en arrière.
PUNCH EQ
Appuyer brièvement pour accéder aux paramètres de PUNCH
EQ. Utiliser l’encodeur rotatif pour ajuster la sortie de gain (0-12).
Appuyer brièvement sur le bouton MENU pour quitter et revenir
d’un niveau en arrière.
Punch EQ est un égaliseur embarqué avec un amplificateur
maximum de +18 dB à 45 Hz et/ou de +12 dB à 12,5 kHz
GAIN SOURCE
Pour ajuster le niveau du gain d’entrée de périphéri-
que, faire défiler les entrées (FM TUNER>AM TUNER>WB
TUNER>USB>BLUETOOTH>PANDORA) jusqu’au périphérique
que l’on souhaite ajuster, appuyer brièvement le bouton
d’encodeur pour accéder aux paramètres de gain. Faire tourner
le bouton d’encodeur pour régler le niveau de gain. (-3 dB > -2
dB > -1 dB > 0 dB > +1 dB > +2 dB > +3 dB)
AMPLIFICATEUR INTERNE
Appuyer brièvement pour accéder aux options AMPLIFICATEUR
INTERNE. Utiliser l’encodeur rotatif pour sélectionner les op-
tions (ON>OFF). Lors de l’utilisation d’un amplificateur pour
alimenter les haut-parleurs, sélectionner OFF. Si on alimente
les haut-parleurs directement de l’unité source, sélectionner
l’AMPLIFICATEUR INTERNE sur ON.
INDICATEUR DE TENSION
Pour aicher la tension du véhicule, appuyer brièvement sur le
bouton d’encodeur sur l’option INDICATEUR DE TENSION.
APPAIRAGE DE PÉRIPHÉRIQUE BT
Appuyez brièvement sur le bouton codeur pour accéder aux
options (DISCOVERABLE>DISPOSITIF).
DISCOVERABLE
Tournez le bouton encodeur pour sélectionner si l’unité est
détectable pour l’appariement. (ENABLE> DISABLE) Une fois ac-
tivée, l’unité source est maintenant visible Et prêt à être couplé
à votre appareil. Ouvrez les paramètres Bluetooth de votre. Pour
trouver l’unité source intitulée «Rockford PMX» et sélectionnez.
DISPOSITIF
La sélection de DEVICE en appuyant brièvement sur le bouton
pour renommer l’unité source avec un maximum de 16 carac-
tères. Cela vous donne la possibilité d’avoir un nom unique pour
faciliter l’identification pendant l’appareil appariement appuyez
brièvement sur la touche du codeur pour sélectionner la lettre à
modifier et tournez le bouton pour modifier la valeur. Répéter le
processus jusqu’à ce que vous désiriez nom est atteint.
BIP
Appuyer brièvement sur le bouton d’encodeur pour accéder aux
options BIP. Faire tourner le bouton d’encodeur pour activer/
désactiver le bip du système.
RÉGION DU TUNER
Pour ajuster, appuyer brièvement sur le bouton d’encodeur pour
accéder. Faire tourner le bouton d’encodeur pour sélection-
ner la RÉGION DU TUNER de préférence. (EUROPE > USA >
RUSSE > AMÉRIQUE LATINE > ASIE > JAPON > MOYEN-ORIENT >
AUSTRALIE)
LOGICIEL
VERSION - Appuyer brièvement sur le bouton d’encodeur pour
aicher la version de logiciel actuelle de l’unité.
MISE À JOUR - Appuyer brièvement sur le bouton d’encodeur
pour mettre le logiciel à jour. Suivre les instructions à l’écran
pour mettre à jour.
THÈME
Pour régler le THEME , appuyez brièvement sur l’encodeur
pour accéder à la fonction . Tournez le bouton encodeur pour
sélectionner le thème désiré ( jour, nuit,)

11
Français
RÉGLAGE D’USINE
AUDIO – Appuyer brièvement sur le bouton d’encodeur pour
accéder. Faire pivoter le bouton d’encodeur pour sélectionner
YES/NO (OUI/NON). Sélectionner YES/OUI pour remettre l’unité
aux réglages d’usine.
SYSTÈME - Appuyer brièvement sur le bouton d’encodeur pour
accéder. Faire pivoter le bouton d’encodeur pour sélectionner
YES/NO (OUI/NON). Sélectionner YES/OUI pour remettre l’unité
aux réglages d’usine.
Fonctionnement de base
ACTIVER/DÉSACTIVER L’UNITÉ
Appuyer longuement sur le bouton SRC (Alimentation) pour
ACTIVER ou DÉSACTIVER l’unité
RÉGLAGE DU VOLUME
Faire tourner le bouton d’encodeur vers la gauche ou vers la
droite au niveau de volume souhaité (0-40). Le niveau de volume
actuel s’aiche pendant le réglage.
RÉGLAGE DE LA SORTIE DU SUBWOOFER
Appuyer sur le bouton SUB + ou SUB- pour régler le niveau de
sortie (0-20).
RÉGLAGE DE LA LUMINOSITÉ DE L’ÉCRAN
Appuyer brièvement sur le bouton LUMINOSITÉ DE L’ÉCRAN
pour ajuster le niveau de luminosité. Il existe deux niveaux de
luminosité.
SÉLECTIONNER UNE SOURCE À JOUER
Appuyer brièvement sur le bouton SRC pour aicher les diéren-
tes options de source (FM TUNER>AM TUNER>WB TUNER>USB
>BLUETOOTH>PANDORA>SIRIUSXM). Utiliser l’encodeur rotatif
ou appuyer brièvement sur le bouton SRC pour faire défiler les
sources.
Fonctionnement du tuner (FM/AM/WB)
Pour faire fonctionner, utiliser l’encodeur rotatif pour sélection-
ner la source de tuner que l’on souhaite écouter (FM>AM>WB).
Pour RECHERCHER AUTOMATIQUEMENT des stations, appuyer
brièvement sur les boutons FWD et REV. Pour RECHERCHER
MANUELLEMENT des stations, appuyer longuement sur les
boutons FWD et REV pour régler à la fréquence souhaitée.
Pour mettre le TUNER en SOURDINE, appuyer brièvement sur le
bouton PLAY/PAUSE.
PARAMÈTRES DE BANDE FM
Pour accéder aux PARAMÈTRES DE BANDE FM, appuyer
brièvement sur le MENU lors de l’utilisation de source FM
TUNER. Ceci donnera accès aux paramètres spécifiques au FM
TUNER (FM>PRESETS>ADD PRESETS>REMOVE PRESETS>AUTO
STORE>LOCAL).
STATIONS PRÉRÉGLÉES
Appuyer brièvement sur le bouton d’encodeur pour accéder à la
liste des STATIONS PRÉRÉGLÉES. Utiliser cette fonction pour voir
quelles STATIONS PRÉRÉGLÉES sont sauvegardées sur l’unité.
ADD PRESETS (AJOUTER DES STATIONS PRÉRÉGLÉES)
Eectuer une pression courte sur le bouton d’encodeur sur
l’option AJOUTER DES STATIONS PRÉRÉGLÉES. Il faudra se
trouver sur la station et sur le groupe des STATIONS PRÉRÉ-
GLÉES que l’on souhaite ajouter en premier (FM1>FM2>FM3).
Utiliser cette fonction pour pouvoir sauvegarder des stations
sur l’unité. Une fois sélectionnée, utiliser l’encodeur rotatif pour
sélectionner le numéro de STATION PRÉRÉGLÉE (1-6) sur lequel
on souhaite sauvegarder la station.
REMOVE PRESETS (SUPPRIMER DES STATIONS PRÉRÉGLÉES)
Eectuer une pression courte sur le bouton d’encodeur sur
l’option SUPPRIMER DES STATIONS PRÉRÉGLÉES. Il faudra se
trouver sous le groupe des STATIONS PRÉRÉGLÉES que l’on sou-
haite ajuster en premier (FM1>FM2>FM3). Utiliser cette fonction
pour pouvoir supprimer des stations sauvegardées sur l’unité.
Une fois sélectionnée, utiliser l’encodeur rotatif pour sélection-
ner le numéro de STATION PRÉRÉGLÉE (1-6) de la station que
l’on souhaite supprimer.
FM
Eectuer une pression courte sur le bouton d’encodeur pour ac-
céder aux options STATIONS PRÉRÉGLÉES FM (FM1>FM2>FM3).
Utiliser cette fonction permet d’avoir des groupes de stations
préréglées de tuner séparés parmi lesquels choisir. Utiliser
le bouton d’encodeur rotatif pour faire défiler les groupes de
TUNER et appuyer brièvement pour sélectionner le groupe.
AUTO STORE (SAUVEGARDE AUTOMATIQUE)
Appuyer brièvement sur le bouton d’encodeur pour accéder à la
fonction SAUVEGARDE AUTOMATIQUE. Il faudra se trouver sous
le groupe des STATIONS PRÉRÉGLÉES que l’on souhaite ajuster
en premier (FM1>FM2>FM3). Cette fonction sauvegarde automa-
tiquement les stations préréglées sur l’unité. Cela s’arrêtera
lorsque les stations préréglées 1-6 sont réglées. Sélectionner
le prochain groupe de STATIONS PRÉRÉGLÉES et répéter pour
remplir le jeu prochain.
LOCAL
Appuyer brièvement sur le bouton d’encodeur pour accéder aux
options LOCAL. Une fois sélectionnée, utiliser l’encodeur rotatif
pour sélectionner ON ou OFF. L’option LOCAL se règle sur les
stations de radio proches avec des signaux suisamment forts
pour une bonne réception. Dans les zones où la réception est
médiocre, passer au réglage à distance permet à l’unité de se
régler dans des stations plus distantes. Le réglage à distance est
le réglage d’usine.
PARAMÈTRES DE BANDE AM
Pour accéder aux PARAMÈTRES DE BANDE AM, appuyer
brièvement sur le MENU lors de l’utilisation de source AM
TUNER. Ceci donnera accès aux paramètres spécifiques au AM
TUNER (AM>PRESETS>ADD PRESETS>REMOVE PRESETS>AUTO
STORE>LOCAL).
STATIONS PRÉRÉGLÉS
Appuyer brièvement sur le bouton d’encodeur pour accéder à la
liste des STATIONS PRÉRÉGLÉES. Utiliser cette fonction pour voir
quelles STATIONS PRÉRÉGLÉES sont sauvegardées sur l’unité.
ADD PRESETS (AJOUTER DES STATIONS PRÉRÉGLÉES)
Appuyer brièvement sur le bouton d’encodeur pour accéder à
l’option ADD PRESETS. Il faudra se trouver sur la station et sur
le groupe des STATIONS PRÉRÉGLÉES que l’on souhaite ajouter
en premier (AM1>AM2). Utiliser cette fonction pour pouvoir
sauvegarder des stations sur l’unité. Une fois sélectionnée, uti-
liser l’encodeur rotatif pour sélectionner le numéro de STATION
PRÉRÉGLÉE (1-6) sur lequel on souhaite sauvegarder la station.
REMOVE PRESETS (SUPPRIMER DES STATIONS PRÉRÉGLÉES)
Eectuer une pression courte sur le bouton d’encodeur sur
l’option SUPPRIMER DES STATIONS PRÉRÉGLÉES. Il faudra se
trouver sous le groupe des STATIONS PRÉRÉGLÉES que l’on
souhaite ajuster en premier (AM1>AM2). Utiliser cette fonction
pour pouvoir supprimer des stations sauvegardées sur l’unité.
Une fois sélectionnée, utiliser l’encodeur rotatif pour sélection-
ner le numéro de STATION PRÉRÉGLÉE (1-6) de la station que
l’on souhaite supprimer.
AM
Appuyer brièvement sur le bouton d’encodeur pour accéder
aux options STATIONS PRÉRÉGLÉES FM (AM1>AM2). Utiliser
cette fonction permet d’avoir des groupes de stations préréglées
de tuner séparés parmi lesquels choisir. Utiliser le bouton
d’encodeur rotatif pour faire défiler les groupes de TUNER et
appuyer brièvement pour sélectionner le groupe.
AUTO STORE (SAUVEGARDE AUTOMATIQUE)
Appuyer brièvement sur le bouton d’encodeur pour accéder à la
fonction SAUVEGARDE AUTOMATIQUE. Il faudra se trouver sous
le groupe des STATIONS PRÉRÉGLÉES que l’on souhaite ajuster
en premier (AM1>AM2). Cette fonction sauvegarde automatique-
ment les stations préréglées sur l’unité. Cela s’arrêtera lorsque
les stations préréglées 1-6 sont réglées. Sélectionner le prochain
groupe de STATIONS PRÉRÉGLÉES et répéter pour remplir le jeu
prochain.

12
LOCAL
Appuyer brièvement sur le bouton d’encodeur pour accéder aux
options LOCAL. Une fois sélectionnée, utiliser l’encodeur rotatif
pour sélectionner ON ou OFF. L’option LOCAL se règle sur les
stations de radio proches avec des signaux suisamment forts
pour une bonne réception. Dans les zones où la réception est
médiocre, passer au réglage à distance permet à l’unité de se
régler dans des stations plus distantes. Le réglage à distance est
le réglage d’usine.
PARAMÈTRES DE BANDE WB
Pour accéder aux PARAMÈTRES DE BANDE WB, appuyer briève-
ment sur le MENU lors de l’utilisation de source WB TUNER.
Ceci donnera accès aux paramètres spécifiques au WB TUNER
(PRESETS>ADD PRESETS>REMOVE PRESETS).
STATIONS PRÉRÉGLÉES
Appuyer brièvement sur le bouton d’encodeur pour accéder à la
liste des STATIONS PRÉRÉGLÉES. Utiliser cette fonction pour voir
quelles STATIONS PRÉRÉGLÉES sont sauvegardées sur l’unité.
ADD PRESETS (AJOUTER DES STATIONS PRÉRÉGLÉES)
Eectuer une pression courte sur le bouton d’encodeur sur
l’option AJOUTER DES STATIONS PRÉRÉGLÉES. Il faudra se trou-
ver sur les deux stations que l’on souhaite ajouter en premier.
Utiliser cette fonction pour pouvoir sauvegarder des stations
sur l’unité. Une fois sélectionnée, utiliser l’encodeur rotatif pour
sélectionner le numéro de STATION PRÉRÉGLÉE (1-6) sur lequel
on souhaite sauvegarder la station.
REMOVE PRESETS (SUPPRIMER DES STATIONS PRÉRÉGLÉES)
Appuyer brièvement sur le bouton d’encodeur sur l’option
SUPPRIMER DES STATIONS PRÉRÉGLÉES. Il faudra se trouver
sous le groupe des STATIONS PRÉRÉGLÉES que l’on souhaite
ajuster en premier (AM1>AM2). Utiliser cette fonction pour
pouvoir supprimer des stations sauvegardées sur l’unité. Une
fois sélectionnée, utiliser l’encodeur rotatif pour sélectionner
le numéro de STATION PRÉRÉGLÉE (1-6) de la station que l’on
souhaite supprimer.
Fonctionnement USB (iPod)
Une fois le périphérique connecté à l’unité source, cette fonction
permet de contrôler la lecture à partir du périphérique directe-
ment de l’unité. Sélectionner l’option source USB sur l’unité
source.
Pour jouer ou pauser une chanson, appuyer brièvement sur le
bouton PLAY/PAUSE.
Pour sauter une piste vers l’avant, appuyer brièvement sur le
bouton FWD. Pour sauter une piste vers l’arrière, appuyer briève-
ment sur le bouton REV.
Pour accéder aux paramètres spécifiques USB, appuyer briève-
ment sur le bouton MENU pour obtenir la liste des paramètres
(BROWSER>REPEAT>SHUFFLE). Utiliser l’encodeur pour sélec-
tionner l’option à modifier.
BROWSER (NAVIGATEUR)
Appuyer brièvement sur le bouton d’encodeur pour accéder
aux options NAVIGATEUR (PLAYLISTS>ARTISTS>ALBUMS>GEN
RES>SONGS>COMPOSERS>AUDIOBOOKS>PODCASTS). Utiliser
cette fonction permet de chercher les pistes ou chansons par
diérents types de catégories.
REPEAT (RÉPÉTITION)
Appuyer brièvement sur le bouton d’encodeur pour accéder aux
options de la fonction RÉPÉTITION (OFF>ONE>ALL).
SHUFFLE
Appuyer brièvement sur le bouton d’encodeur pour accéder
aux options de la fonction SHUFFLE (OFF>ALL). Cette fonction
permet de régler les préférences de lecture aléatoire de pistes
ou de chansons.
Fonctionnement Bluetooth®
Une fois le périphérique appairé à l’unité source, cette fonction
permet de contrôler la lecture à partir du périphérique directe-
ment de l’unité. Sélectionner l’option source BLUETOOTH sur
l’unité source.
Pour jouer ou pauser une chanson, appuyer brièvement sur le
bouton PLAY/PAUSE.
Pour sauter une piste vers l’avant, appuyer brièvement sur le
bouton FWD. Pour sauter une piste vers l’arrière, appuyer briève-
ment sur le bouton REV.
Pour accéder aux paramètres spécifiques BLUETOOTH, ap-
puyer brièvement sur le bouton MENU pour obtenir la liste des
paramètres (BROWSER>REPEAT>SHUFFLE). Utiliser l’encodeur
pour sélectionner l’option à modifier.
BROWSER (NAVIGATEUR)
Appuyer brièvement sur le bouton d’encodeur pour accéder
aux options NAVIGATEUR (PLAYLISTS>ARTISTS>ALBUMS>GEN
RES>SONGS>COMPOSERS>AUDIOBOOKS>PODCASTS). Utiliser
cette fonction permet de chercher les pistes ou chansons par
diérents types de catégories.
REPEAT (RÉPÉTITION)
Appuyer brièvement sur le bouton d’encodeur pour accéder aux
options de la fonction RÉPÉTITION (OFF>ONE>ALL). Cette fonc-
tion permet de régler la préférence sur le nombre de fois qu’une
piste ou qu’une chanson sera répétée.
SHUFFLE
Appuyer brièvement sur le bouton d’encodeur pour accéder
aux options de la fonction SHUFFLE (OFF>ALL). Cette fonction
permet de régler les préférences de lecture aléatoire de pistes
ou de chansons.
REMARQUE: Lors de l’utilisation d’un câble d’extension USB, il
doit s’agir d’un câble d’extension Rockford Fosgate. La distance
maximale pour le câble est de 10 mètres (33 pieds).
NOTE : Lors de l’appairage initiale du périphérique, le volume
sur le périphérique sera approximativement à la moitié du
volume. Il faudra augmenter le volume au maximum sur le
périphérique avant de régler le niveau. Le périphérique restera
au volume maximum après le réglage initial et lors du nouvel
appairage à l’unité source.
Cette fonction permet de contrôler l’application Pandora® à
partir de l’unité source directement (les utilisateurs Android dev-
ront utiliser Bluetooth uniquement, les utilisateurs iOS peuvent
utiliser à la fois USB et Bluetooth). Il faudra lancer l’application
Pandora® sur le périphérique en premier, sélectionner alors
l’option source Pandora® sur l’unité source. Pour utiliser la fonc-
tion « Thumbs Up », appuyer longuement sur le bouton SUB+.
Pour utiliser la fonction « Thumbs down », appuyer longuement
sur le bouton SUB-.
Pour jouer ou pauser une chanson, appuyer brièvement sur le
bouton PLAY/PAUSE.
Pour sauter une piste vers l’avant, appuyer brièvement sur le
bouton FWD.
Pour accéder aux paramètres spécifiques Pandora®, appuyer
brièvement sur le bouton MENU pour obtenir la liste des
paramètres (STATION>BOOKMARKS>STATIONS MANAGE).
Utiliser l’encodeur pour sélectionner l’option à modifier.
STATIONS
Pour ajuster, appuyer brièvement sur le bouton d’encodeur pour
accéder. Faire tourner le bouton d’encodeur pour sélectionner
les options (SHUFFLE>SORT DATE/A-Z>STATIONS). Sélectionner
l’option SHUFFLE pour mélanger les stations et sélectionner la
fonction SORT/TRIER va trier les stations par date ajoutée ou par
ordre alphabétique. Il est également possible de sélectionner
les stations sauvegardées directement de cette liste.
SIGNETS
Pour METTRE EN SIGNET un artiste ou une piste qui joue, ap-
puyer brièvement sur le bouton d’encodeur pour aicher les
options BOOKMARK/SIGNETS (ARTIST>TRACK). Sélectionner
l’option que l’on souhaite utiliser pour la mise en signet.
Français

13
Pandora, le logo Pandora et l’habillage Pandora sont des
marques de commerce ou des marques de commerce déposées
de Pandora Media, LLC. Utilisés avec permission. Pandora n’est
disponible que dans certains pays. Prière de consulter http://
www.pandora.com/legal pour de plus amples informations.
Français
Symptôme/Avertissement Diagnostic Solution
De base
L'unité source ne se met pas
en marche.
Fusible grillé
Vérifier le fusible de l'unité, remplacer avec le calibre
approprié.
L'allumage du véhicule est
désactivé
Si connectée selon les instructions, l'unité ne fonc-
tionnera pas avec l'allumage désactivé.
L'unité n'est pas correctement
mise à la masse.
Vérifier le câblage et réparer selon les besoins.
Tuner de radio
Le tuner ne syntonise aucune
station
Aucune antenne, ou connexion
déconnectée ou ouverte dans
le câble
Vérifier toutes les connexions et réparer selon les
besoins.
Impossible de régler des sta-
tions en mode recherche
On se trouve dans une zone à
signal faible
S'assurer que le mode LOC du tuner est désactivé.
Périphériques USB
Le périphérique USB ne peut
pas être inséré
Le périphérique USB a été inséré
dans le mauvais sens
Inverser le sens de connexion du périphérique USB,
essayer de le réinsérer.
Le connecteur du périphérique
USB est cassé.
Le remplacer par un nouveau périphérique USB.
Le périphérique USB n'est pas
reconnu.
Le périphérique USB est endom-
magé.
Déconnecter le périphérique USB et reconnecter. Si
le périphérique n'est toujours pas reconnu, tenter de
le remplacer par un périphérique USB diérent. USB
ne fonctionne pas avec les périphériques Android.
Les connecteurs sont desserrés
Aucun son entendu avec
l'aichage « Aucun fichier »
Aucun fichier MP3/WMA sauveg-
ardé sur le périphérique USB
Sauvegarder ces fichiers correctement sur le
périphérique USB. USB ne fonctionne par avec les
périphériques Android.
Sautes de son ou son bruyant
Les fichiers MP3/WMA ne sont pas
créés correctement
Utiliser les fichiers MP3/WMA qui sont correctement
encodés.
Bluetooth
Le volume de source Bluetooth
est inférieur aux autres sources
Bluetooth du périphérique n’est
pas au volume maximum
Tourner le volume sur le périphérique au nouveau
maximum

14
Características de diseño (Fig. 1)
Codificador giratorio
Esta perilla es para ajustar el volumen principal, volúmenes de
zona, menú de navegación y ajustes de la configuración.
Botón MENU
Este botón le permite acceso a las configuraciones principales
de la unidad presionando largo tiempo. Si se presiona breve-
mente consigue acceso a las configuraciones de la fuente activa.
Botón SRC (encendido)
Este botón le permite conmutar entre fuentes (presión breve) y
encender (ON) o apagar (OFF) la unidad (presión prolongada)
Botones SUB
Estos botones le permiten ajustar la salida del subwoofer o de la
línea de salida posterior UP (ARRIBA) o DOWN (ABAJO) (0-20).
Botón PLAY/PAUSE (REPRODUCCION/PAUSA)
Presione este botón para reproducir o pausar su música. Este
botón también actúa como MUTE (SILENCIAMIENTO) cuando la
fuente está en el modo TUNER.
Botón DIMMER (ATENUADOR)
Presionar este botón le permitirá seleccionar entre dos valores
de brillo para la pantalla.
Botón REV / FWD (REBOBINAR / AVANZAR)
Use este botón para desplazarse hacia atrás y adelante a través
de canales o pistas presionando brevemente. Si se presiona
durante largo tiempo se activa el modo de búsqueda manual.
Configuración de la unidad fuente
Para acceder a la configuración de la unidad fuente,
presione el botón MENU hasta que aparezcan las op-
ciones. Haga girar el codificador para desplazarse por la
lista de configuraciones y presione brevemente el botón
del codificador para seleccionar la configuración que desea
cambiar. (BALANCE>FADER>AUDIO>VOLTAGE GAUGE>BT
PAIRING>BEEP>TUNER REGION>SOFTWARE>FACTORY DEFAULT)
Esta unidad fuente tiene cero consumo de corriente cuando
está apagada. Se guardará todas sus configuraciones y predeter-
minaciones junto con la batería de su embarcación durante el
almacenamiento.
BALANCE
Presione brevemente el botón codificador para acceder al ajuste
de BALANCE. Haga girar el botón del codificador para configurar
la salida de BALANCE.
FADER (ATENUADOR)
Presione brevemente el botón codificador para acceder al ajuste
de FADER. Haga girar el botón del codificador para configurar la
salida de FADER.
AUDIO
Para acceder a la configuración de AUDIO, presione breve-
mente la opción AUDIO desde la pantalla MENU. Haga girar
el codificador para desplazarse por la lista de configuracio-
nes y presione brevemente el botón del codificador para
seleccionar la configuración que desea cambiar. (7 BAND
EQ>CROSSOVER>PEQ>SOURCE GAIN>INTERNAL AMPLIFIER)
7 BAND EQ (ECUALIZADOR DE 7 BANDAS)
Presione brevemente el botón codificador para acceder a la
configuración de 7 BAND EQ. Use el codificador giratorio para
desplazarse por la configuración del EQ. (FLAT > ROCK > CLAS-
SIC > ACOUSTIC > DANCE > ELECTRONIC > HIP-HOP > CUSTOM)
al configurar CUSTOM EQ, presione brevemente el botón del
codificador para establecer la primera frecuencia. Una vez
activo, haga girar el codificador para ajustar la configuración
de la frecuencia. Presione brevemente de nuevo el botón del
codificador para acceder a la frecuencia siguiente. Repita hasta
haber terminado la configuración del EQ. Presione brevemente
el botón MENU para salir y volver a subir un nivel.
CROSSOVER (CRUCE)
Presione brevemente el botón para acceder a la configuración
de CROSSOVER. Use el codificador giratorio para seleccionar
las opciones de la zona de cruce (FRONT>REAR>SUB). Presione
brevemente el codificador para ajustar la frecuencia del cruce
(60Hz>80Hz>120Hz>APF). Presione brevemente MENU para salir
y volver a subir un nivel.
PUNCH EQ
Presione brevemente el botón para acceder a la configuración
de PUNCH EQ. Use el codificador giratorio para ajustar la ganan-
cia de la salida (0 a 12). Presione brevemente MENU para salir y
volver a subir un nivel.
Punch EQ es un ecualizador abordo con hasta +18dB a 45Hz y/o
un refuerzo de hasta +12dB a 12.5kHz
SOURCE GAIN (GANANCIA DE LA FUENTE)
Para ajustar el nivel de ganancia del dispositivo, desp-
lácese a través de las entradas (FM TUNER>AM TUNER>WB
TUNER>USB>BLUETOOTH>PANDORA) hasta el dispositivo que
quiere ajustar, presione brevemente el botón del codificador
para acceder a los ajustes de la ganancia. Haga girar el botón
codificador para ajustar el nivel de ganancia. (-3dB > -2dB > -1dB
> 0dB > +1dB > +2dB > +3dB)
AMPLIFICADOR INTERNO
Presione brevemente el botón para acceder a las opciones
de AMPLIFICADOR INTERNO. Use el codificador giratorio para
seleccionar las opciones (ON>OFF). Al usar un amplificador para
alimentar sus altavoces, seleccione OFF. Si está alimentando sus
altavoces directamente desde la unidad fuente, seleccione ON
en INTERNAL AMPLIFIER.
VOLTAGE GAUGE (VOLTIMETRO)
Para mostrar el voltaje del vehículo, presione brevemente el
botón del codificador en la opción VOLTAGE GAUGE.
EMPAREJADO DEL DISPOSITIVO BT
Pulse brevemente el botón del encoder para acceder a las
opciones (DISCOVERABLE>DISPOSITIVO).
DESCUBIERTA
Gire el botón del codificador para seleccionar si la unidad es de-
tectable para el emparejamiento. (ENABLE> DESACTIVAR) Una
vez habilitada, la unidad fuente es ahora detectable y lista para
emparejarse a su dispositivo. Abra la configuración de Bluetooth
en su dispositivo para encontrar la unidad fuente etiquetada
“Rockford PMX” y seleccione.
DISPOSITIVO
Si selecciona DISPOSITIVO presionando brevemente el botón
del encoder, podrá cambiar el nombre de la unidad fuente
con un máximo de 16 caracteres. Esto le da la capacidad de
tener un nombre único para facilitar la identificación durante
el emparejamiento del dispositivo. Pulse brevemente el botón
del encoder para seleccionar la letra que desea cambiar y gire
el mando para cambiar el valor. Repita el proceso hasta que se
alcance el nombre deseado.
BEEP (ZUMBIDO)
Presione brevemente el botón codificador para acceder a
las opciones de BEEP. Haga girar el botón codificador para
encender y apagar (ON/OFF) el sistema.
REGIÓN DE SINTONIZADOR
Para ajustar, presione brevemente el botón del codificador para
tener acceso. Haga girar el botón del codificador para seleccio-
nar la REGION DE SINTONIZADOR de su preferencia. (EUROPE >
USA > RUSSIA > LATIN > ASIA > JAPAN > MIDEAST > AUSTRALIA)
SOFTWARE
VERSION - Presione brevemente el botón del codificador para
visualizar la versión actual del firmware de la unidad.
UPDATE - Presione brevemente el botón del codificador para
actualizar el firmware. Siga las instrucciones de la pantalla al
actualizar.
TEMA
Para ajustar el tema, pulse brevemente el codificador para
acceder a la función . Girar el botón del codificador para selec-
Español

15
cionar el tema deseado ( día, noche,)
PREDETERMINACIÓN DE FABRICA
AUDIO – Presione brevemente el botón para tener acceso. Gire
el botón codificador para seleccionar YES/NO. Seleccionar YES
repondrá su unidad de nuevo a la configuración predetermi-
nada de la fábrica.
SYSTEM – Presione brevemente el botón del codificador para
tener acceso. Gire el botón codificador para seleccionar YES/NO.
Seleccionar YES repondrá su unidad de nuevo a la configuración
predeterminada de la fábrica.
Funcionamiento Básico
PARA ENCENDER Y APAGAR (ON/OFF) LA UNIDAD.
Presione prolongadamente el botón SRC (encendido) para
encender la unidad o para apagarla (ON u OFF).
AJUSTE DEL VOLUMEN
Haga girar la perilla del codificador a la izquierda o a la derecha
al nivel de volumen deseado (0-40). Se visualizará el nivel de
volumen actual durante el ajuste.
AJUSTE DE LA SALIDA DEL SUBWOOFER
Presione los botones SUB + o SUB- para ajustar el nivel de la
salida (0-20).
AJUSTE DEL BRILLO DE LA PANTALLA
Presione brevemente el botón SCREEN BRIGHTNESS para
ajustar el nivel de brillo. Hay dos niveles de brillo.
SELECCIÓN DE UNA FUENTE PARA REPRODUCIR
Presione brevemente el botón SRC para mostrar las distintas
opciones de fuente (FM TUNER>AM TUNER>WB TUNER>USB>B
LUETOOTH>PANDORA>SIRIUSXM). Use el codificador giratorio o
presione brevemente SCR para desplazarse por las fuentes.
Operación del sintonizador (FM/AM/WB)
Para operar use el codificador giratorio para seleccionar la
fuente del sintonizador que quiere escuchar (FM>AM>WB).
Para BUSCAR AUTOMÁTICAMENTE estaciones, presione breve-
mente los botones FWD y REV. Para BUSCAR MANUALMENTE
estaciones, presione prolongadamente los botones FWD y REV
para sintonizar la frecuencia deseada.
Para MUTE (silenciar) el TUNER (sintonizador), presione breve-
mente el botón PLAY/PAUSE (reproducción/pausa).
CONFIGURACIÓN DE BANDAS DE FW
Para acceder a FM BAND SETTINGS, presione brevemente
el MENU al utilizar la fuente FM TUNER. Esto le permite
acceso a las configuraciones específicas de FM TUNER
(FM>PRESETS>ADD PRESETS>REMOVE PRESETS>AUTO
STORE>LOCAL).
PRESETS (PREDETERMINACIONES)
Presione brevemente el botón codificador para acceder a las
opciones de PRESETS. El uso de esta característica le permite
ver qué PRESETS se guardan en la unidad.
ADD PRESETS (AGREGAR PREDETERMINACIONES)
Presione brevemente el botón codificador para acceder a la
opción ADD PRESETS. Tendrá que estar en ambos, la estación
y el grupo PRESET que quiere ajustar primero (FM1>FM2>FM3).
Usar esta característica le permite guardar estaciones en la
unidad. Una vez seleccionado, use el codificador giratorio para
seleccionar el número PRESET (1-6) en el que quiere guardar la
estación.
REMOVE PRESETS (ELIMINACIÓN DE PREDETERMINACIONES)
Presione brevemente el botón codificador para acceder a
la opción REMOVE PRESETS. Tendrá que estar bajo el grupo
PRESET que quiere ajustar primero (FM1>FM2>FM3). Usar esta
característica le permite eliminar las estaciones guardadas en la
unidad. Una vez seleccionado, use el codificador giratorio para
seleccionar el número PRESET (1-6) de la estación que quiere
eliminar.
FM
Presione brevemente el botón codificador para acceder a
las opciones de FM PRESET (FM1>FM2>FM3). El uso de esta
característica le permite tener grupos predeterminados de
sintonizador separados de los que puede escoger. Use el botón
codificador giratorio para desplazarse a través de los grupos de
TUNER y presione brevemente para seleccionar el grupo.
AUTO STORE (ALMACENAMIENTO AUTOMÁTICO)
Presione brevemente el botón codificador para acceder a la
función AUTO STORE. Tendrá que estar bajo el grupo PRESET
que quiere ajustar primero (FM1>FM2>FM3). Esta característica
almacena automáticamente predeterminaciones en la unidad.
Se detiene cuando se haya configurado las predeterminaciones
1-6. Seleccione el siguiente grupo PRESET y repita para llenar
el próximo.
LOCAL
Presione brevemente el botón codificador para acceder a las
opciones de LOCAL. Una vez seleccionado, use el codificador
giratorio para seleccionar ON u OFF. La opción local sintoniza
estaciones más cercanas con señales suficientemente fuertes
para tener buena recepción. En áreas donde la recepción es
deficiente, cambiar a sintonización distante habilita a la unidad
a que sintonice estaciones más distantes. La sintonía distante es
la predeterminación.
CONFIGURACIÓN DE BANDAS DE AM
Para acceder a AM BAND SETTINGS, presione brevemente
el MENU al utilizar la fuente AM TUNER. Esto le permite
acceso a las configuraciones específicas de AM TUNER
(FM>PRESETS>ADD PRESETS>REMOVE PRESETS>AUTO
STORE>LOCAL).
PRESETS
Presione brevemente el botón codificador para acceder a las
opciones de PRESETS. El uso de esta característica le permite
ver qué PRESETS se guardan en la unidad.
ADD PRESETS (AGREGAR PREDETERMINACIONES)
Presione brevemente el botón codificador para acceder a la
opción ADD PRESETS. Tendrá que estar en ambos, la estación
y el grupo PRESET que quiere ajustar primero (AM1>AM2).
Usar esta característica le permite guardar las estaciones en la
unidad. Una vez seleccionado, use el codificador giratorio para
seleccionar el número PRESET (1-6) en el que quiere guardar la
estación.
REMOVE PRESETS (ELIMINACION DE PREDETERMINACIONES)
Presione brevemente el botón codificador para acceder a la op-
ción REMOVE PRESETS. Tendrá que estar bajo el grupo PRESET
que quiere ajustar primero (AM1>AM2). Usar esta característica
le permite eliminar las estaciones guardadas en la unidad. Una
vez seleccionado, use el codificador giratorio para seleccionar el
número PRESET (1-6) de la estación que quiere eliminar.
AM
Presione brevemente el botón codificador para acceder a las
opciones de FM PRESET (AM1>AM2). El uso de esta característica
le permite tener grupos de predeterminación de de sintonizador
separados de los que puede escoger. Use el botón codificador
giratorio para desplazarse a través de los grupos de TUNER y
presione brevemente para seleccionar el grupo.
AUTO STORE
Presione brevemente el botón codificador para acceder a la fun-
ción AUTO STORE. Tendrá que estar bajo el grupo PRESET que
quiere ajustar primero (AM1>AM2). Esta característica almacena
automáticamente predeterminaciones en la unidad. Se detiene
cuando se configura las predeterminaciones 1-6. Seleccione el
siguiente grupo PRESET y repita para completar el siguiente.
LOCAL
Presione brevemente el botón codificador para acceder a las
opciones de LOCAL. Una vez seleccionado, use el codificador
giratorio para seleccionar ON u OFF. La opción local sintoniza
estaciones más cercanas con señales suficientemente fuertes
para tener buena recepción. En áreas donde la recepción es
deficiente, cambiar a sintonización distante habilita a la unidad
Español

16
a que sintonice estaciones más distantes. La sintonía distante es
la predeterminación.
WB BAND SETTINGS (CONFIGURACIÓN DE LA BANDA WB)
Para acceder a WB BAND SETTINGS, presione brevemente el
MENU al utilizar la fuente WB TUNER. Esto le permite acceso a
las configuraciones específicas de WB TUNER (PRESETS>ADD
PRESETS>REMOVE PRESETS).
PRESETS
Presione brevemente el botón codificador para acceder a las
opciones de PRESETS. El uso de esta característica le permite
ver qué PRESETS se guardan en la unidad.
ADD PRESETS (AGREGAR PREDETERMINACIONES)
Presione brevemente el botón codificador para acceder a la op-
ción ADD PRESETS. Tendrá que estar en la estación que quiere
agregar primero. Usar esta característica le permite guardar las
estaciones en la unidad. Una vez seleccionado, use el codifica-
dor giratorio para seleccionar el número PRESET (1-6) en el que
quiere guardar la estación.
REMOVE PRESETS (ELIMINACIÓN DE PREDETERMINACIONES)
Presione brevemente el botón codificador para acceder a la op-
ción REMOVE PRESETS. Tendrá que estar bajo el grupo PRESET
que quiere ajustar primero (AM1>AM2). Usar esta característica
le permite eliminar las estaciones guardadas en la unidad. Una
vez seleccionada, use el codificador giratorio para seleccionar el
número PRESET(1-6) de la estación que quiere eliminar.
Operación de USB (iPod)
Después que su dispositivo esté conectado a la unidad fuente,
esta característica le permite controlar la reproducción de su
dispositivo directamente desde la unidad. Seleccione la opción
de fuente USB en la unidad fuente.
Para reproducir o pausar una canción, presione brevemente el
botón PLAY/PAUSE.
Para omitir una pista y avanzar, presione brevemente el botón
FWD. Para omitir una pista y retroceder, presione brevemente
el botón REV.
Para acceder a una configuración específica de USB, presione
brevemente el botón MENU para visualizar una lista de configu-
raciones (BROWSER>REPEAT>SHUFFLE). Use el codificador para
seleccionar la opción a cambiar.
BROWSER
Presione brevemente el botón del codificador para acceder a las
opciones del BROWSER (PLAYLISTS>ARTISTS>ALBUMS>GENRE
S>SONGS>COMPOSERS>AUDIOBOOKS>PODCASTS). El uso de
esta característica permite la búsqueda de pistas o canciones
por tipos de categorías distintas.
REPEAT
Presione brevemente el botón codificador para acceder a las
opciones de la característica REPEAT (OFF>ONE>ALL).
SHUFFLE
Presione brevemente el botón codificador para acceder a las
opciones de la característica SHUFFLE (OFF>ALL). Esta carac-
terística le permite que configure su preferencia en cuanto a la
reproducción en orden aleatorio de pistas o canciones.
NOTA: Cuando use un cable de extensión USB, debe ser un
cable de extensión alimentado por Rockford Fosgate. La distan-
cia máxima para el cable es de 10 metros (33 pies).
Operación de Bluetooth®
Después que su dispositivo esté conectado a la unidad fuente,
esta característica le permite controlar la reproducción de su
dispositivo directamente desde la unidad. Seleccione la opción
de fuente BLUETOOTH en la unidad fuente.
Para reproducir o pausar una canción, presione brevemente el
botón PLAY/PAUSE.
Para omitir una pista y avanzar, presione brevemente el botón
FWD. Para omitir una pista y retroceder, presione brevemente
el botón REV.
Para acceder a una configuración específica de BLUETOOTH,
presione brevemente el botón MENU para visualizar una lista de
configuraciones (BROWSER>REPEAT>SHUFFLE). Use el codifica-
dor para seleccionar la opción a cambiar.
BROWSER
Presione brevemente el botón del codificador para acceder a las
opciones del BROWSER (PLAYLISTS>ARTISTS>ALBUMS>GENRE
S>SONGS>COMPOSERS>AUDIOBOOKS>PODCASTS). El uso de
esta característica permite la búsqueda de pistas o canciones
por tipos de categorías distintas.
REPEAT
Presione brevemente el botón codificador para acceder a las
opciones de de la característica REPEAT (OFF>ONE>ALL). Esta
característica le permite que configure su preferencia en cuanto
a la cantidad de veces que se repetirá una pista o canción.
SHUFFLE
Presione brevemente el botón codificador para acceder a las
opciones de la característica SHUFFLE (OFF>ALL). Esta carac-
terística le permite que configure su preferencia en cuanto a la
reproducción en orden aleatorio de pistas o canciones.
NOTA: Cuando se aparea inicialmente el dispositivo, el volumen
en el dispositivo será aproximadamente la mitad del volumen.
Deberá subir el volumen al máximo en el dispositivo conectado
antes de la configuración del nivel. El dispositivo permanecerá
en el volumen máximo después de la configuración inicial y
cuando se vuelva a aparear con la unidad fuente.
Esta característica le permite controlar la aplicación Pandora®
directamente desde la unidad fuente (los usuarios de Android
deberán usar solamente Bluetooth, los usuarios de iOS pueden
usar ambas, USB y Bluetooth). Tendrá que iniciar la aplicación
Pandora® en su dispositivo, luego debe seleccionar la opción
de fuente de Pandora® en la unidad fuente. Para usar la caracter-
ística “Thumbs Up”, presione prolongadamente el botón SUB+.
Para usar la característica “Thumbs down”, presione prolonga-
damente el botón SUB-.
Para reproducir o pausar una canción, presione brevemente el
botón PLAY/PAUSE.
Para omitir una pista y avanzar, presione brevemente el botón
FWD.
Para acceder a una configuración específica de Pandora®,
presione brevemente el botón MENU para visualizar la lista de
configuraciones (STATIONS>BOOKMARKS>STATIONS MANAGE).
Use el codificador para seleccionar la opción a cambiar.
STATIONS
Para ajustar, presione brevemente el botón del codificador para
tener acceso. Gire el botón del codificador para seleccionar
sus opciones (SHUFFLE>SORT DATE/A-Z>STATIONS). Si se
selecciona la opción SHUFFLE se cambiará aleatoriamente sus
estaciones y seleccionar la característica SORT ordenará sus
estaciones por fecha de agregado o alfabéticamente. Usted tam-
bién puede seleccionar sus estaciones guardadas directamente
de esta lista.
BOOKMARKS
Para BOOKMARK (poner una marca) en un artista o en una
pista que se está reproduciendo, presione brevemente el botón
del codificador para visualizar sus opciones de BOOKMARK
(ARTIST>TRACK). Seleccione la opción que desea usar para
bookmarking (marcar).
Pandora, el logotipo de Pandora, y la decoración comercial
de Pandora son marcas comerciales o marcas registradas de
Pandora Media, LLC. Se ha usado con auorización. Pandora
solamente está disponible en ciertos países. Si desea más
información visite http://www.pandora.com/legal.
Español

17
Español
Síntoma / Asesoramiento Diagnóstico Acción correctiva
Básica
No se enciende la unidad fuente
Fusible quemado
Compruebe el fusible de la unidad cambie por uno
con la calificación correcta.
La ignición del vehículo está
apagada
Si conecta siguiendo las instrucciones, la unidad no
funcionará con la ignición apagada.
El amplificador no está correcta-
mente conectado a tierra
Revise las conexiones y repárelas como sea necesario
Sintonizador de radio
El sintonizador no sintoniza
ninguna estación
No tiene antena o está desco-
nectada o hay una conexión abierta
en el cable
Revise todas las conexiones y repárelas como sea
necesario.
No puede sintonizar estaciones
en el modo seek
Está en un área de señal débil
Asegúrese de que el modo LOC del sintonizador esté
apagado
Dispositivos USB
No se puede insertar el disposi-
tivo USB
Se insertó en dispositivo USB en la
dirección equivocada
Intente reinsertar de nuevo invirtiendo la dirección de
la conexión del dispositivo USB.
El conector del dispositivo USB
está roto
Cambie por un dispositivo USB nuevo
No se reconoció el dispositivo
USB
El dispositivo USB está dañado
Desconecte el dispositivo USB y vuelva a conectar.
Si el dispositivo todavía no se reconoce, pruebe de
reemplazar con un dispositivo USB distinto. USB no
funciona con los dispositivos Android.
Los conectores están sueltos
No se escuchó un sonido y se
muestra el mensaje "No File"
(sin archivo)
No se almacenan archivos MP3/
WMA en el dispositivo USB
Almacene correctamente estos archivos en el disposi-
tivo USB USB no funciona con dispositivos Android.
El sonido salta o es ruidoso
Los archivos MP3/WMA no fueron
creados correctamente.
Use archivos MP3/WMA que estén correctamente
codificados.
Bluetooth
El volumen de la fuente de
Bluetooth es más bajo que las
otras fuentes
Bluetooth desde el dispositivo no
está al volumen máximo
Aumente el volumen del dispositivo al nivel máximo

18
Design-Elemente (Fig. 1)
Drehgeber
Mit diesem Knopf werden Hauptlautstärke, Zonenlautstärke,
Menünavigation und Anpassungen der Einstellungen eingestellt.
MENU-Taste
Langes Drücken der Taste ermöglicht den Zugri auf die Haupt-
einstellungen des Geräts. Kurzes Drücken ermöglicht den Zugri
auf die Einstellungen für die aktive Source.
SRC (Netzschalter)-Taste
Diese Taste ermöglicht das Umschalten zwischen Sources
(kurzes Drücken) und Ein- und Ausschalten des Geräts ON/OFF
(langes Drücken).
SUB-Tasten
Über diese Tasten wird der Subwoofer-Ausgang oder der hintere
Line-out nach oben (UP) oder unten (DOWN) eingestellt (0-20).
PLAY/PAUSE-Taste
Diese Taste für die Musik-Wiedergabe oder Unterbrech-
nung drücken. Diese Taste dient gleichzeitig als MUTE-Taste
(Stummschalttaste), wenn die Source im TUNER-Modus ist.
DIMMER-Taste
Durch Drücken dieser Taste kann man zwischen den zwei Hellig-
keitsstufen des Displays auswählen.
REV/FWD-Taste
Durch kurzes Drücken dieser Taste durch die Kanäle oder Titel
zurück- oder vorspringen. Langes Drücken aktiviert den manuel-
len Suchmodus.
Einstellungen des Source-Geräts
Um auf die Einstellungen des Source-Geräts zuzugreifen,
die MENU-Taste lange drücken, bis die Optionen angezeigt
werden. Den Drehgeber drehen, durch die Liste der Einstel-
lungen blättern und den Drehgeber-Knopf kurz drücken,
um die gewünschte Einstellung auszuwählen und zu
ändern. (BALANCE>FADER>AUDIO>VOLTAGE GAUGE>BT
PAIRING>BEEP>TUNER REGION>SOFTWARE>FACTORY
DEFAULT) (BALANCE>FADER>AUDIO>SPANNU
NSMESSER>BT PAIRING>SIGNALTON>TUNER-
REGION>SOFTWARE>WERKSEINSTELLUNG)
Wenn das Gerät ausgeschaltet ist, ist die Stromaufnahme gleich
Null. Alle Einstellungen und Voreinstellungen werden mit der
Bordbatterie während der Lagerung gespeichert.
BALANCE
Den Drehgeber-Knopf kurz drücken, um auf die BALANCE-
Einstellungen zuzugreifen. Den Drehgeber-Knopf drehen, um die
Ausgang-BALANCE einzustellen.
FADER
Den Drehgeber-Knopf kurz drücken, um auf die FADER-Ein-
stellungen zuzugreifen. Den Drehgeber-Knopf drehen, um den
Ausgang-FADER einzustellen.
AUDIO
Die Option AUDIO in der MENU-Anzeige kurz drücken,
um auf die AUDIO-Einstellungen zuzugreifen. Den Dre-
hgeber drehen, durch die Liste der Einstellungen blät-
tern und den Drehgeber-Knopf kurz drücken, um die
gewünschte Einstellung auszuwählen und zu ändern. (7
BAND EQ>CROSSOVER>PEQ>SOURCE GAIN>INTERNAL
AMPLIFIER) (7 BAND EQ>CROSSOVER>PEQ>SOURCE-
VERSTÄRKUNG>INTERNER VERSTÄRKER)
7 BAND EQ
Den Drehgeber-Knopf kurz drücken, um auf die Einstellungen 7
BAND EQ zuzugreifen. Mit dem Drehgeber durch die EQ-Einstel-
lungen blättern. (FLAT > ROCK > CLASSIC > ACOUSTIC > DANCE
> ELECTRONIC > HIP-HOP > CUSTOM) Bei der Einrichtung von
CUSTOM EQ den Drehgeber-Knopf kurz drücken, um die erste
Frequenz einzustellen. Nach der Aktivierung den Drehgeber
drehen und die Frequenzeinstellungen vornehmen. Den Dreh-
geber-Knopf erneut kurz drücken, um auf die nächste Frequenz
zuzugreifen. Wiederholen, bis alle EQ-Einstellungen vorgenom-
men wurden. Zum Beenden die MENU-Taste kurz drücken und
eine Ebene zurück gehen.
CROSSOVER
Kurz drücken, um auf die CROSSOVER-Einstellungen zuzugrei-
fen. Mit dem Drehgeber die Optionen der CROSSOVER-Zonen
auswählen (FRONT>REAR>SUB) (VORNE>HINTEN>SUB). Den
Drehgeber kurz drücken, um die Crossover-Frequenz einzustel-
len (60Hz>80Hz>120Hz>APF). Zum Beenden MENU kurz drücken
und eine Ebene zurück gehen.
PUNCH EQ
Kurz drücken, um auf die Einstellungen PUNCH EQ zuzugreifen.
Mit dem Drehgeber die Ausgangsverstärkung (0-12) einstel-
len. Zum Beenden MENU kurz drücken und eine Ebene zurück
gehen.
Punch EQ ist ein integrierter Entzerrer mit bis zu +18 dB @ 45 Hz
SOURCE GAIN (Source-Verstärkung)
Zum Einstellen des Levels der Gerät-Eingangsverstärkung
durch die Eingänge (FM TUNER>AM TUNER>WB
TUNER>USB>BLUETOOTH>PANDORA) zum Gerät blättern,
das eingestellt werden soll, und den Drehgeber-Knopf kurz
drücken, um auf die Verstärkungseinstellungen zuzugreifen. Den
Drehgeber-Knopf drehen, um das Verstärkungslevel einzustel-
len. (-3dB > -2dB > -1dB > 0dB > +1dB > +2dB > +3dB)
INTERNAL AMPLIFIER (Interner Verstärker)
Kurz drücken, um auf die Einstellungen INTERNAL AMPLIFIER
zuzugreifen. Mit dem Drehgeber die Optionen auswählen
(ON>OFF). Wenn ein Verstärker für die Stromversorgung der
Lautsprecher verwendet wird, OFF wählen. Wenn die Lautspre-
cher direkt vom Source-Gerät mit Strom versorgt werden, den
INTERNAL AMPLIFIER auf ON einstellen.
VOLTAGE GAUGE (Spannungsmesser)
Zur Ansicht der Fahrzeugspannung den Drehgeber-Knopf auf
der Option VOLTAGE GAUGE kurz drücken.
BT DEVICE PAIRING (BT-Geräte-Kopplung)
Drücken Sie kurz die Encoder-Taste, um auf Optionen
zuzugreifen (DISCOVERABLE> DEVICE).
ENTDECKLICH
Drehen Sie die Encoder-Taste, um auszuwählen, ob die Einheit
für die Paarung erkennbar ist. (ENABLE> DISABLE) Sobald sie
aktiviert ist, ist die Quelleneinheit jetzt erkennbar und bereit
für die Paarung mit Ihrem Gerät. Önen Sie die Bluetooth-
Einstellungen auf Ihrem Gerät, um die Quelleneinheit “Rockford
PMX” zu finden, und wählen Sie.
GERÄT
Wenn Sie DEVICE durch kurzes Drücken der Encodertaste
auswählen, können Sie die Quelleinheit mit bis zu 16 Zeichen
umbenennen. Dadurch haben Sie die Möglichkeit, einen
eindeutigen Namen für eine einfache Identifikation während der
Gerätepaarung zu haben. Drücken Sie kurz die Encoder-Taste,
um den zu ändernden Buchstaben auszuwählen, und drehen
Sie den Regler, um den Wert zu ändern. Wiederholen Sie den
Vorgang, bis der gewünschte Name erreicht ist.
BEEP (Signalton)
Den Drehgeber-Knopf kurz drücken, um auf die BEEP-Optionen
zuzugreifen. Den Drehgeber-Knopf drehen, um den System-
Signalton zu aktivieren (ON) oder deaktivieren (OFF).
TUNER REGION
Den Drehgeber-Knopf kurz drücken, um diese einzustellen. Den
Drehgeber-Knopf drehen, um die bevorzugte TUNER REGION
auszuwählen. (EUROPE > USA > RUSSIA > LATIN > ASIA > JAPAN
> MIDEAST > AUSTRALIA) (EUROPA > USA > RUSSLAN > LATEINA-
MERIKA > ASIEN > JAPAN > NAHOST > AUSTRALIEN)
SOFTWARE
VERSION - Den Drehgeber-Knopf kurz drücken, um die aktuelle
Firmware-Version des Geräts anzuzeigen.
UPDATE (Aktualisieren) - Den Drehgeber-Knopf kurz drücken,
Deutsch

19
um die Firmware zu aktualisieren. Den Anleitungen auf dem
Bildschirm während der Aktualisierung folgen.
THEMA
Zur Einstellung des Thema, drücken Sie kurz die Encoder die
Funktion zuzugreifen. Drehen Sie den Encoder- Taste, um das
gewünschte Thema (Tag, Nacht)
FACTORY DEFAULT (Werkseinstellung)
AUDIO – Den Drehgeber-Knopf kurz drücken, um diese einzustel-
len. Den Drehgeber-Knopf drehen, um YES/NO (Ja/Nein) auszu-
wählen. YES setzt das Gerät auf die Werkseinstellungen zurück.
SYSTEM – Den Drehgeber-Knopf kurz drücken, um diese
einzustellen. Den Drehgeber-Knopf drehen, um YES/NO (Ja/
Nein) auszuwählen. YES setzt das Gerät auf die Werkseinstel-
lungen zurück.
Grundlegende Funktionen
EIN- UND AUSSCHALTEN DES GERÄTS
Die SRC (Netzschalter)-Taste lange drücken, um das Gerät ein-
(ON) oder auszuschalten (OFF).
EINSTELLUNG DER LAUTSTÄRKE
Den Drehgeber-Knopf nach links oder rechts auf die gewünschte
Lautstärke (0-40) drehen. Die aktuelle Lautstärke wird während
der Einstellung angezeigt.
EINSTELLUNG DES SUBWOOFER-AUSGANGS
Die Tasten SUB + oder SUB- drücken, um den Ausgangspegel
einzustellen (0-20).
EINSTELLUNG DER BILDSCHIRM-HELLIGKEIT
Die Taste SCREEN BRIGHTNESS kurz drücken, um die Helligkeit
einzustellen. Es gibt zwei Helligkeitsstufen.
AUSWAHL EINER SOURCE FÜR DIE WIEDERGABE
Die SRC-Taste kurz drücken, um die verschiedenen Source-
Optionen anzuzeigen (FM TUNER>AM TUNER>WB TUNER>US
B>BLUETOOTH>PANDORA>SIRIUSXM). Den Drehgeber-Knopf
verwenden oder die SRC-Taste kurz drücken, um durch die
Sources zu blättern.
Tuner-Bedienung (FM/AM/WB)
Mit dem Drehgeber-Knopf die Tuner-Source wählen, der man
zuhören möchte (FM>AM>WB).
Um Sender AUTOMATISCH ZU SUCHEN, die Tasten FWD und
REV kurz drücken. Um Sender MANUELL ZU SUCHEN, die Tasten
FWD und REV zum Einstellen der gewünschten Frequenz lange
drücken.
Um den TUNER auf MUTE (stumm) einzustellen, die Taste PLAY/
PAUSE kurz drücken.
FM BAND SETTINGS (FM-Band-Einstellungen)
Um auf FM BAND SETTINGS zuzugreifen, bei der Verwend-
ung der Source FM TUNER kurz MENU drücken. Dies gibt
Zugang zu den FM TUNER-spezifischen Einstellungen
(FM>PRESETS>ADD PRESETS>REMOVE PRESETS>AUTO
STORE>LOCAL) (FM>VOREINSTELLUNGEN>VOREINSTELLUNG
EN HINZUFÜGEN>VOREINSTELLUNGEN ENTFERNEN>AUTOM
SPEICHERUNG>ÖRTL).
PRESETS (Voreinstellungen)
Den Drehgeber-Knopf kurz drücken, um auf die PRESETS-Liste
zuzugreifen. Mit dieser Funktion kann angezeigt werden, welche
PRESETS auf dem Gerät gespeichert sind.
ADD PRESETS (Voreinstellungen hinzufügen)
Den Drehgeber-Knopf kurz drücken, um auf die Option ADD
PRESETS zuzugreifen. Es muss sowohl der Sender als auch
die PRESET-Gruppe angezeigt sein, die man zuerst hinzufügen
möchte (FM1>FM2>FM3). Mit dieser Funktion kann man Sender
auf dem Gerät speichern. Nach der Auswahl mit dem Drehgeber
die PRESET-Nummer (1-6) wählen, auf der der Sender ges-
peichert werden soll.
REMOVE PRESETS (Voreinstellungen entfernen)
Den Drehgeber-Knopf kurz drücken, um auf die Option REMOVE
PRESETS zuzugreifen. Es muss die PRESET-Gruppe angezeigt
sein, die man zuerst einstellen möchte (FM1>FM2>FM3). Mit
dieser Funktion kann man gespeicherte Sender auf dem Gerät
entfernen. Nach der Auswahl mit dem Drehgeber die PRESET-
Nummer (1-6) des Senders wählen, der entfernt werden soll.
FM
Den Drehgeber-Knopf kurz drücken, um auf die Optionen
FM PRESET (FM1>FM2>FM3) zuzugreifen. Mit dieser Funktion
ist es möglich, getrennte Gruppen Tuner-Voreinstellungen
zur Auswahl zu haben. Mit dem Drehgeber-Knopf durch die
TUNER-Gruppen blättern und kurz drücken, um die Gruppe
auszuwählen.
AUTO STORE (Automatische Speicherung)
Den Drehgeber-Knopf kurz drücken, um auf die Funktion AUTO
STORE zuzugreifen. Es muss die PRESET-Gruppe angezeigt
sein, die man zuerst einstellen möchte (FM1>FM2>FM3). Diese
Funktion speichert die Voreinstellungen automatisch auf dem
Gerät. Sie stoppt, wenn die Voreinstellungen 1-6 eingestellt sind.
Die nächste PRESET-Gruppe wählen und wiederholen, um die
nächste Serie einzustellen.
LOCAL (Örtlich)
Den Drehgeber-Knopf kurz drücken, um auf die LOCAL-Optionen
zuzugreifen. Nach der Auswahl mit dem Drehgeber ON oder
OFF auswählen. Die LOCAL-Option stellt sich auf Radiosender
in der Nähe ein, die ausreichend starke Signale für einen guten
Empfang haben. In Gebieten mit schlechtem Empfang kann
das Gerät durch Auswahl von Ferneinstellung weiter entfernt
gelegene Sender einstellen. Ferneinstellung ist der Standard.
AM BAND SETTINGS (AM-Band-Einstellungen)
Um auf AM BAND SETTINGS zuzugreifen, bei der Verwend-
ung der Source AM TUNER kurz MENU drücken. Dies gibt
Zugang zu den AM TUNER-spezifischen Einstellungen
(AM>PRESETS>ADD PRESETS>REMOVE PRESETS>AUTO
STORE>LOCAL) (AM>VOREINSTELLUNGEN>VOREINSTELLUNG
EN HINZUFÜGEN>VOREINSTELLUNGEN ENTFERNEN>AUTOM
SPEICHERUNG>ÖRTL).
PRESETS (Voreinstellungen)
Den Drehgeber-Knopf kurz drücken, um auf die PRESETS-Liste
zuzugreifen. Mit dieser Funktion kann angezeigt werden, welche
PRESETS auf dem Gerät gespeichert sind.
ADD PRESETS (Voreinstellungen hinzufügen)
Den Drehgeber-Knopf kurz drücken, um auf die Option ADD
PRESETS zuzugreifen. Es muss sowohl der Sender als auch
die PRESET-Gruppe angezeigt sein, die man zuerst hinzufügen
möchte (AM1>AM2). Mit dieser Funktion kann man Sender auf
dem Gerät speichern. Nach der Auswahl mit dem Drehgeber die
PRESET-Nummer (1-6) wählen, auf der der Sender gespeichert
werden soll.
REMOVE PRESETS (Voreinstellungen entfernen)
Den Drehgeber-Knopf kurz drücken, um auf die Option REMOVE
PRESETS zuzugreifen. Es muss die PRESET-Gruppe angezeigt
sein, die man zuerst einstellen möchte (AM1>AM2). Mit dieser
Funktion kann man gespeicherte Sender auf dem Gerät entfern-
en. Nach der Auswahl mit dem Drehgeber die PRESET-Nummer
(1-6) des Senders wählen, der entfernt werden soll.
AM
Den Drehgeber-Knopf kurz drücken, um auf die Optionen
FM PRESET (AM1>AM2) zuzugreifen. Mit dieser Funktion ist
es möglich, getrennte Gruppen Tuner-Voreinstellungen zur
Auswahl zu haben. Mit dem Drehgeber-Knopf durch die
TUNER-Gruppen blättern und kurz drücken, um die Gruppe
auszuwählen.
AUTO STORE (Automatische Speicherung)
Den Drehgeber-Knopf kurz drücken, um auf die Funktion AUTO
STORE zuzugreifen. Es muss die PRESET-Gruppe angezeigt sein,
die man zuerst einstellen möchte (AM1>AM2). Diese Funktion
speichert die Voreinstellungen automatisch auf dem Gerät. Sie
stoppt, wenn die Voreinstellungen 1-6 eingestellt sind. Die näch-
ste PRESET-Gruppe wählen und wiederholen, um die nächste
Deutsch

20
Serie einzustellen.
LOCAL (Örtlich)
Den Drehgeber-Knopf kurz drücken, um auf die LOCAL-Optionen
zuzugreifen. Nach der Auswahl mit dem Drehgeber ON oder
OFF auswählen. Die LOCAL-Option stellt sich auf Radiosender
in der Nähe ein, die ausreichend starke Signale für einen guten
Empfang haben. In Gebieten mit schlechtem Empfang kann
das Gerät durch Auswahl von Ferneinstellung weiter entfernt
gelegene Sender einstellen. Ferneinstellung ist der Standard.
WB BAND SETTINGS (WB-Band-Einstellungen)
Um auf WB BAND SETTINGS zuzugreifen, bei der Verwendung
der Source WB TUNER kurz MENU drücken. Dies gibt Zugang zu
den WB TUNER-spezifischen Einstellungen (WB>PRESETS>ADD
PRESETS>REMOVE PRESETS) (WB>VOREINSTELLUNGEN>
VOREINSTELLUNGEN HINZUFÜGEN>VOREINSTELLUNGEN
ENTFERNEN).
PRESETS (Voreinstellungen)
Den Drehgeber-Knopf kurz drücken, um auf die PRESETS-Liste
zuzugreifen. Mit dieser Funktion kann angezeigt werden, welche
PRESETS auf dem Gerät gespeichert sind.
ADD PRESETS (Voreinstellungen hinzufügen)
Den Drehgeber-Knopf kurz drücken, um auf die Option ADD
PRESETS zuzugreifen. Es muss der Sender angezeigt sein,
den man zuerst hinzufügen möchte. Mit dieser Funktion kann
man Sender auf dem Gerät speichern. Nach der Auswahl mit
dem Drehgeber die PRESET-Nummer (1-6) wählen, auf der der
Sender gespeichert werden soll.
REMOVE PRESETS (Voreinstellungen entfernen)
Den Drehgeber-Knopf kurz drücken, um auf die Option REMOVE
PRESETS zuzugreifen. Es muss die PRESET-Gruppe angezeigt
sein, die man zuerst einstellen möchte (AM1>AM2). Mit dieser
Funktion kann man gespeicherte Sender auf dem Gerät entfern-
en. Nach der Auswahl mit dem Drehgeber die PRESET-Nummer
(1-6) des Senders wählen, der entfernt werden soll.
USB (iPod)-Betrieb
Nachdem das Gerät an das Source-Gerät angeschlossen ist,
kann über diese Funktion die Wiedergabe vom Gerät direkt über
das Source-Gerät gesteuert werden. USB-Source-Option auf
dem Source-Gerät wählen.
Für die Wiedergabe oder Pause eines Songs die Taste PLAY/
PAUSE kurz drücken.
Um einen Track vorwärts zu springen, die FWD-Taste kurz
drücken. Um einen Track rückwärts zu springen, die REV-Taste
kurz drücken.
Für den Zugang zu spezifischen USB-Einstellungen
die MENU-Taste für die Liste der Einstellungen
(BROWSER>REPEAT>SHUFFLE) kurz drücken. Mit dem Drehge-
ber die zu ändernde Option wählen.
BROWSER
Den Drehgeber-Knopf kurz drücken, um auf die BROWSER-
Optionen zuzugreifen (PLAYLISTS>ARTISTS>ALBUMS>GENRES>
SONGS>COMPOSERS>AUDIOBOOKS>PODCASTS) (Wiedergabeli
sten>Künstler>Alben>Genres>Songs>Komponisten>Audiobüch
er>Podcasts). Mit dieser Funktion können Titel oder Songs nach
verschiedenen Typen von Kategorien durchsucht werden.
REPEAT (Wiederholen)
Den Drehgeber-Knopf kurz drücken, um auf die Optionen
REPEAT (OFF>ONE>ALL) (EIN>EINE>ALLE) zuzugreifen.
SHUFFLE
Den Drehgeber-Knopf kurz drücken, um auf die Option SHUFFLE
(OFF>ALL) (EIN>ALLE) zuzugreifen. Mit dieser Funktion kann die
Shule-Präferenz für Titel oder Songs eingestellt werden.
HINWEIS: Bei Verwendung eines USB-Verlängerungskabels
muss es sich um ein Rockford Fosgate-Netzkabel handeln. Der
maximale Abstand für das Kabel beträgt 33 Fuß (10 Meter).
Bluetooth® -Betrieb
Nachdem das Gerät an das Source-Gerät gekoppelt ist, kann
über diese Funktion die Wiedergabe vom Gerät direkt über das
Source-Gerät gesteuert werden. BLUETOOTH-Source-Option auf
dem Source-Gerät wählen.
Für die Wiedergabe oder Pause eines Songs die Taste PLAY/
PAUSE kurz drücken.
Um einen Track vorwärts zu springen, die FWD-Taste kurz
drücken. Um einen Track rückwärts zu springen, die REV-Taste
kurz drücken.
Für den Zugang zu spezifischen BLUETOOTH-Einstel-
lungen die MENU-Taste für die Liste der Einstellungen
(BROWSER>REPEAT>SHUFFLE) kurz drücken. Mit dem Drehge-
ber die zu ändernde Option wählen.
BROWSER
Den Drehgeber-Knopf kurz drücken, um auf die BROWSER-
Optionen zuzugreifen (PLAYLISTS>ARTISTS>ALBUMS>GENRES>
SONGS>COMPOSERS>AUDIOBOOKS>PODCASTS) (Wiedergabeli
sten>Künstler>Alben>Genres>Songs>Komponisten>Audiobüch
er>Podcasts). Mit dieser Funktion können Titel oder Songs nach
verschiedenen Typen von Kategorien durchsucht werden.
REPEAT (Wiederholen)
Den Drehgeber-Knopf kurz drücken, um auf die Optionen RE-
PEAT (OFF>ONE>ALL) (EIN>EINE>ALLE) zuzugreifen. Mit dieser
Funktion kann die Präferenz für die Anzahl der Wiederholung
von Titeln oder Songs eingestellt werden.
SHUFFLE
Den Drehgeber-Knopf kurz drücken, um auf die Option SHUFFLE
(OFF>ALL) (EIN>ALLE) zuzugreifen. Mit dieser Funktion kann die
Shule-Präferenz für Titel oder Songs eingestellt werden.
HINWEIS: Nach der ersten Kopplung des Geräts wird die
Lautstärke des Geräts auf circa die Häle eingestellt sein. Die
Lautstärke auf dem verbundenen Gerät muss vor der Einstellung
der Lautstärke ganz hochgedreht werden. Das Gerät bleibt auf
der maximalen Lautstärke nach der Anfangseinstellung und bei
einer erneuten Kopplung mit dem Source-Gerät.
Mit dieser Funktion kann die App Pandora® direkt vom Source-
Gerät gesteuert werden (Android-Nutzer können nur Bluetooth
wählen, iOS-Nutzer können USB und Bluetooth wählen). Zuerst
die App Pandora® auf dem Gerät starten, und anschließend die
Source-Option Pandora® auf dem Source-Gerät wählen. Für die
Funktion “Daumen nach oben” die Taste SUB+ lange drücken.
Für die Funktion “Daumen nach unten” die Taste SUB- lange
drücken.
Für die Wiedergabe oder Pause eines Songs die Taste PLAY/
PAUSE kurz drücken.
Um einen Track vorwärts zu springen, die FWD-Taste kurz
drücken.
Für den Zugang zu spezifischen Pandora®-Einstellungen
die MENU-Taste für die Liste der Einstellungen
(STATIONS>BOOKMARKS>STATIONS MANAGE)
(SENDER>LESEZEICHEN>SENDER MANAGEN) kurz drücken. Mit
dem Drehgeber die zu ändernde Option wählen.
SENDER
Den Drehgeber-Knopf kurz drücken, um diese einzustellen.
Den Drehgeber-Knopf drehen, um die Optionen zu wählen
(SHUFFLE>DATUM/A-Z SORTIEREN>SENDER). Die Auswahl
der SHUFFLE-Option verwendet die zufällige Wiedergabe
von Sendern, und die Auswahl der SORT-Funktion sortiert die
Stationen nach hinzugefügtem Datum oder alphabetisch. Die
gespeicherten Sender können auch dieser aus dieser Liste
gewählt werden.
BOOKMARKS (LESEZEICHEN)
Um einem Künstler oder Titel in der Wiedergabe ein
BOOKMARK hinzuzufügen, den Drehgeber-Knopf drehen,
um die BOOKMARK-Optionen anzuzeigen (ARTIST>TRACK)
(KÜNSTLER>TITEL). Die für das Lesezeichen gewünschte Option
auswählen.
Deutsch

21
Pandora, das Pandora-Logo und die Pandora-Handelsform sind
Marken oder eingetragene Marken von Pandora Media, LLC.
Mit Genehmigung verwendet. Pandora ist nur in bestimmten
Ländern verfügbar. Für weitere Informationen siehe http://www.
pandora.com/legal.
Deutsch
Symptom / Beschreibung Diagnose Lösung
Grund
Source-Gerät kann nicht einge-
schaltet werden.
Sicherung durchgebrannt
Die Sicherung des Geräts prüfen und ggf mit der richti-
gen Stärke ersetzen.
Zündung des Fahrzeugs ist aus-
gestellt.
Falls nach den Anleitungen angeschlossen wird das
Gerät bei ausgeschalteter Zündung nicht funktion-
ieren.
Das Gerät ist nicht ordnungsgemäß
gesichert
Die Kabel prüfen und ggf. reparieren.
Radio Tuner
Tuner kann keine Sender
einstellen
Keine Antenne oder unterbrochene
oder oene Kabelverbindung
Alle Verbindungen prüfen und ggf. reparieren.
Sender im Such-Modus nicht
einstellbar
Man befindet sich in einem Gebiet
mit schwachem Signal
Sicherstellen, dass der Tuner-Modus LOC deaktiviert
ist.
USB-Geräte
USB-Gerät kann nicht eingeführt
werden
Das USB-Gerät wurde in der
falschen Richtung eingeführt
Nach Umkehrung der Verbindungsrichtung des USB-
Geräts Einführung nochmals versuchen.
Der USB-Geräteanschluss ist
beschädigt
Durch ein neues USB-Gerät ersetzen.
USB-Gerät wird nicht erkannt
Das USB-Gerät ist beschädigt
Das USB-Gerät trennen und neu anschließen. Wenn
das Gerät trotzdem nicht erkannt wird, es mit einem
anderen USB-Gerät ersetzen. USB funktioniert nicht
mit Android-Geräten.
Anschlüsse sind lose
Kein Ton hörbar mit der Display-
Anzeige "No File"
Keine MP3/WMA-Dateien auf dem
USB-Gerät gespeichert
Diese Dateien korrekt auf dem USB-Gerät speichern.
USB funktioniert nicht mit Android-Geräten.
Tonsprünge oder Geräusche
MP3/WMA-Dateien wurden nicht
korrekt erstellt
Korrekt erstellte MP3/WMA-Dateien verwenden.
Bluetooth
Bluetooth-Source-Lautstärke ist
niedriger als andere Sources
Bluetooth vom Gerät ist nicht auf
der maximalen Lautstärke
Lautstärke auf dem Gerät auf maximale Lautstärke
einstellen

22
Caratteristiche del design
Encoder rotativo
La manopola regola il volume principale, i volumi delle zone, lo
spostamento nei menu e la regolazione delle impostazioni.
Pulsante MENU
Premendo a lungo questo pulsante si accede alle impostazioni
principali dell’unità. Premendo brevemente si accede alle
impostazioni per la fonte attiva.
Pulsante SRC (Alimentazione)
Questo pulsante consente di scegliere la fonte (premendo ve-
locemente) e accendere l’unità ON e spegnerla OFF (premendo
a lungo).
Pulsanti SUB
Questi pulsanti regolano l’uscita del subwoofer o della linea di
uscita posteriore SÙ o GIÙ (0-20).
Pulsante PLAY / PAUSE (Riproduzione/Pausa)
Premere questo pulsante per riprodurre o sospendere la musica.
Questo pulsante ha anche la funzione MUTE per la disattivazi-
one dell’audio quando la fonte è nella modalità TUNER.
Pulsante DIMMER (reostato)
Questo pulsante consente di selezionare uno dei due valori di
luminosità del display.
Pulsante REV / FWD (inversione / avanzamento)
Usare questo pulsante per saltare al canale o brano precedente
o successivo premendo brevemente. Premendo a lungo si attiva
la modalità di ricerca manuale.
Impostazioni dell’unità di fonte
Per accedere alle impostazioni dell’unità di fonte
premere a lungo il pulsante MENU fino a visualiz-
zare le opzioni. Ruotare l’encorder per scorrere attraverso
l’elenco delle impostazioni e premere velocemente per
selezionare l’impostazione che si desidera modifi-
care. (BALANCE>FADER>AUDIO>VOLTAGE GAUGE>BT
PAIRING>BEEP>TUNER REGION>SOFTWARE>FACTORY
DEFAULT) (BILANCIAMENTO>ATTENUATORE>AUDIO>CALIBRO
TENSIONE>APPAIAMENTO BT>SEGNALE ACUSTICO>REGIONE
TUNER>SOFTWARE>IMPOSTAZIONI PREDEFINITE)
Questa unità di fonte ha una potenza assorbita uguale a zero
quando l’unità è spenta. Tutte le impostazioni e le impostazioni
predefinite saranno salvate con la batteria dell’imbarcazione
durante l’immagazzinaggio.
BALANCE (BILANCIAMENTO)
Premere brevemente il pulsante dell’encoder per accedere alle
impostazioni per il regolamento di BALANCE. Ruotare il pulsante
dell’encoder per impostare il bilanciamento dell’output.
FADER (ATTENUATORE)
Premere brevemente il pulsante dell’encoder per accedere alle
impostazioni per il regolamento del FADER. Ruotare il pulsante
dell’encoder per impostare il FADER dell’output.
AUDIO
Per accedere alle impostazioni AUDIO premere brevemente
l’opzione AUDIO dalla schermata MENU. Ruotare l’encorder per
scorrere attraverso l’elenco delle impostazioni e premere velo-
cemente per selezionare l’impostazione che si desidera modifi-
care. (7 BAND EQ>CROSSOVER>PEQ>SOURCE GAIN>INTERNAL
AMPLIFIER) (EQ 7 BANDE>CROSSOVER>PEQ>GUADAGNO
FONTE>AMPLIFICATORE INTERNO)
7 BAND EQ (EQ 7 BANDE)
Premere brevemente il pulsante dell’encoder per accedere
alle impostazioni per 7 BAND EQ. Usare l’encoder rotativo per
scorrere attraverso le impostazioni EQ. (FLAT > ROCK > CLASSIC
> ACOUSTIC > DANCE > ELECTRONIC > HIP-HOP > CUSTOM)
Per impostare CUSTOM EQ, premere brevemente il pulsante
dell’encoder e impostare la prima frequenza. Una volta attivata,
ruotare l’encoder per regolare le impostazioni della frequenza.
Premere brevemente di nuovo il pulsante dell’encoder per ac-
cedere alla prossima frequenza. Ripetere fino a quando tutte le
impostazioni EQ sono state completate. Premere brevemente il
pulsante MENU per uscire e tornare indietro di un livello.
CROSSOVER
Premere brevemente per accedere alle impostazioni CROSS-
OVER. Usare l’encoder rotativo per selezionare le opzioni zona
CROSSOVER (FRONT>REAR>SUB) (ANTER>POST>SUB). Premere
brevemente l’encoder per regolare la frequenza del crossover
(60Hz>80Hz>120Hz>APF). Premere brevemente il pulsante
MENU per uscire e tornare indietro di un livello.
SOURCE GAIN (Guadagno fonte)
Per regolare il livello del guadagno dell’ingresso del disposi-
tivo scorrere attraverso gli input (FM TUNER>AM TUNER>WB
TUNER>USB>BLUETOOTH>PANDORA) fino al dispositivo che si
desidera regolare, premere brevemente il pulsante dell’encoder
per accedere alle impostazioni del guadagno. Ruotare il pul-
sante dell’encoder per impostare il livello di guadagno. (-3dB >
-2dB > -1dB > 0dB > +1dB > +2dB > +3dB)
INTERNAL AMPLIFIER (Amplificatore interno)
Premere brevemente per accedere alle opzioni INTERNAL
AMPLIFIER. Usare l’encoder rotativo per selezionare le opzioni
(ON>OFF) (Acceso>Spento). Quando si usa un amplificatore per
alimentare gli altoparlanti selezionare OFF. Se gli altoparlanti
sono alimentati direttamente dall’unità di fonte, impostare
l’INTERNAL AMPLIFIER su ON.
VOLTAGE GAUGE (Calibro tensione)
Per visualizzare il voltaggio del veicolo, premere brevemente il
pulsante dell’encoder sull’opzione VOLTAGE GAUGE.
BT DEVICE PAIRING (Appaiamento dispositivo BT)
Premere brevemente il pulsante codificatore per accedere alle
opzioni (RILEVABILE> dispositivo).
SCOPRIBILE
Ruotare il pulsante codificatore per selezionare se l’unità è
rilevabile per l’accoppiamento. (ABILITA> DISABILITA) Una
volta attivato, l’unità sorgente è ora rilevabile e pronto per
l’accoppiamento con il dispositivo. Aprire le impostazioni Blue-
tooth sul dispositivo per trovare l’unità sorgente con l’etichetta
“Rockford PMX” e selezionare.
DISPOSITIVO
Selezione dispositivo premendo brevemente il pulsante codifi-
catore vi permetterà di rinominare l’unità sorgente con un mas-
simo di 16 caratteri. Questo ti dà la possibilità di avere un nome
univoco per una facile identificazione durante l’accoppiamento
del dispositivo. Premere brevemente il pulsante codificatore per
selezionare la lettera da modificare e ruotare la manopola per
modificare il valore. si raggiunge Ripetere procedura fino nome
desiderato.
BEEP (Segnale acustico)
Premere brevemente il pulsante dell’encoder per accedere alle
opzioni BEEP. Ruotare il pulsante dell’encoder per accendere ON
o spegnere OFF il segnale acustico del sistema.
TUNER REGION (Regione tuner)
Per regolare premere brevemente il pulsante dell’encoder e
accedere. Ruotare il pulsante dell’encoder per selezionare la
TUNER REGION preferita. (EUROPE > USA > RUSSIA > LATIN >
ASIA > JAPAN > MIDEAST > AUSTRALIA) (EUROPA > USA > RUSSIA
> AMERICA LATINA > ASIA > GIAPPONE > MEDIO ORIENTE >
AUSTRALIA)
SOFTWARE
VERSION - Premere brevemente il pulsante dell’encoder per
visualizzare la versione firmware dell’unità.
UPDATE - Premere brevemente il pulsante dell’encoder per ag-
giornare il firmware. Seguire le istruzioni sullo schermo durante
l’aggiornamento.
TEMA
Per regolare il tema premere brevemente l’encoder per accedere
alla funzione . Ruotare il pulsante encoder per selezionare il
Italiano

23
Italiano
tema desiderato ( giorno, notte , AUTO)
FACTORY DEFAULT (Impostazioni predefinite)
AUDIO – Per accedere premere brevemente il pulsante
dell’encoder. Ruotare il pulsante dell’encoder per selezionare
YES/NO (Sì/No). Selezionando YES l’unità verrà reimpostata alle
impostazioni predefinite.
SYSTEM - Per accedere premere brevemente il pulsante
dell’encoder. Ruotare il pulsante dell’encoder per selezionare
YES/NO (Sì/No). Selezionando YES l’unità verrà reimpostata alle
impostazioni predefinite.
Funzionamento di base
ACCENDERE E SPEGNERE L’UNITÀ ON/OFF
Premere a lungo il pulsante SRC (alimentazione) per accendere
ON o spegnere OFF l’unità.
REGOLARE IL VOLUME
Ruotare la manopola dell’encoder verso sinistra o verso destra
per selezionare il livello di volume desiderato (0-40). Il livello di
volume attuale è visualizzato durante il regolamento.
REGOLARE L’USCITA DEL SUBWOOFER
Premere i pulsanti SUB+ o SUB- per regolare il livello di uscita
(0-20).
REGOLARE LA LUMINOSITÀ DELLO SCHERMO
Premere brevemente il pulsante SCREEN BRIGHTNESS per rego-
lare il livello di luminosità. Ci sono due livelli di luminosità.
SELEZIONARE UNA FONTE PER LA RIPRODUZIONE
Premere brevemente il pulsante SRC per visualizzare le varie fonti
(FM TUNER>AM TUNER>WB TUNER>USB>BLUETOOTH>PANDO
RA>SIRIUSXM). Usare l’encoder rotativo o premere brevemente il
pulsante SRC per scorrere attraverso le fonti.
Funzionamento del tuner (FM/AM/WB)
Per il funzionamento usare l’encoder rotativo per selezionare la
fonte tuner che si desidera ascoltare (FM/AM/WB).
Per LA RICERCA AUTOMATICA delle stazioni, premere i pulsanti
FWD (avanzamento) e REV (inversione). Per LA RICERCA MANUALE
delle stazioni, premere a lungo i pulsanti FWD (avanzamento) e
REV (inversione) per sintonizzare la frequenza desiderata.
Per disattivare l’audio MUTE del TUNER, premere brevemente il
pulsante PLAY/PAUSE (Riproduzione/Pausa).
IMPOSTAZIONI DELLA BANDA FM
Per accedere alle impostazioni della banda FM BAND SET-
TINGS, premere brevemente il MENU durante l’uso della fonte
FM TUNER. Questo da accesso alle impostazioni specifiche
del FM TUNER (FM>PRESETS>ADD PRESETS>REMOVE
PRESETS>AUTO STORE>LOCAL) (FM>PREDEFINITI>AGGIUNGI
PREDEFINITI>RIMUOVI PREDEFINITI>SALVATAGGIO
AUTOM>LOCALE).
PRESETS (Predefiniti)
Premere brevemente il pulsante dell’encoder per accedere
all’elenco PRESETS. Questa funzione consente di visualizzare i
PRESETS salvati sull’unità.
ADD PRESETS (Aggiungi predefiniti)
Premere brevemente il pulsante dell’encoder sull’opzione ADD
PRESETS. Bisogna essere sia sulla stazione sia sul gruppo PRESET
che si desidera aggiungere prima (FM1>FM2>FM3). Questa funzi-
one consente di salvare le stazioni sull’unità. Dopo la selezione
usare l’encoder rotativo per selezionare il numero PRESET (1-6)
sul quale si desidera salvare la stazione.
REMOVE PRESETS (Rimuovi predefiniti)
Premere brevemente il pulsante dell’encoder sull’opzione
REMOVE PRESETS. Bisogna essere sul gruppo PRESET che si de-
sidera regolare prima (FM1>FM2>FM3). Questa funzione consente
di rimuovere le stazioni salvate sull’unità. Dopo la selezione usare
l’encoder rotativo per selezionare il numero PRESET (1-6) della
stazione che si desidera rimuovere.
FM
Premere brevemente il pulsante dell’encoder per accedere alle
opzioni FM PRESET (FM1>FM2>FM3). Questa funzione consente
di avere gruppi predefiniti distinti del tuner dai quali selezionare.
Usare il pulsante dell’encoder rotativo per scorrere attraverso i
gruppi TUNER, e premere brevemente per selezionare il gruppo.
AUTO STORE (Salvataggio automatico)
Premere brevemente il pulsante dell’encoder per accedere alla
funzione AUTO STORE. Bisogna essere sul gruppo PRESET che
si desidera regolare prima (FM1>FM2>FM3). Questa funzione
salva automaticamente i predefiniti sull’unità. Si ferma quando
i predefiniti 1-6 sono impostati. Selezionare il prossimo gruppo
PRESET e ripetere per completare il prossimo set.
LOCAL (Locale)
Premere brevemente il pulsante dell’encoder per accedere
alle opzioni LOCAL. Dopo la selezione usare l’encoder rotativo
per selezionare ON o OFF. L’opzione locale sintonizza sulle
stazioni radio vicine con segnali suicientemente forti per una
buona ricezione. In zone con una scarsa ricezione cambiando
alla sintonizzazione a distanza consente all’unità di sintoniz-
zarsi su stazioni più distanti. La sintonizzazione a distanza è
l’impostazione predefinita.
IMPOSTAZIONI DELLA BANDA AM
Per accedere alle impostazioni della banda AM BAND SET-
TINGS, premere brevemente il MENU durante l’uso della fonte
AM TUNER. Questo da accesso alle impostazioni specifiche
del AM TUNER (AM>PRESETS>ADD PRESETS>REMOVE
PRESETS>AUTO STORE>LOCAL) (AM>PREDEFINITI>AGGIUNGI
PREDEFINITI>RIMUOVI PREDEFINITI>SALVATAGGIO
AUTOM>LOCALE).
PRESETS (Predefiniti)
Premere brevemente il pulsante dell’encoder per accedere
all’elenco PRESETS. Questa funzione consente di visualizzare i
PRESETS salvati sull’unità.
ADD PRESETS (Aggiungi predefiniti)
Premere brevemente il pulsante dell’encoder sull’opzione ADD
PRESETS. Bisogna essere sia sulla stazione sia sul gruppo PRESET
che si desidera aggiungere prima (AM1>AM2). Questa funzione
consente di salvare le stazioni sull’unità. Dopo la selezione usare
l’encoder rotativo per selezionare il numero PRESET (1-6) sul
quale si desidera salvare la stazione.
REMOVE PRESETS (Rimuovi predefiniti)
Premere brevemente il pulsante dell’encoder sull’opzione
REMOVE PRESETS. Bisogna essere sul gruppo PRESET che si
desidera regolare prima (AM1>AM2). Questa funzione consente di
rimuovere le stazioni salvate sull’unità. Dopo la selezione usare
l’encoder rotativo per selezionare il numero PRESET (1-6) della
stazione che si desidera rimuovere.
AM
Premere brevemente il pulsante dell’encoder per accedere alle
opzioni FM PRESET (AM1>AM2). Questa funzione consente di
avere gruppi predefiniti separati del tuner dai quali selezionare.
Usare il pulsante dell’encoder rotativo per scorrere attraverso i
gruppi TUNER, e premere brevemente per selezionare il gruppo.
AUTO STORE (Salvataggio automatico)
Premere brevemente il pulsante dell’encoder per accedere alla
funzione AUTO STORE. Bisogna essere sul gruppo PRESET che si
desidera regolare prima (AM1>AM2). Questa funzione salva auto-
maticamente i predefiniti sull’unità. Si ferma quando i predefiniti
1-6 sono impostati. Selezionare il prossimo gruppo PRESET e
ripetere per completare il prossimo set.
LOCAL (Locale)
Premere brevemente il pulsante dell’encoder per accedere
alle opzioni LOCAL. Dopo la selezione usare l’encoder rotativo
per selezionare ON o OFF. L’opzione locale sintonizza sulle
stazioni radio vicine con segnali suicientemente forti per una
buona ricezione. In zone con una scarsa ricezione cambiando
alla sintonizzazione a distanza consente all’unità di sintoniz-
zarsi su stazioni più distanti. La sintonizzazione a distanza è
l’impostazione predefinita.

24
Italiano
IMPOSTAZIONI DELLA BANDA WB
Per accedere alle impostazioni della banda WB BAND SET-
TINGS, premere brevemente il MENU durante l’uso della fonte
WB TUNER. Questo da accesso alle impostazioni specifiche
del WB TUNER (PRESETS>ADD PRESETS>REMOVE PRESETS)
(PREDEFINITI>AGGIUNGI PREDEFINITI>RIMUOVI PREDEFINITI).
PRESETS (Predefiniti)
Premere brevemente il pulsante dell’encoder per accedere
all’elenco PRESETS. Questa funzione consente di visualizzare i
PRESETS salvati sull’unità.
ADD PRESETS (Aggiungi predefiniti)
Premere brevemente il pulsante dell’encoder sull’opzione ADD
PRESETS. Bisogna essere sia sulla stazione sia sul gruppo PRESET
che si desidera aggiungere prima. Questa funzione consente di
salvare le stazioni sull’unità. Dopo la selezione usare l’encoder
rotativo per selezionare il numero PRESET (1-6) sul quale si
desidera salvare la stazione.
REMOVE PRESETS (Rimuovi predefiniti)
Premere brevemente il pulsante dell’encoder sull’opzione
REMOVE PRESETS. Bisogna essere sul gruppo PRESET che si
desidera regolare prima (AM1>AM2). Questa funzione consente di
rimuovere le stazioni salvate sull’unità. Dopo la selezione usare
l’encoder rotativo per selezionare il numero PRESET (1-6) della
stazione che si desidera rimuovere.
Funzionamento USB (iPod)
Dopo avere collegato il dispositivo all’unità di fonte, questa
funzione consente di controllare la riproduzione dal dispositivo
direttamente dall’unità. Selezionare l’opzione fonte USB sull’unità
di fonte.
Per riprodurre o sospendere un brano, premere brevemente il
pulsante PLAY/PAUSE.
Per saltare avanti di un brano, premere brevemente il pulsante
FWD. Per saltare indietro di un brano, premere brevemente il
pulsante REV.
Per accedere alle impostazioni specifiche USB, pre-
mere brevemente il pulsante MENU per l’elenco
delle impostazioni (BROWSER>REPEAT>SHUFFLE)
(BROWSER>RIPETI>RIPRODUZIONE CASUALE). Usare l’encoder
per selezionare l’opzione da modificare.
BROWSER
Premere brevemente il pulsante dell’encoder per accedere alle
opzioni BROWSER (PLAYLISTS>ARTISTS>ALBUMS>GENRES>SON
GS>COMPOSERS>AUDIOBOOKS>PODCASTS) (Playlist>Artisti>A
lbum>Generi>Brani>Compositori>Libri audio>Podcast). Questa
funzione consente di ricercare tracce o brani in base a vari tipi di
categoria.
REPEAT (Ripeti)
Premere brevemente il pulsante dell’encoder per acce-
dere alle opzioni della funzione REPEAT (OFF>ONE>ALL)
(DISATTIVA>UNO>TUTTI).
SHUFFLE (Riproduzione casuale)
Premere brevemente il pulsante dell’encoder per acce-
dere alle opzioni della funzione SHUFFLE (OFF>ONE>ALL)
(DISATTIVA>TUTTI). Questa funzione consente di impostare le
preferenze riguardo la riproduzione casuale di tracce o brani.
SHUFFLE (Riproduzione casuale)
Premere brevemente il pulsante dell’encoder per acce-
dere alle opzioni della funzione SHUFFLE (OFF>ONE>ALL)
(DISATTIVA>TUTTI). Questa funzione consente di impostare le
preferenze riguardo la riproduzione casuale di tracce o brani.
NOTA: Se si utilizza un cavo di prolunga USB, deve essere un cavo
di prolunga alimentato Rockford Fosgate. La distanza massima
per il cavo è di 33 piedi (10 metri).
Funzionamento Bluetooth®
Dopo avere eettuato il pairing del dispositivo con l’unità di
fonte, questa funzione consente di controllare la riproduzione dal
dispositivo direttamente dall’unità. Selezionare l’opzione fonte
BLUETOOTH sull’unità di fonte.
Per riprodurre o sospendere un brano, premere brevemente il
pulsante PLAY/PAUSE.
Per saltare avanti di un brano, premere brevemente il pulsante
FWD. Per saltare indietro di un brano, premere brevemente il
pulsante REV.
Per accedere alle impostazioni specifiche BLUETOOTH,
premere brevemente il pulsante MENU per l’elenco
delle impostazioni (BROWSER>REPEAT>SHUFFLE)
(BROWSER>RIPETI>RIPRODUZIONE CASUALE). Usare l’encoder
per selezionare l’opzione da modificare.
BROWSER
Premere brevemente il pulsante dell’encoder per accedere alle
opzioni BROWSER (PLAYLISTS>ARTISTS>ALBUMS>GENRES>SON
GS>COMPOSERS>AUDIOBOOKS>PODCASTS) (Playlist>Artisti>A
lbum>Generi>Brani>Compositori>Libri audio>Podcast). Questa
funzione consente di ricercare tracce o brani in base a vari tipi di
categoria.
REPEAT (Ripeti)
Premere brevemente il pulsante dell’encoder per acce-
dere alle opzioni della funzione REPEAT (OFF>ONE>ALL)
(DISATTIVA>UNO>TUTTI). Questa funzione consente di impostare
le preferenze riguardo il numero di volte che una traccia o un
brano verrà ripetuto.
SHUFFLE (Riproduzione casuale)
Premere brevemente il pulsante dell’encoder per acce-
dere alle opzioni della funzione SHUFFLE (OFF>ONE>ALL)
(DISATTIVA>TUTTI). Questa funzione consente di impostare le
preferenze riguardo la riproduzione casuale di tracce o brani.
NOTA: Dopo l’appaiamento iniziale del dispositivo il volume sul
dispositivo sarà a circa metà volume. Sarà necessario alzare il
volume al massimo sul dispositivo connesso prima di impostare
il livello. Il dispositivo rimarrà al volume massimo dopo l’imposta-
zione iniziale e quando si riappaia all’unità di fonte.
Questa funzione consente di controllare l’app Pandora® diret-
tamente dall’unità di fonte (gli utenti Android devono usare
Bluetooth, gli utenti iOS possono usare sia USB sia Bluetooth).
Occorre prima avviare l’app Pandora® sul dispositivo, e quindi
selezionare l’opzione fonte Pandora® sull’unità di fonte. Per usare
la funzione “Pollice su” premere a lungo il pulsante SUB+. Per
usare la funzione “Pollice già” premere a lungo il pulsante SUB-.
Per riprodurre o sospendere un brano, premere brevemente il
pulsante PLAY/PAUSE.
Per saltare avanti di un brano, premere brevemente il pulsante
FWD.
Per accedere alle impostazioni specifiche Pandora®, pre-
mere brevemente il pulsante MENU per l’elenco delle
impostazioni (STATIONS>BOOKMARKS>STATIONS MANAGE)
(STAZIONI>SEGNALIBRI>GESTISCI STAZIONI). Usare l’encoder per
selezionare l’opzione da modificare.
STAZIONI
Per regolare premere brevemente il pulsante dell’encoder e
accedere. Ruotare il pulsante dell’encoder per selezionare le
opzioni (SHUFFLE>SORT DATE/A-Z>STATIONS) (RIPRODUZIONE
CASUALE>ORDINE PER DATA/A-Z>STAZIONI). Selezionando
l’opzione SHUFFLE le stazioni verranno riprodotte casualmente,
e selezionando l’opzione SORT le stazioni verranno ordinate per
data di aggiunta o alfabeticamente. Si possono anche selezionare
le stazioni salvate direttamente da questo elenco.
BOOKMARKS (Segnalibri)
Per aggiungere un segnalibro a un artista o una traccia riprodotta,
premere brevemente il pulsante dell’encoder per visualizzare le
opzioni BOOKMARK (ARTIST>TRACK) (ARTISTA>TRACCIA). Selezi-
onare l’opzione che si desidera usare per i segnalibri.
Pandora, il logo Pandora e il marchio commerciale Pandora sono

25
Italiano
marchi o marchi registrati di Pandora Media, LLC. Usati con per-
messo. Pandora è disponibile solo in alcuni paesi. Visitare http://
www.pandora.com/legal per ulteriori informazioni.
Sintomo / Descrizione Diagnosi Soluzione
Di base
L'unità di fonte non si accende.
Fusibile bruciato
Controllare il fusibile sull'unità, cambiarlo con la
portata corretta.
L'accensione del veicolo è spenta
Se collegata seguendo le istruzioni, l'unità non funzi-
onerà con l'accensione spenta.
L'unità non ha la messa a terra
adeguata
Controllare i cavi e riparare se necessario.
Tuner Radio
Il tuner non si sintonizza su nes-
suna stazione
Non c'è l'antenna, oppure collega-
mento sconnesso o aperto nel cavo
Controllare tutti i collegamenti e riparare se neces-
sario.
Impossibile sintonizzare stazioni
nella modalità di ricerca
Zona con segnale debole
Accertarsi che la modalità LOC del tuner sia spenta
(OFF).
Dispositivi USB
Impossibile inserire il dispositivo
USB
Il dispositivo USB è stato inserito
nella direzione sbagliata
Invertire la direzione di collegamento del dispositivo
USB e provare a reinserirlo.
Il connettore del dispositivo USB
è rotto
Sostituire con un nuovo dispositivo USB.
Dispositivo USB non ricon-
osciuto
Il dispositivo USB è danneggiato.
Disconnettere il dispositivo USB e riconnetterlo. Se il
dispositivo continua a non essere riconosciuto, sosti-
tuirlo con un altro dispositivo USB. USB non funziona
con dispositivi Android.
I connettori sono allentati.
Non vi è suono con il display
visualizzato "No File"
Sul dispositivo USB non ci sono file
MP3/WMA salvati.
Salvare questi file correttamente sul dispositivo USB.
USB non funziona con dispositivi Android.
Il suono salta o è rumoroso
I file MP3/WMA non sono stati creati
correttamente.
Usare i file MP3/WMA che sono codificati corretta-
mente.
Bluetooth
Il volume della fonte Bluetooth è
più basso di altre fonti
Bluetooth dal dispositivo non è al
volume massimo
Aumentare il volume sul dispositivo al livello massimo

26
NOTES

27
NOTES

28
Rockford Corporation oers a limited warranty on Rockford Fosgate products on the following terms:
Length of Warranty
POWER Amplifiers – 2 Years
BMW® Direct Fit Speakers – 2 Years
PUNCH® & PRIME® Amplifiers – 1 Year
Speakers, Signal Processors, Accessories and Capacitors – 1 Year
All marine, motorcycle, motorsport products - 2 Years
Any Factory Refurbished Product – 90 Days (receipt required)
What is Covered
This warranty applies only to Rockford Fosgate products sold to consumers by authorized Rockford Fosgate dealers in the United
States of America. Products purchased by consumers from an Authorized Rockford Fosgate Dealer in another country are covered only
by that country’s Distributor and not by Rockford Corporation.
Who is Covered
This warranty covers only the original purchaser of Rockford product purchased from an authorized Rockford Fosgate dealer in the
United States. In order to receive service, the purchaser must provide Rockford with a copy of the receipt stating the customer name,
dealer name, product purchased and date of purchase.
Products found to be defective during the warranty period will be repaired or replaced (with a product deemed to be equivalent) at
Rockford’s discretion.
What is Not Covered
1. Damage caused by accident, abuse, improper installation, operations, the, water (on non-Element Ready products).
2. Any cost or expense related to the removal or reinstallation of product.
3. Service performed by anyone other than Rockford or an authorized Rockford Fosgate service center.
4. Any product which has had the serial number defaced, altered, or removed.
5. Subsequent damage to other components.
6. Any product purchased outside the U.S.
7. Any product not purchased from an authorized Rockford Fosgate dealer. Refer to rockfordfosgate.com dealer locator for more detail.
Limit on Implied Warranties
Any implied warranties including warranties of fitness for use and merchantability are limited in duration to the period of the express
warranty set forth above. Some states do not allow limitations on the length of an implied warranty, so this limitation may not apply.
No person is authorized to assume for Rockford Fosgate any other liability in connection with the sale of the product.
How to Obtain Service
Please call 1-800-669-9899 for Rockford Customer Service. You must obtain an RA# (Return Authorization number) to return any product
to Rockford Fosgate. You are responsible for shipment of product to Rockford.
EU Warranty
This product meets the current EU warranty requirements, see your Authorized dealer for details.
Warranty
Transcripción de documentos
071619 1230-72994-01-B Printed In China rockfordfosgate.com 600 South Rockford Drive • Tempe, Arizona 85281 United States Direct: (480) 967-3565 • Toll Free: (800) 669-9899 Installation assistance available at: OPERATION MANUAL PMX-P2 Introduction Dear Customer, If, after reading your manual, you still have questions regarding this product, we recommend that you see your Rockford Fosgate dealer. If you need further assistance, you can call us direct at 1-800-669-9899. Be sure to have your serial number, model number and date of purchase available when you call. Congratulations on your purchase of the world’s finest brand of audio products. At Rockford Fosgate we are fanatics about musical reproduction at its best, and we are pleased you chose our product. Through years of engineering expertise, hand craftsmanship and critical testing procedures, we have created a wide range of products that reproduce music with all the clarity and richness you deserve. PRACTICE SAFE SOUND Continuous exposure to sound pressure levels over 100dB may cause permanent hearing loss. High powered auto sound systems may produce sound pressure levels well over 130dB. Use common sense and practice safe sound. For maximum performance we recommend you have your new Rockford Fosgate product installed by an Authorized Rockford Fosgate Dealer. Please read your warranty and retain your receipt and original carton for possible future use. Safety Great product and competent installations are only a piece of the puzzle when it comes to your system. Make sure that your installer is using 100% authentic installation accessories from Rockford Fosgate in your installation. Rockford Fosgate has everything from RCA cables and speaker wire to power wire and battery connectors. Insist on it! After all, your new system deserves nothing but the best. This symbol with “WARNING” is intended to alert the user to the presence of important instructions. Failure to heed the instructions could result in severe injury or death. This symbol with “CAUTION” is intended to alert the user to the presence of important instructions. Failure to heed the instructions could result in injury or unit damage. To add the finishing touch to your new Rockford Fosgate image, order your Rockford accessories, which include everything from T-shirts to hats. Visit our web site for the latest information on all Rockford products; www.rockfordfosgate.com or, in the U.S. call 1-800-669-9899 or FAX 1-800-398-3985. For all other countries, call +001-480-967-3565 or FAX +001-480-966-3983. To prevent injury and damage to the unit, please read and follow the instructions in this manual. If you feel unsure about installing this system yourself, have it installed by a qualified Rockford Fosgate dealer. Table of Contents Before installation, disconnect the battery negative (-) terminal to prevent damage to the unit, fire and/or possible injury. 2 Introduction FCC Compliance Statement 3 Specifications FCC ID: 2AA7S-PMX-P2 4 Design Features This equipment has been tested and found to comply with the limits for a Class B digital device, pursuant to part 15 of the FCC Rules. These limits are designed to provide more reasonable protection against harmful interference in a residential installation. 5-8 Operation Settings Tuner (AM/FM/WB) Operation is subjected to the following two conditions: (1) This device may not cause harmful interference, and (2) the device must accept any interference received, including interference that may cause undesired operation. USB-iPod Bluetooth® Pandora® This equipment generates, uses, and can radiate radio frequency energy and, if not installed and used in accordance with the instructions, may cause harmful interference to radio communications. However, there is no guarantee that interference will not occur in a particular installation. If this equipment does cause harmful interference to radio or television reception, which can be determined by turning the equipment off and on, you are encouraged to try to correct the interference by one of the following measures: 9 Troubleshooting 10-25 French, Spanish, German & Italian 26-27 Notes 28 Limited Warranty Information • Reorient or relocate the receiving antenna. • Increase the separation between the equipment and receiver. • Connect the equipment into an outlet on a circuit different from that to which the receiver is connected. • Consult the dealer or an experienced radio/TV technician for help. ©2019 Rockford Corporation. All Rights Reserved. PUNCH® and associated logos where applicable, are registered trademarks of Rockford Corporation in the United States and/or other countries. iPhone and iPod are trademarks of Apple Inc., registered in the U.S. and other countries. The Bluetooth® word mark and logos are registered trademarks owned by Bluetooth SIG, Inc. and any use of such marks by Rockford Corporation is under license. All other trademarks are the property of their respective owners. Specifications subject to change without notice. “Made for iPod” and “Made for iPhone” mean that an electronic accessory has been designed to connect specifically to iPod, or iPhone, respectively, and has been certified by the developer to meet Apple performance standards. Apple is not responsible for the operation of this device or its compliance with safety and regulatory standards. Please note that the use of this accessory with iPod or iPhone may affect wireless performance. Pandora, the Pandora logo, and the Pandora trade dress are trademarks or registered trademarks of Pandora Media, Inc. Used with permission. Pandora is only available in certain countries. Please visit http://www.pandora.com/legal for more information. 2 Specifications Model PMX-P2 Operating Voltage 10.5V - 16V Fuse Rating 20A 25 W X 4 @ 4 Ohms RMS 50 W x 4 @ 2 Ohms Peak Power Output Output Impedance 500Ω Frequency Response 20 - 20kHz FM Frequency Range 87.5MHz - 107.9MHz AM Frequency Range 530kHz - 1710kHz 162.40 - 162.55 WB Frequency Range (US & Canada) Tuner Presets 18 FM / 12 AM / 6 WB Display 2.7” Color TFT Bluetooth 3.0+EDR, A2DP 1.3 USB Compatibility 2.0 32 GB max, 255 Folders max, 999 Songs max USB Capacity USB Output 1A iPhone 6 Plus iPhone 6 iPhone 5S iPhone 5C iPhone 5 iPhone 4S iPhone 4 iPhone 3GS Made for iPhone Model Names- iPod Touch (5th generation) iPod Touch (4th generation) iPod Nano (7th generation) iPod Nano (6th generation) Made for iPod Model Names Android Compatibility Bluetooth® Only Audio File Compatibility MP3, WMA CEA 2006 Power ratings on Rockford Fosgate source units conform to CEA-2006 industry standards. These guidelines mean your source unit’s output power ratings are REAL POWER numbers, not inflated marketing ratings. 3 Design Features Rotary Encoder REV / FWD button This knob is for adjusting main volume, zone volumes, menu navigation and setting adjustments. Use this button to skip back and forward through channels or tracks with a press. Holding the button down will activate manual seek mode. MENU button Press & hold for 5 seconds to access the main menu settings. Pressing will give you access to the settings for the active source. SRC (Power) Button This button allows you to switch between sources (press) and power the unit ON and OFF (press and hold). SUB Buttons These buttons allow you to adjust the subwoofer output or rear line out UP or DOWN (0-20). DIMMER button Pressing this button will allow you to select between the two brightness values for the display. PLAY / PAUSE button Press this button to play or pause your music. This button also acts as a MUTE when the source is in TUNER mode. Fig. 1 4 Settings Press to access the CROSSOVER settings. Use the rotary encoder to select the crossover zone options (FRONT>REAR>SUB). Press the encoder to adjust the frequency of the crossover (60Hz>80Hz>120Hz>APF). Press MENU to exit and go back up one level. PUNCH EQ Press to access the PUNCH EQ settings. Use the rotary encoder to adjust the gain output (0-12). Press MENU to exit and go back up one level. Punch EQ is an onboard equalizer with up to +18dB @ 45Hz and/or up to +12dB boost at 12.5kHz SOURCE GAIN Source Unit Settings To adjust the level of device input gain, scroll through the inputs (FM TUNER>AM TUNER>WB TUNER>USB>BLUETOOTH>PANDORA) to the device you want to adjust, press the encoder button to access the gain settings. Rotate the encoder button to set the level of gain. (-3dB > -2dB > -1dB > 0dB > +1dB > +2dB > +3dB) To access the source unit’s settings, press and hold the MENU button until the options appear. Rotate the encoder to scroll through the list of settings. Then press the encoder button to select the setting you wish to change. (BALANCE>FADER>AUDIO>VOLTAGE GAUGE>BT PAIRING>BEEP>TUNER REGION>SOFTWARE>FACTORY DEFAULT) INTERNAL AMPLIFIER Press to access the INTERNAL AMPLIFIER options. Use the rotary encoder to select options (ON>OFF). When using an amplifier to power your speakers, select OFF. If you are powering your speakers directly from the source unit, select the INTERNAL AMPLIFIER to ON. This source unit has a zero current draw when turned off. All of your settings and presets will be saved along with your vehicles battery during storage. SOURCE VOLTAGE GAUGE Press the SRC button to show the different source options (FM TUNER>AM TUNER>USB>BLUETOOTH>PANDORA). Use the rotary encoder or press the SRC button to scroll through sources. If a source is GREYED out, that means it is not available. An example would be Bluetooth is greyed out because the Bluetooth mobile device is not connected yet. To display the vehicle voltage, press the encoder button on the VOLTAGE GAUGE option. BT DEVICE PAIRING Press the encoder button to access options (DISCOVERABLE > DEVICE). Once the Bluetooth mobile device is connected, Bluetooth source selection will be available. See BT Device Pairing for connecting your mobile device. DISCOVERABLE This is used to determine if the units Bluetooth is discoverable or not. You can either select ENABLE (allows Bluetooth devices to discover PMX-P2) or DISABLE (PMX-P2 is not able to be discovered by Bluetooth devices). When ENABLE is selected, the PMX-P2 is now ready for pairing to your Bluetooth mobile device. Open the Bluetooth settings on your mobile device to find your source unit labeled “ROCKFORD PMX” and select. BALANCE Press the encoder button to access BALANCE adjustment settings. Rotate the encoder button to set output BALANCE. FADER Press the encoder button to access FADER adjustment settings. Rotate the encoder button to set output FADER. DEVICE AUDIO Selecting DEVICE by pressing the encoder button will allow you to rename the source unit with up to 16 characters. This gives you the ability to have a unique name for easy identification during device pairing. Press the encoder button to select the letter to be changed and rotate the knob to change the value. Repeat process until desired name is reached. To access the AUDIO settings, press the AUDIO option from the MENU screen. Rotate the encoder to scroll through the list of settings. Then press the encoder button to select the setting you wish to change. (7 BAND EQ>CROSSOVER>PEQ>SOURCE GAIN>INTERNAL AMPLIFIER) BEEP 7 BAND EQ Press the encoder button to access the 7 BAND EQ settings. Use the rotary encoder to scroll through the EQ settings. (FLAT > ROCK > CLASSIC > ACOUSTIC > DANCE > ELECTRONIC > HIPHOP > CUSTOM) When setting up the CUSTOM EQ, press the encoder button to set the first frequency. Once active, rotate the encoder to adjust the frequency settings. Press encoder button again to access the next frequency. Repeat until all EQ settings are complete. Press the MENU button to exit and go back up one level. Press the encoder button to access the BEEP options. Rotate the encoder button to turn system beep ON/ OFF. TUNER REGION To adjust, press the encoder button to access. Rotate the encoder button to select the TUNER REGION of your preference. (EUROPE > USA > RUSSIA > LATIN > ASIA > JAPAN > MIDEAST > AUSTRALIA) SOFTWARE CROSSOVER VERSION - Press the encoder button to display the current firmware version of the unit. 5 Settings UPDATE - Press the encoder button to update the firmware. Follow the instructions on the screen when updating. buttons to tune to the desired frequency. To MUTE the TUNER, press the PLAY/PAUSE button. THEME FM BAND SETTINGS To adjust the THEME, press the encoder to access the feature. Rotate the encoder button to select the desired THEME (DAY, NIGHT). DAY – Screen will have a White background with Black Lettering. NIGHT – Screen will have Black background with White lettering. To access the FM BAND SETTINGS, press the MENU when using the FM TUNER source. This will give you access to the settings specific to the FM TUNER (FM>PRESETS>ADD PRESETS>REMOVE PRESETS>AUTO STORE>LOCAL). PRESETS Press the encoder button to access the PRESETS list. Using this feature allows you to see what PRESETS are saved on the unit. FACTORY DEFAULT AUDIO – Press the encoder button to access. Rotate the encoder button to select YES/NO. Selecting YES will reset your unit back to factory default settings. ADD PRESETS Press the encoder button on the ADD PRESETS option. You will need to be on both the station and PRESET group you want to add first (FM1>FM2>FM3). Using this feature allows you to save stations to the unit. Once selected, use the rotary encoder to select the PRESET number (1-6) you want the station saved to. SYSTEM - Press the encoder button to access. Rotate the encoder button to select YES/NO. Selecting YES will reset your unit back to factory default settings. Basic Operation REMOVE PRESETS TURNING THE UNIT ON / OFF Press the encoder button on the REMOVE PRESETS option. You will need to be under the PRESET group you want to adjust first (FM1>FM2>FM3). Using this feature allows you to remove saved stations on the unit. Once selected, use the rotary encoder to select the PRESET number (1-6) of the station you want removed. Press and hold the SRC (Power) button to turn the unit ON or OFF ADJUSTING THE VOLUME Rotate encoder knob left or right to desired volume level (0-40). The current volume level will be displayed during adjustment. FM ADJUSTING THE SUBWOOFER OUTPUT Press the encoder button to access the FM PRESET options (FM1>FM2>FM3). Using this feature allows you to have separate tuner preset groups to choose from. Use the rotary encoder button to scroll through the TUNER groups and press to select the group. Press the SUB + or SUB- buttons to adjust the output level (0-20). ADJUSTING THE SCREEN BRIGHTNESS AUTO STORE Press the SCREEN BRIGHTNESS button to adjust the brightness level. There are two brightness levels. Press the encoder button to access the AUTO STORE function. You will need to be under the PRESET group you want to adjust first (FM1>FM2>FM3). This feature automatically stores presets on the unit. It will stop when presets 1-6 are set. Select the next PRESET group and repeat to fill next set. SELECTING A SOURCE TO PLAY Press the SRC button to show the different source options (FM TUNER>AM TUNER>WB TUNER>USB>BLUETOOTH>PANDORA). Use the rotary encoder or press the SRC button to scroll through sources. LOCAL Press the encoder button to access the LOCAL options. Once selected, use the rotary encoder to select ON or OFF. The local option tunes to nearby radio stations with sufficiently strong signals for good reception. In areas where reception is poor, switching to distance tuning enables the unit to tune in to more distant stations. Distance tuning is the default. AM BAND SETTINGS To access the AM BAND SETTINGS, press the MENU when using the AM TUNER source. This will give you access to the settings specific to the AM TUNER (AM>PRESETS>ADD PRESETS>REMOVE PRESETS>AUTO STORE>LOCAL). PRESETS Press the encoder button to access the PRESETS list. Using this feature allows you to see what PRESETS are saved on the unit. Tuner Operation (FM/AM/WB) To operate, use the rotary encoder to select the tuner source you want to listen to (FM>AM>WB). ADD PRESETS Press the encoder button on the ADD PRESETS option. You will need to be on both the station and PRESET group you want to add first (AM1>AM2). Using this feature allows you to save To switch between AUTO and MANUAL SEEK modes, press and hold either the FWD or REV buttons. To AUTO SEEK stations, press the FWD and REV buttons. To MANUAL SEEK stations, press and hold the FWD and REV 6 Operation stations to the unit. Once selected, use the rotary encoder to select the PRESET number (1-6) you want the station saved to. REMOVE PRESETS Press the encoder button on the REMOVE PRESETS option. You will need to be under the PRESET group you want to adjust first (AM1>AM2). Using this feature allows you to remove saved stations on the unit. Once selected, use the rotary encoder to select the PRESET number (1-6) of the station you want removed. AM Press the encoder button to access the FM PRESET options (AM1>AM2). Using this feature allows you to have separate tuner preset groups to choose from. Use the rotary encoder button to scroll through the TUNER groups and press to select the group. USB (iPod) Operation After your device is connected to the source unit, this feature allows you to control playback from your device directly from the source unit. Select the USB source option on the source unit. AUTO STORE Press the encoder button to access the AUTO STORE function. You will need to be under the PRESET group you want to adjust first (AM1>AM2). This feature automatically stores presets on the unit. It will stop when presets 1-6 are set. Select the next PRESET group and repeat to fill next set. To play or pause a song, press the PLAY/PAUSE button. To skip a track forward, press the FWD button. To skip a track backwards, press the REV button. To access USB specific settings, press the MENU button for the list of settings (BROWSER>REPEAT>SHUFFLE). Use the encoder to select the option to change. LOCAL Press the encoder button to access the LOCAL options. Once selected, use the rotary encoder to select ON or OFF. The local option tunes to nearby radio stations with sufficiently strong signals for good reception. In areas where reception is poor, switching to distance tuning enables the unit to tune in to more distant stations. Distance tuning is the default. BROWSER Press the encoder button to access the BROWSER options (PLA YLISTS>ARTISTS>ALBUMS>GENRES>SONGS>COMPOSERS>AU DIOBOOKS>PODCASTS). Using this feature allows you to search for tracks or songs by different types of categories. WB BAND SETTINGS REPEAT To access the WB BAND SETTINGS, press the MENU when using the WB TUNER source. This will give you access to the settings specific to the WB TUNER (PRESETS>ADD PRESETS>REMOVE PRESETS). Press the encoder button to access the REPEAT feature options (OFF>ONE>ALL). SHUFFLE PRESETS Press the encoder button to access the SHUFFLE feature options (OFF>ALL). This feature allows you to set your preference on shuffling tracks or songs. Press the encoder button to access the PRESETS list. Using this feature allows you to see what PRESETS are saved on the unit. NOTE: When using a USB extension cable, it must be a Rockford Fosgate powered extension cable (part # PMX-USBEXT). The cable is 33 feet (10 meters). ADD PRESETS Press the encoder button on the ADD PRESETS option. You will need to be on both the station you want to add first. Using this feature allows you to save stations to the unit. Once selected, use the rotary encoder to select the PRESET number (1-6) you want the station saved to. REMOVE PRESETS Press the encoder button on the REMOVE PRESETS option. You will need to be under the PRESET group you want to adjust first (AM1>AM2). Using this feature allows you to remove saved stations on the unit. Once selected, use the rotary encoder to select the PRESET number (1-6) of the station you want removed. 7 Operation Bluetooth® Operation This feature allows you to control the Pandora® app from the source unit directly (Android users will have to use Bluetooth only, iOS users can use both USB and Bluetooth). You will need to start the Pandora® app on your device first, then select the Pandora® source option on the source unit. To use the “Thumbs Up” feature, press and hold the SUB+ button. To use the “Thumbs down” feature, press and hold the SUB - button. After your device is paired to the source unit, this feature allows you to control playback from your device directly from the source unit. Select the BLUETOOTH source option on the source unit. To play or pause a song, press the PLAY/PAUSE button. To skip a track forward, press the FWD button. To skip a track backwards, press the REV button. To play or pause a song, press the PLAY/PAUSE button. To skip a track forward, press the FWD button. To access BLUETOOTH specific settings, press the MENU button for the list of settings (BROWSER>REPEAT>SHUFFLE). Use the encoder to select the option to change. To access Pandora® specific settings, press the MENU button for the list of settings (STATIONS>BOOKMARKS>STATIONS MANAGE). Use the encoder to select the option to change. BROWSER STATIONS Press the encoder button to access the BROWSER options (PLA YLISTS>ARTISTS>ALBUMS>GENRES>SONGS>COMPOSERS>AU DIOBOOKS>PODCASTS). Using this feature allows you to search for tracks or songs by different types of categories. To adjust, press the encoder button to access. Rotate the encoder button to select your options (SHUFFLE>SORT DATE/AZ>STATIONS). Selecting the SHUFFLE option will shuffle your stations and selecting the SORT feature will sort your stations by date added or alphabetically. You can also select your saved stations directly from this list. REPEAT Press the encoder button to access the REPEAT feature options (OFF>ONE>ALL). This feature allows you to set your preference on the amount of times a track or song will repeat. BOOKMARKS To BOOKMARK an artist or track that is playing, press the encoder button to display your BOOKMARK options (ARTIST>TRACK). Select the option you wish to use for bookmarking. SHUFFLE Press the encoder button to access the SHUFFLE feature options (OFF>ALL). This feature allows you to set your preference on shuffling tracks or songs. NOTE: When the device is initially paired, the volume on the device will be roughly at half volume. You will need to turn the volume all the way up on the connected device prior to level setting. The device will remain at maximum volume after initially setting and when it re-pairs to the source unit. Pandora, the Pandora logo, and the Pandora trade dress are trademarks or registered trademarks of Pandora Media, LLC. Used with permission. Pandora is only available in certain countries. Please visit http://www.pandora.com/legal for more information. 8 Troubleshooting Symptom Diagnosis Remedy Basic Source unit does not turn on. Blown fuse Check fuse of the unit, replace with correct rating. Vehicle’s ignition is off If connected following the instructions, the unit will not operate with ignition off. Unit is not properly grounded Check wiring and repair as necessary. Radio Tuner Tuner fails to tune any stations No antenna or disconnected or open connection in cable Check all connections and repair as necessary. Unable to tune stations in seek mode You are in a weak signal area Make sure the tuner LOC mode is off. USB Devices USB device cannot be inserted The USB device has been inserted in the wrong direction Reversing the connection direction of the USB device, try reinserting. The USB device connector is broken Replace with a new USB device. Connectors are loose Disconnect USB device and reconnect. If the device is still not recognized, try replacing with a different USB device.USB does not work with Android devices. No sound heard with the display “No File” shown No MP3/WMA files are stored on the USB device Store these files properly on the USB device. USB does not work with Android devices. Sound skips or is noisy MP3/WMA files are not created properly Use MP3/WMA files that are encoded correctly. The USB device is damaged USB device is not recognized Bluetooth Bluetooth source volume is lower than other sources Bluetooth from device is not at maximum volume 9 Turn the volume on the device to maximum level Français Caractéristiques de conception (Fig. 1) Encodeur rotatif Ce bouton sert à ajuster le volume principal, les volumes de zones, la navigation du menu et les réglages des paramètres. Bouton MENU Ce bouton donne accès aux paramètres principaux de l’appareil par une longue pression. Appuyer dessus brièvement pour avoir accès aux paramètres pour la source active. Bouton SRC (Alimentation) Ce bouton permet de commuter entre les sources (pression courte) et d’activer et de désactiver l’appareil (pression longue). Boutons SUB Ces boutons permettent d’ajuster la sortie du subwoofer ou la ligne arrière vers le haut ou vers le bas (0-20). Bouton LECTURE/PAUSE Appuyer sur ce bouton pour jouer ou pauser la musique. Ce bouton sert aussi de VEILLEUSE quand la source est en mode TUNER. Bouton DIMMER (GRADATEUR) Appuyer sur ce bouton pour sélectionner entre les valeurs de luminosité de l’affichage. Bouton REV/FWD Utiliser ce bouton pour sauter en arrière et en avant parmi les chaînes ou les pistes avec une pression courte. Une pression longue activera le mode de recherche manuelle. Paramètres de l’unité source Pour accéder aux paramètres de l’unité source, appuyer longuement sur le bouton MENU jusqu’à affichage des options. Faire pivoter l’encodeur pour faire défiler la liste des paramètres et effectuer une pression courte sur le bouton d’encodeur pour sélectionner le paramètre que l’on souhaite modifier. (BALANCE>FADER>AUDIO>VOLTAGE GAUGE>BT PAIRING>BEEP>TUNER REGION>SOFTWARE>FACTORY DEFAULT) Cette unité source a un courant nul quand elle est désactivée. Tous les paramètres et préréglages seront sauvegardés avec la batterie du bateau pendant l’entreposage. BALANCE Appuyer brièvement sur le bouton d’encodeur pour accéder aux paramètres de réglage de BALANCE. Faire pivoter le bouton d’encodeur pour régler la BALANCE de sortie. FADER Appuyer brièvement sur le bouton d’encodeur pour accéder aux paramètres de réglage du FADER. Faire pivoter le bouton d’encodeur pour régler le FADER de sortie. AUDIO Pour accéder aux paramètres AUDIO, effectuer une pression courte sur l’option AUDIO à partir de l’écran MENU. Faire pivoter l’encodeur pour faire défiler la liste des paramètres et effectuer une pression courte sur le bouton d’encodeur pour sélectionner le paramètre que l’on souhaite modifier. (7 BAND EQ>CROSSOVER>PEQ>SOURCE GAIN>INTERNAL AMPLIFIER) 7 BAND EQ Appuyer brièvement sur le bouton d’encodeur pour accéder aux paramètres 7 BAND EQ. Utiliser l’encodeur rotatif pour faire défiler les paramètres EQ. (FLAT > ROCK > CLASSIC > ACOUSTIC > DANCE > ELECTRONIC > HIP-HOP > CUSTOM) Lors de la configuration du CUSTOM EQ, effectuer une pression courte sur le bouton d’encodeur pour régler la première fréquence. Une fois activé, faire pivoter l’encodeur pour ajuster les paramètres de fréquence. Effectuer une autre pression courte sur le bouton d’encodeur pour accéder à la fréquence prochaine. Répéter jusqu’à ce que tous les paramètres EQ soient terminés. Appuyer brièvement sur le bouton MENU pour quitter et revenir d’un niveau en arrière. CROISEMENT Appuyer brièvement pour accéder aux paramètres de CROISE10 MENT. Utiliser l’encodeur rotatif pour sélectionner les options de zones de croisement (FRONT>REAR>SUB). Effectuer une courte pression sur l’encodeur pour ajuster la fréquence du croisement (60 Hz>80 Hz>120 Hz>APF). Appuyer brièvement sur le bouton MENU pour quitter et revenir d’un niveau en arrière. PUNCH EQ Appuyer brièvement pour accéder aux paramètres de PUNCH EQ. Utiliser l’encodeur rotatif pour ajuster la sortie de gain (0-12). Appuyer brièvement sur le bouton MENU pour quitter et revenir d’un niveau en arrière. Punch EQ est un égaliseur embarqué avec un amplificateur maximum de +18 dB à 45 Hz et/ou de +12 dB à 12,5 kHz GAIN SOURCE Pour ajuster le niveau du gain d’entrée de périphérique, faire défiler les entrées (FM TUNER>AM TUNER>WB TUNER>USB>BLUETOOTH>PANDORA) jusqu’au périphérique que l’on souhaite ajuster, appuyer brièvement le bouton d’encodeur pour accéder aux paramètres de gain. Faire tourner le bouton d’encodeur pour régler le niveau de gain. (-3 dB > -2 dB > -1 dB > 0 dB > +1 dB > +2 dB > +3 dB) AMPLIFICATEUR INTERNE Appuyer brièvement pour accéder aux options AMPLIFICATEUR INTERNE. Utiliser l’encodeur rotatif pour sélectionner les options (ON>OFF). Lors de l’utilisation d’un amplificateur pour alimenter les haut-parleurs, sélectionner OFF. Si on alimente les haut-parleurs directement de l’unité source, sélectionner l’AMPLIFICATEUR INTERNE sur ON. INDICATEUR DE TENSION Pour afficher la tension du véhicule, appuyer brièvement sur le bouton d’encodeur sur l’option INDICATEUR DE TENSION. APPAIRAGE DE PÉRIPHÉRIQUE BT Appuyez brièvement sur le bouton codeur pour accéder aux options (DISCOVERABLE>DISPOSITIF). DISCOVERABLE Tournez le bouton encodeur pour sélectionner si l’unité est détectable pour l’appariement. (ENABLE> DISABLE) Une fois activée, l’unité source est maintenant visible Et prêt à être couplé à votre appareil. Ouvrez les paramètres Bluetooth de votre. Pour trouver l’unité source intitulée «Rockford PMX» et sélectionnez. DISPOSITIF La sélection de DEVICE en appuyant brièvement sur le bouton pour renommer l’unité source avec un maximum de 16 caractères. Cela vous donne la possibilité d’avoir un nom unique pour faciliter l’identification pendant l’appareil appariement appuyez brièvement sur la touche du codeur pour sélectionner la lettre à modifier et tournez le bouton pour modifier la valeur. Répéter le processus jusqu’à ce que vous désiriez nom est atteint. BIP Appuyer brièvement sur le bouton d’encodeur pour accéder aux options BIP. Faire tourner le bouton d’encodeur pour activer/ désactiver le bip du système. RÉGION DU TUNER Pour ajuster, appuyer brièvement sur le bouton d’encodeur pour accéder. Faire tourner le bouton d’encodeur pour sélectionner la RÉGION DU TUNER de préférence. (EUROPE > USA > RUSSE > AMÉRIQUE LATINE > ASIE > JAPON > MOYEN-ORIENT > AUSTRALIE) LOGICIEL VERSION - Appuyer brièvement sur le bouton d’encodeur pour afficher la version de logiciel actuelle de l’unité. MISE À JOUR - Appuyer brièvement sur le bouton d’encodeur pour mettre le logiciel à jour. Suivre les instructions à l’écran pour mettre à jour. THÈME Pour régler le THEME , appuyez brièvement sur l’encodeur pour accéder à la fonction . Tournez le bouton encodeur pour sélectionner le thème désiré ( jour, nuit,) Français RÉGLAGE D’USINE AUDIO – Appuyer brièvement sur le bouton d’encodeur pour accéder. Faire pivoter le bouton d’encodeur pour sélectionner YES/NO (OUI/NON). Sélectionner YES/OUI pour remettre l’unité aux réglages d’usine. SYSTÈME - Appuyer brièvement sur le bouton d’encodeur pour accéder. Faire pivoter le bouton d’encodeur pour sélectionner YES/NO (OUI/NON). Sélectionner YES/OUI pour remettre l’unité aux réglages d’usine. Fonctionnement de base ACTIVER/DÉSACTIVER L’UNITÉ Appuyer longuement sur le bouton SRC (Alimentation) pour ACTIVER ou DÉSACTIVER l’unité RÉGLAGE DU VOLUME Faire tourner le bouton d’encodeur vers la gauche ou vers la droite au niveau de volume souhaité (0-40). Le niveau de volume actuel s’affiche pendant le réglage. RÉGLAGE DE LA SORTIE DU SUBWOOFER Appuyer sur le bouton SUB + ou SUB- pour régler le niveau de sortie (0-20). RÉGLAGE DE LA LUMINOSITÉ DE L’ÉCRAN Appuyer brièvement sur le bouton LUMINOSITÉ DE L’ÉCRAN pour ajuster le niveau de luminosité. Il existe deux niveaux de luminosité. SÉLECTIONNER UNE SOURCE À JOUER Appuyer brièvement sur le bouton SRC pour afficher les différentes options de source (FM TUNER>AM TUNER>WB TUNER>USB >BLUETOOTH>PANDORA>SIRIUSXM). Utiliser l’encodeur rotatif ou appuyer brièvement sur le bouton SRC pour faire défiler les sources. Fonctionnement du tuner (FM/AM/WB) Pour faire fonctionner, utiliser l’encodeur rotatif pour sélectionner la source de tuner que l’on souhaite écouter (FM>AM>WB). Pour RECHERCHER AUTOMATIQUEMENT des stations, appuyer brièvement sur les boutons FWD et REV. Pour RECHERCHER MANUELLEMENT des stations, appuyer longuement sur les boutons FWD et REV pour régler à la fréquence souhaitée. Pour mettre le TUNER en SOURDINE, appuyer brièvement sur le bouton PLAY/PAUSE. PARAMÈTRES DE BANDE FM Pour accéder aux PARAMÈTRES DE BANDE FM, appuyer brièvement sur le MENU lors de l’utilisation de source FM TUNER. Ceci donnera accès aux paramètres spécifiques au FM TUNER (FM>PRESETS>ADD PRESETS>REMOVE PRESETS>AUTO STORE>LOCAL). STATIONS PRÉRÉGLÉES Appuyer brièvement sur le bouton d’encodeur pour accéder à la liste des STATIONS PRÉRÉGLÉES. Utiliser cette fonction pour voir quelles STATIONS PRÉRÉGLÉES sont sauvegardées sur l’unité. ADD PRESETS (AJOUTER DES STATIONS PRÉRÉGLÉES) Effectuer une pression courte sur le bouton d’encodeur sur l’option AJOUTER DES STATIONS PRÉRÉGLÉES. Il faudra se trouver sur la station et sur le groupe des STATIONS PRÉRÉGLÉES que l’on souhaite ajouter en premier (FM1>FM2>FM3). Utiliser cette fonction pour pouvoir sauvegarder des stations sur l’unité. Une fois sélectionnée, utiliser l’encodeur rotatif pour sélectionner le numéro de STATION PRÉRÉGLÉE (1-6) sur lequel on souhaite sauvegarder la station. REMOVE PRESETS (SUPPRIMER DES STATIONS PRÉRÉGLÉES) Effectuer une pression courte sur le bouton d’encodeur sur l’option SUPPRIMER DES STATIONS PRÉRÉGLÉES. Il faudra se trouver sous le groupe des STATIONS PRÉRÉGLÉES que l’on souhaite ajuster en premier (FM1>FM2>FM3). Utiliser cette fonction pour pouvoir supprimer des stations sauvegardées sur l’unité. Une fois sélectionnée, utiliser l’encodeur rotatif pour sélectionner le numéro de STATION PRÉRÉGLÉE (1-6) de la station que l’on souhaite supprimer. 11 FM Effectuer une pression courte sur le bouton d’encodeur pour accéder aux options STATIONS PRÉRÉGLÉES FM (FM1>FM2>FM3). Utiliser cette fonction permet d’avoir des groupes de stations préréglées de tuner séparés parmi lesquels choisir. Utiliser le bouton d’encodeur rotatif pour faire défiler les groupes de TUNER et appuyer brièvement pour sélectionner le groupe. AUTO STORE (SAUVEGARDE AUTOMATIQUE) Appuyer brièvement sur le bouton d’encodeur pour accéder à la fonction SAUVEGARDE AUTOMATIQUE. Il faudra se trouver sous le groupe des STATIONS PRÉRÉGLÉES que l’on souhaite ajuster en premier (FM1>FM2>FM3). Cette fonction sauvegarde automatiquement les stations préréglées sur l’unité. Cela s’arrêtera lorsque les stations préréglées 1-6 sont réglées. Sélectionner le prochain groupe de STATIONS PRÉRÉGLÉES et répéter pour remplir le jeu prochain. LOCAL Appuyer brièvement sur le bouton d’encodeur pour accéder aux options LOCAL. Une fois sélectionnée, utiliser l’encodeur rotatif pour sélectionner ON ou OFF. L’option LOCAL se règle sur les stations de radio proches avec des signaux suffisamment forts pour une bonne réception. Dans les zones où la réception est médiocre, passer au réglage à distance permet à l’unité de se régler dans des stations plus distantes. Le réglage à distance est le réglage d’usine. PARAMÈTRES DE BANDE AM Pour accéder aux PARAMÈTRES DE BANDE AM, appuyer brièvement sur le MENU lors de l’utilisation de source AM TUNER. Ceci donnera accès aux paramètres spécifiques au AM TUNER (AM>PRESETS>ADD PRESETS>REMOVE PRESETS>AUTO STORE>LOCAL). STATIONS PRÉRÉGLÉS Appuyer brièvement sur le bouton d’encodeur pour accéder à la liste des STATIONS PRÉRÉGLÉES. Utiliser cette fonction pour voir quelles STATIONS PRÉRÉGLÉES sont sauvegardées sur l’unité. ADD PRESETS (AJOUTER DES STATIONS PRÉRÉGLÉES) Appuyer brièvement sur le bouton d’encodeur pour accéder à l’option ADD PRESETS. Il faudra se trouver sur la station et sur le groupe des STATIONS PRÉRÉGLÉES que l’on souhaite ajouter en premier (AM1>AM2). Utiliser cette fonction pour pouvoir sauvegarder des stations sur l’unité. Une fois sélectionnée, utiliser l’encodeur rotatif pour sélectionner le numéro de STATION PRÉRÉGLÉE (1-6) sur lequel on souhaite sauvegarder la station. REMOVE PRESETS (SUPPRIMER DES STATIONS PRÉRÉGLÉES) Effectuer une pression courte sur le bouton d’encodeur sur l’option SUPPRIMER DES STATIONS PRÉRÉGLÉES. Il faudra se trouver sous le groupe des STATIONS PRÉRÉGLÉES que l’on souhaite ajuster en premier (AM1>AM2). Utiliser cette fonction pour pouvoir supprimer des stations sauvegardées sur l’unité. Une fois sélectionnée, utiliser l’encodeur rotatif pour sélectionner le numéro de STATION PRÉRÉGLÉE (1-6) de la station que l’on souhaite supprimer. AM Appuyer brièvement sur le bouton d’encodeur pour accéder aux options STATIONS PRÉRÉGLÉES FM (AM1>AM2). Utiliser cette fonction permet d’avoir des groupes de stations préréglées de tuner séparés parmi lesquels choisir. Utiliser le bouton d’encodeur rotatif pour faire défiler les groupes de TUNER et appuyer brièvement pour sélectionner le groupe. AUTO STORE (SAUVEGARDE AUTOMATIQUE) Appuyer brièvement sur le bouton d’encodeur pour accéder à la fonction SAUVEGARDE AUTOMATIQUE. Il faudra se trouver sous le groupe des STATIONS PRÉRÉGLÉES que l’on souhaite ajuster en premier (AM1>AM2). Cette fonction sauvegarde automatiquement les stations préréglées sur l’unité. Cela s’arrêtera lorsque les stations préréglées 1-6 sont réglées. Sélectionner le prochain groupe de STATIONS PRÉRÉGLÉES et répéter pour remplir le jeu prochain. Français LOCAL Appuyer brièvement sur le bouton d’encodeur pour accéder aux options LOCAL. Une fois sélectionnée, utiliser l’encodeur rotatif pour sélectionner ON ou OFF. L’option LOCAL se règle sur les stations de radio proches avec des signaux suffisamment forts pour une bonne réception. Dans les zones où la réception est médiocre, passer au réglage à distance permet à l’unité de se régler dans des stations plus distantes. Le réglage à distance est le réglage d’usine. PARAMÈTRES DE BANDE WB Pour accéder aux PARAMÈTRES DE BANDE WB, appuyer brièvement sur le MENU lors de l’utilisation de source WB TUNER. Ceci donnera accès aux paramètres spécifiques au WB TUNER (PRESETS>ADD PRESETS>REMOVE PRESETS). STATIONS PRÉRÉGLÉES Appuyer brièvement sur le bouton d’encodeur pour accéder à la liste des STATIONS PRÉRÉGLÉES. Utiliser cette fonction pour voir quelles STATIONS PRÉRÉGLÉES sont sauvegardées sur l’unité. ADD PRESETS (AJOUTER DES STATIONS PRÉRÉGLÉES) Effectuer une pression courte sur le bouton d’encodeur sur l’option AJOUTER DES STATIONS PRÉRÉGLÉES. Il faudra se trouver sur les deux stations que l’on souhaite ajouter en premier. Utiliser cette fonction pour pouvoir sauvegarder des stations sur l’unité. Une fois sélectionnée, utiliser l’encodeur rotatif pour sélectionner le numéro de STATION PRÉRÉGLÉE (1-6) sur lequel on souhaite sauvegarder la station. REMOVE PRESETS (SUPPRIMER DES STATIONS PRÉRÉGLÉES) Appuyer brièvement sur le bouton d’encodeur sur l’option SUPPRIMER DES STATIONS PRÉRÉGLÉES. Il faudra se trouver sous le groupe des STATIONS PRÉRÉGLÉES que l’on souhaite ajuster en premier (AM1>AM2). Utiliser cette fonction pour pouvoir supprimer des stations sauvegardées sur l’unité. Une fois sélectionnée, utiliser l’encodeur rotatif pour sélectionner le numéro de STATION PRÉRÉGLÉE (1-6) de la station que l’on souhaite supprimer. Fonctionnement USB (iPod) Une fois le périphérique connecté à l’unité source, cette fonction permet de contrôler la lecture à partir du périphérique directement de l’unité. Sélectionner l’option source USB sur l’unité source. Pour jouer ou pauser une chanson, appuyer brièvement sur le bouton PLAY/PAUSE. Pour sauter une piste vers l’avant, appuyer brièvement sur le bouton FWD. Pour sauter une piste vers l’arrière, appuyer brièvement sur le bouton REV. Pour accéder aux paramètres spécifiques USB, appuyer brièvement sur le bouton MENU pour obtenir la liste des paramètres (BROWSER>REPEAT>SHUFFLE). Utiliser l’encodeur pour sélectionner l’option à modifier. BROWSER (NAVIGATEUR) Appuyer brièvement sur le bouton d’encodeur pour accéder aux options NAVIGATEUR (PLAYLISTS>ARTISTS>ALBUMS>GEN RES>SONGS>COMPOSERS>AUDIOBOOKS>PODCASTS). Utiliser cette fonction permet de chercher les pistes ou chansons par différents types de catégories. REPEAT (RÉPÉTITION) Appuyer brièvement sur le bouton d’encodeur pour accéder aux options de la fonction RÉPÉTITION (OFF>ONE>ALL). SHUFFLE Appuyer brièvement sur le bouton d’encodeur pour accéder aux options de la fonction SHUFFLE (OFF>ALL). Cette fonction permet de régler les préférences de lecture aléatoire de pistes ou de chansons. Fonctionnement Bluetooth® Une fois le périphérique appairé à l’unité source, cette fonction permet de contrôler la lecture à partir du périphérique directement de l’unité. Sélectionner l’option source BLUETOOTH sur l’unité source. Pour jouer ou pauser une chanson, appuyer brièvement sur le bouton PLAY/PAUSE. Pour sauter une piste vers l’avant, appuyer brièvement sur le bouton FWD. Pour sauter une piste vers l’arrière, appuyer brièvement sur le bouton REV. Pour accéder aux paramètres spécifiques BLUETOOTH, appuyer brièvement sur le bouton MENU pour obtenir la liste des paramètres (BROWSER>REPEAT>SHUFFLE). Utiliser l’encodeur pour sélectionner l’option à modifier. BROWSER (NAVIGATEUR) Appuyer brièvement sur le bouton d’encodeur pour accéder aux options NAVIGATEUR (PLAYLISTS>ARTISTS>ALBUMS>GEN RES>SONGS>COMPOSERS>AUDIOBOOKS>PODCASTS). Utiliser cette fonction permet de chercher les pistes ou chansons par différents types de catégories. REPEAT (RÉPÉTITION) Appuyer brièvement sur le bouton d’encodeur pour accéder aux options de la fonction RÉPÉTITION (OFF>ONE>ALL). Cette fonction permet de régler la préférence sur le nombre de fois qu’une piste ou qu’une chanson sera répétée. SHUFFLE Appuyer brièvement sur le bouton d’encodeur pour accéder aux options de la fonction SHUFFLE (OFF>ALL). Cette fonction permet de régler les préférences de lecture aléatoire de pistes ou de chansons. REMARQUE: Lors de l’utilisation d’un câble d’extension USB, il doit s’agir d’un câble d’extension Rockford Fosgate. La distance maximale pour le câble est de 10 mètres (33 pieds). NOTE : Lors de l’appairage initiale du périphérique, le volume sur le périphérique sera approximativement à la moitié du volume. Il faudra augmenter le volume au maximum sur le périphérique avant de régler le niveau. Le périphérique restera au volume maximum après le réglage initial et lors du nouvel appairage à l’unité source. Cette fonction permet de contrôler l’application Pandora® à partir de l’unité source directement (les utilisateurs Android devront utiliser Bluetooth uniquement, les utilisateurs iOS peuvent utiliser à la fois USB et Bluetooth). Il faudra lancer l’application Pandora® sur le périphérique en premier, sélectionner alors l’option source Pandora® sur l’unité source. Pour utiliser la fonction « Thumbs Up », appuyer longuement sur le bouton SUB+. Pour utiliser la fonction « Thumbs down », appuyer longuement sur le bouton SUB-. Pour jouer ou pauser une chanson, appuyer brièvement sur le bouton PLAY/PAUSE. Pour sauter une piste vers l’avant, appuyer brièvement sur le bouton FWD. Pour accéder aux paramètres spécifiques Pandora®, appuyer brièvement sur le bouton MENU pour obtenir la liste des paramètres (STATION>BOOKMARKS>STATIONS MANAGE). Utiliser l’encodeur pour sélectionner l’option à modifier. STATIONS Pour ajuster, appuyer brièvement sur le bouton d’encodeur pour accéder. Faire tourner le bouton d’encodeur pour sélectionner les options (SHUFFLE>SORT DATE/A-Z>STATIONS). Sélectionner l’option SHUFFLE pour mélanger les stations et sélectionner la fonction SORT/TRIER va trier les stations par date ajoutée ou par ordre alphabétique. Il est également possible de sélectionner les stations sauvegardées directement de cette liste. SIGNETS Pour METTRE EN SIGNET un artiste ou une piste qui joue, appuyer brièvement sur le bouton d’encodeur pour afficher les options BOOKMARK/SIGNETS (ARTIST>TRACK). Sélectionner l’option que l’on souhaite utiliser pour la mise en signet. 12 Français Pandora, le logo Pandora et l’habillage Pandora sont des marques de commerce ou des marques de commerce déposées de Pandora Media, LLC. Utilisés avec permission. Pandora n’est disponible que dans certains pays. Prière de consulter http:// www.pandora.com/legal pour de plus amples informations. Symptôme/Avertissement Diagnostic Solution De base L'unité source ne se met pas en marche. Fusible grillé Vérifier le fusible de l'unité, remplacer avec le calibre approprié. L'allumage du véhicule est désactivé Si connectée selon les instructions, l'unité ne fonctionnera pas avec l'allumage désactivé. L'unité n'est pas correctement mise à la masse. Vérifier le câblage et réparer selon les besoins. Tuner de radio Le tuner ne syntonise aucune station Aucune antenne, ou connexion déconnectée ou ouverte dans le câble Vérifier toutes les connexions et réparer selon les besoins. Impossible de régler des stations en mode recherche On se trouve dans une zone à signal faible S'assurer que le mode LOC du tuner est désactivé. Périphériques USB Le périphérique USB ne peut pas être inséré Le périphérique USB n'est pas reconnu. Le périphérique USB a été inséré dans le mauvais sens Inverser le sens de connexion du périphérique USB, essayer de le réinsérer. Le connecteur du périphérique USB est cassé. Le remplacer par un nouveau périphérique USB. Le périphérique USB est endommagé. Les connecteurs sont desserrés Déconnecter le périphérique USB et reconnecter. Si le périphérique n'est toujours pas reconnu, tenter de le remplacer par un périphérique USB différent. USB ne fonctionne pas avec les périphériques Android. Aucun son entendu avec l'affichage « Aucun fichier » Aucun fichier MP3/WMA sauvegardé sur le périphérique USB Sauvegarder ces fichiers correctement sur le périphérique USB. USB ne fonctionne par avec les périphériques Android. Sautes de son ou son bruyant Les fichiers MP3/WMA ne sont pas créés correctement Utiliser les fichiers MP3/WMA qui sont correctement encodés. Bluetooth Le volume de source Bluetooth est inférieur aux autres sources Bluetooth du périphérique n’est pas au volume maximum 13 Tourner le volume sur le périphérique au nouveau maximum Español Características de diseño (Fig. 1) Codificador giratorio Esta perilla es para ajustar el volumen principal, volúmenes de zona, menú de navegación y ajustes de la configuración. Botón MENU Este botón le permite acceso a las configuraciones principales de la unidad presionando largo tiempo. Si se presiona brevemente consigue acceso a las configuraciones de la fuente activa. Botón SRC (encendido) Este botón le permite conmutar entre fuentes (presión breve) y encender (ON) o apagar (OFF) la unidad (presión prolongada) Botones SUB Estos botones le permiten ajustar la salida del subwoofer o de la línea de salida posterior UP (ARRIBA) o DOWN (ABAJO) (0-20). Botón PLAY/PAUSE (REPRODUCCION/PAUSA) Presione este botón para reproducir o pausar su música. Este botón también actúa como MUTE (SILENCIAMIENTO) cuando la fuente está en el modo TUNER. Botón DIMMER (ATENUADOR) Presionar este botón le permitirá seleccionar entre dos valores de brillo para la pantalla. Botón REV / FWD (REBOBINAR / AVANZAR) Use este botón para desplazarse hacia atrás y adelante a través de canales o pistas presionando brevemente. Si se presiona durante largo tiempo se activa el modo de búsqueda manual. Configuración de la unidad fuente Para acceder a la configuración de la unidad fuente, presione el botón MENU hasta que aparezcan las opciones. Haga girar el codificador para desplazarse por la lista de configuraciones y presione brevemente el botón del codificador para seleccionar la configuración que desea cambiar. (BALANCE>FADER>AUDIO>VOLTAGE GAUGE>BT PAIRING>BEEP>TUNER REGION>SOFTWARE>FACTORY DEFAULT) Esta unidad fuente tiene cero consumo de corriente cuando está apagada. Se guardará todas sus configuraciones y predeterminaciones junto con la batería de su embarcación durante el almacenamiento. BALANCE Presione brevemente el botón codificador para acceder al ajuste de BALANCE. Haga girar el botón del codificador para configurar la salida de BALANCE. FADER (ATENUADOR) Presione brevemente el botón codificador para acceder al ajuste de FADER. Haga girar el botón del codificador para configurar la salida de FADER. AUDIO Para acceder a la configuración de AUDIO, presione brevemente la opción AUDIO desde la pantalla MENU. Haga girar el codificador para desplazarse por la lista de configuraciones y presione brevemente el botón del codificador para seleccionar la configuración que desea cambiar. (7 BAND EQ>CROSSOVER>PEQ>SOURCE GAIN>INTERNAL AMPLIFIER) 7 BAND EQ (ECUALIZADOR DE 7 BANDAS) Presione brevemente el botón codificador para acceder a la configuración de 7 BAND EQ. Use el codificador giratorio para desplazarse por la configuración del EQ. (FLAT > ROCK > CLASSIC > ACOUSTIC > DANCE > ELECTRONIC > HIP-HOP > CUSTOM) al configurar CUSTOM EQ, presione brevemente el botón del codificador para establecer la primera frecuencia. Una vez activo, haga girar el codificador para ajustar la configuración de la frecuencia. Presione brevemente de nuevo el botón del codificador para acceder a la frecuencia siguiente. Repita hasta haber terminado la configuración del EQ. Presione brevemente el botón MENU para salir y volver a subir un nivel. CROSSOVER (CRUCE) Presione brevemente el botón para acceder a la configuración 14 de CROSSOVER. Use el codificador giratorio para seleccionar las opciones de la zona de cruce (FRONT>REAR>SUB). Presione brevemente el codificador para ajustar la frecuencia del cruce (60Hz>80Hz>120Hz>APF). Presione brevemente MENU para salir y volver a subir un nivel. PUNCH EQ Presione brevemente el botón para acceder a la configuración de PUNCH EQ. Use el codificador giratorio para ajustar la ganancia de la salida (0 a 12). Presione brevemente MENU para salir y volver a subir un nivel. Punch EQ es un ecualizador abordo con hasta +18dB a 45Hz y/o un refuerzo de hasta +12dB a 12.5kHz SOURCE GAIN (GANANCIA DE LA FUENTE) Para ajustar el nivel de ganancia del dispositivo, desplácese a través de las entradas (FM TUNER>AM TUNER>WB TUNER>USB>BLUETOOTH>PANDORA) hasta el dispositivo que quiere ajustar, presione brevemente el botón del codificador para acceder a los ajustes de la ganancia. Haga girar el botón codificador para ajustar el nivel de ganancia. (-3dB > -2dB > -1dB > 0dB > +1dB > +2dB > +3dB) AMPLIFICADOR INTERNO Presione brevemente el botón para acceder a las opciones de AMPLIFICADOR INTERNO. Use el codificador giratorio para seleccionar las opciones (ON>OFF). Al usar un amplificador para alimentar sus altavoces, seleccione OFF. Si está alimentando sus altavoces directamente desde la unidad fuente, seleccione ON en INTERNAL AMPLIFIER. VOLTAGE GAUGE (VOLTIMETRO) Para mostrar el voltaje del vehículo, presione brevemente el botón del codificador en la opción VOLTAGE GAUGE. EMPAREJADO DEL DISPOSITIVO BT Pulse brevemente el botón del encoder para acceder a las opciones (DISCOVERABLE>DISPOSITIVO). DESCUBIERTA Gire el botón del codificador para seleccionar si la unidad es detectable para el emparejamiento. (ENABLE> DESACTIVAR) Una vez habilitada, la unidad fuente es ahora detectable y lista para emparejarse a su dispositivo. Abra la configuración de Bluetooth en su dispositivo para encontrar la unidad fuente etiquetada “Rockford PMX” y seleccione. DISPOSITIVO Si selecciona DISPOSITIVO presionando brevemente el botón del encoder, podrá cambiar el nombre de la unidad fuente con un máximo de 16 caracteres. Esto le da la capacidad de tener un nombre único para facilitar la identificación durante el emparejamiento del dispositivo. Pulse brevemente el botón del encoder para seleccionar la letra que desea cambiar y gire el mando para cambiar el valor. Repita el proceso hasta que se alcance el nombre deseado. BEEP (ZUMBIDO) Presione brevemente el botón codificador para acceder a las opciones de BEEP. Haga girar el botón codificador para encender y apagar (ON/OFF) el sistema. REGIÓN DE SINTONIZADOR Para ajustar, presione brevemente el botón del codificador para tener acceso. Haga girar el botón del codificador para seleccionar la REGION DE SINTONIZADOR de su preferencia. (EUROPE > USA > RUSSIA > LATIN > ASIA > JAPAN > MIDEAST > AUSTRALIA) SOFTWARE VERSION - Presione brevemente el botón del codificador para visualizar la versión actual del firmware de la unidad. UPDATE - Presione brevemente el botón del codificador para actualizar el firmware. Siga las instrucciones de la pantalla al actualizar. TEMA Para ajustar el tema, pulse brevemente el codificador para acceder a la función . Girar el botón del codificador para selec- Español cionar el tema deseado ( día, noche,) PREDETERMINACIÓN DE FABRICA AUDIO – Presione brevemente el botón para tener acceso. Gire el botón codificador para seleccionar YES/NO. Seleccionar YES repondrá su unidad de nuevo a la configuración predeterminada de la fábrica. SYSTEM – Presione brevemente el botón del codificador para tener acceso. Gire el botón codificador para seleccionar YES/NO. Seleccionar YES repondrá su unidad de nuevo a la configuración predeterminada de la fábrica. Funcionamiento Básico PARA ENCENDER Y APAGAR (ON/OFF) LA UNIDAD. Presione prolongadamente el botón SRC (encendido) para encender la unidad o para apagarla (ON u OFF). AJUSTE DEL VOLUMEN Haga girar la perilla del codificador a la izquierda o a la derecha al nivel de volumen deseado (0-40). Se visualizará el nivel de volumen actual durante el ajuste. AJUSTE DE LA SALIDA DEL SUBWOOFER Presione los botones SUB + o SUB- para ajustar el nivel de la salida (0-20). AJUSTE DEL BRILLO DE LA PANTALLA Presione brevemente el botón SCREEN BRIGHTNESS para ajustar el nivel de brillo. Hay dos niveles de brillo. SELECCIÓN DE UNA FUENTE PARA REPRODUCIR Presione brevemente el botón SRC para mostrar las distintas opciones de fuente (FM TUNER>AM TUNER>WB TUNER>USB>B LUETOOTH>PANDORA>SIRIUSXM). Use el codificador giratorio o presione brevemente SCR para desplazarse por las fuentes. Operación del sintonizador (FM/AM/WB) Para operar use el codificador giratorio para seleccionar la fuente del sintonizador que quiere escuchar (FM>AM>WB). Para BUSCAR AUTOMÁTICAMENTE estaciones, presione brevemente los botones FWD y REV. Para BUSCAR MANUALMENTE estaciones, presione prolongadamente los botones FWD y REV para sintonizar la frecuencia deseada. Para MUTE (silenciar) el TUNER (sintonizador), presione brevemente el botón PLAY/PAUSE (reproducción/pausa). CONFIGURACIÓN DE BANDAS DE FW Para acceder a FM BAND SETTINGS, presione brevemente el MENU al utilizar la fuente FM TUNER. Esto le permite acceso a las configuraciones específicas de FM TUNER (FM>PRESETS>ADD PRESETS>REMOVE PRESETS>AUTO STORE>LOCAL). PRESETS (PREDETERMINACIONES) Presione brevemente el botón codificador para acceder a las opciones de PRESETS. El uso de esta característica le permite ver qué PRESETS se guardan en la unidad. ADD PRESETS (AGREGAR PREDETERMINACIONES) Presione brevemente el botón codificador para acceder a la opción ADD PRESETS. Tendrá que estar en ambos, la estación y el grupo PRESET que quiere ajustar primero (FM1>FM2>FM3). Usar esta característica le permite guardar estaciones en la unidad. Una vez seleccionado, use el codificador giratorio para seleccionar el número PRESET (1-6) en el que quiere guardar la estación. REMOVE PRESETS (ELIMINACIÓN DE PREDETERMINACIONES) Presione brevemente el botón codificador para acceder a la opción REMOVE PRESETS. Tendrá que estar bajo el grupo PRESET que quiere ajustar primero (FM1>FM2>FM3). Usar esta característica le permite eliminar las estaciones guardadas en la unidad. Una vez seleccionado, use el codificador giratorio para seleccionar el número PRESET (1-6) de la estación que quiere eliminar. FM Presione brevemente el botón codificador para acceder a 15 las opciones de FM PRESET (FM1>FM2>FM3). El uso de esta característica le permite tener grupos predeterminados de sintonizador separados de los que puede escoger. Use el botón codificador giratorio para desplazarse a través de los grupos de TUNER y presione brevemente para seleccionar el grupo. AUTO STORE (ALMACENAMIENTO AUTOMÁTICO) Presione brevemente el botón codificador para acceder a la función AUTO STORE. Tendrá que estar bajo el grupo PRESET que quiere ajustar primero (FM1>FM2>FM3). Esta característica almacena automáticamente predeterminaciones en la unidad. Se detiene cuando se haya configurado las predeterminaciones 1-6. Seleccione el siguiente grupo PRESET y repita para llenar el próximo. LOCAL Presione brevemente el botón codificador para acceder a las opciones de LOCAL. Una vez seleccionado, use el codificador giratorio para seleccionar ON u OFF. La opción local sintoniza estaciones más cercanas con señales suficientemente fuertes para tener buena recepción. En áreas donde la recepción es deficiente, cambiar a sintonización distante habilita a la unidad a que sintonice estaciones más distantes. La sintonía distante es la predeterminación. CONFIGURACIÓN DE BANDAS DE AM Para acceder a AM BAND SETTINGS, presione brevemente el MENU al utilizar la fuente AM TUNER. Esto le permite acceso a las configuraciones específicas de AM TUNER (FM>PRESETS>ADD PRESETS>REMOVE PRESETS>AUTO STORE>LOCAL). PRESETS Presione brevemente el botón codificador para acceder a las opciones de PRESETS. El uso de esta característica le permite ver qué PRESETS se guardan en la unidad. ADD PRESETS (AGREGAR PREDETERMINACIONES) Presione brevemente el botón codificador para acceder a la opción ADD PRESETS. Tendrá que estar en ambos, la estación y el grupo PRESET que quiere ajustar primero (AM1>AM2). Usar esta característica le permite guardar las estaciones en la unidad. Una vez seleccionado, use el codificador giratorio para seleccionar el número PRESET (1-6) en el que quiere guardar la estación. REMOVE PRESETS (ELIMINACION DE PREDETERMINACIONES) Presione brevemente el botón codificador para acceder a la opción REMOVE PRESETS. Tendrá que estar bajo el grupo PRESET que quiere ajustar primero (AM1>AM2). Usar esta característica le permite eliminar las estaciones guardadas en la unidad. Una vez seleccionado, use el codificador giratorio para seleccionar el número PRESET (1-6) de la estación que quiere eliminar. AM Presione brevemente el botón codificador para acceder a las opciones de FM PRESET (AM1>AM2). El uso de esta característica le permite tener grupos de predeterminación de de sintonizador separados de los que puede escoger. Use el botón codificador giratorio para desplazarse a través de los grupos de TUNER y presione brevemente para seleccionar el grupo. AUTO STORE Presione brevemente el botón codificador para acceder a la función AUTO STORE. Tendrá que estar bajo el grupo PRESET que quiere ajustar primero (AM1>AM2). Esta característica almacena automáticamente predeterminaciones en la unidad. Se detiene cuando se configura las predeterminaciones 1-6. Seleccione el siguiente grupo PRESET y repita para completar el siguiente. LOCAL Presione brevemente el botón codificador para acceder a las opciones de LOCAL. Una vez seleccionado, use el codificador giratorio para seleccionar ON u OFF. La opción local sintoniza estaciones más cercanas con señales suficientemente fuertes para tener buena recepción. En áreas donde la recepción es deficiente, cambiar a sintonización distante habilita a la unidad Español a que sintonice estaciones más distantes. La sintonía distante es la predeterminación. WB BAND SETTINGS (CONFIGURACIÓN DE LA BANDA WB) Para acceder a WB BAND SETTINGS, presione brevemente el MENU al utilizar la fuente WB TUNER. Esto le permite acceso a las configuraciones específicas de WB TUNER (PRESETS>ADD PRESETS>REMOVE PRESETS). PRESETS Presione brevemente el botón codificador para acceder a las opciones de PRESETS. El uso de esta característica le permite ver qué PRESETS se guardan en la unidad. ADD PRESETS (AGREGAR PREDETERMINACIONES) Presione brevemente el botón codificador para acceder a la opción ADD PRESETS. Tendrá que estar en la estación que quiere agregar primero. Usar esta característica le permite guardar las estaciones en la unidad. Una vez seleccionado, use el codificador giratorio para seleccionar el número PRESET (1-6) en el que quiere guardar la estación. REMOVE PRESETS (ELIMINACIÓN DE PREDETERMINACIONES) Presione brevemente el botón codificador para acceder a la opción REMOVE PRESETS. Tendrá que estar bajo el grupo PRESET que quiere ajustar primero (AM1>AM2). Usar esta característica le permite eliminar las estaciones guardadas en la unidad. Una vez seleccionada, use el codificador giratorio para seleccionar el número PRESET(1-6) de la estación que quiere eliminar. Operación de USB (iPod) Después que su dispositivo esté conectado a la unidad fuente, esta característica le permite controlar la reproducción de su dispositivo directamente desde la unidad. Seleccione la opción de fuente USB en la unidad fuente. Para reproducir o pausar una canción, presione brevemente el botón PLAY/PAUSE. Para omitir una pista y avanzar, presione brevemente el botón FWD. Para omitir una pista y retroceder, presione brevemente el botón REV. Para acceder a una configuración específica de USB, presione brevemente el botón MENU para visualizar una lista de configuraciones (BROWSER>REPEAT>SHUFFLE). Use el codificador para seleccionar la opción a cambiar. BROWSER Presione brevemente el botón del codificador para acceder a las opciones del BROWSER (PLAYLISTS>ARTISTS>ALBUMS>GENRE S>SONGS>COMPOSERS>AUDIOBOOKS>PODCASTS). El uso de esta característica permite la búsqueda de pistas o canciones por tipos de categorías distintas. REPEAT Presione brevemente el botón codificador para acceder a las opciones de la característica REPEAT (OFF>ONE>ALL). SHUFFLE Presione brevemente el botón codificador para acceder a las opciones de la característica SHUFFLE (OFF>ALL). Esta característica le permite que configure su preferencia en cuanto a la reproducción en orden aleatorio de pistas o canciones. NOTA: Cuando use un cable de extensión USB, debe ser un cable de extensión alimentado por Rockford Fosgate. La distancia máxima para el cable es de 10 metros (33 pies). Operación de Bluetooth® Después que su dispositivo esté conectado a la unidad fuente, esta característica le permite controlar la reproducción de su dispositivo directamente desde la unidad. Seleccione la opción de fuente BLUETOOTH en la unidad fuente. Para reproducir o pausar una canción, presione brevemente el botón PLAY/PAUSE. Para omitir una pista y avanzar, presione brevemente el botón FWD. Para omitir una pista y retroceder, presione brevemente el botón REV. Para acceder a una configuración específica de BLUETOOTH, presione brevemente el botón MENU para visualizar una lista de configuraciones (BROWSER>REPEAT>SHUFFLE). Use el codificador para seleccionar la opción a cambiar. BROWSER Presione brevemente el botón del codificador para acceder a las opciones del BROWSER (PLAYLISTS>ARTISTS>ALBUMS>GENRE S>SONGS>COMPOSERS>AUDIOBOOKS>PODCASTS). El uso de esta característica permite la búsqueda de pistas o canciones por tipos de categorías distintas. REPEAT Presione brevemente el botón codificador para acceder a las opciones de de la característica REPEAT (OFF>ONE>ALL). Esta característica le permite que configure su preferencia en cuanto a la cantidad de veces que se repetirá una pista o canción. SHUFFLE Presione brevemente el botón codificador para acceder a las opciones de la característica SHUFFLE (OFF>ALL). Esta característica le permite que configure su preferencia en cuanto a la reproducción en orden aleatorio de pistas o canciones. NOTA: Cuando se aparea inicialmente el dispositivo, el volumen en el dispositivo será aproximadamente la mitad del volumen. Deberá subir el volumen al máximo en el dispositivo conectado antes de la configuración del nivel. El dispositivo permanecerá en el volumen máximo después de la configuración inicial y cuando se vuelva a aparear con la unidad fuente. Esta característica le permite controlar la aplicación Pandora® directamente desde la unidad fuente (los usuarios de Android deberán usar solamente Bluetooth, los usuarios de iOS pueden usar ambas, USB y Bluetooth). Tendrá que iniciar la aplicación Pandora® en su dispositivo, luego debe seleccionar la opción de fuente de Pandora® en la unidad fuente. Para usar la característica “Thumbs Up”, presione prolongadamente el botón SUB+. Para usar la característica “Thumbs down”, presione prolongadamente el botón SUB-. Para reproducir o pausar una canción, presione brevemente el botón PLAY/PAUSE. Para omitir una pista y avanzar, presione brevemente el botón FWD. Para acceder a una configuración específica de Pandora®, presione brevemente el botón MENU para visualizar la lista de configuraciones (STATIONS>BOOKMARKS>STATIONS MANAGE). Use el codificador para seleccionar la opción a cambiar. STATIONS Para ajustar, presione brevemente el botón del codificador para tener acceso. Gire el botón del codificador para seleccionar sus opciones (SHUFFLE>SORT DATE/A-Z>STATIONS). Si se selecciona la opción SHUFFLE se cambiará aleatoriamente sus estaciones y seleccionar la característica SORT ordenará sus estaciones por fecha de agregado o alfabéticamente. Usted también puede seleccionar sus estaciones guardadas directamente de esta lista. BOOKMARKS Para BOOKMARK (poner una marca) en un artista o en una pista que se está reproduciendo, presione brevemente el botón del codificador para visualizar sus opciones de BOOKMARK (ARTIST>TRACK). Seleccione la opción que desea usar para bookmarking (marcar). Pandora, el logotipo de Pandora, y la decoración comercial de Pandora son marcas comerciales o marcas registradas de Pandora Media, LLC. Se ha usado con auorización. Pandora solamente está disponible en ciertos países. Si desea más información visite http://www.pandora.com/legal. 16 Español Síntoma / Asesoramiento Diagnóstico Acción correctiva Básica Compruebe el fusible de la unidad cambie por uno con la calificación correcta. Si conecta siguiendo las instrucciones, la unidad no funcionará con la ignición apagada. Fusible quemado No se enciende la unidad fuente El sintonizador no sintoniza ninguna estación No puede sintonizar estaciones en el modo seek No se puede insertar el dispositivo USB No se reconoció el dispositivo USB No se escuchó un sonido y se muestra el mensaje "No File" (sin archivo) El sonido salta o es ruidoso El volumen de la fuente de Bluetooth es más bajo que las otras fuentes La ignición del vehículo está apagada El amplificador no está correctaRevise las conexiones y repárelas como sea necesario mente conectado a tierra Sintonizador de radio No tiene antena o está descoRevise todas las conexiones y repárelas como sea nectada o hay una conexión abierta necesario. en el cable Asegúrese de que el modo LOC del sintonizador esté Está en un área de señal débil apagado Dispositivos USB Se insertó en dispositivo USB en la Intente reinsertar de nuevo invirtiendo la dirección de dirección equivocada la conexión del dispositivo USB. El conector del dispositivo USB Cambie por un dispositivo USB nuevo está roto El dispositivo USB está dañado Los conectores están sueltos Desconecte el dispositivo USB y vuelva a conectar. Si el dispositivo todavía no se reconoce, pruebe de reemplazar con un dispositivo USB distinto. USB no funciona con los dispositivos Android. No se almacenan archivos MP3/ WMA en el dispositivo USB Almacene correctamente estos archivos en el dispositivo USB USB no funciona con dispositivos Android. Los archivos MP3/WMA no fueron creados correctamente. Bluetooth Use archivos MP3/WMA que estén correctamente codificados. Bluetooth desde el dispositivo no está al volumen máximo 17 Aumente el volumen del dispositivo al nivel máximo Deutsch Design-Elemente (Fig. 1) Drehgeber Mit diesem Knopf werden Hauptlautstärke, Zonenlautstärke, Menünavigation und Anpassungen der Einstellungen eingestellt. MENU-Taste Langes Drücken der Taste ermöglicht den Zugriff auf die Haupteinstellungen des Geräts. Kurzes Drücken ermöglicht den Zugriff auf die Einstellungen für die aktive Source. SRC (Netzschalter)-Taste Diese Taste ermöglicht das Umschalten zwischen Sources (kurzes Drücken) und Ein- und Ausschalten des Geräts ON/OFF (langes Drücken). SUB-Tasten Über diese Tasten wird der Subwoofer-Ausgang oder der hintere Line-out nach oben (UP) oder unten (DOWN) eingestellt (0-20). PLAY/PAUSE-Taste Diese Taste für die Musik-Wiedergabe oder Unterbrechnung drücken. Diese Taste dient gleichzeitig als MUTE-Taste (Stummschalttaste), wenn die Source im TUNER-Modus ist. DIMMER-Taste Durch Drücken dieser Taste kann man zwischen den zwei Helligkeitsstufen des Displays auswählen. REV/FWD-Taste Durch kurzes Drücken dieser Taste durch die Kanäle oder Titel zurück- oder vorspringen. Langes Drücken aktiviert den manuellen Suchmodus. Einstellungen des Source-Geräts Um auf die Einstellungen des Source-Geräts zuzugreifen, die MENU-Taste lange drücken, bis die Optionen angezeigt werden. Den Drehgeber drehen, durch die Liste der Einstellungen blättern und den Drehgeber-Knopf kurz drücken, um die gewünschte Einstellung auszuwählen und zu ändern. (BALANCE>FADER>AUDIO>VOLTAGE GAUGE>BT PAIRING>BEEP>TUNER REGION>SOFTWARE>FACTORY DEFAULT) (BALANCE>FADER>AUDIO>SPANNU NSMESSER>BT PAIRING>SIGNALTON>TUNERREGION>SOFTWARE>WERKSEINSTELLUNG) Wenn das Gerät ausgeschaltet ist, ist die Stromaufnahme gleich Null. Alle Einstellungen und Voreinstellungen werden mit der Bordbatterie während der Lagerung gespeichert. BALANCE Den Drehgeber-Knopf kurz drücken, um auf die BALANCEEinstellungen zuzugreifen. Den Drehgeber-Knopf drehen, um die Ausgang-BALANCE einzustellen. FADER Den Drehgeber-Knopf kurz drücken, um auf die FADER-Einstellungen zuzugreifen. Den Drehgeber-Knopf drehen, um den Ausgang-FADER einzustellen. AUDIO Die Option AUDIO in der MENU-Anzeige kurz drücken, um auf die AUDIO-Einstellungen zuzugreifen. Den Drehgeber drehen, durch die Liste der Einstellungen blättern und den Drehgeber-Knopf kurz drücken, um die gewünschte Einstellung auszuwählen und zu ändern. (7 BAND EQ>CROSSOVER>PEQ>SOURCE GAIN>INTERNAL AMPLIFIER) (7 BAND EQ>CROSSOVER>PEQ>SOURCEVERSTÄRKUNG>INTERNER VERSTÄRKER) 7 BAND EQ Den Drehgeber-Knopf kurz drücken, um auf die Einstellungen 7 BAND EQ zuzugreifen. Mit dem Drehgeber durch die EQ-Einstellungen blättern. (FLAT > ROCK > CLASSIC > ACOUSTIC > DANCE > ELECTRONIC > HIP-HOP > CUSTOM) Bei der Einrichtung von CUSTOM EQ den Drehgeber-Knopf kurz drücken, um die erste Frequenz einzustellen. Nach der Aktivierung den Drehgeber drehen und die Frequenzeinstellungen vornehmen. Den Drehgeber-Knopf erneut kurz drücken, um auf die nächste Frequenz 18 zuzugreifen. Wiederholen, bis alle EQ-Einstellungen vorgenommen wurden. Zum Beenden die MENU-Taste kurz drücken und eine Ebene zurück gehen. CROSSOVER Kurz drücken, um auf die CROSSOVER-Einstellungen zuzugreifen. Mit dem Drehgeber die Optionen der CROSSOVER-Zonen auswählen (FRONT>REAR>SUB) (VORNE>HINTEN>SUB). Den Drehgeber kurz drücken, um die Crossover-Frequenz einzustellen (60Hz>80Hz>120Hz>APF). Zum Beenden MENU kurz drücken und eine Ebene zurück gehen. PUNCH EQ Kurz drücken, um auf die Einstellungen PUNCH EQ zuzugreifen. Mit dem Drehgeber die Ausgangsverstärkung (0-12) einstellen. Zum Beenden MENU kurz drücken und eine Ebene zurück gehen. Punch EQ ist ein integrierter Entzerrer mit bis zu +18 dB @ 45 Hz SOURCE GAIN (Source-Verstärkung) Zum Einstellen des Levels der Gerät-Eingangsverstärkung durch die Eingänge (FM TUNER>AM TUNER>WB TUNER>USB>BLUETOOTH>PANDORA) zum Gerät blättern, das eingestellt werden soll, und den Drehgeber-Knopf kurz drücken, um auf die Verstärkungseinstellungen zuzugreifen. Den Drehgeber-Knopf drehen, um das Verstärkungslevel einzustellen. (-3dB > -2dB > -1dB > 0dB > +1dB > +2dB > +3dB) INTERNAL AMPLIFIER (Interner Verstärker) Kurz drücken, um auf die Einstellungen INTERNAL AMPLIFIER zuzugreifen. Mit dem Drehgeber die Optionen auswählen (ON>OFF). Wenn ein Verstärker für die Stromversorgung der Lautsprecher verwendet wird, OFF wählen. Wenn die Lautsprecher direkt vom Source-Gerät mit Strom versorgt werden, den INTERNAL AMPLIFIER auf ON einstellen. VOLTAGE GAUGE (Spannungsmesser) Zur Ansicht der Fahrzeugspannung den Drehgeber-Knopf auf der Option VOLTAGE GAUGE kurz drücken. BT DEVICE PAIRING (BT-Geräte-Kopplung) Drücken Sie kurz die Encoder-Taste, um auf Optionen zuzugreifen (DISCOVERABLE> DEVICE). ENTDECKLICH Drehen Sie die Encoder-Taste, um auszuwählen, ob die Einheit für die Paarung erkennbar ist. (ENABLE> DISABLE) Sobald sie aktiviert ist, ist die Quelleneinheit jetzt erkennbar und bereit für die Paarung mit Ihrem Gerät. Öffnen Sie die BluetoothEinstellungen auf Ihrem Gerät, um die Quelleneinheit “Rockford PMX” zu finden, und wählen Sie. GERÄT Wenn Sie DEVICE durch kurzes Drücken der Encodertaste auswählen, können Sie die Quelleinheit mit bis zu 16 Zeichen umbenennen. Dadurch haben Sie die Möglichkeit, einen eindeutigen Namen für eine einfache Identifikation während der Gerätepaarung zu haben. Drücken Sie kurz die Encoder-Taste, um den zu ändernden Buchstaben auszuwählen, und drehen Sie den Regler, um den Wert zu ändern. Wiederholen Sie den Vorgang, bis der gewünschte Name erreicht ist. BEEP (Signalton) Den Drehgeber-Knopf kurz drücken, um auf die BEEP-Optionen zuzugreifen. Den Drehgeber-Knopf drehen, um den SystemSignalton zu aktivieren (ON) oder deaktivieren (OFF). TUNER REGION Den Drehgeber-Knopf kurz drücken, um diese einzustellen. Den Drehgeber-Knopf drehen, um die bevorzugte TUNER REGION auszuwählen. (EUROPE > USA > RUSSIA > LATIN > ASIA > JAPAN > MIDEAST > AUSTRALIA) (EUROPA > USA > RUSSLAN > LATEINAMERIKA > ASIEN > JAPAN > NAHOST > AUSTRALIEN) SOFTWARE VERSION - Den Drehgeber-Knopf kurz drücken, um die aktuelle Firmware-Version des Geräts anzuzeigen. UPDATE (Aktualisieren) - Den Drehgeber-Knopf kurz drücken, Deutsch um die Firmware zu aktualisieren. Den Anleitungen auf dem Bildschirm während der Aktualisierung folgen. THEMA Zur Einstellung des Thema, drücken Sie kurz die Encoder die Funktion zuzugreifen. Drehen Sie den Encoder- Taste, um das gewünschte Thema (Tag, Nacht) FACTORY DEFAULT (Werkseinstellung) AUDIO – Den Drehgeber-Knopf kurz drücken, um diese einzustellen. Den Drehgeber-Knopf drehen, um YES/NO (Ja/Nein) auszuwählen. YES setzt das Gerät auf die Werkseinstellungen zurück. SYSTEM – Den Drehgeber-Knopf kurz drücken, um diese einzustellen. Den Drehgeber-Knopf drehen, um YES/NO (Ja/ Nein) auszuwählen. YES setzt das Gerät auf die Werkseinstellungen zurück. Grundlegende Funktionen EIN- UND AUSSCHALTEN DES GERÄTS Die SRC (Netzschalter)-Taste lange drücken, um das Gerät ein(ON) oder auszuschalten (OFF). EINSTELLUNG DER LAUTSTÄRKE Den Drehgeber-Knopf nach links oder rechts auf die gewünschte Lautstärke (0-40) drehen. Die aktuelle Lautstärke wird während der Einstellung angezeigt. EINSTELLUNG DES SUBWOOFER-AUSGANGS Die Tasten SUB + oder SUB- drücken, um den Ausgangspegel einzustellen (0-20). EINSTELLUNG DER BILDSCHIRM-HELLIGKEIT Die Taste SCREEN BRIGHTNESS kurz drücken, um die Helligkeit einzustellen. Es gibt zwei Helligkeitsstufen. AUSWAHL EINER SOURCE FÜR DIE WIEDERGABE Die SRC-Taste kurz drücken, um die verschiedenen SourceOptionen anzuzeigen (FM TUNER>AM TUNER>WB TUNER>US B>BLUETOOTH>PANDORA>SIRIUSXM). Den Drehgeber-Knopf verwenden oder die SRC-Taste kurz drücken, um durch die Sources zu blättern. Tuner-Bedienung (FM/AM/WB) Mit dem Drehgeber-Knopf die Tuner-Source wählen, der man zuhören möchte (FM>AM>WB). Um Sender AUTOMATISCH ZU SUCHEN, die Tasten FWD und REV kurz drücken. Um Sender MANUELL ZU SUCHEN, die Tasten FWD und REV zum Einstellen der gewünschten Frequenz lange drücken. Um den TUNER auf MUTE (stumm) einzustellen, die Taste PLAY/ PAUSE kurz drücken. FM BAND SETTINGS (FM-Band-Einstellungen) Um auf FM BAND SETTINGS zuzugreifen, bei der Verwendung der Source FM TUNER kurz MENU drücken. Dies gibt Zugang zu den FM TUNER-spezifischen Einstellungen (FM>PRESETS>ADD PRESETS>REMOVE PRESETS>AUTO STORE>LOCAL) (FM>VOREINSTELLUNGEN>VOREINSTELLUNG EN HINZUFÜGEN>VOREINSTELLUNGEN ENTFERNEN>AUTOM SPEICHERUNG>ÖRTL). PRESETS (Voreinstellungen) Den Drehgeber-Knopf kurz drücken, um auf die PRESETS-Liste zuzugreifen. Mit dieser Funktion kann angezeigt werden, welche PRESETS auf dem Gerät gespeichert sind. ADD PRESETS (Voreinstellungen hinzufügen) Den Drehgeber-Knopf kurz drücken, um auf die Option ADD PRESETS zuzugreifen. Es muss sowohl der Sender als auch die PRESET-Gruppe angezeigt sein, die man zuerst hinzufügen möchte (FM1>FM2>FM3). Mit dieser Funktion kann man Sender auf dem Gerät speichern. Nach der Auswahl mit dem Drehgeber die PRESET-Nummer (1-6) wählen, auf der der Sender gespeichert werden soll. REMOVE PRESETS (Voreinstellungen entfernen) Den Drehgeber-Knopf kurz drücken, um auf die Option REMOVE PRESETS zuzugreifen. Es muss die PRESET-Gruppe angezeigt 19 sein, die man zuerst einstellen möchte (FM1>FM2>FM3). Mit dieser Funktion kann man gespeicherte Sender auf dem Gerät entfernen. Nach der Auswahl mit dem Drehgeber die PRESETNummer (1-6) des Senders wählen, der entfernt werden soll. FM Den Drehgeber-Knopf kurz drücken, um auf die Optionen FM PRESET (FM1>FM2>FM3) zuzugreifen. Mit dieser Funktion ist es möglich, getrennte Gruppen Tuner-Voreinstellungen zur Auswahl zu haben. Mit dem Drehgeber-Knopf durch die TUNER-Gruppen blättern und kurz drücken, um die Gruppe auszuwählen. AUTO STORE (Automatische Speicherung) Den Drehgeber-Knopf kurz drücken, um auf die Funktion AUTO STORE zuzugreifen. Es muss die PRESET-Gruppe angezeigt sein, die man zuerst einstellen möchte (FM1>FM2>FM3). Diese Funktion speichert die Voreinstellungen automatisch auf dem Gerät. Sie stoppt, wenn die Voreinstellungen 1-6 eingestellt sind. Die nächste PRESET-Gruppe wählen und wiederholen, um die nächste Serie einzustellen. LOCAL (Örtlich) Den Drehgeber-Knopf kurz drücken, um auf die LOCAL-Optionen zuzugreifen. Nach der Auswahl mit dem Drehgeber ON oder OFF auswählen. Die LOCAL-Option stellt sich auf Radiosender in der Nähe ein, die ausreichend starke Signale für einen guten Empfang haben. In Gebieten mit schlechtem Empfang kann das Gerät durch Auswahl von Ferneinstellung weiter entfernt gelegene Sender einstellen. Ferneinstellung ist der Standard. AM BAND SETTINGS (AM-Band-Einstellungen) Um auf AM BAND SETTINGS zuzugreifen, bei der Verwendung der Source AM TUNER kurz MENU drücken. Dies gibt Zugang zu den AM TUNER-spezifischen Einstellungen (AM>PRESETS>ADD PRESETS>REMOVE PRESETS>AUTO STORE>LOCAL) (AM>VOREINSTELLUNGEN>VOREINSTELLUNG EN HINZUFÜGEN>VOREINSTELLUNGEN ENTFERNEN>AUTOM SPEICHERUNG>ÖRTL). PRESETS (Voreinstellungen) Den Drehgeber-Knopf kurz drücken, um auf die PRESETS-Liste zuzugreifen. Mit dieser Funktion kann angezeigt werden, welche PRESETS auf dem Gerät gespeichert sind. ADD PRESETS (Voreinstellungen hinzufügen) Den Drehgeber-Knopf kurz drücken, um auf die Option ADD PRESETS zuzugreifen. Es muss sowohl der Sender als auch die PRESET-Gruppe angezeigt sein, die man zuerst hinzufügen möchte (AM1>AM2). Mit dieser Funktion kann man Sender auf dem Gerät speichern. Nach der Auswahl mit dem Drehgeber die PRESET-Nummer (1-6) wählen, auf der der Sender gespeichert werden soll. REMOVE PRESETS (Voreinstellungen entfernen) Den Drehgeber-Knopf kurz drücken, um auf die Option REMOVE PRESETS zuzugreifen. Es muss die PRESET-Gruppe angezeigt sein, die man zuerst einstellen möchte (AM1>AM2). Mit dieser Funktion kann man gespeicherte Sender auf dem Gerät entfernen. Nach der Auswahl mit dem Drehgeber die PRESET-Nummer (1-6) des Senders wählen, der entfernt werden soll. AM Den Drehgeber-Knopf kurz drücken, um auf die Optionen FM PRESET (AM1>AM2) zuzugreifen. Mit dieser Funktion ist es möglich, getrennte Gruppen Tuner-Voreinstellungen zur Auswahl zu haben. Mit dem Drehgeber-Knopf durch die TUNER-Gruppen blättern und kurz drücken, um die Gruppe auszuwählen. AUTO STORE (Automatische Speicherung) Den Drehgeber-Knopf kurz drücken, um auf die Funktion AUTO STORE zuzugreifen. Es muss die PRESET-Gruppe angezeigt sein, die man zuerst einstellen möchte (AM1>AM2). Diese Funktion speichert die Voreinstellungen automatisch auf dem Gerät. Sie stoppt, wenn die Voreinstellungen 1-6 eingestellt sind. Die nächste PRESET-Gruppe wählen und wiederholen, um die nächste Deutsch Serie einzustellen. LOCAL (Örtlich) Den Drehgeber-Knopf kurz drücken, um auf die LOCAL-Optionen zuzugreifen. Nach der Auswahl mit dem Drehgeber ON oder OFF auswählen. Die LOCAL-Option stellt sich auf Radiosender in der Nähe ein, die ausreichend starke Signale für einen guten Empfang haben. In Gebieten mit schlechtem Empfang kann das Gerät durch Auswahl von Ferneinstellung weiter entfernt gelegene Sender einstellen. Ferneinstellung ist der Standard. WB BAND SETTINGS (WB-Band-Einstellungen) Um auf WB BAND SETTINGS zuzugreifen, bei der Verwendung der Source WB TUNER kurz MENU drücken. Dies gibt Zugang zu den WB TUNER-spezifischen Einstellungen (WB>PRESETS>ADD PRESETS>REMOVE PRESETS) (WB>VOREINSTELLUNGEN> VOREINSTELLUNGEN HINZUFÜGEN>VOREINSTELLUNGEN ENTFERNEN). PRESETS (Voreinstellungen) Den Drehgeber-Knopf kurz drücken, um auf die PRESETS-Liste zuzugreifen. Mit dieser Funktion kann angezeigt werden, welche PRESETS auf dem Gerät gespeichert sind. ADD PRESETS (Voreinstellungen hinzufügen) Den Drehgeber-Knopf kurz drücken, um auf die Option ADD PRESETS zuzugreifen. Es muss der Sender angezeigt sein, den man zuerst hinzufügen möchte. Mit dieser Funktion kann man Sender auf dem Gerät speichern. Nach der Auswahl mit dem Drehgeber die PRESET-Nummer (1-6) wählen, auf der der Sender gespeichert werden soll. REMOVE PRESETS (Voreinstellungen entfernen) Den Drehgeber-Knopf kurz drücken, um auf die Option REMOVE PRESETS zuzugreifen. Es muss die PRESET-Gruppe angezeigt sein, die man zuerst einstellen möchte (AM1>AM2). Mit dieser Funktion kann man gespeicherte Sender auf dem Gerät entfernen. Nach der Auswahl mit dem Drehgeber die PRESET-Nummer (1-6) des Senders wählen, der entfernt werden soll. USB (iPod)-Betrieb Nachdem das Gerät an das Source-Gerät angeschlossen ist, kann über diese Funktion die Wiedergabe vom Gerät direkt über das Source-Gerät gesteuert werden. USB-Source-Option auf dem Source-Gerät wählen. Für die Wiedergabe oder Pause eines Songs die Taste PLAY/ PAUSE kurz drücken. Um einen Track vorwärts zu springen, die FWD-Taste kurz drücken. Um einen Track rückwärts zu springen, die REV-Taste kurz drücken. Für den Zugang zu spezifischen USB-Einstellungen die MENU-Taste für die Liste der Einstellungen (BROWSER>REPEAT>SHUFFLE) kurz drücken. Mit dem Drehgeber die zu ändernde Option wählen. BROWSER Den Drehgeber-Knopf kurz drücken, um auf die BROWSEROptionen zuzugreifen (PLAYLISTS>ARTISTS>ALBUMS>GENRES> SONGS>COMPOSERS>AUDIOBOOKS>PODCASTS) (Wiedergabeli sten>Künstler>Alben>Genres>Songs>Komponisten>Audiobüch er>Podcasts). Mit dieser Funktion können Titel oder Songs nach verschiedenen Typen von Kategorien durchsucht werden. REPEAT (Wiederholen) Den Drehgeber-Knopf kurz drücken, um auf die Optionen REPEAT (OFF>ONE>ALL) (EIN>EINE>ALLE) zuzugreifen. SHUFFLE Den Drehgeber-Knopf kurz drücken, um auf die Option SHUFFLE (OFF>ALL) (EIN>ALLE) zuzugreifen. Mit dieser Funktion kann die Shuffle-Präferenz für Titel oder Songs eingestellt werden. HINWEIS: Bei Verwendung eines USB-Verlängerungskabels muss es sich um ein Rockford Fosgate-Netzkabel handeln. Der maximale Abstand für das Kabel beträgt 33 Fuß (10 Meter). Bluetooth® -Betrieb Nachdem das Gerät an das Source-Gerät gekoppelt ist, kann über diese Funktion die Wiedergabe vom Gerät direkt über das Source-Gerät gesteuert werden. BLUETOOTH-Source-Option auf dem Source-Gerät wählen. Für die Wiedergabe oder Pause eines Songs die Taste PLAY/ PAUSE kurz drücken. Um einen Track vorwärts zu springen, die FWD-Taste kurz drücken. Um einen Track rückwärts zu springen, die REV-Taste kurz drücken. Für den Zugang zu spezifischen BLUETOOTH-Einstellungen die MENU-Taste für die Liste der Einstellungen (BROWSER>REPEAT>SHUFFLE) kurz drücken. Mit dem Drehgeber die zu ändernde Option wählen. BROWSER Den Drehgeber-Knopf kurz drücken, um auf die BROWSEROptionen zuzugreifen (PLAYLISTS>ARTISTS>ALBUMS>GENRES> SONGS>COMPOSERS>AUDIOBOOKS>PODCASTS) (Wiedergabeli sten>Künstler>Alben>Genres>Songs>Komponisten>Audiobüch er>Podcasts). Mit dieser Funktion können Titel oder Songs nach verschiedenen Typen von Kategorien durchsucht werden. REPEAT (Wiederholen) Den Drehgeber-Knopf kurz drücken, um auf die Optionen REPEAT (OFF>ONE>ALL) (EIN>EINE>ALLE) zuzugreifen. Mit dieser Funktion kann die Präferenz für die Anzahl der Wiederholung von Titeln oder Songs eingestellt werden. SHUFFLE Den Drehgeber-Knopf kurz drücken, um auf die Option SHUFFLE (OFF>ALL) (EIN>ALLE) zuzugreifen. Mit dieser Funktion kann die Shuffle-Präferenz für Titel oder Songs eingestellt werden. HINWEIS: Nach der ersten Kopplung des Geräts wird die Lautstärke des Geräts auf circa die Hälfte eingestellt sein. Die Lautstärke auf dem verbundenen Gerät muss vor der Einstellung der Lautstärke ganz hochgedreht werden. Das Gerät bleibt auf der maximalen Lautstärke nach der Anfangseinstellung und bei einer erneuten Kopplung mit dem Source-Gerät. Mit dieser Funktion kann die App Pandora® direkt vom SourceGerät gesteuert werden (Android-Nutzer können nur Bluetooth wählen, iOS-Nutzer können USB und Bluetooth wählen). Zuerst die App Pandora® auf dem Gerät starten, und anschließend die Source-Option Pandora® auf dem Source-Gerät wählen. Für die Funktion “Daumen nach oben” die Taste SUB+ lange drücken. Für die Funktion “Daumen nach unten” die Taste SUB- lange drücken. Für die Wiedergabe oder Pause eines Songs die Taste PLAY/ PAUSE kurz drücken. Um einen Track vorwärts zu springen, die FWD-Taste kurz drücken. Für den Zugang zu spezifischen Pandora®-Einstellungen die MENU-Taste für die Liste der Einstellungen (STATIONS>BOOKMARKS>STATIONS MANAGE) (SENDER>LESEZEICHEN>SENDER MANAGEN) kurz drücken. Mit dem Drehgeber die zu ändernde Option wählen. SENDER Den Drehgeber-Knopf kurz drücken, um diese einzustellen. Den Drehgeber-Knopf drehen, um die Optionen zu wählen (SHUFFLE>DATUM/A-Z SORTIEREN>SENDER). Die Auswahl der SHUFFLE-Option verwendet die zufällige Wiedergabe von Sendern, und die Auswahl der SORT-Funktion sortiert die Stationen nach hinzugefügtem Datum oder alphabetisch. Die gespeicherten Sender können auch dieser aus dieser Liste gewählt werden. BOOKMARKS (LESEZEICHEN) Um einem Künstler oder Titel in der Wiedergabe ein BOOKMARK hinzuzufügen, den Drehgeber-Knopf drehen, um die BOOKMARK-Optionen anzuzeigen (ARTIST>TRACK) (KÜNSTLER>TITEL). Die für das Lesezeichen gewünschte Option auswählen. 20 Deutsch Pandora, das Pandora-Logo und die Pandora-Handelsform sind Marken oder eingetragene Marken von Pandora Media, LLC. Mit Genehmigung verwendet. Pandora ist nur in bestimmten Ländern verfügbar. Für weitere Informationen siehe http://www. pandora.com/legal. Symptom / Beschreibung Diagnose Lösung Grund Sicherung durchgebrannt Source-Gerät kann nicht eingeschaltet werden. Tuner kann keine Sender einstellen Sender im Such-Modus nicht einstellbar USB-Gerät kann nicht eingeführt werden USB-Gerät wird nicht erkannt Kein Ton hörbar mit der DisplayAnzeige "No File" Tonsprünge oder Geräusche Bluetooth-Source-Lautstärke ist niedriger als andere Sources Zündung des Fahrzeugs ist ausgestellt. Das Gerät ist nicht ordnungsgemäß gesichert Radio Tuner Keine Antenne oder unterbrochene oder offene Kabelverbindung Man befindet sich in einem Gebiet mit schwachem Signal USB-Geräte Das USB-Gerät wurde in der falschen Richtung eingeführt Der USB-Geräteanschluss ist beschädigt Das USB-Gerät ist beschädigt Anschlüsse sind lose Keine MP3/WMA-Dateien auf dem USB-Gerät gespeichert MP3/WMA-Dateien wurden nicht korrekt erstellt Bluetooth Bluetooth vom Gerät ist nicht auf der maximalen Lautstärke 21 Die Sicherung des Geräts prüfen und ggf mit der richtigen Stärke ersetzen. Falls nach den Anleitungen angeschlossen wird das Gerät bei ausgeschalteter Zündung nicht funktionieren. Die Kabel prüfen und ggf. reparieren. Alle Verbindungen prüfen und ggf. reparieren. Sicherstellen, dass der Tuner-Modus LOC deaktiviert ist. Nach Umkehrung der Verbindungsrichtung des USBGeräts Einführung nochmals versuchen. Durch ein neues USB-Gerät ersetzen. Das USB-Gerät trennen und neu anschließen. Wenn das Gerät trotzdem nicht erkannt wird, es mit einem anderen USB-Gerät ersetzen. USB funktioniert nicht mit Android-Geräten. Diese Dateien korrekt auf dem USB-Gerät speichern. USB funktioniert nicht mit Android-Geräten. Korrekt erstellte MP3/WMA-Dateien verwenden. Lautstärke auf dem Gerät auf maximale Lautstärke einstellen Italiano Caratteristiche del design Encoder rotativo La manopola regola il volume principale, i volumi delle zone, lo spostamento nei menu e la regolazione delle impostazioni. Pulsante MENU Premendo a lungo questo pulsante si accede alle impostazioni principali dell’unità. Premendo brevemente si accede alle impostazioni per la fonte attiva. Pulsante SRC (Alimentazione) Questo pulsante consente di scegliere la fonte (premendo velocemente) e accendere l’unità ON e spegnerla OFF (premendo a lungo). Pulsanti SUB Questi pulsanti regolano l’uscita del subwoofer o della linea di uscita posteriore SÙ o GIÙ (0-20). Pulsante PLAY / PAUSE (Riproduzione/Pausa) Premere questo pulsante per riprodurre o sospendere la musica. Questo pulsante ha anche la funzione MUTE per la disattivazione dell’audio quando la fonte è nella modalità TUNER. Pulsante DIMMER (reostato) Questo pulsante consente di selezionare uno dei due valori di luminosità del display. Pulsante REV / FWD (inversione / avanzamento) Usare questo pulsante per saltare al canale o brano precedente o successivo premendo brevemente. Premendo a lungo si attiva la modalità di ricerca manuale. Impostazioni dell’unità di fonte Per accedere alle impostazioni dell’unità di fonte premere a lungo il pulsante MENU fino a visualizzare le opzioni. Ruotare l’encorder per scorrere attraverso l’elenco delle impostazioni e premere velocemente per selezionare l’impostazione che si desidera modificare. (BALANCE>FADER>AUDIO>VOLTAGE GAUGE>BT PAIRING>BEEP>TUNER REGION>SOFTWARE>FACTORY DEFAULT) (BILANCIAMENTO>ATTENUATORE>AUDIO>CALIBRO TENSIONE>APPAIAMENTO BT>SEGNALE ACUSTICO>REGIONE TUNER>SOFTWARE>IMPOSTAZIONI PREDEFINITE) Questa unità di fonte ha una potenza assorbita uguale a zero quando l’unità è spenta. Tutte le impostazioni e le impostazioni predefinite saranno salvate con la batteria dell’imbarcazione durante l’immagazzinaggio. BALANCE (BILANCIAMENTO) Premere brevemente il pulsante dell’encoder per accedere alle impostazioni per il regolamento di BALANCE. Ruotare il pulsante dell’encoder per impostare il bilanciamento dell’output. FADER (ATTENUATORE) Premere brevemente il pulsante dell’encoder per accedere alle impostazioni per il regolamento del FADER. Ruotare il pulsante dell’encoder per impostare il FADER dell’output. AUDIO Per accedere alle impostazioni AUDIO premere brevemente l’opzione AUDIO dalla schermata MENU. Ruotare l’encorder per scorrere attraverso l’elenco delle impostazioni e premere velocemente per selezionare l’impostazione che si desidera modificare. (7 BAND EQ>CROSSOVER>PEQ>SOURCE GAIN>INTERNAL AMPLIFIER) (EQ 7 BANDE>CROSSOVER>PEQ>GUADAGNO FONTE>AMPLIFICATORE INTERNO) 7 BAND EQ (EQ 7 BANDE) Premere brevemente il pulsante dell’encoder per accedere alle impostazioni per 7 BAND EQ. Usare l’encoder rotativo per scorrere attraverso le impostazioni EQ. (FLAT > ROCK > CLASSIC > ACOUSTIC > DANCE > ELECTRONIC > HIP-HOP > CUSTOM) Per impostare CUSTOM EQ, premere brevemente il pulsante dell’encoder e impostare la prima frequenza. Una volta attivata, ruotare l’encoder per regolare le impostazioni della frequenza. Premere brevemente di nuovo il pulsante dell’encoder per ac22 cedere alla prossima frequenza. Ripetere fino a quando tutte le impostazioni EQ sono state completate. Premere brevemente il pulsante MENU per uscire e tornare indietro di un livello. CROSSOVER Premere brevemente per accedere alle impostazioni CROSSOVER. Usare l’encoder rotativo per selezionare le opzioni zona CROSSOVER (FRONT>REAR>SUB) (ANTER>POST>SUB). Premere brevemente l’encoder per regolare la frequenza del crossover (60Hz>80Hz>120Hz>APF). Premere brevemente il pulsante MENU per uscire e tornare indietro di un livello. SOURCE GAIN (Guadagno fonte) Per regolare il livello del guadagno dell’ingresso del dispositivo scorrere attraverso gli input (FM TUNER>AM TUNER>WB TUNER>USB>BLUETOOTH>PANDORA) fino al dispositivo che si desidera regolare, premere brevemente il pulsante dell’encoder per accedere alle impostazioni del guadagno. Ruotare il pulsante dell’encoder per impostare il livello di guadagno. (-3dB > -2dB > -1dB > 0dB > +1dB > +2dB > +3dB) INTERNAL AMPLIFIER (Amplificatore interno) Premere brevemente per accedere alle opzioni INTERNAL AMPLIFIER. Usare l’encoder rotativo per selezionare le opzioni (ON>OFF) (Acceso>Spento). Quando si usa un amplificatore per alimentare gli altoparlanti selezionare OFF. Se gli altoparlanti sono alimentati direttamente dall’unità di fonte, impostare l’INTERNAL AMPLIFIER su ON. VOLTAGE GAUGE (Calibro tensione) Per visualizzare il voltaggio del veicolo, premere brevemente il pulsante dell’encoder sull’opzione VOLTAGE GAUGE. BT DEVICE PAIRING (Appaiamento dispositivo BT) Premere brevemente il pulsante codificatore per accedere alle opzioni (RILEVABILE> dispositivo). SCOPRIBILE Ruotare il pulsante codificatore per selezionare se l’unità è rilevabile per l’accoppiamento. (ABILITA> DISABILITA) Una volta attivato, l’unità sorgente è ora rilevabile e pronto per l’accoppiamento con il dispositivo. Aprire le impostazioni Bluetooth sul dispositivo per trovare l’unità sorgente con l’etichetta “Rockford PMX” e selezionare. DISPOSITIVO Selezione dispositivo premendo brevemente il pulsante codificatore vi permetterà di rinominare l’unità sorgente con un massimo di 16 caratteri. Questo ti dà la possibilità di avere un nome univoco per una facile identificazione durante l’accoppiamento del dispositivo. Premere brevemente il pulsante codificatore per selezionare la lettera da modificare e ruotare la manopola per modificare il valore. si raggiunge Ripetere procedura fino nome desiderato. BEEP (Segnale acustico) Premere brevemente il pulsante dell’encoder per accedere alle opzioni BEEP. Ruotare il pulsante dell’encoder per accendere ON o spegnere OFF il segnale acustico del sistema. TUNER REGION (Regione tuner) Per regolare premere brevemente il pulsante dell’encoder e accedere. Ruotare il pulsante dell’encoder per selezionare la TUNER REGION preferita. (EUROPE > USA > RUSSIA > LATIN > ASIA > JAPAN > MIDEAST > AUSTRALIA) (EUROPA > USA > RUSSIA > AMERICA LATINA > ASIA > GIAPPONE > MEDIO ORIENTE > AUSTRALIA) SOFTWARE VERSION - Premere brevemente il pulsante dell’encoder per visualizzare la versione firmware dell’unità. UPDATE - Premere brevemente il pulsante dell’encoder per aggiornare il firmware. Seguire le istruzioni sullo schermo durante l’aggiornamento. TEMA Per regolare il tema premere brevemente l’encoder per accedere alla funzione . Ruotare il pulsante encoder per selezionare il Italiano tema desiderato ( giorno, notte , AUTO) FACTORY DEFAULT (Impostazioni predefinite) AUDIO – Per accedere premere brevemente il pulsante dell’encoder. Ruotare il pulsante dell’encoder per selezionare YES/NO (Sì/No). Selezionando YES l’unità verrà reimpostata alle impostazioni predefinite. SYSTEM - Per accedere premere brevemente il pulsante dell’encoder. Ruotare il pulsante dell’encoder per selezionare YES/NO (Sì/No). Selezionando YES l’unità verrà reimpostata alle impostazioni predefinite. Funzionamento di base ACCENDERE E SPEGNERE L’UNITÀ ON/OFF Premere a lungo il pulsante SRC (alimentazione) per accendere ON o spegnere OFF l’unità. REGOLARE IL VOLUME Ruotare la manopola dell’encoder verso sinistra o verso destra per selezionare il livello di volume desiderato (0-40). Il livello di volume attuale è visualizzato durante il regolamento. REGOLARE L’USCITA DEL SUBWOOFER Premere i pulsanti SUB+ o SUB- per regolare il livello di uscita (0-20). REGOLARE LA LUMINOSITÀ DELLO SCHERMO Premere brevemente il pulsante SCREEN BRIGHTNESS per regolare il livello di luminosità. Ci sono due livelli di luminosità. SELEZIONARE UNA FONTE PER LA RIPRODUZIONE Premere brevemente il pulsante SRC per visualizzare le varie fonti (FM TUNER>AM TUNER>WB TUNER>USB>BLUETOOTH>PANDO RA>SIRIUSXM). Usare l’encoder rotativo o premere brevemente il pulsante SRC per scorrere attraverso le fonti. Funzionamento del tuner (FM/AM/WB) Per il funzionamento usare l’encoder rotativo per selezionare la fonte tuner che si desidera ascoltare (FM/AM/WB). Per LA RICERCA AUTOMATICA delle stazioni, premere i pulsanti FWD (avanzamento) e REV (inversione). Per LA RICERCA MANUALE delle stazioni, premere a lungo i pulsanti FWD (avanzamento) e REV (inversione) per sintonizzare la frequenza desiderata. Per disattivare l’audio MUTE del TUNER, premere brevemente il pulsante PLAY/PAUSE (Riproduzione/Pausa). IMPOSTAZIONI DELLA BANDA FM Per accedere alle impostazioni della banda FM BAND SETTINGS, premere brevemente il MENU durante l’uso della fonte FM TUNER. Questo da accesso alle impostazioni specifiche del FM TUNER (FM>PRESETS>ADD PRESETS>REMOVE PRESETS>AUTO STORE>LOCAL) (FM>PREDEFINITI>AGGIUNGI PREDEFINITI>RIMUOVI PREDEFINITI>SALVATAGGIO AUTOM>LOCALE). PRESETS (Predefiniti) Premere brevemente il pulsante dell’encoder per accedere all’elenco PRESETS. Questa funzione consente di visualizzare i PRESETS salvati sull’unità. ADD PRESETS (Aggiungi predefiniti) Premere brevemente il pulsante dell’encoder sull’opzione ADD PRESETS. Bisogna essere sia sulla stazione sia sul gruppo PRESET che si desidera aggiungere prima (FM1>FM2>FM3). Questa funzione consente di salvare le stazioni sull’unità. Dopo la selezione usare l’encoder rotativo per selezionare il numero PRESET (1-6) sul quale si desidera salvare la stazione. REMOVE PRESETS (Rimuovi predefiniti) Premere brevemente il pulsante dell’encoder sull’opzione REMOVE PRESETS. Bisogna essere sul gruppo PRESET che si desidera regolare prima (FM1>FM2>FM3). Questa funzione consente di rimuovere le stazioni salvate sull’unità. Dopo la selezione usare l’encoder rotativo per selezionare il numero PRESET (1-6) della stazione che si desidera rimuovere. FM Premere brevemente il pulsante dell’encoder per accedere alle 23 opzioni FM PRESET (FM1>FM2>FM3). Questa funzione consente di avere gruppi predefiniti distinti del tuner dai quali selezionare. Usare il pulsante dell’encoder rotativo per scorrere attraverso i gruppi TUNER, e premere brevemente per selezionare il gruppo. AUTO STORE (Salvataggio automatico) Premere brevemente il pulsante dell’encoder per accedere alla funzione AUTO STORE. Bisogna essere sul gruppo PRESET che si desidera regolare prima (FM1>FM2>FM3). Questa funzione salva automaticamente i predefiniti sull’unità. Si ferma quando i predefiniti 1-6 sono impostati. Selezionare il prossimo gruppo PRESET e ripetere per completare il prossimo set. LOCAL (Locale) Premere brevemente il pulsante dell’encoder per accedere alle opzioni LOCAL. Dopo la selezione usare l’encoder rotativo per selezionare ON o OFF. L’opzione locale sintonizza sulle stazioni radio vicine con segnali sufficientemente forti per una buona ricezione. In zone con una scarsa ricezione cambiando alla sintonizzazione a distanza consente all’unità di sintonizzarsi su stazioni più distanti. La sintonizzazione a distanza è l’impostazione predefinita. IMPOSTAZIONI DELLA BANDA AM Per accedere alle impostazioni della banda AM BAND SETTINGS, premere brevemente il MENU durante l’uso della fonte AM TUNER. Questo da accesso alle impostazioni specifiche del AM TUNER (AM>PRESETS>ADD PRESETS>REMOVE PRESETS>AUTO STORE>LOCAL) (AM>PREDEFINITI>AGGIUNGI PREDEFINITI>RIMUOVI PREDEFINITI>SALVATAGGIO AUTOM>LOCALE). PRESETS (Predefiniti) Premere brevemente il pulsante dell’encoder per accedere all’elenco PRESETS. Questa funzione consente di visualizzare i PRESETS salvati sull’unità. ADD PRESETS (Aggiungi predefiniti) Premere brevemente il pulsante dell’encoder sull’opzione ADD PRESETS. Bisogna essere sia sulla stazione sia sul gruppo PRESET che si desidera aggiungere prima (AM1>AM2). Questa funzione consente di salvare le stazioni sull’unità. Dopo la selezione usare l’encoder rotativo per selezionare il numero PRESET (1-6) sul quale si desidera salvare la stazione. REMOVE PRESETS (Rimuovi predefiniti) Premere brevemente il pulsante dell’encoder sull’opzione REMOVE PRESETS. Bisogna essere sul gruppo PRESET che si desidera regolare prima (AM1>AM2). Questa funzione consente di rimuovere le stazioni salvate sull’unità. Dopo la selezione usare l’encoder rotativo per selezionare il numero PRESET (1-6) della stazione che si desidera rimuovere. AM Premere brevemente il pulsante dell’encoder per accedere alle opzioni FM PRESET (AM1>AM2). Questa funzione consente di avere gruppi predefiniti separati del tuner dai quali selezionare. Usare il pulsante dell’encoder rotativo per scorrere attraverso i gruppi TUNER, e premere brevemente per selezionare il gruppo. AUTO STORE (Salvataggio automatico) Premere brevemente il pulsante dell’encoder per accedere alla funzione AUTO STORE. Bisogna essere sul gruppo PRESET che si desidera regolare prima (AM1>AM2). Questa funzione salva automaticamente i predefiniti sull’unità. Si ferma quando i predefiniti 1-6 sono impostati. Selezionare il prossimo gruppo PRESET e ripetere per completare il prossimo set. LOCAL (Locale) Premere brevemente il pulsante dell’encoder per accedere alle opzioni LOCAL. Dopo la selezione usare l’encoder rotativo per selezionare ON o OFF. L’opzione locale sintonizza sulle stazioni radio vicine con segnali sufficientemente forti per una buona ricezione. In zone con una scarsa ricezione cambiando alla sintonizzazione a distanza consente all’unità di sintonizzarsi su stazioni più distanti. La sintonizzazione a distanza è l’impostazione predefinita. Italiano IMPOSTAZIONI DELLA BANDA WB Per accedere alle impostazioni della banda WB BAND SETTINGS, premere brevemente il MENU durante l’uso della fonte WB TUNER. Questo da accesso alle impostazioni specifiche del WB TUNER (PRESETS>ADD PRESETS>REMOVE PRESETS) (PREDEFINITI>AGGIUNGI PREDEFINITI>RIMUOVI PREDEFINITI). PRESETS (Predefiniti) Premere brevemente il pulsante dell’encoder per accedere all’elenco PRESETS. Questa funzione consente di visualizzare i PRESETS salvati sull’unità. ADD PRESETS (Aggiungi predefiniti) Premere brevemente il pulsante dell’encoder sull’opzione ADD PRESETS. Bisogna essere sia sulla stazione sia sul gruppo PRESET che si desidera aggiungere prima. Questa funzione consente di salvare le stazioni sull’unità. Dopo la selezione usare l’encoder rotativo per selezionare il numero PRESET (1-6) sul quale si desidera salvare la stazione. REMOVE PRESETS (Rimuovi predefiniti) Premere brevemente il pulsante dell’encoder sull’opzione REMOVE PRESETS. Bisogna essere sul gruppo PRESET che si desidera regolare prima (AM1>AM2). Questa funzione consente di rimuovere le stazioni salvate sull’unità. Dopo la selezione usare l’encoder rotativo per selezionare il numero PRESET (1-6) della stazione che si desidera rimuovere. Funzionamento USB (iPod) Dopo avere collegato il dispositivo all’unità di fonte, questa funzione consente di controllare la riproduzione dal dispositivo direttamente dall’unità. Selezionare l’opzione fonte USB sull’unità di fonte. Per riprodurre o sospendere un brano, premere brevemente il pulsante PLAY/PAUSE. Per saltare avanti di un brano, premere brevemente il pulsante FWD. Per saltare indietro di un brano, premere brevemente il pulsante REV. Per accedere alle impostazioni specifiche USB, premere brevemente il pulsante MENU per l’elenco delle impostazioni (BROWSER>REPEAT>SHUFFLE) (BROWSER>RIPETI>RIPRODUZIONE CASUALE). Usare l’encoder per selezionare l’opzione da modificare. BROWSER Premere brevemente il pulsante dell’encoder per accedere alle opzioni BROWSER (PLAYLISTS>ARTISTS>ALBUMS>GENRES>SON GS>COMPOSERS>AUDIOBOOKS>PODCASTS) (Playlist>Artisti>A lbum>Generi>Brani>Compositori>Libri audio>Podcast). Questa funzione consente di ricercare tracce o brani in base a vari tipi di categoria. REPEAT (Ripeti) Premere brevemente il pulsante dell’encoder per accedere alle opzioni della funzione REPEAT (OFF>ONE>ALL) (DISATTIVA>UNO>TUTTI). SHUFFLE (Riproduzione casuale) Premere brevemente il pulsante dell’encoder per accedere alle opzioni della funzione SHUFFLE (OFF>ONE>ALL) (DISATTIVA>TUTTI). Questa funzione consente di impostare le preferenze riguardo la riproduzione casuale di tracce o brani. SHUFFLE (Riproduzione casuale) Premere brevemente il pulsante dell’encoder per accedere alle opzioni della funzione SHUFFLE (OFF>ONE>ALL) (DISATTIVA>TUTTI). Questa funzione consente di impostare le preferenze riguardo la riproduzione casuale di tracce o brani. NOTA: Se si utilizza un cavo di prolunga USB, deve essere un cavo di prolunga alimentato Rockford Fosgate. La distanza massima per il cavo è di 33 piedi (10 metri). Funzionamento Bluetooth® Dopo avere effettuato il pairing del dispositivo con l’unità di fonte, questa funzione consente di controllare la riproduzione dal dispositivo direttamente dall’unità. Selezionare l’opzione fonte BLUETOOTH sull’unità di fonte. Per riprodurre o sospendere un brano, premere brevemente il pulsante PLAY/PAUSE. Per saltare avanti di un brano, premere brevemente il pulsante FWD. Per saltare indietro di un brano, premere brevemente il pulsante REV. Per accedere alle impostazioni specifiche BLUETOOTH, premere brevemente il pulsante MENU per l’elenco delle impostazioni (BROWSER>REPEAT>SHUFFLE) (BROWSER>RIPETI>RIPRODUZIONE CASUALE). Usare l’encoder per selezionare l’opzione da modificare. BROWSER Premere brevemente il pulsante dell’encoder per accedere alle opzioni BROWSER (PLAYLISTS>ARTISTS>ALBUMS>GENRES>SON GS>COMPOSERS>AUDIOBOOKS>PODCASTS) (Playlist>Artisti>A lbum>Generi>Brani>Compositori>Libri audio>Podcast). Questa funzione consente di ricercare tracce o brani in base a vari tipi di categoria. REPEAT (Ripeti) Premere brevemente il pulsante dell’encoder per accedere alle opzioni della funzione REPEAT (OFF>ONE>ALL) (DISATTIVA>UNO>TUTTI). Questa funzione consente di impostare le preferenze riguardo il numero di volte che una traccia o un brano verrà ripetuto. SHUFFLE (Riproduzione casuale) Premere brevemente il pulsante dell’encoder per accedere alle opzioni della funzione SHUFFLE (OFF>ONE>ALL) (DISATTIVA>TUTTI). Questa funzione consente di impostare le preferenze riguardo la riproduzione casuale di tracce o brani. NOTA: Dopo l’appaiamento iniziale del dispositivo il volume sul dispositivo sarà a circa metà volume. Sarà necessario alzare il volume al massimo sul dispositivo connesso prima di impostare il livello. Il dispositivo rimarrà al volume massimo dopo l’impostazione iniziale e quando si riappaia all’unità di fonte. Questa funzione consente di controllare l’app Pandora® direttamente dall’unità di fonte (gli utenti Android devono usare Bluetooth, gli utenti iOS possono usare sia USB sia Bluetooth). Occorre prima avviare l’app Pandora® sul dispositivo, e quindi selezionare l’opzione fonte Pandora® sull’unità di fonte. Per usare la funzione “Pollice su” premere a lungo il pulsante SUB+. Per usare la funzione “Pollice già” premere a lungo il pulsante SUB-. Per riprodurre o sospendere un brano, premere brevemente il pulsante PLAY/PAUSE. Per saltare avanti di un brano, premere brevemente il pulsante FWD. Per accedere alle impostazioni specifiche Pandora®, premere brevemente il pulsante MENU per l’elenco delle impostazioni (STATIONS>BOOKMARKS>STATIONS MANAGE) (STAZIONI>SEGNALIBRI>GESTISCI STAZIONI). Usare l’encoder per selezionare l’opzione da modificare. STAZIONI Per regolare premere brevemente il pulsante dell’encoder e accedere. Ruotare il pulsante dell’encoder per selezionare le opzioni (SHUFFLE>SORT DATE/A-Z>STATIONS) (RIPRODUZIONE CASUALE>ORDINE PER DATA/A-Z>STAZIONI). Selezionando l’opzione SHUFFLE le stazioni verranno riprodotte casualmente, e selezionando l’opzione SORT le stazioni verranno ordinate per data di aggiunta o alfabeticamente. Si possono anche selezionare le stazioni salvate direttamente da questo elenco. BOOKMARKS (Segnalibri) Per aggiungere un segnalibro a un artista o una traccia riprodotta, premere brevemente il pulsante dell’encoder per visualizzare le opzioni BOOKMARK (ARTIST>TRACK) (ARTISTA>TRACCIA). Selezionare l’opzione che si desidera usare per i segnalibri. 24 Pandora, il logo Pandora e il marchio commerciale Pandora sono Italiano marchi o marchi registrati di Pandora Media, LLC. Usati con permesso. Pandora è disponibile solo in alcuni paesi. Visitare http:// www.pandora.com/legal per ulteriori informazioni. Sintomo / Descrizione Diagnosi Soluzione Di base Fusibile bruciato L'unità di fonte non si accende. Il tuner non si sintonizza su nessuna stazione Impossibile sintonizzare stazioni nella modalità di ricerca Impossibile inserire il dispositivo USB Dispositivo USB non riconosciuto Non vi è suono con il display visualizzato "No File" Il suono salta o è rumoroso Il volume della fonte Bluetooth è più basso di altre fonti L'accensione del veicolo è spenta L'unità non ha la messa a terra adeguata Tuner Radio Non c'è l'antenna, oppure collegamento sconnesso o aperto nel cavo Zona con segnale debole Dispositivi USB Il dispositivo USB è stato inserito nella direzione sbagliata Il connettore del dispositivo USB è rotto Il dispositivo USB è danneggiato. I connettori sono allentati. Sul dispositivo USB non ci sono file MP3/WMA salvati. I file MP3/WMA non sono stati creati correttamente. Bluetooth Bluetooth dal dispositivo non è al volume massimo 25 Controllare il fusibile sull'unità, cambiarlo con la portata corretta. Se collegata seguendo le istruzioni, l'unità non funzionerà con l'accensione spenta. Controllare i cavi e riparare se necessario. Controllare tutti i collegamenti e riparare se necessario. Accertarsi che la modalità LOC del tuner sia spenta (OFF). Invertire la direzione di collegamento del dispositivo USB e provare a reinserirlo. Sostituire con un nuovo dispositivo USB. Disconnettere il dispositivo USB e riconnetterlo. Se il dispositivo continua a non essere riconosciuto, sostituirlo con un altro dispositivo USB. USB non funziona con dispositivi Android. Salvare questi file correttamente sul dispositivo USB. USB non funziona con dispositivi Android. Usare i file MP3/WMA che sono codificati correttamente. Aumentare il volume sul dispositivo al livello massimo NOTES 26 NOTES 27 Warranty Rockford Corporation offers a limited warranty on Rockford Fosgate products on the following terms: Length of Warranty POWER Amplifiers – 2 Years BMW® Direct Fit Speakers – 2 Years PUNCH® & PRIME® Amplifiers – 1 Year Speakers, Signal Processors, Accessories and Capacitors – 1 Year All marine, motorcycle, motorsport products - 2 Years Any Factory Refurbished Product – 90 Days (receipt required) What is Covered This warranty applies only to Rockford Fosgate products sold to consumers by authorized Rockford Fosgate dealers in the United States of America. Products purchased by consumers from an Authorized Rockford Fosgate Dealer in another country are covered only by that country’s Distributor and not by Rockford Corporation. Who is Covered This warranty covers only the original purchaser of Rockford product purchased from an authorized Rockford Fosgate dealer in the United States. In order to receive service, the purchaser must provide Rockford with a copy of the receipt stating the customer name, dealer name, product purchased and date of purchase. Products found to be defective during the warranty period will be repaired or replaced (with a product deemed to be equivalent) at Rockford’s discretion. What is Not Covered 1. Damage caused by accident, abuse, improper installation, operations, theft, water (on non-Element Ready products). 2. Any cost or expense related to the removal or reinstallation of product. 3. Service performed by anyone other than Rockford or an authorized Rockford Fosgate service center. 4. Any product which has had the serial number defaced, altered, or removed. 5. Subsequent damage to other components. 6. Any product purchased outside the U.S. 7. Any product not purchased from an authorized Rockford Fosgate dealer. Refer to rockfordfosgate.com dealer locator for more detail. Limit on Implied Warranties Any implied warranties including warranties of fitness for use and merchantability are limited in duration to the period of the express warranty set forth above. Some states do not allow limitations on the length of an implied warranty, so this limitation may not apply. No person is authorized to assume for Rockford Fosgate any other liability in connection with the sale of the product. How to Obtain Service Please call 1-800-669-9899 for Rockford Customer Service. You must obtain an RA# (Return Authorization number) to return any product to Rockford Fosgate. You are responsible for shipment of product to Rockford. EU Warranty This product meets the current EU warranty requirements, see your Authorized dealer for details. 28-
 1
1
-
 2
2
-
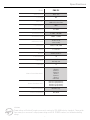 3
3
-
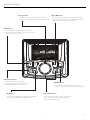 4
4
-
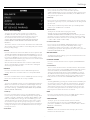 5
5
-
 6
6
-
 7
7
-
 8
8
-
 9
9
-
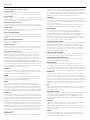 10
10
-
 11
11
-
 12
12
-
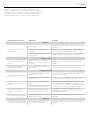 13
13
-
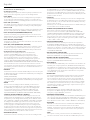 14
14
-
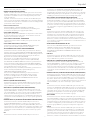 15
15
-
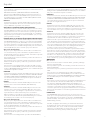 16
16
-
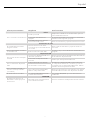 17
17
-
 18
18
-
 19
19
-
 20
20
-
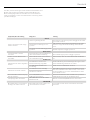 21
21
-
 22
22
-
 23
23
-
 24
24
-
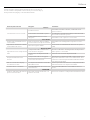 25
25
-
 26
26
-
 27
27
-
 28
28


Rockford Fosgate Polaris PMX-P2 Instrucciones de operación
- Categoría
- Receptor
- Tipo
- Instrucciones de operación
en otros idiomas
Artículos relacionados
-
 Rockford Fosgate PMX-HD9813 El manual del propietario
-
Rockford Fosgate PMX-2 Manual de usuario
-
 Rockford Fosgate PMX-3 Manual de usuario
-
 Rockford Fosgate Punch PMX-5 El manual del propietario
-
 Rockford Fosgate PMX-0 El manual del propietario
-
 Rockford Fosgate PUNCH PMX-BTUR Installation & Operation Manual
-
Rockford Fosgate PMX-8BB Manual de usuario
-
 Rockford Fosgate PUNCH PMX-BTUR Installation & Operation Manual
-
 Rockford Fosgate PMX-1R El manual del propietario


