PEAK PKC0C1500 El manual del propietario
- Categoría
- Cargadores de bateria
- Tipo
- El manual del propietario

Cargador de Baterías/
Mantenedor de 1.500 mA
No. de Modelo: PKC0C1500
Manual del Propietario
e Información de Garantía
Lea completamente estas instrucciones antes de usar este producto.
Conserve este Manual del Propietario para referencia futura.
12/16
© 2016
1
1500mA Battery
Charger/Maintainer
Model No.: PKC0C1500
Owner’s Manual
and Warranty Information
Read these instructions completely before using this product.
Retain this Owner’s Manual for future reference.
1
12/16
© 2016

2
CONTENTS
SAFETY PRECAUTIONS ................................................................................................................ 2
Important Safety Instructions .................................................................................................. 2
INTRODUCTION ............................................................................................................................. 6
FEATURES ......................................................................................................................................6
SPECIFICATIONS ........................................................................................................................... 7
OPERATING INSTRUCTIONS ........................................................................................................ 8
LED Display Panel ..................................................................................................................8
Before Charging ...................................................................................................................... 8
Pre-Charge Activation ............................................................................................................. 8
Charging if Battery Is Installed in a Vehicle ............................................................................. 8
Charging if Battery Is Outside of Vehicle ................................................................................ 9
Use of Extension Cords .......................................................................................................... 9
Charging Times .......................................................................................................................9
CARE AND MAINTENANCE ......................................................................................................... 10
Fuse Replacement ................................................................................................................10
Cleaning ................................................................................................................................10
Adding Water to the Battery .................................................................................................. 10
Storage .................................................................................................................................10
Disposal ................................................................................................................................ 10
FCC INFORMATION .....................................................................................................................11
IC INFORMATION ......................................................................................................................... 11
TROUBLESHOOTING ...................................................................................................................11
LIMITED WARRANTY ...................................................................................................................12
To Obtain Service .................................................................................................................12
SAFETY PRECAUTIONS
WARNING: Cancer and Reproductive Harm. For more information go to:
www.P65Warnings.ca.gov
The battery clamp component of this product contains DEHP, a phthalate
chemical known to the State of California to cause cancer and birth defects and other
reproductive harm.
This safety alert symbol indicates that a potential personal injury hazard is present. The symbol
is usually used with a signal word (e.g., WARNING) which designates the degree or level of hazard
seriousness.
The signal word WARNING indicates a hazardous situation which, if not avoided, could result in
death or serious injury.
The signal word NOTICE indicates a situation which can cause damage to the product, other
personal property and/or to the environment, or cause the product to operate improperly.
The combination of the safety alert symbol and signal word is used in safety messages throughout
this manual and on safety labels on this product.
Follow these instructions and those published by the battery manufacturer, vehicle manufacturer
and manufacturer of any equipment you intend to use near the battery. Pay attention to all hazard
precautions on these products and on the engine before charging.
All safety messages that follow have WARNING level hazards. Failure to
comply could result in death or serious injury.
IMPORTANT SAFETY
INSTRUCTIONS
1) SAVE THESE INSTRUCTIONS –
This manual contains important safety and operating instructions for
battery charger model PKC0C1500.
2) Do not expose charger to rain or snow.
2
ÍNDICE
PRECAUCIONES DE SEGURIDAD ................................................................................................ 2
Instrucciones de Seguridad Importantes ................................................................................ 2
INTRODUCCIÓN .............................................................................................................................6
CARACTERÍSTICAS ....................................................................................................................... 6
ESPECIFICACIONES .....................................................................................................................7
INSTRUCCTIONES DE OPERACIÓN ............................................................................................8
Panel de Pantalla LED ............................................................................................................ 8
Antes de Cargar ......................................................................................................................8
Activación de Pre-Carga ......................................................................................................... 8
Carga si la Batería está Instalada en un Vehículo ..................................................................8
Carga si la Batería está Fuera del Vehículo ............................................................................9
Uso de Cables de Extensión ...................................................................................................9
Tiempos de Carga ..................................................................................................................9
CUIDADOS Y MANTENIMIENTO ..................................................................................................10
Reemplazo del Fusible .........................................................................................................10
Limpieza................................................................................................................................10
Adición de Agua en la Batería ..............................................................................................10
Almacenaje ........................................................................................................................... 10
Descarte ............................................................................................................................... 10
INFORMACIÓN DE LA FCC .........................................................................................................10
INFORMACIÓN DE LA IC .............................................................................................................11
RESOLUCIÓN DE PROBLEMAS .................................................................................................11
GARANTÍA LIMITADA ...................................................................................................................12
Para Obtener Servicio ...........................................................................................................12
PRECAUCIONES DE SEGURIDAD
ADVERTENCIA: Cáncer y daños reproductivos. Para obtener más información
visite: www.P65Warnings.ca.gov
ADVERTENCIA
El componente de la abrazadera de la batería contiene DEHP, un
químico de ftalato conocido en el Estado de California como causante de cáncer y
defectos de nacimiento y otros daños al sistema reproductivo.
Este símbolo de alerta de seguridad indica que está presente un peligro potencial de lesión
personal. Este símbolo es usualmente usado con una palabra de señalamiento (por ejemplo,
ADVERTENCIA) la cual designa el grado o nivel de seriedad del peligro.
La palabra de señalamiento ADVERTENCIA indica una situación peligrosa que, si no se evita,
puede resultar en la muerte o en lesiones graves.
La palabra de señalamiento AVISO indica una situación que puede causarle daño al producto, otra
propiedad personal y/o al medio ambiente o causar que el producto funcione de manera incorrecta.
La combinación del símbolo de alerta de seguridad y la palabra de señalamiento es usada en
mensajes de seguridad a lo largo de este manual y en etiquetas de seguridad en este producto.
Siga estas instrucciones y aquellas publicadas por el fabricante de la batería, por el fabricante del
vehículo y por el fabricante de cualquier equipo que usted intente usar cerca de la batería. Antes de
cargar, préstele atención a las precauciones de peligro en estos productos y en el motor.
ADVERTENCIA
Todos los mensajes de seguridad siguientes tienen niveles de peligro de
ADVERTENCIA. El no cumplirlos puede resultar en la muerte o en lesiones graves.
INSTRUCCIONES DE
SEGURIDAD IMPORTANTES
1) CONSERVE ESTAS
INSTRUCCIONES –
Este manual contiene
importantes instrucciones de seguridad y de manejo para el cargador de
baterías modelo PKC0C1500.
2) No exponga el cargador a la lluvia ni a la nieve.

3
3) El uso de accesorios que no hayan sido recomendados o vendidos
por el f
abricante del cargador de baterías puede ocasionar r
iesgo de
incendio
, descarga eléctrica o daños personales.
4)
P
ara reducir el riesgo de dañar los enchufes y el cab
le al desconectar el
cargador
, se recomienda tirar del enchufe y no del cable.
5)
No
se debe utilizar un cable alargador si no es absolutamente necesario.
El uso de un alargador inadecuado puede ocasionar r
iesgo de incendio
o descarga eléctr
ica. Si precisa usar un alargador, asegúrese de que:
a)
El enchuf
e del cable alargador tiene el mismo número de pines, son del
mismo tamaño y de la misma forma que el del enchufe del cargador.
b)
Ese alargador tiene los hilos adecuados y está en buenas
condiciones de uso; y que
c)
Los hilos son de suficiente g
rosor para el amper
aje del cargador
según especificado en la tab
la 1.
TABLA 1
Longitud del cable,
pies/metros
25/7,6 50/15,2 100/30,5 150/45,7
Diámetro del cable, AWG 18 18 18 16
6) No maneje el cargador con un cable o una clavija estropeados,
sustitúy
alos inmediatamente.
7)
No maneje el cargador si ha recibido un golpe punzante, se ha caído o
se ha dañado de alguna maner
a; llévelo a un técnico cualificado.
8)
No desmonte el cargador
; llév
elo a un técnico cualificado cuando se
necesite cualquier ser
vicio o reparación. Un nuev
o montaje inadecuado
puede ocasionar descarga eléctr
ica o incendio.
9)
P
ara reducir el riesgo de descarga eléctrica, desenchuf
e el cargador
antes de cualquier oper
ación de mantenimiento o limpieza.
Apagar los
interruptores no reduce este riesgo.
10) CUIDADO – RIESGO DE EXPLOSIÓN DE GASES.
a)
ES PELIGR
OSO TRABAJAR CERCA DE UNA BA
TERÍA DE
PLOMO ÁCIDO
. LAS BATERÍAS GENERAN GASES EXPLOSIV
OS
DURANTE SU NORMAL FUNCIONAMIENT
O. POR ESTE MOTIV
O
ES DE SUMA IMPOR
TANCIA QUE SIGA LAS INSTR
UCCIONES
CAD
A VEZ QUE UTILICE ESTE CARGADOR.
b)
P
ara reducir el riesgo de explosión de las baterías
, siga estas
instr
ucciones y las de su fabr
icante o de cualquier otro equipo
que vaya a utilizar cerca de la batería. Revise las indicaciones de
adv
ertencia que lleven estos productos o el propio motor.
11) PRECAUCIONES PERSONALES
a)
Intente tener a alguien cerca que pueda acudir en su a
yuda cuando
esté tr
abajando con una batería de plomo ácido.
b)
T
enga cerca abundante agua fresca y jabón par
a el caso en que los
ácidos de la batería entren en contacto con la piel, la ropa o los ojos
.
c)
Protéjase los ojos y la ropa.
Evite tocarse los ojos mientr
as esté
tr
abajando cerca de la batería.
d) Si el ácido de la batería entra en contacto con la piel o la ropa,
límpielos inmediatamente con agua y jabón.
Si el ácido entr
a en los
ojos, eche abundante agua corriente sobre los mismos, al menos
dur
ante diez minutos y acuda inmediatamente al médico.
e)
NUNCA fume ni deje que ha
y
a chispas o llamas cerca de la batería o
del motor
.
3
3) Use of an attachment not recommended or sold by the battery charger
manufacturer may result in a risk of fire, electric shock, or injury to
persons.
4)
T
o reduce risk of damage to electric plug and cord, pull by plug rather
than cord when disconnecting charger.
5) An extension cord should not be used unless absolutely necessary. Use
of improper extension cord could result in a risk of fire and electric shock.
If an extension cord must be used, make sure:
a)
That pins on plug of e
xtension cord are the same number, size, and
shape as those of plug on charger;
b)
That e
xtension cord is properly wired and in good electrical condition;
and
c)
That wire siz
e is large enough for ac ampere rating of charger as
specified in Table 1
TABLE 1
Length of Cord, Feet/Meters 25/7.6 50/15.2 100/30.5 150/45.7
AWG Size of Cord 18 18 18 16
6) Do not operate charger with damaged cord or plug – replace the cord or
plug immediately.
7)
Do not oper
ate charger if it has received a sharp blow, been dropped, or
otherwise damaged in any way; take it to a qualified serviceman.
8)
Do not disassemb
le charger; take it to a qualified serviceman when
service or repair is required. Incorrect reassembly may result in a risk of
electric shock or fire.
9)
T
o reduce risk of electric shock, unplug charger from outlet before
attempting any maintenance or cleaning. Turning off controls will not
reduce this risk.
10) WARNING – RISK OF EXPLOSIVE GASES.
a)
W
ORKING IN VICINITY OF A LEAD-ACID BATTERY IS
DANGEROUS. BATTERIES GENERATE EXPLOSIVE GASES
DURING NORMAL BATTERY OPERATION. FOR THIS REASON,
IT IS OF UTMOST IMPORTANCE THAT YOU FOLLOW THE
INSTRUCTIONS EACH TIME YOU USE THE CHARGER.
b)
T
o reduce risk of battery explosion, follow these instructions and those
published by battery manufacturer and manufacturer of any equipment
you intend to use in vicinity of battery. Review cautionary marking on
these products and on engine.
11) PERSONAL PRECAUTIONS
a)
Consider ha
ving someone close enough by to come to your aid when
you work near a lead-acid battery.
b)
Ha
ve plenty of fresh water and soap nearby in case battery acid
contacts skin,clothing, or eyes.
c)
W
ear complete eye protection and clothing protection. Avoid touching
eyes while working near battery.
d) If battery acid contacts skin or clothing, wash immediately with soap
and water. If acid enters eye, immediately flood eye with running cold
water for at least 10 minutes and get medical attention immediately.
e)
NEVER smok
e or allow a spark or flame in vicinity of battery or
engine.

4
f) Be extra cautious to reduce risk of dropping a metal tool onto battery.
It might spark or short-circuit battery or other electrical part that may
cause explosion.
g) Remove personal metal items such as rings, bracelets, necklaces,
and watches when working with a lead-acid battery. A lead-acid
battery can produce a shortcircuit current high enough to weld a ring
or the like to metal, causing a severe burn.
h) Use charger for charging a LEAD-ACID battery only. It is not intended
to supply power to a low voltage electrical system other than in a
starter-motor application. Do not use battery charger for charging
dry-cell batteries that are commonly used with home appliances.
These batteries may burst and cause injury to persons and damage to
property.
i) NEVER charge a frozen battery.
12) PREPARING TO CHARGE
a) If necessary to remove battery from vehicle to charge, always remove
grounded terminal from battery first. Make sure all accessories in the
vehicle are off, so as not to cause an arc.
b) Be sure area around battery is well ventilated while battery is being
charged.
c) Clean battery terminals. Be careful to keep corrosion from coming in
contact with eyes.
d) Add distilled water in each cell until battery acid reaches level
specified by battery manufacturer. Do not overfill. For a battery without
removable cell caps, such as valve regulated lead acid batteries,
carefully follow manufacturer’s recharging instructions.
e) Study all battery manufacturers specific precautions such as removing
or not removing cell caps while charging and recommended rates of
charge.
f) Determine voltage of battery by referring to car owner’s manual and
make sure that output voltage selector switch is set at correct voltage.
Do not use the battery charger unless battery voltage matches the
output voltage rating of the charger.
13) CHARGER LOCATION
a) Locate charger as far away from battery as dc cables permit.
b) Never place charger directly above battery being charged; gases from
battery will corrode and damage charger.
c) Never allow battery acid to drip on charger when reading electrolyte
specific gravity or filling battery.
d) Do not operate charger in a closed-in area or restrict ventilation in any
way.
e) Do not set a battery on top of charger.
14) DC CONNECTION PRECAUTIONS
a) Connect and disconnect dc output clips only after setting any charger
and removing ac cord from electric outlet. Never allow clips to touch
each other.
b) Attach clips to battery and chassis as indicated in 15(e), 15(f), and
16(b) through 16(d).
15) FOLLOW THESE STEPS WHEN BATTERY IS INSTALLED IN VEHICLE.
A SPARK NEAR BATTERY MAY CAUSE BATTERY EXPLOSION. TO
REDUCE RISK OF A SPARK NEAR BATTERY:
a) Position ac and dc cords to reduce risk of damage by hood, door, or
moving engine part.
4
f) Tenga mayor cuidado del habitual para no dejar caer herramientas
metálicas sobre la batería. Ello puede hacer que salten chispas o
que se genere un corto circuito en la batería o en cualquier otro
componente eléctrico y que se produzca una explosión.
g) Quítese los objetos personales metálicos como anillos, pulseras,
collares y relojes cuando esté trabajando cerca de una batería
de plomo ácido. Las baterías de plomo ácido pueden producir un
cortocircuito que llegue a soldar un anillo u otro elemento con el
metal, causando graves quemaduras.
h) Utilice el cargador únicamente para baterías de plomo ácido. No es
adecuado para cargar un sistema eléctrico de baja potencia excepto
cuando se use como motor de arranque. No utilice el cargador de
baterías para cargar baterías secas normalmente de uso doméstico.
Estas baterías pueden estallar y causar daños personales y
materiales.
i) NUNCA cargue una batería congelada.
12) PREPARAR LA CARGA
a) Si es necesario, quite la batería del vehículo que quiera cargar,
desconectando siempre antes el terminal a tierra de la batería.
Apague todos los accesorios del vehículo para que no se pueda
formar un arco eléctrico.
b) Asegúrese de que la zona alrededor de la batería está bien ventilada
mientras se carga la batería.
c) Limpie los terminales de la batería. Tenga cuidado de que la
corrosión no entre en contacto con sus ojos.
d) Añada agua destilada a cada celda hasta que el ácido alcance el
nivel indicado por el fabricante. No rellene por encima de lo indicado.
En el caso de baterías de celdas con tapones extraíbles, como las
baterías de plomo ácido reguladas por válvula, siga cuidadosamente
las instrucciones del fabricante para recargarlas.
e) Estudie todas las precauciones concretas que indica el fabricante de
la batería, como quitar o no, el tapón de las celdas durante la carga
así como los índices de carga recomendados.
f) Busque la potencia de la batería en el manual de instrucciones del
carro y asegúrese de que el interruptor selector de la potencia de
salida coincide con el voltaje correcto. No use el cargador de baterías
si no coincide el voltaje de la batería con la potencia de salida del
cargador.
13) UBICACIÓN DEL CARGADOR
a) Sitúe el cargador tan lejos de la batería como permitan los cables de
alimentación.
b) No sitúe nunca el cargador directamente sobre la batería mientras
se está cargando; los gases de la batería corroerían y dañarían el
cargador.
c) No permita nunca que el ácido de la batería gotee sobre el cargador
cuando esté leyendo la gravedad electrolítica o al rellenar la batería.
d) No maneje el cargador en una zona cerrada o con poca ventilación.
e) No coloque la batería sobre el cargador.
14) PRECAUCIONES CON EL CABLE DE ALIMENTACIÓN
a) Conecte y desconecte las pinzas de salida solo después de poner
en posición “off” todos los interruptores del cargador y de haber
desenchufado el cable de salida. Nunca deje que las pinzas entren
en contacto entre ellas.

5
b) Conecte las pinzas a la batería y al chasis como se indica en 15(e),
15(f), 16(b) y 16(d).
15) SIGA ESTOS PASOS CUANDO SE INSTALE LA BATERÍA EN EL
VEHÍCULO. UNA CHISPA CERCA DE LA BATERÍA PUEDE HACER
QUE EXPLOTE. PARA REDUCIR EL RIESGO DE CHISPAS CERCA
DE LA BATERÍA:
a) Para reducir el riesgo de daños, coloque los cables de CC y CA
sobre el capó, puerta o cualquier otra pieza del vehículo.
b) Apártese de las palas del ventilador, correas, poleas o cualquier otra
pieza que pueda causar daños personales.
c) Compruebe la polaridad de los bornes de la batería. Los bornes
POSITIVOS (POS, P, +) de la batería normalmente tienen un
diámetro mayor que los NEGATIVOS, (NEG, N, –).
d) Determine qué borne de la batería está conectado al chasis. Si el
borne negativo es el que está conectado al chasis (como en la mayor
parte de los vehículos), vaya a (e). Si el borne positivo es el que está
conectado al chasis, vaya a (f).
e) Si es un vehículo con conexión negativa, conecte la pinza POSITIVA
(ROJA) del cargador de baterías al borne no conectado POSITIVO
(POS, P, +) de la batería. Conecte la pinza NEGATIVA (NEGRA)
al chasis del vehículo o al bloque del motor, lejos de la batería.
No conecte la pinza al carburador, tubos de gasolina o piezas de
chapa metálica de la carrocería. Conéctela a una pieza metálica del
bastidor de sección ancha o al bloque del motor.
f) Si es un vehículo con conexión positiva, conecte la pinza NEGATIVA
(NEGRA) del cargador de baterías al borne no conectado
NEGATIVO (NEG, N, +) de la batería. Conecte la pinza POSITIVA
(ROJA) al chasis del vehículo o bloque de motor lejos de la batería.
No conecte la pinza al carburador, tubos de gasolina o piezas de
chapa metálica de la carrocería. Conéctela a una pieza metálica del
bastidor de sección ancha o al bloque del motor.
g) Cuando desconecte el cargador, apague los interruptores,
desconecte el cable de alimentación CA y quite la pinza del chasis
del vehículo; luego quite la pinza del terminal de la batería.
h) Vea las instrucciones de funcionamiento para más información sobre
la duración de la carga.
16) SIGA ESTOS PASOS CUANDO LA BATERÍA ESTÉ FUERA DEL
VEHÍCULO. UNA CHISPA CERCA DE LA BATERÍA PUEDE CAUSAR
SU EXPLOSIÓN. PARA REDUCIR EL RIESGO DE CHISPAS CERCA
DE LA BATERÍA:
a) Compruebe la polaridad de los bornes de la batería. Los bornes
POSITIVOS (POS, P, +) de la batería normalmente tienen un
diámetro mayor que los NEGATIVOS, (NEG, N, –).
b) Conecte un cable aislado de al menos 60 cms de largo y de calibre 6
AWG al terminal de la batería.
c) Conecte la pinza del cargador POSITIVA (ROJA) al borne POSITIVO
(POS, P, +) de la batería.
d) Colóquese tan lejos como sea posible de la batería y haga lo
mismo con el extremo libre del cable; conecte la pinza del cargador
NEGATIVA (NEGRA) al extremo libre del cable.
e) No esté de cara a la batería cuando realice la conexión final.
5
b) Stay clear of fan blades, belts, pulleys, and other parts that can cause
injury to persons.
c) Check polarity of battery posts. POSITIVE (POS, P, +) battery post
usually has larger diameter than NEGATIVE (NEG, N,–) post.
d) Determine which post of battery is grounded (connected) to the
chassis. If negative post is grounded to chassis (as in most vehicles),
see (e). If positive post is grounded to the chassis, see (f).
e) For negative-grounded vehicle, connect POSITIVE (RED) clip from
battery charger to POSITIVE (POS, P, +) ungrounded post of battery.
Connect NEGATIVE (BLACK) clip to vehicle chassis or engine block
away from battery. Do not connect clip to carburetor, fuel lines, or
sheet-metal body parts. Connect to a heavy gage metal part of the
frame or engine block.
f) For positive-grounded vehicle, connect NEGATIVE (BLACK) clip
from battery charger to NEGATIVE (NEG, N, –) ungrounded post of
battery. Connect POSITIVE (RED) clip to vehicle chassis or engine
block away from battery. Do not connect clip to carburetor, fuel lines,
or sheet-metal body parts. Connect to a heavy gage metal part of the
frame or engine block.
g) When disconnecting charger, disconnect AC cord, remove clip from
vehicle chassis, and then remove clip from battery terminal.
h) See operating instructions for length of charge information.
16) FOLLOW THESE STEPS WHEN BATTERY IS OUTSIDE VEHICLE. A
SPARK NEAR THE BATTERY MAY CAUSE BATTERY EXPLOSION. TO
REDUCE RISK OF A SPARK NEAR BATTERY:
a) Check polarity of battery posts. POSITIVE (POS, P, +) battery post
usually has a larger diameter than NEGATIVE (NEG, N, –) post.
b) Attach at least a 60cm (24-inch) long 6-gauge (AWG) insulated
battery cable to NEGATIVE (NEG, N, –) battery post.
c) Connect POSITIVE (RED) charger clip to POSITIVE (POS, P, +) post
of battery.
d) Position yourself and free end of cable as far away from battery as
possible – then connect NEGATIVE (BLACK) charger clip to free end
of cable.
e) Do not face battery when making final connection.
f) When disconnecting charger, always do so in reverse sequence of
connecting procedure and break first connection while as far away
from battery as practical.
g) A marine (boat) battery must be removed and charged on shore. To
charge it on board requires equipment specially designed for marine
use.
• The supply cord cannot be replaced. If the cord is damaged the
appliance should be scrapped.
• Examine the battery charger regularly for damage, especially the
cord, plug and enclosure; if the battery charger is damaged, it must
not be used until it has been repaired.
This symbol indicates separate collection for electrical and
electronic equipment.

6
INTRODUCTION
The 1500mA or 1.5A CHARGE CARD™ is a fully automatic 6-volt/12-volt Battery Charger Maintainer
that will allow for maintenance-free charging of a vehicle’s battery over a long period of time. It is
intended to be plugged in for long periods of time. The CHARGE CARD™ 1500mA Battery Charger
has 3 modes of charging:
• Bulk Mode or Constant Current Mode: Where the charger provides constant current to charge
the vehicle’s battery to 80% of its capacity
• Absorption or Constant Voltage Mode: At this stage the charger provides constant voltage to
charge the battery to its full capacity at 100%.
• Float/Maintenance Mode: At this stage the charger is maintaining the battery capacity to its full
capacity over a period of time.
This Charger is further equipped with an intuitive LED user interface that has 4 LEDs and a mode
select button:
• A green Charging LED which will flash green when charging and appear solid green when the
battery is fully charged.
• A red reverse polarity LED which will flash red if the charger is connected incorrectly to the battery
terminals.
• The mode select buttons allow you to choose a battery type, whether a 6V or a 12V battery.
• A blue LED above 12V indicates that 12V mode is selected to charge a 12V battery.
• A blue LED above 6V indicates that 6V Mode is selected to charge a 6V battery.
The CHARGE CARD™ 1500mA Battery Charger/Maintainer is intended to charge 6-volt or 12-
volt lead-acid batteries maintenance-free and conventional automotive, marine deep cycle – that
are usually used in cars, trucks, farm equipment, boats, RVs and SUVs, lawn mowers and garden
tractors, motorcycles, personal watercraft, snowmobiles, ATVs and various light commercial
applications. This is the perfect Plug and Go charger for maintaining batteries during the winter time.
This Battery Charger has been carefully engineered and manufactured to give you dependable
operation. Please read this manual thoroughly before operating your new Battery Charger, as it
contains the information you need to become familiar with its features and obtain the performance
that will bring you continued enjoyment for many years. Please keep this manual on file for future
reference.
FEATURES
• Charges 6-volt or 12-volt lead-acid battery (AGM, gel-cell and deep-cycle)
• Green LED indicates charging status
• Red LED indicates reverse polarity
• Mode select button to select 6-volt or 12-volt charging mode
• Blue LED, as shown in picture below (4), indicates 6-volt charging mode
• Blue LED, as shown in picture below (3), indicates 12-volt charging mode
• Cables are corrosion-resistant for better connections
• Connect to side or top-mount battery terminals
• Ideal for charging during winter season when the starting performance of vehicle batteries is
lowered by cold or extreme weather conditions
6
f) Cuando desconecte el cargador, hágalo siempre de forma inversa
a la secuencia de conexión e interrumpa la primera conexión
manteniéndose tan lejos como pueda de la batería.
g) Las baterías marinas, de barcos, deben sacarse y cargarse en
tierra. Para cargarlas a bordo se requiere un equipo especialmente
diseñado para el marino.
• No se puede reemplazar el cable de suministro. Si el cable está
estropeado, se debe desechar el aparato.
• Compruebe regularmente que el cargador de baterías no tiene
daños, sobre todo el cable, el enchufe y carcasa; no se puede
volver a utilizar hasta que no se haya reparado.
Este símbolo indica que se deben recoger de forma separada
el equipo eléctrico y el electrónico.
INTRODUCCIÓN
La tarjeta CHARGE CARD™ de 1.500 mA o 1,5 A es un Cargador Mantenedor de Baterías de
6 voltios/12 voltios completamente automático que permitirá la carga de libre mantenimiento de
la batería de un vehículo durante un período de tiempo largo. Está destinada a estar enchufada
durante largos períodos de tiempo. El Cargador de Baterías CHARGE CARD™ de 1.500 mA tiene 3
modos de carga:
• Modo a Granel o Modo de Corriente Constante: Donde el cargador proporciona corriente
constante para cargar la batería del vehículo al 80% de su capacidad
• Modo de Absorción o de Voltaje Constante: En esta etapa el cargador proporciona voltaje
constante para cargar la batería a su capacidad total del 100%.
• Modo de Flotación/Mantenimiento: En esta etapa el cargador está manteniendo la capacidad de la
batería a su máxima capacidad por un período de tiempo.
Este cargador está también equipado con una interfaz intuitiva para el usuario que tiene 4 luces
LED y un botón de selección de modo.
• Una luz LED verde de carga la cual parpadeará en verde durante la carga y aparecerá en verde sólido
cuando la batería esté completamente cargada.
• Una luz LED roja de polaridad inversa que parpadeará en rojo si el cargador está conectado
incorrectamente a los terminales de la batería.
• Los botones de selección de modo le permiten elegir un tipo de batería, ya sea una batería de 6V o 12V.
• Un LED azul por encima de 12V indica que el modo de 12V está seleccionado para cargar una batería
de 12V.
• Un LED azul por encima de 6V indica que el modo de 6V está seleccionado para cargar una batería de 6V.
La tarjeta Cargador/Mantenedor CHARGE CARD™ de 1.500 mA fue intentada para cargar
baterías de 6 y de 12 voltios de plomo ácido libres de mantenimiento y baterías automotrices
convencionales, marinas de ciclo profundo - que son usualmente usadas en automóviles, camiones,
equipos agrícolas, botes, vehículos de recreo RV y SUV, cortadoras de grama y tractores de
jardín, motocicletas, motos acuáticas, motos de nieve, vehículos todo terreno y varias aplicaciones
comerciales ligeras. Este es el cargador de enchufar y usar “Plug and Go” perfecto para el
mantenimiento de las baterías durante el invierno.
Este Cargador de Baterías ha sido diseñado y fabricado cuidadosamente para proporcionarle
una operación confiable. Por favor lea completamente este manual antes de operar su nuevo
Cargador de Baterías, ya que contiene la información que usted necesita para familiarizarse con
sus características y obtener el rendimiento que le dará satisfacción continua por muchos años. Por
favor guarde este manual para referencia futura.
CARACTERÍSTICAS
• Carga baterías de plomo-ácido de 6 ó 12 voltios (Estera de vidrio absorbente AGM por sus siglas en
inglés, celda de gel y ciclo profundo).
• La luz LED verde indica el estado de la carga.
• La luz LED roja indica polaridad invertida.
• Botón de selección de modo para seleccionar el modo de carga de 6 ó 12 voltios.
• La luz LED azul, como se muestra en la imagen inferior (4), indica un modo de carga de 6 voltios.
• La luz LED azul, como se muestra en la imagen inferior (3), indica un modo de carga de 12 voltios.
• Los cables son resistentes a la corrosión para obtener mejores conexiones.
• Conecta a los terminales de la batería montados encima o a un lado.
• Ideal para cargar durante la temporada de invierno cuando el rendimiento de arranque de las baterías
se baja a causa de las condiciones de tiempo extremas.

7
CHARGING REVERSE
POLARITY
CHARGED
7
9
10
8
1
2
3 4
5
6
11
11
MODE
SELECT
12V
6V
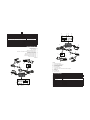
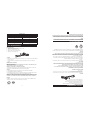
Leyenda
1. Luz Indicadora de Carga
2. Luz Indicadora de Polaridad Invertida
3. Luz Indicadora de Modo de 12 Voltios
4. Luz Indicadora de Modo de 6 Voltios
5. Botón de Selección de Modo
6. Cable de 110/120 Voltios CA
7. Cable de la Pinza de Carga Rojo = Positivo, Negro = Negativo
8. Cable de Terminales de Anillo
9. Fusible de 7,5 A
10. Cable de Salida CC
11. Conectores de Cables
ESPECIFICACIONES
1. Entrada 120V 60 Hz 0,6 A
2. Voltaje de carga 6V/12V CC
3. Corriente de carga 1,5 A
4. Energía de entrada (sin carga) < 0,8 W
5. Energía de entrada < 30 W
6. Compatibilidad de batería Batería de plomo-ácido de 6V/12V (Estera de vidrio absorbente
[AGM por sus siglas en inglés], celda de gel y ciclo profundo).
7. Altura 2-3/4 pul. (7,0 cm)
8. Ancho 4-3/8 pul. (11,1 cm)
9. Profundidad 1-3/8 pul. (3,5 cm)
10. Peso 0.77 lb (0,35 kg)
7
CHARGING REVERSE
POLARITY
CHARGED
7
9
10
8
1
2
3 4
5
6
11
11
MODE
SELECT
12V
6V
Legend
1. Charge Indicator Light
2. Reverse Polarity Indicator Light
3. 12-Volt Mode Indicator Light
4. 6-Volt Mode Indicator Light
5. Mode Select Button
6. 110/120-Volt AC Cable
7. Charging Clamp Cable: Red = Positive, Black = Negative
8. O-Ring Cable
9. 7.5A Fuse
10. DC Output Cable
11. Cable Connectors
SPECIFICATIONS
1.
Input 120V 60 Hz 0.6A
2.
Charging voltage 6V/12V DC
3.
Charging current 1.5A
4.
Input power (no load) < 0.8W
5.
Input power < 30W
6.
Battery compatibility 6V/12V lead-acid battery (AGM, gel cell and deep cycle)
7.
Height 2-3/4 in. (7.0 cm)
8.
Width 4-3/8 in. (11.1 cm)
9.
Depth 1-3/8 in. (3.5 cm)
10.
Weight 0.77 lb (0.35 kg)

8
OPERATING INSTRUCTIONS
LED Display Panel
Charge Indicator Light – While charging the battery, the green LED will flash. When the battery is
fully charged, the green LED will remain lit.
Reverse Polarity Indicator Light – The red LED will flash when the Battery Charger is not properly
connected to the battery. When lit, it will not allow the Battery Charger to begin charging.
Mode Select Button – Press button to change charging mode, 6-volt or 12-volt.
NOTE: The charger default is 12V mode.
6-Volt Mode Indicator Light – When blue LED is lit above 6V, the Battery Charger is in 6-volt
charging mode for a 6-volt battery.
12-Volt Mode Indicator Light – When blue LED is lit above 12V, the Battery Charger is in 12-volt
charging mode for a 12-volt battery.
Before Charging
• Make sure the Battery Charger is disconnected from the power supply.
• Make sure that the voltage of the battery matches the rated output of the Battery Charger by
referring to the vehicle owner’s manual.
• Check the polarities of the battery terminals: positive for the (+) symbol and negative for the (–)
symbol.
• Ensure the correct voltage mode is selected for your battery.
• The charger default is 12V.
• See CHARGING TIMES on page 9 before charging battery.
Pre-Charge Activation
When starting to charge a battery, the current will depend on the battery’s percent of charge. As the
battery charge level increases, the current reduces. To measure the battery charge level as charging
proceeds, a hydrometer or a voltmeter should be used. Typically 12.6V DC is considered full charge
for a 12-volt battery if the voltage is measured one hour after the Battery Charger is disconnected.
During charging, a nominal 12-volt battery can measure 13.6 volts or higher. If so, it needs to rest
after charging to measure actual state of charge.
WARNING: EXPLOSION HAZARD
Be aware that a fully charged battery will also cause a low current reading. Attempting pre-
charge activation of a fully charged battery may cause explosion - make sure that battery is
discharged before using this procedure.
NOTICE: Pre-charge activation is the term for the time it takes before a battery begins to
accept a measurable rate of charge - it can be as long as 4-8 hours from the time the charging
process begins. Pre-charge activation is indicated if a hydrometer or voltmeter reading shows
that the battery is fully discharged.
NOTICE: The newer, high-calcium-type 12-volt DC batteries may need pre-charge activation if
their charge has been allowed to drop to a very low level. When deeply discharged, this type
of battery will provide only a very low voltage output and will draw less than 1 amp during the
recharging process, until activated.
Charging if Battery Is Installed in a Vehicle
1. Check polarity of battery terminals: For top-mounted battery connectors, the positive (+) terminal
usually has a larger diameter than the negative (–) battery terminal. For side-mounted battery
connections, the positive terminal is red, and the negative terminal is black.
2. There are two different sets of cables that can be used for charging. You can use the charging
clamp cables or the o-ring cables.
NOTICE: When using the o-ring terminal cable, make sure to use the correct hardware to
connect the cables to the battery. Hardware is not supplied with the Battery Charger.
3. Using the appropriate cable, plug it into the cable connector cord from the Battery Charger.
4. Using the charging clamp cable or the o-ring cable, attach cable connectors to battery
connections as follows.
Negative-Grounded Vehicle: Connect the positive (RED) charging clamp cable to the positive
(+) ungrounded battery terminal. Then, connect the negative (BLACK) charging clamp cable to
the vehicle chassis, or the engine block (away from the battery). Do not connect the cable to the
carburetor, fuel lines or sheet metal body parts: connect only to a heavy gauge metal part of the
frame or engine block.
NOTICE: Negative-grounded type systems are the most common in today’s vehicles.
8
INSTRUCCIONES DE OPERACIÓN
Panel de Pantalla LED
Luz Indicadora de Carga – Mientras carga la batería, la luz LED verde parpadeará. Cuando la batería
quede completamente cargada, la luz LED verde se quedará encendida.
Luz Indicadora de Polaridad Invertida – La luz LED roja parpadeará cuando el Cargador de Baterías
no fue conectado apropiadamente a la batería. Cuando está encendido no le permitirá al Cargador de
Baterías comenzar a cargar.
Botón Selector de Modo – Oprima el botón para cambiar el modo, 6 voltios o 12 voltios.
NOTA: El modo predeterminado del cargador es el de 12V.
Luz Indicadora de Modo de 6 Voltios – Cuando la luz LED azul está encendida por encima de 6V, el
Cargador de Baterías esta en el modo de carga de 6 voltios para una batería de 6 voltios.
Luz Indicadora de Modo de 12 Voltios – Cuando la luz LED azul está encendida por encima de 12V, el
Cargador de Baterías esta en el modo de carga de 12 voltios para una batería de 12 voltios.
Antes de Cargar
• Asegúrese de que el Cargador de Baterías sea desconectado de la fuente de energía.
• Asegúrese de que el voltaje de la batería sea igual a la potencia nominal del Cargador de Baterías
refiriéndose al manual del propietario del vehículo.
• Revise las polaridades de los terminales de batería: positivo para el símbolo de (+) y negativo para el
símbolo de (–).
• Asegúrese de seleccionar el modo de voltaje correcto para su batería.
• El predeterminado del cargador es de 12V.
• Consulte TIEMPOS DE CARGA en la página 9 antes de cargar la batería.
Activación Pre-Carga
Cuando comience a cargar una batería, la corriente dependerá del porcentaje de carga de la batería. A
medida que el nivel de carga de la batería aumenta, se reduce la corriente. Para medir el nivel de carga
de la batería a medida que carga, se debe usar un hidrómetro o un voltímetro. Típicamente 12,6V CC se
consideran carga completa para una batería de 12 voltios si el voltaje es medido una hora después de
desconectar el Cargador de Baterías. Durante la carga, el voltaje nominal de una batería de 12 voltios
puede medir 13,6 voltios o más. Si es así, necesita reposar después de la carga para medir el estado de
carga real.
ADVERTENCIA: PELIGRO DE EXPLOSIÓN
Esté enterado de que una batería completamente cargada causara una lectura de corriente baja. El
intentar activación de pre-carga de una batería completamente cargada podrá causar una explosión
- asegúrese que la batería esté descargada antes de usar este procedimiento.
AVISO: Activación de pre-carga es un término para el tiempo que se toma antes de que una batería
comience a aceptar una tasa de carga cuantificable - puede ser tanto como de 4 a 8 horas desde el
comienzo del proceso de carga. La activación de pre-carga es indicada si la lectura del hidrómetro
o voltímetro muestra que la batería está totalmente descargada.
AVISO: Las baterías más nuevas de tipo de alto calcio de 12 voltios CC podrán necesitar activación
de pre-carga si se les ha permitido que su nivel de carga caiga a un nivel muy bajo. Cuando están
profundamente descargadas, este tipo de baterías proporcionaran sólo una salida de voltaje muy
baja y consumirán menos de 1 amperio durante el proceso de recarga, hasta que son activadas.
Carga si la Batería está Instalada en un Vehículo
1. Revise la polaridad de los terminales de la batería: Para terminales de batería montados en la parte
superior, usualmente el terminal de batería positivo (+) tiene un diámetro mayor que el del terminal
negativo (–). Para conexiones de batería montadas al lado, el terminal positivo es rojo y el terminal
negativo es negro.
2. Hay dos juegos de cables diferentes que pueden ser usados para cargar. Usted puede usar las pinzas
de los cables de carga o los cables de anillo.
AVISO: Cuando use el cable de terminales de anillo, asegúrese de usar los herrajes correctos para
conectar los cables a la batería. Los herrajes no son suministrados con el Cargador de Baterías.
3. Usando el cable apropiado, enchúfelo dentro del cordón del conector del cable del Cargador de
Baterías.
4. Usando el cable de pinzas o el cable de anillos, sujete los conectores de los cables a las conexiones
de la batería de la forma siguiente.
Vehículo con Tierra Negativa Conecte el cable de la pinza positiva (ROJA) de carga al terminal
positivo (+) sin tierra de la batería. Luego, conecte el cable de la pinza de carga negativo (NEGRO) al
chasis del vehículo o al bloque del motor (lejos de la batería). No conecte el cable al carburador, tubos
de combustible o piezas de hojalata de la carrocería: conéctelo solamente a una pieza metálica de
grueso calibre del chasis o del bloque del motor.
AVISO: Los sistemas de tipo de tierra negativa son los más comunes en los vehículos actuales.
Vehículo con Tierra Positiva Conecte el cable de la pinza negativa (NEGRA) de carga al terminal
de batería negativo (–) sin tierra. Luego, conecte el cable de la pinza del cargador de baterías
positivo (ROJO) al chasis del vehículo o pieza del motor (lejos de la batería). No conecte el cable al
carburador, tubos de combustible o piezas de hojalata de la carrocería: conéctelo solamente a una
pieza estable metálica de grueso calibre del chasis o del bloque del motor.

9
5. Enchufe el cable de carga de 110/120 voltios CA en la salida de 110/120 voltios CA.
AVISO: Si la luz LED roja de polaridad invertida está parpadeando, las conexiones de la batería son
incorrectas. Invierta las conexiones de la batería.
6. Cuando la carga esté completa, la luz LED verde se quedará encendida.
7. Después de que la carga esté completa, desconecte el enchufe del Cargador de Baterías de la toma
de corriente de 110/120 voltios CA.
8. Desconecte los cables en orden inverso al que fueron conectados. Desconecte su primer cable tan
lejos de la batería como le sea posible.
Carga si la Batería está Fuera del Vehículo
1. Revise la polaridad de los terminales de la batería - Para conectores de batería montados encima, el
terminal positivo (+) tiene usualmente un diámetro mayor que el del terminal negativo (–) de la batería.
Para conexiones de batería montadas al lado, el terminal positivo es rojo y el terminal negativo es
negro.
2. Hay dos juegos de cables diferentes que pueden ser usados para cargar. Usted puede usar los cables
de las pinzas de carga o los cables de anillo.
AVISO: Cuando use el cable de anillo, asegúrese de usar los herrajes correctos para conectar los
cables a la batería. Los herrajes no son suministrados con el Cargador de Baterías.
3. Conecte el cable de carga de pinza positivo (ROJO) al terminal positivo (+) de la batería.
4. Párese tan lejos de la batería como le sea posible y no le de la cara a la batería al efectuar las
conexiones finales.
5. Párese con el extremo libre de los cables tan lejos de la batería como le sea posible. Conecte
cuidadosamente la pinza de carga negativa (NEGRA) al extremo libre del cable de la batería
conectado al terminal negativo.
6. Conecte el cordón del Cargador de Baterías en una toma de corriente de 110/120 voltios CA.
AVISO: Si la luz LED roja de polaridad invertida está parpadeando, las conexiones de la batería son
incorrectas. Invierta las conexiones de la batería.
7. Cuando la carga esté completa, la luz LED verde se quedará encendida.
8. Después de que la carga esté completa, desconecte el enchufe del Cargador de Baterías de la toma
de corriente de 110/120 voltios CA.
9. Desconecte los cables en orden inverso al que fueron conectados. Desconecte su primer cable tan
lejos de la batería como le sea posible.
AVISO: Una batería marina (de bote) tiene que ser removida y cargada en tierra. Para cargarla a
bordo se necesitan equipos diseñados especialmente para uso marino.
Uso de Cables de Extensión
Si es necesario usar un cable de extensión, observe la siguiente información importante de seguridad:
• Antes de usar un cable de extensión, asegúrese de que el calibre del cable sea por lo menos de 18
AWG o más grueso y de 16 AWG para longitudes mayores de 100 pies (30,5 m).
• Use sólo un cable de buena calidad y en buenas condiciones, aprobado por UL, y SIEMPRE conecte
el Cargador de Baterías al cable de extensión antes de enchufar el cable de extensión a una toma de
corriente de 110/120 voltios CA. El uso de un cable de extensión de baja calidad o uno que no esté en
buenas condiciones podrá causar un incendio o electrochoque.
Tiempos de Carga
El Cargador de Baterías PKC0C1500 es completamente automático. Ajusta automáticamente la tasa de
carga a medida que carga la batería y para de cargar cuando la batería está completamente cargada.
Para estimar el tiempo de carga de una batería descargada, divida la capacidad de Ah (amperios/hora) de
la batería por la tasa de carga. Este es el número de horas necesario para recargar la batería. Por ejemplo,
una batería de 50 Ah (12 voltios) se descargo a 10 voltios. ¿Por cuanto tiempo deberá ser cargada a una
tasa de 1,5 amperios? Divida 50 Ah por 1,5 Ah. La respuesta es aproximadamente 33 horas. Siempre
redondee el tiempo de carga por un 25% para asegurar una carga completa. En la mayoría de los casos,
los tiempos de recarga de la batería varían dependiendo de la edad y de la condición de la batería. Para
baterías más pequeñas, el tiempo de carga se debe ajustar usando la tabla mostrada abajo y agregando 1
hora al tiempo calculado.
Cargador de 1.500 mA
Capacidad de la Batería (Ah) Tiempo de Carga (horas)
5 4
10 8
20 15
40 30
60 44
70 52
75 55
9
Positive-Grounded Vehicle: Connect the negative (BLACK) charging clamp cable to the
negative (–) ungrounded battery terminal. Then, connect the positive (RED) charging clamp cable
to the vehicle chassis or engine part (away from the battery). Do not connect the cable to the
carburetor, fuel lines or sheet metal body parts: connect only to a heavy gauge, stable metal part
of the frame or engine block.
5. Plug the battery 110/120-volt AC cable into a 110/120-volt AC power outlet.
NOTICE: If the red reverse polarity LED is blinking, the battery connections are incorrect.
Reverse the battery connections.
6. When charging is complete, the green LED will remain lit.
7. After charging is complete, disconnect the Battery Charger plug from the 110/120-volt AC power
outlet.
8. Disconnect the cables in the reverse order in which they were connected. Disconnect your first
cable as far away from the battery as possible.
Charging if Battery Is Outside of Vehicle
1. Check polarity of battery terminals - For top-mounted battery connectors, the positive (+) terminal
usually has a larger diameter than the negative (–) battery terminal. For side-mounted battery
connections the positive terminal is red, the negative terminal is black.
2. There are two different sets of cables that can be used for charging. You can use the charging
clamp cable or the o-ring cable.
NOTICE: When using the o-ring cable, make sure to use the correct hardware to connect the
cables to the battery. Hardware is not supplied with the Battery Charger.
3. Connect the positive (RED) charging clamp cable to the positive (+) battery terminal.
4. Stand as far back from battery as possible, and do not face battery when making final
connection.
5. Position yourself and free end of cables as far away from battery as possible. Carefully connect
the negative (BLACK) charging clamp cable to the free end of the battery cable connected to the
negative terminal.
6. Connect the Battery Charger’s power cord to a 110/120-volt AC power outlet.
NOTICE: If the red reverse polarity LED is blinking, the battery connections are incorrect.
Reverse the battery connections.
7. When charging is complete, the green LED will remain lit.
8. After charging is complete, disconnect the Battery Charger plug from the 110/120-volt AC power
outlet.
9. Disconnect the cables in the reverse order in which they were connected. Disconnect your first
cable as far away from the battery as possible.
NOTICE: A marine (boat) battery must be removed and charged on shore. To charge it on
board requires equipment specially designed for marine use.
Use of Extension Cords
If it is necessary to use an extension cord, observe the following important safety information:
• Before using any extension cord, ensure that the wire size is at least 18 AWG or larger and
16 AWG for longer than 100 ft (30.5 m).
• Use only a good quality, good condition, UL-approved extension cord, and ALWAYS connect
Battery Charger to the extension cord before plugging the extension cord into a 110/120-volt AC
power outlet. The use of a poor quality extension cord or one that is not in good repair could cause
fire and/or electric shock.
Charging Times
The PKC0C1500 is a fully automatic Battery Charger. It automatically adjusts the charge rate as the
battery becomes charged and stops charging when the battery is fully charged.
To estimate charging time for a discharged battery, divide the AH rating of the battery by the charge
rate. This is the number of hours required to recharge the battery. For example, a 50 AH (12-volt)
battery is discharged to 10 volts. How long should it be charged at the 1.5-amp rate? Divide the
50 AH by 1.5 AH. The answer is approximately 33 hours. Always round up the charge time by 25%
to ensure full charge. In most cases, battery recharge times will vary depending on the age and
condition of the battery. For smaller batteries, the charge time should be adjusted using the table
below and adding 1 hour to the time calculated.

10
1500mA charger
Battery Capacity (AH) Charge Time (Hrs)
5 4
10 8
20 15
40 30
60 44
70 52
75 55
CARE AND MAINTENANCE
Fuse Replacement
1. Disconnect the Battery Charger from its power source.
2. Remove the fuse protective cover.
3. Pull the fuse straight out of the holder.
4. Replace with a new 7.5A spade-type fuse.
5. Replace the fuse protective cover.
Cleaning
• After each use, clean the charging cables and connectors - be sure to remove any battery fluid that
will cause corrosion.
• Clean the outside case of the Battery Charger with a soft cloth and, if necessary, mild soap
solution.
Adding Water to the Battery
WARNING: BURN HAZARD
Always wear protective eyewear when adding water to the battery. Contact with battery acid
can cause blindness and/or severe chemical burns.
NOTICE: Do not add water to a maintenance-free battery.
Once the battery is fully charged, check the electrolyte level of the battery. If the level is below the
specified level, add clean distilled water only. Never add acid or tap water.
Storage
• Store the Battery Charger disconnected from AC power, battery cables and battery.
• Store the Battery Charger at room temperature.
• Keep the Battery Charger cords loosely coiled during storage to prevent damage to the cords. Do
not use the Battery Charger if cords or cables have been damaged in any way.
NOTICE: Due to inherent self-discharge, lead-acid batteries should be charged at least every
4 months, especially in a warm environment. Leaving a battery in a discharged state, or if not
recharged every 4 months, may result in permanent battery damage and poor performance.
Disposal
The Battery Charger is designed to provide years of service. However, when the Battery Charger
reaches the end of its service life, it should be disposed of properly.
PLEASE
RECYCLE
10
CUIDADOS Y MANTENIMIENTO
Reemplazo del Fusible
1. Desconecte el Cargador de Baterías de su fuente de energía.
2. Remueva la tapa de protección del fusible.
3. Saque el fusible directamente hacia afuera del soporte.
4. Reemplácelo por uno nuevo de 7,5 A de tipo pala.
5. Reinstale la tapa de protección del fusible.
Limpieza
• Después de cada uso, limpie los cables de carga y conectores - asegúrese de remover cualquier fluido
de batería que pueda causar corrosión.
• Limpie la caja exterior del Cargador de Baterías con un trapo suave y si es necesario con una solución
de jabón suave.
Adición de Agua en la Batería
ADVERTENCIA: PELIGRO DE QUEMADURAS
Siempre use gafas de protección cuando le adicione agua a la batería. El contacto con el
ácido de la batería podrá causar ceguera y/o quemaduras químicas severas.
AVISO: No le adicione agua a una batería libre de mantenimiento.
Una vez que la batería quede completamente cargada, revise el nivel del electrolito de la batería.
Si el nivel está por debajo del nivel especificado, adiciónele sólo agua destilada. Nunca le adicione
ácido o agua del grifo.
Almacenaje
• Almacene el Cargador de Baterías desconectado de la energía CA, de los cables de batería y de
la batería.
• Almacene el Cargador de Baterías a temperatura ambiente.
• Mantenga los cordones del Cargador de Baterías enrollados flojamente durante el almacenaje
para evitar dañar los cordones. No use el Cargador de Baterías si los cordones o cables se han
dañado de cualquier manera.
AVISO: Por causa de la auto descarga inherente, las baterías de plomo-ácido se deben cargar
por lo menos cada 4 meses, especialmente en un medio cálido. El dejar la batería descargada
o si no se carga cada 4 meses, podrá resultar en daños permanentes a la batería y bajo
desempeño.
Descarte
El Cargador de Baterías fue diseñado para proporcionarle años de servicio. Sin embargo, cuando el
Cargador de Baterías llegue al fin de su vida de trabajo, beberá ser desechado apropiadamente.
PLEASE
RECYCLE
INFORMACIÓN DE LA FCC
ADVERTENCIA: Cambios o modicaciones a este equipo no aprobadas expresamente por
la parte responsable de cumplimiento podrá anular la autoridad del usuario para operar el
equipo.
Este dispositivo cumple con la parte 15 de las Reglas de la FCC. La operación está sujeta a
las siguientes dos condiciones: (1) Este dispositivo no deberá causar interferencia dañina, y
(2) este dispositivo deberá aceptar cualquier interferencia recibida, incluyendo interferencia
que pueda causar la operación indeseada.

11
AVISO: Este equipo ha sido probado y se encontró que cumple con los límites de un
dispositivo digital Clase B, conforme a la Parte 15 de las Reglas de la FCC. Estos límites
fueron diseñados para suministrar protección razonable contra interferencias dañinas en
una instalación residencial. Este equipo genera, usa y puede radiar energía de frecuencia
radial y si no es instalado y usado de acuerdo con las instrucciones, podrá causar
interferencia dañina para las comunicaciones radiales. Sin embargo, no hay garantía de que
dicha interferencia no ocurra en una instalación en particular.
Si este equipo causa interferencia dañina a la recepción de radio o televisión, lo cual puede
ser determinado apagando y encendiendo el equipo, alentamos al usuario para que trate de
corregir la interferencia por medio de una o más de las siguientes medidas:
• Reoriente o reubique la entena receptora.
• Aumente la separación entre el equipo y el receptor.
• Conecte el equipo en una toma de corriente de un circuito diferente al que el receptor
está conectado.
• Consulte al agente o a un técnico de radio/TV para obtener ayuda.
INFORMACIÓN DE LA IC
Este dispositivo cumple con los RSS exentos de licencia de la Industria Canadiense. La operación
está sujeta a las siguientes dos condiciones:
1. Este dispositivo no puede causar interferencias; y
2. Este dispositivo debe aceptar cualquier interferencia, incluyendo interferencias que puedan
causar un funcionamiento no deseado del dispositivo.
RESOLUCIÓN DE PROBLEMAS
Problema Situación Acción
Ninguna luz LED
encendida
No hay energía
CA en la toma de
corriente
Asegúrese de que el Cargador de Baterías este
conectado a una toma de corriente "energizada" de
110/120 voltios CA con conexión a tierra.
La luz LED verde de
Batería Cargada no se
enciende después de
la carga.
Conexiones flojas
del cable de carga
en la batería
Desenchufe el Cargador de Baterías y revise las
conexiones de la batería - asegúrese que haya una
buena conexión en los terminales de la batería y/o
chasis del vehículo.
Batería lenta para
cargar
Asegúrese de que se le haya permitido suficiente
tiempo de carga. Consulte TIEMPOS DE CARGA
en la página 9 para obtener más información.
Batería demasiado fría. La tasa de carga aumentara
a medida que la batería se calienta por encima de
32 °F (0 °C).
La luz LED verde de
carga no enciende
El voltaje de la
batería es bajo
o la batería está
dañada
Verifique el voltaje de la batería con un multímetro.
Reemplace la batería si el voltaje está demasiado
bajo.
Apagado por
cortocircuito
Desconecte los cables de las pinzas de carga y
revise si los cables de las pinzas de carga están
en corto o si la batería está en corto. La carga
continuara cuando la condición de cortocircuito sea
corregida.
La batería no
carga
Consulte ACTIVACIÓN PRE-CARGA en la página 8.
Verifique si la batería está sulfatada.
La luz LED roja de
polaridad inversa
intermitente
Los cables del
cargador no
están conectados
apropiadamente.
Desenchufe el cargador de baterías y revise
si los cables del cargador están conectados
apropiadamente. Vea las páginas 8 y 9 para obtener
instrucciones sobre cómo conectar los cables del
cargador en la batería.
11
FCC INFORMATION
WARNING: Changes or modications to this equipment not expressly approved by the party
responsible for compliance could void the user’s authority to operate the equipment.
This device complies with part 15 of the FCC Rules. Operation is subject to the following
two conditions: (1) This device may not cause harmful interference, and (2) this device must
accept any interference received, including interference that may cause undesired operation.
NOTICE: This equipment has been tested and found to comply with the limits for a Class B
digital device, pursuant to Part 15 of the FCC Rules. These limits are designed to provide
reasonable protection against harmful interference in a residential installation. This
equipment generates, uses and can radiate radio frequency energy and, if not installed
and used in accordance with the instructions, may cause harmful interference to radio
communications. However, there is no guarantee that interference will not occur in a
particular installation.
If this equipment does cause harmful interference to radio or television reception, which can
be determined by turning the equipment o and on, the user is encouraged to try to correct
the interference by one or more of the following measures:
• Reorient or relocate the receiving antenna.
• Increase the separation between the equipment and receiver.
• Connect the equipment into an outlet on a circuit dierent from that to which the receiver is
connected.
• Consult the dealer or an experienced radio/TV technician for help.
IC INFORMATION
This device complies with Industry Canada’s license-exempt RSSs. Operation is subject to the
following two conditions:
1. This device may not cause interference; and
2. This device must accept any interference, including interference that may cause undesired
operation of the device.
TROUBLESHOOTING
Problem Situation Action
No LEDs lit
No AC power at
outlet
Make sure that the Battery Charger is connected to
a “live” 110/120-volt AC grounded outlet.
Green charged LED will
not light after charging
Loose charging
cable connections
at the battery
Unplug Battery Charger and check battery
connections - ensure that there is a good
connection with the battery terminal and/or vehicle
chassis.
Battery slow to
charge
Ensure that enough charging time has been
allowed. See CHARGING TIMES on page 9 for
more information.
Very cold battery. Charge rate will increase as
battery warms above 32°F (0°C).
Green charging LED
does not light
Battery voltage is
low or battery is
damaged
Check the battery voltage with a multimeter.
Replace the battery if the battery voltage is too low.
Short circuit
shutdown
Disconnect the charging clamp cables and check
for charging clamp cable short or battery short.
Charging will resume when the short condition is
corrected.
Battery will not
charge
See PRE-CHARGE ACTIVATION on page 8.
Check if battery is sulfated.
Red reverse polarity
LED flashing
Charger leads are
not connected
properly
Unplug the battery charger and check that the
charger leads are connected properly. See page
8 and 9 for instructions on connecting the charger
leads to the battery.

12
LIMITED WARRANTY
Manufacturer warrants to the original consumer, or purchaser, that the PEAK® PKC0C1500 1500mA
Digital Battery Charger/Maintainer will be free from defects in material and workmanship for one year
from the date of sale to the original purchaser. Manufacturer hereby excludes and disclaims any and
all other warranties, expressed or implied, beyond those warranties specified above. Manufacturer
excludes any implied warranty of merchantability or fitness for a particular purpose.
IF YOUR PEAK® BATTERY CHARGER MALFUNCTIONS DUE TO A DEFECT IN MATERIALS
AND WORKMANSHIP WITHIN THE ONE-YEAR WARRANTY PERIOD, MANUFACTURER WILL,
AT ITS ELECTION REPAIR OR REPLACE IT. MANUFACTURER SHALL NOT, HOWEVER, BE
RESPONSIBLE FOR ANY DAMAGE TO YOUR PRODUCT DUE TO ANY CAUSE OTHER THAN
DEFECTS IN MATERIAL OR WORKMANSHIP, INCLUDING WITHOUT LIMITATION: FAILURE TO
FOLLOW INSTRUCTIONS FOR USE; MISUSE; REPAIRS BY AN UNAUTHORIZED PERSON;
MISHANDLING; MODIFICATIONS; NORMAL WEAR AND TEAR; ACCIDENT OR OVERLOAD.
REPAIR OR REPLACEMENT AS PROVIDED UNDER THIS WARRANTY IS THE EXCLUSIVE
REMEDY OF THE CONSUMER. MANUFACTURER SHALL NOT BE LIABLE FOR ANY
INCIDENTAL, CONSEQUENTIAL OR PUNITIVE DAMAGES FOR BREACH OF ANY EXPRESSED
OR IMPLIED WARRANTY ON THIS PRODUCT OR BASED ON ANY OTHER CAUSE OR CLAIM.
To Obtain Service:
1. Before returning this product for any reason, please call toll free (800) 477-5847.
2. Do not return your PEAK® product to the place of purchase for service. Send your unit, postage
prepaid and insured, along with a copy of the original sales receipt and a phone number to the
address below. Pack your unit properly, as we are not responsible for any damage caused during
shipping.
Old World Industries, LLC
c/o Technical Services
4065 Commercial Avenue
Northbrook, IL 60062
3. A copy of the original receipt is required for warranty service. If no receipt is provided, the unit
manufacturer’s date will be used as the date of purchase.
PEAK, PEAK Mountain graphic and CHARGE CARD are trademarks of
Old World Industries, LLC, Northbrook, IL 60062
All Rights Reserved
MADE IN CHINA
www.peakauto.com
12
GARANTÍA LIMITADA
El fabricante le garantiza al consumidor original o comprador, que el Cargador/Mantenedor de
Baterías Digital de 1.500 mA PEAK® modelo PKC0C1500 estará libre de defectos en material y
mano de obra durante un año a partir de la fecha de venta al comprador original. El fabricante por
la presente excluye y renuncia a cualquier otra garantía, expresa o implícita, más allá de aquellas
garantías especificadas anteriormente. El fabricante excluye cualquier garantía implícita de
comerciabilidad o de aptitud para un propósito en particular.
SI SU CARGADOR DE BATERÍAS PEAK® TIENE UN MAL FUNCIONAMIENTO DEBIDO A
UN DEFECTO EN MATERIAL Y MANO DE OBRA DENTRO DEL AÑO DEL PERÍODO DE
GARANTÍA, EL FABRICANTE A SU ELECCIÓN LO REPARARÁ O CAMBIARÁ. EL FABRICANTE,
SIN EMBARGO, NO SERÁ RESPONSABLE POR NINGÚN DAÑO A SU PRODUCTO DEBIDO
A CUALQUIER CAUSA QUE NO SE DEBA A DEFECTOS EN MATERIAL O MANO DE OBRA,
INCLUYENDO SIN LIMITACIONES: NO SEGUIR LAS INSTRUCCIONES DE USO, MAL USO,
REPARACIONES EFECTUADAS POR PERSONAS NO AUTORIZADAS, MAL MANEJO,
MODIFICACIONES, DESGASTE NORMAL, ACCIDENTES O SOBRECARGA. LA REPARACIÓN
O REEMPLAZO SEGÚN ESTA GARANTÍA ES EL REMEDIO EXCLUSIVO DEL CLIENTE. EL
FABRICANTE NO SERÁ RESPONSABLE POR NINGÚN DAÑO INCIDENTAL, CONSECUENTE
O PUNITIVO POR QUEBRANTO DE CUALQUIER GARANTÍA EXPRESA O IMPLÍCITA DE ESTE
PRODUCTO O BASADO EN CUALQUIERA OTRA CAUSA O RECLAMO.
Para Obtener Servicio:
1. Antes de retornar este producto por cualquier razón, por favor llame gratis al teléfono
(800) 477-5847.
2. No regrese para servicio su producto PEAK® al lugar de compra. Envíe la unidad, con
franqueo pre pagado y asegurado, junto con una copia del recibo de venta original y un número
telefónico a la dirección mostrada a continuación. Empaque la unidad apropiadamente, ya que
no somos responsables por ningún daño causado durante el envío.
Old World Industries, LLC
c/o Technical Services
4065 Commercial Avenue
Northbrook, IL 60062
3. Se requiere una copia del recibo original para servicio de garantía. Si no presenta un recibo, la
fecha de fabricación será usada como la fecha de compra.
PEAK, Gráca de la Montaña PEAK y CHARGE CARD son marcas registradas de
Old World Industries, LLC, Northbrook, IL 60062
Todos los derechos reservados
FABRICADO EN CHINA
www.peakauto.com
-
 1
1
-
 2
2
-
 3
3
-
 4
4
-
 5
5
-
 6
6
-
 7
7
-
 8
8
-
 9
9
-
 10
10
-
 11
11
-
 12
12


PEAK PKC0C1500 El manual del propietario
- Categoría
- Cargadores de bateria
- Tipo
- El manual del propietario
en otros idiomas
- English: PEAK PKC0C1500 Owner's manual
Artículos relacionados
Otros documentos
-
Schumacher Electric SC1366 3A Wireless Smart Charger El manual del propietario
-
Schumacher Electric SP1297 Automatic Battery Charger/Maintainer UL 88-1 El manual del propietario
-
-
Schumacher SC1344 3A Wireless Smart Charger El manual del propietario
-
Schumacher Electric FR01548FR01548 El manual del propietario
-
-
-
Schumacher Electric SP3 Manual de usuario
-
PowerStroke PS906811P-H El manual del propietario