Dell PowerEdge FD332 Guía de inicio rápido
- Tipo
- Guía de inicio rápido
Dell PowerEdge FD332 es una solución potente y escalable para el almacenamiento de datos de alto rendimiento, diseñada para satisfacer las crecientes demandas de las aplicaciones empresariales y de centros de datos modernos. Ofrece una combinación de rendimiento, capacidad y eficiencia energética con una capacidad máxima de almacenamiento de hasta 108 TB. También admite una variedad de tipos de unidades, incluyendo discos duros tradicionales (HDD) y unidades de estado sólido (SSD), lo que le da flexibilidad para personalizar su solución de almacenamiento según sus necesidades específicas.
Dell PowerEdge FD332 es una solución potente y escalable para el almacenamiento de datos de alto rendimiento, diseñada para satisfacer las crecientes demandas de las aplicaciones empresariales y de centros de datos modernos. Ofrece una combinación de rendimiento, capacidad y eficiencia energética con una capacidad máxima de almacenamiento de hasta 108 TB. También admite una variedad de tipos de unidades, incluyendo discos duros tradicionales (HDD) y unidades de estado sólido (SSD), lo que le da flexibilidad para personalizar su solución de almacenamiento según sus necesidades específicas.


Transcripción de documentos
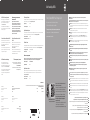
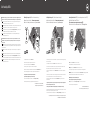
Dell PowerEdge FD332 Dell End User License Agreement Before using your system, read the Dell Software License Agreement that is shipped with your system. If you do not accept the terms of agreement, see Dell.com/contactdell. Save all software media that are shipped with your system. These media are backup copies of the software installed on your system. Contrat de licence utilisateur final Dell Avant d’utiliser le système, lisez le contrat de licence logicielle Dell fourni avec le système. Si vous n’acceptez pas les conditions du contrat, rendez-vous sur Dell.com/contactdell. Conservez tous les supports de logiciel fournis avec le système. Ces supports sont des copies de sauvegarde du logiciel installé sur le système. Лицензионное соглашение конечного пользователя Dell Перед использованием системы ознакомьтесь с Лицензионным соглашением на использование ПО Dell, которое поставляется в комплекте с системой. Если вы не согласны с условиями соглашения, см. Dell.com/contactdell. Сохраните все носители с программным обеспечением, прилагаемые к системе. Данные мультимедийные записи являются резервными копиями программного обеспечения, установленного на вашей системе. Technical specifications The following specifications are only those required by law to ship with your system. For a complete and current listing of the specifications for your system, see Dell.com/poweredgemanuals. Supply voltage 12 V DC Current consumption 24 A Spécifications techniques Les caractéristiques suivantes se limitent à celles que la législation impose de fournir avec le système. Pour obtenir la liste complète et à jour des spécifications du système, rendez-vous sur Dell.com/poweredgemanuals. Tension d’alimentation 12 V CC Contrato de licencia de usuario final de Dell Consommation de courant 24 A Antes de usar el sistema, lea el Contrato de licencia de software de Dell que se incluye con el sistema. Si no acepta los términos del contrato, consulte Dell.com/contactdell. Technische Daten Guarde todos los medios de software que se incluyen con el sistema. Estos medios son copias de seguridad del software instalado en el sistema. Getting Started With Your Storage Sled WARNUNG: Bevor Sie Ihr System einrichten, lesen und beachten Sie die im Lieferumfang enthaltenen Sicherheitshinweise. Bien démarrer avec votre traîneau de stockage VORSICHTSHINWEIS: Entfernen Sie nicht den Speicherschlitten aus dem Gehäuse, wenn der Schlitten eingeschaltet ist, da dies den Verlust von Daten zur Folge haben kann. Erste Schritte mit Ihrem Speicherschlitten ANMERKUNG: Installieren Sie den/die Speicherschlitten in den unteren Steckplätzen des Gehäuses, beginnend von links. In einem Gehäuse mit vier Schächten können Sie den Speicherschlitten auch in den oberen rechten Steckplatz des Gehäuses installieren. Руководство по началу работы с салазками для накопителя ANMERKUNG: Während der Installation des Speicherschlittens muss/müssen der/die Rechenschlitten, dem der Speicherschlitten zugewiesen ist, ausgeschaltet sein. Primeros pasos con la bandeja de almacenamiento ANMERKUNG: Der Speicherschlitten lässt sich nur einschalten, wenn der Rechenschlitten, dem er zugewiesen ist, eingeschaltet ist. תחילת עבודה עם מגירת האחסון ANMERKUNG: Die Dokumentation für Ihr System finden Sie unter Dell.com/poweredgemanuals. Prüfen Sie diese regelmäßig auf Aktualisierungen und lesen Sie die Aktualisierungen zuerst, da diese oft Angaben in anderen Dokumenten ersetzen. ANMERKUNG: Informationen zum Einrichten des PowerEdge FX2s-Gehäuses finden Sie in dem im Lieferumfang des Gehäuses enthaltenen Dokument „Zum Einstieg in Ihr System“. ПРЕДУПРЕЖДЕНИЕ: Перед настройкой системы внимательно изучите и следуйте инструкциям по безопасности, прилагаемым к системе. Die folgenden Angaben enthalten nur die technischen Daten, die laut Gesetz im Lieferumfang Ihres Systems enthalten sein müssen. Eine vollständige und aktuelle Auflistung Ihrer Systemdaten finden Sie unter Dell.com/poweredgemanuals. Versorgungsspannung 12 V Gleichspannung Stromverbrauch 24 A ВНИМАНИЕ: Не извлекайте салазки для накопителя из корпуса во включенном состоянии, так как это может привести к потере данных. ПРИМЕЧАНИЕ. Устанавливайте салазки для накопителя в нижние разъемы корпуса, начиная слева. В корпусе с четырьмя отсеками салазки для накопителя также можно установить в правый верхний разъем корпуса. Технические характеристики Dell הסכם רישיון למשתמש קצה של Dell Enduser-Lizenzvereinbarung Bevor Sie das System verwenden, lesen Sie die im Lieferumfang enthaltene Dell SoftwareLizenzvereinbarung. Wenn Sie die Bedingungen nicht akzeptieren, besuchen Sie Dell.com/contactdell. Speichern Sie sämtliche im Lieferumfang Ihres Systems enthaltene Softwaremedien. Diese Medien sind Sicherungskopien der auf Ihrem System installierten Software. ,Dell קרא את הסכם רישיון התוכנה של,לפני השימוש במערכת , אם אינך מסכים לתנאי ההסכם.שהגיע יחד עם המערכת .Dell.com/contactdell ראה מדיה זו היא.שמור את כל מדיית התוכנה שהגיעה יחד עם המערכת .גיבוי לתוכנות המותקנות במערכת ПРИМЕЧАНИЕ. При установке салазок для накопителя должны быть отключены салазки для компьютера, с которыми они сопоставлены. Приводятся только те технические характеристики, которые по закону необходимо указывать при поставках вашей системы. Более полный список текущих спецификаций для вашей системы см. по ссылке Dell.com/poweredgemanuals. Сетевое напряжение 12 В постоянного тока Потребление тока 24 A ПРИМЕЧАНИЕ. Салазки для накопителя включаются только в том случае, если включены салазки для компьютера, с которыми они сопоставлены. NПРИМЕЧАНИЕ. Комплект документов для вашей системы доступен по ссылке Dell.com/poweredgemanuals. Всегда проверяйте на наличие обновлений и читайте описания обновлений, так как информация, содержащаяся в них, заменяет информацию в других документах. Especificaciones técnicas ПРИМЕЧАНИЕ. Дополнительную информацию об установке корпуса PowerEdge FX2s см. в руководстве «Запуск вашей системы», прилагаемом к корпусу. Las especificaciones siguientes son únicamente las que deben incluirse por ley con el envío del sistema. Para obtener una lista completa y actualizada de todas las especificaciones correspondientes a su sistema, consulte Dell.com/poweredgemanuals. Tensión de suministro 12 V CC Consumo eléctrico 24 A AVISO: Antes de configurar el sistema, revise y siga las instrucciones de seguridad que se incluyen con el sistema. PRECAUCIÓN: No extraiga la bandeja de almacenamiento del chasis cuando la bandeja esté encendida, ya que puede causar una pérdida de datos. NOTA: Instale la(s) bandeja(s) de almacenamiento en las ranuras inferiores del chasis, empezando por la izquierda. En el chasis de cuatro compartimentos, también puede instalar la bandeja de almacenamiento en la ranura superior derecha del chasis. מפרטים טכניים © 2015 Dell Inc. © 2015 Dell Inc. Regulatory Model/type: E02B Series/E02B003 Модель согласно нормативной документации: Серия E02B/E02B003 Printed in Poland Напечатано в Польше 2015 - 08 2015 - 08 © 2015 Dell Inc. © 2015 Dell Inc. Modèle/type réglementaires : Série E02B/E02B003 Modelo/tipo normativo: Serie E02B/E02B003 Imprimé en Pologne Impreso en Polonia 2015 - 08 2015 - 08 © 2015 Dell Inc. Muster-Modellnummer/-Typnummer: E02B Serie/E02B003 Gedruckt in Polen 2015 - 08 ראה, לרשימה מלאה ומעודכנת של כל המפרטים של המערכת.המפרטים הבאים הם רק אלה שהחוק דורש שיישלחו יחד עם המערכת .Dell.com/poweredgemanuals 12 V DC מתח אספקה 24 A צריכת זרם Quick Resource Locator Dell.com/QRL/Server/PEFD332 © 2015 Dell Inc. E02B/E02B003 סדרה:סוג תקינה/דגם הודפס בפולין 2015 - 08 Scan to see how-to videos, documentation, and troubleshooting information. Scannez pour voir des didacticiels vidéo, obtenir de la documentation et des informations de dépannage. Finden Sie hier Anleitungsvideos, Dokumentationen und Informationen zur Behebung von Störungen. Сканируйте, чтобы увидеть видео с практическими рекомендациями, документацию и информацию по устранению неполадок. Consúltelo para ver vídeos explicativos, documentación e información para la solución de problemas. . תיעוד ומידע לגבי פתרון בעיות,סרוק כדי לראות הדגמות וידאו NOTA: Al instalar la bandeja de almacenamiento, la bandeja de computación a la que se ha asignado debe estar apagada. NOTA: La bandeja de almacenamiento se enciende solo cuando la bandeja de computación a la que se ha asignado está encendida. NOTA: La documentación del sistema se encuentra disponible en Dell.com/poweredgemanuals. Compruebe siempre si existen actualizaciones disponibles y léalas antes porque a menudo su información ya se encuentra en otros documentos. NOTA: Para obtener más información acerca de la configuración del chasis PowerEdge FX2s, consulte el documento “Primeros pasos con el sistema” que se envía con el chasis. . קרא היטב את הוראות הבטיחות שהגיעו עם המערכת ופעל לפיהן, לפני התקנת המערכת:אזהרה . אין להוציא את מגירת האחסון מהמארז כשהיחידה דולקת הואיל והדבר עלול לגרום לאובדן נתונים:התראה ניתן להתקין את מגירת האחסון גם בחריץ, במארז המרובע. משמאל ימינה, התקן את מגירת(ות) האחסון בחריצים התחתונים של המארז:הערה .הימני העליון של המארז .) צריכה(ות) יחידת(ות) המחשוב שאליה(ן) ממופה מגירת האחסון להיות כבויה(ות, בעת התקנת מגירת האחסון:הערה . מגירת האחסון נדלקת רק כאשר יחידת המחשוב שאליה היא ממופה דולקת:הערה יש לחפש עדכונים ולקרוא אותם ראשונים שכן לעיתים הם.Dell.com/poweredgemanuals התיעוד עבור המערכת זמין בכתובת:הערה .מחליפים מידע במסמכים אחרים . יש לעיין במסמך ‘תחילת עבודה עם המערכת’ המצורף למארזPowerEdge FX2 למידע על הקמה והגדרה של מארזי:הערה Dell PowerEdge FD332 WARNING: Before setting up your system, review and follow the safety instructions that are shipped with the system. CAUTION: Do not remove the storage sled from the enclosure when the sled is powered on, as it may result in data loss. NOTE: Install the storage sled(s) in the bottom slots of the enclosure, beginning from the left. In the four-bay chassis, you can also install the storage sled in the top right slot of the enclosure. Removing the storage sled | Retirer le traîneau de stockage | Ausbau des Speicherschlittens | Снятие салазок для накопителя | Extracción de la bandeja de almacenamiento | הוצאת מגירת האחסון Installing the storage sled | Installer le traîneau de stockage | Installation des Speicherschlittens | Установка салазок для накопителя | Instalación de la bandeja de almacenamiento | התקנת מגירת האחסון 1. Use a Philips #2 screwdriver to unlock the Sled Release lock. 1. Slide the storage sled into the enclosure until the dotted line on top of the sled is not visible from the top edge of the bay and the sled clicks into place. NOTE: When installing the storage sled, the compute sled(s) to which the storage sled is mapped to, must be turned off. Accessing the hard drive or SSD | Accéder au disque dur ou au lecteur SDD | Zugriff auf die Festplatte oder SSD-Karte | Доступ к жесткому диску или твердотельному накопителю SSD | Acceso al disco duro o la unidad de estado sólido | SSD גישה לכונן קשיח או NOTE: The storage sled turns on only when the compute sled to which it is mapped is turned on. NOTE: The documentation set for your system is available at Dell.com/poweredgemanuals. Always check for updates and read the updates first because they often supersede information in other documents. NOTE: For information on setting up the PowerEdge FX2s enclosure, see the Getting Started With Your System document that shipped with the enclosure. AVERTISSEMENT : avant d’installer le système, lisez et suivez les consignes de sécurité fournies avec ce dernier. PRÉCAUTION : ne retirez pas le traîneau de stockage du boîtier lorsque le traîneau est sous tension sous peine de perdre ses données. REMARQUE : installez le ou les traîneaux de stockage dans les emplacements inférieurs du boîtier en commençant par la gauche. Dans le châssis à quatre baies, vous pouvez également installer le traîneau de stockage dans l’emplacement supérieur droit du boîtier. REMARQUE : lors de l’installation d’un traîneau de stockage, les autres traîneaux auxquels celui-ci est mappé doivent être éteints. REMARQUE : le traîneau de stockage s’allume seulement lorsque le traîneau de calcul auquel il est mappé est allumé. REMARQUE : la documentation relative au système est disponible sur Dell.com/poweredgemanuals. Recherchez toujours des mises à jour et lisez-les préalablement car elles remplacent souvent les informations contenues dans d’autres documents. REMARQUE : pour plus d’informations sur l’installation du boîtier PowerEdge FX2s, consultez le document « Mise en route du système » fourni avec ce dernier. 2. Lift the release tabs up and pull the storage sled out of the enclosure. 2. Use a Philips #2 screwdriver to lock the Sled Release lock and secure the sled in the enclosure. 1. Utilisez un tournevis Philips #2 pour libérer le verrou du traîneau. 2. Soulevez les onglets de verrouillage et retirez le traîneau de son emplacement. 1. Glissez le traîneau dans son emplacement jusqu’à ce que la ligne pointillée située au dessus du traîneau ne soit plus visible à partir de la partie supérieure de la baie et que le traîneau soit bien sécurisé à la baie. 1. Verwenden Sie einen Philips-Schraubenzieher Nr. 2 um die Feststellschraube am Schlittenschacht zu lösen. 2. Utilisez un tournevis Phillips #2 pour verrouiller le verrou du traîneau et sécuriser le traîneau dans son emplacement de stockage. 2. Heben Sie die Entriegelungslaschen an und ziehen Sie den Speicherschlitten aus dem Gehäuse. 1. Разблокируйте замок салазок Sled Release с помощью отвертки Philips #2. 2. Поднимите фиксаторы и выдвиньте салазки для накопителя из корпуса. 1. Utilice un destornillador Phillips núm. 2 para soltar el cierre de desbloqueo de la bandeja. 2. Levante las pestañas de desbloqueo y extraiga la bandeja de almacenamiento del chasis. 1. Schieben Sie den Speicherschlitten in das Gehäuse, bis die gepunktete Linie auf der Oberseite des Schlittens nicht mehr von der oberen Kante des Schachts ersichtlich ist und der Schlitten mit einem Klicken einrastet. 2. Verwenden Sie einen Philips-Schraubenzieher Nr. 2, um den Schlittenschacht zu verriegeln und sichern Sie den Schlitten im Gehäuse. . כדי לשחרר את נעילת המגירה2 ’ השתמש במברג פיליפס מס.1 1. Задвигайте салазки для накопителя в корпус до тех пор, пока пунктирная линия сверху салазок не скроется под верхним краем отсека и салазки не зафиксируются на месте со щелчком. . הרם את לשוניות השחרור ושלוף את מגירת האחסון מהמארז.2 2. Заблокируйте замок салазок Sled Release с помощью отвертки Philips #2, чтобы зафиксировать салазки в корпусе. 1. Desplace la bandeja de almacenamiento dentro del chasis hasta que la línea de puntos de la parte superior no sea visible desde el borde superior del compartimento y la bandeja encaje en su sitio. 2. Utilice un destornillador Phillips núm. 2 para bloquear el cierre de desbloqueo de la bandeja y fijar la bandeja en el chasis. . החלק את מגירת האחסון לתוך המארז עד שהקו המנוקד שעל גבי המגירה אינו נראה עוד והיחידה ננעלת למקומה בצליל נקישה.1 . כדי לנעול את נעילת המגירה2 ’ השתמש במברג פיליפס מס.2 NOTE: Ensure that the Sled Release lock is in the locked position. Pull the drive drawer handle on the front panel and slide the drawer out. REMARQUE : vérifiez que le verrou du traîneau est bien dans sa position verrouillée. Tirez sur la poignée de la cage pour disque dur située sur le panneau avant pour la désengager du châssis. ANMERKUNG: Vergewissern Sie sich, dass sich die Feststellschraube am Schlittenschacht in Verriegelungsposition befindet. Ziehen Sie am Griff auf der Vorderseite des Schubfachs und ziehen Sie das Schubfach heraus. ПРИМЕЧАНИЕ. Убедитесь, что замок Sled Release заблокирован. Потяните за рукоятку выдвижного устройства на передней панели и выдвиньте его. NOTA: Asegúrese de que el cierre de desbloqueo de la bandeja se encuentra en la posición de bloqueo. Tire del asa frontal del cajón de la unidad para extraerlo. . וודא שמנעול המגירה נמצא במצב נעילה:הערה .משוך את ידית המגירה שעל הלוח הקדמי והחלק את המגירה החוצה-
 1
1
-
 2
2


Dell PowerEdge FD332 Guía de inicio rápido
- Tipo
- Guía de inicio rápido
Dell PowerEdge FD332 es una solución potente y escalable para el almacenamiento de datos de alto rendimiento, diseñada para satisfacer las crecientes demandas de las aplicaciones empresariales y de centros de datos modernos. Ofrece una combinación de rendimiento, capacidad y eficiencia energética con una capacidad máxima de almacenamiento de hasta 108 TB. También admite una variedad de tipos de unidades, incluyendo discos duros tradicionales (HDD) y unidades de estado sólido (SSD), lo que le da flexibilidad para personalizar su solución de almacenamiento según sus necesidades específicas.