
FCC Notice
This device complies with Part 15 of the FCC rules.
Operation is subject to the following two conditions:
(1) this device may not cause harmful interference,
and
(2) this device must accept any interference received, including
interference that may cause undesired operation.
Radio and Television Interference
NOTE: This equipment has been tested and found to comply with the limits for a
Class B digital device, pursuant to Part 15 of the FCC Rules. These limits are
designed to provide reasonable protection against harmful interference in a residen-
tial installation. This equipment generates, uses and can radiate radio frequency
energy, and if not installed and used in accordance with the instructions, may cause
harmful interference to radio communications. However, there is no guarantee that
interference will not occur in a particular installation. If this equipment does cause
harmful interference to radio or television reception, which can be determined by
turning the equipment off and on, the user is encouraged to try to correct the inter-
ference by one or more of the following measures:
- - Reorient or relocate the receiving antenna.
- - Increase the separation between the equipment and the receiver.
- - Connect the equipment into an outlet on a circuit different from
that to which the receiver is connected.
- - Consult the dealer or an experienced radio/TV technician for help.
To Contact
AAnneellaaccee,, IInncc..::
On the Web: www.anelace.com
Mail/Warranty Return: Please contact us at
to obtain a return address.
Fig. 4
[A]
[B]
[C]
AAnneell aa ccee
- Limited Warranty, US, Canada, EU
This product is warranted by Anelace, Inc. to the original pur-
chaser to be free from defects in material and workmanship
under normal use for a period of 90 days from the date of pur-
chase. During the warranty period, and upon proof of purchase,
the product will be repaired or replaced (with the same or similar
model) at Anelace’s option without any charge for either parts or
labor. This warranty will not apply if the product has been mis-
used, abused, or altered. To obtain warranty service you must
send the product postage paid with a copy of your sales receipt
or other proof of purchase and the date of purchase to address
below. Due to the possibility of damage or loss, it is recom-
mended when sending the product that you package it securely.
NEITHER THIS WARRANTY NOR ANY OTHER WARRANTY,
EXPRESSED OR IMPLIED, INCLUDING ANY IMPLIED WAR-
RANTY OF MERCHANTABILITY OR OF FITNESS FOR A PAR-
TICULAR PURPOSE, SHALL EXTEND BEYOND THE WAR-
RANTY PERIOD. NO RESPONSIBILITY IS ASSUMED FOR
ANY INCIDENTAL OR CONSEQUENTIAL DAMAGES. SOME
STATES DO NOT ALLOW THE EXCLUSION OR LIMITATION
OF INCIDENTAL OR CONSEQUENTIAL DAMAGES, SO THE
ABOVE LIMITATIONS OR EXCLUSIONS MAY NOT APPLY TO
YOU.
This warranty gives you specific rights and you may also have
other rights which vary from country to country.
Classic Powers of 2
™
BCD Clock
AAnneellaaccee IInncc..
English - Español - Français - Deutsch
© Anelace, Inc. Model CR
Product P/N: 950-0005 and EU 950-0005
Powers of 2™ BCD Clock - by
AAnneell aa ccee
This package contains a clock and a power unit.
Reading the clock
This clock is based on the binary number system, the language of computers.
Six digits are required to indicate time. For example, at 10:48 and 36 seconds, we write
10:48:36.
This clock uses 6 columns: each column represents a number value from 0 to 9. The two
columns on the left indicate hours, the middle two are minutes, and the right two are sec-
onds.
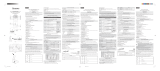
The value of each column is determined by which lights are ON:
The bottom light, if ON, is worth “1”. The one above it is worth “ 2,” the third one from
the bottom is worth “4,” and the top one is worth “8.”
Add the values of the ON light positions to get the final value.
• Fig. 1 - In this example, the bottom three lights are ON.
Add their respective values of “1”, “2”, and “4” to get a total value of “7”.
• Fig. 2 illustrates all 10 possible values.
• Fig. 3 demonstrates what the clock will look like at 10:48:36.
Setting up your new “Powers of 2” clock
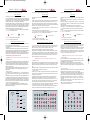
• Fig. 4: [A] Plug the connector at the end of the power unit cord into the socket in the
hole in the bottom of the clock. [ B ] Turn the cord to slip it into the channel, and then
[ C ] rotate the cord to secure it in place.
- Now, plug the power unit into an electrical outlet that matches the adapter that came with
your unit (read the label on the adapter). Anelace sells two versions: a 120V / 60 Hz out-
let model for the normal U.S. power line, and a 220-240V / 50 Hz [EU power line] version
for most other places in the world. A row of lights will scan up and down on the face of
the clock to indicate that the clock has been powered on, but that the time has not yet been
set. This scan will exercise all 20 lights.
⇒⇒
WARNING: Be sure that the line voltage is correct for your adapter.
• Setting the time
- Hours: To set hours, push and release the button marked “H” on the rear of the clock to
advance the hours by one unit. Holding the ‘H’ button down will automatically cycle the
hours forward.
- Minutes: To set minutes, use the above procedure, except push the button marked “M”.
- Seconds: To reset the seconds’ counter to zero, push the “H” and the “M” buttons at
the same time. Release them both to allow the seconds to advance.
• Special options
- 24 hour clock: To activate the 24 hour mode (e.g. 11PM = 23:00:00), hold in the “H”
button when applying AC power to the unit. i.e. when plugging the power unit into the ac
power socket.
- Binary Mode: The clock can be set to operate in “true” binary as opposed to the default
BCD mode. In binary mode, the bottom row of lights represents seconds, the second row
up from the bottom represents minutes and the next row up represents hours (the top row
is not used). See Fig. 5. To enter binary mode, hold in the “M” button when applying
AC power to the unit. i.e. . when plugging the power unit into the ac power socket.
- To activate the true binary display in 24 hour mode, hold both the "H" and "M" buttons
when plugging in the power unit.
- DIM: There are 3 brightness settings for the LED's. Press the "DIM" button found near
where the power cord is plugged into the clock (see FIG. 4) to cycle through the settings.
= Light is “ON”
= Light is “ O F F ”
Fig. 5
8
14
32
2
16
Hours
Minutes
Seconds
10
48
36
• The CE Certificate applies to the EU version only
• EU Adaptor: Hon-Kwang # HKA-A0920-230 9V~ 200 mA 1.8 VA.
• The apparatus shall not be exposed to dripping or splashing and no
objects filled with liquids, such as vases, should be placed so that
they can spill on the apparatus.
• Do not cover the apparatus with materials that will impede its
cooling.
V2-6-04 R.I.S.EU.6.12.04a 14/6/04 9:00 PM Page 1

Powers of 2™ BCD Uhr – von
AAnneell aa ccee
Das Paket enthält eine Uhr und ein Netzteil zur Stromversorgung.
Ablesen der Uhrzeit
Die Uhr basiert auf dem binären Zahlensystem, der Sprache von Computern.
Um die Zeit anzuzeigen werden sechs Ziffern benötigt. So schreiben wir zum Beispiel um
10:48 und 36 Sekunden 10:48:36. Diese Uhr verwendet 6 Spalten: Jede Spalte repräsentiert
einen Wert zwischen 0 und 9. Die zwei Spalten auf der linken Seite zeigen die Stunden an,
die mittleren zwei die Minuten, und die rechten zwei sind die Sekunden.
Der Wert jeder Spalte hängt davon ab, welche LEDs aufleuchten: Leuchtet die unterste LED,
so hat sie den Wert 1, leuchtet die darüber, so hat diese LED den Wert 2, die nächste den
Wert 4, leuchtet die oberste, so hat sie den Wert 8. Zählt man die Werte der beiden linken
Spalten zusammen, so erhält man die Stunden, die Werte der mittleren beiden Spalten
ergeben addiert die Minuten, die der beiden rechten die Sekunden.
• Abb. 1 - In diesem Beispiel sind die unteren drei LEDs an, die dazugehörigen Werte
„1“, „2“, und „4“ addiert ergeben den Wert „7“.
• Abb. 2 - Erläuterung aller zehn möglichen Werte
• Abb. 3 - Beispiel für die Uhrzeit 10:48:36.
Einstellen Ihrer neuen „Powers of 2™“ Uhr
Abb. 4: [A] Stecken sie den Stecker des Netzteilkabels in den dazugehörigen Anschluss.
Der Anschluss befindet sich an der Unterseite der Uhr.
-[ B ] Drehen Sie das Kabel bis es in den Kanal rutscht [ C ] Wickeln Sie das Kabel danach
zur Sicherung auf.
- Schließen Sie jetzt das Netzteil an die Stromversorgung an. Die zur Stromversorgung
erforderliche Spannung ist auf dem Netzteil angegeben. Anelace verkauft zwei Versionen: ein
120 V/60 Hz Netzteil für US- Stromleitung und ein 220-240 V/50 Hz Netzteil für EU-
Stromleitung. Auf der Vorderseite der Uhr blinken nun die LED- Reihen abwechselnd von
unten nach oben auf um anzuzeigen, dass die Uhr zwar eingeschaltet, die Zeit aber noch
nicht eingestellt worden ist. Hierbei sind alle 20 LEDs aktiv.
⇒⇒
WARNUNG: Achten Sie darauf, dass die Stromspannung Ihrem Adapter entspricht.
•Einstellen der Zeit
- Stunden: Um die Stunden einzustellen, drücken Sie den „H“ Knopf, dieser befindet sich
auf der Rückseite der Uhr. Der Stundenwert wird pro Knopfdruck um eine Einheit erhöht.
Wird der „H“ Knopf dauerhaft gedrückt, erhöht sich der Wert der Stunden automatisch.
- Minuten: Die Minuten werden nach dem gleichen Verfahren eingestellt, allerdings unter
Verwendung des „M“ Knopfes
- Sekunden: Um die Sekunden auf den Wert Null zurück zu setzen, müssen „H“ und „M“
Knopf zusammen gedrückt werden. Lässt man beide Knöpfe wieder los, laufen die
Sekunden weiter.
•Spezielle Optionen
-24 Stundenuhr: Um den 24 Stundenmodus( z.B. 11 p.m. = 23:00:00) zu aktivieren, muss
der „H“ Knopf beim Einschalten der Uhr, also beim Anschluss des Netzteils, gedrückt wer-
den.
- Binärer Modus: Die Uhr kann, im Gegensatz zu dem voreingestellten BCD Modus, auch
im „richtigen“ binären Modus betrieben werden. Im binären Modus stellt die untere LED
Reihe die Sekunden dar, die zweite Reihe von unten die Minuten und die dritte Reihe die
Stunden, die oberste Reihe wird hierbei nicht verwendet (siehe Abb. 5). Um den binären
Modus zu starten, hält man beim Einschalten der Uhr, also beim Anschluss des Netzteils,
den „H“ und den „M“ Knopf zusammen gedrückt.
- Dimmen: Es gibt drei Helligkeitsstufen für die LEDs, durch Betätigung des Dimm-
Knopfes, der sich an der Uhrunterseite befindet (siehe Abb. 5), kann zwischen diesen
Helligkeitsstufen gewechselt werden.
Powers of 2™ BCD Horlage - fait par
AAnneell aa ccee
Ce colis contient une horloge et un transformateur de tension.
Lecture de l’horloge
Cette horloge est basée sur le système de numération binaire, qui est le langage informatique des
ordinateurs.
6 chiffres sont nécessaires pour indiquer le temps. Par exemple, 10h 48 minutes 36 secondes s’écrit
10:48:38. Cette horloge utilise 6 colonnes. Chaque colonne représente un nombre de 0 à 9. Les
deux colonnes à gauche indiquent les heures, les deux colonnes du milieu indiquent les minutes,
les deux colonnes de droite indiquent les secondes. La valeur de chaque colonne est déterminée par
l’état: allumé («On») ou bien éteint («Off») des voyants lumineux.
Le voyant du bas, s’il est allumé («On») vaut «1». Celui du dessus «2», le troisième à partir du bas
«4», celui au sommet «8».
Vous devez ajouter les valeurs «On» pour obtenir la valeur finale.
• Figure 1 (Ci-dessous) - Dans cet exemple les trois voyants du bas sont «On». En ajoutant leur
valeurs respectives [«1»+«2»+«4»], vous obtenez une valeur totale de «7».
• La Figure 2 illustre les 10 valeurs possibles.
• La Figure 3 montre ce qui apparaît à l’horloge à 10:48:36.
Installer votre nouveau «Powers of 2™» horlage
• Figure 4 (au dos de la feuille): [ A ] Brancher le connecteur situé au bout du cordon d’alimenta-
tion, dans la prise située dans le trou au fond de l’horloge. [B ] Courbez le cordon pour le faire
glisser dans le canal, et, ensuite [ C ] faire tourner le cordon pour le fixer en place.
- Maintenant brancher l’alimentation dans une prise électrique qui correspond avec
l'adaptateur livré avec votre horloge (lisez l’étiquette sur l'adaptateur). Anelace vend deux versions:
un modèle 120V pour l'électricité américaine, et une version 230V pour la plupart des autres pays
du monde. Des rangées voyants lumineux vont s’allumer en balayant verticalement la face de l’hor-
loge, indiquant ainsi que l’horloge à été mise sous tension, mais que l’heure n’a pas encore été
réglée. Ce balayage s’applique aux 20 voyants lumineux .
=> AVERTISSEMENT: Assurez vous que le voltage pour votre adaptateur soit correct.
• Réglage de l’heure
-Réglage des heures: Poussez et relâchez le bouton marqué «H» à l’arrière de l’horloge pour avancer
d’une unité. Pour faire avancer automatiquement les heures, appuyer, sans le relâcher sur le bouton.
-Réglage des minutes: Même procédure que ci-dessus excepté que vous devez utiliser le bouton
«M».
-Réglage des secondes: pour remettre le compteur à zéro, appuyer en même temps sur les boutons
«H» et «M». relâcher les pour faire avancer les secondes.
• Options spéciales
- Horloge 24 heures: pour activer ce mode (Exemple 11PM= 23:00:00), appuyez de manière contin-
ue sur le bouton «H« lorsque vous mettez sous tension AC l’horloge (lors du branchement de l’ali-
mentation à la prise de courant AC)
- Mode Binaire: L'horloge peut opérer en «vrai» mode binaire au lieu du mode BCD. En «vrai»
mode binaire, le rang du bas indique les secondes. Celui du dessus indique les minutes. Le
troisième à partir du bas indique les heures. On n’utilise pas celui au sommet (r egardez fig 5).
Pour activer ce mode, appuyez de manière continue sur le bouton «H« lorsque vous mettez sous
tension AC l’horloge (lors du branchement de l’alimentation à la prise de courant AC).
- Pour activer à la fois les modes 24H et «vrai» binaire, appuyez en même temps de manière contin-
ue sur les boutons «M» et «H» , lorsque vous mettez l’horloge sous tension AC.
• Baisser la lumière: La luminosité des voyants a trois niveaux. Appuyez sur le bouton DIM qui se
trouve près du raccordement entre le cordon électrique et l'horloge (regardez fig 4).
Powers of 2™ BCD Reloj -
AAnneell aa ccee
Contenidos: 1 reloj y 1 unidad de alimento
Leyendo el reloj
Este reloj esta basado en el sistema the numeros binarios que es el lenguage de computa-
dores.
Se necesitan 6 numeros para indicar el tiempo. Por ejemplo: las 10:48 y 36 segundos lo
expresamos 10:48:36
Este reloj usa 6 columnas: cada columna representa un valor de 0 a 9. Las dos columnas a
la izquierda indican las horas, las 2 en la mitad indican los minutos y las dos a la derecha
indican los segundos
El valor de cada columna esta determinado por las luces que estan prendidas.
Primera hilera (fig. 1) si esta luz esta prendida vale “1” La segunda vale “2” La tercera vale
“4” y la cuarta vale “8” Sume los valores de todas las luces prendidas para obtener el
valor final.
• Fig. 1: En este ejemplo las tres luces bajas estan prendidas y sus valores respectivos
son : “1”, “2” y “4” por un valor de “7
• F ig. 2: Ilustra los 10 valores posibles.
• F ig. 3: Demuestra como se ve el reloj a las 10:48:36.
Fijando el tiempo en su nuevo “Powers Of 2™” reloj
• F ig. 4 (al revez de esta pagina): [ A ] Enchufle el conector que esta al final del cordon
de electricidad en el orificio ubicado en la parte inferior del reloj. [ B ] Gire el cable para
depositarlo en el canal, [ C] dele la vuelta para asegurarlo en sitio.
Enchuflar el reloj en una caja electrica que produce el mismo voltaje que usa el adaptador
que pertenece a su reloj (lease el label en el adaptador). Anelace vende dos modelos:
120V/60Hz para los EEUU y 220-240V/50Hz para Europa, America del Sur y otros paises.
Una linea de luces aparecerán en la cara del reloj listas para fijar el tiempo correcto. Todas
las 20 luces van a ser comprobadas por este escrutinio.
⇒⇒
AVERTENCIA: Asegurase que el voltaje es lo correcto para su adaptador.
• Fijando el tiempo
Horas: Para fijar las horas oprima y suelte el botón marcado “H” localizado en la parte
posterior del reloj para avanzar las horas de una en una. Manteniendo oprimido el botón
“H” automaticamente mueve las horas adelante.
Minutos: Para fijar los minutos siga el mismo proceso pero oprima el botón “M”.
Segundos: Para fijar los segundos oprima ambos botones “H” y “M” al mismo tiempo
hasta que los zeros aparescan, suelte los botones para que los segundos empiezen a mar-
car.
• Opciones Especiales
- Reloj marcando 24 horas: Para activar la opcion de 24 horas (ejemplo: 11PM=23:00:00),
mantenga oprimido el botón “H” mientras enchufla el cordon de electricidad.
- Moda Binaria: Se puede prender el reloj para operar en "moda verdadera binaria" en vez
de la "moda default". En moda binaria, la linea de botones mas abajo representa los
segundos, la segunda linea desde abajo representa minutos y la tercera linea desde abajo
representa las horas (la linea mas arriba no se usa). Vease Fig. 5. Para emplear la
"moda binaria" prende el boton marcado "M", que quiere decir cuando se conecta el cor-
don al poder.
- Para activar la "moda binaria" en moda de 24 horas, oprimidos los botones “H” y “M”
mientras enchufla el cordon de electricidad.
- DIM: Hay tres niveles de brillanza para los LEDs. Prende el boton "DIM" (vease Fig.
4) varias veces para ver el ciclo completo.
0
1
2
3456789
Fig. 2
"ON" Value
Fig. 1
8
4
2
1
+ 0
+ 4
+ 2
+ 1
= 7
Fig. 3
4
68
1
3
0
::
= LED “an” = LED “aus”
= Voyant est « O N»
= Voyant est «OFF»
= luz PRENDIDA “ON”
= luz APAGADA “OFF”
P/N 800-0001-03 Rev. B
V2-6-04 R.I.S.EU.6.12.04a 14/6/04 9:00 PM Page 2
Transcripción de documentos
V2-6-04 R.I.S.EU.6.12.04a 14/6/04 9:00 PM Page 1 Powers of 2™ BCD Clock - by A n e l a c e - Limited Warranty, US, Canada, EU Classic Powers of 2™ Anelace This package contains a clock and a power unit. This product is warranted by Anelace, Inc. to the original purchaser to be free from defects in material and workmanship under normal use for a period of 90 days from the date of purchase. During the warranty period, and upon proof of purchase, the product will be repaired or replaced (with the same or similar model) at Anelace’s option without any charge for either parts or labor. This warranty will not apply if the product has been misused, abused, or altered. To obtain warranty service you must send the product postage paid with a copy of your sales receipt or other proof of purchase and the date of purchase to address below. Due to the possibility of damage or loss, it is recommended when sending the product that you package it securely. NEITHER THIS WARRANTY NOR ANY OTHER WARRANTY, EXPRESSED OR IMPLIED, INCLUDING ANY IMPLIED WARRANTY OF MERCHANTABILITY OR OF FITNESS FOR A PARTICULAR PURPOSE, SHALL EXTEND BEYOND THE WARRANTY PERIOD. NO RESPONSIBILITY IS ASSUMED FOR ANY INCIDENTAL OR CONSEQUENTIAL DAMAGES. SOME STATES DO NOT ALLOW THE EXCLUSION OR LIMITATION OF INCIDENTAL OR CONSEQUENTIAL DAMAGES, SO THE ABOVE LIMITATIONS OR EXCLUSIONS MAY NOT APPLY TO YOU. This warranty gives you specific rights and you may also have other rights which vary from country to country. To Contact On the Web: Mail/Warranty Return: Anelace, Inc.: www.anelace.com Please contact us at [email protected] to obtain a return address. Fig. 4 BCD Clock Reading the clock This clock is based on the binary number system, the language of computers. Six digits are required to indicate time. For example, at 10:48 and 36 seconds, we write 10:48:36. This clock uses 6 columns: each column represents a number value from 0 to 9. The two columns on the left indicate hours, the middle two are minutes, and the right two are seconds. The value of each column is determined by which lights are ON: The bottom light, if ON, is worth “1”. The one above it is worth “ 2,” the third one from the bottom is worth “4,” and the top one is worth “8.” Add the values of the ON light positions to get the final value. • Fig. 1 - In this example, the bottom three lights are ON. Add their respective values of “1”, “2”, and “4” to get a total value of “7”. = Light is “ O N ” = Light is “ O F F ” • Fig. 2 illustrates all 10 possible values. • Fig. 3 demonstrates what the clock will look like at 10:48:36. Setting up your new “Powers of 2” clock • Fig. 4: [ A ] Plug the connector at the end of the power unit cord into the socket in the hole in the bottom of the clock. [ B ] Turn the cord to slip it into the channel, and then [ C ] rotate the cord to secure it in place. - Now, plug the power unit into an electrical outlet that matches the adapter that came with your unit (read the label on the adapter). Anelace sells two versions: a 120V / 60 Hz outlet model for the normal U.S. power line, and a 220-240V / 50 Hz [EU power line] version for most other places in the world. A row of lights will scan up and down on the face of the clock to indicate that the clock has been powered on, but that the time has not yet been set. This scan will exercise all 20 lights. ⇒ WARNING: Be sure that the line voltage is correct for your adapter. • Setting the time - Hours: To set hours, push and release the button marked “H” on the rear of the clock to advance the hours by one unit. Holding the ‘H’ button down will automatically cycle the hours forward. - Minutes: To set minutes, use the above procedure, except push the button marked “M”. - Seconds: To reset the seconds’ counter to zero, push the “H” and the “M” buttons at the same time. Release them both to allow the seconds to advance. • Special options - 24 hour clock: To activate the 24 hour mode (e.g. 11PM = 23:00:00), hold in the “H” button when applying AC power to the unit. i.e. when plugging the power unit into the ac power socket. - Binary Mode: The clock can be set to operate in “true” binary as opposed to the default BCD mode. In binary mode, the bottom row of lights represents seconds, the second row up from the bottom represents minutes and the next row up represents hours (the top row is not used). See Fig. 5. To enter binary mode, hold in the “M” button when applying AC power to the unit. i.e. . when plugging the power unit into the ac power socket. - To activate the true binary display in 24 hour mode, hold both the "H" and "M" buttons when plugging in the power unit. - DIM: There are 3 brightness settings for the LED's. Press the "DIM" button found near where the power cord is plugged into the clock (see FIG. 4) to cycle through the settings. [A] [B] Fig. 5 [C] Hours 10 Minutes 48 Seconds 36 32 16 8 4 2 1 Anelace Inc. English - Español - Français - Deutsch © Anelace, Inc. Model CR Product P/N: 950-0005 and EU 950-0005 • The CE Certificate applies to the EU version only • EU Adaptor: Hon-Kwang # HKA-A0920-230 9V~ 200 mA 1.8 VA. • The apparatus shall not be exposed to dripping or splashing and no objects filled with liquids, such as vases, should be placed so that they can spill on the apparatus. • Do not cover the apparatus with materials that will impede its cooling. FCC Notice This device complies with Part 15 of the FCC rules. Operation is subject to the following two conditions: (1) this device may not cause harmful interference, and (2) this device must accept any interference received, including interference that may cause undesired operation. Radio and Television Interference NOTE: This equipment has been tested and found to comply with the limits for a Class B digital device, pursuant to Part 15 of the FCC Rules. These limits are designed to provide reasonable protection against harmful interference in a residential installation. This equipment generates, uses and can radiate radio frequency energy, and if not installed and used in accordance with the instructions, may cause harmful interference to radio communications. However, there is no guarantee that interference will not occur in a particular installation. If this equipment does cause harmful interference to radio or television reception, which can be determined by turning the equipment off and on, the user is encouraged to try to correct the interference by one or more of the following measures: - - Reorient or relocate the receiving antenna. - - Increase the separation between the equipment and the receiver. - - Connect the equipment into an outlet on a circuit different from that to which the receiver is connected. - - Consult the dealer or an experienced radio/TV technician for help. V2-6-04 R.I.S.EU.6.12.04a 14/6/04 9:00 PM Page 2 Powers of 2™ BCD Uhr – von Anelace Das Paket enthält eine Uhr und ein Netzteil zur Stromversorgung. Powers of 2™ BCD Horlage - fait par Die Uhr basiert auf dem binären Zahlensystem, der Sprache von Computern. Um die Zeit anzuzeigen werden sechs Ziffern benötigt. So schreiben wir zum Beispiel um 10:48 und 36 Sekunden 10:48:36. Diese Uhr verwendet 6 Spalten: Jede Spalte repräsentiert einen Wert zwischen 0 und 9. Die zwei Spalten auf der linken Seite zeigen die Stunden an, die mittleren zwei die Minuten, und die rechten zwei sind die Sekunden. Der Wert jeder Spalte hängt davon ab, welche LEDs aufleuchten: Leuchtet die unterste LED, so hat sie den Wert 1, leuchtet die darüber, so hat diese LED den Wert 2, die nächste den Wert 4, leuchtet die oberste, so hat sie den Wert 8. Zählt man die Werte der beiden linken Spalten zusammen, so erhält man die Stunden, die Werte der mittleren beiden Spalten ergeben addiert die Minuten, die der beiden rechten die Sekunden. • Abb. 1 - In diesem Beispiel sind die unteren drei LEDs an, die dazugehörigen Werte „1“, „2“, und „4“ addiert ergeben den Wert „7“. Leyendo el reloj Cette horloge est basée sur le système de numération binaire, qui est le langage informatique des ordinateurs. 6 chiffres sont nécessaires pour indiquer le temps. Par exemple, 10h 48 minutes 36 secondes s’écrit 10:48:38. Cette horloge utilise 6 colonnes. Chaque colonne représente un nombre de 0 à 9. Les deux colonnes à gauche indiquent les heures, les deux colonnes du milieu indiquent les minutes, les deux colonnes de droite indiquent les secondes. La valeur de chaque colonne est déterminée par l’état: allumé («On») ou bien éteint («Off») des voyants lumineux. Le voyant du bas, s’il est allumé («On») vaut «1». Celui du dessus «2», le troisième à partir du bas «4», celui au sommet «8». Vous devez ajouter les valeurs «On» pour obtenir la valeur finale. • Figure 1 (Ci-dessous) - Dans cet exemple les trois voyants du bas sont «On». En ajoutant leur valeurs respectives [«1»+«2»+«4»], vous obtenez une valeur totale de «7». Este reloj esta basado en el sistema the numeros binarios que es el lenguage de computadores. Se necesitan 6 numeros para indicar el tiempo. Por ejemplo: las 10:48 y 36 segundos lo expresamos 10:48:36 Este reloj usa 6 columnas: cada columna representa un valor de 0 a 9. Las dos columnas a la izquierda indican las horas, las 2 en la mitad indican los minutos y las dos a la derecha indican los segundos El valor de cada columna esta determinado por las luces que estan prendidas. Primera hilera (fig. 1) si esta luz esta prendida vale “1” La segunda vale “2” La tercera vale “4” y la cuarta vale “8” Sume los valores de todas las luces prendidas para obtener el valor final. • Fig. 1: En este ejemplo las tres luces bajas estan prendidas y sus valores respectivos son : “1”, “2” y “4” por un valor de “7 = LED “ a u s ” • Abb. 2 - Erläuterung aller zehn möglichen Werte • Abb. 3 - Beispiel für die Uhrzeit 10:48:36. = luz PRENDIDA “ O N ” Einstellen Ihrer neuen „Powers of 2™“ Uhr ⇒WARNUNG: Achten Sie darauf, dass die Stromspannung Ihrem Adapter entspricht. •Einstellen der Zeit - Stunden: Um die Stunden einzustellen, drücken Sie den „H“ Knopf, dieser befindet sich auf der Rückseite der Uhr. Der Stundenwert wird pro Knopfdruck um eine Einheit erhöht. Wird der „H“ Knopf dauerhaft gedrückt, erhöht sich der Wert der Stunden automatisch. - Minuten: Die Minuten werden nach dem gleichen Verfahren eingestellt, allerdings unter Verwendung des „M“ Knopfes - Sekunden: Um die Sekunden auf den Wert Null zurück zu setzen, müssen „H“ und „M“ Knopf zusammen gedrückt werden. Lässt man beide Knöpfe wieder los, laufen die Sekunden weiter. •Spezielle Optionen -24 Stundenuhr: Um den 24 Stundenmodus( z.B. 11 p.m. = 23:00:00) zu aktivieren, muss der „H“ Knopf beim Einschalten der Uhr, also beim Anschluss des Netzteils, gedrückt werden. - Binärer Modus: Die Uhr kann, im Gegensatz zu dem voreingestellten BCD Modus, auch im „richtigen“ binären Modus betrieben werden. Im binären Modus stellt die untere LED Reihe die Sekunden dar, die zweite Reihe von unten die Minuten und die dritte Reihe die Stunden, die oberste Reihe wird hierbei nicht verwendet (siehe Abb. 5). Um den binären Modus zu starten, hält man beim Einschalten der Uhr, also beim Anschluss des Netzteils, den „H“ und den „M“ Knopf zusammen gedrückt. - Dimmen: Es gibt drei Helligkeitsstufen für die LEDs, durch Betätigung des DimmKnopfes, der sich an der Uhrunterseite befindet (siehe Abb. 5), kann zwischen diesen Helligkeitsstufen gewechselt werden. P/N 800-0001-03 Rev. B • Fig. 2: Ilustra los 10 valores posibles. • Fig. 3: Demuestra como se ve el reloj a las 10:48:36. Fijando el tiempo en su nuevo “Powers Of 2™” reloj Installer votre nouveau «Powers of 2™» horlage • Figure 4 (au dos de la feuille): [ A ] Brancher le connecteur situé au bout du cordon d’alimentation, dans la prise située dans le trou au fond de l’horloge. [ B ] Courbez le cordon pour le faire glisser dans le canal, et, ensuite [ C ] faire tourner le cordon pour le fixer en place. - Maintenant brancher l’alimentation dans une prise électrique qui correspond avec l'adaptateur livré avec votre horloge (lisez l’étiquette sur l'adaptateur). Anelace vend deux versions: un modèle 120V pour l'électricité américaine, et une version 230V pour la plupart des autres pays du monde. Des rangées voyants lumineux vont s’allumer en balayant verticalement la face de l’horloge, indiquant ainsi que l’horloge à été mise sous tension, mais que l’heure n’a pas encore été réglée. Ce balayage s’applique aux 20 voyants lumineux . => AVERTISSEMENT: Assurez vous que le voltage pour votre adaptateur soit correct. • Réglage de l’heure -Réglage des heures: Poussez et relâchez le bouton marqué «H» à l’arrière de l’horloge pour avancer d’une unité. Pour faire avancer automatiquement les heures, appuyer, sans le relâcher sur le bouton. -Réglage des minutes: Même procédure que ci-dessus excepté que vous devez utiliser le bouton «M». -Réglage des secondes: pour remettre le compteur à zéro, appuyer en même temps sur les boutons «H» et «M». relâcher les pour faire avancer les secondes. • Options spéciales - Horloge 24 heures: pour activer ce mode (Exemple 11PM= 23:00:00), appuyez de manière continue sur le bouton «H« lorsque vous mettez sous tension AC l’horloge (lors du branchement de l’alimentation à la prise de courant AC) - Mode Binaire: L'horloge peut opérer en «vrai» mode binaire au lieu du mode BCD. En «vrai» mode binaire, le rang du bas indique les secondes. Celui du dessus indique les minutes. Le troisième à partir du bas indique les heures. On n’utilise pas celui au sommet (regardez fig 5). Pour activer ce mode, appuyez de manière continue sur le bouton «H« lorsque vous mettez sous tension AC l’horloge (lors du branchement de l’alimentation à la prise de courant AC). - Pour activer à la fois les modes 24H et «vrai» binaire, appuyez en même temps de manière continue sur les boutons «M» et «H» , lorsque vous mettez l’horloge sous tension AC. • Baisser la lumière: La luminosité des voyants a trois niveaux. Appuyez sur le bouton DIM qui se trouve près du raccordement entre le cordon électrique et l'horloge (regardez fig 4). • Fig. 4 (al revez de esta pagina): [ A ] Enchufle el conector que esta al final del cordon de electricidad en el orificio ubicado en la parte inferior del reloj. [ B ] Gire el cable para depositarlo en el canal, [ C ] dele la vuelta para asegurarlo en sitio. Enchuflar el reloj en una caja electrica que produce el mismo voltaje que usa el adaptador que pertenece a su reloj (lease el label en el adaptador). Anelace vende dos modelos: 120V/60Hz para los EEUU y 220-240V/50Hz para Europa, America del Sur y otros paises. Una linea de luces aparecerán en la cara del reloj listas para fijar el tiempo correcto. Todas las 20 luces van a ser comprobadas por este escrutinio. ⇒AVERTENCIA: Asegurase que el voltaje es lo correcto para su adaptador. • Fijando el tiempo Horas: Para fijar las horas oprima y suelte el botón marcado “H” localizado en la parte posterior del reloj para avanzar las horas de una en una. Manteniendo oprimido el botón “H” automaticamente mueve las horas adelante. Minutos: Para fijar los minutos siga el mismo proceso pero oprima el botón “M”. Segundos: Para fijar los segundos oprima ambos botones “H” y “M” al mismo tiempo hasta que los zeros aparescan, suelte los botones para que los segundos empiezen a marcar. • Opciones Especiales - Reloj marcando 24 horas: Para activar la opcion de 24 horas (ejemplo: 11PM=23:00:00), mantenga oprimido el botón “H” mientras enchufla el cordon de electricidad. - Moda Binaria: Se puede prender el reloj para operar en "moda verdadera binaria" en vez de la "moda default". En moda binaria, la linea de botones mas abajo representa los segundos, la segunda linea desde abajo representa minutos y la tercera linea desde abajo representa las horas (la linea mas arriba no se usa). Vease Fig. 5. Para emplear la "moda binaria" prende el boton marcado "M", que quiere decir cuando se conecta el cordon al poder. - Para activar la "moda binaria" en moda de 24 horas, oprimidos los botones “H” y “M” mientras enchufla el cordon de electricidad. - DIM: Hay tres niveles de brillanza para los LEDs. Prende el boton "DIM" (vease F i g . 4) varias veces para ver el ciclo completo. Fig. 3 Fig. 2 Fig. 1 8 +0 4 +4 2 +2 1 +1 =7 0 1 2 3 = luz APAGADA “ O F F ” = Voyant est « O F F » • La Figure 2 illustre les 10 valeurs possibles. • La Figure 3 montre ce qui apparaît à l’horloge à 10:48:36. Abb. 4: [ A ] Stecken sie den Stecker des Netzteilkabels in den dazugehörigen Anschluss. Der Anschluss befindet sich an der Unterseite der Uhr. -[ B ] Drehen Sie das Kabel bis es in den Kanal rutscht [ C ] Wickeln Sie das Kabel danach zur Sicherung auf. - Schließen Sie jetzt das Netzteil an die Stromversorgung an. Die zur Stromversorgung erforderliche Spannung ist auf dem Netzteil angegeben. Anelace verkauft zwei Versionen: ein 120 V/60 Hz Netzteil für US- Stromleitung und ein 220-240 V/50 Hz Netzteil für EUStromleitung. Auf der Vorderseite der Uhr blinken nun die LED- Reihen abwechselnd von unten nach oben auf um anzuzeigen, dass die Uhr zwar eingeschaltet, die Zeit aber noch nicht eingestellt worden ist. Hierbei sind alle 20 LEDs aktiv. Anelace - Lecture de l’horloge = Voyant est « O N» "ON" Value Powers of 2™ BCD Reloj Contenidos: 1 reloj y 1 unidad de alimento Ce colis contient une horloge et un transformateur de tension. Ablesen der Uhrzeit = LED “ a n ” Anelace 4 5 6 7 8 9 1 0 : 4 8 : 3 6-
 1
1
-
 2
2


en otros idiomas
- français: Anelace Classic Powers of 2
- English: Anelace Classic Powers of 2
- Deutsch: Anelace Classic Powers of 2
Artículos relacionados

Otros documentos
-
Bushnell 119519 El manual del propietario
-
Tasco 119422 Manual de usuario
-
-
 Oregon Scientific BAR206SA Manual de usuario
-
 Oregon Scientific RM823 / RM822 Manual de usuario
-
-
 Oregon Scientific OSBAR208SX El manual del propietario


