Everbilt BPCKHD Instrucciones de operación
- Tipo
- Instrucciones de operación

Use and Care Guide
Dryer Lint Removal Kit
Item # 592-276
Model # BPCKHD
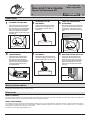
Operation
1
CleanInG The lInT Trap
□ Remove the lint trap from the dryer
and insert the brush into the lint
trap vent until you reach the bottom.
Use a left to right and up and down
motion to capture lint and debris.
Continue up the vent until you reach
the opening.
2
DIsposInG The lInT
anD DebrIs
□ Slowly remove the lint trap brush
from the vent and dispose of the
lint and debris. Repeat step 1 as
necessary.
3
UsInG The VaCUUm hose
aTTaChmenT
□ Attach the vacuum hose attachment
to your vacuum and insert it into the
lint trap vent. Turn on the vacuum
and clean up and down the lint trap
vent.
NOTICE: If you experience decreased
suction during cleaning, ensure debris is
not lodged in the opening of the vacuum
hose attachment.
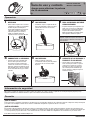
4
remoVInG anD CleanInG
The Dryer DUCT
□ Follow the dryer manufacturer’s
instructions to detach the dryer
from the duct. Insert the dryer
duct brush into the duct and push
the brush forward and backward,
spinning it both clockwise and
counterclockwise.
5
DIsposInG The lInT
anD DebrIs
□ Remove the dryer duct brush from
the duct and dispose of the lint and
debris. Repeat step 4 as necessary.
6
reaTTaChInG The Dryer
DUCT anD TesTInG aIr Flow
□ Follow your dryer manufacturer’s
instructions to reattach the dryer
duct back to the dryer. Turn on the
dryer and ensure the air is owing
properly throughout the duct and
exhausting air through the outside
vent cap.
Safety Information
Never force the dryer duct brush through the duct. If it should become jammed, pull the brush away from the restricted area a few inches then slowly push
forward again turning the brush in a clockwise motion.
Warranty
whaT Is CoVereD
All merchandise is warranted to be free from defects in workmanship and material for one year from the date of purchase. This includes normal wear and
performance failure on items. The manufacturer will replace or repair at their option.
whaT Is noT CoVereD
This warranty only covers normal wear and performance failure. It does not cover any malfunction, performance failure or defect arising from the misuse,
abuse, neglect or modication of the product. Any damage or malfunction inicted upon the product by the user or other external sources, or any failure to
comply with the warnings and instructions is not covered.
For further assistance visit www.HomeDepot.com.
HOMEDEPOT.COM

Guía de uso y cuidado
Juego para eliminar la pelusa
de la secadora
Operación
1
CÓMO LIMPIAR EL FILTRO
DE PELUSA
□ Retire el ltro de pelusa de la secadora
e introduzca el cepillo en el respiradero
del ltro de pelusa hasta llegar al
fondo. Haga movimientos de izquierda
a derecha y de arriba a abajo para
capturar la pelusa y los desechos.
Limpie ascendiendo dentro del
respiradero hasta alcanzar la abertura.
2
CÓMO ELIMINAR LA PELUSA Y
LOS DESECHOS
□ Lentamente, saque el cepillo del ltro de
pelusa del respiradero y bote las pelusas
y demás desechos. De ser necesario,
repita el paso 1.
3
CÓMO USAR LA MANGUERA
PARA ASPIRADORA QUE VIENE
COMO ACCESORIO
□ Acople la manguera para aspiradora que
viene como accesorio a su aspiradora e
introdúzcala en el respiradero del ltro
de pelusa. Encienda la aspiradora y
limpie hacia arriba y hacia abajo dentro
del respiradero del ltro de pelusa.
AVISO: Si disminuye la succión durante la
limpieza, asegúrese de que los desechos no
hayan obstruido la abertura de la manguera
para aspiradora.
4
CÓMO SACAR Y LIMPIAR EL
CONDUCTO DE LA SECADORA
□ Siga las instrucciones del fabricante
de la secadora para desconectarla
del conducto. Inserte el cepillo para
conducto de secadora en el conducto y
empuje el cepillo hacia adelante y hacia
atrás al tiempo que lo gira en el sentido
de las manecillas del reloj y en sentido
contrario.
5
CÓMO ELIMINAR LA PELUSA Y
LOS DESECHOS
□ Saque el cepillo de conducto de
secadora del conducto y bote las pelusas
y desechos. De ser necesario, repita
el paso 4.
6
CÓMO VOLVER A ACOPLAR EL
CONDUCTO DE LA SECADORA Y
PROBAR EL FLUJO DE AIRE
□ Siga las instrucciones del fabricante
de la secadora para volver a acoplar el
conducto de secadora a la secadora.
Encienda la secadora y asegúrese de
que el aire uya adecuadamente por
todo el conducto y salga por la tapa de
ventilación exterior.
Información de seguridad
Nunca fuerce el cepillo de conducto de secadora a través del conducto. Si se atasca, saque el cepillo del área restringida algunas pulgadas y luego
empújelo lentamente hacia adelante mientras lo gira en el sentido de las manecillas del reloj.
Garantía
¿QUÉ SE CUBRE?
Toda la mercancía se garantiza contra defectos de fabricación y de los materiales durante un año a partir de la fecha de compra. Esto incluye el desgaste
y las fallas en el desempeño normales de los artículos. El fabricante reemplazará o reparará el artículo a su criterio.
¿QUÉ NO SE CUBRE?
Esta garantía cubre únicamente el desgaste y las fallas en el desempeño normales. No cubre el mal funcionamiento, las fallas en el desempeño ni los
defectos que surjan debido al mal uso, el abuso, la negligencia o la modicación del producto. No están cubiertos los daños ni el mal funcionamiento que
se cause al producto por parte del usuario o otras fuentes externas, ni las fallas debidas al incumplimiento de las advertencias y las instrucciones.
Para obtener más ayuda visite www.HomeDepot.com.
Artículo # 592-276
Modelo # BPCKHD
HOMEDEPOT.COM
-
 1
1
-
 2
2

