Magic Chef HMDR1000BE El manual del propietario
- Categoría
- Neveras
- Tipo
- El manual del propietario
Este manual también es adecuado para

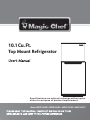
Model HMDR1000WE / HMDR1000BE / HMDR1000SE / HMDR1000ST
10.1 Cu. Ft.
Specifications are subject to change without prior
notice for purpose of product improvement.
Top Mount Refrigerator

1

4 - 5
6
6
6
7
9 - 11
12
13 - 14
15
LIMITED WARRANTY
2
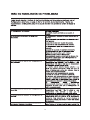
TEMPERATURE CONTROL PANELS
SETTING THE TEMPERATURE CONTROL
7
FREEZING FRESH FOODS
8
12
12
12

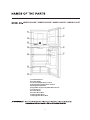
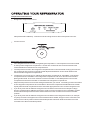
HMDR1000WE / HMDR1000BE / HMDR1000SE / HMDR1000ST
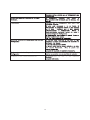
1. Freezer Section
2. Freezer Shelf
3. Freezer Temperature Control
4. Refrigerator Temperature Control
5. Refrigerator Shelves
6. Vegetable Crispers (2) With Glass Cover
7. Leveling Leg
8. Freezer Door
9. Freezer Door Bins
10. Refrigerator Door
11. Refrigerator Door Bins
3

WARNING
WARNING
4

5

6
Do not attempt to repair or replace any part of your refrigerator unless it specifically recommended
in this manual. All other servicing should be referred to a qualified technician, so as to minimize the
risk of possible ignition due to incorrect parts or improper service.

Temperature Control Panels
Refrigerator Temperature Control
SET(HOLD 3 SEC ON/OFF): This will turn off all cooling functions but not the power to the unit.
Freezer Control
Setting the Temperature Control
Your refrigerator has one control for regulating the temperature. The temperature control is located
on the top of the refrigerator compartment. As well as a control knob in the freezer to balance the
cold air distribution between the two compartments.
The temperature control in the refrigerator compartment will control the actual cooling cycle whereas
the control knob in the freezer compartment will adjust the distribution of the cold air between the
freezer and the refrigerator compartments.
The first time you turn the unit on, adjust the temperature control knob to “COLDEST” in the freezer
compartment and “COLDEST” in the refrigerator compartment and run for at least 4 hours before
placing foods inside. Then return selector to “Recommended” or COLDER position in the freezer
compartment and “Recommended” or COLDER in the refrigerator compartment.
Adjust the temperature control to the setting that best suits your needs. The setting of “Recommended”
in the refrigerator compartment and “COLDER” in the freezer compartment will distribute the cold air
equally between both compartments which should be appropriate for home or office refrigerator use.
If you at any time want to distribute a larger amount of cold air to the freezer for example is a large
amount of food has been added to the freezer, simply move the controller to the “COLDEST” position
until the desired temperature has been attained then return the controller to the “Recommended”
position.
If you at any time want to distribute a larger amount of cold air to the refrigerator section, for example
to quickly cool down if a large amount of fresh food has been added, simply move the controller in the
freezer to the “COLD” position until the desired temperature has been attained and then return the
controller to the “Recommended” position.
7

NOTE:
If the unit is unplugged, has lost power, or is turned off, you must wait 3 to 5 minutes before restarting
the unit. If you attempt to restart before this time delay, the refrigerator-freezer will not start.
NOTE:
We do not recommend the installation of the refrigerator where the temperature will drop below 50ºF
(13ºC) or rise above 110ºF(43ºC). The compressor will not be able to maintain proper temperatures
inside the refrigerator.
NOTE:
For installations where the temperatures will drop below 50ºF set the freezer temperature control to
the “coldest” setting. This will improve the operations of the refrigerator under these conditions.
Freezing Fresh Foods
Proper use of the appliance, adequately packed food, correct temperature and taking into account
hygienic precautions will substantially influence the quality of freezing the food or storing of the
frozen foods.
This compartment is designed for the long-term storage of frozen food.
The storage life of frozen foods varies and the recommended storage time should not be exceeded.
Pre-packed commercially frozen food should be stored in accordance with the frozen foods
manufacturer’s instructions for a three star frozen food storage compartment or home freezer.
Place frozen food into the freezer as quickly as possible after purchase. If there are instructions on
the packet, carefully follow these instructions regarding storage times.
Carefully select food you intend to freeze, it should be of adequate quality and suitable for freezing.
Use correct packaging and wrap it tight.
The packaging should be airtight and shouldn’t leak since this could cause substantial vitamin loss
and dehydration of foods.
Foils and bags should be soft enough to tightly wrap around the foods.
When preparing foods to be frozen, consider sanitary precautions.
Mark packages with following data: kind and amount of foods and the date of loading.
It is extremely important that the food is frozen as quickly as possible.
If the loading amount is too large, the quality of freezing is reduced which affects the quality of frozen
foods.
8

Tool required: Philips screwdriver, Flat bladed screwdriver, Hexagonal spanner.
Ensure the unit is unplugged and empty.
To take the door off, it is necessary to tilt the unit backwards. You should rest the unit on something
solid so that it will not slip during the door reversing process.
All parts removed must be saved to do the reinstallation of the door.
Do not lay the unit flat as this may damage the coolant system.
It’s better that 2 people handle the unit during assembly.
1. Unscrew top hinge cover and then unscrew the top hinge. Then lift upper door and place it on a soft pad
to avoid scratch and damage.
2. Remove the pin with a screwdriver and flip the hinge bracket. Then
refit the pin to hinge bracket.
3. Remove the top left screw cover.
4. Unscrew middle hinge.
9

5. Move shaft sleeve and pin hole plug from left side to right side.
6. Move the middle hinge hole covers from left side to right side.
7. Unscrew bottom hinge. Then remove the adjustable feet from both side.
9. Disassemble right hinge, find out right bottom hinge from spare parts bags and fix it.
10
8. Move the bottom hinge hole covers from left side to right side.

10. Refit the bracket fitting the bottom hinge pin. Replace both adjustable feet. Transfer the lower door
to the property position.
12. Place the upper door back on. Ensure the door is aligned horizontally and vertically so that the seal
are closed on all sides before finally tightening the top hinge. Then inert the top hinge and screw it to
the top of unit and then fix hinge cover (in accessary bag) by screw.
13. Place the top left cover to right side and fix it by screw.
11
11. Make the middle hinge reverse the direction 180 then
transfer it to the left property position. Make the middle hinge
pin in the upper hole of the lower door, then tight the bolts.
º,

12

13

14

HMDR1000WE
HMDR1000BE
HMDR1000SE
HMDR1000ST
15
In Home
In Home
In Home
In Home


Las especificaciones están sujetas a cambios
sin previo aviso para mejorar el producto.
HMDR1000WE / HMDR1000BE / HMDR1000SE / HMDR1000ST
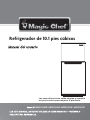
Refrigerador de 10.1 pies cúbicos

1

INSTRUCCIONES DE SEGURIDAD IMPORTANTES
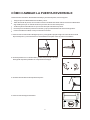
CÓMO CAMBIAR LA PUERTA REVERSIBLE
GARANTIA LIMITADA
4 - 5
6
6
6
7
7
9 - 11
12
12
12
12
13 - 14
15
2
8
PANELES DE CONTROL DE TEMPERATURA
CÓMO CONFIGURAR EL CONTROL DE TEMPERATURA
CÓMO CONGELAR ALIMENTOS FRESCOS
CÓMO OPERAR TU REFRIGERADOR

HMDR1000WE / HMDR1000BE / HMDR1000SE / HMDR1000ST
3
1. Sección del congelador
2. Repisa del congelador
3. Control de temperatura del congelador
4. Control de temperatura del refrigerador
5. Repisas de refrigerador
6. Cajones para vegetales (2) con cubierta de vidrio
7. Pata de nivelación
8. Puerta del congelador
9. Recipientes en la puerta del congelador
10. Puerta del refrigerador
11. Recipientes en la puerta del refrigerador

INSTRUCCIONES DE SEGURIDAD IMPORTANTES
ADVERTENCIA
ADVERTENCIA
ADVERTENCIA
ADVERTENCIA
ADVERTENCIA
ADVERTENCIA
4

5

6
No intente reparar o reemplazar ninguna parte de su refrigerador a menos que se recomiende
específicamente en este manual. Todos los demás servicios deben ser remitidos a un técnico
cualificado, para minimizar el riesgo de una posible ignición debido a piezas incorrectas o un
servicio inadecuado.

CÓMO OPERAR TU REFRIGERADOR
7
PANELES DE CONTROL DE TEMPERATURA
Control de temperatura del refrigerador
Control del congelador
CÓMO CONFIGURAR EL CONTROL DE TEMPERATURA
Tu refrigerador tiene un control para regular la temperatura El control de temperatura está ubicado
en la parte superior del compartimiento del refrigerador. Así mismo, hay una perilla de control en el
congelador para la distribución equilibrada del aire frío entre los dos compartimientos.
El control de temperatura en el compartimiento del refrigerador controlará el ciclo en enfriamiento
actual mientras que la perilla de control en el compartimiento del congelador ajustará la distribución
del aire frío entre este compartimiento y aquel.
La primera vez que enciendas la unidad, ajusta la perilla de control de temperatura a “COLDEST”
(FRÍO MÁXIMO) en ambos compartimientos y deja que la unidad funcione así por al menos 4 horas
antes de poner alimentos dentro. Después, pon de vuelta el selector en la posición “Recommended”
(Recomendado) o COLDER (MÁS FRÍO) en ambos compartimientos.
Ajusta el control de temperatura en la configuración que mejor se adecue a tus necesidades. La
configuración “Recommended” en el compartimiento del refrigerador y “COLDER” en el compartimiento
del congelador distribuirá uniformemente el aire frío entre uno y otro, lo cual será apropiado para el uso
del refrigerador en hogar u oficina.
Si en algún momento deseas distribuir mayor volumen de aire frío al congelador, por ejemplo, por
haber depositado mayor cantidad de alimentos allí, solo tienes que desplazar el controlador a la
posición “COLDEST” y tras alcanzar la temperatura deseada volver a poner el control en la posición
“Recommended”.
Si en algún momento deseas distribuir mayor volumen de aire frío a la sección del refrigerador, por
ejemplo, para enfriar rápidamente luego de haber depositado mayor cantidad de alimentos allí, solo
tienes que desplazar el controlador a la posición “COLD” (FRÍO) y tras alcanzar la temperatura
deseada volver a poner el control en la posición “Recommended”.
CONFIGURAR (MANTENER 3 SEG ON/OFF): Así se apagarán todas las funciones de enfriamiento,
pero no el suministro de corriente a la unidad.

8
NOTA:
Si la unidad está desenchufada, pierde potencia o se apaga, tienes que esperar de 3 a 5 minutos
antes de reiniciarla. Si intentas reiniciar antes de este retraso temporal, el refrigerador-congelador
no arrancará.
NOTA:
NOTA:
CÓMO CONGELAR ALIMENTOS FRESCOS
El uso apropiado del equipo, los alimentos empacados adecuadamente, la temperatura correcta
y tener en cuenta las precauciones de higiene son factores que influenciarán sustancialmente en
la calidad tanto del congelamiento de los alimentos como del almacenaje de alimentos congelados.
Este compartimento está diseñado para almacenar alimentos a largo plazo.
El tiempo de almacenaje útil de alimentos congelados varía según estos y se recomienda no excederlo.
Los alimentos congelados comercialmente pre-empacados deben guardarse conforme a las
instrucciones del fabricante de dichos alimentos para un compartimiento de almacenaje de alimentos
congelados o congelador doméstico de la categoría tres estrellas.
Coloca el alimento congelado dentro del congelador tan pronto como sea posible después de la
compra. Si aparecen instrucciones en el paquete, síguelas con cuidado, especialmente aquellas
sobre tiempos de almacenaje.
El empaque debe ser hermético y sin filtraciones, ya que estas pudieran causar pérdidas sustanciales
de vitaminas y deshidratar los alimentos.
Las bolsas y papeles de envoltura deben ser lo suficientemente suaves como para envolver
completamente los alimentos con hermeticidad. Al preparar los alimentos que serán congelados,
ten en cuenta las precauciones sanitarias.
No recomendamos instalar el refrigerador donde la temperatura descienda a menos de 50ºF (13ºC)
o suba por encima de 110ºF (43ºC). El compresor no podría mantener las temperaturas apropiadas
dentro del refrigerador.
Para instalaciones en lugares donde la temperatura descienda a menos de 50ºF, pon el control de
temperatura de lcongelador en la configuración “COLDEST”. En estas condiciones mejorarán las
operaciones del refrigerador.
Selecciona cuidadosamente el alimento que pretendes congelar. Debe ser de la calidad adecuada y
apto para ser congelado. Usa el empaque correcto y envuélvelo herméticamente.
Marca los paquetes con los siguientes datos: Clase y cantidad de alimentos, y la fecha de depósito.
Es extremadamente importante que el alimento se congele lo más rápido posible.
Si la cantidad de alimento a depositar es muy grande, la calidad del congelamiento se reduce y
esto afecta la calidad misma de los alimentos congelados.

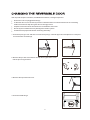
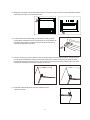
Herramientas necesarias: Desarmadores Philips y de cabeza plana, llave hexagonal.
Asegura que la unidad está desenchufada y vacía.
Para desmontar la puerta, es necesario inclinar la unidad hacia atrás. Debes colocar la unidad sobre
algo sólido para que no resbale durante el proceso de inversión de la puerta.
Todas las partes retiradas tienen que conservarse para reinstalar la puerta.
No coloques la unidad en posición horizontal, ya que pudiera dañarse el sistema refrigerante.
Para ensamblar la unidad, lo mejor es hacerlo entre dos.
1. Desenrosca la cubierta de la bisagra superior y enseguida la propia bisagra. A continuación levanta
la puerta superior y colócala sobre una almohadilla suave para evitar rayones u otros daños.
2. Quita el pasador con un desarmador y voltea el soporte de la bisagra.
Enseguida reajusta el pasador en el soporte de la bisagra.
3. Quita la cubierta del tornillo izquierdo superior.
4. Desenrosca la bisagra intermedia.
CÓMO CAMBIAR LA PUERTA REVERSIBLE
9

10
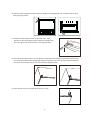
5. Pasa la funda del eje y el tapón del orificio del pasador del lado
izquierdo al derecho.
6. Pasa las cubiertas del orificio de la bisagra intermedia del lado
izquierdo al derecho.
7. Desenrosca la bisagra inferior. Después, quita las patas ajustables de ambos lados.
9. Desarma la bisagra derecha, busca la bisagra inferior derecha en las bolsas de piezas de repuesto y fíjala.
8. Pasa las cubiertas del orificio de la bisagra inferior del lado izquierdo
al derecho.

11
10. Reajusta el pasador que fija la bisagra inferior a su soporte. Vuelve a colocar ambas patas ajustables.
Pasa la puerta inferior a su debida posición.
12. Vuelve a colocar la puerta superior. Antes de apretar finalmente la bisagra superior, asegura que la
puerta quede alineada horizontal y verticalmente para que el sello cierre bien por todos los lados.
Enseguida inserta la bisagra superior y enróscala en la parte superior de la unidad. Fija entonces la
cubierta de la bisagra (en la bolsa incluida) con tornillo.
13. Coloca la cubierta izquierda superior al lado derecho
y fíjala con tornillo.
11. Invierte la dirección de la bisagra intermedia en 180º y pásala
enseguida a la debida posición a la izquierda. Pon el pasador de
la bisagra intermedia en el orificio superior de la puerta inferior
y aprieta enseguida los tornillos.

12

13

14

15
HMDR1000WE
HMDR1000BE
HMDR1000SE
HMDR1000ST
En Casa
En Casa
En Casa
En Casa

-
 1
1
-
 2
2
-
 3
3
-
 4
4
-
 5
5
-
 6
6
-
 7
7
-
 8
8
-
 9
9
-
 10
10
-
 11
11
-
 12
12
-
 13
13
-
 14
14
-
 15
15
-
 16
16
-
 17
17
-
 18
18
-
 19
19
-
 20
20
-
 21
21
-
 22
22
-
 23
23
-
 24
24
-
 25
25
-
 26
26
-
 27
27
-
 28
28
-
 29
29
-
 30
30
-
 31
31
-
 32
32
-
 33
33
-
 34
34


Magic Chef HMDR1000BE El manual del propietario
- Categoría
- Neveras
- Tipo
- El manual del propietario
- Este manual también es adecuado para
En otros idiomas
- English: Magic Chef HMDR1000BE Owner's manual