Elkay ECTGRO33229R2R Guía de instalación
- Categoría
- Fregaderos de cocina
- Tipo
- Guía de instalación
Este manual también es adecuado para

ECTGR SERIES TOP MOUNT STAINLESS
STEEL SINK
TOP MOUNT INSTALLATION
• READ THESE INSTRUCTIONS THOROUGHLY BEFORE YOU BEGIN.
DO NOT REMOVE PROTECTIVE PLASTIC ATTACHED TO GLASS
RIM UNTIL INSTALLATION IS COMPLETE.
ATTENTION INSTALLER:
1) ELKAY RECOMMENDS THAT SINK SHOULD BE INSTALLED BY A PROFESSIONAL
EXPERIENCED INSTALLER.
2) ELKAY IS NOT RESPONSIBLE FOR SINK AND COUNTERTOP IF DAMAGED DURING
INSTALLATION.
3) METAL EDGES MAY BE SHARP - USE CAUTION WHEN HANDLING.
4) FOLLOW ALL LOCAL PLUMBING AND BUILDING CODES.
5) INSPECT SINK FOR DAMAGE PRIOR TO BEGINNING INSTALLATION.
6) ELKAY CANNOT ASSUME ANY RESPONSIBILITY FOR FIXTURES IMPROPERLY INSTALLED.
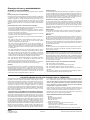
STEP 1: COUNTERTOP OPENING
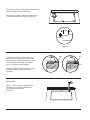
Carefully position template (enclosed) on the counter and
tape down.
Take into consideration adequate clearance for the
faucet, backsplash, and any accessories such as
soap/lotion dispenser.
The template includes the faucet hole locations, glass rim
perimeter and bowl cutouts. (Figure 1)
Carefully mark sink cutout and faucet hole locations.
+ +
1" R
Bowl Cutout
Figure 1
Glass Rim Outline
Cut countertop opening following the countertop manufacturer’s
recommended instructions (Figure 2).
Figure 2
Page 1 of 4

Page 2 of 4
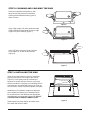
Test fit sink to make sure sink fits into opening and
sink bowl flanges rest on countertop.
Remove sink. Create a rabbet cut 0.090" deep x
0.75" wide around the sink opening (Figure 3).
0.75"
0.090"
Figure 3
Figure 4
Figure 5
Test fit sink to make sure the glass rim is
sitting on the counter (Figure 4). If the sink
flange prevents the glass from sitting on the
counter, increase the depth of the rabbet
by 0.01" increments and test again.
With sink in place, check faucet hole cutout
location and adjust cutout locations as
necessary.
YES
NO
Remove sink.
Use a 1-1/2" hole saw to cut faucet holes
following the countertop manufacturer’s
recommended instructions.
(Figure 5).
+ +
GlassGlass
Gap
Counter
Counter

Page 3 of 4
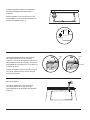
STEP 2: CLEANING AND CAULKING THE SINK
Clean the underside of the glass rim, sink
flange and sealing surface of countertop
opening with denatured alcohol (Figure 6).
Allow to air dry.
Apply a high quality 3/8" wide continuous bead
of black Kitchen & Bath Grade silicone to edge
of glass rim (not furnished) (Figure 7).
Add a 3/8" wide continuous bead of silicone
to the rabbet cut, as well as faucet holes
(Figure 8).
Figure 6
Figure 7
Figure 8
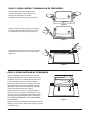
STEP 3: INSTALLING THE SINK
Insert the sink and rotate it so that it is positioned
properly with respect to the edge of the counter
(Figure 9). Press gently onto the countertop to
squeeze out excess silicone. Remove any excess
silicone and allow it to properly cure following silicone
manufacturer’s recommended instructions. Clean up
excess silicone. Remove protective plastic from glass.
Install faucet (not included), soap/lotion dispenser
(not included) and drain(s) (not included) that will
be connected to the sink following the appropriate
manufacturer’s recommended instructions. DO NOT
OVERTIGHTEN PLUMBING CONNECTIONS.
Install supply lines, drain fittings, and other items.
Run water and check for leaks.
Figure 9

Page 4 of 4
(9/14) PART NO. 1000001875
ELKAY LIMITED LIFETIME SINK WARRANTY
Use and Care Hints
Elkay
2222 Camden Court
Oak Brook, IL 60523
©2014 Elkay
elkay.com
Elkay warrants to the original purchaser of an Elkay stainless steel sink, that
Elkay will, at its option, replace or repair, without charge, such product if it fails
due to manufacturing defect for a lifetime of normal residential use. Product re-
placement does not include transportation cost or labor installation costs. This
warranty covers only stainless steel self-rimming drop-in sink installed in a con-
ventional countertop surface and stainless steel un
dermount sinks installed in
a conventional solid surface countertop and applies to residential installations
only. Elkay reserves the right to examine product in question and its installation
prior to replacement.
WASTE FITTINGS AND ACCESSORIES ARE NOT WARRANTED
OTHER WARRANTY CONDITIONS ON SINKS
This warranty applies to sinks purchased after March 1st 2001 as shown on the
purchaser’s dated receipt. For sinks purchased prior to March 1st 2001, the ap-
plicable warranty at that time will be in effect. Our warranty does not cover prod-
uct failure or damage caused by abusive treatment, misuse, environmental
factors, normal wear including dents and scratches, improper care and clean-
ing, use of aggressive and abrasive cleaners, damage due to handling or fail-
ure to follow recommended procedures for installation, care and maintenance
as detailed in the installation and care guide provided with every sink. This war-
ranty is extended
only to the original consumer purchaser of the product. This
warranty does not cover shipping costs, labor costs, or any other charges for
such items as installation or replacement of the sink, diagnosis or replacement
of any faucet or component part, or any other expense or loss.
All incidental or consequential damages are specifically excluded. No ad-
ditional warranties, express or implied are given, including but not lim-
ited to, any implied warranty of merchantabi
lity or fitness for a particular
purpose.
Some states do not allow the exclusion or limitation of incidental or consequen-
tial damages or limitations on how long an implied warranty lasts, so the above
limitations or exclusions may not apply to you.
This warranty gives you specific legal rights, and you may also have other rights
which vary from state to state.
TO OBTAIN SERVICE UNDER WARRANTY
1. Write to:
Elkay Manufacturing Company
Attention: Consumer Services
2222 Camd
en Court
Oak Brook, Illinois 60523
2. Include a letter containing the following information:
a. Date of Purchase and installation
b. Proof of Purchase (copy of original dated invoice)
c. Description of nature of defect
d. Model number or description of model and/or
component part if possible.
Stainless Steel Finish
Regular cleaning is important to maintain the appearance of your
Elkay sink.
Easy Cleaning Instructions
Rinsing is the most important part of sink care. An Elkay stainless
steel sink finish will retain its original bright appearance if the sink is
rinsed thoroughly after each use. “Thorough” rinsing can be done by
running the water throughout the sink for a few minutes after each
use. Typically, a rinse and towel dry after each use takes care of most
everyday clean ups.
Recommendations for Proper Maintenance
• Do…Use only a mild liquid dishwashing detergent with a soft sponge
to clean and then thoroughly rinse the sink.
• Do…Rinse thoroughly after each use. “Thorough” rinsing can be
done by running the water throughout the sink for a few minutes and
rubbing the cleaned area with a sponge.
• Do…Towel dry after each use to prevent mineral deposits from build-
ing up on the surface of the sink.
• Do…Use an Elkay bottom grid or rinsing basket to protect your sink.
• Do Not…Allow liquid soap or other household cleansers to dry on
the surface of the sink. Most brands contain chemical additives
which will affect the original finish.
• Do Not…Use solutions of chlorine bleach and water in the sink.
Chlorides, which are found in most soaps, detergents, bleaches,
and cleansers are very aggressive to stainless steel. If left on the
sink too long they can cause surface pitting.
• Do Not…Use dish mats as these can trap soap and dirt making sink
maintenance more time-consuming.
• Do Not…Use a steel wool pad to clean your sink. Steel wool pads
have a tendency to break apart and small particles of steel can
become embedded in the surface of the sink. The steel particles will
rust and will give the appearance that the sink itself is rusting.
• Do Not…Use abrasive cleansers or abrasive pads as it will scratch
the surface.
• Do Not…Leave wet sponges, cloths, or cleaning pads on the sink.
This can lead to surface rust.
Following these recommendations for the care and cleaning of your
stainless steel sink will insure that it will provide you with many years
of service.
Chlorides
Today, chlorides are found in most all soaps, detergents, bleaches
and cleansers; chlorides can be oppressive to stainless steel.
However, chlorides are very water soluble. Therefore, THOROUGH
RINSING of your sink after each use to remove any chloride residue
and a weekly scouring is all that is required to keep your sink looking
bright and shiny.
Water Quality
The quality of your water can affect your sink’s appearance. If your
water has a high iron content, a brown surface stain can form on the
sink giving the appearance of rust. Additionally, in areas with a high
concentration of minerals, or with over-softened water, a white film
may develop on the sink. To combat these problems, we suggest that
the sink be towel dried after use.
Discoloration, Rust and Possible Pitting
Wet sponges, cloths, cleaning pads and rubber mats left on the sink
can lead to discoloration. Steel wool pads should never be used to
clean your sink as they leave small iron particles in the grain lines
which rust and can damage the sink. Continued usage in this matter
may eventually lead to the sink itself rusting and pitting.
Liquid Soap
Do not allow concentrated liquid detergent to dry on your sink. Most
brands contain chemical additives which will affect the original finish.
Spotting
The quality of your water can affect your sink’s appearance. In areas
with hard water, a brown surface stain can form on the sink giving
the appearance of rust. This phenomena also occurs in water with
high iron content. Additionally, in areas with a high concentration of
minerals, or with over-softened water, a white film may develop on the
sink. To combat these problems, we suggest that the sink be towel
dried after use.
Foods
Heavy salt concentration or foods containing high levels of salt should
not be allowed to dry onto the sink surface. Rinse your sink thoroughly
after use.
Glass Top
Clean the glass top with a glass cleaner to keep it in the best
condition.
For stubborn stains, cover with a piece of paper towel soaked in
vinegar and let stand overnight.
Specialist hardware shops also stock reliable lime scale removers or
vinegar based cleaner. Some stains can’t be removed by the methods
described above. In these cases we would recommend using a non-
abrasive liquid or cream bathroom cleaner.
Recommendations for Proper Maintenance
• Do Not…Use scouring liquid or scouring powder.
• Do Not…Use highly concentrated drain cleaners.
• Do Not…Use scouring pads, they will scratch the glass surface.
• Do Not…Use heavy sharp objects when cleaning the glass, they will
scratch the surface.
• Do Not…Rest pots, pans, etc. on glass top when scrubbing or
scouring. The back and forth action will damage the glass surface.

Página 1 de 4
fregaderos + grifos
FREGADERO DE ACERO INOXIDABLE DE
MONTAJE SUPERIOR, DE LA SERIE ECTGR
INSTALACIÓN DE MONTAJE SUPERIOR
• LEE ATENTAMENTE ESTAS INSTRUCCIONES ANTES DE COMENZAR.
NO RETIRES EL PLÁSTICO PROTECTOR ADJUNTO AL BORDE DE VIDRIO
HASTA QUE HAYAS TERMINADO LA INSTALACIÓN.
ATENCIÓN INSTALADOR:
1) ELKAY RECOMIENDA CONTRATAR A UN INSTALADOR PROFESIONAL CON EXPERIENCIA
PARA MONTAR ESTE FREGADERO.
2) ELKAY NO ES RESPONSABLE POR DAÑOS AL FREGADERO NI AL MOSTRADOR DURANTE
LA INSTALACIÓN.
3) LOS BORDES DE METAL PUEDEN ESTAR AFILADOS - TEN CUIDADO AL MANIPULARLOS.
4) SIGUE TODAS LAS NORMAS LOCALES DE PLOMERÍA Y CONSTRUCCIÓN.
5) ANTES DE LA INSTALACIÓN, REVISA EL FREGADERO PARA VER SI TIENE DEFECTOS.
6) ELKAY NO PUEDE HACERSE RESPONSABLE DE NINGUNA MANERA POR INSTALACIONES
INADECUADAS.
PASO 1: ABERTURA DEL MOSTRADOR
Ubica cuidadosamente la plantilla (incluida) sobre el
mostrador y adhiérela con cinta adhesiva.
Recuerda dejar el espacio suficiente para montar el grifo,
el salpicadero y cualquier otro accesorio como el
dispensador de jabón/loción.
La plantilla incluye la ubicación de los orificios de los grifos,
el perímetro del borde de vidrio y los recortes del recipiente.
(Figura 1)
Marca con cuidado el recorte del fregadero y las ubicaciones
de los orificios del grifo.
+ +
2.5 cm
Derecha
Corte del recipiente
Figura 1
Figura 2
Esquema del
borde de vidrio
Corta la abertura del mostrador siguiendo las instrucciones
recomendadas del fabricante del mismo (Figura 2).

Página 2 de 4
Figura 3
Figura 5
Figura 4
Prueba si el fregadero se ajusta en la abertura y
las bridas del fregadero descansan sobre el
mostrador.
Retira el fregadero. Corte una ranura de 2.2 mm
de profundidad x 19 mm de ancho alrededor de la
abertura del fregadero (Figura 3).
0.75"
0.090"
Prueba para asegurarte de que el borde de
vidrio está asentado sobre el mostrador
(Figura 4). Si la brida del fregadero evita que el
vidrio descanse sobre el mostrador, aumenta la
profundidad de las ranuras en 0.3 mm cada vez
y prueba de nuevo.
Cuando el fregadero esté en su lugar, revisa el
corte de la ubicación de los orificios del grifo
según sea necesario.
SÍ
NO
Retira el fregadero.
Usa sierra cilíndrica de 1-1/2" para cortar
los orificios siguiendo las instrucciones
recomendadas por el fabricante del mostrador
(Figura 5).
+ +
VidrioVidrio
Espacio
Mostrador Mostrador

Página 3 de 4
Figura 6
Figura 7
Figura 8
Figura 9
PASO 2: CÓMO LIMPIAR Y ENMASILLAR EL FREGADERO
Limpia el lado inferior del borde de vidrio,
la brida del fregadero y la superficie de la
abertura del mostrador con alcohol
desnaturalizado (Figura 6). Deja secar al aire.
Aplica una franja continua de 9.5 mm de ancho
de silicona de alta calidad para cocina y baño
en el borde de vidrio (no incluido) (Figura 7).
Agrega una franja continua de 9.5 mm de ancho
de silicona a la ranura y a los orificios del grifo
(Figura 8).
PASO 3: CÓMO INSTALAR EL FREGADERO
Inserta el fregadero y rótalo de manera que esté
ubicado adecuadamente con respecto al borde del
mostrador. (Figura 9). Presiona suavemente sobre
el mostrador para sacar la silicona excedente.
Elimina el exceso de silicona y espera a que cure
adecuadamente según las recomendaciones del
fabricante. Limpia el exceso de silicona. Quita del
vidrio la cubierta protectora de plástico.
Instala el grifo (no se incluye), el dispensador de
jabón/loción (no se incluye) y los desagües (no se
incluyen) que se conectarán al fregadero siguiendo
las instrucciones recomendadas por el fabricante.
NO APRIETES DEMASIADO LAS CONEXIONES
DE PLOMERÍA.
Instala las líneas de suministro, los acoplamientos de
drenaje y otros artículos. Deja correr el agua y verifica
si hay filtraciones.

Página 4 de 4
(Septiembre 2014) PIEZA NÚM. 1000001875
Elkay
2222 Camden Court
Oak Brook, IL 60523
©2014 Elkay
elkay.com
GARANTÍA LIMITADA DE POR VIDA DE ELKAY PARA EL FREGADERO
Consejos de uso y mantenimiento
Elkay garantiza al comprador original de un fregadero Elkay de acero inoxidable
que Elkay, a su criterio, reparará o reemplazará, sin cargo alguno, dicho pro-
ducto si presenta defectos de fabricación durante toda una vida de uso resi-
dencial normal. El reemplazo del producto no incluye los costos de transporte
ni de la mano de obra de instalación. Esta garantía sólo cubre los fregaderos
empotrados con rebordes, de acero inoxidable, instalados en un mostrador
convencio
nal y los fregaderos de acero inoxidable instalados en un mostrador
convencional de superficie sólida y sólo se aplica a instalaciones residenciales.
Elkay se reserva el derecho de examinar el producto en cuestión y su insta-
lación antes de reemplazarlo.
LOS ACCESORIOS Y ACOPLAMIENTOS DEL DESAGÜE NO ESTÁN GAR-
ANTIZADOS OTRAS CONDICIONES DE LA GARANTÍA DE FREGADEROS
Esta garantía cubre los fregaderos comprados después del 1ro de marzo de
2001, según la fecha registrad
a en los recibos del comprador. Para fregaderos
comprados antes del 1ro de marzo de 2001, la garantía aplicable en esa fecha
estará en vigor. Nuestra garantía no cubre la falla o daño del producto causado
por: uso abusivo e inapropiado, factores ambientales, desgaste normal in-
cluyendo arañazos y abolladuras, limpieza y cuidado inapropiados, uso de
limpiadores agresivos y abrasivos, daños debidos al manejo o errores al seguir
los procedimientos recomendados de instal
ación, cuidado y mantenimiento de-
tallados en la guía de instalación y cuidado, adjunta a cada fregadero. Esta
garantía se extiende únicamente al comprador y usuario original del producto.
La garantía no cubre costos de transporte, mano de obra o cualquier otro costo
por conceptos tales como la instalación o reemplazo del fregadero, diagnós-
tico o reemplazo de cualquier grifo o pieza ni cualquier otra pérdida o gasto.
Todos los daños directos o indirectos se excluyen es
pecíficamente. No se
ofrecen otras garantías adicionales, expresas o implícitas, incluyendo,
pero no limitándose a, cualquier garantía implícita de comerciabilidad o
idoneidad para un propósito en particular.
Algunos estados no permiten la exclusión o limitación de daños directos o in-
directos, ni límites a la duración de una garantía implícita; por lo tanto las ex-
clusiones o limitaciones anteriores pueden no ser pertinentes en su caso.
Esta garantía le otorga a u
sted derechos legales específicos, y pudiera tener
también otros derechos, que varían según el estado.
PARA OBTENER SERVICIO BAJO ESTA GARANTÍA
1. Escriba a:
Elkay Manufacturing Company
Atención: Consumer Services
2222 Camden Court
Oak Brook, Illinois 60523
2. Incluya una carta que contenga la siguiente información:
a. Fecha de compra e instalación
b. Comprobante de xompra (copia de la factura original fechada)
c. Descripción del defecto
d. Número de modelo o descrip
ción del modelo y/o pieza si es posible.
Acabado en acero inoxidable
La limpieza regular es importante para mantener la apariencia de tu fregadero
Elkay.
Instrucciones para una limpieza fácil
Enjuagar es la parte más importante del cuidado del fregadero. El acabado de
un fregadero de acero inoxidable Elkay mantendrá su apariencia brillante
original si el fregadero se enjuaga completamente después de cada uso. Un
enjuague “completo” puede hacerse dejando correr agua po
r el fregadero
durante unos minutos después de cada uso. Generalmente, enjuagar y secar
con toalla después de cada uso es lo principal de la mayoría de las limpiezas
diarias.
Recomendaciones para un mantenimiento adecuado
• Sí…Usa sólo un detergente líquido y suave para fregar con una esponja para
limpiar y luego enjuagar abundantemente el fregadero.
• Sí…Enjuaga completamente después de cada uso. Un enjuague “completo”
puede hacerse dejando correr agua por el fregader
o durante unos minutos y
frotando el área limpia con una esponja.
• Sí…Seca con una toalla después de cada uso para evitar que se acumulen
depósitos minerales en la superficie del fregadero.
• Sí…Usa una rejilla inferior Elkay o una cesta de enjuague para proteger tu
fregadero.
• No…Dejar que jabón líquido u otros limpiadores del hogar se sequen en la
superficie del fregadero. La mayoría de las marcas contienen aditivos
químicos que afectarán el acabado original.
• No…Usar so
luciones de blanqueador con cloro y agua en el fregadero. Los
cloruros, que pueden hallarse en la mayoría de los jabones, detergentes,
blanqueadores y limpiadores, son muy agresivos para el acero inoxidable. Si
se dejan en el fregadero durante mucho tiempo pueden causar perforaciones
en la superficie.
• No…Usar almohadillas para platos, ya que ellas pueden capturar el jabón y
la suciedad, haciendo que el mantenimiento del fregadero tome más tiempo.
• No…Usar una esponja
de alambre para limpiar tu fregadero. Las esponjas
de alambre tienen tendencia a romperse y pequeñas partículas de acero
pueden insertarse en la superficie del fregadero. Las partículas de acero se
oxidarán y darán la apariencia de que el fregadero se está oxidando.
• No…Usar limpiadores o almohadillas abrasivas, ya que dañarán la superficie.
• No…Dejar esponjas, paños, o almohadillas de limpieza húmedas en el
fregadero. Esto podría provocar que la superficie se oxide.
Seguir estas recomendaciones para el cuidado y la limpieza de tu fregadero de
acero inoxidable asegurará que te brindará muchos años de servicio.
Cloruros
En la actualidad, la mayoría de los jabones, detergentes, blanqueadores y
limpiadores contienen cloruros; estos son muy agresivos para el acero inoxid-
able. Sin embargo, los cloruros son muy solubles en agua. Por lo tanto, EN-
JUAGAR ABUNDANTEMENTE tu fregadero después de cada uso para quitar
cualquier residuo de cl
oruro, y pulirlo una vez a la semana es todo lo que se
necesita para mantener el fregadero brillante y reluciente.
Calidad del agua
La calidad del agua puede afectar la apariencia de tu fregadero. Si el agua tiene
un gran contenido de hierro, una mancha superficial de color marrón puede for-
marse en el fregadero, dando la apariencia de óxido. Adicionalmente, en áreas
con una gran concentración de minerales, o con agua demasiado suave, una
película blanca puede formarse en el f
regadero. Para combatir estos proble-
mas, sugerimos secar con toalla el fregadero después de usarlo.
Decoloración, óxido y posibles perforaciones
Las esponjas húmedas, paños, almohadillas de limpieza y almohadillas de
goma que se dejen en el fregadero pueden causar decoloración. Nunca debes
usar esponjas de alambre para limpiar tu fregadero, porque dejan pequeñas
partículas de hierro en las líneas de la veta, las que pueden oxidarse y dañar
el fregadero. El uso conti
nuo de esta manera puede provocar finalmente que
el fregadero se oxide y se pique.
Jabón líquido
No permitas que el detergente líquido concentrado se seque sobre tu fregadero.
La mayoría de las marcas contienen aditivos químicos que afectarán el
acabado original.
Manchas
La calidad del agua puede afectar la apariencia de tu fregadero. En áreas con
agua dura, una mancha superficial marrón puede formarse en el fregadero,
dando la apariencia de óxido. Este fenómeno también o
curre en agua con alto
contenido de hierro. Adicionalmente, en áreas con una gran concentración de
minerales, o con agua demasiado suave, una película blanca puede formarse
en el fregadero. Para combatir estos problemas, sugerimos secar con toalla el
fregadero después de usarlo.
Alimentos
La alta concentración de sal o los alimentos con alto contenido de sal no deben
dejarse secar en la superficie del fregadero. Enjuaga tu fregadero abundante-
mente después de usarlo.
Superficie de vidrio
Limpia la superficie de vidrio con un limpiador de vidrios para mantenerlo en las
mejores condiciones. Para manchas difíciles, cubre con un pedazo de toalla de
papel humedecida con vinagre y déjalo toda la noche. Las tiendas de herrajes
para especialistas también venden removedores de costras de cal o limpiadores
a base de vinagre. Algunas manchas no pueden removerse con los métodos
descritos arriba. En estos casos recomendaríamos usar un limpiador d
e baño
no abrasivo líquido o en crema.
Recomendaciones para un mantenimiento adecuado
• No…Usar líquidos o polvos abrasivos.
• No…Usar limpiadores de desagües altamente concentrados.
• No…Usar esponjas abrasivas, ya que rayarán la superficie.
• No…Usar objetos pesados o afilados al limpiar el vidrio ya que rayarán la
superficie.
• No…Dejar ollas, sartenes, etc. en superficies de vidrio al fregarlas o pulirlas.
Colocarlas repetidamente dañará la superficie de vidrio
.
-
 1
1
-
 2
2
-
 3
3
-
 4
4
-
 5
5
-
 6
6
-
 7
7
-
 8
8


Elkay ECTGRO33229R2R Guía de instalación
- Categoría
- Fregaderos de cocina
- Tipo
- Guía de instalación
- Este manual también es adecuado para
en otros idiomas
Artículos relacionados
-
Elkay HD523637 Guía de instalación
-
-
-
Elkay CR33214 Guía de instalación
-
Elkay N217324 Guía de instalación
-
Elkay DLRS3322104 Guía de instalación
-
Dayton HDDB332284QI Guía de instalación
-
-
Revere ELUH2816 Guía de instalación
-
