CORBERO FC1801I Manual de usuario
- Categoría
- Frigoríficos combinados
- Tipo
- Manual de usuario

REFRIGERADOR-
CONGELADOR
FRIDGE-FREEZER
FC 1801 I
LIBRO DE INSTRUCCIONES
INSTRUCTION BOOKLET
2222 284-07

2
ADVERTENCIAS IMPORTANTES
Es muy importante conservar este libro de instrucciones junto al aparato por si fuera necesario
consultarlo. Si el aparato se vendiese o transfiriese a otra persona, acuérdese de entregarlo junto con
él para que el nuevo propietario conozca el funcionamiento de la máquina y sus advertencias.
En caso de que este aparato, dotado de cierre magnético, sustituya uno con cierre automático,
aconsejamos que la cerradura de este último quede inservible, antes de deshacerse de él. Así se
evitará que los niños, jugando, puedan quedarse encerrados dentro, con grave peligro de sus vidas.
Estas advertencias han sido redactadas para su seguridad y para la seguridad de los demás. Le
rogamos, por lo tanto, leerlas atentamente antes de instalar y utilizar el aparato.
Seguridad
• Este aparato ha sido proyectado para ser usado
por adultos. Por lo tanto, tener cuidado que los
niños no se acerquen para jugar con él.
• Es peligroso modificar o intentar modificar las
características de este aparato.
• Quitar siempre el enchufe de la toma de
corriente antes de efectuar cualquier operación
de limpieza o mantenimiento.
• No consumir nunca los cubitos de hielo recién
sacados del congelador ya que podrían provocar
quemaduras.
• Estos aparatos son pesados. Tener cuidado en
los desplazamientos.
Asistencia
• Cualquier modificación que eventualmente fuese
necesaria a la instalación eléctrica doméstica
para poder instalar el aparato tiene que ser
realizada sólo por personal competente.
• Para eventuales intervenciones dirigirse a un
Centro de Asistencia Técnica autorizado y exigir
las piezas de repuesto originales.
• En caso de necesitar reparaciones no intentar
hacerlas personalmente. Las reparaciones
efectuadas por personas no competentes
pueden provocar daños. Ponerse en contacto
con el Centro de Asistencia más cercano y
emplear sólo repuestos originales.
Uso
• Los frigoríficos y/o congeladores domésticos
están destinados sólo a la conservación y/o
congelación de alimentos.
• Las mejores prestaciones se obtienen con
temperaturas ambiente comprendidas entre
+18°C y +43°C (Clase T); +18°C y +38°C (Clase
ST); +16°C y +32°C (Clase N); +10°C y +32°C
(Clase SN); la clase de pertenencia está indicada
en la placa matrícula situada en la cámara al
lado del cajón verduras.
Atención: en caso de temperaturas ambiente
diferentes de las indicadas para la clase
climática a la cual pertenece este producto, es
preciso observar las indicaciones siguientes:
cuando la temperatura ambiente desciende por
debajo del valor mínimo puede suceder que la
temperatura de conservación en el vano
congelador no esté garantizada; por lo tanto, se
aconseja que se consuman a lo más pronto los
alimentos presentes en su interior.
• Los productos que hayan sido descongelados no
se pueden que volver a congelar.
• Seguir atentamente las indicaciones del
fabricante para la conservación y/o congelación
de los alimentos.
• En todos los aparatos de refrigeración y
congelación existen superficies que se cubren
con escarcha. Según el modelo, la escarcha
puede ser eliminada automáticamente
(desescarche automático) o manualmente. No
intentar nunca quitar la escarcha con un objeto
puntiagudo ya que se podría dañar
irremediablemente el evaporador. Utilizar para
ello sólo el rascador de plástico que se
suministra con el aparato. Por el mismo motivo
no despegar nunca las cubetas del hielo con un
cuchillo o cualquier otro objeto puntiagudo.
• No colocar en el compartimiento de baja
temperatura (congelador o conservador) bebidas
gaseosas que podrían explotar
Instalación
• El aparato se calienta considerablemente en la
proximidad del condensador y del compresor,
por lo tanto hay que verificar que el aire pueda
circular libremente alrededor del mismo. Una
ventilación insuficiente puede causar un mal
funcionamiento y daños al aparato. Seguir
cuidadosamente las instrucciones que se dan
para la instalación.
23
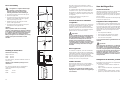
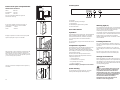
If the appliance is fixed to the side of the kitchen unit,
simply slacken the screws in the fixing brackets (E),
move the brackets as shown in the figure and re-
tighten the screws.
D735
E
E
PR167/1
D
B
D029
The doors can be opened using the sliding system
previously illustrated, or one of the two doors can be
opened by fitting the small handle supplied as an
accessory (see figure).
Fix cover (D) on guide (B) until it clips into place.

3
INDICE
Advertencias y consejos importantes . . . . . .2
Uso . . . . . . . . . . . . . . . . . . . . . . . . . . . . . . . . . . .4
Limpieza de las partes internas . . . . . . . . . . . . .4
Uso del congelador . . . . . . . . . . . . . . . . . . . . . .4
Panel de mando . . . . . . . . . . . . . . . . . . . . . . . . .4
Puesta en marcha . . . . . . . . . . . . . . . . . . . . . . . .4
Regulación de la temperatura . . . . . . . . . . . . . . .4
Congelación rapida . . . . . . . . . . . . . . . . . . . . . . .4
Piloto de alarma de la temperatura . . . . . . . . . . .4
Congelación de los alimentos frescos . . . . . . . .4
Conservación de los alimentos congelados . . . .5
Descongelación . . . . . . . . . . . . . . . . . . . . . . . . .5
Cubitos de hielo . . . . . . . . . . . . . . . . . . . . . . . . .5
Uso del frigorifico . . . . . . . . . . . . . . . . . . . . . . .5
Puesta en marcha . . . . . . . . . . . . . . . . . . . . . . . .5
Regulación de la temperatura . . . . . . . . . . . . . . .5
Refrigeracíon de alimentos y bebidas . . . . . . . . .5
Rejillas movibles . . . . . . . . . . . . . . . . . . . . . . . . .6
Ubicación mensulas de la contrapuerta . . . . . . .6
Consejos . . . . . . . . . . . . . . . . . . . . . . . . . . . . . .6
Consejos para refrigeración . . . . . . . . . . . . . . . .6
Consejos para congelación . . . . . . . . . . . . . . . . .6
Consejos para conservación de alimentos . . . .
congelados . . . . . . . . . . . . . . . . . . . . . . . . . . . . .7
Mantenimiento . . . . . . . . . . . . . . . . . . . . . . . . . .7
Limpieza periódica . . . . . . . . . . . . . . . . . . . . . . .7
Temporadas largas de inactividad . . . . . . . . . . .7
Lámpara de iluminación . . . . . . . . . . . . . . . . . . .7
Desescarche . . . . . . . . . . . . . . . . . . . . . . . . . . . .8
Como actuar si el aparato no funciona . . . . . .8
Instalación . . . . . . . . . . . . . . . . . . . . . . . . . . . . .9
Colocación . . . . . . . . . . . . . . . . . . . . . . . . . . . . .9
Conexión elétrica . . . . . . . . . . . . . . . . . . . . . . . .9
Reversibilidad de las puertas . . . . . . . . . . . . . . .9
Instrucciones para el empotrmiento . . . . . . . . . .10
04/01
Protección del ambiente
Este aparato no contiene en el circuito refrige-
rante ni en el aislamiento, gases refrigerantes
nocivos para el ozono. El aparato no debe ser
eliminado junto con los deshechos urbanos y
chatarras. Se debe evitar el daño del circuito
refrigerante, sobre todo en la parte posterior
cerca del intercambiador. Las informaciones
sobre los centros de recepciõn son
suministradas por las autoridades municipales;
Los materiales usados en este aparato
marcados con el simbolo son reciclables.
• Una vez instalado el aparato verificar que no
esté apoyado sobre el cable de alimentación.
Importante: en caso de que el cable de
alimentación se dañe, deberá ser sustituido con
un cable especial. Ambos cables pueden ser
solicitados al fabricante o al Servicio de
asistencia.
• Si el aparato es transportado de forma horizontal
es posible que el aceite contenido en el
compresor pase al circuito refrigerante. Esperar
por lo menos dos horas antes de poner en
marcha el aparato para dar tiempo a que el
aceite regrese al compresor.
22
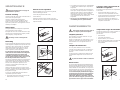
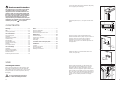
8mm
PR167
A
B
PR168
Open the appliance door and the furniture door at
90°. Insert the small square (B) into guide (A). Put
together the appliance door and the furniture door
and mark the holes as indicated in the figure.
Remove the squares and drill holes with ø 2 mm at
8 mm from the outer edge of the door. Place the
small square on the guide again and fix it with the
screws supplied.
Should the lining up of the furniture door be
necessary, use the clearance of slots.
At the end of operations, it is necessary to check if
the door of the furniture closes properly.
20 mm
A
50mm
PR166
PR33
C
A
Place guide (A) on the inside part of the furniture
door, up and down as shown in the figure and mark
the position of external holes. After having drilled
holes, fix the guide with the screws supplied.
Fix cover (C) on guide (A) until it clips into place.

4
Limpieza de las partes internas
Antes de su utilización limpiar todas las partes
internas con agua tibia y jabón neutro y secarlas
luego cuidadosamente.
USO
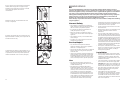
Panel de mando
Uso del congelador
A - Piloto de control de funcionamiento
B - Piloto de congelación rapida
C - Piloto de alarma temperatura
D - Mando N/S (Normal/Super)
E - Mando del termostato (congelador)
1
2
3
4
5
6
O
N
S
S
EABC D
Congelación de los alimentos
frescos
El congelador está apto para congelar alimentos
frescos y para conservar alimentos congelados.
Para la congelación de los alimentos ponga el
congelador en situación de congelación rápida por
lo menos 24 horas antes de introducir los alimentos.
No emplear detergentes o polvos
abrasivos que podrían dañar las superficies.
Puesta en marcha
Introducir el enchufe en la toma de corriente, se
encenderá el piloto (A), lo cual indica que el
congelador está en tensión. Girar el mando del
termostato (E), en sentido horario hasta una
posición distinta de la posición «O» (parada). El
congelador se pone en marcha.
El funcionamiento del congelador se interrumpe al
girar el mando en la posicíon «O».El refrigerador
continuará a funcionar.
Regulación de la temperatura
La temperatura se regula automaticámente y puede
ser aumentada (menos frío) girando el mando hacia
los números más bajos o bien se puede disminuir
(más frío) girándolo hacia los números más altos.De
todos modos, la colocación del mando se determina
teniendo en cuenta que la temperatura interna
depende:
• de la temperatura ambiente;
• de la frecuencia de aperatura de la puerta;
• de la cantidad de alimentos conservados;
• de la colocación del aparato.
La posición intermedia es generalmente la más
indicada.
Congelación rapida
Para la congelación rápida, gire el botón (D) hasta
el simbolo «S» (SUPER). Se encenderá el piloto de
congelación rápida (B).
Piloto de alarma temperatura
El piloto de alarma de la temperatura se enciende
automáticamente cada vez que la temperatura
interior del congelador supera un cierto valor que
podría impedir una larga conservación de los
alimentos.
Es perfectamente normal que el piloto de alarma
permanezca encendida un rato después de
encender el congelador por primera vez. Quedará
encendida inasta alcanzar la temperatura óptima
para la conservación de los alimentos.
21
Press in the joint covers between the appliance and
the kitchen unit.
D724
D
C
D723
Open the door and push the appliance against the
side of the kitchen unit opposite to that of appliance
hinges.
Fasten the appliance with 4 screws provided in the
kit included with the appliance. Snap vent grille (C)
and hinge cover (D) into position.
A
D023
Push appliance into the housing until stop strip (A)
touches the kitchen unit.
D726
B
Apply covers (B) on joint cover lugs and into hinge
holes.
PR266
A
B
C
D
Separate parts A, B, C, D as shown in the figure

5
Al acabar el proceso de congelación, vuelva a
regular el congelador por la conservación “normal”
de los alimentos.
La cantidad máxima de alimentos que pueden ser
congelados en 24 h. figura en la Tarjeta Matrícula
del aparato.Los alimentos necesitan 24 horas para
completar su congelación después de ponerlos en
el congelador.
Coloque los alimentos por congelar en el
compartimiento superior.
Conservación de los alimentos
congelados
Cuando se enciende por primera vez o después de
un periodo de inactividad del congelador, ponga el
congelador en posición de congelación rápida
(SUPER) y espere por los menos dos horas antes
de poner los productos en el congelador. Después
puede volver a la conservación normal.
Importante
En caso de interrupción de corriente durante la
conservación de los alimentos congelados, no
abrir absolutamente la puerta. Los alimentos no
se deterioran si la interrupción es breve (un
aumento de la temperaturade los alimentos
congelados reduce el período de conservación)
y el compartimento congelador está lleno, de lo
contrario se aconseja consumirlos a la mayor
brevedad.
Uso del frigorifico
Puesta en marcha
Introducir el enchufe en la toma de corriente. Abrir la
puerta del refrigerador y girar el mando del
termostato, en sentido horario hasta una posición
distinta de la posición «O» (parada). El aparato se
pone en marcha.
El funcionamiento del aparato se interrumpe al girar
el mando en la posicíon «O».
Regulación de la temperatura
La temperatura se regula automaticámente y puede
ser aumentada (menos frío) girando el mando hacia
los números más bajos o bien se puede disminuir
(más frío) girándolo hacia los números más altos.De
todos modos, la colocación del mando se determina
teniendo en cuenta que la temperatura interna
depende:
• de la temperatura ambiente;
• de la frecuencia de aperatura de la puerta;
• de la cantidad de alimentos conservados;
• de la colocación del aparato.
La posición intermedia es generalmente la más
indicada.
Importante:
En las posiciones de máximo frío, con tempera-
tura ambiente elevada, el funcionamiento puede
ser continuo, con consiguiente formación de
escarcha en la parte posterior del compartimien-
to; en tal caso es necesario girar el mando a una
posición de menor frío, a fin de consentir la
eliminacíon automática de la escarcha y, como
consecuencia, obtener un consumo menor de
energía eléctrica.
Descongelación
Los alimentos congelados, antes de ser utilizados,
pueden ponerse a descongelar en el refrigerador o
a temperatura ambiente, según el tiempo disponible
para esta operación. Si se trata de pequeñas
porciones, pueden ser cocinadas directamente
apenas sacadas del congelador, pero en este caso
el tiempo de cocción es más prolongado.
Cubitos de hielo
El aparato está dotado de una o más bandejitas
para la produccíon de hielo; llenar esta cubeta con
agua potable y colocarla en el compartimento
congelador.
No utilizar nunca instrumentos metálicos para
despegar las cubetas cuando se han pegado por
causa del hielo.
Refrigeración de alimentos y bebidas
Para utilizar de la mejor manera el compartimiento
refrigerante, es necesario:
• no introducir comidas calientes o líquidos en
evaporacíon;
• tapar o envolver los alimentos, especialmente si
son aromáticos;
• no colocar sobre las rejillas papeles, cartones o
plásticos que obstaculicen la circulacíon del aire.
20
Door reversibility
The appliance is supplied with the right
door opening. To change the opening
direction of the door proceed as in the
following instructions before installing it.
1. Unscrew the upper pin and remove the spacer
2. Remove the upper door
3. Unscrew the pins (B) and the spacers (C) and
refit them on the middle hinge of the opposite
side. Snap the hinge cover (A).
4. Refit the upper door, the upper pin and the
spacer on the opposite side
5. Unscrew the lower pin and remove the spacer
and refit them on the opposite side
Attention
After completion of the door reversibility
operation, verify that the door gasket is adherent
to the cabinet. If the ambient temperature is cold
(i.e. in Winter), the gasket may not fit perfectly to
the cabinet. In that case, wait for the natural
fitting of the gasket or accelerate this process by
heating up the part involved with a normal
hairdrier.
It is necessary that the niche is provided with a
conduct of ventilation having the following
dimensions:
Depth 50 mm
Width 540 mm
Building-in instructions
Dimensions of housing
Height 1780 mm
Depth 550 mm
Width 560 mm
For safety reasons, minimum ventilation must be as
shown in Fig.
Attention: keep ventilation openings clear of
obstruction.
PR01
540
50
B
T
H
50 mm
min.
200 cm
2
200 cm
2
min.
D567
B
C
A

6
D040
Rejillas movibles
En las paredes del compartimento existen unas
guías que permiten poner las rejillas a distintas
alturas.
CONSEJOS
Consejos para refrigeración
Para un correcto uso aconsejamos:
Carne: debe ser envuelta en bolsas de plástico y
colocada en el espacio situado sobre los cajones
verdura.
En esta posicíon la carne puede ser conservada
como máximo durante 1 a 2 dias.
Alimentos cocinados , platos fríos, etc. tienen
que conservarse bien cubiertos y se pueden colocar
en cualquier bandeja del frigorífico.
Fruta y verdura: una vez lavada, ha de colocarse
en el cajón (cajones) inferior.
Mantequilla y queso: deben colocarse en los reci-
pientes adecuados o envueltos en papel de aluminio
o politileno, a fin de evitar el contacto con el aire.
Leche embotellada: bien tapada, en la contrapuerta.
Bananas, patatas, cebollas y ajo, si no están
envueltos, no se deben colocar en frigorífico.
PR189
Ubicación mensulas de la
contrapuerta
Se puede cambiar la posición de las mensulas de la
contrapuerta.
La operación se efectúa de la siguiente manera:
Empujar gradualmente el estante en el sentido
indicado por las flechas hasta llegar a
desengancharlo, luego volverlo a montar en la
posición deseada.
Consejos para congelación
Para obtener las máximas ventajas del proceso de
congelacíon aconsejamos lo sigiuente:
• Durante la congelacíon no añadir nuevos alimentos
por congelar y no abrir la puerta del congelador.
• Dividir todo pequeñas porciones para facilitar la
rapidez de congelación y permitir la
descongelación sólo de las cantidades
necesarias en cada ocasión.
• Envolver los alimentos en láminas de aluminio o
politileno, cuidando de que estas queden bien
adheridas a los alimentos y perfectamente
cerradas.
• Evitar colocar los productos por congelar a
contacto con otros ya congelados; así evitará un
aumento de temperatura de estos últimos.
• No consumir nunca los cubitos de hielo recién
sacados del congeldaor ya que podrían provocar
quemaduras de frío.
• Es aconsejable apuntar en los paquetes la fecha
de inicio de la congelación con el fin de controlar
el tiempo de conservación.
19
CUSTOMER SERVICE AND SPARE PARTS
If the appliance is not functioning properly, check
that:
• the plug is firmly in the wall socket and the mains
power switch is on;
• there is an electricity supply (find out by plugging
in another appliance);
• the thermostat knob is in the correct position.
• If there are water drops on the bottom of the
cabinet, check that the defrost water drain
opening is not obstructed (see “Defrosting”
section).
• If your appliance is still not working properly after
making the above checks, contact the nearest
service centre.
To obtain fast service, it is essential that when you
apply for it you specify the model and serial number
of your appliance which can be found on the
guarantee certificate or on the rating plate located
inside the appliance, on the bottom left-hand side.
2. remove any stored food, wrap it in several layers
of newspaper and put it in a cool place;
3. leave the door open, insert the plastic scraper in
the appropriate seating at the bottom centre,
placing a basin underneath to collect the defrost
water;
4. when defrosting is completed, dry the interior
thoroughly and refit the plug; keep the scraper for
future use;
5. turn the thermostat knob back to the required
setting or replace the plug in the power socket.
After letting the appliance run for at least half an
hour, replace the previously removed food into
the compartment.
Important:
Never use sharp metal tools to scrape off frost
from the evaporator as you could damage it.
Do not use a maechanical device or any artificial
means to speed up the thawing process other
than those recommended by the manufacturer.
A temperature rise of the frozen food packs,
during defrosting, may shorten their safe
storage life. s
INSTALLATION
Location
The appliance should be installed well away from
sources of heat such as radiators, boilers, direct
sunlight etc.
Electrical connection
Before plugging in, ensure that the voltage and
frequency shown on the serial number plate
correspond to your domestic power supply. Voltage
can vary by ±6% of the rated voltage.
For operation with different voltages, a suitably sized
auto-transformer must be used.
The appliance must be earthed.
The power supply cable plug is provided with a
contact for this purpose.
If the domestic power supply socket is not earthed,
connect the appliance to a separate earth in
compliance with current regulations, consulting a
specialist technician.
The Manufacturer declines all responsibility if
the above safety precautions are not observed.
This appliance complies with the following
E.E.C. Directives:
- 87/308 EEC of 2/6/87 relative to radio interference
suppression.
- 73/23 EEC of 19.2.73 (Low Voltage Directive) and
subsequent modifications;
- 89/336 EEC of 3.5.89 (Electromagnetic
Compatibility Directive) and subsequent
modifications.
It must be possible to disconnect the appliance from
the mains power supply; the plug must therefore be
easily accessible after installation

7
• Los símbolos en las tapas de los compertimentos
y cubetas indican diferentes tipos de productos
congelados.
Las cifras indican el tiempo de conservación en
meses para cada tipo de producto congelado. La
validez del valor máximo o mínimo establecido
del tiempo de conservación de los productos
congelados depende de la calidad y de la calidad
y de la preparación de ellos antes de ser
congelados.
• No colocar en el compartimento de congela-
ción bebidas gaseosas; pueden estallar.
Consejos para conservación de
alimentos congelados
Para utilizar de la mejor manera el compartimento,
es necesario:
• que el transporte desde la compra a la
colocación en el compartimento sea breve;
• no abrir demasiado frecuentemente la puerta ni
dejarla abierta más de lo necesario;
• una vez descongelados los alimentos se
deterioran en breve tiempo y no pueden ser
congelados nuevamente.
MANTENIMIENTO
Desenchufar siempre el aparato antes de
proceder a cualquier operación de limpieza.
Limpieza periódica
Lavar el interior y las partes exteriores con agua
tibia y bicarbonato sódico.
Limpiar el condensador y el motocompresor con un
cepillo o un aspirador. Esta operación mejorará el
funcionamiento con el consiguiente ahorro de
energia.
Temporadas largas de inactividad
Durante los períodos en los cuales el aparato no
esté funcionando observar las siguientes
precauciones:
• desenchufarlo;
• sacar todos los alimentos;
• limpiar el interior y los accesorios.
• Dejar las puertas abierta para la circulación del
aire, a fin de evitar la formación de olores
desagradables.
Lámpara de iluminación
Si con la puerta abierta la luz no se enciende,
controlar que esté bien enroscada; si el defecto no
se corrige, cambiar la bombilla con otra de igual
potencia.
Se puede acceder a la lámpara de iluminación del
compartimento refrigerante como se indica en la
figura.
La potencia máxima se indica en el difusor.
D411
Desescarche
La escarcha del evaporador del compartimento refri-
gerante se elimina automáticamente a cada interrup-
cion del motocompresor. El agua de la escarcha der-
retida, mediante un canal adecuado, se recoge en un
pequeño depósito colocado en la parte posterior sobre
el motocompresor del aparato, de donde evapora.
Se recomienda limpiar periódicamente el agujero
de desagüe del agua de desescarche, situado en
la parte central del canal en el compartimiento
refrigerante, utilizando el «limpiador» adecuado
que se encuentra en el agujero, para evitar que el
agua de desescarche caiga sobre los alimentos.
D037
18
D068
Defrosting
Frost is automatically eliminated from the evaporator
of the refrigerator compartment every time the motor
compressor stops, during normal use. The defrost
water drains out through a trough into a special
container at the back of the appliance, over the
motor compressor, where it evaporates.
It is important to periodically clean the defrost
water drain hole in the middle of the refrigerator
compartment channel to prevent the water
overflowing and dripping onto the food inside.
Use the special cleaner provided, which you will
find already inserted into the drain hole.
The freezer compartment, will become progressively
covered with frost. This should be removed with a
plastic scraper, whenever the thickness of the frost
exceeds 4 mm. During this operation it is not
necessary to switch off the power supply or to
remove the foodstuffs.
However, when the ice becomes very thick on the
inner liner, complete defrosting should be carried out
and it is advisable to carry out this operation when
the appliance is empty.
To carry out complete defrosting of the freezer
compartment proceed as follows:
1. pull out the plug from the wall socket or turn the
thermostat knob to the «O» setting;
D037
D411
MAINTENANCE
Periods of non-operation
When the appliance is not in use for long periods,
take the following precautions:
remove the plug from the wall socket;
remove all food;
defrost and clean the interior and all accessories;
leave the door ajar to allow air to circulate to prevent
unpleasant smells.
Interior light
The light bulb inside the refrigerator compartment
can be reached as shown in figure.
If the light does not come on when the door is open,
check that it is screwed into place properly. If it still
does not light up, change the bulb.
The rating is shown on the light bulb
cover.
Periodic cleaning
Clean the inside with warm water and bicarbonate of
soda. Rinse and dry thoroughly.
Clean the condenser (black grill) and the
compressor at the back of the appliance with a
brush or a vacuum cleaner. This operstion will
improve the performance of the appliance and save
electricity consumption.
Unplug the appliance before carrying out
any maintenance operation.

8
COMO ACTUAR SI ELAPARATO NO FUNCIONA
Si el aparato presentase anomalías será oportuno
controlar:
• Que esté bien enchufado y que el interruptor de
la instalación eléctrica esté conectado.
• Que no haya un corte de energía eléctrica.
• Que el mando del termostato se encuentre en su
posición correcta.
• Si el compresor funciona sin interrupción,
verificar que el termostato no se encuentre en
una posición
• Además si el aparato hace demasiado ruido
verificar que los costados no estén en contacto
con muebles que pueden causar ruidos o
vibraciones y que la unidad refrigerante no vibre.
• Si se ven restos de agua en el fondo del
refrigerador comprobar que el orificio de
desagüe de la escarcha derretida no esté
obturado (ver cápitulo Desescarche).
Si después de los controles sugeridos, el defecto
persiste, serà oportuno llamar al Centro de
Asistencia Técnica más cercano.
Es importante en el momento de llamar
proporcionar la referencia del modelo y el
número de matrícula del aparato indicados en el
certificado de garantía o en la tarjeta matrícula.
En el compartimento congelador la escarcha deber
á ser eliminada cada vez que se ha formado un
estrato de aproximadamente 4 mm de espesor,
utilizando un raspador en plástico. Durante esta
operación no es necesario interrumpir la conexión
electrica o quitar los alimentos contenidos en el
compartimento.
En el caso que se formara una espesa capa de
hielo, será necesario descongelar totalmente el
congelador, procediendo de la manera siguiente:
1. Colocar el mando del termostato (E) en posición
«0», o desenchufar el aparato.
2. Envolver los alimentos congelados en varios
papeles de periodico y colocarlos en un lugar
muy fresco.
3. Dejar la puerta abierta. Colocar el rascador en la
posición adecuada como se indica en la figura
poniendo debajo una cubeta para recoger el
agua.
4. Al completar la operación secar cuidadosamente
la cuba del congelador.
5. Conservar el rascador para usos futuros.
6. Girar el mando del termostato (E) en la posición
deseada o enchufar otre vez el aparato.
7. Poner el congelador en situación de congelación
rápida.
8. Pasadas dos o tres horas, el congelador está de
nuevo listo para la conservación de los alimentos
congelados.
D068
Atención
Se recomienda no utilizar utensilios metálicos
para quitar la escarcha a fin de evitar graves
daños al aparato.
No usar dispositivo mecánico alguno u otro
medio artificial para acelerar el processo de
desescarche excepto los recomendados.
Un aumento de la temperatura de los alimentos
ultracongelados durante el desescarche podría
reducir el tiempo de conservación.
17
Hints for storage of frozen food
To obtain the best performance from this appliance,
you should:
• be sure that frozen foodstuffs are transferred
from the foodstore to the freezer in the shortest
possible time;
• not open the door frequently or leave it open
longer than absolutely necessary.
• Once defrosted, food deteriorates rapidly and
cannot be refrozen.
• wrap up the food in aluminium foil or polythene
and make sure that the packages are airtight;
• do not allow fresh, unfrozen food to touch food
which is already frozen, thus avoiding a rise in
temperature of the latter;
• lean foods store better and longer than fatty
ones; salt reduces the storage life of food;
• water ices, if consumed immediately after
removal from the freezer compartment, can
possibly cause the skin to be freeze burnt;
• it is advisable to show the freezing-in date on
each individual pack to enable you to keep tab of
the storage time;
• The symbols on the drawers show different types
of frozen goods.
The numbers indicate storage times in months
for the appropriate types of frozen goods.
Whether the upper or lower value of the indicated
storage time is valid depends on the quality of
the foods and pre-treating before freezing.
• do not put carbonated liquids (fizzy drinks,
etc.) in the freezer compartment as they may
burst.
Hints for freezing
To help you make the most of the freezing process,
here are some important hints:
• the maximum quantity of food which can be
frozen in 24 hrs. is shown on the rating plate;
• the freezing process takes 24 hours. No further
food to be frozen should be added during this
period;
• only freeze top quality, fresh and thoroughly
cleaned, foodstuffs;
• prepare food in small portions to enable it to be
rapidly and completely frozen and to make it
possible subsequently to thaw only the quantity
required;
HINTS
Hints for refrigeration
Useful hints:
Meat (all types): wrap in polythene bags and place
on the glass shelf above the vegetable drawer.
For safety, store in this way only one or two days
at the most.
Cooked foods, cold dishes, etc..: these should be
covered and may be placed on any shelf.
Fruit and vegetables: these should be thoroughly
cleaned and placed in the special drawer(s)
provided.
Butter and cheese: these should be placed in
special airtight containers or wrapped in aluminium
foil or polythene bags to exclude as much air as
possible.
Milk bottles: these should have a cap and should
be stored in the bottle rack on the door.
Bananas, potatoes, onions and garlic, if not
packed, must not be kept in the refrigerator.

9
Conexión eléctrica
Antes de enchufar el aparato, asegurarse de que la
tensión y la frecuencia indicadas en la tarjeta
matrícula, correspondan a las de la instalación
doméstica. Se admite una oscilación del 6% sobre
la tensión nominal.
Para el funcionamiento a tensiones distintas, habrá
que utilizar un autotransformador de potencia
adecuada. Asegurarse de que la toma de corriente y
el enchufe sean compatibles entre sí sin tener que
interponer reducciones ladrones o adaptadores
varios. Si fuera necesario, cambiar la toma de la
instalación de la casa.
Es indispensable conectar el aparato a una toma
de tierra eficaz.
Para ello el enchufe del cable de alimentación está
dotado de un adecuado contacto. Si la toma de
corriente de la instalación doméstica no estuviera
conectada a tierra, conectar el aparato a una
instalación de tierra, conforme a las leyes en vigor,
consultando para ello con un técnico especializado.
El fabricante declina toda responsabilidad en el
caso que esta norma no sea respetada.
Este aparato es conforme a las siguientes
Directivas Comunitarias:
- 87/308 CEE del 2/6/87 relativa a la supresión de
interferencias radio.
- 73/23 CEE 19/02/73 (Baja tensión) y
modificaciones sucesivas;
- 89/336 CEE 03/05/89 (Compatibilidad
electromagnética) y modificaciones sucesivas.
INSTALACIÓN
Colocación
Situar el aparato lejos de fuentes de calor, como:
radiadores, estufas, exposición directa a los rayos
del sol, etc.
Atención
Se debe poder desenchufar el aparato; por lo tanto
una vez efectuada la instalación es necesario que el
enchufe no quede escondido
1. Aflojar el perno superior y quitar el distanciador.
2. Quitar la puerta superior.
3. Aflojar los pernos (B) y los distanciadores (C) y
volver a incorporarlos a la bisagra intermedia por
el lado opuesto. Incorporar el embellecedor (A).
4. Volver a colocar la puerta superior y enroscar el
perno superior y el distanciador por el lado
opuesto.
5. Aflojar el perno inferior y quitar el distanciador;
luego volver a incorporarlos por el lado opuesto.
Atención
Terminada la reversibilidad de las puertas,
controlar que la junta magnética adhiera bien al
mueble. Si la temperatura ambiente es fría (por
ejemplo en invierno), puede suceder que la junta
no adhiera perfectamente al mueble. En tal caso
esperar que la junta se recobre naturalmente o
bien acelerar el proceso calentando la parte con
un normal secador de cabellos.
Reversibilidad de les puertas
El aparato se suministra con las puertas
que se abren hacia la derecha. Para que se
abran hacia la izquierda hace falta realizar las
siguientes operaciones antes de llevar a cabo la
instalación:
B
C
A
16
D040
Movable shelves
The walls of the refrigerator are equipped with a
series of runners so that the shelves can be
positioned as desired.
Positioning the door shelves
To permit storage of food packages of various sizes,
the door shelves can be adjusted in height.
To make these adjustments proceed as follows:
Gradually pull the shelf in the direction of the arrows
until it comes off, then reposition as required.
PR189
Operation
Insert the plug into the wall socket.
Open the refrigerator door and turn the thermostat
knob, clockwise, beyond the «O» (STOP) position.
The appliance will start to operate.
To stop operation, simply turn the thermostat knob to
position «O»
Fresh food refrigeration
To obtain the best performance:
• do not store warm food or evaporating liquids in
the refrigerator;
• do cover or wrap the food, particularly if it has a
strong flavour.
• Position food so that air can circulate freely round it.
Use of the fridge
Thawing
Deep-frozen or frozen food, prior to being used, can
be thawed in the refrigerator compartment or at
room temperature, depending on the time available
for this operation.
Small pieces may even be cooked still frozen, directly
from the freezer: in this case, cooking will take longer.
Ice-cube production
This appliance is equipped with one or more trays
for the production of ice-cubes. Fill these trays with
water, then put them in the freezer compartment.
Do not use metallic instruments to remove the
trays from the freezer.
Temperature regulation
The temperature is automatically regulated and can
be increased to achieve a higher temperature
(warmer) by rotating the thermostat knob toward
lower settings or reduced (colder) rotating the knob
towards higher settings.
However, the exact setting should be chosen
keeping in mind that the temperature inside the
refrigerator depends on:
• room temperature;
• how often the door is opened;
• the quantity of food stored;
• location of appliance.
A medium setting is generally the most suitable.
Important
If the ambient temperature is high or the
appliance is fully loaded, and the appliance is
set to the lowest temperatures, it may run
continuously causing frost to form on the rear
wall. In this case the dial must be set to a higher
temperature to allow automatic defrosting and
therefore reduced energy consumption.

10
Colocar a presión el cubrejuntas entre el aparato y
el mueble.
D724
D
C
D723
Empujar el aparato en el hueco hasta que el perfil
superior (A) llegue a tope con el mueble.
A
D023
PR01
540
50
B
T
H
Es necesario además que el hueco tenga un
conducto de ventilación con estas medidas:
profundidad 50 mm
ancho 540 mm
Instrucciones para el empotramiento
Dimensiones del hueco
Altura 1780 mm
Profundidad 550 mm
Anchura 560 mm
Para una adecuada ventilación seguir las
indicaciones de la Fig.
50 mm
min.
200 cm
2
200 cm
2
min.
D567
Abrir la puerta y adosar el aparato contra el lado del
mueble al lado opuesto a la bisagra de la puerta.
Fijar el aparato con los 4 tornillos en dotación. Colo-
car el zócalo de aireación (C) encajándola a presión
y colocar la tapa (D) en posición.
15
Control panel
A. Pilot light
B. SUPER operating control light
C. Warning light
D. Normal/Super (quick-freezing) switch
E. Thermostat knob
1
2
3
4
5
6
O
N
S
S
EABC D
Operation
Insert the plug into the wall socket. The pilot light will
light up, indicating that the appliance is powered.
Turn the thermostat knob, clockwise, beyond the
«O» (STOP) position. The freezer will start to
operate.
To stop operation, simply turn the thermostat knob to
position «O».
Temperature regulation
The temperature is automatically regulated and can
be increased to achieve a higher temperature
(warmer) by rotating the thermostat knob toward
lower settings or reduced (colder) rotating the knob
towards higher settings.
However, the exact setting should be chosen
keeping in mind that the temperature inside the
refrigerator depends on:
• room temperature;
• how often the door is opened;
• the quantity of food stored;
• location of appliance.
A medium setting is generally the most suitable.
Freezing fresh food
The 4-star compartment is suitable for long term
storage of commercially frozen food and for freezing
fresh food.
To freeze fresh foods allow it to run on the fast
freeze setting for at least 24 hours before loading
food.
Place the food to be frozen in the upper in the
freezer compartment as this is the coldest part.
Use of the freezer
Quick-freezing
For quick-freezing, turn the knob (D). The quick-
freezing indicator light (B) will then light up.
Warning light (C)
The temperature alarm light turns on automatically
whenever the temperature within the freezer rises
above a certain value which might endanger
satisfactory long-term conservation.
It is perfectly normal for the temperature alarm light
to remain lit up for a short time after the freezer is
initially turned on. It will remain lit up until the
optimum temperature for the conservation of frozen
food is attained.
Storage of frozen food
When first starting-up or after a period out of use,
before putting the products in the compartment let
the appliance run for at least two hours on the fast
freeze setting, then turn the thermostat knob to the
normal operating position.
Important
If there is a power failure when food is in the
freezer, do not open the door of the freezer
compartment. The frozen food will not be
affected if the power cut is of short duration (up
to 6-8 hours) and the freezer compartment is full,
otherwise, it is recommended that the food
should be used within a short time (a
temperature increase of the frozen food
shortens its safe storage period).

11
D726
B
Colocar las tapas (B) sobre los extremos del perfil y
en los agujeros para la bisagra.
20 mm
A
50mm
PR166
PR266
A
B
C
D
PR33
C
A
8mm
PR167
A
B
Separar las piezas A, B, C, D según se indica en la
figura.
Apoyar la guía (A) sobre la parte interior de la
puerta del mueble arriba y abajo según se indica en
la figura y marcar la posición de los agujeros
exteriores. Una vez que se hayan hecho los
agujeros, fijar la guía con los tornillos presentes en
el equipo base.
Introducir la tapa (C), presionándola hasta oír el
resorte, en la guía (A).
Abrir la puerta del aparato y la del mueble a 90°
aprox. Introducir la escuadrita (B) en la guía (A).
Mantener unidas la puerta del aparato y la del
mueble y marcar los agujeros según se indica en la
figura. Quitar las escuadritas y hacer unos agujeros
de 2 mm de Ø a 8 mm desde el borde exterior de la
puerta. Colocar otra vez la escuadrita sobre la guía
y fijarla con los tornillos presentes en el equipo
base.
14
Cleaning the interior
Before using the appliance for the first time, wash
the interior and all internal accessories with luke-
warm water and some neutral soap so as to remove
the typical smell of a brand-new product, then dry
thoroughly.
Do not use detergents or abrasive
powders, as these will damage the finish.
USE
CONTENTS
Warnings . . . . . . . . . . . . . . . . . . . . . . . . . . . . . .13
Use . . . . . . . . . . . . . . . . . . . . . . . . . . . . . . . . . .14
Cleaning the interior . . . . . . . . . . . . . . . . . . . . . .14
Use of the freezer . . . . . . . . . . . . . . . . . . . . . . .15
The control panel . . . . . . . . . . . . . . . . . . . . . . . .15
Operation . . . . . . . . . . . . . . . . . . . . . . . . . . . . . .15
Temperature regulation . . . . . . . . . . . . . . . . . . . .15
Quick-freezing . . . . . . . . . . . . . . . . . . . . . . . . . . .15
Warning light . . . . . . . . . . . . . . . . . . . . . . . . . . . .15
Freezing fresh food . . . . . . . . . . . . . . . . . . . . . . .15
Storage of frozen food . . . . . . . . . . . . . . . . . . . .15
Thawing . . . . . . . . . . . . . . . . . . . . . . . . . . . . . . .16
Ice-cube production . . . . . . . . . . . . . . . . . . . . . .16
Use of the fridge . . . . . . . . . . . . . . . . . . . . . . . .16
Operation . . . . . . . . . . . . . . . . . . . . . . . . . . . . . .16
Temperature regulation . . . . . . . . . . . . . . . . . . . .16
Fresh food refrigeration . . . . . . . . . . . . . . . . . . . .16
Movable shelves . . . . . . . . . . . . . . . . . . . . . . . . .16
Positioning the door shelves . . . . . . . . . . . . . . . .16
Hints . . . . . . . . . . . . . . . . . . . . . . . . . . . . . . . . . .17
Hints for refrigeration . . . . . . . . . . . . . . . . . . . . .17
Hints for freezing . . . . . . . . . . . . . . . . . . . . . . . . .17
Hints for storage of frozen food . . . . . . . . . . . . . .17
Maintenance . . . . . . . . . . . . . . . . . . . . . . . . . . .18
Periodic cleaning . . . . . . . . . . . . . . . . . . . . . . . . .18
Periods of no operation . . . . . . . . . . . . . . . . . . . .18
Interior light . . . . . . . . . . . . . . . . . . . . . . . . . . . . .18
Defrosting . . . . . . . . . . . . . . . . . . . . . . . . . . . . . .18
Customer service and spare parts . . . . . . . . .19
Installation . . . . . . . . . . . . . . . . . . . . . . . . . . . . .19
Location . . . . . . . . . . . . . . . . . . . . . . . . . . . . . . .19
Electrical connection . . . . . . . . . . . . . . . . . . . . . .19
Door reversibility . . . . . . . . . . . . . . . . . . . . . . . . .20
Building-in instructions . . . . . . . . . . . . . . . . . . . .20
Environment Protection
This appliance does not contain gasses which
could damage the ozone layer, in either its
refrigerant circuit or insulation materials. The
appliance shall not be discarded together with
the urban refuse and rubbish. Avoid damaging
the cooling unit, especially at the rear near the
heat exchanger. Information on your local
disposal sites may be obtained from municipal
authorities. The materials used on this appliance
marked by the symbol are recyclable.

12
El aparato está provisto de dos escuadras (E) para
fijarlo lateralmente al mueble; para su aplicación ver
les indicaciones de la Fig.
D735
E
E
PR168
PR167/1
D
B
D029
La apertura de las puertas se puede realizar con el
sistema corredizo precedentemente ilustrado o bien
se puede abrir una de las dos puertas aplicado la
manilla suministrada como accesorio (ver figura).
Introducir la tapa (D), presionándola hasta oír el
resorte, en la guía (B).
En caso de que sea necesario alinear la puerta del
mueble, utilizar el juego de los agujeros de ojal.
Al término de las operaciones es preciso controlar
que la puerta del aparato esté cerrada
correctamente.
13
WARNINGS
It is most important that this instruction book should be retained with the appliance for future
reference. Should the appliance be sold or transferred to another owner, or should you move house
and leave the appliance, always ensure that the book is supplied with the appliance in order that the
new owner can be acquainted with the functioning of the appliance and the relevant warnings.
If this appliance featuring magnetic door seals is to replace an older appliance having a spring lock
(latch) on the door or lid, be sure to make that spring lock unusable before you discard the old
appliance. This will prevent it from becoming a death-trap for a child.
These warnings are provided in the interest of safety. You must read them carefully before installing or
using the appliance.
General Safety
• This appliance is designed to be operated by
adults. Children should not be allowed to tamper
with the controls or play with the product.
• It is dangerous to alter the specifications or
modify this product in any way.
• Before any cleaning or maintenance work is
carried out, be sure to switch off and unplug the
appliance.
• This appliance is heavy. Care should be taken
when moving it
• Ice lollies can cause frost burns if consumed
straight from the appliance.
Service/Repair
• Any electrical work required to install this
appliance should be carried out by a qualified
electrician or competent person
• This product should be serviced by an authorized
Service Centre, and only genuine spare parts
should be used.
• Under no circumstances should you attempt to re-
pair the appliance yourself. Repairs carried out by
inexperienced persons may cause injury or more
serious malfunctioning. Refer to your local Service
Centre, and always insist on genuine spare parts.
Use
• The domestic refrigerators and freezers are
designed to be used specifically for the storage
of edible foodstuffs only.
• Best performance is obtained with ambient
temperature between +18°C and +43°C (class T);
+18°C and +38°C (class ST); +16°C and +32°C
(class N); +10°C and +32°C (class SN). The class
of your appliance is shown on its rating plate.
Warning: when the ambient temperature is not
included within the range indicated for the class
of this appliance, the following instructions must
be observed: when the ambient temperature
drops below the minimum level, the storage
temperature in the freezer compartment cannot
be guaranteed; therefore it is advisable to use
the food stored as soon as possible.
• Frozen food must not be re-frozen once it has
been thawed out.
• Manufacturers’ storage recommendations should
be strictly adhered to. Refer to relevant
instructions.
• The inner lining of the appliance consists of
channels through which the refrigerant passes. If
these should be punctured this would damage
the appliance beyond repair and cause food loss.
DO NOT USE SHARP INSTRUMENTS to scrape
off frost or ice. Frost may be removed by using
the scraper provided. Under no circumstances
should solid ice be forced off the liner. Solid ice
should be allowed to thaw when defrosting the
appliance. See defrost instructions.
• Do not place carbonated or fizzy drinks in the
freezer as it creates pressure on the container,
which may cause it to explode, resulting in
damage to the appliance.
Installation
• There are working parts in this product which
heat up. Always ensure that there is adequate
ventilation as a failure to do this will result in
component failure and possible food loss. See
installation instructions.
• Care must be taken to ensure that the appliance
does not stand on the electrical supply cable.
Important: if the supply cord is damaged, it must
be replaced by a special cord or assembly avail-
able from the manufacturer or its service agent.
• Parts which heat up should not be exposed.
Wherever possible the back of the product
should be against a wall.
• If the appliance has been transported
horizontally, it is possible that the oil contained in
the compressor flows in the refrigerant circuit. It
is advisable to wait at least two hours before
connecting the appliance to allow the oil to flow
back in the compressor.
-
 1
1
-
 2
2
-
 3
3
-
 4
4
-
 5
5
-
 6
6
-
 7
7
-
 8
8
-
 9
9
-
 10
10
-
 11
11
-
 12
12


CORBERO FC1801I Manual de usuario
- Categoría
- Frigoríficos combinados
- Tipo
- Manual de usuario
en otros idiomas
- English: CORBERO FC1801I User manual
Artículos relacionados
-
CORBERO FC1801I/1 Manual de usuario
-
-
-
-
-
-
-
-
