Engel EngelDroid TDT2 EN1020 Manual de usuario
- Tipo
- Manual de usuario

ENGLISH
1
MANUAL DE USUARIO
USER MANUAL
MANUEL D’UTILISATION
MANUALE UTENTE
EN1020


ESPAÑOL
3
Receptor ANDROID + DVB-T2
ESPAÑOL
Las pantallas pueden diferir de la versión nal del producto

EN1020
INFORMACIÓN DE SEGURIDAD

EN1020
1
1
1
2
3
4
4- 5
6
7
7
7
7
7
8
8
8
8
9
9
9- 10
10
10
11
12
CONTENIDO
INFORMACIÓN DE SEGURIDAD
Apariencia del producto
Panel frontal
Panel trasera
Derecha y izquierda
Mando a distancia
CONEXION DEL SISTEMA
Conexion al TV
EMPEZANDO
Pantalla de bienvenida
Conguracion inicial
PANTALLA DE INICIO
Tema de la pantalla principal
AJUSTES
Sobre los ajustes
Redes inalámbricas
Conguración Ethernet
Sonido
Visualicación
Apps
Idioma y entrada
Backup & Reset
Sobre EN1020
MODO DVB-T
Sobre el reproductor DVB-T
Buscar
Programa
Sistema
Opciones
APP
Media Center
SOLUCIÓN DE PROBLEMAS
ESPECIFICACIÓNES

EN1020
1
USB USB
RECOVERY
APARIENCIA DEL PRODUCTO
Parte frontal
Parte trasera
Botón ON/OFF
Indicador encendido Sensor IR
Indicador de red
Salida HDMI
Restablecer
Toma de corriente
Salida AV
Conexion Ethernet
Lector de tarjetas SD
Antena TV
Conexión antena
de televisión externa
Izquierda y derecha
Español

EN1020
1
2
3
4
5
6
7
8
9
10
11
12
13
14
15
8
9
11
10
12
13
15
14
5
6
7
1
2
3
4
2
Apariencia del Producto
Mando a Distancia
BOTON ON/OFF: pulse para encender o
poner en reposo su receptor EN1020
BOTONES ROJO/VERDE/AMARILLO/AZUL:
botones para funciones interactivas y para
funciones en los submenús
SUBTÍTULO: activar o desactivar subtítulos
TELETEXTO: pulse para acceder al Teletexto
MENÚ: acceder al menú
CURSOR: para desplazarse por los menús
OK: pulse para acceder
EPG: abrir la Guía Electrónica de Programas
TECLADO NUMÉRICO: pulse para introducir
valores numéricos y para ir a un canal en
concreto
AUDIO: seleccione el modo de audio o la
pista de sonido
SILENCIAR: activar o desactivar el sonido
VOLUMEN: pulse para subir o bajar el sonido
HOME: volver al menú principal y para
cambiar entre modo DVB-T y Android si se
pulsa 2 veces
VOLVER: ir al menú anterior
DVB: pulse para cambiar al modo DVB-T
Español

EN1020
3
CONEXIONES
Conexiones del TV
Hay muchos tipos diferentes de televisión y otros equipos que puede conectar al Engeldroid.
En este manual, verá las formas más comunes de conectar los equipos.
Antena
Cable de antena
(no incluido)
Cable AV
(no incluido)
Cable HDMI
Cable AV
(no incluido)
TV HDMI
Nota:
1. No es necesario conectar el cable AV y el cable HDMI a la vex con el televisor, elija cualquiera de ellos bajo
su elección, sin embargo recomendamos la conexión HDMI por su mejor calida de imagen.
2. No enchufe / desenchufe el cable HDMI o AV mientras que el dispositivo esté en marcha.
3. El indicador de encendido se iluminará en verde cuando el dispositivo esté encendido, y en rojo cuando el
dispositivo se encuentre en modo reposo.
4. El indicador NET se vuelve rojo cuando el dispositivo se encuentre conectado a la red de su casa, y se
pone verde cuando transmite o recibe información de internet.
Español

EN1020
4
Empezando
Pantalla de bienvenida
Conguración inicial
Al inicar el receptor, el menú de bienvenida aparecerá
Paso 1: Selecione su idioma favorito
Paso 3: Selecione su pais
Paso 2: Congurar la red por cable o Wi-Fi
Español

EN1020
5
EMPEZANDO
Paso 4: Conéctese con su cuenta de Google o puede
saltar este paso si lo desea.
Paso 5: EngelDroid contine aplicaciones y sistemas
que buscan proteger a los niños de la casa. Cuando
Engel detecta algunas aplicaciones o contenido
protegido le pediremos una contraseña.
usted puede saltar este paso;
Paso 6: Pulsa “Finalizar” y terminara la conguración
NOTA:
Miracast se activa después de que su receptor se pone en marcha. Asegúrese de que su dispositivo
móvil y el receptor estén conectados a la misma red WiFi
Español

EN1020
6
PANTALLA DE INICIO
Tema de Pantalla Principal
Después de encender su Engeldroid, la pantalla principal
aparece. Hay 7 elementos (VER, ESCUCHAR, JUGAR,
COMPARTIR, DESCUBRIR, MIS APPS y AJUSTES) en la
pantalla.
En el apartado VER, existen aplicaciones como MX Player y
XBMC que es para ver programas.
En el apartado ESCUCHAR, tiene aplicaciones como el
Google Play Music para la reproducción de música.
VER
ESCUCHAR
JUGAR
COMPARTIR
DESCUBRIR
En el apartado de JUGAR, allí tendrá aplicaciones para
jugar, pero si es la primera vez que enciende el
Dispositivo, no tendra ninguna aplicación en este
submenú.
En el apartado COMPARTIR, se pueden encontrar algunas
aplicaciones para comunicaciones, como el Gmail y
Chrome
En el apartado DESCUBRIR, allí tiene algunas otras
aplicaciones tales como servicios de Google Play, ASTRO
Administrador de archivos y los Mapas
Español

EN1020
7
AJUSTES
Sobre los ajustes
Redes inalámbricas
Conguración Ethernet
Sonido
Visualicación
Utilice Conguración en la iTV para congurar las conexiones de red, congurar la resolución de pantalla
y cambiar otros ajustes
Encienda Wi-Fi o desactivar: Seleccione Wi-Fi, y luego activar Wi-Fi
encendido o apagado.
Únase a una red Wi-Fi: Seleccione conguración Wi-Fi, espere a que acabe
de escanear la red inalámbrica en el campo cercano, y luego seleccione
una red. Si es necesario, introduzca la contraseña y haga clic en
conectarse.
Únete a una red Wi-Fi cerrada: Para unirse a una red Wi-Fi que no se
muestra en la lista de redes, elija Agregar Redes y escriba a continuación
las redes nombre. Si luego redes requiere una contraseña, haga clic en
Seguridad, clik el tipo de seguridad que utiliza la red, e introduzca la
contraseña
Conmutador Ethernet Activar o Desactivar: Elige Ethernet, y luego alternar
Ethernet encendido o apagado.
Únete a la red Ethernet: Elija la conguración de Ethernet, Si elige DHCP,
puede hacer clic directamente en Guardar.
Si choos IP estática, tendrá que introducir su dirección IP, la máscara, DNS
y por defecto del router y, a continuación, haga clic en Guardar.
Seleccione la salida de audio digital, y luego establecer el sonido de
noticación predeterminado.
Elija Display, y entonces puede establecer el tamaño de fuente y de la
pantalla que usted quiera.
Español

EN1020
8
EMPEZAR
Apps
Idioma y entrada
Sobre EN1020
Back & Reset
Permite la instalación de aplicaciones que no son del Market:
Cambie fuentes desconocidas a ON ó OFF.
Ajustes de idioma: entre en "idioma" y suba o baje el cursor en la
lista de idiomas, y seleccione el idioma que desee visualizar.
Ajustes de Privacidad: Seleccione la opción "Restaurar valores de
Fábrica", y luego seleccione "Reiniciar mbx"
Las Actualizaciones del sistema abre una pantalla que informa de la
disponibilidad de la actualización del software del sistema Android.
Status abre la pantalla de estado con una larga lista de información
acerca de su batería, conexión de red móvil, y otros detalles. El uso
de la batería o plumas una lista de las aplicaciones y componentes
del sistema operativo no has utilizado desde la última vez,
ordenados por la cantidad de poder que han utilizado. información
legal abre una pantalla donde se puede obtener información legal
sobre el software incluido en su dispositivo.
Español

EN1020
9
MODO DVB-T
Sobre el reproductor DVB-T
Buscar
Programa
El repreductor DVB-T arranca automáticamente cuando enciende el receptor. EL modo DVB-T se activa/desactiva desde el
mando a distancia (mirar las instrucciones del mando a distancia)
En el modo DVB-T pulse el botón MENU y entre en el apartado “Buscar”
para acceder a las siguientes opciones de búsqueda de canales:
1 - Búsqueda Automática: entre en esta opción para iniciar la búsqueda
automática de canales.
2 - Búsqueda Manual: entre en esta opción para iniciar la búsqueda
manual de canales. Pulse las echas de su mando a distancia para
congurar el Modo de Búsqueda, la Banda de Búsqueda, Canal,
Frecuencia y Ancho de Banda. Después seleccione “Búsqueda” y pulse
OK para empezar la búsqueda de canales.
3 - Área: seleccione su país. Cuando éste es España, podrá optar que la
función OCA esté activada o desactivada (OCA es la función que
organiza los canales de forma automática).
4 - LCN: ON/OFF (esta función está inhabilitada cuando selecciona
“España” en el apartaddo “Área”).
5- OCA:
On/Off (para España por defecto aparece activado)
Editar Programa:
Seleccione “Editar Programa” en el apartado PROGRAMA del menú
principal y presione el botón OK de su mando, se le pedirá una
contraseña (por defecto “0000”), una vez introducida pulse OK. En este
menú podrá borrar o bloquear canales.
EPG (Guía electrónica de programas):
Su receptor EN1020 dispone de la función EPG (Guía Electrónica de
Programas) para 7 días, para acceder a ella sólo debe pulsar el botón
MENU de su mando a distancia.
Pulse “derecha/izquierda/arriba/abajo” para ver el EPG en los siguientes
7 días. Pulse el botón VERDE para ver la información de EPG, pulse el
botón ROJO para abrir “Book list”, pulse el botón AMARILLO para “Subir
página”, pulse el botón AZUL para “Bajar página”.
Español

EN1020
10
MODO DVB-T
Ajustes PVR:
Pdrá visualizar el nombre del disco duro, el formato del disco y el tamaño del Timeshift
Gestor PVR:
Sleccione “Gestor PVR”, pulse el botón OK, se le pedirá introducir la contraseña (por defecto “0000”), entonces pulse OK
para entrar en el menú del Gesto PVR.
Time Shift:
Seleccione"TimeShifting", pulse "OK" para iniciar el Timeshift.
ista de Rellamada: 1/3/5
Activar/desactivar Subtítulos: On / Off
Restaurar los Ajustes de Fábrica:
Seleccione "Restablecer datos de fábrica", pulse el botón "OK", se preguntó
para introducir la contraseña, (La contraseña por defecto es "0000"), a
continuación, puede restaurar su APP.
Establecer contraseña:
Este menú le permite establecer una contraseña para proteger los canales
y el acceso a los menús. Entre en el menú Congurar contraseña, se le
pedirá que introduzca la contraseña de 4 dígitos (la contraseña
predeterminada es "0000")
Congurar la edad para el Control Parental:
todo / 4/5/6/7/8/9/10/11/12/13/14/15/16/17/18
Seleccione "Edad para el Control Parental", pulse el botón "OK", se le
preguntará para introducir la contraseña, (La contraseña por defecto es
"0000"), a continuación, pulse el botón "OK" para establecer la edad de
clasicación indicativa.
Región del Teletexto: Seleccione su región deseada.
Este menú le permite congurar Tamaño de imagen, el idioma de los subtítulos, idioma de audio, Política Blackout y la
alimentación de la antena.
Opciones
Sistema
Este menú le permite congurar la Lista de Rellamada, Activar/desactivar Subtítulos, Restaurar los Ajustes de Fábrica,
Congurar una contraseña para proteger canales, Congurar la edad para el Control Parental y la Región del Teletexto
Español

EN1020
11
APP
Seleccion “Media Center”, pulse OK para entrar en el menú Media
Center, buscará el dispositivo DMS automáticamente, entonces
podrá reproducir archivos desde un dispositivos DMS tales como
archivos de música, vídeo, imágenes, etc.
NOTA:
Soporta Air Player para pantalla de red iOS
Media Center
Español

EN1020
12
SOLUCIÓN DE PROBLEMAS
En alguna región, la señal digital terrestre puede ser débil.
Problema Posible causa Qué hacer
Español

12V 1A
EN1020
ESPECIFICACIONES
SINTONIZADOR Y CANAL
DECODIFICADOR
· Decodicador de vídeo
· Decodicador de audio
· Rango de Entrada
· Formatos de vídeo
· Formatos de audio
· Salida de Vídeo
· CONECTOR DE ENTRADA RF x1
(IEC-TYPE, IEC 169-2, HEMBRA)
· RANGO DE FRECUENCIA:
177.5MHz ~ 226.5 MHz (VHF)
474 MHz ~ 858 MHz (UHF)
· NIVEL DE SEÑAL:
-15 ~ -70 DBm
MPEG-1 / MPEG-2 MP @ ML /
MPEG-4 AVC / H.264 HP @ L3
MPEG-1 Layer 1,2
PCM 7HE-AAC V1.0
Dolby D + Y Dolby D
MAX. 15 Mbit / s
Pantalla completa / 4: 3/4: 3 Letter
Box / 4: 3 PAN SCAN / 4: 3
COMBINADO / 16: 9/16: 9 BUZÓN /
16: 9 PAN SCAN / 16: 9 COMBINADO
MPEG Layer I & II, 32 / 44,1 / 48 kHz
CVBS, HDMI
CONEXIÓN
· Cable de alimentación principal
· Sintonizador
· Puerto de Datos
· Tarjetas SD
· Ethernet
· Salida AV
· Salida HDMI
FUENTE DE ALIMENTACIÓN
· Entrada DC
TIPO FIJO
Entrada RF x1
entrada USB x2
x1
x1
x1
x1
NOTA: El diseño y las especicaciones están sujetas a cambios sin previo aviso.
Fabricado bajo licencia de Dolby Laboratories. Dolby y el símbolo
de la doble D son marcas comerciales de Dolby Laboratories.

ESPAÑOL
5
ANDROID + DVB-T2 receiver
ENGLISH
Screens may differ from final product release

EN1020
SAFETY INFORMATION
TO REDUCE THE RISK OF FIRE AND ELECTRIC SHOCK, DO NOT EXPOSE THIS UNIT TO RA IN OR
MOISTURE.
IMPORTANT SAFEGUARDS
: To reduce the
risk of fire and electric shock, do
not remove the cover (or back panel)
of the unit. Refer servicing to qualified service personnel.
The lightning flash with arrow head symbol, within an equilateral
triangle, is intended to alert the user to the presence of uninsulated
"dangerous voltage" within the product's enclosure that may be of
sufficient magnitude to constitute a risk of electric shock.
The exclamation point within an equilateral triangle is intended to
alert the user to the presence of important operation and servicing
instructions in the literature accompanying the appliance.
WARNING: TO REDUCE THE RISK OF FIRE OR ELECTRIC SHOCK, DO
NOT EXPOSE THIS APPLIA NCE TO RA IN OR MOISTURE.
CA UTION: TO PREVENT ELECTRIC SHOCK, MATCH WIDE BLADE OF
PLUG TO WIDE SLOT AND FULLY INSERT.
In addition to the careful attention devoted to quality standards
in the manufacturing of your set-top box, safety is a major factor
in the design of every instrument. However, safety is your
responsibility, too. This sheet lists important information that will
help assure your enjoyment and proper use of the set-top box
and its accessories. Please read them carefully before installing
and operating your set-top box.
Installation
10.
11.
11a.
12.
13.
14.
15.
16.
17.
18.
19.
20.
21.
22.
CAUTION
The apparatus shall not be exposed to dripping or splashing, and no
objects filled with liquids, such as vases, shall be placed on the apparatus.
1.
2.
3.
4.
5.
6.
7.
8.
9.
Read and Follow Instructions- All the safety and operation instructions
should be read before the set-top box is operated. Follow all operating
instructions.
Retain Instructions- The safety and operating instructions should be
retained for future reference.
Heed all Warnings-Comply with all warning
s on the set-top box and
operating instructions.
Power - This set-top box is supplied with a DC power. To prevent
electric shock, ensure the adaptor is inserted correctly into
the power outlet.
Power Sources- This set-top box should only be operated with the
ratting specified on the label on the back panel of the set-top box.
If you are not sure of the type of power supply to your home or office,
please consult your set-top box dealer or electrician. For set-top boxes
intended to operate from battery power, or other sources, refer to the
operating instructions.
Overloading- Do not ove
rload wall outlets or extension cords as this can
result in a risk of fire or electric shock. Overloaded AC outlets, extension
cords, frayed power cords, damaged or cracked wire insulation, and
broken plugs are dangerous, They may result in a shock or fire hazard.
Periodically examine the cord, and if its appearance indicate damage or
deteriorated insulation, have it replaced by your service technician.
Power-Cord Protection- Power-supply cords should be routed so that
they are not likely to be walked on or damaged by items placed upon or
against them, paying particular a
ttention to the point where they exit
from the set-top box.
Ventilation- Slots and openings in the case are provided for ventilation
to ensure reliable operation of the set-top box and to protect it from
overheating. These openings must not be blocked or covered. The
openings should never be blocked by placing the set-top box on a
bed, sofa, rug, or heat register. This set-top box should not be placed in a
built-in installation such as a book case or rack, unless proper ventilation
is provided or the set-top box manufacturer's instructions have been
followed.
Attachments- Do no
t use attachments unless recommended by the
set-top box manufacturer as they may cause hazards.
The apparatus shall not be exposed to dripping or splashing and no objects
filled with liquids ,such as vases shall be placed on the apparatus.
Caution: Maintain electrical safety. Powerline operated equipment or accessories
connected to this unit should bear safety certification mark on the accessory itself
and should not be modified so as to compromise the safety features. This will help
avoid any potential hazard from electrical shock or fire. If in doubt, contact a
qual
ified service personnel.
Accessories- Do not place this set-top box on an unstable cart, stand, tripod,
bracket, or table. The set-top box may fall, causing serious injury to a child or
adult as well as serious damage to the set-top box. Use this set-top box only
with a cart, stand, tripod, bracket, or table recommended by the manufacturer's
or sold with the set-top box. Any mounting of the product should follow the
manufacturer's instructions and use of a mounting accessory recommended by
the manufacturer.
A set-top box and cart combination should be moved with care. Quick sto
ps,
excessive force, and uneven surfaces may cause damage to the set-top box.
Outdoor Antenna Grounding- If an outside antenna or cable system is connected to
the set-top box, be sure the antenna or cable system is grounded so as to provide
some protection against voltage surges and built-up static charges. Section 810 of
the National Electrical Code, ANSI/NFPA No.70-1984 (Section 54 of Canadian
Electrical Code, Part1) provides information with respect to proper grounding of
the mast and supporting structure, grounding of the lead-in wire to an antenna-
discharg
e unit, connection to grounding electrodes, and requirements for the
grounding electrode.
Power Lines-A n outside antenna system should not be located in the vicinity of
overhead power lines, other electric light or power circuits, or where it can fall into
such power lines or circuits. When installing an outside antenna system, extreme
care should be taken to keep from touching or approaching such power lines or
circuits, as contact with them might be fatal. Installing an outdoor antenna can be
hazardous and should be left to a professional antenna installer.
Use
Cle
aning- Unplug the set-top box from the wall outlet before cleaning.
Do not use liquid cleaners or aerosol cleaners. Use a damp cloth for cleaning.
Objects that may touch dangerous voltage points or "short-out" parts could result in
a fire or electric shock. Never spill liquid of any kind on the set-top box.
Lightning-For added protection for this set-top box during a lightning storm, or
when it is left unattended and unused for long periods of time, unplug it from the
wall outlet and disconnect the antenna or cable system. This will prevent damage to
the set-top box due to lightning and pow
er line surges.
Service
Servicing-Do not attempt to service this set-top box yourself, as opening or
removing covers may expose you to dangerous voltage or other hazards. Refer all
servicing to qualified service personnel.
Conditions Requiring Service-Unplug the set-top box from the wall outlet and
refer servicing to qualified service personnel under the following conditions:
A. When the DC power adaptor or connecting power cord is damaged.
B. If liquid has been spilled, or objects have fallen into the set-top box.
C. If the set-top box has been exposed to rain or w
ater.
D. If the video does not operate normally by following the operating
instructions.
Adjust only those controls that are covered by operating instructions.
Improper adjustment of other controls may result in damage and will often
require extensive work by a qualified technician to restore the set-top box
to its normal operation.
E. I f the set-top box has been dropped or cabinet has been damaged.
F. W hen the set-top box exhibits a distinct change in performance-this
indicates a need for service.
Replacement Parts-When replacement parts are require
d, have the service
technician verify that the replacements he uses have the same safety characteristics
as the original parts. Use of replacements specified by the set-top box manufacturer
can prevent fire, electric shock, or other hazards.
Safety Check-Upon completion of any service or repairs to this set-top box, ask
the service technician to perform safety checks recommended by the manufacturer
to determine that the set-top box is in safe operating condition.
Wall or Ceiling Mounting- The product should be mounted to a wall or ceiling only
as recommended by the m
anufacturer.
Heat-The product should be situated away from heat sources such as radiators,
heat registers, stoves, or other products (including amplifiers) that produce heat.

SAFETY INFORM ATION
Product Appearance
Front pane
l
Rear panel
Right &Lef
t
Remote cont ro
l
SY STEM CONNECTION
Connect t o t he TV
GETTING STARTED
Welcome Screen
Initial Conf iguration
HOM E SCREEN
Main Screen Theme
SETTINGS
About Settings
Wireless Networks
Ethernet Conf iguration
Sound
Display
Apps
Language&Input
Back up&reset
About EN1020
DTV PLAY ER
About DTV Player
Search
Program
System
Opt ion
APPs
Media Center
TROUBLESHOOTING
SPECIFICATIONS
EN1020
CONTENTS
1
1
1
2
3
4
4- 5
6
7
7
7
7
7
8
8
8
8
9
9
9- 10
10
10
11
12

EN1020
Product appearance
1
English
Front panel
Remote sensor
St andby
Power I ndicat or
Net I ndicator
Rear panel
A V out put
SD card slot
TV aerial
f or an external T V aerial
LA N port
HDM I output
DC M ains
Right & Left
USB USB
Recovery
RECOVERY

Remote Control
EN1020
Product appearance
1
2
3
4
5
6
7
8
9
10
11
12
13
14
15
OK b utton
(Press to enter)
A UDIO
(Select a udio mode and audio t rack)
8
9
11
10
12
13
15
14
5
6
7
EPG
(Open up Elect ronic Program Guide M enu)
Cursor
VOL + / -
(VOL+/- :Volume Up and Down)
M UTE (Turn of f /on the volume)
H
Or switch between DVB-T and Android
modes when pressing 2 times.
OM E (back t o the home screen)
Numeric entry
(Enter numeric values and select t he
channel direct ly by ent ering it 's number)
RED/GREEN/Y ELLOW/BLUE Buttons
(For interact ive f unct ion/Submenu
funct ion buttons)
SUBTITLE (On/Of f S ubt it le)
1
2
3
STA NDBY
4
TX T
M enu
(Open and close the menu f or A PP))
BA CK
(Switch t o previous menu)
DVB (enter t o t he DVB mode)
2
English

Connect to the TV
There are many dif f erent t ypes of T V and other equipment t hat you can connect t o t he BOX .
In t his manual you will see some of t he most common ways to connect your equipment .
EN1020
SYSTEM CONNECTION
HDM I T V
A ntenna
HDM I cable
AV cable
(not included)
LAN cable
(not included)
RF cable
(not included)
Not e:
1. Needn't connect b ot h A V cable and HDM I cable with your T V set concurrently,
choose eit her of t hem under your circumst ance, however HDM I connect ion is
recommended f or better pict ure quality.
2. Do not plug/unplug HDM I or A V connector while media center power i s on.
3. Power i ndicat or will t urn green when media center power on, and turn red when
media center goes st andby.
4. Net i ndictator will t urn red when home net work i s connected, and turn green when
internet gets through.
3
English

Initial Configuration
Welcome Screen
EN1020
Step1: Select your f avorite language
GETTING STARTED
Step2: Set up Wired Network o r Wi-Fi
Step3: Select your country
When you open the box, the " Welcome" m enu appears like blow.
4
English

EN1020
GETTING STARTED
Step5: Engeldroid has locking system of content and
applications to protect children from the home.
When Engel detects some applications or protected
content we will ask f or a pass word.
Y ou can jump this step
Step4: Connect t o Google account or jump
Step6: Click " Finish" t o f inish this setup.
NOTE:
Miracast i s activated after your box starts up. Make sure your mobile device and the box are
in the same Wifi.
5
English

EN1020
Main Screen Theme
HOME SCREEN
After you turn on your Box, Home opens. There are 7 items
(WATCH, LISTEN, PLAY, SHARE, DISCOVER, MY APPS & SETTINGS)
on the screen:
In t he WA TCH item, there are apps such as M X P layer and
X BM C which is forwat ching programs.
WATCH
LISTEN
In t he LISTEN it em, there has app such as the Google Play
M usic for music playing.
PLAY
In t he PLA Y i tem, there will have apps for playing, but i f t his
is your f irst t ime opening the Box, there would have no app
in this submenu, and it will warn you lik e t he screen shows.
SHARE
In t he SHA RE item, you can f ind some apps for communications
such as the Gmail a nd the Chrome.
DISCOVER
In t he DISCOVER i t em, there has some other apps such as the
Google Play services, A STRO File M anager and the M aps.
6
English

SETTINGS
EN1020
About Settings
Use Settings on the iTV to configure network connection, set display resolution, and change other settings.
Wireless Networks
Turn Wi-Fi on or off : Choose Wi-Fi, and then turn Wi-Fi on
or off.
Join a Wi-Fi network: Select W i-Fi setting, wait f or
completion of scanning wireless networks in the f ield, and
then select a network.
If necessary, enter the password and then click connect.
Join a closed Wi-Fi network: To join a Wi-Fi network t hat
isn't shown in the list of networks, choose A dd Network,
and then enter the network name. If t he network requires
a password, click Security, click t he type of security the
network uses, and enter the password.
Ethernet Configuration
Ethernet Switch On or Of f: Choose Ethernet, and then toggle
Ethernet on or off.
Join Ethernet network: Choose Ethernet conf iguration,
If choose DHCP, you can click Save directly.
If choos Static IP, you will need to input your IP address, Mask,
DNS and Default R outer, and then click Save.
Sound
Choose Digital audio output, and then set Def ault notification
sound and Touch sounds.
Display
Choose Display, and then you can set Font size and Cast screen.
7
English

SETTINGS
EN1020
Apps
Allow installation of non-Market applications:
Turn unknown sources on or off.
Language & input
Language Setting: enter " language" a nd move up or down
the cursor in language list, and select t he language you
want t o use.
Back & reset
Privacy settings: Choose " Factory data reset" , and then
select " Reset mbx" .
About EN1020
System updates Opens a screen that reports on the
availability of A ndroid system software update.
Status Opens the Status screen with a long list of i nformation
about your battery, mobile network connection, and other
details. Battery use opens a list of t he applications and
operating system components you have used since you last
charged the stick, sorted by the amount of power they have
used. Legal inf ormation opens a screen where you can obtain
legal inf ormation about t he software included with your stick.
8
English

EN1020
About DTV player
DTV player running aut omat ic while t urn on the receiver. DTV player would be t urn on/of f
on the remot e cont rol (Ref er t o Remot e Control i nst ruct ion).
Search
DTV PLAYER
This menu allows you to set A uto Scan, Manual Scan, NIT Scan,
Aera and LCN.
Auto Scan:
Press " UP" a nd " DOWN" b utton to select " Auto
Scan" , then press " OK " b utton to search the
program.
Manual Scan:
Select n" , press the " OK" b utton Manual Scan
to enter the Scan menu.Manual
Press cursor button to set Scan mode, Scan
Band, Channel, Frequency and Bandwidth,
then highlight " Search" , press " OK " button to start channel scan .
Area:
Select your country. (When you select Spain, you can set OCA o n/off)
LCN:
O
OCA:
On/Off (for Spain is ON by default)
n/Of f (This menu is invalid when selected " Spain" i n Area option) .
Program
Program Edit:
Select " Program Edit" , press " OK" b utton, you asked to
input t he password, (The def ault password is" 0000" ),
then press OK button to enter the programedit menu.
Y ou can use this menu to delete, lock channel.
EPG( :Electronic Program Guide)
The receiver support 7 days EPG. Press Lef t/Right,
Up/Down but ton to look f or EPG in the next 7 days.
Press GREEN button to view EPG inf ormation, press
RED button to open BOOK L ist , press Y ELLOW b utt on
to PA GE UP, press BLUE but ton to PA GE DOWN.
9
English

EN1020
DTV PLAYER
You can view Disk name, Format Disk a nd set T imeshift Size.PVR Conf igure :
PVR M anager:
Select " PVR M anager" , press " OK" button, you asked to input t he password,(The default password
is" 0000" ), then press OK b utton to enter the PVR Manager menu.
Time Shif ting:
Select " TimeShif ting" , press " OK " button to start t imeshif t.
System
This menu allows you to set R ecall List, Subtitle Switch, Factory data reset, Set password,
Parental rating age and TTX R egion.
Recall List:
1/3/5
Subtitle Switch:
On/Of f
Factory data reset:
Select " Factory data reset" , press " OK" b utton, you asked to
input t he password,(The def ault password is" 0000" ), then
you can reset your A PP.
Set password:
This menu allows you to set p assword t o protect channels
and access to all menu. Enter Set password menu, you will
be ask ed t o enter 4- digits password (The def ault password
is" 0000" ).
Highlight " New Password" ,Input new password.
Input p assword again t o conf irm.
(The def ault p assword is" 0000" )
Parental rating age:
Select " Parental rating age" , press " OK " b utton, you asked to input t he password,(The def ault
password is" 0000" ), then press " OK " b utton to set parental rating age.
all/4/5/6/7/8/9/10/11/12/13/14/15/16/17/18
TTX R egion:
Select your desired region.
Option
This menu allows you to set Picture Size, Subtitle Language, Audio Language,
Blackout Policy and Antenna Power.
10
English

EN1020
APPs
Media Center
Select " Media Center" , press OK button to enter the media
center menu, it will search the DM S device automatically,
then you can play the f iles from DM S device such as playing
music, video, picture, etc.
NOTE:
Air Player support f or ios net work display
11
English

In some region, the digital terrestrial signal may be weak. So you'd better use the antenna in
which the booster was built,for watching the weak signal channels.
Problem
Standby light not lit
No signal found
No picture or sound
Scrambled channel
message
No response to remote
control
Forgotten channel lock
code
Forgotten menu lock
code
The remote control will
not operate your STB
After moving the STB to
another room you find you
are no longer able to
receive digital reception
Possible cause What to do
Mains lead unplugged
Mains fuse blown
Aerial is disconnect
ed
Aerial is damaged/misaligned
Out of digital signal area
Scart/AV is not selected on your TV
Channel is scrambled
Receiver off
Handset not aimed correctly
Front panel obstructed
Hand set batteries exhausted
(1) The batteries in your remote
control need replacing
(2) There is an obstruction
blocking the signal path
between the remote control
and the box.
The aerial feed former new point
may come through a distribution
system which may reduce the
digital signal now received by the
box.
Check mains lead
Check fuse
Check aerial lead
Check aerial
Check wi
th dealer
Reduce to another channel
Select alternative channel
Plug in and turn on plug
Aim handset at front panel
Check for obstructions
Replace handset batteries
Re-install channels to cancel
channel lock
Contact help line
(1) Replace the batteries
(2) Check that there is nothing in
the way of the path between
the remote control and the
receiver
Try a direct feed from the antenna
EN1020
TROUBLESHOOTING
12
English

Design and Specifications are subject to change without notice.
RF INPUT CONNECTOR x1
(IEC-TYPE, IEC169-2, FEMALE)
FREQUENCY RA NGE:
177.5MHz~226.5MHz(VHF)
474MHz ~858MHz (UHF)
SIGNAL LEVEL:
-15 ~ -70 dbm
MAX. 15Mbit/s
Full Screen/4:3/4:3 letter box/4:3 PAN SCAN
/4:3 COMBINED/16:9/16:9 LETTER BOX/
16:9 PAN SCAN/16:9 COMBINED
CVBS, HDMI
MPEG Layer I & II, 32 / 44.1 / 48KHz
FIXED TYPE
RF INx1
x1
12V 1A
x1
MPEG-1/MPEG-2 MP@ML/
MPEG-4 AVC/H.264 HP @L3
MPEG-1 Layer 1,2
PCM/HE-A AC V1.0
Dolby D+ and Dolby D
x1
NOTE:
USB slot x 2
EN1020
SPECIFICATIONS
TUNER & CHA NNEL
DECODER
Video decoder
Audio decoder
VIDEO FORMATS
AUDIO FORMATS
VIDEO OUTPUT
INPUT RA TE
CONNECTION
MAIN POWER CABLE
TUNER
TF CA RD
LAN
POWER SUPPLY
DC INPUT
AV OUTPUT
DATA PORT
HDMI OUTPUT
x1
Manufactured under license from Dolby Laboratories. Dolby and
the double-D symbol are trademarks of Dolby Laboratories.

ENGLISH
7
Récepteur ANDROID + DVB-T2
FRANÇAIS
Le visuel peut être différent du produit final

EN1020
INFORMATION DE SÉCURITÉ

EN1020
1
1
1
2
3
4
4- 5
6
7
7
7
7
7
8
8
8
8
9
9
9- 10
10
10
11
12
TABLE DES MATIÈRES
INFORMATION DE SÉCURITÉ
Aperçu du produit
Face avant
Face arrière
Droite & Gauche
Télécommande
COMMEXION SYSTÈME
Connexion à la TV
DÉMARRAGE
Écran de bienvenue
Conguration initiale
ÉCRAN D’ACCUEIL
Thème de l'écran principal
RÉGLAGES
À propos des réglages
Réseau Sans-l
Conguration Ethernet
Audio
Afchage
Applications
Langue & Saisi
Sauvegarde & réinitialisation
À propos de l' EN1020
RÉCEPTEUR TNT
À propos du récepteur TNT
Recherche
Programme
Système
Option
APPLICATIONS
Media Center
DLNA
PROBLÈMES
SPÉCIFICATIONS

EN1020
1
USB USB
RECOVERY
APERÇU DU PRODUIT
Face avant
Face arrière
Mise en veille
Indicateur d'alimentation Capteur de la télécommande
Indicateur Internet
Sortie HDMI
Réinitialisation
Prise Alimentation
Sortie AV
Port LAN
Fente carte SD
Prise Antenne
TV pour une
antenne TV extérieure
Droite & Gauche
Français

EN1020
1
2
3
4
5
6
7
8
9
10
11
12
13
14
15
8
9
11
10
12
13
15
14
5
6
7
1
2
3
4
2
APERÇU DU PRODUIT
Télécommande
MISE EN VEILLE: appuyez sur le bouton pour
activer ou reposer votre récepteur EN1020
BOUTONS ROUGE / VERT / JAUNE / BLEU
(Boutons pour les fonctions interactives/-
Sous-menu)
SOUS-TITRES(Activer/Désactiver les sous-titres)
TÉLÉTEXT: Appuyez pour accéder au Télétexte
MENÚ: Ouvre et ferme le menu de
l'application
CURSEUR
BOUTON OK: Appuyer pour entrer
EPG:Ouvre le menu du Guide Electronique
des Programmes
TOUCHE NUMÉRIQUE: Entrer les valeurs
numériques et sélectionner directement une
chaîne en entrant son numéro
AUDIO: Choisir le mode et la piste audio
SOURDINE: Couper/Remettre le volume
VOLUMEN: Vol +/-: Augmenter et Baisser le
volume
ACCUELI: retourner au menu principal et pour
basculer entre DVB-T et le mode Android
lorsqu'il est pressé 2 fois
RETOUR: Basculer au menu précédent
DVB: entrer dans le mode DVB
Français

EN1020
3
Connexion Système
Connexion à la TV
l y a beaucoup de types différents de TV et autres équipement auquel vous pouvez
connecter la BOX. Dans ce manuel vous verrez certaines des façons les plus communes de
connecter votre équipement.
Antenne
Câble Coaxial
(non inclus)
Câble AV
(non inclus)
Câble HDMI
Câble Ethernet
(non inclus)
TV HDMI
Nota:
1. Nul besoin de connecter les câbles AV et HDMI en même temps sur votre TV, choisissez l'un d'eux selon
vos besoin, cependant la connexion HDMI est recommandée pour une meilleure qualité d'image.
2. Ne pas brancher/débrancher le câble HDMI ou AV lorsque le produit est alimenté
3. L'indicateur d'alimentation sera vert lorsque le produit est allumé, et sera rouge lorsque celui-ci sera en
veille.
4. L'indicateur Internet sera rouge lorsque le réseau local est connecté, et sera vert lorsqu'une connexion
internet est active.
Français

EN1020
4
Démarrage
Écran de Bienvenue
Conguration Initiale
Lorsque vous allumerez la box, le menu "Bienvenue" ci-dessous
Étape 1: Sélectionner la langue
Étape 3: Sélectionner votre pays;
Étape 2: Régler le réseau laire ou Wi-Fi;
Français

EN1020
5
DÉMARRAGE
Étape 4: Connexion à un compte Google ou passer;
Étape 5: L'Engeldroid a un système de verrouillage
du contenu et des applications an de protéger les
enfants de la maison.
Lorsque celui-ci détecte une application ou contenu
protégés, il vous demandera un mot de passe.
Vous pouvez passer cette étape.
Étape 6: Cliquer sur "Terminer" pour nir le réglage
NOTE:
Miracast est activé une fois votre box démarrée. Assurez-vous que votre périphérique mobile et la box
sont sur le même réseau.
Français

EN1020
6
ÉCRAN D'ACCUEIL
Thème de l'écran Principal
Une fois votre box démarrée, l'Accueil s'ouvre. Il y a 5
icônes (Regarde, Écouter, Jouer, Partager, Découvrir) sur
l'écran.
Il y a les classications de certaines applications.
Dans l'icpône REGARDER, il y a des applications tels que
MX Player et XBMC lesquelles servent à regarder des
programmes.
Dans l'icône ÉCOUTER, il y a des applications tels que
Google play Music pour écouter de la musique.
REGARDER
ÉCOUTER
JOUER
PARTAGER
DÉCOUVRIR
Dans l'icône JOUER, il y a des applications pour jouer,
mais si c'est la première fois que vous utilisez votre Box, il
n'y aura pas d'applications dans ce sous-menu, et il vous
en avertira comme sur l'écran.
Dans l'icône PARTAGER, vous trouverez des applications
pour la communication tels que Gmail et Chrome.
Dans l'icône DÉCOUVRIR, il y a quelques autres
applications tels que Google Play Services, Astro File
Manager et Maps.
Français

EN1020
7
RÉGLAGES
À propos des réglages
Réseau Sans-l
Conguration Ethernet
Audio
Afchage
Utiliser les réglages sur la iTV pour congurer la connexion réseau, la résolution d'afchage et changer
d'autre réglages.
Allumer ou éteindre le WiFi: Choisir WiFi,puis allumer ou couper le WiFi.
Rejoindre un réseau WiFi: Sélectionner le réglages WiFi, attendre que la
recherche des réseaux WiFi soit terminée, puis sélectionner un réseau.
Si besoin, entrer le mot de passe et appuyer sur Se connecter.
Rejoindre un réseau WiFi fermé: Pour rejoindre un réseau WiFi qui
n'apparaît pas dans la liste des réseaux, choisir Ajouter Réseau, puis entrer
le nom du réseau. Si le réseau nécessite un mot de passe, cliquer sur
Sécurité, cliquer sur le type de sécurité utilisé par le réseau et entrer le mot
de passe.
Allumer ou éteindre l'Ethernet: Choisir Ethernet puis basculer sur on ou
off.
Rejoindre un réseau Ethernet: Choisir Conguration éthernet, si vous
choisissez DHCP, vous pouvez cliquer directement sur Sauvegarder.
Si vous choisissez IP Statique, vous devrez entrer votre adresse IP, le
Masque de sous-réseau, le DNS et la passerelle par défaut, puis cliquer sur
Sauvegarder.
Choisir la sortie audio numérique, régler le son par défaut des notications
et le son des touches.
Choisir Afchage, vous pourrez régler la taille de la police et le fond
d'écran.
Français

EN1020
8
RÉGLAGES
Applications
Langue & Saisi
À propos de l'EN1020
Sauvegarder & Réinitialiser
Permettre l'installation des applications Non-market: Activer ou
désactiver les Sources Inconnues
Réglages de la Langue: Entrer dans "Langue" puis déplacer le
curseur de haut en bas dans la liste des langues puis sélectionner la
langue que vous souhaitez utiliser.
Réglages Privés: Choisir "Restaurer les valeurs d'usines" puis
sélectionner "Réinitialisation MBX".
Mise à jour: Ouvre un écran qui informe de la disponibilité d'une
mise à jour du système Android.
État: ouvre l'écran de l'état avec une longue liste d'information au
sujet de votre batterie, connexion au réseau mobile et d'autres
détails. utilisation de la batterie ouvre une liste des applications et
des fonctions système que vous avez utilisé depuis la dernière
charge, trié par la consommation de batterie.
Informations Légales: ouvre un écran où vous pouvez obtenir les
informations légales au sujet du logiciel.
Français

EN1020
9
Récepteur TNT
Propos du récepteur TNT
Recherche
Programme
Le récepteur TNT démarre automatiquement lorsque vous allumer le récepteur. Le récepteur TNT peut être allumer/éteint
grâce à la télécommande. (Se référer aux instructions de la Télécommande)
Ce menu vous permet de régler les Recherche Auto, Recherche
Manuelle, Recherche NIT, Pays et LCN.
1 - Recherche Auto: Appuyer sur "HAUT" et "BAS" pour sélectionner
"Recherche Auto", puis appuyer sur "OK" pour rechercher les chaînes.
2 - Recherche Manuelle: Sélectionner "Recherche Manuelle", appuyer sur
"OK" pour entrer dans ce menu.
Utiliser le curseur pour régler le mode et bande de recherche, le canal, la
fréquence et la largeur de bande, puis choisir "Recherche" et appuyer
sur "OK" pour lancer la recherche.
3 - Recherche NIT: Appuyer sur "HAUT" et "BAS" pour sélectionner
"Recherche NIT", puis appuyer sur "OK" pour entrer dans ce menu.
4 - Pays: Sélectionner votre pays. (Lorsque vous choisissez Espagne, vous
pouvez régler l'OCA)
5- LCN: Activer/Désactiver(Ce menu n'est pas disponible si vous
choisissez "Espagne")
Éditer programmes:
Sélectionner "Éditer Programme" et appuyer sur "OK", on vous
demandera d'entrer le mot de passe (par défaut "0000"), puis appuyer
sur "OK" pour entrer dans le menu de programmation. Vous pouvez
utiliser ce menu pour effacer, verrouiller les chaînes.
EPG (Guide Electronique des Programmes):
Le récepteur supporte un EPG à 7 jours. Appuyer sur
Gauche/Droite/Haut/Bas pour rechercher l'EPG des 7 prochains jours.
Appuyer sur le bouton VERT pour voir les informations EPG, appuyer sur
le bouton ROUGE pour ouvrir la liste de PROGRAMMATION, appuyer sur
le bouton JAUNE pour monter de page et appuyer sur le bouton BLEU
pour descendre de PAGE.
Français

EN1020
10
Récepteur TNT
Réglage PVR:
Vous pouvez voir le nom et le format du disque et régler la taille du Timeshift.
Gestion PVR:
Sélectionner "Gestion PVR", appuyer sur "OK" et on vous demandera d'entrer le mot de passe (par défaut "0000") puis
appuyer sur "OK" pour entrer dans ce menu.
Time Shift:
Sélectionner "TimeShifting" et appuyer sur "OK" pour le démarrer.
Liste de Rappel: 1/3/5
Sous-titres: Activer/Désactiver
Restaure Valeurs d'Usines:
Sélectionner "Restaurer Valeurs d'Usines" et appuyer sur "OK", on vous
demandera d'entrer le mot de passe (par défaut "0000")puis vous pourrez
réinitialiser votre Récepteur.
Régler le mot de passe:
Ce menu vous permet de régler le mot de passe pour protéger les chaînes
et l'accès à tous les menus. Entrer dans le menu "Régler Mot de Passe", on
vous demandera d'entrer un mot de passe de 4 caractères (Le mot de
passe par défaut est "0000"). Mettre en surbrillance "Nouveau Mot de
Passe", et entrer le nouveau mot de passe. Entrer-le à nouveau pour le
conrmer. (Le mot de passe par défaut est "0000").
Contrôle parental:
Tout/4/5/6/7/8/9/10/11/12/13/14/15/16/17/18.
Sélectionner "Contrôle Parental", puis appuyer sur "OK", on vous
demandera le mot de passe (le mot de passe par défaut est "000"), puis
appuyer sur "OK" pour régler le niveau du contrôle parental.
Région TXT: Sélectionner votre région.
Ce menu vous permet de régler la Taille de l'image, la Langue des Sous-titres, la Langue Audio, la politique de panne et
l'Alimentation d'Antenne.
Options
Système
Ce menu vous permet de régler la Liste de Rappel, Sous-titre, restaurer les valeurs d'usines, Régler le mot de passe,
Contrôle parental et la Langue TXT.
Français

EN1020
11
APPLICATIONS
Sélectionner "Média Center", appuyer sur "OK" pour entrer dans
ce menu, il recherchera le périphérique DMS automatiquement,
alors vous pourrez lire des chiers depuis le périphérique DMS tels
que de la musique, vidéo, image, ect...
NOTA:
L'Air player supporte l'afchage pour réseau ios.
Media Center
Français

EN1020
12
PROBLÈME
Dans certains pays, le signal numérique terrestre peut être faible. Donc vous devrez utiliser une
antenne avec un amplicateur intégré, pour recevoir les canaux avec un faible signal.
Pas de lumière de Mise en
veille
Prise principale débranchée
Fusible principal brûlé
Vérier l'alimentation principale
Vérie le fusible
Antenne déconnectée
Antenne est endommagée/désorienté
Hors de la zone de réception
Vérier la prise d'antenne
Vérier l'antenne
Vérier chez votre revendeur
Pas de signal trouvé
Pas d'action de la
télécommande
Oubli du code de verrouillage
des chaînes
Oubli du code de verrouillage
des menus
La télécommande n'agit pas
sur votre récepteur
Après avoir déplacé le STB
dans une autre pièce, vous
trouvez que vous n'êtes plus
en mesure de recevoir la
réception numérique
Pas d'image, ni son
Péritel/AV n'est pas sélectionné sur
votre TV
Réduire à une autre chaîne
Sélectionner une autre chaîne
Réinstaller les chaînes pour annuler
le code de verrouillage
(1) Remplacer les piles
(2) Vérier qu'il n'y a rien sur le
chemin entre la télécommande et
la box.
Essayer une prise directe depuis
l'antenne
Contacter la Hotline
Message Chaîne cryptée Chaîne cryptée
Récepteur éteint
Télécommande non dirigé correctement
Face avant obstruée
Piles de télécommande épuisées
Brancher et allumer le
Diriger la télécommande vers la face avant
Vérier qu'il n'y a pas d'obstructions
Remplacer les piles de la télécommande
(1) Les piles de la télécommande ont
besoin d'être remplacées.
(2) Il y a une obstruction qui bloque le
signal entre la télécommande et la box.
Le nouveau point de réception de
l'antenne peut arriver par un système
de distribution qui peut réduire la
force du signal.
Problème Cause possible Quoi faire
Français

12V 1A
EN1020
SPÉCIFICATIONS
TUNER & CANAUX
Décodeur
· Décodeur Vidéo
· Décodeur Audio
· Débit d'entrée
· Formats Vidéo
· Formats Audio
· Sortie Vidéo
· Connecteur d'entrée RF x1
(IEC-TYPE, IEC 169-2, FEMELLE)
· Bande de fréquence:
177.5MHz ~ 226.5 MHz (VHF)
474 MHz ~ 858 MHz (UHF)
· Niveau de signal:
-15 ~ -70 DBm
MPEG-1 / MPEG-2 MP @ ML /
MPEG-4 AVC / H.264 HP @ L3
MPEG-1 Layer 1,2
PCM 7HE-AAC V1.0
Dolby D + et Dolby D
MAX. 15 Mbit / s
Plein Écran / 4: 3/4: 3 Letter Box / 4:
3 PAN SCAN / 4: 3 COMBINADO / 16:
9/16: 9 BUZÓN / 16: 9 PAN SCAN /
16: 9 COMBINADO
MPEG Layer I & II, 32 / 44,1 / 48 kHz
CVBS, HDMI
Connexion
· Câble d'alimentation principal
· Tuner
· Port de donnée
· Carte Mémoire
· LAN
· Sortie AV
· Sortie HDMI
Alimentation
· Entrée Alimentation
Type Fixe
1x Entrée RF
Fente USB x2
x1
x1
x1
x1
NOTA: Le Design et les Spécications sont sujet aux changements sans avertissement
Fabriqué sous licence de Dolby Laboratories. Dolby et le symbole
double-D sont des marques déposées de Dolby Laboratories.

FRANÇAIS
9
Ricevitore ANDROID + DVB-T2
Italiano
Le schermate possono di erire dalla versione nale del prodotto

EN1020
ISTRUZIONI DI SICUREZZA

EN1020
1
1
1
2
3
4
4- 5
6
7
7
7
7
7
8
8
8
8
9
9
9- 10
10
10
11
12
TABLE DES MATIÈRES
INFORMAZIONI DI SICUREZZA
Aspetto del prodotto
Pannello anteriore
Pannello Posteriore
Destra e Sinistra
Telecomando
CONNESSIONI
Collegamento al TV
INIZIARE
Schermata iniziale
Congurazione iniziale
SCHERAMATA INIZIALE
Tema dello schermo Principale
IMPOSTAZIONI
Informazioni sulle
impostazioni
Reti wireless
Congurazione Ethernet
suono
display
Apps
Lingua e immissione
Backup e ripristino
A proposito di EN1020
DTV PLAYER
A proposito diDTV Player
Cerca
Programma
Sistema
Opzioni
APPs
Media Center
DLNA
RICERCA GUASTI
SPECIFICHE

EN1020
1
USB USB
RECOVERY
DETTAGLI PRODOTTO
Pannello Frontale
Pannello Posteriore
Standby
Indicatore Alimentazione
Sensore Telecomando
Indicatore Rete
Uscita HDMI
Reset
DC Mains
Uscita AV
Porta LAN
TF card slot
Ingresso Antenna TV
Destra & Sinistra
Italiano

EN1020
1
2
3
4
5
6
7
8
9
10
11
12
13
14
15
8
9
11
10
12
13
15
14
5
6
7
1
2
3
4
2
DETTAGLI PRODOTTO
Telecomando
STANDBY: premere per attivare o riposare
ricevitore nel 1020
Tasti Rosso/Verde/Giallo/Blu Per funzioni
interattive/funzioni Submenu
SOTTOTITOLI (On/Off)
TXT: premere per accedere al Televideo
Menu Aprire e chiudere il menu per APP
Cursore
Tasto OK: Premi per to selezionare
EPG: Per aprire la Guida Elettronica ai
Programmi
Tastiera numerica
Inserire i valori numerici e selezionare il
canale direttamente inserendo il suo numero
AUDIO: Selezionare la modalità audio e
traccia audio
SILENCIAR: Spegnere / Accendere il volume
VOLUMEN: VOL+/-:Aumento - Diminizione
Volume
HOME: tornare al menu principale per
passare dalla modalità di Android a DVB-T e se
premuto 2 volte
VOLVER: Ritorno al menu
precedente
DVB: Entrare nel modo DVB
Italiano

EN1020
3
CONNESSIONE SISTEMA
Connessione al TV
Ci sono molti diversi tipi di TV e di altri dispositivi che è possibile collegare al BOX. In questo
manuale potrete vedere alcuni dei modi più comuni per collegare il vostro dispositivo.
Antenna
RF cavo
AV cavo
HDMI cavo
LAN
HDMI TV
Note:
1. Non è necessario collegare sia il cavo AV e cavo HDMI con il vostro televisore contemporaneamente,
sceglierne uno , ma la connessione HDMI è consigliato per una migliore qualità
dell'immagine.
2.Non collegare / scollegare HDMI o il connettore AV quando l'alimentazione del media center è acceso.
3.IIndicatore di accensione diventa verde quando l'alimentazione media center è acceso, e diventa rosso
media center è in stand-by
4.Indictatore di Rete diventa rosso quando è collegato rete domestica, diventa verde quando
internet scambia i dati
Italiano

EN1020
4
INIZIANDO
Videata di Benvenuto
Congurazione Iniziale
Quando si accende il dispositivo, viene visualizzato il menu "Benvenuto" come di seguito.
Step1: Seleziona la lingua favorita;
Step3: Seleziona il tuo Paese;
Step2: Imposta la connessione Rete o Wi-Fi ;
Italiano

EN1020
5
INIZIANDO
Step4: Connettersi all' account Google o saltare;
Step5:Engeldroid ha sistema di chiusura di contenuti
e applicazioni per proteggere i bambini da casa.
Quando Engel rileva alcune applicazioni o contenuti
protetti chiederemo una password. Potete saltare
questo passaggio;
Step6: Fare clic su "Fine" per terminare questa
impostazione.
NOTE:
Miracast viene attivata quando il dispositivo si avvia. Assicuratevi che il vostro dispositivo mobile e
la scatola si trovino nella stessa Wi.
Italiano

EN1020
6
Schemata Iniziale
Tema Principale dello schermo
Dopo aver acceso il tuo dispositivo, si apre il Menu. Ci
sono 5 oggetti
(Guardare, Ascoltare, PLAY, Condividere e Scoprire) sullo
schermo.
Ci sono le classicazioni di alcune applicazioni.
Nella voce GUARDARE, ci sono applicazioni come la MX
Player e XBMC per visualizzare programmi.
Nella voce ASCOLTARE, ci sono app come Google Play
Music per la riproduzione di musica.
GUARDARE
ASCOLTARE
PLAY
CONDIVIDERE
SCOPRIRE
Nella voce PLAY, ci saranno applicazioni per riprodurre,
ma seil dispositivo è aperto per la prima volta , non
trovere alcuna applicazione in questo sottomenu, e ci
nsarà un messaggio di avvertimento come visualizzato
dallo schermo.
Alla voce CONDIVIDERE, è possibile trovare alcune
applicazioni per le comunicazioni, come Gmail e Chrome.
Nella voce SCOPRIRE, ci deve alcune altre applicazioni,
come Google Play servizi, ASTRO File Manager e Maps.
Italiano

EN1020
7
IMPOSTAZIONI
Informazioni sulle impostazioni
Reti wireless
Congurazione Ethernet
Suono
Display
Utilizzare le impostazioni sulla iTV per congurare la connessione di rete, risoluzione dello schermo e
modicare altre impostazioni.
Accendere Wi-Fi o disattivare: scegli Wi-Fi, e quindi attivare il
Wi-Fi acceso o spento.
Seleziona un network Wi-Fi: Selezionare l'impostazione Wi-Fi,
attendere il completamento della scansione di reti wireless nel
campo, e quindi selezionare una rete.
Se necessario, inserire la password e quindi fare clic su
connessione. Seleziona un network Wi-Fi protetto: per accedere a una rete
Wi-Fi che non viene visualizzato nell'elenco delle reti, scegliere
Aggiungi Rete e quindi immettere il nome della rete. Se la rete
richiede una password, fare clic su Protezione, selezionare il
tipo di protezione utilizzato dalla rete, ed inserire la password.
Ethernet Switch On o Off: Scegli Ethernet, e poi seleziona
Ethernet acceso o spento.
Collegati alla rete Ethernet: Scegli congurazione Ethernet,
Se scegli DHCP, è possibile fare clic direttamente su Salva.
Se scegliete Static IP, è necessario inserire il tuo indirizzo IP, Mask,
DNS e router predenito, e quindi fare clic su Salva.
Scegli Uscita audio digitale e quindi impostare notiche predenite
del suono e Touch Suoni.
Scegliere Display e quindi è possibile impostare le dimensioni dei
caratteri e dello Cast Screen.
Italiano

EN1020
8
IMPOSTAZIONI
Apps
Langu & input
A proposito di EN1020
Back & reset
Consentire l'installazione di applicazioni di mercato sconosciute:
Accedere a fonti sconosciute o disattivare.
Impostazione della lingua: inserire "lingua" e spostarsi verso
l'alto o verso il basso il cursore nella lista delle lingue, e
selezionare la lingua che si desidera utilizzare.
Le impostazioni di privacy: Scegli "Ripristino dati di
fabbrica", quindi selezionare "Reset mbx".
Gli aggiornamenti di sistema apre una schermata che riporta sulla
disponibilità di aggiornamento del software di sistema Android.
Stato - Apre la schermata Stato con una lunga lista di informazioni
sulla batteria, connessione di rete mobile, e altri dettagli. Utilizzo
batteria - apre l'elenco delle applicazioni e dei componenti del
sistema operativo che avete usato dall'ultimo addebito, ordinati per
la quantità di energia che hanno usato. Informazioni legali - apre
una schermata in cui è possibile ottenere informazioni legali sul
software fornito con il il dispositivo.
Italiano

EN1020
9
DTV PLAYER
A proposito di DTV Player
Ricerca
Programma
DTV Player esecuzione automatica mentre accendere il ricevitore. DTV Player sarà acceso / spento
dal telecomando (Fare riferimento alle istruzioni di controllo remoto).
Questo menu consente di impostare la scansione automatica,
scansione manuale, scansione NIT, Aera e LCN.
1 - Auto Scan: Premere "UP" e il tasto "DOWN" per selezionare "Auto
Scansione ", quindi premere il tasto" OK "per
cercare il programma.
2 - Scan Manuael :Selezionare Scann Manuale ", premere il tasto" OK "
per accedere al menu di scansione manuale.
Premere il pulsante cursore per impostare la modalità di scansione,
Band Scan, canale, frequenza e larghezza di banda, quindi evidenziare
"Cerca", premere il tasto "OK" per iniziare la ricerca dei canali.
3 - NIT Scan: Premere "UP" e il tasto "DOWN" per selezionare "NIT Scan",
quindi premere il tasto
"OK" per entrare nel menu NIT Scan.
Modica Programma:
Selezionare "Modica programma", premere il tasto "OK", ti
ha chiesto di inserire la password, (la password predenita è
"0000"), quindi premere il tasto OK per accedere al menu
programedit. È possibile utilizzare questo menu per
cancellare, il canale di blocco.
EPGGuida Elettronica Programmi):
Il ricevitore supporta 7 giorni EPG. Pulsante Su / Giù
Premere Sinistra / Destra, per cercare EPG nei prossimi 7
giorni. Premete il tasto VERDE per visualizzare le
informazioni EPG, premere il pulsante rosso per aprire
BOOK lista, premere il tasto GIALLO per PAGE UP,
premere il tasto BLU per PAGE DOWN.
Italiano
4 - Area: Seleziona il tuo paese. (Quando si seleziona la Spagna, è possibile impostare OCA on / off)
5- LCN: On / Off (Questo menu è valido quando si seleziona "Spagna" in opzione Area).

EN1020
10
DTV PLAYER
Congurazione PVR: È possibile visualizzare il nome del disco, Formatta disco e impostare Timeshift.
Gestione PVR: Selezionare " Gestione", premere il tasto "OK", ti ha chiesto di inserire la
password, (la password predenita è "0000"), quindi premere il pulsante OK toenter menu
Manager.
Time Shifting:
Selezionare "TimeShifting", premere il tasto "OK" per avviare timeshift.
Elenco Recall: 1/3/5
Interruttore Sottotitoli:On/Off
Ripristino dati di fabbrica:
Selezionare premere il tasto "OK" "Ripristino dati di fabbrica", ti ha chiesto
di inserire la password (la password predenita è "0000"), poi un è
possibile reimpostare la APP
Imposta password:
Questo menù permette di impostare una password per proteggere i
canalie l'accesso a tutti i menu. Entra nel menu Imposta password, sarà
chiesto essere di 4 cifre per inserire la password (la password predenitaè
"0000"). Evidenziare "Nuova password" Input nuova password.
Inserire la password di nuovo per confermare. (La password predenita è
"0000")
Controllo parentare:
all/4/5/6/7/8/9/10/11/12/13/14/15/16/17/18
Selezionare "età parentale", premere il tasto "OK", ti ha chiesto di inserire la
password (l'impostazione
predenitapassword è "0000"), quindi premere il tasto "OK" per impostare
fascia d'età dei genitori.
tutto / 4/5/6/7/8/9/10/11/12/13/14/15/16/17/18
TTX Regione: Seleziona la regione desiderata.
Questo menu consente di impostare l'immagine Formato, Lingua sottotitoli, Lingua
audio, politica e Antenna Blackout.
Opzione
Sistema
Questo menu permette a settembre Recall List, Switch Sottotitoli Ripristino dati di fabbrica,
Imposta password Età ai minori e TTX Regione
Italiano

EN1020
11
APPs
Selezionare "Media Center", premere il tasto OK per accedere al
menu media center, cercherà automaticamente il dispositivo
DMS, quindi è possibile riprodurre i le dal dispositivo DMS
come la riproduzione di musica, video, foto, ecc
NOTA:
Air Player supporta ios net work
Media Center
Italiano

EN1020
12
Ricerca Guasti
In alcune regioni, il segnale digitale terrestre può essere debole. Quindi è meglio utilizzare
l'antenna in cui è stato inserito un Amplicatore, per la visione dei canali con segnale debole.
La luce di Standby non si
accende
Cavo di alimentazione scollegato
fusibile bruciato
Controlla il cavo
Controlla il fusibile
Antenna non collegata
Antenna danneggiata / allineata male
Fuori dell'area del segnale digitale
Controlla cavo antenna
Controlla antenna
Consulta uno specialista
Nessun segnale trovato
Il Telecomando non funziona
Hai dimenticato il codice di
blocco del canale
Hai dimenticato il codice di
blocco del canale
Il telecomando
Non funziona con il Ricevitore
Dopo aver spostato il
Ricevitore in un'altra stanza e
scoprire che non si è più in
grado di ricevere ricezione
digitale
Nessuna immagine o suono
Scart / AV non è selezionata sul
televisore
Ridurre a un altro canale
Seleziona canale alternativo
Reinstallare canali per annullare il
blocco del canale
(1) Sostituire le batterie
(2) Vericare che non vi è nullasul
percorso tra il telecomando e il
ricevitore
Prova ad alimetare direttamente il
segnale dall'antenna.
Contatta help line
Messaggio canale codicato Il canale è codicato
Ricevitore spento
Il portatile non correttamente posizionato
- Pannello frontale ostriuto ostacolato
- le batterie sono esaurite
Collegare e accendere la spina
- Puntare portatile sul pannello frontale
- Vericare la presenza di ostacoli
- Sostituire le batterie del portatile
(1) LE batterie de Telecomando
controllo e se ha bisogno di sostituire
(2) Vi è un ostacolo bloccando il
percorso del segnale tra il telecomando
e il dispositivo.
Il cavo del segnale distribuito può
avere perso intensità attraverso la
canalina di distribuzione
Problema Possibile causa Cosa fare
Italiano

12V 1A
EN1020
SPECIFICHE
TUNER & Canali
DECODER
· Video decoder
· Audio decoder
· INPUT RATE
· VIDEO FORMATS
· AUDIO FORMATS
· VIDEO OUTPUT
· RF INPUT CONNECTOR x1
(IEC-TYPE, IEC169-2, FEMALE)
· FREQUENCY RANGE:
177.5MHz~226.5MHz(VHF)
474MHz ~858MHz (UHF)
· SIGNAL LEVEL:
-15 ~ -70 dbm
MPEG-1/MPEG-2 MP@ML/
MPEG-4 AVC/H.264 HP @L3
MPEG-1 Layer 1,2
PCM/HE-AAC V1.0
Dolby D+ and Dolby D
MAX. 15Mbit/s
Full Screen/4:3/4:3 letter box/4:3 PAN
SCAN /4:3 COMBINED/16:9/16:9
LETTER BOX/ 16:9 PAN SCAN/16:9
COMBINED CVBS, HDMI
MPEG Layer I & II, 32 / 44.1 / 48KHz
CONNSSIONI
· CAVO ALIMENTAZIONE
· TUNER
· DATA PORT
· TF CARD
· LAN
· AV OUTPUT
· HDMI OUTPUT
ALIMENTATORE
· DC INPUT
TIPO FISSO
RF INx1
USB slot x 2
x1
x1
x1
x1
NOTA: Design e le speciche sono soggette a modiche senza preavviso.
Prodotto su licenza di Dolby Laboratories. Dolby e il simbolo della
doppia D sono marchi registrati di Dolby Laboratories.


10
ENGEL SYSTEMS, S.L.U. · Gran Vía Carlos III, 61 Bajos · 08028 Barcelona (Spain)
Transcripción de documentos
ENGLISH EN1020 MANUAL DE USUARIO USER MANUAL MANUEL D’UTILISATION MANUALE UTENTE 1 ESPAÑOL Receptor ANDROID + DVB-T2 ESPAÑOL 3 Las pantallas pueden diferir de la versión final del producto INFORMACIÓN DE SEGURIDAD EN1020 CONTENIDO EN1020 INFORMACIÓN DE SEGURIDAD Apariencia del producto Panel frontal Panel trasera Derecha y izquierda Mando a distancia 1 1 1 2 CONEXION DEL SISTEMA Conexion al TV 3 EMPEZANDO Pantalla de bienvenida Configuracion inicial 4 4- 5 PANTALLA DE INICIO Tema de la pantalla principal 6 AJUSTES Sobre los ajustes Redes inalámbricas Configuración Ethernet Sonido Visualicación Apps Idioma y entrada Backup & Reset Sobre EN1020 7 7 7 7 7 8 8 8 8 MODO DVB-T Sobre el reproductor DVB-T Buscar Programa Sistema Opciones 9 9 9- 10 10 10 APP Media Center 11 SOLUCIÓN DE PROBLEMAS 12 ESPECIFICACIÓNES APARIENCIA DEL PRODUCTO EN1020 Parte frontal Indicador de red Indicador encendido Sensor IR Botón ON/OFF Parte trasera Antena TV Conexión antena de televisión externa Lector de tarjetas SD Toma de corriente Conexion Ethernet Salida AV Salida HDMI Restablecer Izquierda y derecha RECOVERY USB USB 1 Español Apariencia del Producto EN1020 Mando a Distancia 1 BOTON ON/OFF: pulse para encender o poner en reposo su receptor EN1020 1 11 2 BOTONES ROJO/VERDE/AMARILLO/AZUL: botones para funciones interactivas y para funciones en los submenús 2 3 SUBTÍTULO: activar o desactivar subtítulos 3 4 5 12 4 TELETEXTO: pulse para acceder al Teletexto 13 5 MENÚ: acceder al menú 6 CURSOR: para desplazarse por los menús 6 7 OK: pulse para acceder 7 8 EPG: abrir la Guía Electrónica de Programas 8 14 9 TECLADO NUMÉRICO: pulse para introducir valores numéricos y para ir a un canal en concreto 10 AUDIO: seleccione el modo de audio o la pista de sonido 9 11 SILENCIAR: activar o desactivar el sonido 12 VOLUMEN: pulse para subir o bajar el sonido 10 15 13 HOME: volver al menú principal y para cambiar entre modo DVB-T y Android si se pulsa 2 veces 14 VOLVER: ir al menú anterior 15 DVB: pulse para cambiar al modo DVB-T 2 Español CONEXIONES EN1020 Conexiones del TV Hay muchos tipos diferentes de televisión y otros equipos que puede conectar al Engeldroid. En este manual, verá las formas más comunes de conectar los equipos. TV HDMI Cable de antena (no incluido) Cable AV (no incluido) Cable AV (no incluido) Antena Cable HDMI Nota: 1. No es necesario conectar el cable AV y el cable HDMI a la vex con el televisor, elija cualquiera de ellos bajo su elección, sin embargo recomendamos la conexión HDMI por su mejor calida de imagen. 2. No enchufe / desenchufe el cable HDMI o AV mientras que el dispositivo esté en marcha. 3. El indicador de encendido se iluminará en verde cuando el dispositivo esté encendido, y en rojo cuando el dispositivo se encuentre en modo reposo. 4. El indicador NET se vuelve rojo cuando el dispositivo se encuentre conectado a la red de su casa, y se pone verde cuando transmite o recibe información de internet. 3 Español Empezando EN1020 Pantalla de bienvenida Al inicar el receptor, el menú de bienvenida aparecerá Configuración inicial Paso 1: Selecione su idioma favorito Paso 2: Configurar la red por cable o Wi-Fi Paso 3: Selecione su pais 4 Español EMPEZANDO EN1020 Paso 4: Conéctese con su cuenta de Google o puede saltar este paso si lo desea. Paso 5: EngelDroid contine aplicaciones y sistemas que buscan proteger a los niños de la casa. Cuando Engel detecta algunas aplicaciones o contenido protegido le pediremos una contraseña. usted puede saltar este paso; Paso 6: Pulsa “Finalizar” y terminara la configuración NOTA: Miracast se activa después de que su receptor se pone en marcha. Asegúrese de que su dispositivo móvil y el receptor estén conectados a la misma red WiFi 5 Español PANTALLA DE INICIO EN1020 Tema de Pantalla Principal Después de encender su Engeldroid, la pantalla principal aparece. Hay 7 elementos (VER, ESCUCHAR, JUGAR, COMPARTIR, DESCUBRIR, MIS APPS y AJUSTES) en la pantalla. VER En el apartado VER, existen aplicaciones como MX Player y XBMC que es para ver programas. ESCUCHAR En el apartado ESCUCHAR, tiene aplicaciones como el Google Play Music para la reproducción de música. JUGAR En el apartado de JUGAR, allí tendrá aplicaciones para jugar, pero si es la primera vez que enciende el Dispositivo, no tendra ninguna aplicación en este submenú. COMPARTIR En el apartado COMPARTIR, se pueden encontrar algunas aplicaciones para comunicaciones, como el Gmail y Chrome DESCUBRIR En el apartado DESCUBRIR, allí tiene algunas otras aplicaciones tales como servicios de Google Play, ASTRO Administrador de archivos y los Mapas 6 Español AJUSTES EN1020 Sobre los ajustes Utilice Configuración en la iTV para configurar las conexiones de red, configurar la resolución de pantalla y cambiar otros ajustes Redes inalámbricas Encienda Wi-Fi o desactivar: Seleccione Wi-Fi, y luego activar Wi-Fi encendido o apagado. Únase a una red Wi-Fi: Seleccione configuración Wi-Fi, espere a que acabe de escanear la red inalámbrica en el campo cercano, y luego seleccione una red. Si es necesario, introduzca la contraseña y haga clic en conectarse. Únete a una red Wi-Fi cerrada: Para unirse a una red Wi-Fi que no se muestra en la lista de redes, elija Agregar Redes y escriba a continuación las redes nombre. Si luego redes requiere una contraseña, haga clic en Seguridad, clik el tipo de seguridad que utiliza la red, e introduzca la contraseña Configuración Ethernet Conmutador Ethernet Activar o Desactivar: Elige Ethernet, y luego alternar Ethernet encendido o apagado. Únete a la red Ethernet: Elija la configuración de Ethernet, Si elige DHCP, puede hacer clic directamente en Guardar. Si choos IP estática, tendrá que introducir su dirección IP, la máscara, DNS y por defecto del router y, a continuación, haga clic en Guardar. Sonido Seleccione la salida de audio digital, y luego establecer el sonido de notificación predeterminado. Visualicación Elija Display, y entonces puede establecer el tamaño de fuente y de la pantalla que usted quiera. 7 Español EMPEZAR EN1020 Apps Permite la instalación de aplicaciones que no son del Market: Cambie fuentes desconocidas a ON ó OFF. Idioma y entrada Ajustes de idioma: entre en "idioma" y suba o baje el cursor en la lista de idiomas, y seleccione el idioma que desee visualizar. Back & Reset Ajustes de Privacidad: Seleccione la opción "Restaurar valores de Fábrica", y luego seleccione "Reiniciar mbx" Sobre EN1020 Las Actualizaciones del sistema abre una pantalla que informa de la disponibilidad de la actualización del software del sistema Android. Status abre la pantalla de estado con una larga lista de información acerca de su batería, conexión de red móvil, y otros detalles. El uso de la batería o plumas una lista de las aplicaciones y componentes del sistema operativo no has utilizado desde la última vez, ordenados por la cantidad de poder que han utilizado. información legal abre una pantalla donde se puede obtener información legal sobre el software incluido en su dispositivo. 8 Español MODO DVB-T EN1020 Sobre el reproductor DVB-T El repreductor DVB-T arranca automáticamente cuando enciende el receptor. EL modo DVB-T se activa/desactiva desde el mando a distancia (mirar las instrucciones del mando a distancia) Buscar En el modo DVB-T pulse el botón MENU y entre en el apartado “Buscar” para acceder a las siguientes opciones de búsqueda de canales: 1 - Búsqueda Automática: entre en esta opción para iniciar la búsqueda automática de canales. 2 - Búsqueda Manual: entre en esta opción para iniciar la búsqueda manual de canales. Pulse las flechas de su mando a distancia para configurar el Modo de Búsqueda, la Banda de Búsqueda, Canal, Frecuencia y Ancho de Banda. Después seleccione “Búsqueda” y pulse OK para empezar la búsqueda de canales. 3 - Área: seleccione su país. Cuando éste es España, podrá optar que la función OCA esté activada o desactivada (OCA es la función que organiza los canales de forma automática). 4 - LCN: ON/OFF (esta función está inhabilitada cuando selecciona “España” en el apartaddo “Área”). 5- OCA: On/Off (para España por defecto aparece activado) Programa Editar Programa: Seleccione “Editar Programa” en el apartado PROGRAMA del menú principal y presione el botón OK de su mando, se le pedirá una contraseña (por defecto “0000”), una vez introducida pulse OK. En este menú podrá borrar o bloquear canales. EPG (Guía electrónica de programas): Su receptor EN1020 dispone de la función EPG (Guía Electrónica de Programas) para 7 días, para acceder a ella sólo debe pulsar el botón MENU de su mando a distancia. Pulse “derecha/izquierda/arriba/abajo” para ver el EPG en los siguientes 7 días. Pulse el botón VERDE para ver la información de EPG, pulse el botón ROJO para abrir “Book list”, pulse el botón AMARILLO para “Subir página”, pulse el botón AZUL para “Bajar página”. 9 Español MODO DVB-T EN1020 Ajustes PVR: Pdrá visualizar el nombre del disco duro, el formato del disco y el tamaño del Timeshift Gestor PVR: Sleccione “Gestor PVR”, pulse el botón OK, se le pedirá introducir la contraseña (por defecto “0000”), entonces pulse OK para entrar en el menú del Gesto PVR. Time Shift: Seleccione"TimeShifting", pulse "OK" para iniciar el Timeshift. Sistema Este menú le permite configurar la Lista de Rellamada, Activar/desactivar Subtítulos, Restaurar los Ajustes de Fábrica, Configurar una contraseña para proteger canales, Configurar la edad para el Control Parental y la Región del Teletexto ista de Rellamada: 1/3/5 Activar/desactivar Subtítulos: On / Off Restaurar los Ajustes de Fábrica: Seleccione "Restablecer datos de fábrica", pulse el botón "OK", se preguntó para introducir la contraseña, (La contraseña por defecto es "0000"), a continuación, puede restaurar su APP. Establecer contraseña: Este menú le permite establecer una contraseña para proteger los canales y el acceso a los menús. Entre en el menú Configurar contraseña, se le pedirá que introduzca la contraseña de 4 dígitos (la contraseña predeterminada es "0000") Configurar la edad para el Control Parental: todo / 4/5/6/7/8/9/10/11/12/13/14/15/16/17/18 Seleccione "Edad para el Control Parental", pulse el botón "OK", se le preguntará para introducir la contraseña, (La contraseña por defecto es "0000"), a continuación, pulse el botón "OK" para establecer la edad de clasificación indicativa. Región del Teletexto: Seleccione su región deseada. Opciones Este menú le permite configurar Tamaño de imagen, el idioma de los subtítulos, idioma de audio, Política Blackout y la alimentación de la antena. 10 Español APP EN1020 Media Center Seleccion “Media Center”, pulse OK para entrar en el menú Media Center, buscará el dispositivo DMS automáticamente, entonces podrá reproducir archivos desde un dispositivos DMS tales como archivos de música, vídeo, imágenes, etc. NOTA: Soporta Air Player para pantalla de red iOS 11 Español SOLUCIÓN DE PROBLEMAS EN1020 En alguna región, la señal digital terrestre puede ser débil. Problema Posible causa 12 Español Qué hacer ESPECIFICACIONES SINTONIZADOR Y CANAL EN1020 · CONECTOR DE ENTRADA RF x1 (IEC-TYPE, IEC 169-2, HEMBRA) · RANGO DE FRECUENCIA: 177.5MHz ~ 226.5 MHz (VHF) 474 MHz ~ 858 MHz (UHF) · NIVEL DE SEÑAL: -15 ~ -70 DBm DECODIFICADOR · Decodificador de vídeo · Decodificador de audio · Rango de Entrada · Formatos de vídeo · Formatos de audio · Salida de Vídeo MPEG-1 / MPEG-2 MP @ ML / MPEG-4 AVC / H.264 HP @ L3 MPEG-1 Layer 1,2 PCM 7HE-AAC V1.0 Dolby D + Y Dolby D MAX. 15 Mbit / s Pantalla completa / 4: 3/4: 3 Letter Box / 4: 3 PAN SCAN / 4: 3 COMBINADO / 16: 9/16: 9 BUZÓN / 16: 9 PAN SCAN / 16: 9 COMBINADO MPEG Layer I & II, 32 / 44,1 / 48 kHz CVBS, HDMI CONEXIÓN · · · · · · · Cable de alimentación principal Sintonizador Puerto de Datos Tarjetas SD Ethernet Salida AV Salida HDMI TIPO FIJO Entrada RF x1 entrada USB x2 x1 x1 x1 x1 FUENTE DE ALIMENTACIÓN · Entrada DC NOTA: 12V 1A El diseño y las especificaciones están sujetas a cambios sin previo aviso. Fabricado bajo licencia de Dolby Laboratories. Dolby y el símbolo de la doble D son marcas comerciales de Dolby Laboratories. ESPAÑOL ANDROID + DVB-T2 receiver ENGLISH 5 Screens may differ from final product release EN1020 SAFETY INFORMATION TO REDUCE THE RISK OF FIRE AND ELECTRIC SHOCK, DO NOT EXPOSE THIS UNIT TO RA IN OR MOISTURE. : To reduce the CAUTION r isk of fire and electric shock, do 10. n ot remove the cover (or back panel) of the unit. Refer servicing to qualified service personnel. The lightning flash with arrow head symbol, within an equilateral triangle, is intended to alert the user to the presence of uninsulated "dangerous voltage" within the product's enclosure that may be of 11. sufficient magnitude to constitute a risk of electric shock. The exclamation point within an equilateral triangle is intended to alert the user to the presence of important operation and servicing instructions in the literature accompanying the appliance. WA RNING: TO REDUCE THE RISK OF FIRE OR ELECTRIC SHOCK, DO NOT EXPOSE THIS APPLIA NCE TO RA IN OR MOISTURE. CA UTION: TO PREVENT ELECTRIC SHOCK, MA TCH WIDE BLA DE OF PLUG TO WIDE SLOT A ND FULLY INSERT. The apparatus shall not be exposed to dripping or splashing, and no objects filled with liquids, such as vases, shall be placed on the apparatus. IMPORTANT SAFEGUARDS The apparatus shall not be exposed to dripping or splashing and no objects filled with liquids ,such as vases shall be placed on the apparatus. Caution: Maintain electrical safety. Powerline operated equipment or accessories connected to this unit should bear safety certification mark on the accessory itself and should not be modified so as to compromise the safety features. This will help avoid any potential hazard from electrical shock or fire. If in doubt, contact a qualified service personnel. A ccessories- Do not place this set-top box on an unstable cart, stand, tripod, bracket, or table. The set-top box may fall, causing serious injury to a child or adult as well as serious damage to the set-top box. Use this set-top box only with a cart, stand, tripod, bracket, or table recommended by the manufacturer's or sold with the set-top box. Any mounting of the product should follow the manufacturer's instructions and use of a mounting accessory recommended by the manufacturer. 11a. A set-top box and cart combination should be moved with care. Quick stops, excessive force, and uneven surfaces may cause damage to the set-top box. 12. Outdoor Antenna Grounding- If an outside antenna or cable system is connected to the set-top box, be sure the antenna or cable system is grounded so as to provide some protection against voltage surges and built-up static charges. Section 810 of the National Electrical Code, ANSI/NFPA No.70-1984 (Section 54 of Canadian Electrical Code, Part1) provides information with respect to proper grounding of the mast and supporting structure, grounding of the lead-in wire to an antennadischarge unit, connection to grounding electrodes, and requirements for the grounding electrode. In addition to the careful attention devoted to quality standards in the manufacturing of your set-top box, safety is a major factor in the design of every instrument. However, safety is your 13. Power Lines-A n outside antenna system should not be located in the vicinity of overhead power lines, other electric light or power circuits, or where it can fall into responsibility, too. This sheet lists important information that will such power lines or circuits. When installing an outside antenna system, extreme help assure your enjoyment and proper use of the set-top box care should be taken to keep from touching or approaching such power lines or and its accessories. Please read them carefully before installing circuits, as contact with them might be fatal. Installing an outdoor antenna can be and operating your set-top box. hazardous and should be left to a professional antenna installer. Installation 1. Read and Follow Instructions- All the safety and operation instructions should be read before the set-top box is operated. Follow all operating instructions. 2. Retain Instructions- The safety and operating instructions should be retained for future reference. 3. Heed all Warnings-Comply with all warnings on the set-top box and operating instructions. 4. Power - This set-top box is supplied with a DC power. To prevent electric shock, ensure the adaptor is inserted correctly into the power outlet. 5. Power Sources- This set-top box should only be operated with the ratting specified on the label on the back panel of the set-top box. If you are not sure of the type of power supply to your home or office, please consult your set-top box dealer or electrician. For set-top boxes intended to operate from battery power, or other sources, refer to the operating instructions. 6. Overloading- Do not overload wall outlets or extension cords as this can result in a risk of fire or electric shock. Overloaded AC outlets, extension cords, frayed power cords, damaged or cracked wire insulation, and broken plugs are dangerous, They may result in a shock or fire hazard. Periodically examine the cord, and if its appearance indicate damage or deteriorated insulation, have it replaced by your service technician. 7. Power-Cord Protection- Power-supply cords should be routed so that they are not likely to be walked on or damaged by items placed upon or against them, paying particular attention to the point where they exit from the set-top box. 8. Ventilation- Slots and openings in the case are provided for ventilation to ensure reliable operation of the set-top box and to protect it from overheating. These openings must not be blocked or covered. The openings should never be blocked by placing the set-top box on a bed, sofa, rug, or heat register. This set-top box should not be placed in a built-in installation such as a book case or rack, unless proper ventilation is provided or the set-top box manufacturer's instructions have been followed. 9. A ttachments- Do not use attachments unless recommended by the set-top box manufacturer as they may cause hazards. Use 14. Cleaning- Unplug the set-top box from the wall outlet before cleaning. Do not use liquid cleaners or aerosol cleaners. Use a damp cloth for cleaning. 15. Objects that may touch dangerous voltage points or "short-out" parts could result in a fire or electric shock. Never spill liquid of any kind on the set-top box. 16. Lightning-For added protection for this set-top box during a lightning storm, or when it is left unattended and unused for long periods of time, unplug it from the wall outlet and disconnect the antenna or cable system. This will prevent damage to the set-top box due to lightning and power line surges. Service 17. Servicing-Do not attempt to service this set-top box yourself, as opening or removing covers may expose you to dangerous voltage or other hazards. Refer all servicing to qualified service personnel. 18. Conditions Requiring Service-Unplug the set-top box from the wall outlet and refer servicing to qualified service personnel under the following conditions: A. When the DC power adaptor or connecting power cord is damaged. B. If liquid has been spilled, or objects have fallen into the set-top box. C. If the set-top box has been exposed to rain or water. D. If the video does not operate normally by following the operating instructions. A djust only those controls that are covered by operating instructions. Improper adjustment of other controls may result in damage and will often require extensive work by a qualified technician to restore the set-top box to its normal operation. E. I f the set-top box has been dropped or cabinet has been damaged. F. W hen the set-top box exhibits a distinct change in performance-this indicates a need for service. 19. Replacement Parts-When replacement parts are required, have the service technician verify that the replacements he uses have the same safety characteristics as the original parts. Use of replacements specified by the set-top box manufacturer can prevent fire, electric shock, or other hazards. 20. Safety Check-Upon completion of any service or repairs to this set-top box, ask the service technician to perform safety checks recommended by the manufacturer to determine that the set-top box is in safe operating condition. 21. Wall or Ceiling Mounting- The product should be mounted to a wall or ceiling only as recommended by the manufacturer. 22. Heat-The product should be situated away from heat sources such as radiators, heat registers, stoves, or other products (including amplifiers) that produce heat. CONTENTS EN1020 S AFETY INFORM ATION Product Appearance Front p anel Rear panel Ri ght &Lef t Remot e cont rol 1 1 1 2 S Y S TEM CONNECTION Connect t o t he T V 3 GETTING STARTED Wel come Screen Ini t i al Conf i gurat i on 4 4- 5 HOM E SCREEN Mai n Screen T heme 6 S ETTINGS About S et t i ngs Wi rel ess Net work s Et hernet Conf i gurat i on Sound Di spl ay Apps Language&Input Back up&reset About E N1020 7 7 7 7 7 8 8 8 8 DTV PLAY ER About D T V Pl ayer Search Program Syst em Opt i on 9 9 9- 10 10 10 APPs Medi a Cent er 11 TROUBLES HOOTING 12 S PECIFICATIONS EN1020 Product appearance Front panel Net I ndi cat or Power I ndi cat or R emot e sensor St andby Rear panel LA N port SD card slot T V aeri al f or a n ext ernal T V aeri al A V out put DC M ai ns HDM I out put Recovery Right & Left RECOVERY USB USB 1 English EN1020 Product appearance Remote Control 1 11 1 ST A NDBY 2 R ED/GR EEN/Y ELLOW /BLUE But t ons (For i nt eract i ve f unct i on/Submenu f unct i on but t ons) 3 SUBT IT LE (On/Of f S ubt i t l e) 4 TX T 5 M enu (Open and cl ose t he menu f or A PP)) 6 Cursor 7 OK b ut t on (Press t o ent er) 8 EPG (Open up Elect ronic Program Guide M enu) 9 Numeri c ent ry (Ent er numeri c val ues and sel ect t he channel d i rect l y by ent eri ng it ' s number) 10 A UDIO (Sel ect a udi o mode and audi o t rack ) 11 M UT E (T urn of f /on t he vol ume) 12 VOL + / (VOL+/- :Vol ume Up and Down) 13 H OM E (back t o t he home screen) Or switch between DVB-T and Android modes when pressing 2 times. 14 BA CK (Swi t ch t o previ ous menu) 15 DVB (ent er t o t he DVB mode) 2 3 4 12 5 13 6 7 8 14 9 10 15 2 English EN1020 SY STEM CONNECTION Connect to the TV T here are many di f f erent t ypes of T V and ot her e qui pment t hat y ou can connect t o t he BOX . In t hi s manual y ou wi l l see some of t he most common ways t o connect y our e qui pment . HDM I T V AV cable (not included) RF cable (not included) LAN cable (not included) A nt enna HDM I cabl e Not e: 1. Needn' t connect b ot h A V cabl e and HDM I cabl e wi t h your T V set concurrent l y, choose ei t her o f t hem under your ci rcumst ance, however HDM I connect i on is recommended f or b et t er p i ct ure qual i t y. 2. Do not p l ug/unpl ug HDM I or A V connect or whi l e medi a cent er p ower i s on. 3. Power i ndi cat or wi l l t urn green when medi a cent er p ower o n, and t urn red when medi a cent er goes st andby. 4. Net i ndi ct at or wi l l t urn red when home net work i s connect ed, and t urn green when i nt ernet g et s t hrough. 3 English EN1020 GETTING STARTED Welcome Screen When you open the box, the " Welcome" m enu appears lik e blow. Initial Configuration Step1: Select your f avorite language Step2: Set up Wired Network o r W i- Fi Step3: Select your country 4 English EN1020 GETTING STARTED Step4: Connect t o Google account o r jump Step5: Engeldroid has lock ing system of content a nd applications to protect children f rom t he home. When Engel detects some applications or protected content we will ask f or a pass word. Y ou can jump t his step Step6: Click " Finish" t o f inish this setup. NOTE: M iracast i s activated af ter your box starts up. M ak e sure your mobile device and the box are in the same W if i. 5 English HOME SCREEN EN1020 Main Screen Theme After you turn on your Box, Home opens. There are 7 items (WATCH, LISTEN, PLAY, SHARE, DISCOVER, MY APPS & SETTINGS) on the screen: WATCH In t he W A T CH it em, there are apps such as M X P l ayer a nd X BM C whi ch is f orwat chi ng programs. LISTEN In t he LIST EN it em, there has app such as t he Googl e Pl ay M usi c f or m usi c pl ayi ng. PLAY In t he PLA Y i t em, there wi l l have apps f or p l ayi ng, but i f t hi s i s your f i rst t i me openi ng t he Box, there woul d have no app i n t hi s submenu, and i t w i l l warn you l i k e t he screen shows. SHARE In t he SHA R E it em, you can f i nd some apps f or communi cat i ons such as t he Gmai l a nd t he Chrome. DISCOVER In t he DISCOVER i t em, there has some ot her a pps such as t he Googl e Pl ay servi ces, A ST R O Fi l e M anager a nd t he M aps. 6 English EN1020 SETTINGS About Settings Use Settings on the iTV t o conf igure network connection, set display resolution, and change other settings. Wireless Networks Turn Wi- Fi on or of f : Choose W i- Fi, and then turn Wi- Fi on or of f . Join a W i- Fi network : Select W i- Fi setting, wait f or completion of scanning wireless network s in the f ield, and then select a n etwork . If n ecessary, enter t he password and then click connect. Join a closed Wi- Fi network : To join a W i- Fi network t hat isn' t shown in the list o f n etwork s, choose A dd Network , and then enter t he network n ame. If t he network r equires a password, click S ecurity, click t he t ype of security the network u ses, and enter t he password. Ethernet Configuration Ethernet S witch On or Of f : Choose Ethernet, and then toggle Ethernet o n or of f . Join Ethernet network : Choose Ethernet conf iguration, If choose DHCP, you can click S ave directly. If choos Static IP, you will need to input your IP address, M ask , DNS and Def ault R outer, and then click S ave. Sound Choose Digital audio output, and then set Def ault notif ication sound and Touch sounds. Display Choose Display, and then you can set Font size and Cast screen. 7 English EN1020 SETTINGS Apps A llow installation of n on- M ark et a pplications: Turn unk nown sources on or of f . Language & input Language Setting: enter " language" a nd move up or down the cursor i n language list, and select t he language you want t o use. Back & reset Privacy settings: Choose " Factory data reset" , and then select " Reset m bx" . About EN1020 System updates Opens a screen that r eports on the availability of A ndroid system sof tware update. Status Opens the Status screen with a long list o f i nf ormation about your battery, mobile network connection, and other details. Battery use opens a list o f t he applications and operating system components you have used since you last charged the stick , sorted by the amount o f p ower t hey have used. Legal i nf ormation opens a screen where you can obtain legal i nf ormation about t he sof tware included with your stick . 8 English DTV PLAY ER EN1020 About DTV player DT V pl ayer r unni ng aut omat i c whi l e t urn on t he r ecei ver. DT V pl ayer woul d be t urn on/of f on t he r emot e cont rol ( R ef er t o R emot e Cont rol i nst ruct i on). Search This menu allows you t o set A uto Scan, M anual Scan, NIT Scan, A era and LCN. A uto Scan: Press " UP" a nd " DOWN" b utton to select " A uto Scan" , then press " OK " b utton to search the program. M anual Scan: Select M anual Scan n" , press the " OK " b utton to enter t he M anual Scan menu. Press cursor button to set S can mode, Scan Band, Channel, Frequency and Bandwidth, then highlight " Search" , press " OK " button to start channel scan . A rea: Select your country. (When you select S pain, you can set OCA o n/of f ) LCN: On/Of f ( This menu is invalid when selected " Spain" i n A rea option) . OCA: On/Off (for Spain is ON by default) Program Program Edit: Select " Program Edit" , press " OK " b utton, you ask ed to input t he password, (The def ault p assword is" 0000" ), then press OK b utton to enter t he programedit m enu. Y ou can use t his menu to delete, lock channel. EPG( Electronic Program Guide) : T he r ecei ver support 7 days EPG. Press Lef t /R i ght , Up/Down but t on t o l ook f or EPG in t he next 7 days. Press GR EEN but t on t o vi ew EPG inf ormat i on, press R ED but t on t o open BOOK L i st , press Y ELLOW b ut t on t o PA GE UP, press BLUE but t on t o PA GE DOW N. 9 English EN1020 DTV PLAY ER PVR Conf i gure : You can view Disk n ame, Format Disk a nd set T imeshif t S ize. PVR M anager: Select " PVR M anager" , press " OK " button, you ask ed to input t he password,(The def ault p assword is" 0000" ), then press OK b utton to enter t he PVR Manager menu. T i me Shi f t i ng: Select " TimeShif ting" , press " OK " button to start t imeshif t. System This menu allows you to set R ecall List, Subtitle Switch, Factory data reset, Set p assword, Parental r ating age and TTX R egion. Recall List: 1/3/5 Subtitle Switch: On/Of f Factory data reset: Select " Factory data reset" , press " OK " b utton, you ask ed to input t he password,(The def ault p assword is" 0000" ), then you can reset your A PP. Set p assword: T hi s menu al l ows you t o set p assword t o prot ect channel s and access t o al l m enu. Ent er S et p assword menu, you wi l l be ask ed t o ent er 4- di gi t s password (T he def aul t p assword i s" 0000" ). Hi ghl i ght " New Password" ,Input n ew password. Input p assword agai n t o conf i rm. (T he def aul t p assword i s" 0000" ) Parental r ating age: all/4/5/6/7/8/9/10/11/12/13/14/15/16/17/18 Select " Parental r ating age" , press " OK " b utton, you ask ed to input t he password,(The def ault password is" 0000" ), then press " OK " b utton to set p arental r ating age. TTX R egion: Select your desired region. Option This menu allows you t o set P icture Size, Subtitle Language, A udio Language, Black out P olicy and A ntenna Power. 10 English EN1020 APPs Media Center Select " M edia Center" , press OK b utton to enter t he media center menu, it will search the DM S device automatically, then you can play the f iles from DM S device such as playing music, video, picture, etc. NOTE: A ir Player support f or i os net work d isplay 11 English EN1020 TROUBLESHOOTING In some region, the digital terrestrial signal may be weak. So you'd better use the antenna in which the booster was built,for watching the weak signal channels. Problem Possible cause What to do Standby light not lit Mains lead unplugged Mains fuse blown Check mains lead Check fuse No signal found A erial is disconnected A erial is damaged/misaligned Out of digital signal area Check aerial lead Check aerial Check with dealer No picture or sound Scart/A V is not selected on your TV Reduce to another channel Scrambled channel message Channel is scrambled Select alternative channel No response to remote control Receiver off Handset not aimed correctly Front panel obstructed Hand set batteries exhausted Plug in and turn on plug A im handset at front panel Check for obstructions Replace handset batteries Forgotten channel lock code Re-install channels to cancel channel lock Forgotten menu lock code Contact help line The remote control will not operate your STB (1) The batteries in your remote control need replacing (2) There is an obstruction blocking the signal path between the remote control and the box. (1) Replace the batteries (2) Check that there is nothing in the way of the path between the remote control and the receiver A fter moving the STB to another room you find you are no longer able to receive digital reception The aerial feed former new point may come through a distribution system which may reduce the digital signal now received by the box. Try a direct feed from the antenna 12 English EN1020 SPECIFICATIONS TUNER & CHA NNEL RF INPUT CONNECTOR x1 (IEC-TYPE, IEC169-2, FEMA LE) FREQUENCY RA NGE: 177.5MHz~ 226.5MHz(VHF) 474MHz ~858MHz (UHF) SIGNA L LEVEL: -15 ~ -70 dbm DECODER Video decoder MPEG-1/MPEG-2 MP@ML/ MPEG-4 AVC/H.264 HP @L3 MPEG-1 Layer 1,2 PCM/HE-A A C V1.0 Dolby D+ and Dolby D A udio decoder INPUT RA TE VIDEO FORMA TS M A X. 15Mbit/s Full Screen/4:3/4:3 letter box/4:3 PA N SCA N /4:3 COMBINED/16:9/16:9 LETTER BOX/ 16:9 PA N SCA N/16:9 COMBINED MPEG Layer I & II, 32 / 44.1 / 48KHz CVBS, HDMI A UDIO FORMA TS VIDEO OUTPUT CONNECTION MA IN POWER CA BLE FIXED TYPE TUNER DA TA PORT RF INx1 USB slot x 2 TF CA RD LA N A V OUTPUT x1 x1 x1 HDMI OUTPUT x1 POWER SUPPLY DC INPUT NOTE: 12V 1A Design and Specifications are subject to change without notice. Manufactured under license from Dolby Laboratories. Dolby and the double-D symbol are trademarks of Dolby Laboratories. ENGLISH Récepteur ANDROID + DVB-T2 FRANÇAIS 7 Le visuel peut être différent du produit final INFORMATION DE SÉCURITÉ EN1020 TABLE DES MATIÈRES EN1020 INFORMATION DE SÉCURITÉ Aperçu du produit Face avant Face arrière Droite & Gauche Télécommande 1 1 1 2 COMMEXION SYSTÈME Connexion à la TV 3 DÉMARRAGE Écran de bienvenue Configuration initiale 4 4- 5 ÉCRAN D’ACCUEIL Thème de l'écran principal 6 RÉGLAGES À propos des réglages Réseau Sans-fil Configuration Ethernet Audio Affichage Applications Langue & Saisi Sauvegarde & réinitialisation À propos de l' EN1020 7 7 7 7 7 8 8 8 8 RÉCEPTEUR TNT À propos du récepteur TNT Recherche Programme Système Option APPLICATIONS Media Center DLNA 9 9 9- 10 10 10 11 12 PROBLÈMES SPÉCIFICATIONS APERÇU DU PRODUIT EN1020 Face avant Indicateur Internet Indicateur d'alimentation Capteur de la télécommande Mise en veille Face arrière Prise Antenne TV pour une antenne TV extérieure Prise Alimentation Port LAN Fente carte SD Sortie AV Sortie HDMI Réinitialisation Droite & Gauche RECOVERY USB USB 1 Français APERÇU DU PRODUIT EN1020 Télécommande 1 MISE EN VEILLE: appuyez sur le bouton pour activer ou reposer votre récepteur EN1020 1 11 2 BOUTONS ROUGE / VERT / JAUNE / BLEU (Boutons pour les fonctions interactives/Sous-menu) 2 3 SOUS-TITRES(Activer/Désactiver les sous-titres) 3 4 5 12 4 TÉLÉTEXT: Appuyez pour accéder au Télétexte 13 5 MENÚ: Ouvre et ferme le menu de l'application 6 CURSEUR 6 7 BOUTON OK: Appuyer pour entrer 7 8 EPG:Ouvre le menu du Guide Electronique des Programmes 8 14 9 TOUCHE NUMÉRIQUE: Entrer les valeurs numériques et sélectionner directement une chaîne en entrant son numéro 10 AUDIO: Choisir le mode et la piste audio 9 11 SOURDINE: Couper/Remettre le volume 12 VOLUMEN: Vol +/-: Augmenter et Baisser le 10 15 volume 13 ACCUELI: retourner au menu principal et pour basculer entre DVB-T et le mode Android lorsqu'il est pressé 2 fois 14 RETOUR: Basculer au menu précédent 15 DVB: entrer dans le mode DVB 2 Français Connexion Système EN1020 Connexion à la TV l y a beaucoup de types différents de TV et autres équipement auquel vous pouvez connecter la BOX. Dans ce manuel vous verrez certaines des façons les plus communes de connecter votre équipement. TV HDMI Câble Coaxial (non inclus) Câble AV (non inclus) Câble Ethernet (non inclus) Antenne Câble HDMI Nota: 1. Nul besoin de connecter les câbles AV et HDMI en même temps sur votre TV, choisissez l'un d'eux selon vos besoin, cependant la connexion HDMI est recommandée pour une meilleure qualité d'image. 2. Ne pas brancher/débrancher le câble HDMI ou AV lorsque le produit est alimenté 3. L'indicateur d'alimentation sera vert lorsque le produit est allumé, et sera rouge lorsque celui-ci sera en veille. 4. L'indicateur Internet sera rouge lorsque le réseau local est connecté, et sera vert lorsqu'une connexion internet est active. 3 Français Démarrage EN1020 Écran de Bienvenue Lorsque vous allumerez la box, le menu "Bienvenue" ci-dessous Configuration Initiale Étape 1: Sélectionner la langue Étape 2: Régler le réseau filaire ou Wi-Fi; Étape 3: Sélectionner votre pays; 4 Français DÉMARRAGE EN1020 Étape 4: Connexion à un compte Google ou passer; Étape 5: L'Engeldroid a un système de verrouillage du contenu et des applications afin de protéger les enfants de la maison. Lorsque celui-ci détecte une application ou contenu protégés, il vous demandera un mot de passe. Vous pouvez passer cette étape. Étape 6: Cliquer sur "Terminer" pour finir le réglage NOTE: Miracast est activé une fois votre box démarrée. Assurez-vous que votre périphérique mobile et la box sont sur le même réseau. 5 Français ÉCRAN D'ACCUEIL EN1020 Thème de l'écran Principal Une fois votre box démarrée, l'Accueil s'ouvre. Il y a 5 icônes (Regarde, Écouter, Jouer, Partager, Découvrir) sur l'écran. Il y a les classifications de certaines applications. REGARDER Dans l'icpône REGARDER, il y a des applications tels que MX Player et XBMC lesquelles servent à regarder des programmes. ÉCOUTER Dans l'icône ÉCOUTER, il y a des applications tels que Google play Music pour écouter de la musique. JOUER Dans l'icône JOUER, il y a des applications pour jouer, mais si c'est la première fois que vous utilisez votre Box, il n'y aura pas d'applications dans ce sous-menu, et il vous en avertira comme sur l'écran. PARTAGER Dans l'icône PARTAGER, vous trouverez des applications pour la communication tels que Gmail et Chrome. DÉCOUVRIR Dans l'icône DÉCOUVRIR, il y a quelques autres applications tels que Google Play Services, Astro File Manager et Maps. 6 Français RÉGLAGES EN1020 À propos des réglages Utiliser les réglages sur la iTV pour configurer la connexion réseau, la résolution d'affichage et changer d'autre réglages. Réseau Sans-fil Allumer ou éteindre le WiFi: Choisir WiFi,puis allumer ou couper le WiFi. Rejoindre un réseau WiFi: Sélectionner le réglages WiFi, attendre que la recherche des réseaux WiFi soit terminée, puis sélectionner un réseau. Si besoin, entrer le mot de passe et appuyer sur Se connecter. Rejoindre un réseau WiFi fermé: Pour rejoindre un réseau WiFi qui n'apparaît pas dans la liste des réseaux, choisir Ajouter Réseau, puis entrer le nom du réseau. Si le réseau nécessite un mot de passe, cliquer sur Sécurité, cliquer sur le type de sécurité utilisé par le réseau et entrer le mot de passe. Configuration Ethernet Allumer ou éteindre l'Ethernet: Choisir Ethernet puis basculer sur on ou off. Rejoindre un réseau Ethernet: Choisir Configuration éthernet, si vous choisissez DHCP, vous pouvez cliquer directement sur Sauvegarder. Si vous choisissez IP Statique, vous devrez entrer votre adresse IP, le Masque de sous-réseau, le DNS et la passerelle par défaut, puis cliquer sur Sauvegarder. Audio Choisir la sortie audio numérique, régler le son par défaut des notifications et le son des touches. Affichage Choisir Affichage, vous pourrez régler la taille de la police et le fond d'écran. 7 Français RÉGLAGES EN1020 Applications Permettre l'installation des applications Non-market: Activer ou désactiver les Sources Inconnues Langue & Saisi Réglages de la Langue: Entrer dans "Langue" puis déplacer le curseur de haut en bas dans la liste des langues puis sélectionner la langue que vous souhaitez utiliser. Sauvegarder & Réinitialiser Réglages Privés: Choisir "Restaurer les valeurs d'usines" puis sélectionner "Réinitialisation MBX". À propos de l'EN1020 Mise à jour: Ouvre un écran qui informe de la disponibilité d'une mise à jour du système Android. État: ouvre l'écran de l'état avec une longue liste d'information au sujet de votre batterie, connexion au réseau mobile et d'autres détails. utilisation de la batterie ouvre une liste des applications et des fonctions système que vous avez utilisé depuis la dernière charge, trié par la consommation de batterie. Informations Légales: ouvre un écran où vous pouvez obtenir les informations légales au sujet du logiciel. 8 Français Récepteur TNT EN1020 Propos du récepteur TNT Le récepteur TNT démarre automatiquement lorsque vous allumer le récepteur. Le récepteur TNT peut être allumer/éteint grâce à la télécommande. (Se référer aux instructions de la Télécommande) Recherche Ce menu vous permet de régler les Recherche Auto, Recherche Manuelle, Recherche NIT, Pays et LCN. 1 - Recherche Auto: Appuyer sur "HAUT" et "BAS" pour sélectionner "Recherche Auto", puis appuyer sur "OK" pour rechercher les chaînes. 2 - Recherche Manuelle: Sélectionner "Recherche Manuelle", appuyer sur "OK" pour entrer dans ce menu. Utiliser le curseur pour régler le mode et bande de recherche, le canal, la fréquence et la largeur de bande, puis choisir "Recherche" et appuyer sur "OK" pour lancer la recherche. 3 - Recherche NIT: Appuyer sur "HAUT" et "BAS" pour sélectionner "Recherche NIT", puis appuyer sur "OK" pour entrer dans ce menu. 4 - Pays: Sélectionner votre pays. (Lorsque vous choisissez Espagne, vous pouvez régler l'OCA) 5- LCN: Activer/Désactiver(Ce menu n'est pas disponible si vous choisissez "Espagne") Programme Éditer programmes: Sélectionner "Éditer Programme" et appuyer sur "OK", on vous demandera d'entrer le mot de passe (par défaut "0000"), puis appuyer sur "OK" pour entrer dans le menu de programmation. Vous pouvez utiliser ce menu pour effacer, verrouiller les chaînes. EPG (Guide Electronique des Programmes): Le récepteur supporte un EPG à 7 jours. Appuyer sur Gauche/Droite/Haut/Bas pour rechercher l'EPG des 7 prochains jours. Appuyer sur le bouton VERT pour voir les informations EPG, appuyer sur le bouton ROUGE pour ouvrir la liste de PROGRAMMATION, appuyer sur le bouton JAUNE pour monter de page et appuyer sur le bouton BLEU pour descendre de PAGE. 9 Français Récepteur TNT EN1020 Réglage PVR: Vous pouvez voir le nom et le format du disque et régler la taille du Timeshift. Gestion PVR: Sélectionner "Gestion PVR", appuyer sur "OK" et on vous demandera d'entrer le mot de passe (par défaut "0000") puis appuyer sur "OK" pour entrer dans ce menu. Time Shift: Sélectionner "TimeShifting" et appuyer sur "OK" pour le démarrer. Système Ce menu vous permet de régler la Liste de Rappel, Sous-titre, restaurer les valeurs d'usines, Régler le mot de passe, Contrôle parental et la Langue TXT. Liste de Rappel: 1/3/5 Sous-titres: Activer/Désactiver Restaure Valeurs d'Usines: Sélectionner "Restaurer Valeurs d'Usines" et appuyer sur "OK", on vous demandera d'entrer le mot de passe (par défaut "0000")puis vous pourrez réinitialiser votre Récepteur. Régler le mot de passe: Ce menu vous permet de régler le mot de passe pour protéger les chaînes et l'accès à tous les menus. Entrer dans le menu "Régler Mot de Passe", on vous demandera d'entrer un mot de passe de 4 caractères (Le mot de passe par défaut est "0000"). Mettre en surbrillance "Nouveau Mot de Passe", et entrer le nouveau mot de passe. Entrer-le à nouveau pour le confirmer. (Le mot de passe par défaut est "0000"). Contrôle parental: Tout/4/5/6/7/8/9/10/11/12/13/14/15/16/17/18. Sélectionner "Contrôle Parental", puis appuyer sur "OK", on vous demandera le mot de passe (le mot de passe par défaut est "000"), puis appuyer sur "OK" pour régler le niveau du contrôle parental. Région TXT: Sélectionner votre région. Options Ce menu vous permet de régler la Taille de l'image, la Langue des Sous-titres, la Langue Audio, la politique de panne et l'Alimentation d'Antenne. 10 Français APPLICATIONS EN1020 Media Center Sélectionner "Média Center", appuyer sur "OK" pour entrer dans ce menu, il recherchera le périphérique DMS automatiquement, alors vous pourrez lire des fichiers depuis le périphérique DMS tels que de la musique, vidéo, image, ect... NOTA: L'Air player supporte l'affichage pour réseau ios. 11 Français PROBLÈME EN1020 Dans certains pays, le signal numérique terrestre peut être faible. Donc vous devrez utiliser une antenne avec un amplificateur intégré, pour recevoir les canaux avec un faible signal. Problème Pas de lumière de Mise en veille Cause possible Quoi faire Prise principale débranchée Fusible principal brûlé Vérifier l'alimentation principale Vérifie le fusible Pas de signal trouvé Antenne déconnectée Antenne est endommagée/désorienté Hors de la zone de réception Vérifier la prise d'antenne Vérifier l'antenne Vérifier chez votre revendeur Pas d'image, ni son Péritel/AV n'est pas sélectionné sur votre TV Réduire à une autre chaîne Message Chaîne cryptée Chaîne cryptée Sélectionner une autre chaîne Pas d'action de la télécommande Récepteur éteint Télécommande non dirigé correctement Face avant obstruée Piles de télécommande épuisées Brancher et allumer le Diriger la télécommande vers la face avant Vérifier qu'il n'y a pas d'obstructions Remplacer les piles de la télécommande Oubli du code de verrouillage des chaînes Réinstaller les chaînes pour annuler le code de verrouillage Oubli du code de verrouillage des menus Contacter la Hotline La télécommande n'agit pas sur votre récepteur (1) Les piles de la télécommande ont besoin d'être remplacées. (2) Il y a une obstruction qui bloque le signal entre la télécommande et la box. (1) Remplacer les piles (2) Vérifier qu'il n'y a rien sur le chemin entre la télécommande et la box. Après avoir déplacé le STB dans une autre pièce, vous trouvez que vous n'êtes plus en mesure de recevoir la réception numérique Le nouveau point de réception de l'antenne peut arriver par un système de distribution qui peut réduire la force du signal. Essayer une prise directe depuis l'antenne 12 Français SPÉCIFICATIONS EN1020 · Connecteur d'entrée RF x1 (IEC-TYPE, IEC 169-2, FEMELLE) TUNER & CANAUX · Bande de fréquence: 177.5MHz ~ 226.5 MHz (VHF) 474 MHz ~ 858 MHz (UHF) · Niveau de signal: -15 ~ -70 DBm Décodeur MPEG-1 / MPEG-2 MP @ ML / MPEG-4 AVC / H.264 HP @ L3 MPEG-1 Layer 1,2 PCM 7HE-AAC V1.0 Dolby D + et Dolby D MAX. 15 Mbit / s Plein Écran / 4: 3/4: 3 Letter Box / 4: 3 PAN SCAN / 4: 3 COMBINADO / 16: 9/16: 9 BUZÓN / 16: 9 PAN SCAN / 16: 9 COMBINADO MPEG Layer I & II, 32 / 44,1 / 48 kHz CVBS, HDMI · Décodeur Vidéo · Décodeur Audio · Débit d'entrée · Formats Vidéo · Formats Audio · Sortie Vidéo Connexion · · · · · · · Câble d'alimentation principal Tuner Port de donnée Carte Mémoire LAN Sortie AV Sortie HDMI Type Fixe 1x Entrée RF Fente USB x2 x1 x1 x1 x1 Alimentation · Entrée Alimentation NOTA: 12V 1A Le Design et les Spécifications sont sujet aux changements sans avertissement Fabriqué sous licence de Dolby Laboratories. Dolby et le symbole double-D sont des marques déposées de Dolby Laboratories. FRANÇAIS Ricevitore ANDROID + DVB-T2 Italiano 9 Le schermate possono differire dalla versione finale del prodotto ISTRUZIONI DI SICUREZZA EN1020 TABLE DES MATIÈRES EN1020 INFORMAZIONI DI SICUREZZA Aspetto del prodotto Pannello anteriore Pannello Posteriore Destra e Sinistra Telecomando 1 1 1 2 CONNESSIONI Collegamento al TV 3 INIZIARE Schermata iniziale Configurazione iniziale SCHERAMATA INIZIALE Tema dello schermo Principale IMPOSTAZIONI Informazioni sulle impostazioni Reti wireless Configurazione Ethernet suono display Apps Lingua e immissione Backup e ripristino A proposito di EN1020 DTV PLAYER A proposito diDTV Player Cerca Programma Sistema Opzioni APPs Media Center DLNA 4 4- 5 6 7 7 7 7 7 8 8 8 8 9 9 9- 10 10 10 11 12 RICERCA GUASTI SPECIFICHE DETTAGLI PRODOTTO EN1020 Pannello Frontale Indicatore Rete Indicatore Alimentazione Sensore Telecomando Standby Pannello Posteriore DC Mains Porta LAN TF card slot Uscita AV Uscita HDMI Ingresso Antenna TV Reset Destra & Sinistra RECOVERY USB USB 1 Italiano DETTAGLI PRODOTTO EN1020 Telecomando 1 STANDBY: premere per attivare o riposare ricevitore nel 1020 1 11 2 Tasti Rosso/Verde/Giallo/Blu Per funzioni interattive/funzioni Submenu 2 3 SOTTOTITOLI (On/Off) 3 4 5 12 4 TXT: premere per accedere al Televideo 13 5 Menu Aprire e chiudere il menu per APP 6 Cursore 6 7 Tasto OK: Premi per to selezionare 7 8 EPG: Per aprire la Guida Elettronica ai 8 Programmi 9 Tastiera numerica Inserire i valori numerici e selezionare il canale direttamente inserendo il suo numero 14 10 AUDIO: Selezionare la modalità audio e traccia audio 9 11 SILENCIAR: Spegnere / Accendere il volume 12 VOLUMEN: VOL+/-:Aumento - Diminizione 10 15 Volume 13 HOME: tornare al menu principale per passare dalla modalità di Android a DVB-T e se premuto 2 volte 14 VOLVER: Ritorno al menu precedente 15 DVB: Entrare nel modo DVB 2 Italiano CONNESSIONE SISTEMA EN1020 Connessione al TV Ci sono molti diversi tipi di TV e di altri dispositivi che è possibile collegare al BOX. In questo manuale potrete vedere alcuni dei modi più comuni per collegare il vostro dispositivo. HDMI TV AV cavo RF cavo LAN Antenna HDMI cavo Note: 1. Non è necessario collegare sia il cavo AV e cavo HDMI con il vostro televisore contemporaneamente, sceglierne uno , ma la connessione HDMI è consigliato per una migliore qualità dell'immagine. 2.Non collegare / scollegare HDMI o il connettore AV quando l'alimentazione del media center è acceso. 3.IIndicatore di accensione diventa verde quando l'alimentazione media center è acceso, e diventa rosso media center è in stand-by 4.Indictatore di Rete diventa rosso quando è collegato rete domestica, diventa verde quando internet scambia i dati 3 Italiano INIZIANDO EN1020 Videata di Benvenuto Quando si accende il dispositivo, viene visualizzato il menu "Benvenuto" come di seguito. Configurazione Iniziale Step1: Seleziona la lingua favorita; Step2: Imposta la connessione Rete o Wi-Fi ; Step3: Seleziona il tuo Paese; 4 Italiano INIZIANDO EN1020 Step4: Connettersi all' account Google o saltare; Step5:Engeldroid ha sistema di chiusura di contenuti e applicazioni per proteggere i bambini da casa. Quando Engel rileva alcune applicazioni o contenuti protetti chiederemo una password. Potete saltare questo passaggio; Step6: Fare clic su "Fine" per terminare questa impostazione. NOTE: Miracast viene attivata quando il dispositivo si avvia. Assicuratevi che il vostro dispositivo mobile e la scatola si trovino nella stessa Wifi. 5 Italiano Schemata Iniziale EN1020 Tema Principale dello schermo Dopo aver acceso il tuo dispositivo, si apre il Menu. Ci sono 5 oggetti (Guardare, Ascoltare, PLAY, Condividere e Scoprire) sullo schermo. Ci sono le classificazioni di alcune applicazioni. GUARDARE Nella voce GUARDARE, ci sono applicazioni come la MX Player e XBMC per visualizzare programmi. ASCOLTARE Nella voce ASCOLTARE, ci sono app come Google Play Music per la riproduzione di musica. PLAY Nella voce PLAY, ci saranno applicazioni per riprodurre, ma seil dispositivo è aperto per la prima volta , non trovere alcuna applicazione in questo sottomenu, e ci nsarà un messaggio di avvertimento come visualizzato dallo schermo. CONDIVIDERE Alla voce CONDIVIDERE, è possibile trovare alcune applicazioni per le comunicazioni, come Gmail e Chrome. SCOPRIRE Nella voce SCOPRIRE, ci deve alcune altre applicazioni, come Google Play servizi, ASTRO File Manager e Maps. 6 Italiano IMPOSTAZIONI EN1020 Informazioni sulle impostazioni Utilizzare le impostazioni sulla iTV per configurare la connessione di rete, risoluzione dello schermo e modificare altre impostazioni. Reti wireless Accendere Wi-Fi o disattivare: scegli Wi-Fi, e quindi attivare il Wi-Fi acceso o spento. Seleziona un network Wi-Fi: Selezionare l'impostazione Wi-Fi, attendere il completamento della scansione di reti wireless nel campo, e quindi selezionare una rete. Se necessario, inserire la password e quindi fare clic su connessione. Seleziona un network Wi-Fi protetto: per accedere a una rete Wi-Fi che non viene visualizzato nell'elenco delle reti, scegliere Aggiungi Rete e quindi immettere il nome della rete. Se la rete richiede una password, fare clic su Protezione, selezionare il tipo di protezione utilizzato dalla rete, ed inserire la password. Configurazione Ethernet Ethernet Switch On o Off: Scegli Ethernet, e poi seleziona Ethernet acceso o spento. Collegati alla rete Ethernet: Scegli configurazione Ethernet, Se scegli DHCP, è possibile fare clic direttamente su Salva. Se scegliete Static IP, è necessario inserire il tuo indirizzo IP, Mask, DNS e router predefinito, e quindi fare clic su Salva. Suono Scegli Uscita audio digitale e quindi impostare notifiche predefinite del suono e Touch Suoni. Display Scegliere Display e quindi è possibile impostare le dimensioni dei caratteri e dello Cast Screen. 7 Italiano IMPOSTAZIONI EN1020 Apps Consentire l'installazione di applicazioni di mercato sconosciute: Accedere a fonti sconosciute o disattivare. Langu & input Impostazione della lingua: inserire "lingua" e spostarsi verso l'alto o verso il basso il cursore nella lista delle lingue, e selezionare la lingua che si desidera utilizzare. Back & reset Le impostazioni di privacy: Scegli "Ripristino dati di fabbrica", quindi selezionare "Reset mbx". A proposito di EN1020 Gli aggiornamenti di sistema apre una schermata che riporta sulla disponibilità di aggiornamento del software di sistema Android. Stato - Apre la schermata Stato con una lunga lista di informazioni sulla batteria, connessione di rete mobile, e altri dettagli. Utilizzo batteria - apre l'elenco delle applicazioni e dei componenti del sistema operativo che avete usato dall'ultimo addebito, ordinati per la quantità di energia che hanno usato. Informazioni legali - apre una schermata in cui è possibile ottenere informazioni legali sul software fornito con il il dispositivo. 8 Italiano DTV PLAYER EN1020 A proposito di DTV Player DTV Player esecuzione automatica mentre accendere il ricevitore. DTV Player sarà acceso / spento dal telecomando (Fare riferimento alle istruzioni di controllo remoto). Ricerca Questo menu consente di impostare la scansione automatica, scansione manuale, scansione NIT, Aera e LCN. 1 - Auto Scan: Premere "UP" e il tasto "DOWN" per selezionare "Auto Scansione ", quindi premere il tasto" OK "per cercare il programma. 2 - Scan Manuael :Selezionare Scann Manuale ", premere il tasto" OK " per accedere al menu di scansione manuale. Premere il pulsante cursore per impostare la modalità di scansione, Band Scan, canale, frequenza e larghezza di banda, quindi evidenziare "Cerca", premere il tasto "OK" per iniziare la ricerca dei canali. 3 - NIT Scan: Premere "UP" e il tasto "DOWN" per selezionare "NIT Scan", quindi premere il tasto "OK" per entrare nel menu NIT Scan. 4 - Area: Seleziona il tuo paese. (Quando si seleziona la Spagna, è possibile impostare OCA on / off) 5- LCN: On / Off (Questo menu è valido quando si seleziona "Spagna" in opzione Area). Programma Modifica Programma: Selezionare "Modifica programma", premere il tasto "OK", ti ha chiesto di inserire la password, (la password predefinita è "0000"), quindi premere il tasto OK per accedere al menu programedit. È possibile utilizzare questo menu per cancellare, il canale di blocco. EPGGuida Elettronica Programmi): Il ricevitore supporta 7 giorni EPG. Pulsante Su / Giù Premere Sinistra / Destra, per cercare EPG nei prossimi 7 giorni. Premete il tasto VERDE per visualizzare le informazioni EPG, premere il pulsante rosso per aprire BOOK lista, premere il tasto GIALLO per PAGE UP, premere il tasto BLU per PAGE DOWN. 9 Italiano DTV PLAYER EN1020 Configurazione PVR: È possibile visualizzare il nome del disco, Formatta disco e impostare Timeshift. Gestione PVR: Selezionare " Gestione", premere il tasto "OK", ti ha chiesto di inserire la password, (la password predefinita è "0000"), quindi premere il pulsante OK toenter menu Manager. Time Shifting: Selezionare "TimeShifting", premere il tasto "OK" per avviare timeshift. Sistema Questo menu permette a settembre Recall List, Switch Sottotitoli Ripristino dati di fabbrica, Imposta password Età ai minori e TTX Regione Elenco Recall: 1/3/5 Interruttore Sottotitoli:On/Off Ripristino dati di fabbrica: Selezionare premere il tasto "OK" "Ripristino dati di fabbrica", ti ha chiesto di inserire la password (la password predefinita è "0000"), poi un è possibile reimpostare la APP Imposta password: Questo menù permette di impostare una password per proteggere i canalie l'accesso a tutti i menu. Entra nel menu Imposta password, sarà chiesto essere di 4 cifre per inserire la password (la password predefinitaè "0000"). Evidenziare "Nuova password" Input nuova password. Inserire la password di nuovo per confermare. (La password predefinita è "0000") Controllo parentare: all/4/5/6/7/8/9/10/11/12/13/14/15/16/17/18 Selezionare "età parentale", premere il tasto "OK", ti ha chiesto di inserire la password (l'impostazione predefinitapassword è "0000"), quindi premere il tasto "OK" per impostare fascia d'età dei genitori. tutto / 4/5/6/7/8/9/10/11/12/13/14/15/16/17/18 TTX Regione: Seleziona la regione desiderata. Opzione Questo menu consente di impostare l'immagine Formato, Lingua sottotitoli, Lingua audio, politica e Antenna Blackout. 10 Italiano APPs EN1020 Media Center Selezionare "Media Center", premere il tasto OK per accedere al menu media center, cercherà automaticamente il dispositivo DMS, quindi è possibile riprodurre i file dal dispositivo DMS come la riproduzione di musica, video, foto, ecc NOTA: Air Player supporta ios net work 11 Italiano Ricerca Guasti EN1020 In alcune regioni, il segnale digitale terrestre può essere debole. Quindi è meglio utilizzare l'antenna in cui è stato inserito un Amplificatore, per la visione dei canali con segnale debole. Problema La luce di Standby non si accende Possibile causa Cosa fare Cavo di alimentazione scollegato fusibile bruciato Controlla il cavo Controlla il fusibile Nessun segnale trovato Antenna non collegata Antenna danneggiata / allineata male Fuori dell'area del segnale digitale Controlla cavo antenna Controlla antenna Consulta uno specialista Nessuna immagine o suono Scart / AV non è selezionata sul televisore Ridurre a un altro canale Messaggio canale codificato Il canale è codificato Seleziona canale alternativo Il Telecomando non funziona Ricevitore spento Il portatile non correttamente posizionato - Pannello frontale ostriuto ostacolato - le batterie sono esaurite Collegare e accendere la spina - Puntare portatile sul pannello frontale - Verificare la presenza di ostacoli - Sostituire le batterie del portatile Hai dimenticato il codice di blocco del canale Reinstallare canali per annullare il blocco del canale Hai dimenticato il codice di blocco del canale Contatta help line Il telecomando Non funziona con il Ricevitore (1) LE batterie de Telecomando controllo e se ha bisogno di sostituire (2) Vi è un ostacolo bloccando il percorso del segnale tra il telecomando e il dispositivo. (1) Sostituire le batterie (2) Verificare che non vi è nullasul percorso tra il telecomando e il ricevitore Dopo aver spostato il Ricevitore in un'altra stanza e scoprire che non si è più in grado di ricevere ricezione digitale Il cavo del segnale distribuito può avere perso intensità attraverso la canalina di distribuzione Prova ad alimetare direttamente il segnale dall'antenna. 12 Italiano SPECIFICHE EN1020 · RF INPUT CONNECTOR x1 (IEC-TYPE, IEC169-2, FEMALE) · FREQUENCY RANGE: TUNER & Canali 177.5MHz~226.5MHz(VHF) 474MHz ~858MHz (UHF) · SIGNAL LEVEL: -15 ~ -70 dbm DECODER MPEG-1/MPEG-2 MP@ML/ MPEG-4 AVC/H.264 HP @L3 MPEG-1 Layer 1,2 PCM/HE-AAC V1.0 Dolby D+ and Dolby D MAX. 15Mbit/s Full Screen/4:3/4:3 letter box/4:3 PAN SCAN /4:3 COMBINED/16:9/16:9 LETTER BOX/ 16:9 PAN SCAN/16:9 COMBINED CVBS, HDMI MPEG Layer I & II, 32 / 44.1 / 48KHz · Video decoder · Audio decoder · INPUT RATE · VIDEO FORMATS · AUDIO FORMATS · VIDEO OUTPUT CONNSSIONI · · · · · · · CAVO ALIMENTAZIONE TUNER DATA PORT TF CARD LAN AV OUTPUT HDMI OUTPUT TIPO FISSO RF INx1 USB slot x 2 x1 x1 x1 x1 ALIMENTATORE · DC INPUT NOTA: 12V 1A Design e le specifiche sono soggette a modifiche senza preavviso. Prodotto su licenza di Dolby Laboratories. Dolby e il simbolo della doppia D sono marchi registrati di Dolby Laboratories. 10 ENGEL SYSTEMS, S.L.U. · Gran Vía Carlos III, 61 Bajos · 08028 Barcelona (Spain)-
 1
1
-
 2
2
-
 3
3
-
 4
4
-
 5
5
-
 6
6
-
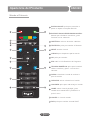 7
7
-
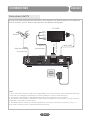 8
8
-
 9
9
-
 10
10
-
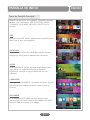 11
11
-
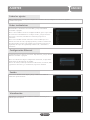 12
12
-
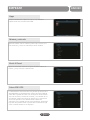 13
13
-
 14
14
-
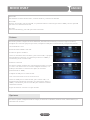 15
15
-
 16
16
-
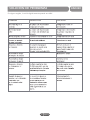 17
17
-
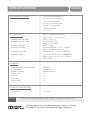 18
18
-
 19
19
-
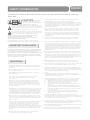 20
20
-
 21
21
-
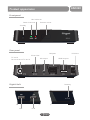 22
22
-
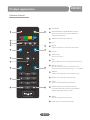 23
23
-
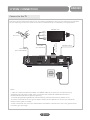 24
24
-
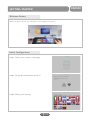 25
25
-
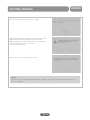 26
26
-
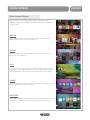 27
27
-
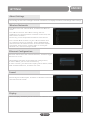 28
28
-
 29
29
-
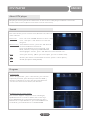 30
30
-
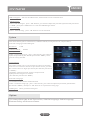 31
31
-
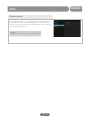 32
32
-
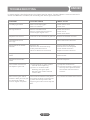 33
33
-
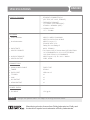 34
34
-
 35
35
-
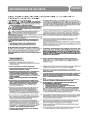 36
36
-
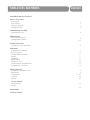 37
37
-
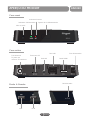 38
38
-
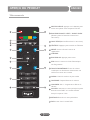 39
39
-
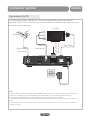 40
40
-
 41
41
-
 42
42
-
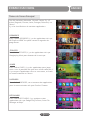 43
43
-
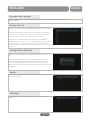 44
44
-
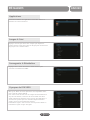 45
45
-
 46
46
-
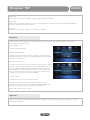 47
47
-
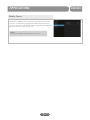 48
48
-
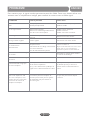 49
49
-
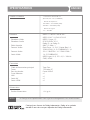 50
50
-
 51
51
-
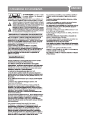 52
52
-
 53
53
-
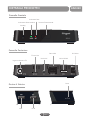 54
54
-
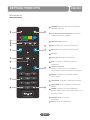 55
55
-
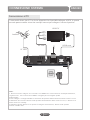 56
56
-
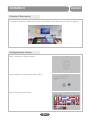 57
57
-
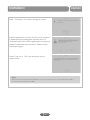 58
58
-
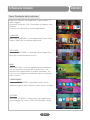 59
59
-
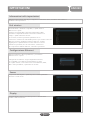 60
60
-
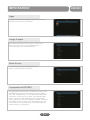 61
61
-
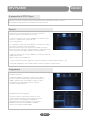 62
62
-
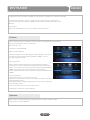 63
63
-
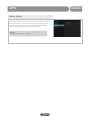 64
64
-
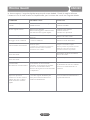 65
65
-
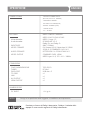 66
66
-
 67
67
-
 68
68


Engel EngelDroid TDT2 EN1020 Manual de usuario
- Tipo
- Manual de usuario
en otros idiomas
Artículos relacionados

Otros documentos
-
Schneider Kaza 3220 Smart PVR Manual de usuario
-
EDENWOOD ANDROID ED65C01UHD-VE Wifi B El manual del propietario
-
JVC LT-46HW65U Manual de usuario
-
Approx DTT Player/Recorder Manual de usuario
-
CONTINENTAL EDISON CELEDBMS40200C3 Operating Instructions Manual
-
Sytech SY417HD El manual del propietario
-
Panasonic TX55HX710E Instrucciones de operación
-
-
-
Irradio DTU-101 Manual de usuario